Ben Gurion International Airport Map (Most Up-To-Date)
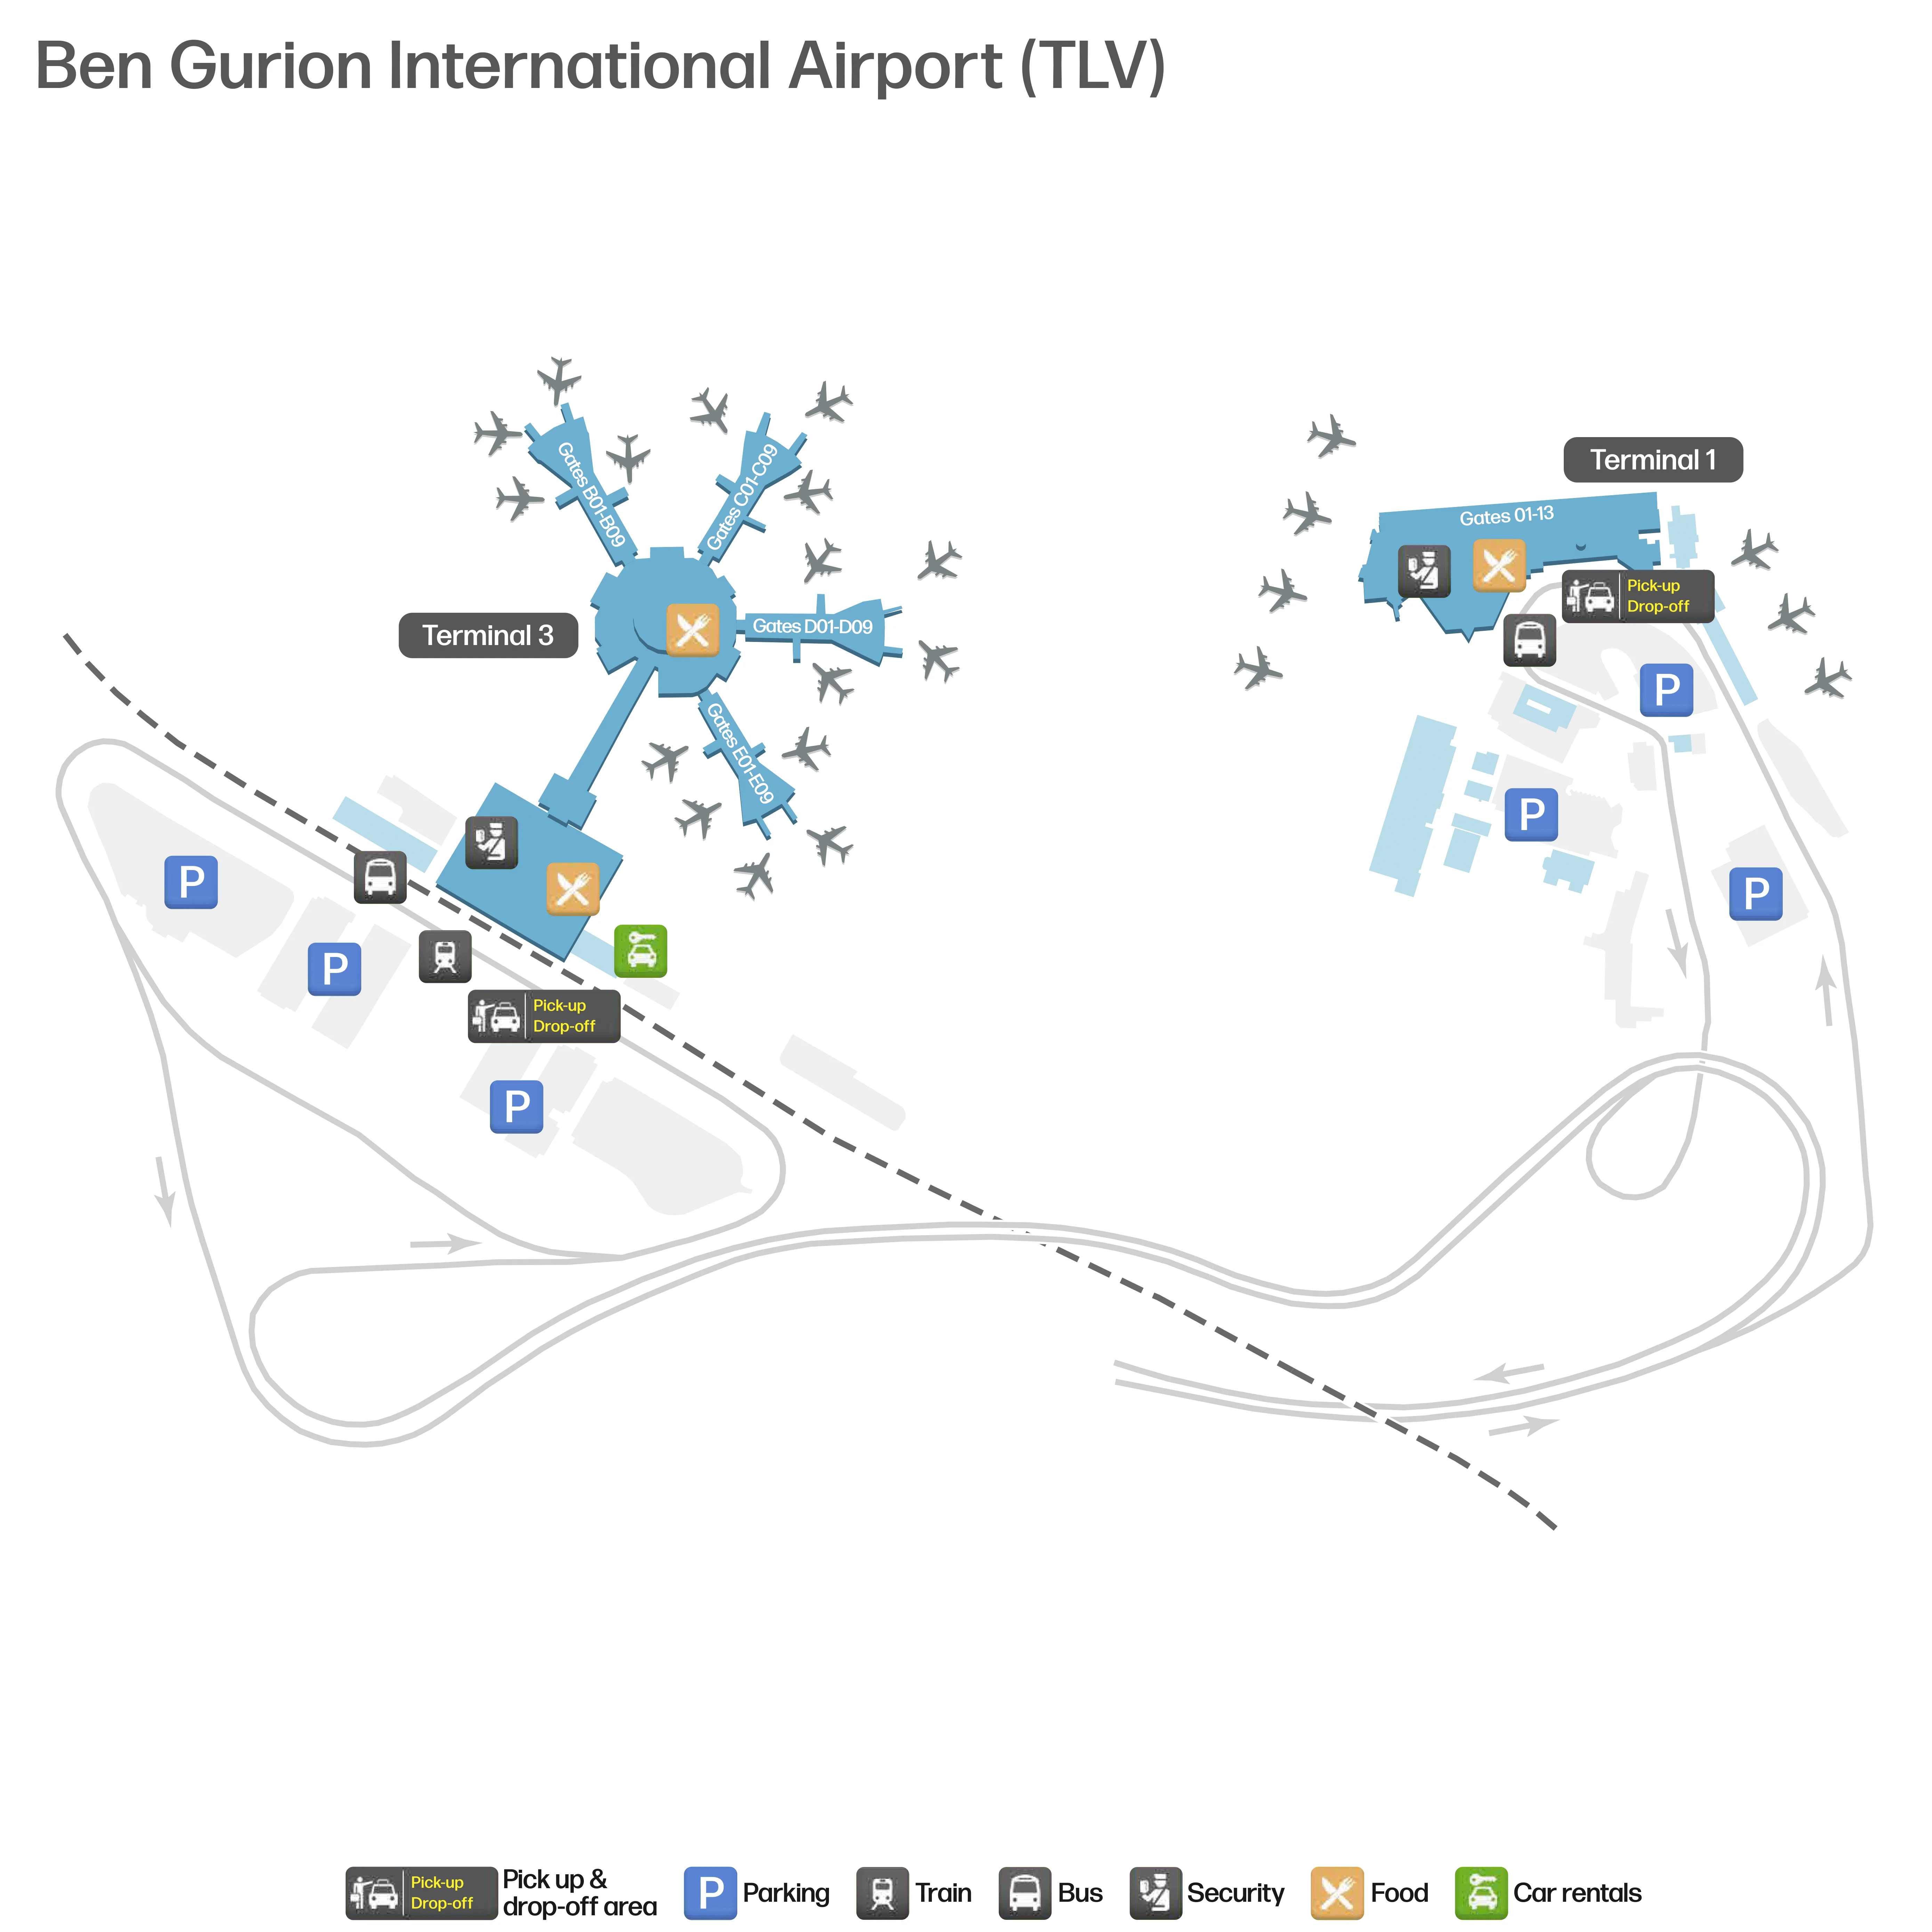
Ben Gurion International Airport is a multi-level airport complex with Terminal 3 as the primary international processor and Terminal 1 handling domestic and many low-cost operations. The footprint runs as a landside processing spine (rail station below, departures above) feeding into an airside “star” of concourses from the central Rotunda. Most departure uncertainty concentrates early, before check-in, inside Israel’s main gateway hub where interview queues can expand beyond their normal stanchions.
Map Table
| Terminal | Key Airlines | Primary Function | Transfer Mode |
|---|---|---|---|
| Terminal 3 | El Al, major intercontinental carriers | Main international departures/arrivals | Rail (Level S), taxi, bus, car |
| Terminal 1 | Low-cost, domestic, select short-haul | Low-cost + domestic processing | Shuttle bus from Terminal 3 (Level G) |
| Airport Train Station | Israel Railways | Terminal access node | Vertical transfer to Terminal 3 |
| Airside Rotunda | Duty Free core | Concourse distribution | Walkways, moving walkways |
Ben Gurion International Airport Map Strategy
- Lock the terminal first: confirm Terminal 1 versus Terminal 3 before you enter the flow, and treat the Terminal 1 shuttle as a Ground Level task (not a departures-curb task).
- Navigate by control points, not retail: train or curb arrival → pre-check-in interview zone → check-in hall center → main security entrance → passport control → concourse split at the Rotunda.
- Assume the interview queue is elastic: identify where the stanchion maze begins and where overflow wraps into main corridors, then commit so you don’t join the wrong end.
- Pre-plan support without losing your place: locate restrooms, official help points, and a nearby waiting pocket before you approach the interview queue because exiting often means surrendering your position.
2026 Ben Gurion International Airport Map + Printable PDF
2026 navigation at Ben Gurion International Airport still hinges on early, human-led screening before check-in, not just the main scanners. Terminal choice (Terminal 1 versus Terminal 3), the vertical jump from the train station up to departures, and the fluid “line start” for interviews are the three map-critical variables. A printable map should prioritize queue landmarks and control points over retail so you can route confidently under peak loads.
2026 Ben Gurion International Airport Map Guide
What is the exact walking distance (meters) from the Terminal 3 curbside drop-off to the first security interview checkpoint?
No buffer zone exists at Terminal 3 Departures—screening engagement begins immediately inside the doors. Walking distance from curbside drop-off to the first security interview checkpoint is typically 15–25 meters, depending on which numbered door bank (for example, Gate 31–33) you enter and where the interview podium is positioned for your Zone.
| Segment | Start landmark | End landmark | Distance |
|---|---|---|---|
| Curb to doors | Departures curbside lane | Glass door bank (numbered gates) | under 10 m |
| Doors to interview | Inside airlock/entry | Tablet/sticker podium at stanchion-head (Zone A–D) | ~5–15 m |
| Total | Drop-off curb | First interview checkpoint | ~15–25 m |
Where is the earliest physical “line start” landmark for the pre-check-in security interview in Terminal 3 (e.g., escalator base, column number, door bank)?
The line start is the stanchion-maze entrance in front of your Zone’s check-in counters, marked by a small security podium where staff handle passports and apply stickers. Look for the tablet-and-sticker point at the head of the tensile barriers directly under the large illuminated Zone totem (A, B, C, or D), not the check-in desks themselves.
During peak load, the true “start” can shift outward: the queue may spill past the zone mouth into the main Buy & Bye spine, becoming a floating mass that hides the stanchion entrance. When that happens, backtrack to find the first visible opening of the barrier maze nearest the zone totem and confirm you’re joining at the podium end, not cutting into an overflow wrap.
What is the shortest indoor route from the train station entrance to the Terminal 3 departures security interview area (turn-by-turn via named corridors/levels)?
The shortest indoor route runs from the train platform up to Level G, then up the sloped moving-walkway travelators to Level 3, exiting into the Buy & Bye spine and turning to your Zone A–D interview podium. This avoids elevator cycle waits and keeps you on the main forced-flow path.
| Step | Route (indoor) | Landmark triangulation | Typical distance/time |
|---|---|---|---|
| 1 | Level S platform → escalators up | “Ben Gurion Airport” station platform exit | vertical ascent |
| 2 | Arrive Level G → walk inward | Greeters Hall; walk away from street exits toward central atrium cores | 30–50 m |
| 3 | Level G → Level 3 via sloped moving walkways | Long inclined travelators flanking the central atrium | 3–6 min |
| 4 | Level 3 exit into Buy & Bye → face Zones | Buy & Bye mall spine; locate big illuminated Zone A–D totem | 30–120 m |
| 5 | Zone mouth → interview line head | Stanchion-maze entrance; tablet/sticker podium before check-in counters | 5–20 m |
From the Terminal 3 security interview desks, what is the walking distance to the primary check-in counter hall (center point to center point)?
Walking distance is typically 5–15 meters from the security interview podiums to the check-in counters because the interview desks function as the gate to the counter rows. The “center point” is effectively the space between the podium line and the first bank of weigh scales directly behind it.
The shortest path is straight ahead from the interview position to your airline’s counter bank in the same Zone (A, B, C, or D). The main friction isn’t distance; it’s the interstitial congestion where travelers stop to rearrange documents and tags right after the interview. If you need to repack, step laterally out of the corridor between the podiums and scales so you don’t block the flow.
Where are the secondary screening rooms/lanes located relative to the main security interview desks (left/right, behind/in-front), and what is the walking distance to them?
Secondary screening usually happens in-zone at inspection tables 10–20 meters from the main interview podiums, not in a clearly marked separate corridor. Relative to the interview desks, these stainless-steel tables are typically off to the side wall of the same Zone (left or right depending on whether you’re in Zone A versus Zone D) or positioned just behind the interview line but still before the check-in counters.
Most passengers are directed forward from the podium area and then laterally to the nearest open inspection table within the same check-in zone. For higher-risk cases, peripheral interview rooms exist on the edges of the Departures Hall, but they are not public-facing landmarks; the practical navigation assumption is that “secondary” is adjacent and visible in the same zone footprint even if the time penalty is large.
What is the exact path from the end of check-in counters to the main security screening entrance (the point where tray/scanner screening begins)?
The path funnels from any Zone’s check-in area into the central security hall entrance located in the middle of the Buy & Bye commercial spine on Level 3. From the end of your check-in counter row, you walk out to the main cross-aisle, aim for the central atrium, and enter the security hall where the tray and scanner lanes begin.
From Zones B and C, the route is nearly straight to the central entrance, passing the Buy & Bye storefronts. From Zones A or D, you first traverse inward along the departures hall edge toward the center, then merge into the same central throat. The entry landmark is the concentrated crowd and lane mouth at the central security hall opening directly off the Buy & Bye axis, where stanchions form the final approach to the trays.
What is the walking distance from main security exit to passport control (departures) in Terminal 3?
Walking distance is typically 20–40 meters from the main security exit (the point you clear the X-ray belt and body scan area) to the departures passport control hall. The route is straight ahead: collect items, recompose immediately, and follow the forward flow into the immigration queue field.
The key landmark is how tightly the two areas are coupled—passport queues can back up close enough to affect the corridor coming out of security. If you see the immigration crowd pressing near the security exit, staff may meter people into security to prevent deadlock, so treat the short walk as a controlled choke point rather than an open hallway.
What is the walking distance from passport control exit to a representative far gate area (e.g., furthest concourse end) in Terminal 3?
Walking distance from passport control exit to a far gate area is approximately 500 meters to the end of a long concourse (for example, the Concourse D far end such as Gate D9). The walk is longest after passport control because it includes the duty-free loop and the full length of a concourse spine.
| Segment | Start landmark | End landmark | Distance |
|---|---|---|---|
| Rotunda approach | Passport control exit | Rotunda duty-free core | ~100–150 m |
| Concourse connector | Rotunda edge | Glass bridge to concourse | ~150 m |
| Concourse spine | Concourse entry | Far gate end | ~200 m |
| Total | Passport control exit | Far gate area | ~500 m |
If departing from Terminal 1, where is the exact shuttle/bus pickup point from Terminal 3 (if applicable), and what is the walking distance from Terminal 3 departures hall to that pickup?
The Terminal 1 shuttle pickup is at Terminal 3 Ground Level, Gate 01, at the far end of the arrivals-side facade near the long-term parking shuttle stops. Walking distance from the Terminal 3 departures hall to that pickup is about 150 meters plus the vertical descent from Departures to Ground Level.
From Level 3 Departures, enter the building, take an escalator or elevator down to Ground Level, then follow the terminal frontage toward Gate 01 until you reach the posted shuttle stop area. Do not search for this shuttle on the departures curb; the pickup point is not on Level 3.
Inside Terminal 3, where is the closest quiet waiting area (lounge/soft-seating zone) to the security interview bottleneck, and what is the walking distance to it?
The closest quiet waiting option is usually the mezzanine gallery seating on Level 2 overlooking the arrivals hall, reached by stepping away from the Level 3 interview zones and using the nearest vertical core down one level. This area stays calmer than the reflective, loud departures hall because it sits off the main queue flows.
A near-alternative is the far edges beyond Zone A or Zone D by the glass walls facing the apron, where benches sit outside the Buy & Bye foot traffic. From the interview-zone mouth, expect roughly 2–5 minutes of walking plus a short level change to reach Level 2 gallery seating, or a similar 2–5 minute walk to the zone extremity benches depending on whether you’re already in Zone A/D or in the central zones.
Where is the nearest restroom to the start of the security interview queue, and what is the walking distance from the queue start marker to that restroom door?
The nearest restroom is typically along the rear wall behind the check-in counters or near the central commercial spine on the departures level, roughly 50–80 meters from the stanchion-maze entrance that marks the interview queue start. The practical constraint is that once you commit into the Selektzia lanes, reaching a restroom usually requires exiting the queue and losing your place.
From the queue start podium at the head of the tensile barriers, the shortest walk is usually back toward the center of the hall (toward Buy & Bye) or along the back-of-counters line depending on your zone. If you need facilities, use them before approaching the Zone A–D totems and the stanchion entrance so you don’t get trapped by the lock-in.
What is the walking distance from the first security interview checkpoint to the nearest staffed information desk (or official help point) in departures?
Walking distance is typically 30–50 meters from the interview checkpoint in the central zones to the staffed information desk on the main Level 3 axis near the Buy & Bye spine, and closer to about 100 meters if you’re starting from the far ends of Zone A or Zone D. The nearest “official help point” for immediate departures-flow issues is often not the information desk, but a roaming security supervisor within the zone.
From a Zone B or Zone C interview podium, walk outward into the main circulation aisle toward the central Buy & Bye area until you reach the prominent counter setup used for general passenger assistance. From Zone A or Zone D, you’re doing the same move but with a longer traverse along the departures hall edge before you reach the central desk.


