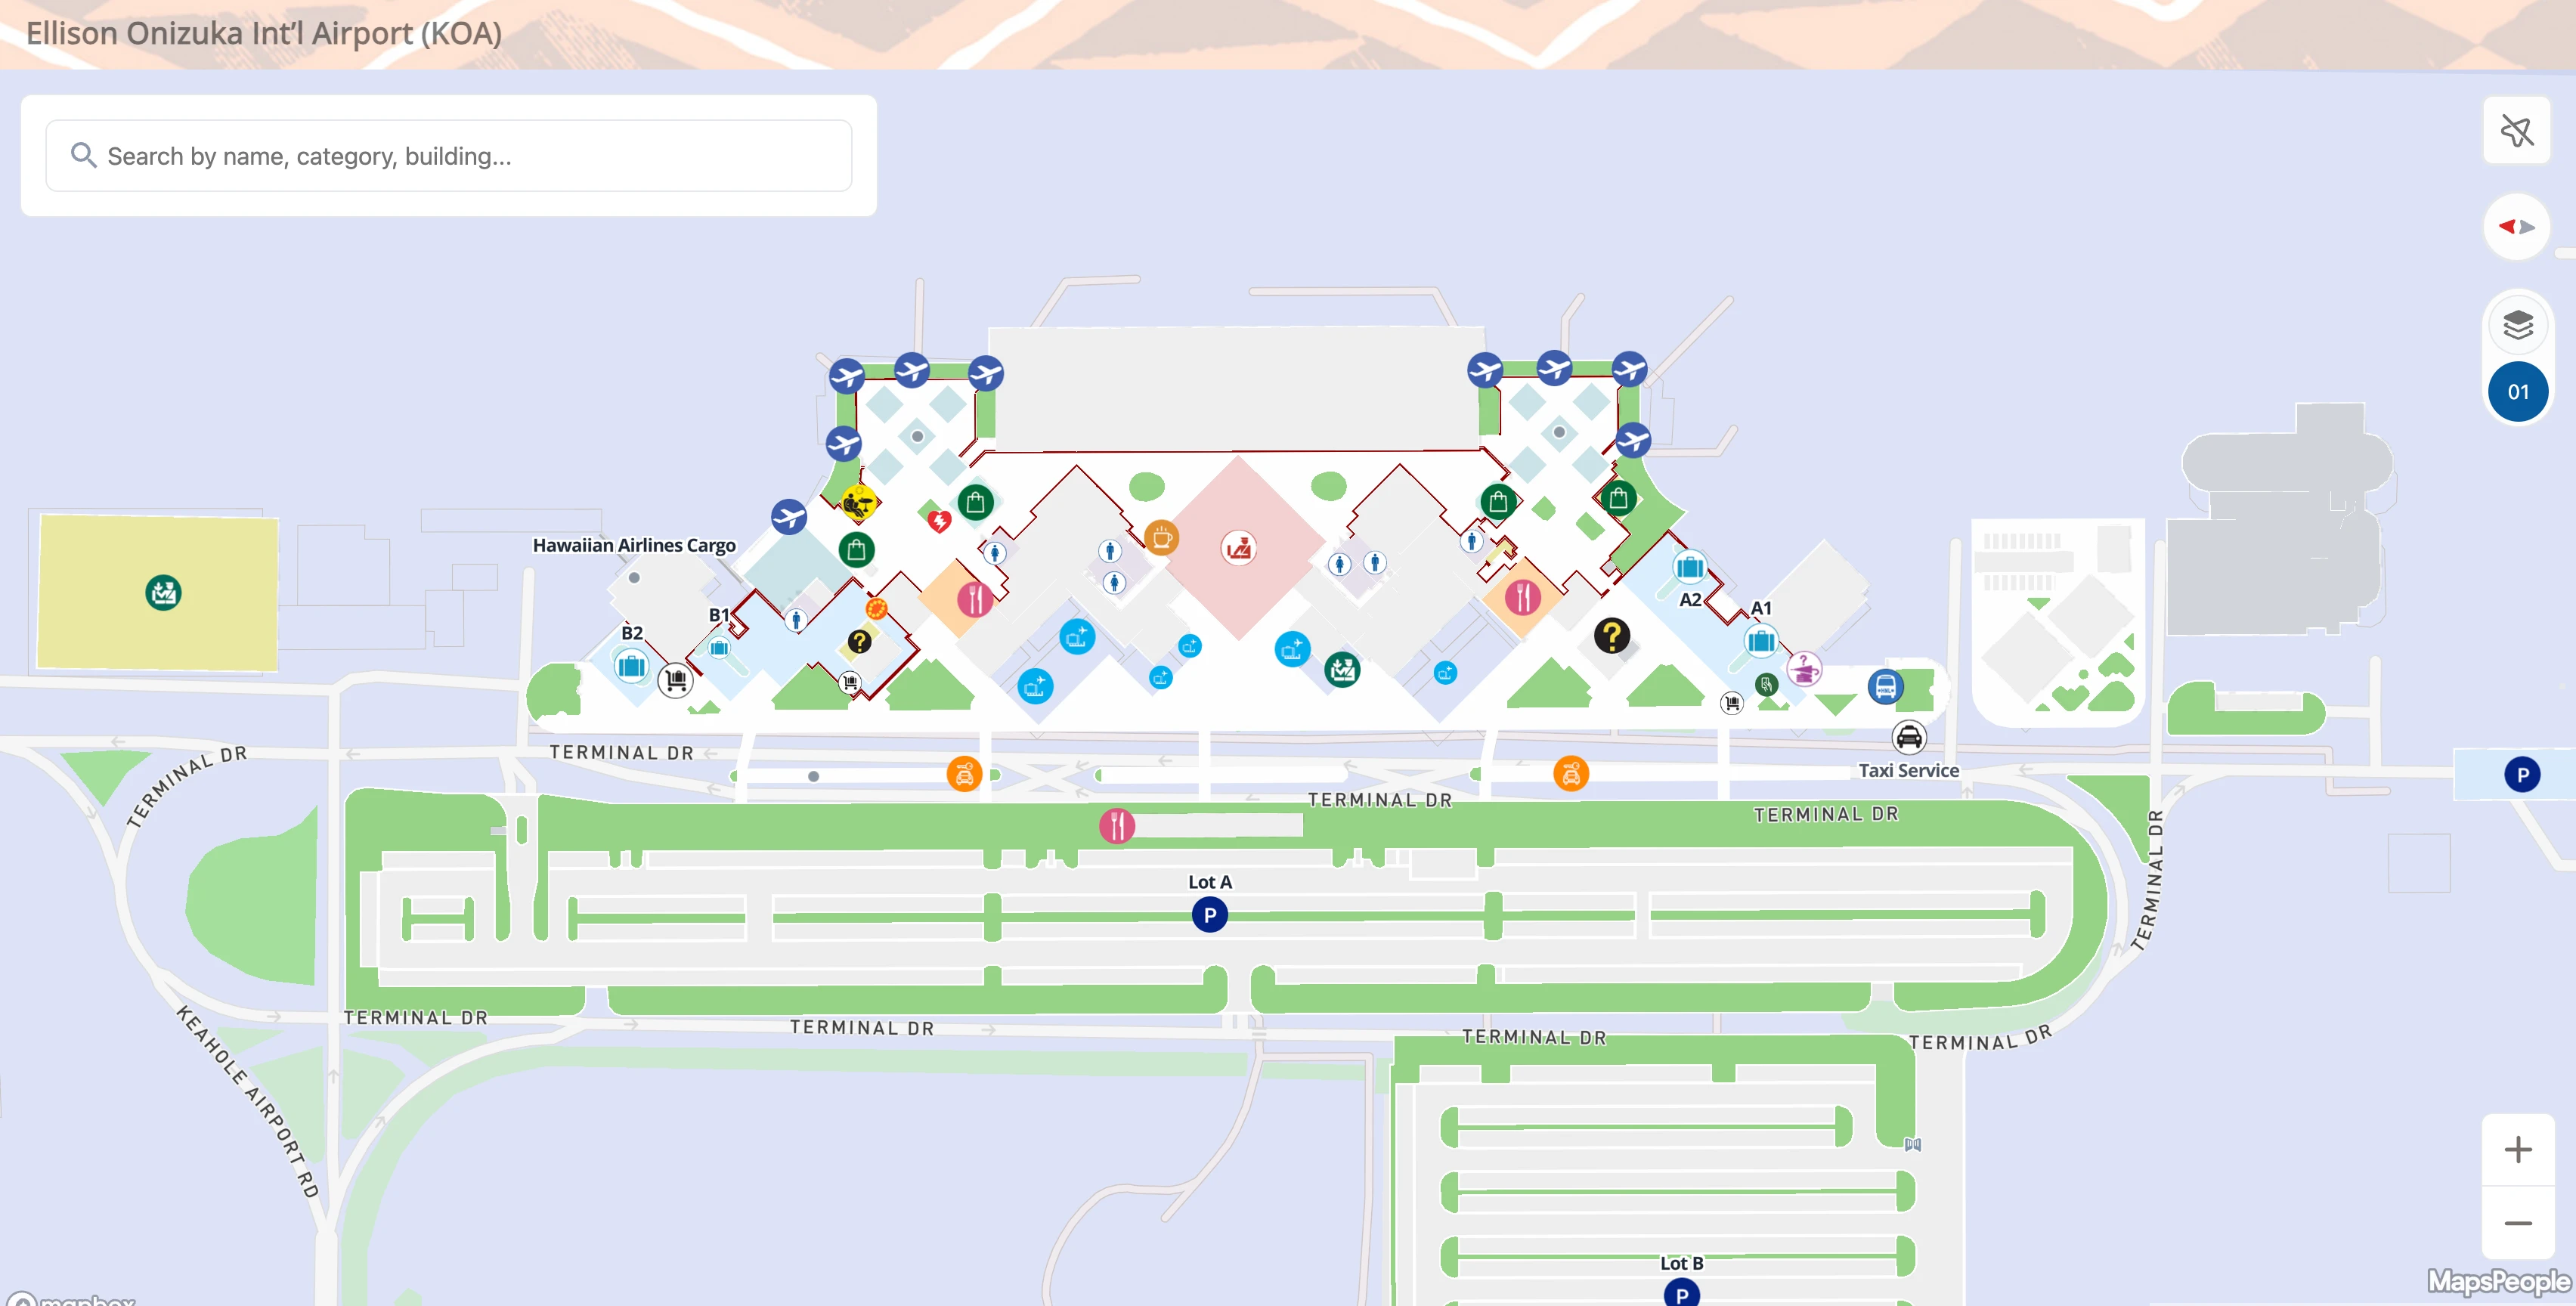
Ellison Onizuka Kona International Airport Map (Most Up-To-Date)
Ellison Onizuka Kona International Airport at Keahole is a low-rise, open-air terminal campus stretched along a one-way loop road, with passenger facilities split into north/south clusters and long, exposed walkways between processing “islands.” The layout runs roughly parallel to the airfield, with gates and holdrooms dispersed outward from the central security areas. Most navigation happens on foot within Hawaii Island’s main Kona airport grounds, across roofed-but-open pavilions and apron-adjacent corridors.
Map Table
| Terminal | Key Airlines | Primary Function | Transfer Mode |
|---|---|---|---|
| Terminal 1 (North) | Hawaiian | Inter-island departures/arrivals | Walk, open-air |
| Terminal 2 (South) | United, Delta, American, JAL | Mainland + international processing | Walk, open-air |
| Terminal 3 (Commuter) | Mokulele | Prop/commuter operations | Landside walk, curbside |
Ellison Onizuka Kona International Airport Map Strategy
- Treat the airport as an outdoor walk: pre-pack for heat and sudden rain, and prefer routes that keep you under rooflines even if they add a few extra steps.
- Build time around the two departure choke points: USDA bag screening (mainland departures) before counters, then bag-tag/kiosk clusters and TSA queues that spike during bank departures.
- Use the median pickup system intentionally: plan exactly which crosswalk you’ll use to reach shuttles, ride-hail, and taxi zones, and avoid “figure it out at the curb” during wide-body arrivals.
- Assume the reset loop is real for some connections: if you must exit to landside and re-clear TSA, navigate straight to the correct terminal cluster first, then restart the sequence (screening → check-in → TSA) without detours.
2026 Ellison Onizuka Kona International Airport Map + Printable PDF
Active modernization at the Kona airport in 2026 continues to focus on “hardening” the most painful gaps: restroom capacity near airside waiting areas and more durable covered walkway segments near security. Even with upgrades, the dominant reality remains open-air circulation, weather exposure during key steps (curb → screening → TSA → gate), and peak-time compression around bag-tag kiosks, USDA screening, and TSA entry points.
2026 Ellison Onizuka Kona International Airport Map Guide
What is the exact walking route and distance from the main ticket counters to the TSA checkpoint entrance at KOA?
The shortest walk runs from the open-air ticketing pavilion straight to the nearest security checkpoint entry for that terminal cluster, and it is typically a short, flat, fully walkable segment with intermittent roof cover. At KOA, the decision point is which checkpoint you’re using: the North checkpoint for the Hawaiian-focused cluster or the South checkpoint for the mainland/international cluster.
| Route | Practical start point | Path landmarks | Typical exposure profile |
|---|---|---|---|
| Terminal 1 (North) ticket counters → North TSA entrance | Hawaiian ticketing pavilion face | USDA screening area near curbside → kiosk/counter frontage → covered open-air corridor toward the North checkpoint queue start | Mostly roofed, open-sided; sun/rain drift possible |
| Terminal 2 (South) ticket counters → South TSA entrance | Mainland carrier ticketing pavilion face | USDA screening outside entry → kiosk cluster/counter frontage → open-air walkway toward the South checkpoint queue start | Mostly roofed, open-sided; higher rain exposure in lateral wind |
| “Reset loop” landside re-entry → nearest TSA entrance | Public-side sidewalk between clusters | Landside sidewalk → follow terminal cluster signage → checkpoint queue start | Highest exposure; no sterile corridor protection |
From the TSA exit, what is the shortest, signed path to the most-used departure gate clusters, and how long is the walk (in feet/meters)?
Walking takes about 4–7 minutes to reach the main gate holdrooms from the TSA exit, with the shortest path following the first “Gates” signage into the open-air airside corridor. KOA’s gate clusters split by terminal: Gates 1–5 (north/inter-island) and Gates 6–10 (south/mainland-heavy), and the fastest route is simply the nearest numbered-gate direction immediately after you clear screening.
| Gate cluster | Shortest signed path from TSA exit | Walk time | Distance |
|---|---|---|---|
| Gates 1–5 (north cluster) | Exit TSA → follow “Gates 1–5” signs → stay in the airside open-air corridor → enter the Gate 1–5 holdroom pavilion | 4–6 min | 850–1,200 ft (260–365 m) |
| Gates 6–10 (south cluster) | Exit TSA → follow “Gates 6–10” signs → continue along the airside corridor past the first holdroom junctions → enter the Gate 6–10 holdroom pavilions | 5–7 min | 1,050–1,450 ft (320–440 m) |
Where are the highest-reliability shaded waiting zones post-security (roofed areas that still let you hear boarding calls), and what’s the shortest route to them?
The most reliable shaded waiting is inside the roofed gate holdroom pavilions closest to your assigned gate, because they stay within the boarding-audio footprint while keeping you out of direct sun. At KOA, shade quality changes fast with wind-driven rain, so the best “stay shaded and still hear calls” move is to anchor near the gate podium corridor rather than the open courtyard edges.
- Gate 6–10 holdroom pavilions: from the South TSA exit, follow the “Gates 6–10” signs and continue until you reach the first large seating/holdroom pavilion entrance near the gate podiums.
- Gate 1–5 holdroom pavilions: from the North TSA exit, follow the “Gates 1–5” signs to the first holdroom pavilion immediately adjacent to the gate queue stanchions.
- United Club vicinity near Gate 10: from the Gates 6–10 corridor, continue toward the far end of the south cluster, using Gate 10 signage as the anchor point for the nearest consistently air-conditioned refuge.
Where is the largest concentration of seating available to departing passengers, and what is the exact path from TSA to that seating area?
The largest seating concentration is in the main gate holdroom pavilions for Gates 6–10 in the south airside cluster, where multiple wide-body departure banks load at once. That seating is denser than the north inter-island side and is the best “default” if you clear security without a gate assignment yet.
Exit the South TSA checkpoint and immediately follow the overhead “Gates 6–10” signage into the airside open-air corridor. Stay on the primary corridor until it opens into the first large shared holdroom pavilion serving the Gates 6–10 podium area, using the first major gate-stanchion/boarding-queue zone as your visual anchor. Continue deeper only if your boarding pass shows a higher-numbered gate, because seating thins as passengers compress near active podiums.
When it’s raining, what is the most covered route from check-in to TSA (minimizing time exposed to open walkways)?
Roofed pavilion edges are the most covered route, because KOA’s open-air design leaves you exposed whenever you step into the courtyard gaps or cross between detached structures. The best rain-minimizing move is to stay under continuous rooflines from the ticketing pavilion frontage to the checkpoint queue start, even if that means hugging the building side rather than taking the most direct courtyard line.
From your airline’s check-in pavilion, keep to the back (inboard) side of the counters where the roof coverage is deepest, then follow the covered corridor segment that leads toward your terminal’s security checkpoint signage. Avoid cutting diagonally across open courtyards between pavilions, since wind-driven rain enters from the sides. For the mainland/international cluster, route toward the South checkpoint by staying alongside the long roofed walkway that parallels the airside fence line; for the inter-island cluster, do the same toward the North checkpoint, entering the queue where the stanchions begin under the pavilion roof.
What is the exact location of the rental-car shuttle pickup point(s) relative to baggage claim exits, and which exit door is fastest?
The rental-car shuttle pickup is in the center median of the terminal loop road, reached by crossing the inner traffic lane at the signed crosswalk directly outside baggage claim. The fastest exit is the baggage-claim door that lines up with the nearest marked crosswalk to the median, because it minimizes curbside walking with luggage.
| Exit choice from baggage claim | Relative pickup location | Fastest path landmarks |
|---|---|---|
| Door nearest the main baggage-claim curb frontage | Center median, shuttle-stop bay beside the shaded gazebo structures | Exit → turn toward the painted crosswalk → cross to the median → queue at the rental-car shuttle signpost |
| Door that forces you to walk along the curb first | Same center median zone | Exit → roll luggage along curb line to the crosswalk → cross to the median → queue at the shuttle signpost |
What is the walk distance and safest pedestrian route from the terminal/baggage claim area to the rental car facilities (for people who choose to walk instead of shuttle)?
No continuous safe pedestrian route exists for walking from the terminal to the rental car baseyards, so the shuttle is the required option for normal planning. The rental car facilities sit roughly 1 mile (about 1.6 km) off-terminal along the airport access roadway, and the connection lacks protected sidewalks for luggage-wheeled travelers.
The practical constraint is the “pedestrian void” between the terminal loop and the baseyards: you would be forced onto roadway shoulders, uneven edges, or parking/industrial cut-throughs that interact with buses, trucks, and fast-moving traffic. If you are trying to save time, the more reliable tactic is to walk straight to the center-median shuttle stop using the nearest crosswalk from baggage claim, then budget for shuttle variability (queueing plus ride time) instead of attempting the off-terminal walk.
Where is the most time-efficient curb/zone for pickup (rideshare/taxi/friend), and what’s the shortest path from baggage claim belts to that pickup point?
The fastest pickup is curbside in the outer lane directly in front of your baggage claim exit, because it avoids the crosswalk and the center-median bottleneck. Rideshare and taxis typically operate from the center median, which adds a forced crosswalk crossing and extra queue friction during peak arrival banks.
| Pickup type | Most time-efficient zone | Shortest path from baggage belts | Reliability notes |
|---|---|---|---|
| Friend/private car | Curbside outer lane at the baggage claim doors | Carousel → roll straight out the nearest baggage claim exit → stop at the curb in front of that door | Best for luggage; least walking; depends on curb space |
| Taxi | Center median taxi line | Carousel → nearest exit aligned with a painted crosswalk → cross inner lane to the median → join the taxi queue by the gazebo/shade structures | Slower in heavy arrival surges; median crowding |
| Rideshare (Uber/Lyft) | Center median rideshare zone | Carousel → nearest exit aligned with a painted crosswalk → cross to the median → stand at the signed pickup area (not the rental shuttle line) | Highest confusion risk; median saturation at peaks |
From the long-term parking area, what is the exact fastest walking path to check-in, including which crosswalks/sidewalks are actually usable with luggage?
Walking takes about 8–12 minutes from long-term parking to the ticketing pavilions using the marked pedestrian exits that feed the terminal-loop crosswalks. The fastest usable route is the one that keeps you on continuous sidewalk edges through the parking field, then uses a painted crosswalk to reach the curbside sidewalk in front of your terminal cluster.
| Parking start | Usable luggage route | Key crosswalk to use | Typical exposure profile |
|---|---|---|---|
| Long-term parking rows nearest the terminal loop | Parking-lane sidewalk edge → pedestrian exit gap → curbside sidewalk frontage → airline pavilion entry | Nearest painted crosswalk into the terminal curb frontage (avoid unmarked lane cuts) | Sun/rain exposure in lot; roof cover begins at pavilion |
| Deeper long-term parking rows | Main pedestrian spine through the lot → follow signs toward terminal loop → use the first painted crosswalk you reach (don’t jaywalk between stopped cars) → curbside sidewalk frontage | Crosswalk aligned with the busiest curb frontage zone (most consistently maintained/visible) | Highest heat load; wind-driven rain risk crossing the loop |
If the bag-tag kiosks line backs up, what is the alternative kiosk cluster (exact location) and the shortest route to reach it from the curbside entry?
The best fallback is the secondary kiosk bank inside the same ticketing pavilion but away from the primary curbside entry pinch point, because KOA’s kiosk clusters tend to form two “fronts” that spill into the main pedestrian flow. At peak times, the curb-adjacent kiosk row jams first, while the inboard-side kiosks nearer the counter ends often move faster.
From the curbside entry into your airline’s ticketing pavilion, do not stop at the first kiosk row you see at the entrance edge. Continue under the roofline along the counter frontage toward the far end of the pavilion, using the staffed counter line as your anchor, then look for the smaller kiosk grouping positioned perpendicular to the counters near the pavilion edge. This keeps you out of the entry choke point where kiosk users and counter-line passengers cross paths.
For itineraries that require re-clearing security, what is the exact corridor/exit route from arrivals to the public area/check-in (the “reset loop”) and how long does that walk take?
A hard exit to landside is required from international arrivals before you can reach domestic check-in and re-enter TSA, because there is no sterile corridor connecting the International Arrivals Building to the secure terminal. This reset loop typically adds 45–60 minutes end-to-end once you include walking plus re-processing, and the walking portion alone is commonly 8–15 minutes depending on where you re-enter.
| Segment | Route anchors | Typical walk time | Exposure profile |
|---|---|---|---|
| Arrivals → public exit | International Arrivals Building processing hall → landside exit doors | 2–4 min | Enclosed then open-air immediately |
| Public exit → domestic terminal check-in | Landside sidewalk along the loop road → follow terminal cluster signage to the correct ticketing pavilion | 6–10 min | Mostly exposed; intermittent roof cover |
| Check-in area → TSA re-entry | Ticketing pavilion frontage → nearest checkpoint queue start | 3–5 min | Roofed but open-sided; heat/rain drift |
Where are the nearest restrooms to each major waiting zone (pre-security and post-security), and what are the shortest routes to them from the primary choke points (TSA line start + gate holds)?
Restrooms are closest when you use the blocks immediately adjacent to the security checkpoints and the airside restroom buildings added near the main gate corridors, because older KOA restroom placement tended to push facilities to the edges of the clusters. The quickest strategy is to identify one restroom “pair” per side: one just before the checkpoint queue and one immediately after you clear security near the first holdroom pavilion.
- Pre-security, North cluster: from the TSA queue start, backtrack along the ticketing pavilion edge to the nearest restroom block on the landside side of the pavilion, using the checkpoint stanchions as your anchor point.
- Pre-security, South cluster: from the TSA queue start, follow the pavilion edge back toward the ticketing counters until you reach the nearest restroom block adjacent to the main circulation line.
- Post-security, Gates 1–5: from the first holdroom pavilion entrance, take the shortest spur toward the nearest airside restroom building positioned along the main gate corridor, using the gate podium area as your reference.
- Post-security, Gates 6–10: from the primary seating/holdroom pavilion, follow the main corridor toward the airside restroom building near the central gate junction, using the densest seating zone as your anchor.