Zürich Airport Map (Most Up-To-Date)
Zürich Airport (ZRH) is a compact, centralized hub built around the Airport Center stack (rail station below, departures above) feeding a single Security Check Building into the Airside Center “spine,” within Switzerland’s main Zürich aviation hub. From that airside lung, Schengen piers (A/B) run as short walkable fingers, while non-Schengen long-haul traffic is physically separated in Dock E (midfield) reached only by the Skymetro tunnel. Most tight-connection risk concentrates at security, passport control, and the Skymetro link.
Map Table
| Terminal | Key Airlines | Primary Function | Transfer Mode |
|---|---|---|---|
| Airside Center | SWISS, Star Alliance | Distribution hall, retail, transfers | Walk |
| Dock A / Dock B | SWISS, European carriers | Schengen gates | Walk |
| Dock D (Bus Gates) | Mixed | Remote stands, bus operations | Walk + bus |
| Dock E (Midfield) | SWISS, long-haul partners | Non-Schengen long-haul gates | Skymetro |
Zürich Airport Map Strategy
- Treat Dock E as a hard dependency: follow “Gates E” signs with the train pictogram early, and assume a Skymetro disruption turns a quick transfer into a bus-gate operation.
- Bias for choke points, not distance: passport control (especially “Other passports”) and security surges are the real time sinks, so route choices that avoid the main Level 1 crowding matter more than short walks.
- Use irreversible-commit awareness: solve boarding-pass or document issues at Airside Center help points before entering the passport control/Skymetro path to Dock E.
- Anchor your navigation to fixed nodes: Bahnhof → Check-in 3 (vertical bypass), Airside Center as the central spine, and the B/D pier entry as the fallback corridor if Skymetro service is constrained.
2026 Ronald Zürich Airport Map + Printable PDF
Operational flow at ZRH in 2026 still hinges on three nodes: the Security Check Building intake from the Airport Center, the passport control hall inside the Airside Center for Schengen → non-Schengen moves, and the Skymetro ride to Dock E. Security-lane capacity can shift during CT-scanner works, and any staffing or system disruption amplifies queues fast—so the most “printable” map value is level changes, commit points, and the Dock E dependency.
2026 Zürich Airport Map Guide
What is the exact indoor route from Airside Center (Gates A/B/D transfer corridor) to the Skymetro platform for Dock E, including the correct level (floor) transitions?
Passport control sits directly on the only airside path to the Skymetro, so you must clear the border hall before you can descend to the train platform for Dock E. From the Airside Center main level, follow the “Gates E” signs with the train pictogram toward the non-Schengen corridor, enter the passport control hall, then continue forward to the Skymetro station access.
The route stays on the Airside Center’s main transfer level until you exit the passport control hall, then it becomes a vertical descent. After border control, keep following “Gates E / Skymetro” signage to the station bank and take the long down escalators (the deep drop into the tunnel level) to the Skymetro platform. Your key confirmation anchor is the Airside Center’s “Gates E” overhead boards before the passport hall, then the escalator well immediately after it.
Where exactly is passport control located on the path when transferring Schengen → non-Schengen at ZRH (the physical checkpoint you must pass before reaching non-Schengen gates)?
Passport control is inside the Airside Center on the “Gates E” transfer corridor, positioned before the Skymetro descent and before any access to Dock E. It’s the hard checkpoint you must pass after leaving the Schengen pier flow (A/B) and before you can reach the Skymetro escalators.
From the Airside Center main level, follow overhead signs for “Gates E” with the train pictogram and you’ll be funneled into the passport control hall that acts like an airlock. The checkpoint sits immediately ahead of the retail/lounge spine, so once you enter that hall you’re committed to the non-Schengen path. After clearing, continue straight and you’ll hit the Skymetro station access, marked by the deep escalator well down to the platform.
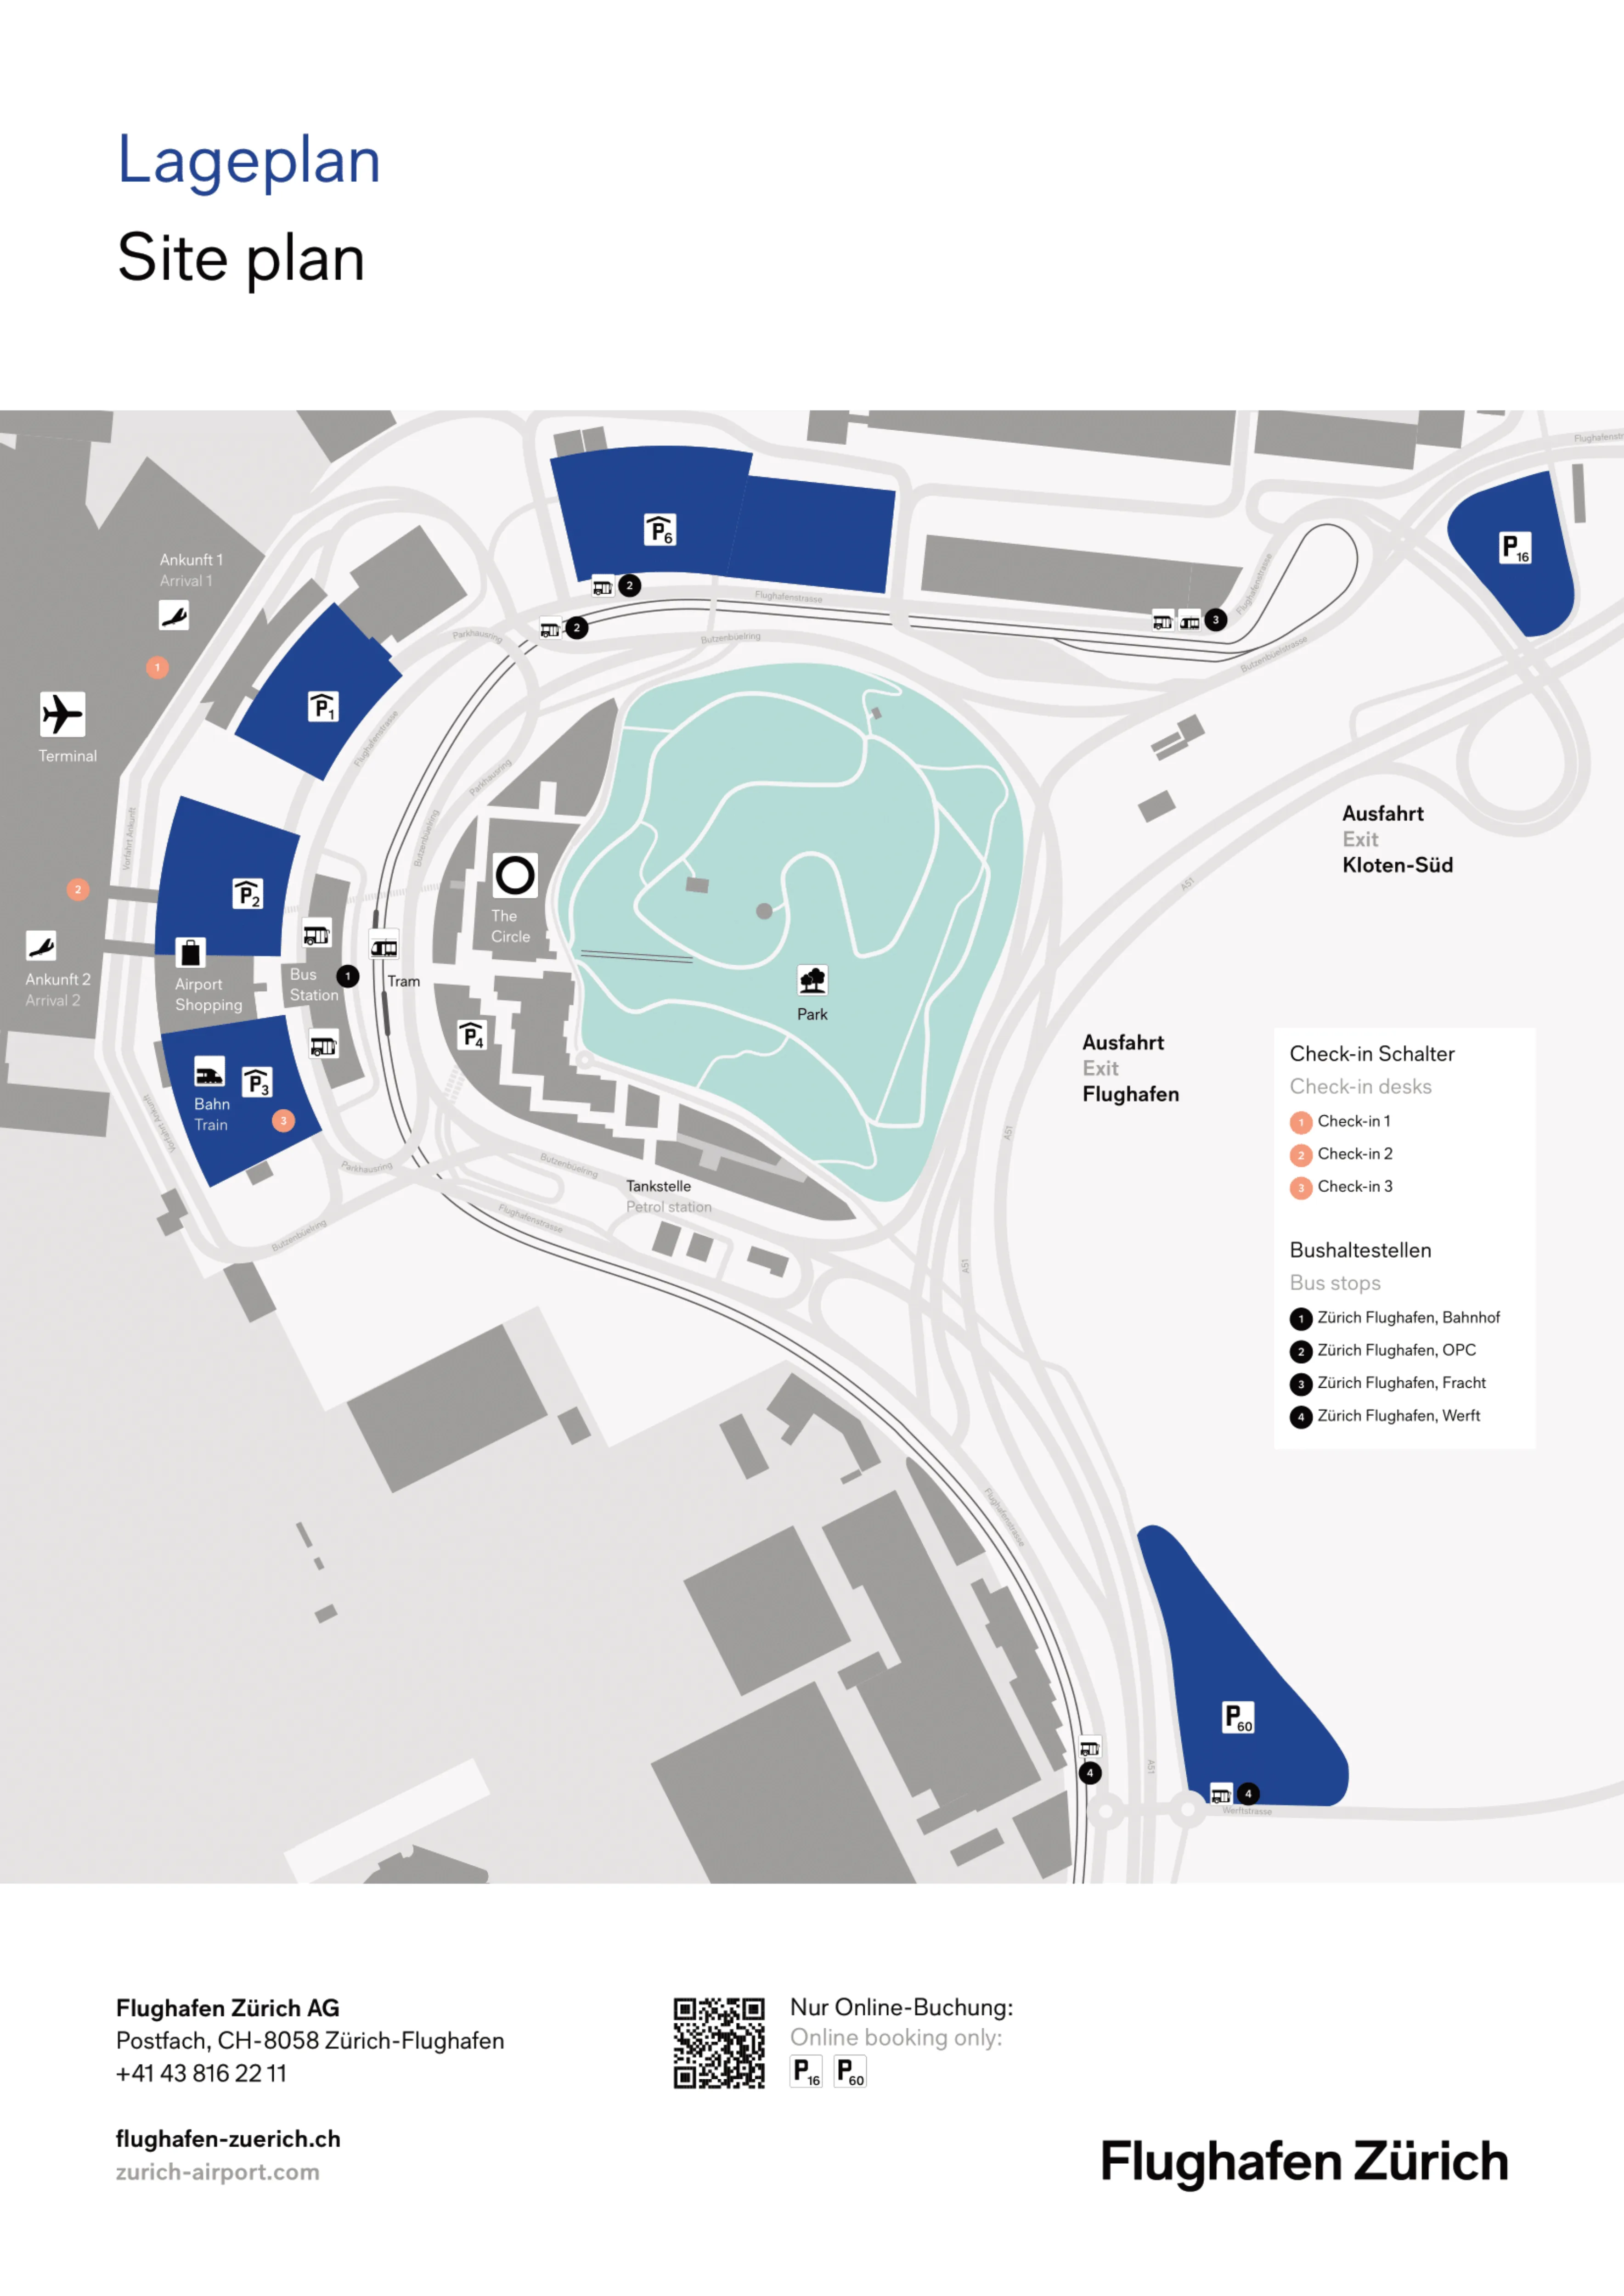
From Zürich Flughafen train station (Bahnhof), what is the shortest indoor route to the primary departures/security entrance, and which sign labels are the first reliable wayfinding anchors?
The shortest indoor route uses the “Check-in 3” vertical bypass from the Bahnhof to reach departures above the station and feed into the upper access to the Security Check Building. From the platforms, follow yellow airport wayfinding for “Check-in 3” rather than generic “Departures,” and ride the escalators up from rail level to the check-in level directly over the tracks.
From Check-in 3, stay inside the Airport Center complex and follow signs for security/“Gates” toward the bridge/escalator link into the Security Check Building, entering the security processing stack from the higher-floor approach instead of the crowded Level 1 portal near Check-in 1/2. The two anchors that confirm you’re on the fastest vector are the “Check-in 3” signage at the platform escalator core and the “Gates”/security direction immediately after you arrive in the Check-in 3 area.
If the Skymetro is constrained (single line / replacement bus scenario), where is the replacement bus pickup point located (exact zone/level) and what is the mapped walking route to it from Airside Center?
Replacement buses for Dock E load from the bus-gate level in the Pier B/D area (tarmac bus operations), not from the underground Skymetro station. The pickup is on Level 0 at the Bus Gates used for apron transfers, reached by walking out of the Airside Center toward the B/D finger and then descending to the bus level.
| Segment | What to follow | Level change | Anchor to confirm |
|---|---|---|---|
| Airside Center → B/D pier entry | “Gates B / Gates D” direction | None | B/D pier entrance off the Airside Center spine |
| B/D pier entry → vertical core | Bus/transfer flow down the pier | None | Escalators/lifts signed for “Bus Gates” |
| Vertical core → Bus Gates pickup | Down to apron bus level | Down to Level 0 | Bus-gate holding area and tarmac-facing doors for Cobus boarding |
From Skymetro arrival at Dock E, what is the shortest walking path to the first “E” gate cluster (closest gate numbers), and where does the corridor split?
The first gates are the central Dock E clusters around E35 and E36, reached after you ride up from the Skymetro station level to the departures level and step into the central atrium. From the Skymetro, take the escalators/elevators up to Dock E departures, then walk straight out into the atrium where the gate-direction signage immediately divides the satellite into two wings.
The corridor split happens at the atrium decision point: left (west) leads toward Gates E16–E35, and right (east) leads toward Gates E36–E67. The fastest “first cluster” is whichever side your first gate falls on—E35 is typically a 1–2 minute walk into the left wing, and E36 is typically a 1–2 minute walk into the right wing. The key anchor is the atrium’s overhead “E Gates” boards; check your gate number before committing down a wing because there’s no loop shortcut at the ends.
When arriving at a remote stand (bus gate), where exactly do buses typically drop passengers relative to transfer routing—and what is the shortest mapped path from that drop-off to the connections corridor?
Remote-stand buses typically drop passengers at the bus-gate level (Level 0) at Pier B (Schengen bus gates) or the Pier B/D bus-gate area (non-Schengen/segregated operations), which is below the main transfer deck. From that tarmac-level entry, the fastest path to connections is to go up immediately to Level 1 and then walk back toward the Airside Center spine where transfers are distributed.
The most reliable landmark is the first escalator bank just inside the bus-gate doors; treat it as the “gain altitude” move. From Bus Gates B (Schengen), go up to Level 1, merge into Pier B flow, and follow “Transfer/Connections” or “Airside Center” direction back to the central hall. From Bus Gates D (non-Schengen side), go up to Level 1 and follow transfer routing toward the Airside Center and, if needed, passport control for Schengen/non-Schengen switching.
Where are the “Other passports” (non-EU/CH) lanes positioned relative to the e-gates, and what is the closest landmark (shop/bridge/escalator) that confirms you’re in the right queue area?
The “Other passports” lanes sit on the right-hand side of the passport control hall when you enter from the Schengen side of the Airside Center, while the e-gates are on the far left. The quickest success move is to drift right immediately as you enter the border hall instead of following the center crowd.
The landmark that confirms you’re in the correct bank is the overhead gantry signage above the queue mouths: the e-gates cluster is visibly grouped to the left, while the longest, denser queue bank is typically the right-side “All/Other passports” area. If you can still see the Skymetro-direction corridor beyond the desks in front of you, you’re aligned correctly; if you’ve drifted left into the automated-gate crowd, you’re in the wrong zone for non-EU/CH processing.
If security lines spill “outside the first doors,” which specific entrance/portal is that referring to on the terminal map, and what is the nearest alternate entry point on the same level?
The “first doors” are the main Level 1 access portals from the landside Airport Center (near Check-in 1/2) into the Security Check Building, where queues can back up into the public retail/circulation space. When that spillover happens, the fastest fix is usually not a different doorway on the same corridor, but a same-building alternate feed by moving vertically to reach higher-level security-lane access.
Stay inside the Airport Center and immediately look for escalators/elevators that take you up toward the Check-in 3 side and upper retail levels, then follow “Security / Gates” signage to the higher-floor entry into the same Security Check Building. The confirming anchor is “Check-in 3” wayfinding and the bridge/escalator link that delivers you into the upper security processing stack, bypassing the jammed Level 1 portal where the line is visible outside the access gates.
Where is the fastest “Transfer/Connections” help point located airside (desk/booth) for passengers who need a paper boarding pass before they can proceed?
The fastest airside help point is the Transfer/Connections desk in the Airside Center, positioned before you commit to passport control and the Skymetro path to Dock E. It sits on the Airside Center main level near the B/D pier entrance and opposite the Sprüngli shop, making it reachable from A/B/D flows without needing to ride to the midfield terminal.
This location is strategically faster because it intercepts passengers at the central distribution hall where reroutes are still possible. If you wait until Dock E, you’re already isolated in the satellite and your recovery options shrink. Use the Sprüngli storefront as the “you’re here” landmark, then look across the spine toward the B/D pier entry for the Transfer/Connections help point signage and counter area.
For tight departures, where is the closest “last-minute” security checkpoint to Gates A/B (by map position), and what is the shortest route from check-in to that checkpoint?
There is no last-minute, gate-side security checkpoint for Gates A/B at Zürich Airport, because ZRH uses a centralized security model. The only security access is through the Security Check Building between the landside Airport Center check-in halls and the Airside Center, with priority capacity handled by the Fast Track lane within that same entrance complex.
From Check-in 1/2 on Level 1, the shortest route is straight to the main security portal into the Security Check Building (the same “first doors” area where queues can spill into the Airport Center), then through security into the Airside Center and onward to Gates A/B. If you’re coming from the Bahnhof and want the fastest injection point, route via Check-in 3 above the station and follow “Security / Gates” into the upper-level access to the Security Check Building, then descend/flow into the Airside Center for A/B. The only “last-minute” advantage is finding the Priority/Fast Track lane at the central entrance rather than searching for a separate checkpoint.