Tan Son Nhat International Airport Map (most Up-To-Date)
Tan Son Nhat International Airport is a split-layout hub with a tight “Legacy Cluster” (Terminal 1 Domestic + Terminal 2 International) fronting Trường Sơn Street, plus a separated Terminal 3 domestic node reached by road loops. The map reads best from curbside outward: Arrivals exits (A1/A2), lane/column markers, then crossings into parking/Grab zones. This guide treats Saigon’s main airport complex as a deterministic system: terminal first, then level, then column.
Map Table
| Terminal | Key Airlines | Primary Function | Transfer Mode |
|---|---|---|---|
| Terminal 1 | VietJet Air, Pacific Airlines, VASCO | Domestic | walk to/from T2; shuttle to/from T3 |
| Terminal 2 | international carriers | International | walk to/from T1; shuttle to/from T3 |
| Terminal 3 | Vietnam Airlines, Bamboo Airways | Domestic | shuttle/taxi only |
Tan Son Nhat International Airport Map Strategy
- Verify the domestic terminal by airline before you move: Vietnam Airlines/Bamboo → T3; VietJet/Pacific/VASCO → T1 (exceptions exist on some regional turboprop routes).
- Make transfers deterministic by locking onto level + column, not “outside Arrivals”: T3 shuttles require descending from Arrivals (Level 2) to Ground (Level 1) before you even start scanning for A17–A20.
- Reduce scam exposure by pre-committing to an official pickup type and walking without pausing: taxi queue (T2 left end, columns 1–3), bus stop (T2 column 12), or Grab zones (parking/garage side), not the curb chaos.
- Eliminate wrong-zone pickups by treating the Grab pin as “pillar-matched”: cross into the designated parking/garage area, then select the exact pillar/letter-number range in-app instead of negotiating on the roadway lanes.
2026 Tan Son Nhat International Airport Map + Printable PDF
Terminal 3’s April 2025 opening remains the biggest map-change driver in 2026, because “Domestic” now splits across T1 and T3. The walkable connection is still only T1↔T2 via the covered walkway; T3 requires a curbside shuttle with level-specific pickup columns. For printing, prioritize curb maps that show lane letters and column numbers (B15–B16, A17–A20, B17–B20).
Tan Son Nhat International Airport Terminal 1 Domestic Arrival Map 2024-2026
Tan Son Nhat International Airport Terminal 1 Domestic Departure Map 2024-2026

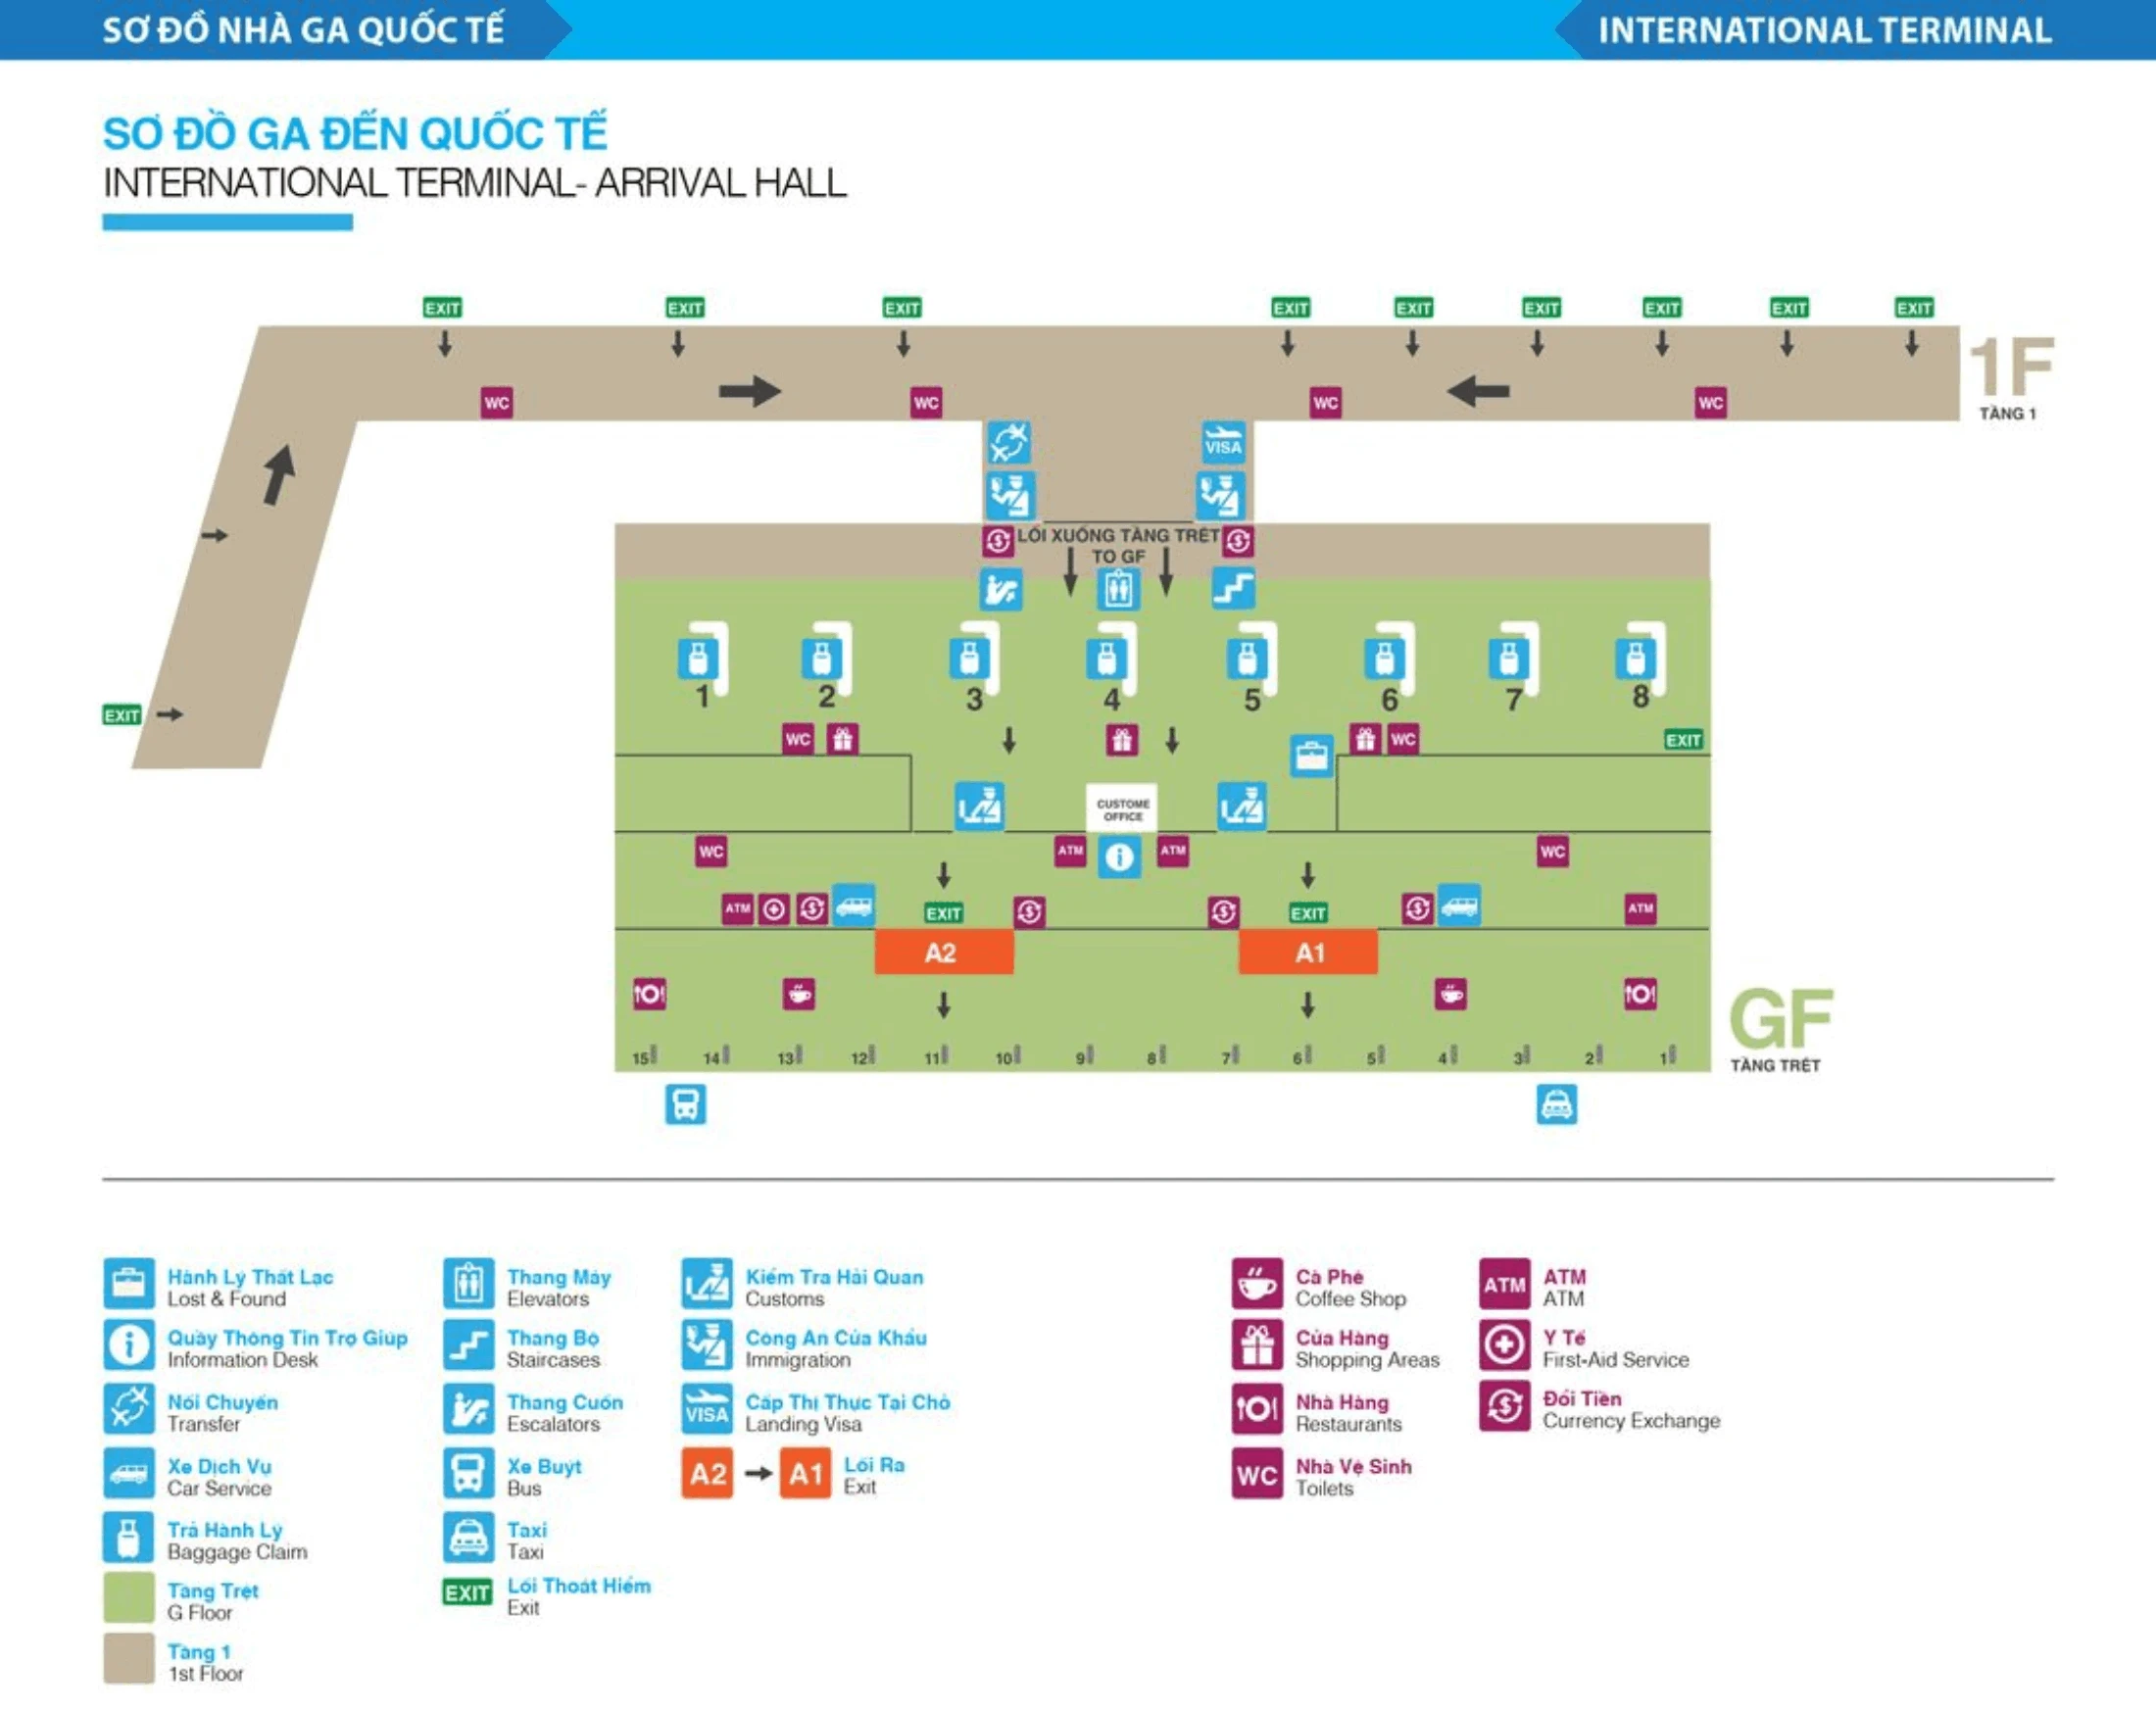
Tan Son Nhat International Airport Terminal 2 International Arrival Map 2024-2026
Tan Son Nhat International Airport Terminal 1 Domestic Departure Map 2024-2026

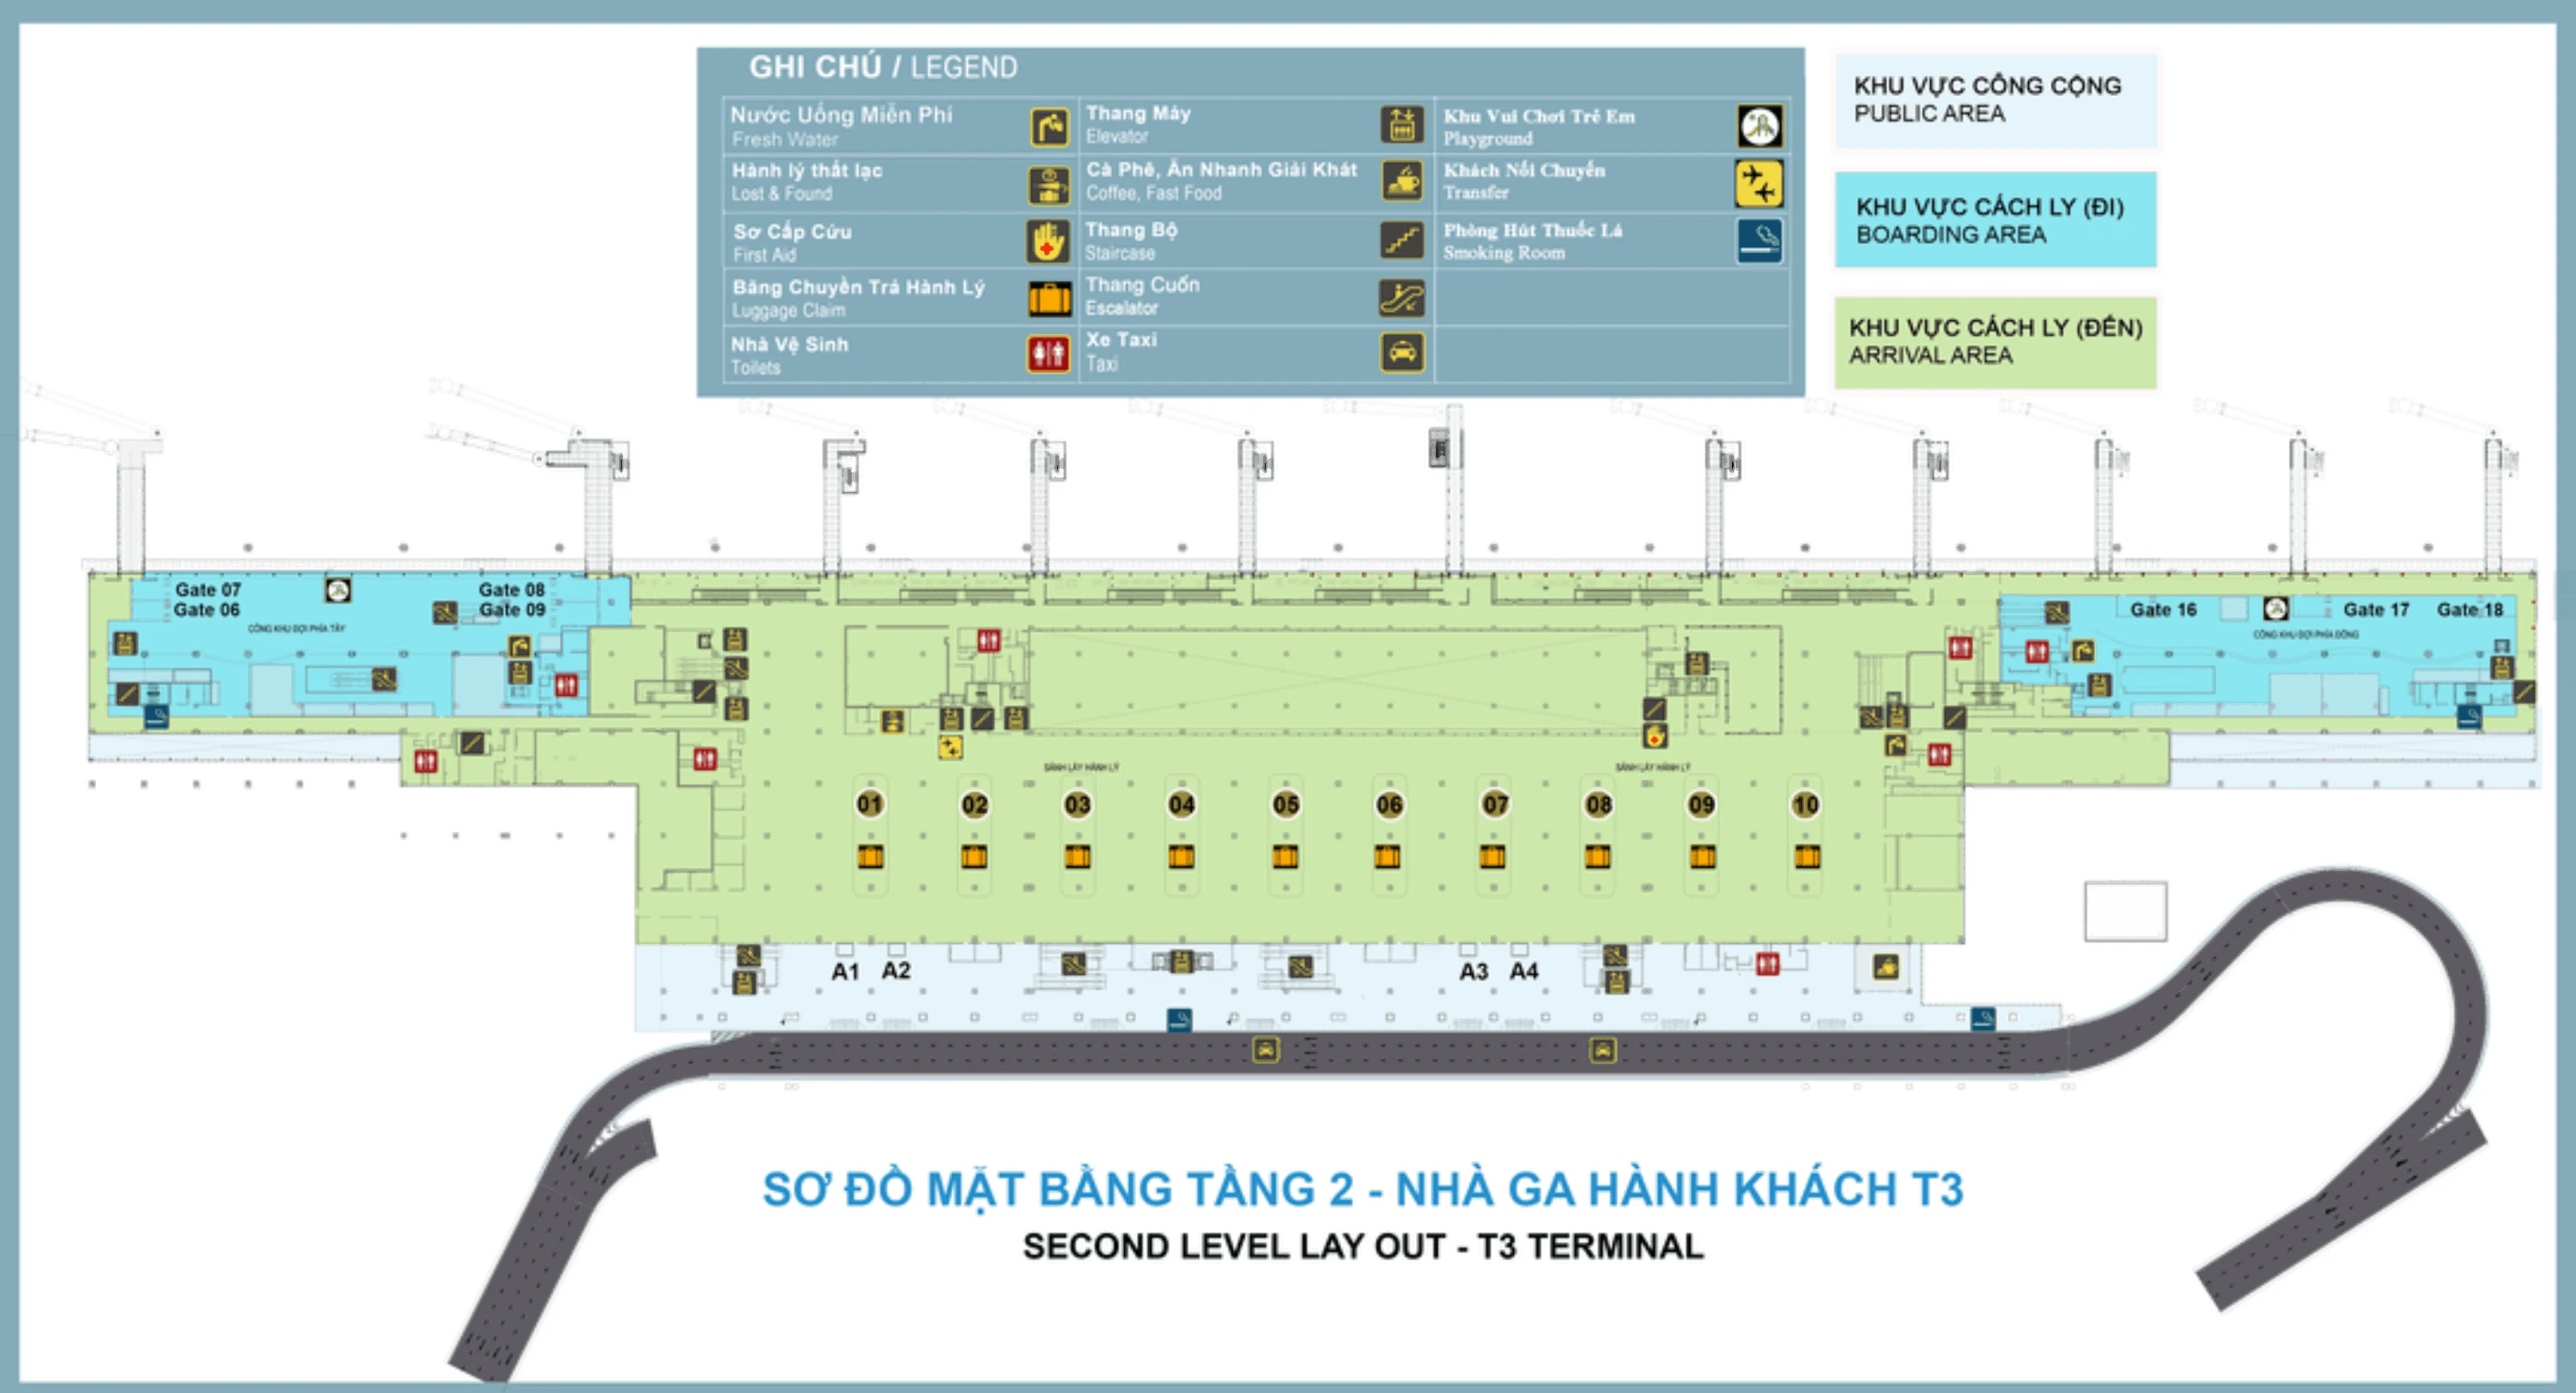
Tan Son Nhat International Airport Terminal 3 Domestic Level 2 Map 2024-2026
Tan Son Nhat International Airport Terminal 3 Domestic Level 3 Map 2024-2026
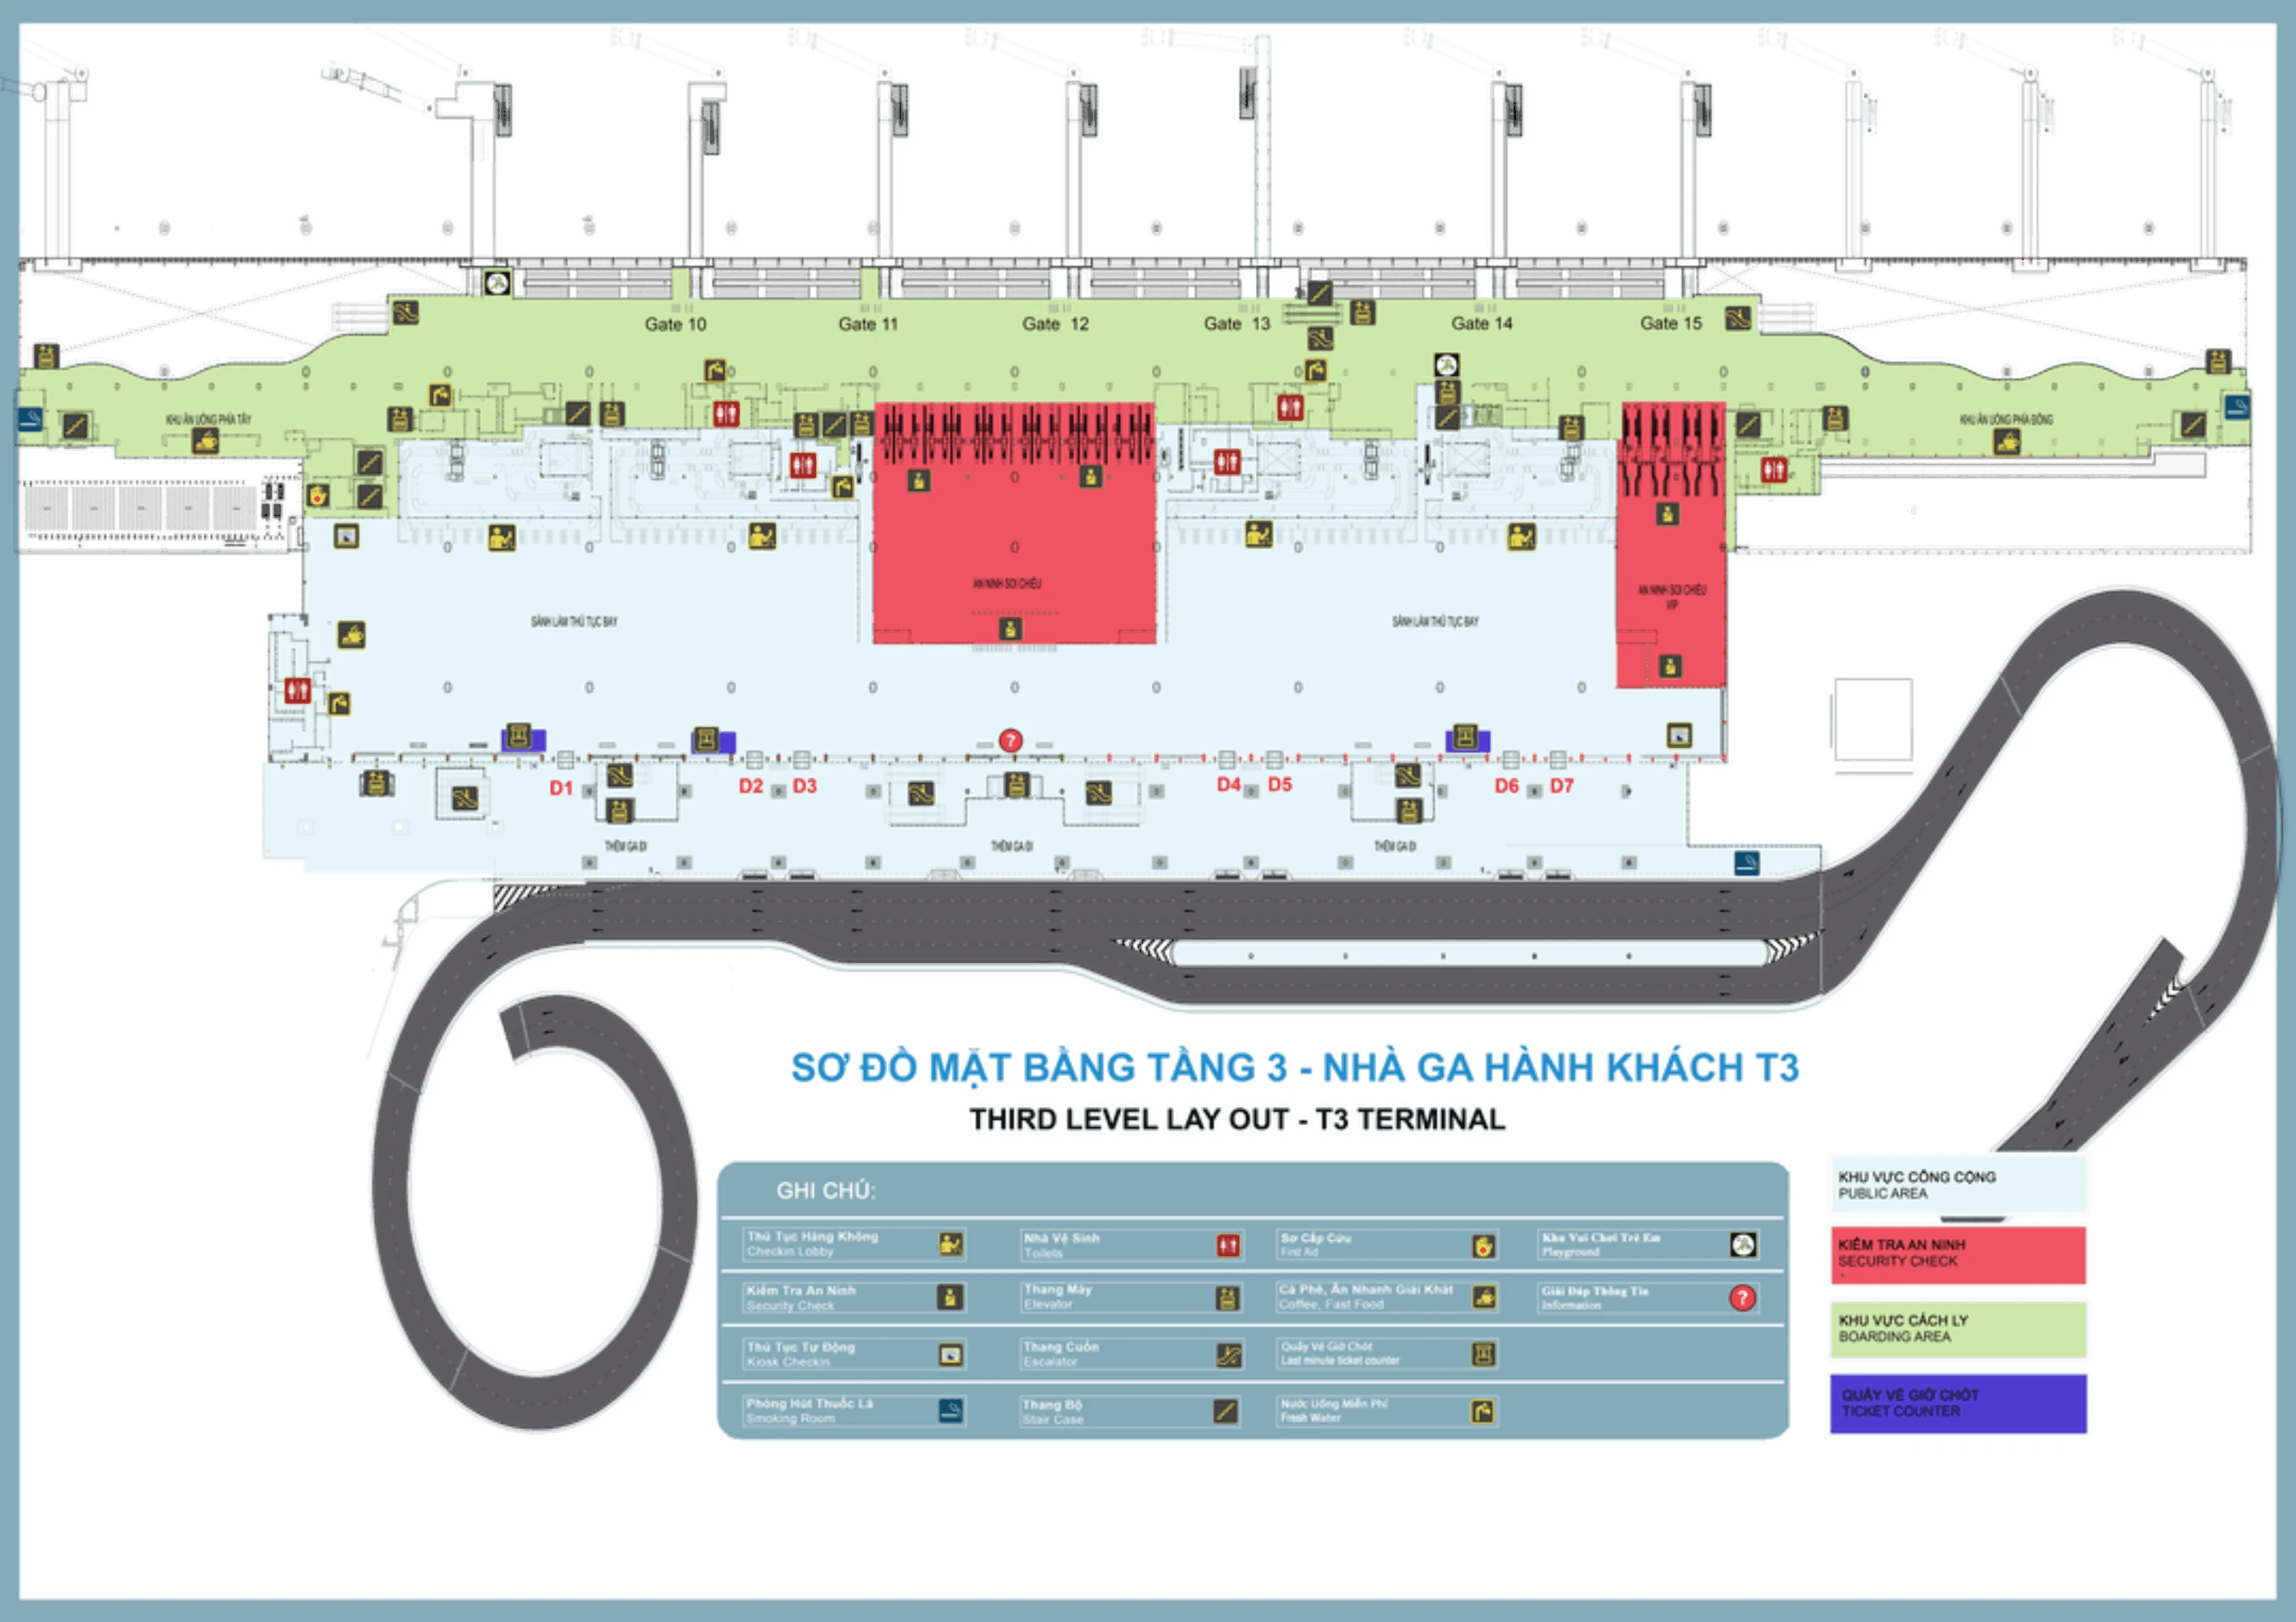
Tan Son Nhat International Airport Terminal 3 Domestic Level 4 Map 2024-2026

2026 Tan Son Nhat International Airport Map Guide
What is the exact walking route and distance from T2 Arrivals exit to the T1 Departures check-in hall (including which pedestrian crossings/covered walkways are used)?
Walking takes about 5–8 minutes for roughly 200–300 meters using the covered pedestrian walkway that links Terminal 2 to Terminal 1.
Exit Terminal 2 Arrivals at ground level via Door A1 or A2, step onto the curbside sidewalk, and turn right while staying on the terminal-side footpath. Follow the covered metal/glass-canopy walkway past the Terminal 2 taxi-queue frontage, continue as the path curves with the connector road, and stay on the same side without crossing to the car park. The walkway deposits you at Terminal 1’s landside entrance area; from there, enter and go up by escalator to reach the Terminal 1 Departures check-in hall.
Where is the official inter-terminal shuttle pickup point at T3 to reach T1/T2, and what exact landmark labels identify it on the terminal curb map (e.g., column/zone names)?
Descending to Ground Floor (Level 1) is required because the inter-terminal shuttle pickup at Terminal 3 is not on the Arrivals level. The official pickup zone is along the curb at columns A17–A20.
Exit Terminal 3 Arrivals on Level 2, then go down to Level 1 and walk to the curb between pillars marked 17 and 20 on the “A” lane side. The most reliable map-verifiable identifiers are the column labels A17, A18, A19, and A20 on the curb pillars near the shuttle bus signage; staying inside that A17–A20 span prevents the common failure of waiting in the taxi/private pickup area instead of the shuttle stop.
On the T3 curb map, which floor/level is the correct shuttle pickup level for transfers to T1/T2 (to avoid waiting at the same-number “column” on the wrong level)?
Ground Floor (Level 1) is the correct shuttle pickup level at Terminal 3 for transfers to Terminal 1 and Terminal 2. The shuttle loads at columns A17–A20 on Level 1, not on the Level 2 Arrivals curb.
Terminal 3 Arrivals flow exits on Level 2, which creates the classic “same column number, wrong level” trap when travelers scan pillars upstairs and assume the shuttle is missing. Use the nearest escalator/elevator down to Level 1, then anchor your search to the A-lane curb between pillar numbers 17 and 20 where the shuttle signage is placed, rather than lingering in the Level 2 pickup zones.
What is the exact curbside location of the Grab (ride-hail) pickup zone at T1 (Domestic), and which exit door numbers / pillars / parking-lane labels align with it?
Lane D1 inside the TCP Parking Garage is the correct GrabCar pickup zone for Terminal 1, not the curb lanes directly outside Arrivals. The in-app alignment uses pillar selections within the D5–K5 ranges inside that garage zone.
Exit Terminal 1 Arrivals, cross the immediate curb lanes (A/B/C), and enter the TCP Park garage directly opposite the terminal frontage. Use the garage ground-level anchors (Highlands Coffee or Starbucks) to confirm you’re in the right structure, then walk to the specific letter-number pillar your driver selects (examples used on-site include F5, J5, or K5 within the D5–K5 set). Matching the exact pillar code in the Grab app prevents “wrong level/wrong lane” pickups and avoids curbside solicitation.
What is the exact curbside location of the Grab pickup zone at T2 (International), and which exit door numbers / pillars / lane labels correspond to the app’s pickup pin?
Crossing to the parking lot island opposite Terminal 2 is required because Grab pickups are not handled on the Terminal 2 curb lanes. The practical anchor is the parking lot area near Lucky Cafe, typically aligning with outer-lane column markers around the 10–12 zone rather than the A/B curbside lanes.
Exit Terminal 2 Arrivals via Door A1 or A2, use the zebra crossings to get across the immediate terminal lanes, and continue toward the large arrivals parking lot area facing the terminal. The most consistent landmark triangulation is Lucky Cafe and the adjacent fast-food stalls at the edge of the lot; that is where drivers expect the pickup pin to resolve. Avoid requesting pickup in Lane A or Lane B at the curb because security commonly moves drivers on, creating “ghost ride” mismatches even when the pin looks close.
From T2 Arrivals, what is the shortest mapped path to the official taxi queue / reputable taxi stand area, and what signage terms appear along that path?
Turning left from Terminal 2 Arrivals and walking about 50 meters to the far end of the frontage is the shortest route to the official taxi queue, which sits around columns 1–3. The key sign to follow is “Taxi Stand,” with reputable operators commonly indicated as Mai Linh or Vinasun.
Exit Terminal 2 Arrivals through Door A1 or A2 to the curbside, then immediately turn left and keep walking along the terminal frontage until the curbside crowd thins near the end-zone. Anchor your stop to the pillar/column numbers 1 through 3 and look for a managed queue with staff presence, not drivers approaching you in the middle of the concourse. If someone offers a ride before you reach the marked stand, treat it as a solicitation failure mode and continue walking to the labeled taxi area.
Where are the airport bus stops (e.g., 109/152) located relative to T1 vs T2, and what are the exact column/stop markers shown on the airport ground transport map?
Bus 109/152 board at Terminal 2 column 12 and Terminal 1 column 18, both on Lane B. These column markers are the fastest way to disambiguate the public bus stop from the inter-terminal shuttle zone.
At Terminal 2, exit Arrivals and orient to Lane B, then walk to the pillar labeled 12 near the mid-section of the frontage where bus signage is posted. At Terminal 1, use Lane B again but anchor to the pillar labeled 18, which is close enough to the shuttle corridor to create confusion if you only look for “buses.” Confirm you are boarding the city bus (yellow for 109, green for 152) rather than the inter-terminal shuttle by matching the route number on the vehicle and stop sign at the column.
For a T2 → T3 connection, where is the correct departure point (shuttle/taxi staging) shown on airport maps, and what is the mapped travel corridor (internal roads/loops) between terminals?
Shuttle pickup at Terminal 2 is at Ground Floor curbside Lane B, columns B15–B16, and it is the most deterministic departure point for reaching Terminal 3. The mapped corridor runs out from the Terminal 2 loop to Trường Sơn Street, then via Trần Quốc Hoàn to the Terminal 3 access roads.
From Terminal 2 Arrivals, stay on the ground-level curb frontage and walk to the pillars marked B15 and B16 on Lane B where “Shuttle Bus to T3 / Free Shuttle” signage is posted. After loading, the bus typically exits the airport frontage onto Trường Sơn Street, turns onto Trần Quốc Hoàn, and enters Terminal 3 via the connector/access road network (often referenced locally as the new connector toward Street 18E). Because this route uses public roads, the travel time expands sharply during the 07:00–09:00 and 16:30–18:30 congestion windows.
On the arrivals hall map, where are the high-risk “solicitation choke points” (where travelers report being approached for SIM/taxi/“Grab help”), and what alternate mapped route avoids them to reach official pickup zones?
The highest-risk solicitation choke points cluster immediately outside Terminal 2 Arrivals at the A1/A2 exit doors and the first curbside transition zone where travelers pause to orient. The safest avoidance route is a no-stop “deterministic walk” that commits to a numbered target (columns 1–3 for taxis, column 12 for buses, or the parking-lot island for Grab) before you exit.
After customs, move straight through the public arrivals hall and out via Door A1 or A2 without stopping near the glass doors or the first curb edge where greeters and touts mix. For an official taxi, turn left immediately and walk to the managed stand at columns 1–3; for buses, walk directly to Lane B column 12; for Grab, use the zebra crossing to the parking lot island near Lucky Cafe and wait only after you’re inside the lot area. Avoid any “help” offers that try to redirect you back toward curb lanes A/B for ride-hail.
If arriving on a remote stand (bus-to-terminal), where is the bus drop-off entry point relative to immigration hall entrances, and what is the mapped walking distance from that entry to the main queues?
Ascending to Level 1 immediately is required because the remote-stand bus drop-off at Terminal 2 feeds into a ground-level portal while Immigration is upstairs. The walking distance from the bus drop-off doors to the escalator/elevator bank is under 30 meters, with the main immigration queues reached right after you come up.
After the apron bus unloads, enter the terminal through the ground-floor entry doors and look straight ahead for the vertical transition point directly inside the doorway. Take the escalator or elevator up one level to reach the Immigration Hall entrances and the zigzag queue field. The time penalty is not the walk but the hidden bus latency (waiting to load, driving across the apron, and unloading), so treat the “bus-to-terminal” arrival as an added buffer event even though the physical distance to the queues is short.