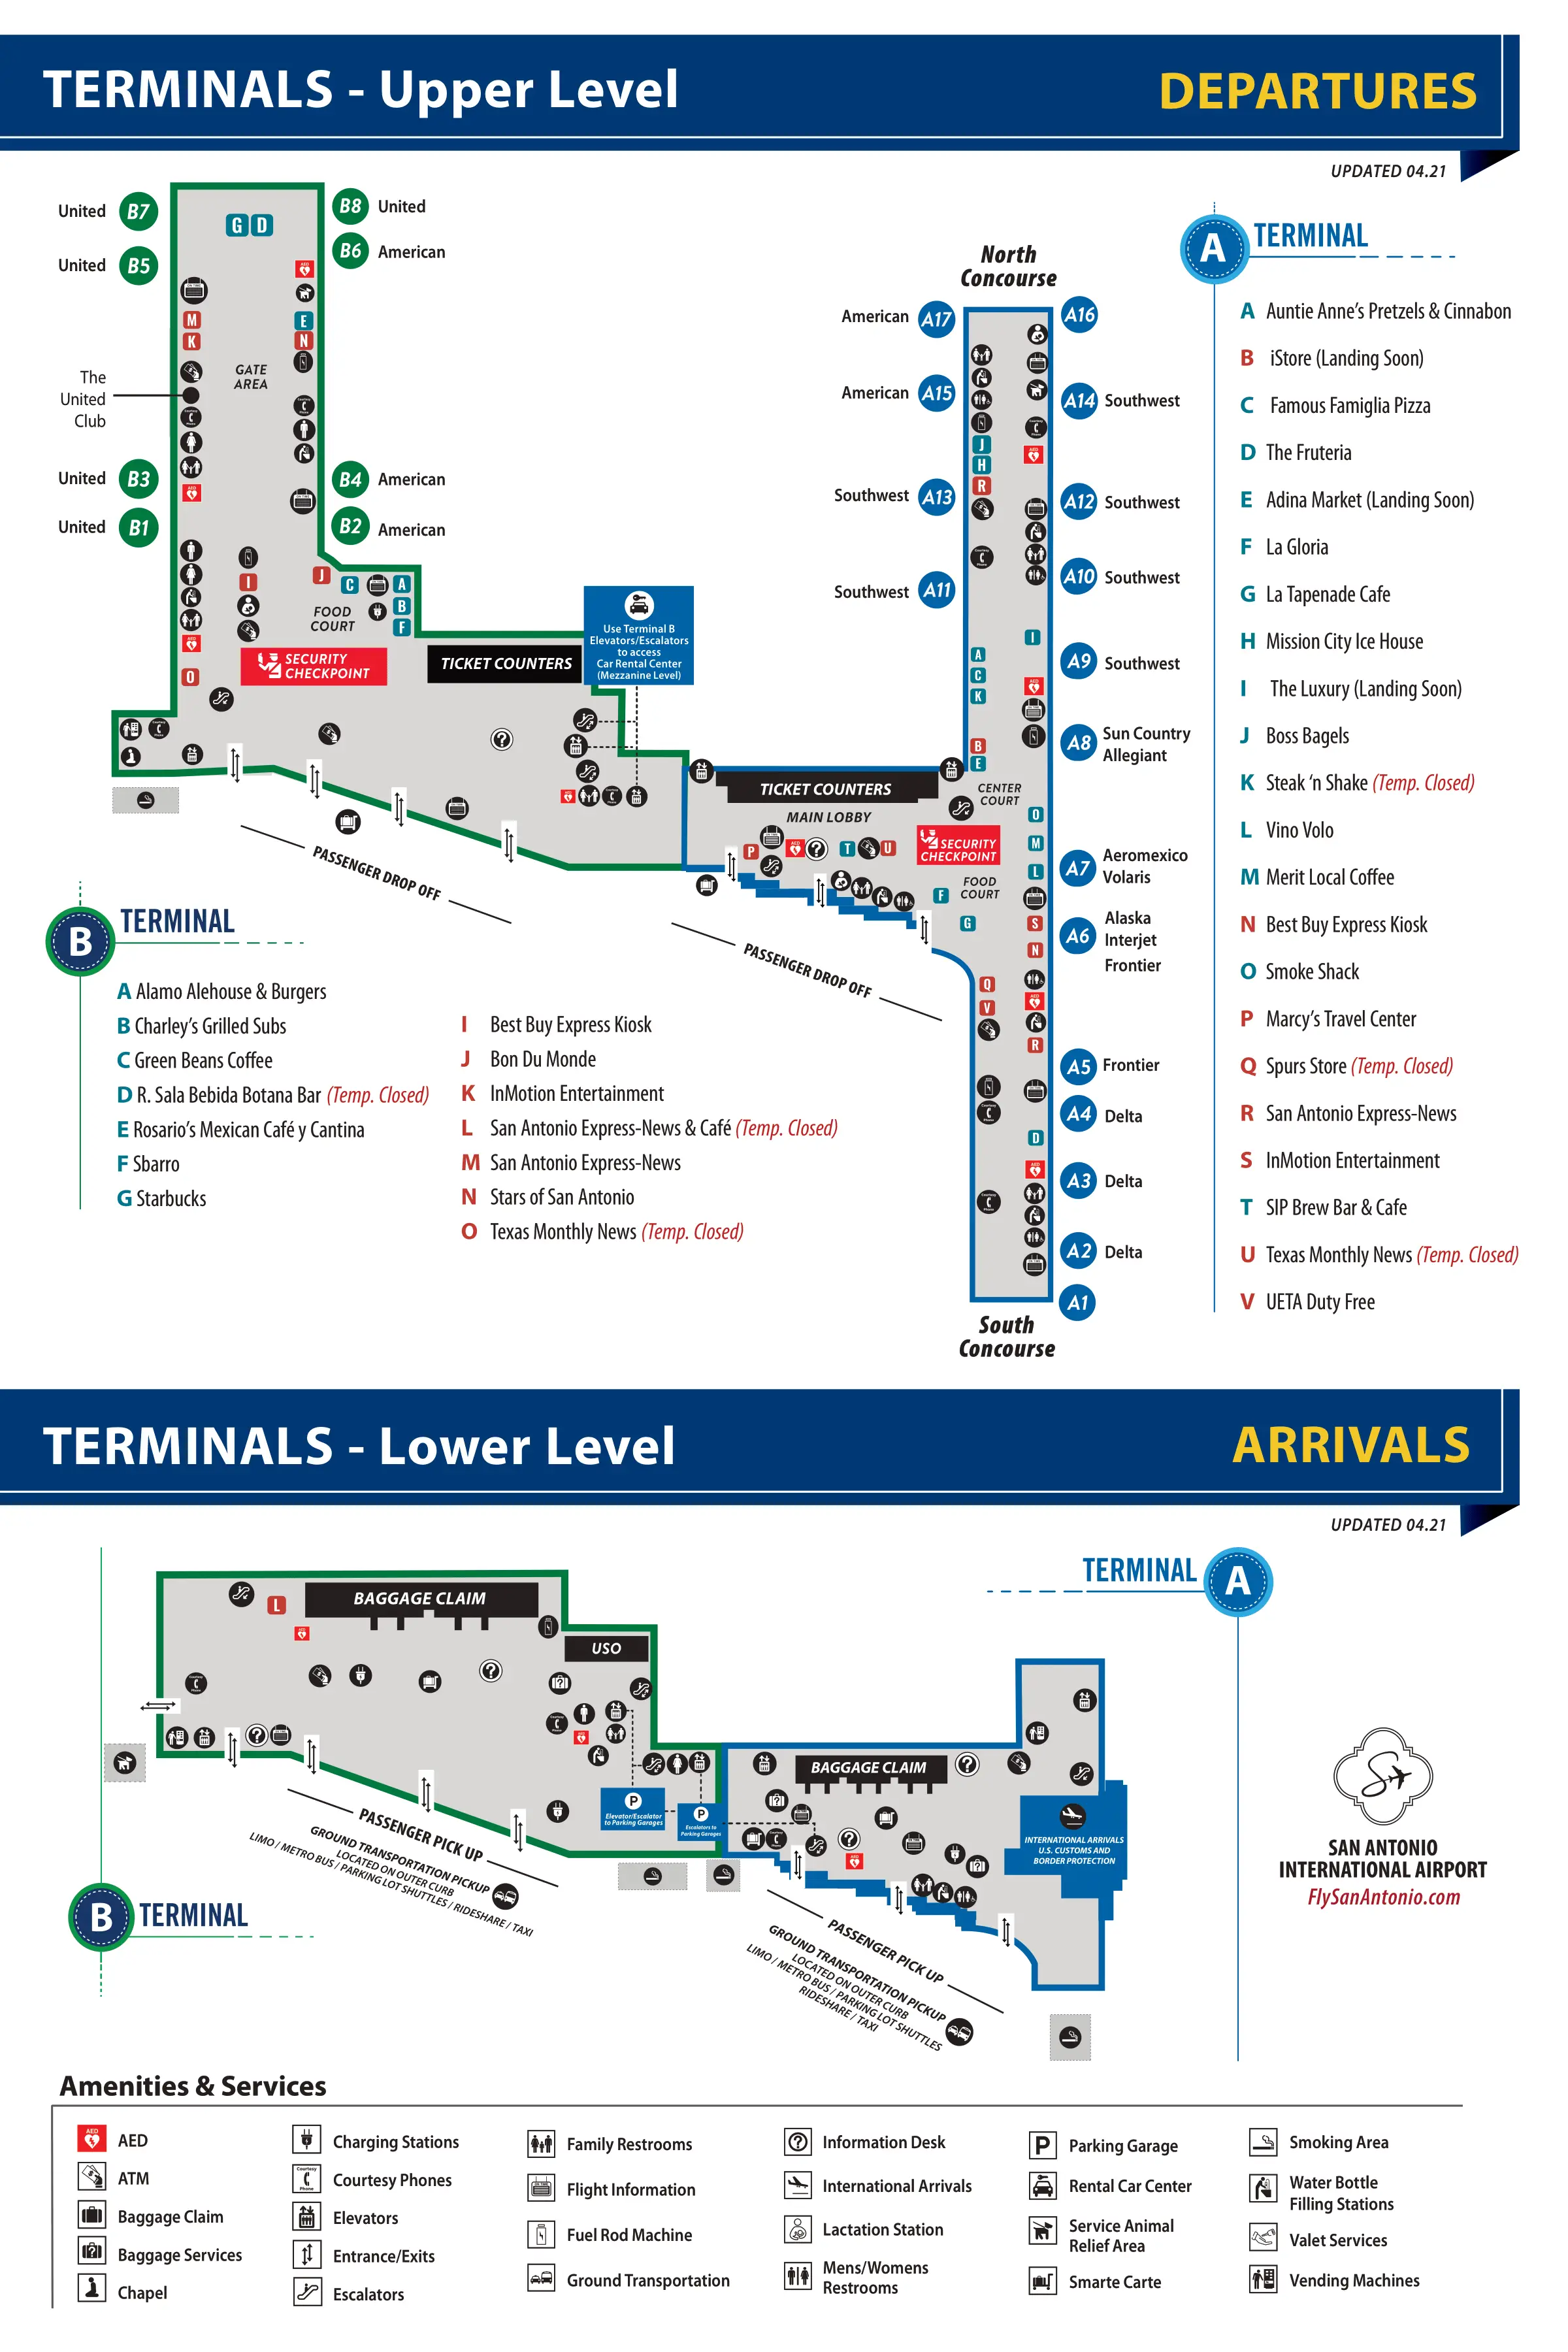
San Antonio International Airport Map (Most Up-To-Date)
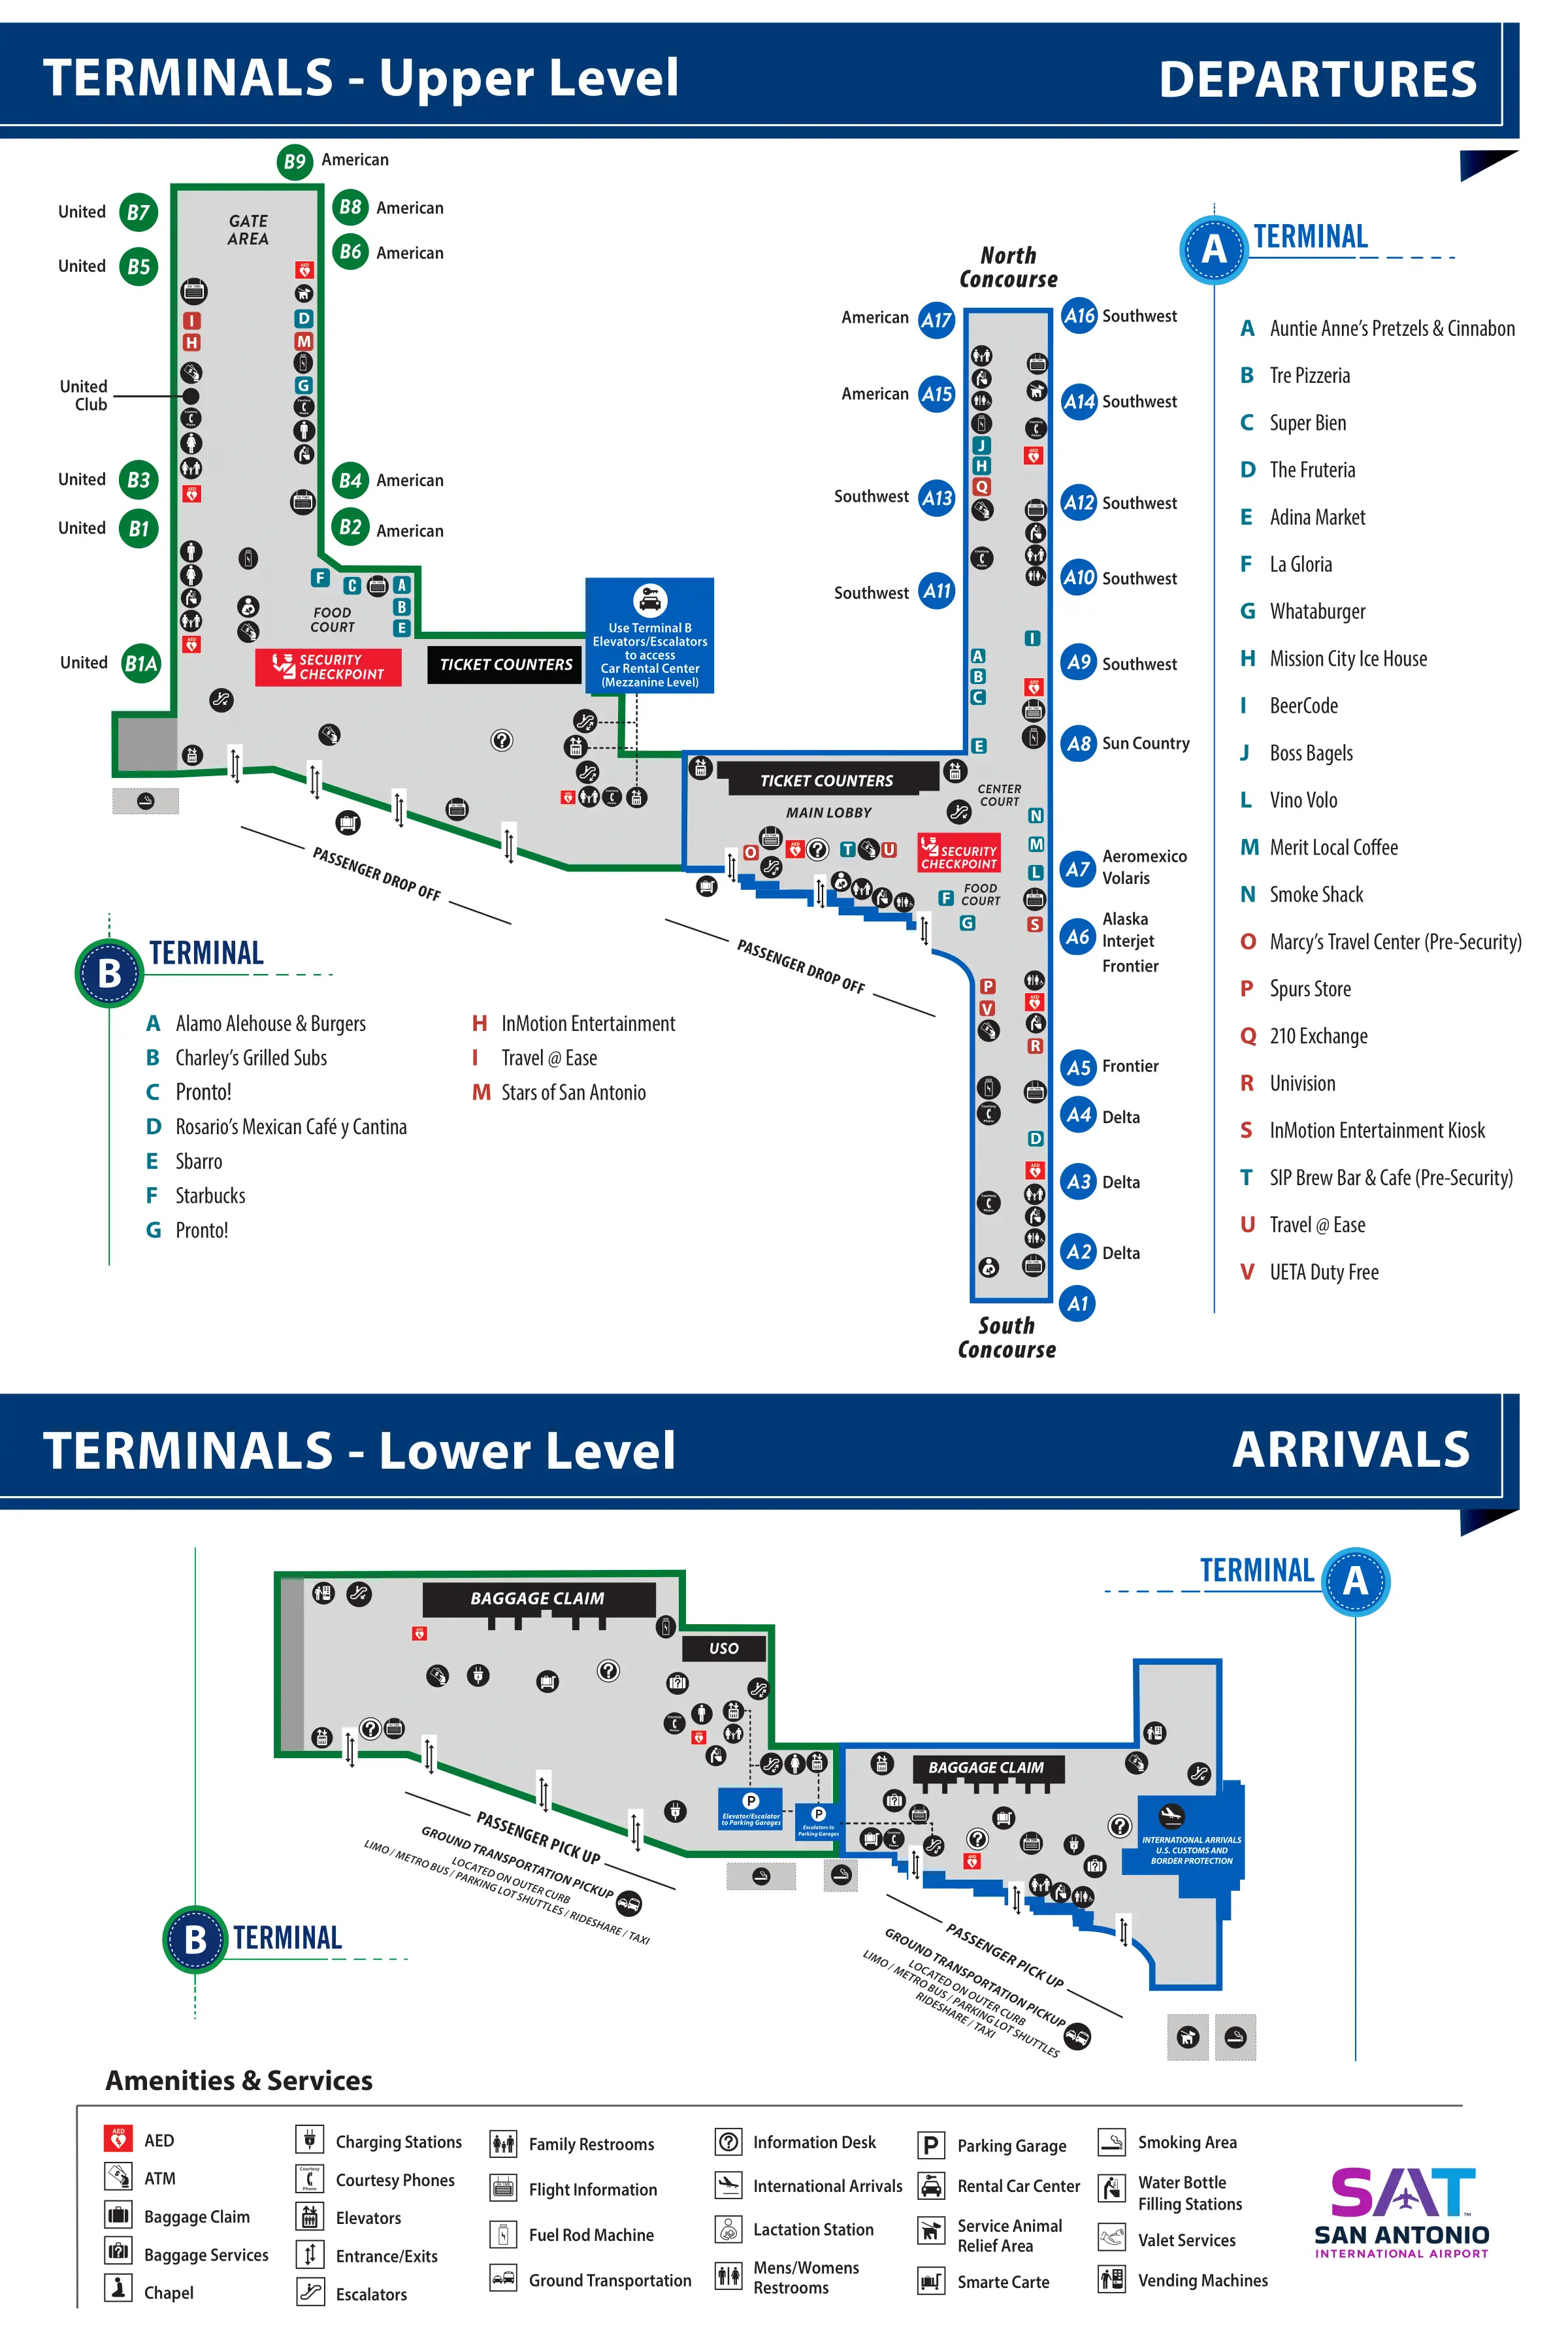
San Antonio International Airport is a split-terminal layout with Terminal A and Terminal B separated by a landside gap, both fronting the same two-level curb (Arrivals below, Departures/Ticketing above). The main parking garages and pedestrian bridges feed the upper level, while shuttles and pickups concentrate on the lower curb islands. Within San Antonio’s primary airport complex, the critical navigation challenge is choosing the correct level first—most missed turns start with the wrong vertical move.
Map Table
| Terminal | Key Airlines | Primary Function | Transfer Mode |
|---|---|---|---|
| Terminal A | Southwest, Delta, Aeromexico, Volaris | majority domestic gates, international arrivals, longer concourse | landside upper-level walkway, exit + re-screen required |
| Terminal B | United, American | modern linear concourse, rental car skybridge access | landside upper-level walkway, exit + re-screen required |
| Terminal C | future expansion | construction zone, shifting gate operations | none during build, follow FIDS + barricades |
San Antonio International Airport Terminal Map Strategy
- Start with the vertical decision: garage-to-terminal works best from the bridge/mezzanine level into ticketing; street-level crossings create forced elevator hunts and luggage backtracks.
- Treat Terminal A and Terminal B as separate secure worlds: any Terminal A to Terminal B switch requires going landside and re-clearing security, so plan time for a full reset.
- Anchor every route to a door node: use the west-most Terminal A ticketing doors and east-most Terminal B ticketing doors for the upper-level connector, not the arrivals curb.
- Assume construction reroutes are real-time: verify gate and terminal on flight information screens on arrival, and expect blocked zones near impacted gate clusters that force detours around barricade walls.
2026 San Antonio International Airport Map + Printable PDF
Active construction and phased renovations define San Antonio International Airport right now: Terminal A work plus the Terminal C program can shift gate usage, block seating zones, and change the “normal” path you remember. Printable maps are most useful when they show connector levels (Arrivals vs Departures), bridge/walkway entries, and where barricades pinch corridors—because those are the spots that trigger backtracking with luggage.
2026 San Antonio International Airport Map Guide
Where is the closest elevator route from the main parking garage pedestrian entry to Terminal A ticketing (exact door/connector location)?
The closest elevator route is the Short Term Parking Garage main elevator bank beside the Paseo pedestrian spine, riding to Level 2 (Mezzanine) and crossing the Level 2 pedestrian bridge that enters Terminal A at the west-most ticketing doors closest to the bridge landing.
| Segment | Exact node to target | What you should see |
|---|---|---|
| Garage entry → elevators | Main garage elevator core next to the Paseo walkway | “Paseo” pedestrian channel running through the garage |
| Elevators → bridge | Select Level 2 (Mezzanine/Bridge) | Bridge entrance aligned to the roadway span |
| Bridge → Terminal A | Cross the Level 2 pedestrian bridge | Direct deposit onto the ticketing level, no street crossing |
| Door → ticketing counters | Enter Terminal A via the west-most ticketing doors at the bridge landing | Ticketing lobby ahead; Terminal A dome/vaulted roofline to the right/south |
Where is the landside pedestrian walkway that links Terminal A to Terminal B, and which terminal doors does it connect?
The landside pedestrian walkway is the covered upper-level sidewalk that runs along the Departures/Ticketing frontage, connecting Terminal A’s west-most ticketing exit doors to Terminal B’s east-most ticketing entry doors.
This connector stays on the Departures/Ticketing level (not the Arrivals curb), using the same facade-line sidewalk under the terminal overhang. From Terminal A ticketing, exit through the doors closest to the parking garage bridge landing, then follow “To Terminal B” wayfinding along the front of the terminals across the roadway gap. Enter Terminal B through the first ticketing doors on the east end of the Terminal B lobby. Expect about a 5–8 minute walk, and remember there is no post-security connection—switching terminals requires exiting security and re-clearing TSA.
Where is the Economy Lot shuttle pickup point relative to Terminal A arrivals doors (exact curb/stop position)?
The Economy Lot shuttle pickup point is on the Arrivals level at the outer commercial curb island across the first traffic lane from Terminal A’s baggage-claim exit doors, at the “Parking Shuttles / Economy Parking” signed stop toward the far end of the island (not the inner curb).
Shuttle pickup is a two-step curb geometry: the doors open to the inner curb for private vehicles, but the economy shuttles stage on the outer commercial island. Exit Terminal A baggage claim, cross the first roadway lane to the commercial median, then walk laterally along that island until you reach the section labeled for parking shuttles with “Economy Parking” branding on the pillar signage. Do not wait at the VIA bus stop area and do not wait immediately in front of the doors on the inner curb—both are common “looks right, wrong stop” traps.
Which security checkpoint is the correct entry for Gate A17 (to avoid entering at the wrong checkpoint and backtracking)?
The north-oriented checkpoint lanes signed for Gates A8–A17 are the correct security entry for Gate A17, because they deposit you at the mouth of the north concourse instead of forcing a diagonal cross-through of the central atrium.
Terminal A’s ticketing lobby feeds screening flows that split by gate direction. As you face the security area from ticketing, follow the lanes and overhead digital signs pointing to Gates A8–A17 (the left/north side relative to the lobby). Entering the south flow signed for Gates A1–A7 is not a hard block, but it creates a high-friction backtrack: you’ll exit security on the wrong side of the post-security throat, then cut across food court lines and arriving passenger flow to reach the A8–A17 corridor. For A17—the far north tip—starting in the A8–A17 security flow is the time-saver.
Where is the rental car garage access from Terminal B baggage claim (exact exit plus elevator/escalator node)?
The rental car garage access is Terminal B Level 3 via the skybridge, reached from the baggage claim hall by the central/west elevator–escalator bank up to Level 3 (Mezzanine), not by exiting curbside at baggage claim.
From Terminal B baggage claim (Arrivals/Level 1), stay inside and locate the main vertical circulation node near the middle-to-west side of the baggage hall where escalators and elevators serve upper levels. Go up past ticketing (Level 2) to Level 3, then follow “Rental Cars” to the skybridge that spans the roadway into the consolidated rental car facility lobby. The critical constraint is binary: curbside exits on Level 1 put you at the street and the short-term garage frontage, not the rental car center; the only clean connector is the Level 3 skybridge.
Where are the numbered pickup pillars located on the Arrivals level, and which pillar range is closest to Terminal B baggage-claim exit?
The numbered pickup pillars are on the Arrivals curbside frontage outside baggage claim, with the lowest “B” numbers aligned closest to the main Terminal B baggage-claim exit, typically in the B-2 to B-6 range.
Pillars run sequentially along the Terminal B arrivals curb, acting as meet-up coordinates for curbside pickups. The primary baggage-claim exit doors open toward the start of the Terminal B pillar sequence, so the nearest meeting zone is the first cluster of B-number pillars immediately outside that exit. This closest area is also the highest-congestion zone because most pickups stop there; a lower-stress move is to walk downstream along the curb to a higher B-number cluster (often around B-10 to B-16), using the same pillar numbering to keep the driver aligned while avoiding the choke point at the doors.
What is the exact walking distance from Terminal A security exit to Gate A17 (in feet/meters, following the primary corridor)?
The walk is about 1,200 feet (about 366 meters) from the Terminal A security exit to Gate A17, following the main post-security atrium and the A8–A17 corridor to the far north tip.
| Path segment | Landmark anchor points | Distance |
|---|---|---|
| Security exit → start of A8 corridor | Post-security throat by the food court/retail cluster → entrance to the A8–A17 hallway | ~200 ft / ~61 m |
| A8 corridor → Gate A17 | Pass gates A8 through A16 along the primary concourse → Gate A17 at the end cap | ~990 ft / ~302 m |
| Total | Security exit → Gate A17 | ~1,200 ft / ~366 m |
Where is the shortest path from Terminal A baggage claim to Terminal B ticketing (outside-security transfer), including the exact crossing point?
The shortest path is the inside elevator up from Terminal A baggage claim to the Ticketing/Departures level, then the upper-level landside connector sidewalk from Terminal A’s west-most ticketing doors to Terminal B’s east-most ticketing doors.
Use the vertical node inside Terminal A baggage claim (the central elevator bank near the escalators) to go up to Level 2 instead of exiting to the arrivals curb. From Terminal A ticketing, exit through the west-most doors nearest the parking garage bridge landing, then cross the inter-terminal gap on the covered upper-level walkway that runs along the front facade under the overhang. Enter Terminal B through the east-most ticketing doors at the start of the Terminal B lobby, then angle to the United/American counters. The exact crossing point is the upper-level facade-line sidewalk, not the street-level arrivals roadway.
Which gates are currently closed/blocked in Terminal A (and where are the physical barricade points) that force reroutes?
Gates A1 and A2 are the most likely to be closed, restricted, or physically constrained due to Ground Load Facility work at the southwest end of Terminal A, with barricade walls and construction partitions tightening the waiting area and corridor approach near the A1–A3 zone.
Construction interfaces at the south/southwest end of Terminal A place the highest disruption pressure on the A1/A2 pocket, where you should expect hard visual barriers: temporary walls, dust partitions, narrowed seating, and funneling that redirects foot traffic back toward the A3/A4 frontage before you can approach the end cap. Even when A1/A2 appear on a map, they may operate as controlled-use positions rather than normal walk-up jetbridge gates, so route plans should treat the A1–A2 corner as a potential dead-end and rely on corridor continuity from the central atrium toward A3–A7 instead.
Where are the common-use A gates used for irregular airline arrivals during Terminal C construction (exact gate cluster position)?
The common-use cluster is most often the mid-to-north Terminal A concourse near the international-capable end, centered around the A10–A14 corridor segment and extending toward the A15–A17 area that feeds the federal inspection routing.
Terminal A’s irregular-ops flexibility concentrates where gates are not tightly airline-dedicated and where international handling infrastructure is nearby. Practically, that means the mid-concourse stretch around Gates A10–A14 is the “swing” zone you should expect to see reassigned on flight information screens, with spillover toward the higher-numbered gates near A15–A17 when international-capable positions are used. The map-verifiable cue is location: these gates sit beyond the central post-security throat and food court, deeper into the A8–A17 hallway, rather than at the construction-pressured south end near A1/A2.
Archive San Antonio International Airport Map
Below are all historical map versions for San Antonio International Airport. Each year includes the official map available for that period, presented as both WebP and PDF.
2021 San Antonio International Airport Map