Ronald Reagan Washington National Airport Terminal 2 Map (Most Up-To-Date)
Terminal 2 is a long spine-and-piers layout built around the National Hall corridor running roughly north to south, with B, C, and D branching off and the E concourse continuing as a straight extension at the far north end. Within the Reagan National airfield complex, the scale looks compact but hides distance shocks and high-penalty decision points, especially checkpoint choice and the D versus E split. One wrong turn can add double-digit minutes.
Map Table
| Zone | Connection | Walk Time |
|---|---|---|
| North Security | D gates, E concourse | E far end 12–15 min |
| South Security | B gates, C gates | B10 area 1–3 min |
| National Hall spine | B, C, D junctions | end-to-end ~0.6 mi |
| Terminal 1 link | landside walkway | 10–15 min + re-screen |
Ronald Reagan Washington National Airport Terminal 2 Map Strategy
- Treat Terminal 1 and Terminal 2 as separate security islands; any transfer is landside, then re-screen, with a large time penalty if you guessed wrong.
- Choose your checkpoint deliberately: North Security for D and E, South Security for B and C, and avoid getting absorbed into the wrong priority queue shape at North.
- Use National Hall as your navigation spine, then take the correct branch; B, C, and D are side piers, while E is a straight extension past the D split.
- Ignore “G crossover” shortcut talk here; anchor on real nodes like North Security, South Security, the C pier entrance, the D pier entrance, and the E threshold.
2025 Ronald Reagan Washington National Airport Terminal 2 Map + Printable PDF
2026 Terminal 2 still functions as a single connected airside zone for B, C, D, and E through the secured National Hall, while Terminal 1 remains separate and requires a landside transfer with re-clearing security. A printable map is most useful for avoiding wrong-checkpoint mistakes and for spotting the exact pier split so you do not walk into the wrong branch and backtrack.
Ronald Reagan Washington National Airport Terminal 2 Level 2 B Gates Map 2025
Ronald Reagan Washington National Airport Terminal 2 Level 2 C Gates Map 2025
Ronald Reagan Washington National Airport Terminal 2 Level 2 D Gates Map 2025
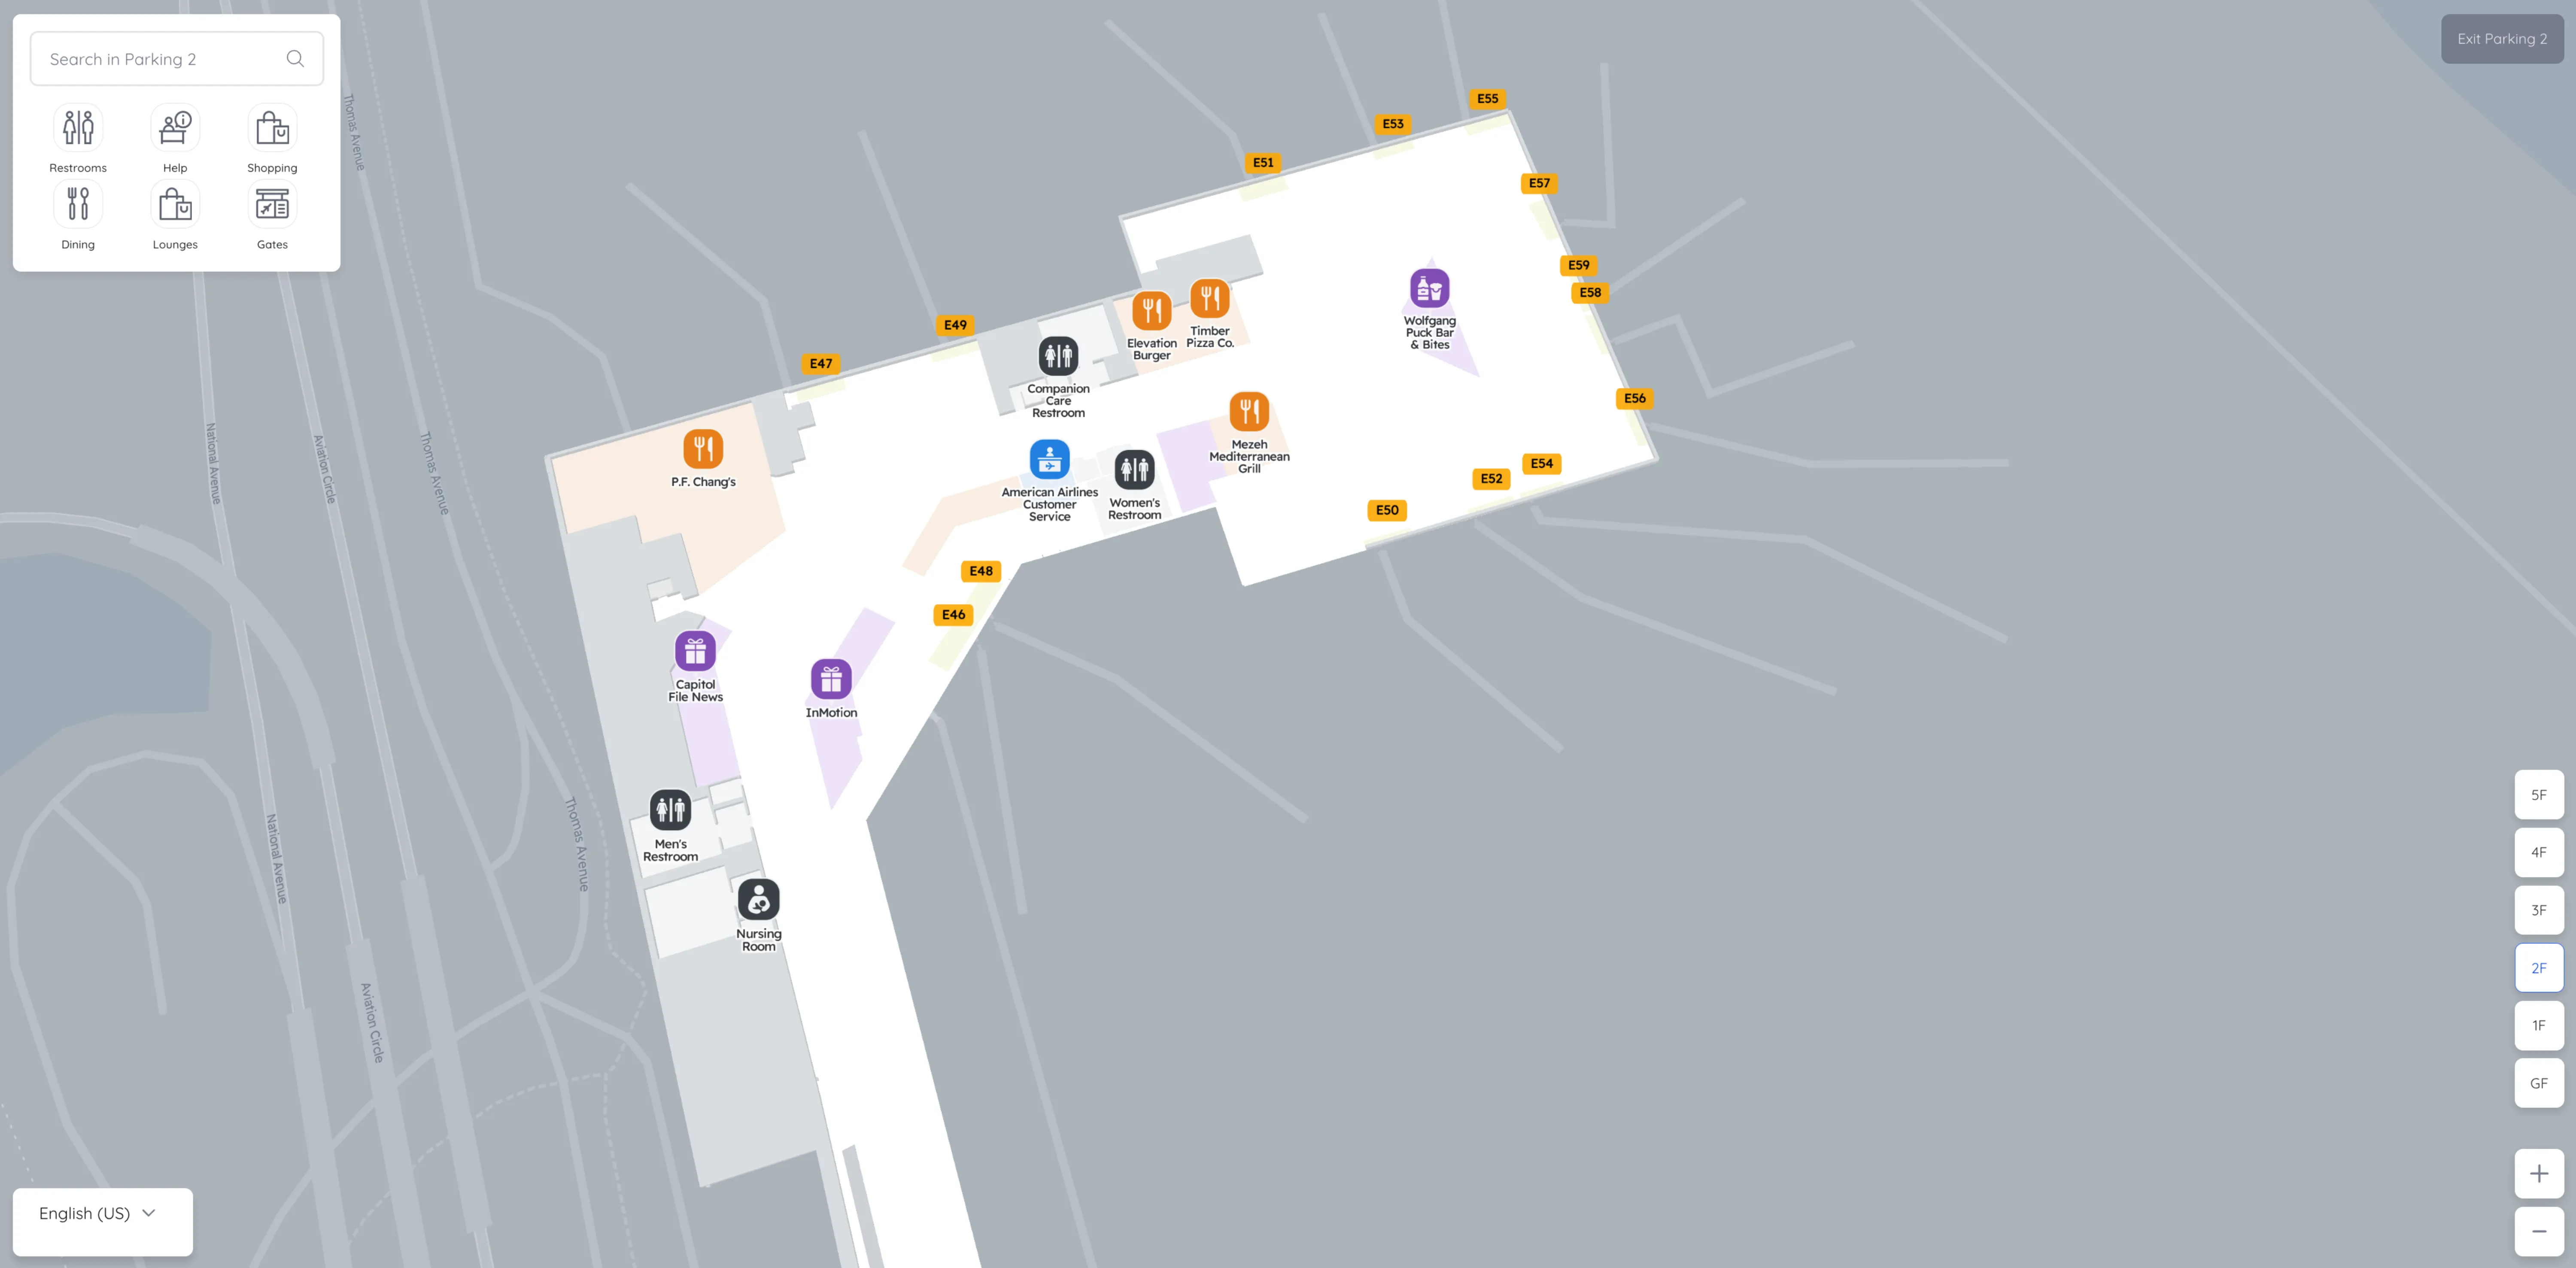
Ronald Reagan Washington National Airport Terminal 2 Level 2 E Gates Map 2025
2026 Ronald Reagan Washington National Airport Terminal 2 Map Guide
What is the exact landside walking route between Terminal 2 and Terminal 1, and which level does that connector start from?
No airside connection exists between Terminal 2 and Terminal 1, so the route requires exiting security and re-clearing at Terminal 1. The connector starts from Terminal 2’s south end on the public (landside) side, typically accessed from the concourse level via the South Security exit.
Exit Terminal 2 through the South Security doors to landside, then follow signs for Terminal 1 or the Historic Terminal. Walk through the transitional corridor that leads into the Historic Lobby area, using the USO Lounge and conference-center area as your confirmation landmarks that you are on the correct connector. Continue straight to the Terminal 1 checkpoint approach on the public side, then go through Terminal 1 security to reach Gates A1–A9. Walking is about 10–15 minutes plus the Terminal 1 security queue.
From Terminal 2 North Security exit, what is the shortest mapped path to the start of the C-gates corridor (first decision point), without detours?
The shortest path is a straight southbound walk on the secure-side National Hall spine from North Security to the C Pier entrance. The key is skipping the first pier you see after screening so you don’t get pulled into D or the E extension.
| Segment | Landmark anchor | Time |
|---|---|---|
| Exit North Security recomposure area | seating and repack zone immediately after screening | 0:30–1:00 |
| Turn right and commit south on National Hall | long window wall and main concessions spine | 1:00–2:00 |
| Pass the D Pier entrance without turning | D gate signage at the first major branch | 0:30–1:30 |
| Arrive at the C Pier entrance decision point | C gate signage at the left-side branch | 1:00–2:00 |
Where exactly is the Terminal 2 North Security entrance relative to the main hall—i.e., which approach path (from ticketing/central corridor) avoids accidental funneling into the wrong queue area?
The North Security entrance sits on Level 2 at the far north end of the National Hall, beside the American Airlines side of the building. The safest approach is the one that puts you on the wall-side of the checkpoint first, so you can read lane headers before you enter the stanchions.
From the central National Hall landside corridor, keep walking north until you’re aligned with the American check-in zone above and the North Metro bridge entry nearby. On Level 2, aim for the large “North Security” overhead sign on the wall that divides public and sterile areas, then approach parallel to that wall rather than drifting into the middle crowd. Pause at the mouth of the stanchions to confirm you’re entering the correct lane set (standard vs PreCheck vs CLEAR/priority) before committing, because the main flow can shove you into the wrong queue shape.
What is the mapped walking distance from Terminal 2 South Security exit to Gate B1 (first gate on the B pier)?
No Gate B1 exists in Terminal 2, so the correct “first B gate” target is Gate B10. Walking from South Security to the start of the B pier is essentially immediate, with the B-pier corridor beginning right beside the post-screening recomposure area.
| Route point | Adjacent anchor | Distance and time |
|---|---|---|
| South Security exit to B pier threshold | B gate signage immediately next to the South Security exit area | under 100 ft, under 1 min |
| B pier threshold to Gate B10 area | B pier corridor leading toward the B gate rotunda near the B10–B15 cluster | ~200–300 ft, ~1–3 min |
On the map, where is the “G crossover” drop-off point people reference (near the G Sky Club) relative to North Security?
The “G crossover” drop-off point and a “G Sky Club” do not exist at Ronald Reagan Washington National Airport, so there is no mapped location relative to North Security. The fastest correction is to re-anchor on real DCA nodes: North Security is at the north end of National Hall, and the Delta Sky Club is near the B gates.
If you were trying to replicate the idea of “getting dropped close to the Delta Sky Club,” use Terminal 2 South access instead, because it places you closest to the B pier cluster where the club actually is. If you were trying to replicate “getting dropped close to North Security,” use Terminal 2 North curb access and enter near the American side, then descend to Level 2 for the North Security approach. Any plan that involves a “G” area, tram, or crossover is cross-airport lore and will send you on a dead-end search loop inside National Hall.
What is the mapped walking time/distance from North Security exit to a far-end E concourse gate area (end-of-hall distance shock)?
Walking from North Security to the far end of the E concourse can take 12–15 minutes in real conditions, even though the pure distance looks modest on a map. The “distance shock” comes from the E extension being a straight, linear hall beyond the D split with crowd drag and no shortcut options.
| Segment | Landmark anchor | Distance and time |
|---|---|---|
| North Security exit to D/E split zone | pass the D pier entrance signage before the corridor narrows | ~300–400 ft, ~1–3 min |
| E threshold to far-end E gate area | architectural transition to the newer, lower-ceiling connector and then the full E hall | ~800–1,000 ft, ~4–8 min walking |
| Real-world buffer | crowding, luggage drag, repack turbulence | plan 12–15 min total |
Where is the covered pedestrian walkway to the Rental Car Center, and where does it begin compared to the rental car shuttle-bus shelter?
The covered pedestrian walkway to the Rental Car Center runs through the parking garages and is accessed from the terminal’s garage bridges, not from the curbside shuttle stop. The walk begins inside the terminal at the bridge entrances to the garages, while the rental car shuttle-bus shelter is outside on the curb level.
From Terminal 2, follow signs for Parking or Garage connections and take the enclosed pedestrian bridges on the upper pedestrian level into the garage complex, then continue toward Garage A (Parking 1), where the Rental Car Center is located on Level 1. The shuttle-bus shelter starts at the exterior curbside pickup area and requires waiting and riding the loop. If you see outdoor “Rental Car Shuttle” curb signage, you are at the bus option; if you are entering enclosed bridges into the garages, you are on the covered walk option.
On the current Terminal 2 map, where does the E concourse branch off the main corridor (the exact split point that prevents “wrong pier” walking)?
The E concourse branches off at the far north end of National Hall just beyond the Concourse D entrance. The split point is the moment you pass the D gates turnoff and the main corridor continues forward into the newer E extension instead of another side pier.
From North Security on the secure side, you’ll reach the D pier entrance first as the major branch point. Do not turn into D if your gate is E; continue straight ahead past the D entrance, where the corridor narrows and the architecture shifts into the newer connector that leads directly into the E concourse hall. If you turned into D, you’ve already missed the E branch and will have to backtrack to the National Hall spine to take the straight-ahead continuation into E.
Where is the CLEAR / priority entry merge point at North Security relative to the main PreCheck entrance (the exact spot that causes line confusion)?
The merge point sits just in front of the TSA document-check podiums, where the CLEAR lane feeds into the front of the PreCheck flow from the far left side of the checkpoint. This is the spot that creates the “zipper” effect and makes the end of the PreCheck line hard to read.
Facing North Security from the public side, the CLEAR entry is on the far left edge of the checkpoint footprint. After the CLEAR kiosks, escorts bring passengers diagonally toward the podium area, merging into PreCheck roughly 10–15 feet before the TSA Travel Document Checker positions. When PreCheck backs up into the main hall, the crowd body can hide the far-left CLEAR entry, so the safest cue is to hug the left wall as you approach and look for the CLEAR kiosks before you step into the main PreCheck stanchion maze.
From the Metro station entrance into Terminal 2, what is the shortest mapped route to North Security (no backtracking)?
The shortest route uses the North pedestrian bridge from the Metro station straight into the north end of National Hall on Level 2. Taking the South bridge is the classic backtracking mistake because it drops you near South Security and forces a long landside walk to the opposite end.
Exit the Metro faregates and follow signage for the North bridge toward Terminal 2 and the American/North end. The bridge deposits you directly into National Hall on the concourse level, close to the North Security approach zone. From the bridge landing, stay on Level 2 and walk a short distance toward the wall that divides public and sterile areas until you see the large “North Security” overhead sign and the stanchion entrance. If you instead arrive at South Security, you chose the wrong bridge and will need to traverse the full length of the hall landside to reach North Security.
For a curbside drop-off, which Terminal 2 door/segment is closest to the North Security approach (minimizing inside-terminal walking)?
Doors 5 or 6 on the upper-level departures curb are the closest curbside entry for the North Security approach. This puts you on the American side near the north end, minimizing the amount of landside walking through the National Hall crowd.
Use the Terminal 2 upper level and ask your driver to target the north end of the curb line, aiming for the Doors 5–6 segment where American check-in is concentrated. From that entry, the escalator/elevator bank down to Level 2 is nearby, and you can approach North Security from the wall side rather than being pulled into the center-hall flow. Dropping at the south end doors forces a long interior walk past ticketing congestion and increases the chance of joining the wrong checkpoint queue out of fatigue or crowd funneling.
Where is the fastest mapped route from Terminal 2 Arrivals (baggage claim level) to the primary exit curb, without being routed into parking/garage corridors?
The fastest route is the straight-out “Level 1 out the glass doors” path from baggage claim to the curb, without going upstairs toward bridges, Metro, or garages. Staying on the arrivals level prevents the common mistake of being funneled into garage connectors and pedestrian bridges.
From baggage claim on Level 1, follow the outward-facing EXIT doors directly in front of the claim area and commit to the “OUT” direction to the curb. Use Doors 4–9 if you’re positioned toward the north half of the hall and want the most direct curb access there, or Doors 1–4 for the south half. Avoid escalators up to Level 2, because those routes prioritize Parking and Metro bridge access and can pull you into garage corridors. Once outside, move to the correct curb lane for your pickup type (private vehicle versus commercial/app-based rides).