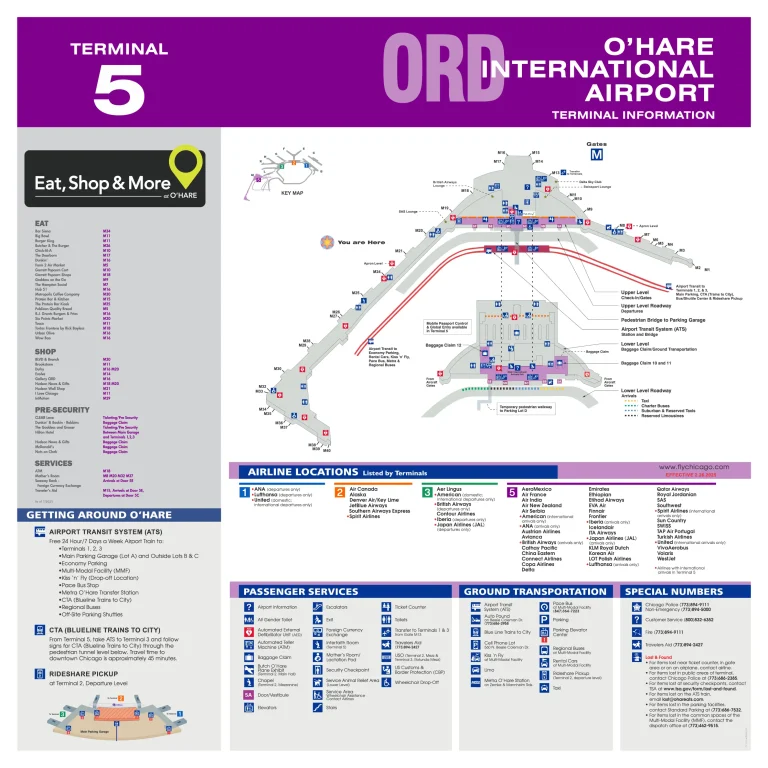
John Wayne Airport Terminal A Map (Most Up-To-Date)
Terminal A sits on the north end of the Thomas F. Riley Terminal as a compact, linear concourse (Gates 1–8) with a small “dogleg” extension at the far end. Landside, it’s stacked vertically (Arrivals below, Departures above) and tightly tied into the garage bridges that most people underestimate. Because it’s part of Orange County’s primary airport hub, a short indoor walk connects A to B/C—use that to escape security surges and amenities gaps.
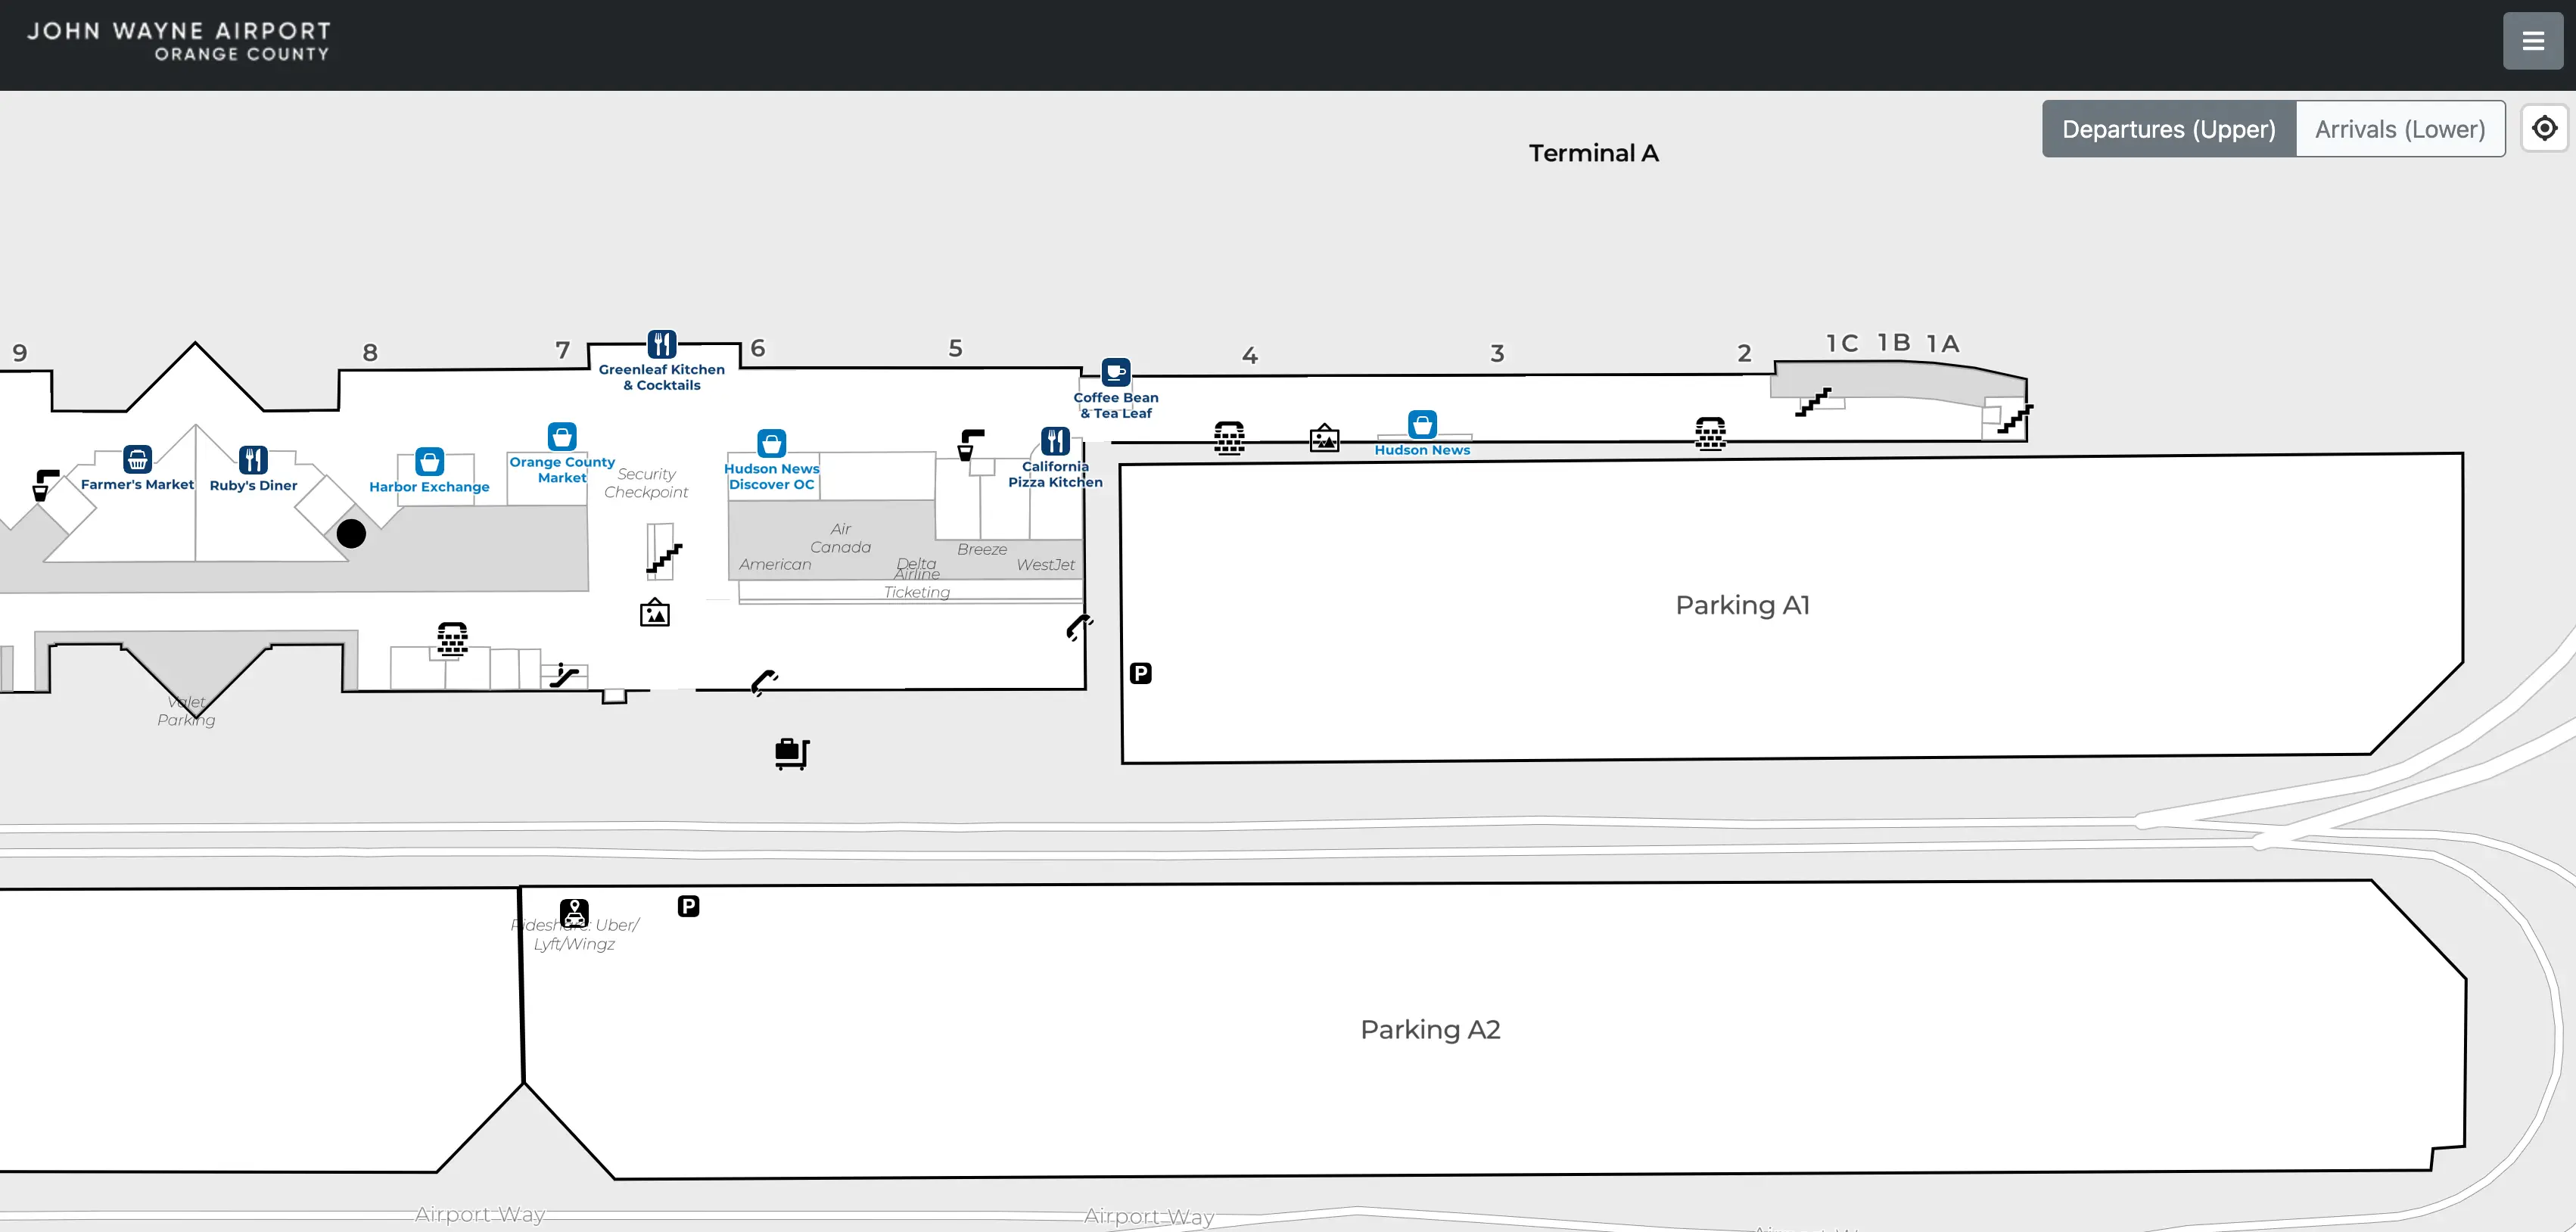
Map Table
| Gate Range | Security Access | Ground Access | Key Constraint |
|---|---|---|---|
| 1–8 | Checkpoint A | Departures curb | Morning surge |
| A ↔ B | Indoor connector | Ticketing corridor | Misleading “separate terminal” labels |
| Garage A2 roof | Rideshare pickup | Garage A2 | Level mismatch |
| Terminal loop road | Curb vs garage split | One-way circulation | Wrong-lane forced exits |
John Wayne Airport Terminal A Map Strategy
- Treat A, B, and C as one continuous building and use the short indoor walk to Terminal B security when Checkpoint A’s queue spills into the lobby.
- For rideshare, think “up, across, up”: stay inside, go to Departures level first, cross to Garage A2, then take the nearest elevator core to the roof.
- Commit early to center-right curbside lanes on the Terminal A approach; late corrections from the left lanes can force garage entry or a full loop recirculation.
- If you’re time-boxed for early departures, assume a sudden security burst and build buffer time before you even reach the checkpoint doors.
2026 John Wayne Airport Terminal A Map + Printable PDF
Operational flow at Terminal A still hinges on the same tight chokepoints: morning security spikes concentrated at Checkpoint A, vertical misreads between Arrivals curb and garage/roof pickups, and unforgiving one-way loop geometry that punishes late lane changes. For a printable 2026 map, prioritize decision points—security entry, bridge-to-garage crossings, and the exact lane commitment areas—because that’s where most time-loss happens.
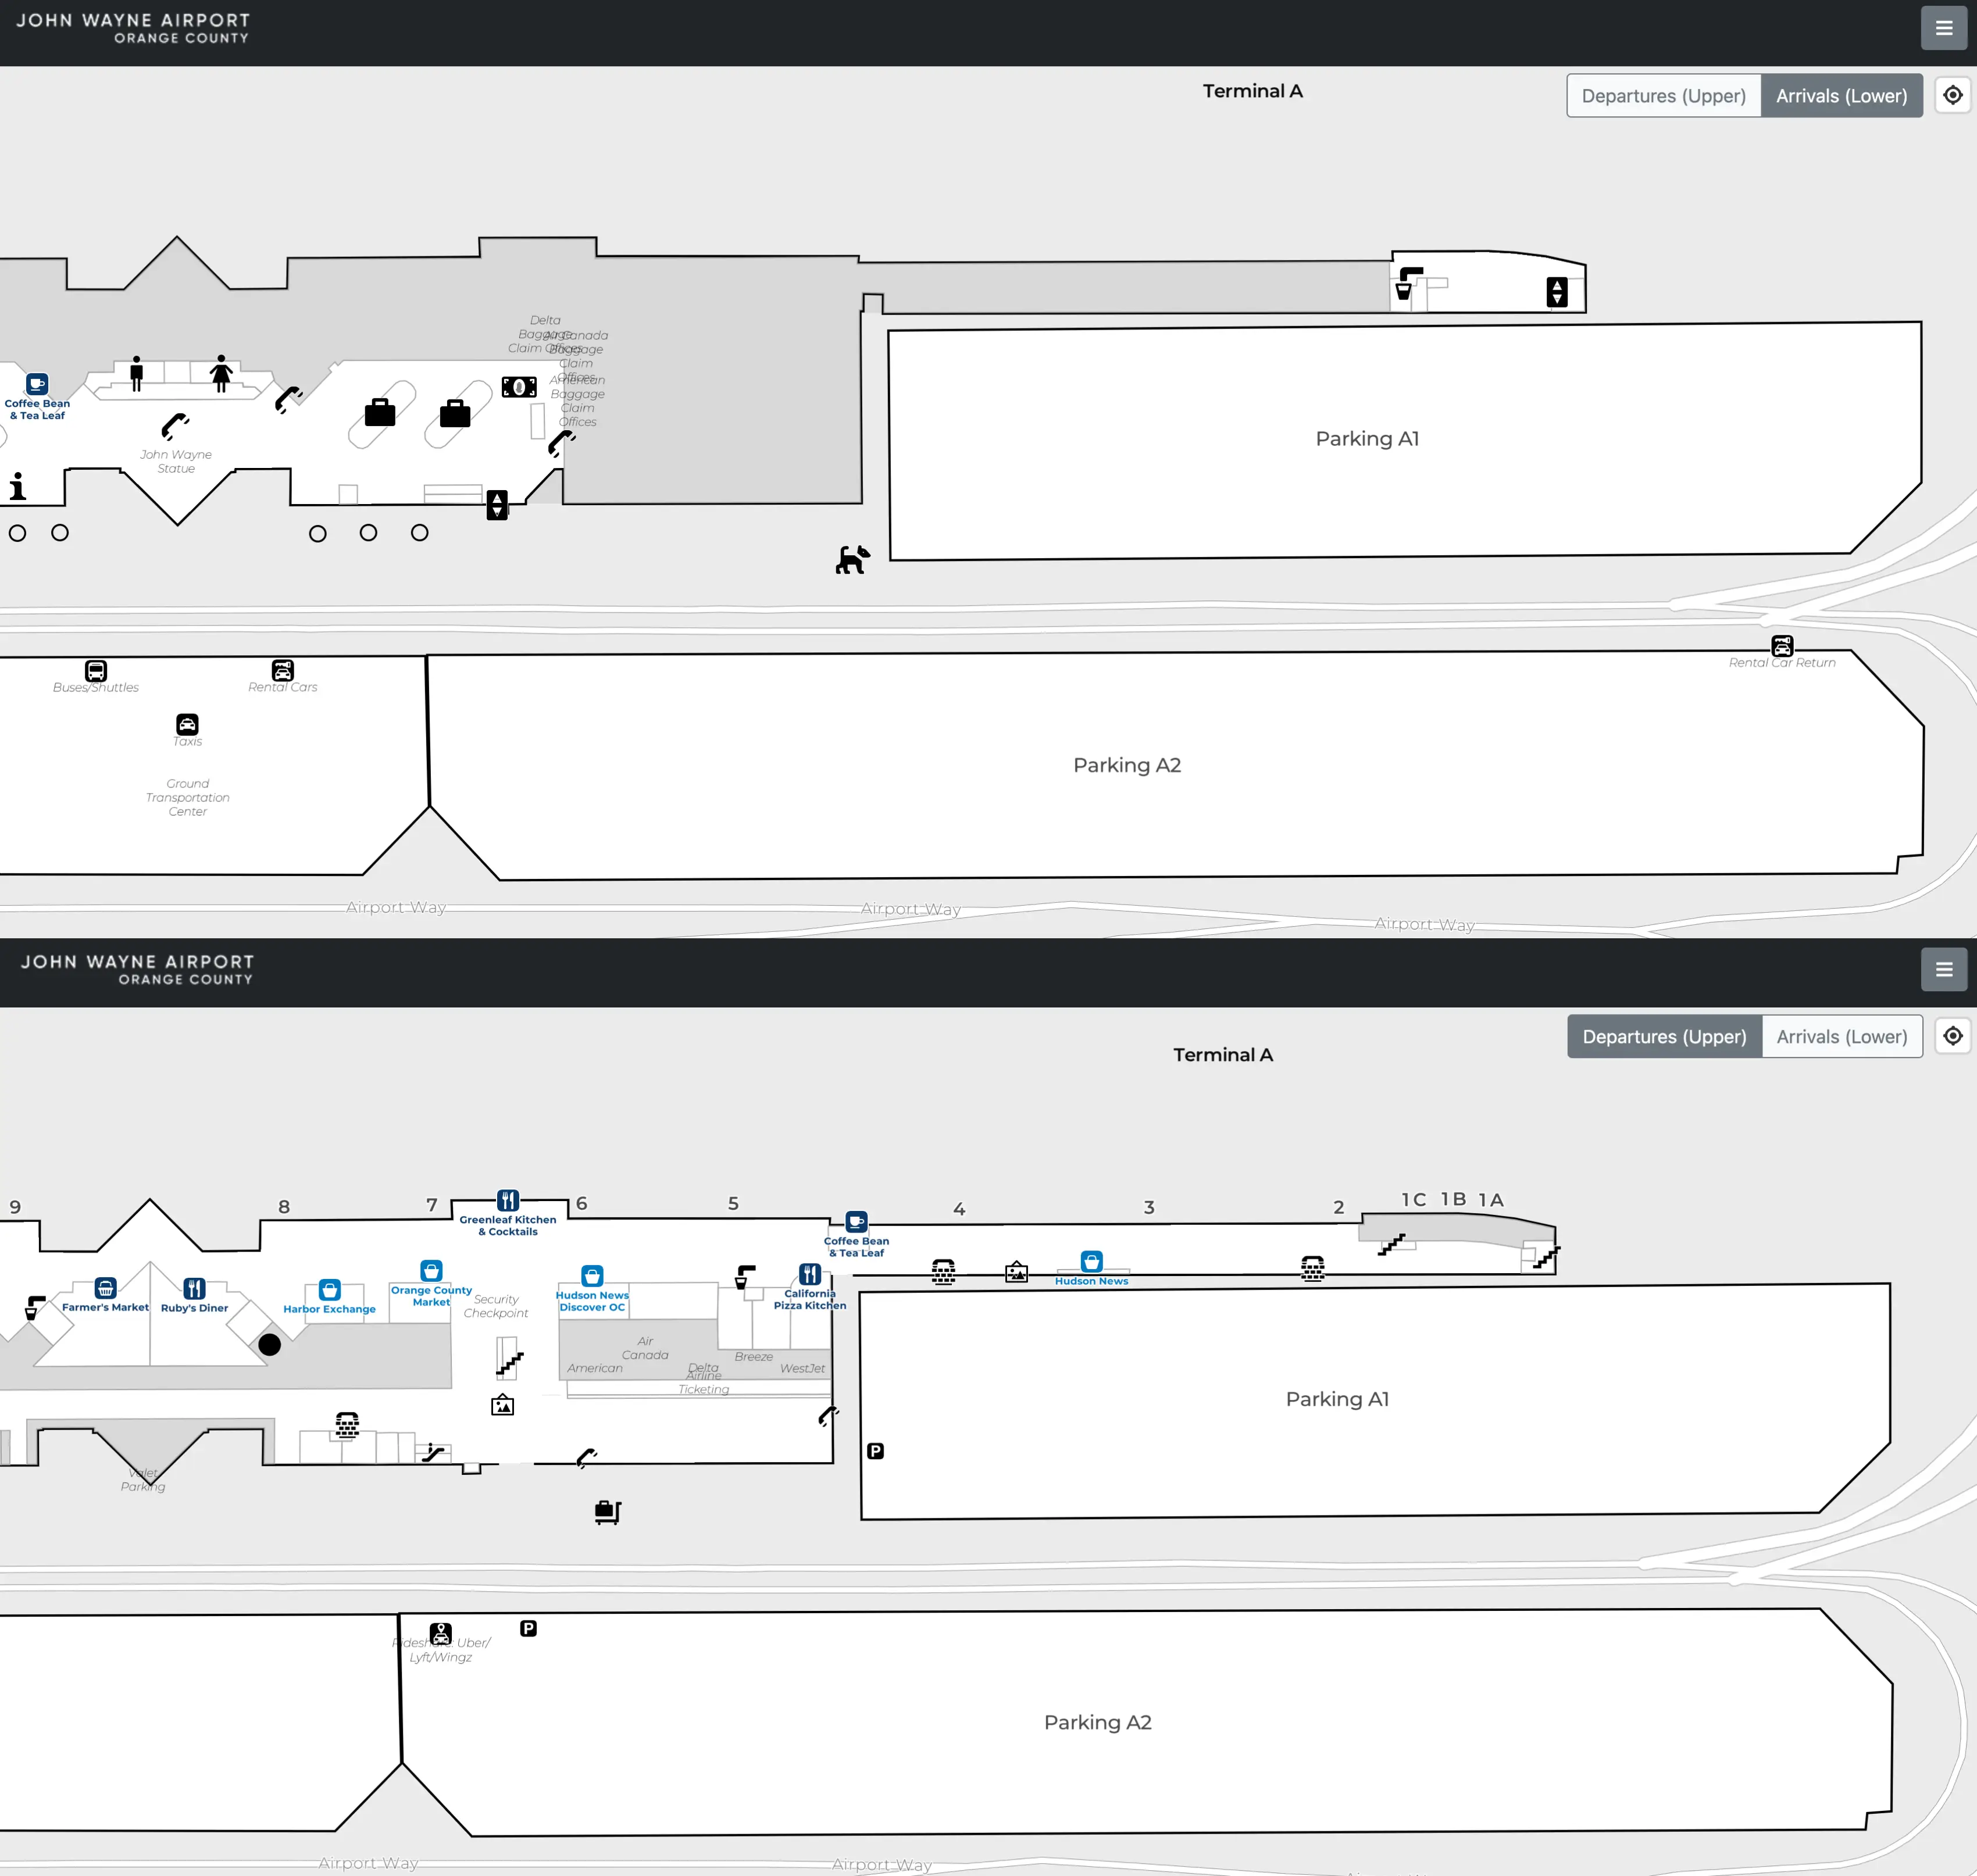
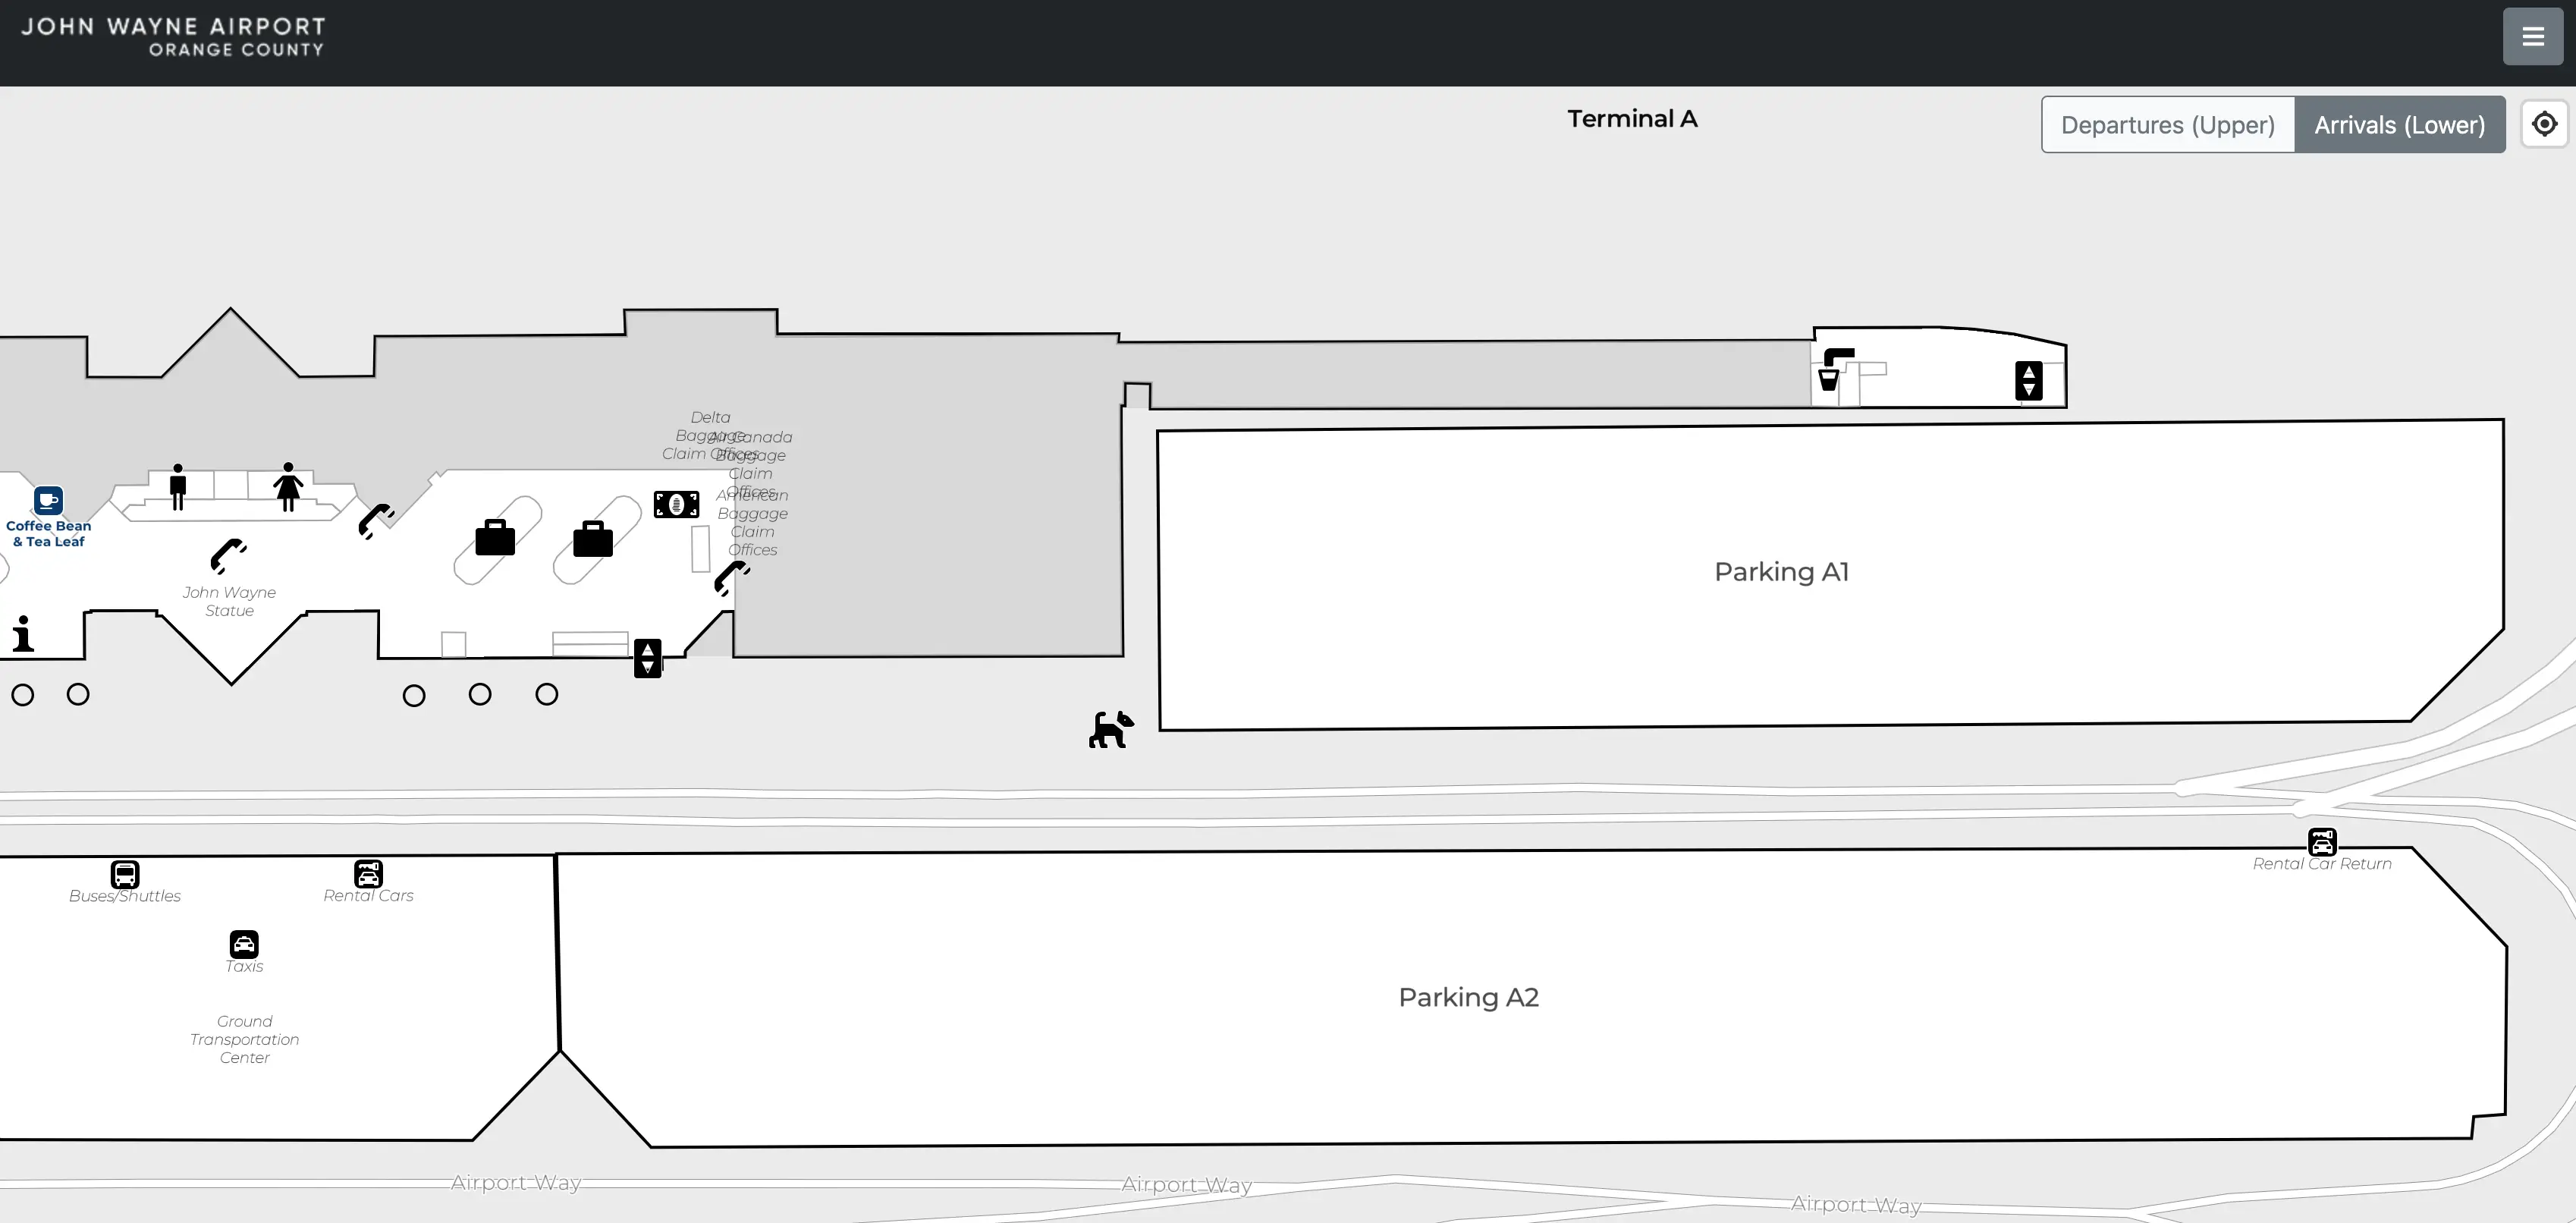
John Wayne Airport Terminal A Arrivals Map 2025
John Wayne Airport Terminal A Departures Map 2025
2026 John Wayne Airport Terminal A Map Guide
What is the exact walking time from Terminal A security (A checkpoint) to Gate 8 (farthest end of A gates)?
Walking takes about 3 minutes from Terminal A security to Gate 8 in free-flow conditions.
Gate 8 sits at the “elbow” at the end of the Terminal A gates, before the narrower commuter-gate extension continues north. From the A checkpoint exit, turn right toward the A concourse and continue straight past the first concessions/holdrooms without changing levels. During peak boarding or when the corridor is pinched by gate-area queues, the same walk commonly stretches to about 4.5 minutes, especially if passengers are lining up along the main path near the mid-A gates.
What is the exact walking time from Terminal A security to Gate 22 (farthest end of the connected concourses)?
Walking takes about 10–12 minutes from Terminal A security to Gate 22 in free-flow conditions.
Gate 22 is at the far south end of the connected Terminal C concourse, so this is essentially a full-building traverse (A → through the central rotunda area at the A/B boundary → through B → into C). From the A checkpoint exit, head left (south) toward the rotunda landmark where the concourse widens, then continue straight through the B gates and into Terminal C until the final gate cluster at the end wall. In heavy congestion—especially when boarding lines pinch the narrow B-corridor—the walk can run closer to ~15 minutes.
Where is rideshare pickup on Parking Lot A2 roof relative to Terminal A arrivals curb, and which elevator/stair core is the fastest connection?
No curbside pickup exists at the Terminal A arrivals level, so the fastest connection requires going up to Departures level first, crossing to Garage A2, then going up again to the roof.
Rideshare pickup is on the roof deck of Parking Structure A2, which sits across the roadway from Terminal A but is not walkable from the arrivals curb because there’s no legal pedestrian crosswalk at that level. From Terminal A baggage claim, stay inside and take an elevator/escalator up one floor to Departures (Level 2), exit to the crosswalk/bridge to A2, then use the southwest elevator core in Garage A2 (closest to the terminal/bridge) to reach the roof most quickly.
Where is the lane-split decision point on the Terminal A/garage exit road that can force drivers onto the wrong direction, and which lane must you be in to avoid the trap?
The trap happens on the Terminal A approach just before the terminal canopy becomes fully visible, when concrete separators/solid markings lock the left lanes into parking/through-traffic and prevent a late move to the curb.
That commitment point is roughly 300–500 feet before the Terminal A curb zone, where the roadway straightens and the barrier between the garage entry/through lanes and the curbside drop-off lanes begins abruptly. To avoid being forced into the garage entry spiral or bypass lanes, hold a center-right curbside lane as soon as you enter the airport loop toward Terminal A, keeping the parking structure massing to your left and the terminal canopy ahead/right.
If departures curb is backed up, what is the shortest mapped path from arrivals-level drop-off to the Terminal A ticketing/security level (exact elevator/escalator locations)?
The shortest path is arrivals-level drop-off at Terminal A, then an immediate indoor ride up to Departures level using the baggage-claim elevator by Carousel 1 or the central escalators by the John Wayne statue.
Use the lower (Arrivals) roadway and drop at the Terminal A arrivals curb near Columns 1–4, then enter through Door 1 or Door 2 into baggage claim. For the fastest vertical move, head to the elevator core adjacent to Baggage Carousel 1 at the north end and go up one level to Departures (Level 2), landing across from the American Airlines/Delta check-in side and within steps of Checkpoint A. If you’re closer to the middle of the building, use the central escalator bank near the John Wayne statue to reach the same Departures/ticketing level without re-exiting to the jammed upper curb.
What is the shortest indoor walking route from Terminal A ticketing to the Terminal B security checkpoint entrance (for line-check switching)?
Walking takes about 1.5–2 minutes from Terminal A ticketing to the Terminal B security checkpoint entrance using the landside indoor connector.
From the Terminal A ticketing area near the American Airlines counters, turn right (south) and follow the main indoor corridor along the window wall toward the central atrium landmark with the John Wayne statue. Continue straight past the atrium edge into the Terminal B zone until you reach the Terminal B checkpoint entry stanchions. This route stays entirely indoors on the ticketing/security level and avoids any curbside detours, making it the fastest switch when Checkpoint A’s queue spills into the lobby.
From Parking Garage A pedestrian bridge/connector, what is the shortest walking route to Terminal A security (including which door you enter)?
Walking is essentially direct because the Garage A2 pedestrian bridge lands at the Terminal A Departures level doors adjacent to Checkpoint A.
From Parking Structure A2, go to Level 2 and take the pedestrian bridge into the terminal. Enter through the first set of automatic sliding doors at the bridge landing on the Departures level, near the American Airlines check-in side. Once inside, stay straight and slightly left toward the visible security stanchions—Checkpoint A is only a few steps from this entry, with no additional elevators or escalators required. Avoid trying to cross at the Arrivals level because there’s no equivalent safe pedestrian crossing there.
Where are the closest restrooms to Terminal A Gates 1–4, and which route minimizes backtracking through the tight seating/queue area?
The closest higher-capacity restrooms for Gates 1–4 are at the Gate 5 core, which avoids the tightest pinch-point seating and boarding-queue area near the commuter gates.
Restrooms exist nearer the far-north commuter extension, but that zone can surge and bottleneck when regional flights unload and when Gate 1A/1B/1C seating fills. From Gates 1–4, walk a short distance south on the main concourse toward the Gate 5 area, using the wider central corridor instead of cutting through the densest holdroom rows. This route reduces backtracking because Gate 5 sits on the main pass-through spine, so you can rejoin the concourse flow without weaving back through narrow seating pockets.
What is the exact walking time from Terminal A security to the nearest ‘better concessions’ cluster around B/C gate areas (first major food zone)?
Walking takes about 1.0–1.5 minutes from Terminal A security to the first major “better concessions” cluster at the central rotunda near the Terminal A–Terminal B boundary.
From the A checkpoint exit, head left (south) toward the concourse widening where the rotunda/atrium zone begins. The food options start appearing as you reach that boundary area—this is the first noticeable jump in variety versus the limited grab-and-go near the north A gates. In peak periods, the walk time usually stays similar, but expect brief slowdowns where people bunch up near menu boards and boarding queues at the rotunda edge.
If you clear security at Terminal A for a flight departing from the main Southwest gate cluster, what is the exact walking time from Terminal A security to that gate cluster?
Walking takes about 10–12 minutes from Terminal A security to the main Southwest gate cluster in Terminal C.
Southwest’s primary gates are in the Terminal C range (Gates 16–22), so clearing at Checkpoint A means you’ll traverse the full airside corridor. From the A checkpoint exit, turn left (south) toward the central rotunda landmark at the A/B boundary, continue straight through the B gates corridor, then proceed into Terminal C until you reach the Southwest-heavy gate area. When boarding lines narrow the B-corridor and people cluster near choke points, the same walk can push longer, so build a buffer if you’re close to door-close time.
From Terminal A arrivals curb, where is the correct one-way-loop re-entry point to reach Parking Lot A2 roof pickup without getting forced out of the airport loop?
The correct re-entry is the left-side “Return to Terminal” U-turn slot just past the Terminal C canopy, before the roadway commits into the MacArthur Boulevard exit ramps.
From the Terminal A arrivals curb, continue forward in the loop and stay in the left-most lane as you pass Terminals B and C, ignoring the pull of the right-lane freeway/exit signage. After Terminal C, watch for the median break and the “Return to Terminal” marking on the left; taking that slot flips you back to the start of the loop near Terminal A so you can line up again for the Garage A2 roof pickup approach. Missing it typically forces a full exit and surface-street loop back.
Where is the TSA PreCheck lane entrance at Terminal A security relative to the standard queue, and which approach path prevents getting stuck in the wrong line?
The TSA PreCheck entrance is typically on the far left side of the Terminal A checkpoint array when you face the screening lanes from the ticketing lobby.
During peak periods, the standard queue often balloons backward and can visually mask the PreCheck opening. To avoid getting trapped in the wrong line, approach the checkpoint by hugging the left-side wall/edge of the lobby space and scan specifically for the PreCheck banner and its dedicated stanchion入口 before you commit to the longest visible line. If the general line has spilled into the main walking corridor, keep moving left until you can see the lane signage over the stanchions.
If access is constrained before early flights, where is the mapped outside waiting/queue area for Terminal A, and which doorway is the first usable entry to reach security?
Waiting works best in Parking Structure A2 near the Level 2 pedestrian bridge, because it’s covered, lit, and gives the quickest straight-line access once doors become usable.
If Terminal A doors are temporarily locked before the early-morning ramp-up, the most practical “outside” waiting area is Garage A2 at the bridge landing level, where you can watch for the terminal entry doors to open without standing on the exposed curb. Once access is available, use the main automatic sliding doors on the Terminal A Departures level near the central atrium/John Wayne statue area, then walk directly to the Checkpoint A stanchions on the same level.