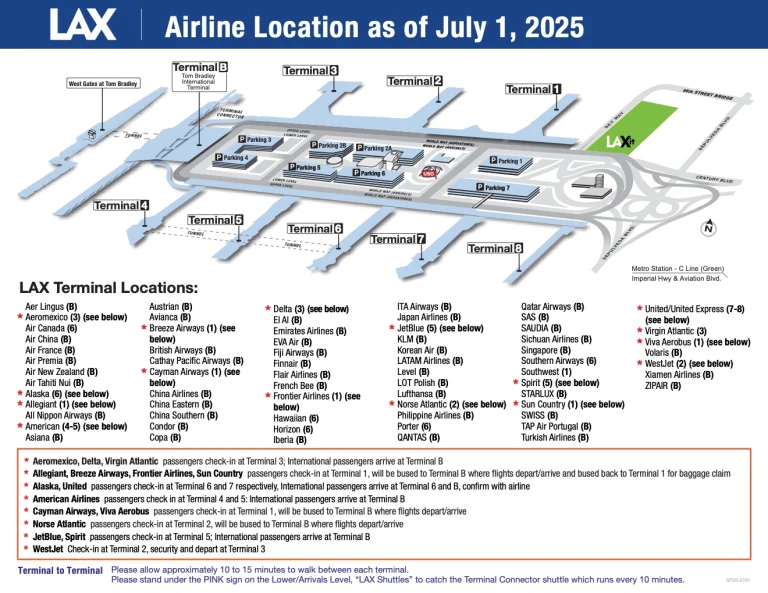
Dubai International Airport Map (Most Up-To-Date)
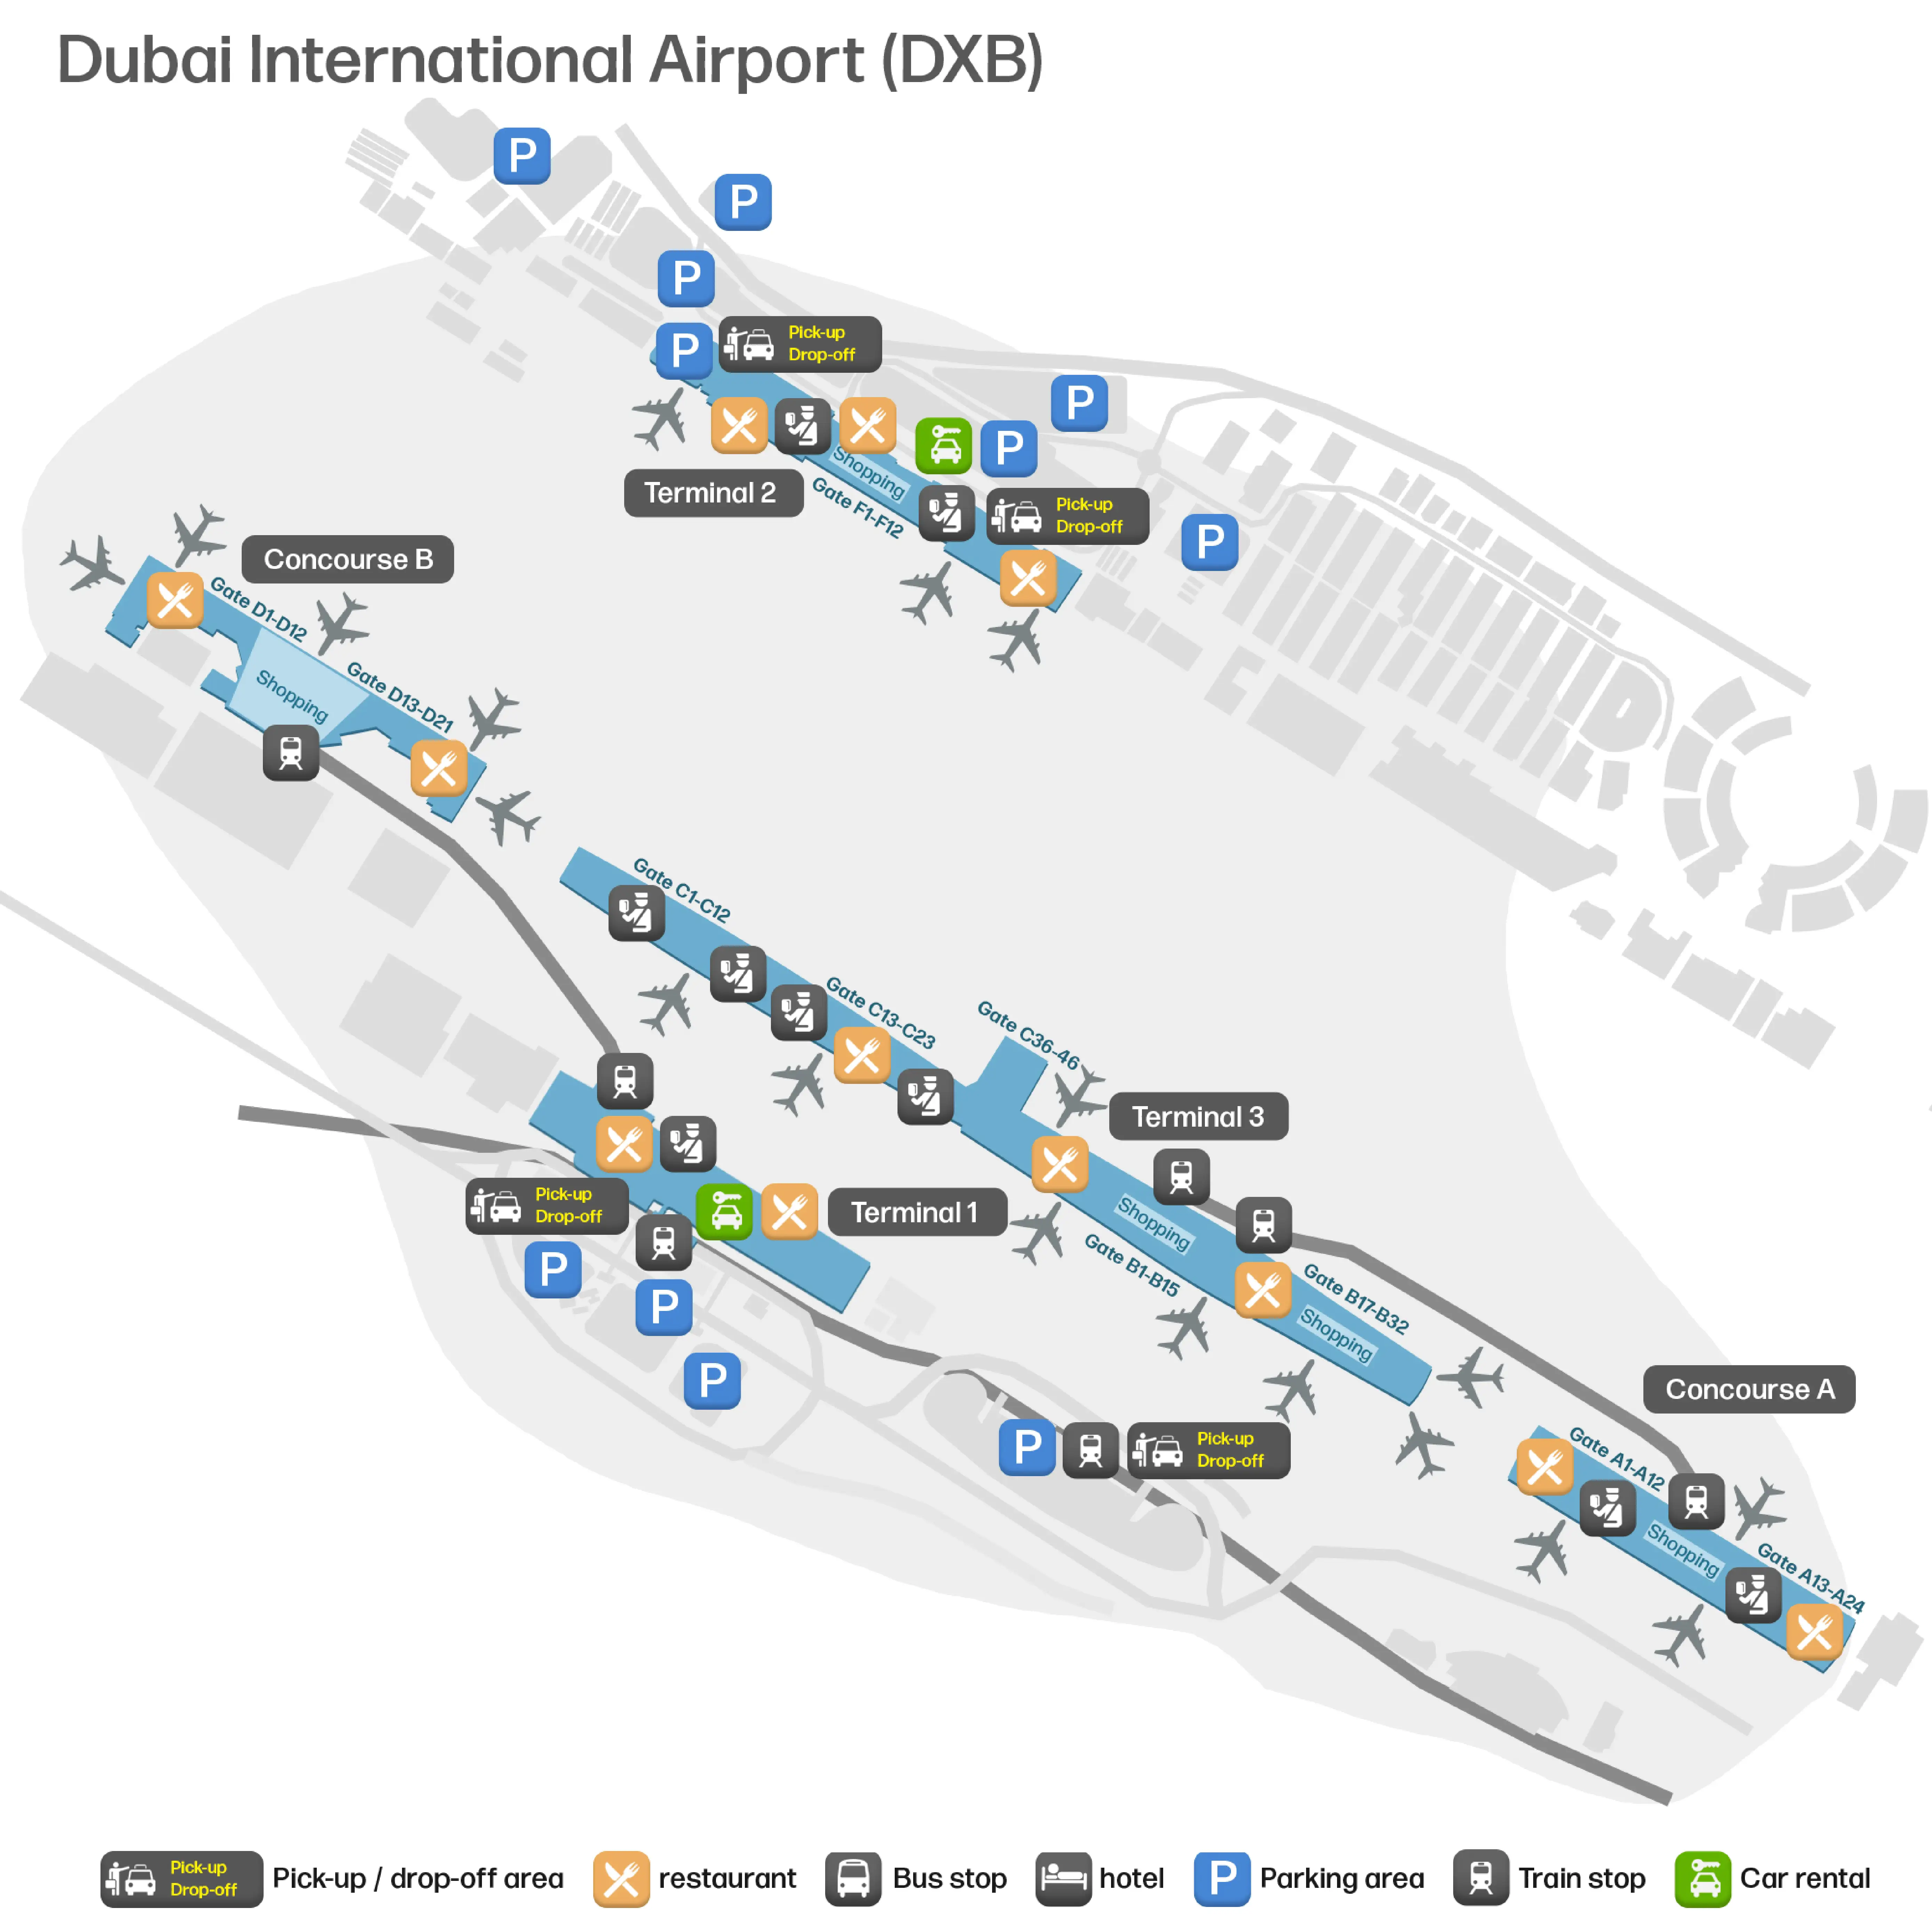
Dubai International Airport is a multi-terminal complex built around one dominant mass—Terminal 3—with a long, linear airside footprint that stretches across Concourses A, B, and C. Concourse B acts as the central “centroid,” while Concourse A is a detached island reached only by train. Terminal 2 sits physically separate across the airfield, making it a shuttle-dependent outlier within Dubai’s main airport hub.
Map Table
| Terminal | Key Airlines | Primary Function | Transfer Mode |
|---|---|---|---|
| Terminal 3 (Concourses A/B/C) | Emirates, flydubai | Hub operations, most long-haul connections | A↔B train; B↔C walkways; central transfer security |
| Terminal 1 | International carriers | Non-Emirates operations, connections to T3 | T1↔T3 airside walkway; airside shuttle bus |
| Terminal 2 | Regional carriers, low-cost | Satellite operations | Shuttle bus to/from T1/T3; no pedestrian link |
Dubai International Airport Map Strategy
- Identify your concourse letter first (A/B/C) at the first FIDS bank after transfer security, then commit immediately to train vs. walk—hesitation is where DXB “hidden minutes” accumulate.
- Treat Concourse A as a separate island: budget time for vertical down/up plus train interval, not just the ride, and don’t assume “arriving in A” means you’re near the gate.
- Expect transfer security to sit beneath the Concourse B duty-free atrium: missing the Connections/Transfers fork and drifting toward Immigration is the fastest way to blow a connection.
- Assume Terminal 2 equals bus dependency: the critical task is reaching the transfer desk/bus assembly point quickly and not losing time hunting for pickup doors or following landside “Arrivals/Exit” flow.
2026 Dubai International Airport Map + Printable PDF
DXB’s connection reality is still defined by Terminal 3’s split footprint (A/B/C) and the “hidden minutes” created by train access points, long concourse ends, and transfer-security placement under the Concourse B duty-free core. Terminal 2 remains a separate satellite that depends on shuttle buses, so map-reading accuracy matters most at bus doors, train platforms, and arrivals-to-connections forks.
2026 Dubai International Airport Map Guide
What is the walking time (minutes) from the Concourse B train platform exit to the nearest Concourse B gate cluster (first gate “spine” intersection)?
Walking takes 2–3 minutes from the Concourse B train platform exit to the first nearby Concourse B gate cluster at the central spine. The time is dominated by the vertical transition up from the underground APM station into the Concourse B departures core.
After exiting the train in Concourse B, go up via the main escalators/elevators signed for gates and the central duty-free zone near the Zen Garden. You’ll emerge into the Concourse B hub area where the first gate “spine” intersection begins, with the closest gate cluster typically around the B18–B22 range. Reaching far-end gates (like B1 or B32) adds a separate 8–10 minute walk from this same central point.
What is the walking time (minutes) from the end of Concourse C to the Concourse B/C junction point (the point where signage splits to B vs C)?
Walking takes 10–12 minutes from the far end of Concourse C to the B/C junction where signage begins splitting toward Concourse B versus deeper Concourse C. The time is mostly linear distance, with moving walkways helping but crowding often flattening speed.
From the last gate area in Concourse C, follow the main concourse spine toward the C-to-B connector until you reach the cornered “L” transition into the linking corridor. The junction itself is the decision point where the concourse geometry changes and directional signs start resolving into B-bound versus C-bound flows. This is only the handoff point—continuing into Concourse B from there still adds meaningful walking time depending on your target gate.
Where exactly is the Terminal 3 “Transfer Security” checkpoint located relative to the central duty-free atrium, and what is the shortest mapped path to reach it from arrivals flow?
The Terminal 3 Transfer Security checkpoint sits directly beneath the central duty-free atrium in Concourse B. The shortest mapped path is the Connections/Transfers arrivals corridor that funnels you to the lower arrivals/transfer level, then straight into the screening banks before you re-ascend into the duty-free core.
After leaving your arrival gate in Concourse B or C, follow Connections/Transfers signs (not Arrivals/Baggage Reclaim) down into the dedicated arrivals/transfer channel. Stay in the transfer flow until you reach the x-ray and metal-detector lanes positioned under the Concourse B retail atrium. Once cleared, take the immediate escalators/elevators up and you’ll emerge into the Concourse B duty-free hub near the Zen Garden, where passengers disperse toward A/B/C gates.
What is the walking distance (meters) from Transfer Security exit to the nearest flight information display (FIDS) bank in Terminal 3?
Walking distance is about 10–20 meters from the Transfer Security exit to the nearest FIDS bank in Terminal 3. The screens sit almost immediately at the top of the escalators/elevators where you re-enter the Concourse B duty-free atrium.
After clearing Transfer Security beneath the central retail core, take the escalators up into the Concourse B departures hub near the Zen Garden. The first major FIDS bank is positioned within a few steps of the landing so you can confirm your concourse letter (A/B/C) before committing to the train access node for A-gates or the long walk corridors toward B- or C-gate ranges.
In Terminal 2, where is the airside transfer/shuttle bus boarding point for Terminal 2 → Terminal 3 connections (exact level + corridor landmark on the map)?
The Terminal 2 → Terminal 3 airside transfer bus boarding point is in the Terminal 2 departures airside area near Gate F17. The boarding doors cluster with the transfer desk/holding area in the F-gate corridor, making F17 the practical landmark to navigate to first.
Follow Terminal 2 airside “Transfers” or “Transfer Desk” signs and stay inside the secure departures circulation rather than drifting toward Arrivals/Exit. The route converges on the lower-numbered F gates, where the transfer processing point batches passengers for the next shuttle. On the map, treat “Gate F17 / F-gate zone” as the anchor: once you reach that gate cluster, the bus doors are adjacent or immediately behind the transfer desk area rather than deeper down the concourse.
What is the walking time (minutes) from the Terminal 2 transfer desk area to the Terminal 2 → Terminal 3 shuttle boarding point along the signed route?
Walking takes under 2 minutes from the Terminal 2 transfer desk area to the Terminal 2 → Terminal 3 shuttle boarding point. The transfer desk and bus boarding doors are essentially co-located in the same F-gate zone near Gate F17.
From the transfer desk/processing point, follow the immediate Transfer/Bus signs to the nearby boarding doors without leaving the secure departures corridor. The walking portion is not the real risk at Terminal 2—“hidden minutes” come from waiting for the next shuttle (often on a 20–30 minute cycle), boarding/batching procedures, and the airfield drive time that can stretch when ground traffic is heavy.
Where is the Concourse A ↔ Concourse B train station entrance located on each side, and what is the shortest path from the main concourse spine to that entrance?
The Concourse A ↔ Concourse B train station entrances are in the central core of each concourse, not at the ends. Concourse B access sits at the geographical center of the B spine near the duty-free atrium and Zen Garden, while Concourse A access opens into the central core of Concourse A.
From Concourse B, move toward the main duty-free hub between the mid-B gate cluster (around B15–B22) and follow “A Gates / Concourse A” signs to the down escalators/elevators leading to the underground APM platform. From Concourse A, walk toward the central atrium/core and follow signs for the train/APM back to Concourse B; the entrance is designed as the primary distribution point where passengers arrive, then fan out toward A-gate branches.
What is the walking time (minutes) from the far end of Concourse B to the Concourse A train platform entrance (same level access route)?
Walking takes 8–10 minutes from the far end of Concourse B to the Concourse A train platform entrance, with the total driven by the long linear B spine plus the vertical transition down to the APM. The center-of-B location of the train access node means end gates pay a built-in distance penalty.
From a far-end gate area such as B32, follow the main Concourse B spine toward the central duty-free/Zen Garden core until you reach the “A Gates / Concourse A” access point near the mid-B gate cluster. Then descend via the signed escalators/elevators to the underground platform entrance. This estimate covers the brisk walk plus typical vertical movement time, but it does not include train wait time or the ride itself, which adds additional non-compressible minutes.
Where on the concourse map are secondary screening areas (extra checks) positioned near specific gate zones (e.g., “gate hold room” checkpoints), and which gate ranges are most affected?
Secondary screening is positioned at the entrance to the specific boarding gate hold-room area, not at a single central checkpoint. The most affected gate zones are typically larger-capacity gates that can support cordoned holding pens, commonly including A4 and A13 in Concourse A and B32 in Concourse B.
On the map, look for the gate seating area that can be physically separated from the main concourse spine—often shown as a gated hold-room or partitioned zone at the gate mouth. The screening point is the choke at that threshold, where passengers queue for bag checks and additional inspection before entering the enclosed seating pen. Because this is flight-dependent (often US-bound, sometimes other enhanced-screening routes), the “where” is best understood as a repeating pattern: big gates with big hold rooms get the checkpoint, and the checkpoint sits right before the gate’s controlled entry.
What is the walking time (minutes) from the nearest lounge cluster to the most common extra-screening gate zone in that concourse (map-verified shortest route)?
Walking takes 5–15 minutes from the nearest lounge cluster to the most common extra-screening gate zones, depending on concourse. The time is usually manageable; the surprise minutes come after arrival, when the at-gate screening queue can add 20–30 minutes before you even reach the hold room.
| Concourse | Nearest lounge cluster (anchor) | Common extra-screening gate zone (anchor) | Walk time |
|---|---|---|---|
| Concourse A | Central/upper-level lounge area near the Concourse A core | A4 or A13 gate mouths (large hold-room gates) | ~5 minutes |
| Concourse B | Central Concourse B lounge area near duty-free/Zen Garden | B32 gate area (far-end large hold-room gate) | ~10 minutes |
| Concourse C | Lounge cluster nearer the B/C junction | Far-end C gate areas when assigned (long linear spine) | ~15 minutes |
For Terminal 1 ↔ Terminal 3 airside connections, what is the exact mapped pedestrian route (corridor-by-corridor) and its total walking time (minutes)?
Walking takes 20–30 minutes for the Terminal 1 ↔ Terminal 3 airside pedestrian connection, using the enclosed connector linking the root of Concourse C (Terminal 3 side) to the Concourse D (Terminal 1 side). The route is controllable and continuous, but it is physically long even with travelators.
From Terminal 3, follow airside “Connections/Terminal 1” signage toward the Concourse C root area, staying on the departures-side circulation until you reach the dedicated inter-terminal connector entrance. Enter the enclosed walkway and remain in the same corridor system through the long travelator-assisted stretch until signage resolves into Terminal 1 / Concourse D wayfinding. On arrival in Terminal 1, continue along Concourse D’s main spine to the first major node (central retail/decision area) before branching to your gate zone.
Where are the decision-point forks (map junctions) where passengers can accidentally follow “Arrivals/Exit” instead of “Connections/Transfers”—and what is the correct junction landmark to prevent the mistake?
The main wrong-turn fork is immediately before the Immigration Hall in Terminal 3, where the natural crowd flow continues toward Arrivals/Baggage Reclaim/Exit. The correct landmark is the Security Screening Banks: the Connections/Transfers path leads to x-ray lanes, while the Arrivals path leads straight toward immigration booths.
After leaving gates in Concourses B or C, stay alert as the arrivals corridor approaches the passport-control area and look for the divergence signed for Connections/Transfers. Use the environment as confirmation: if you can see rows of immigration desks and border-control officers ahead, you’ve drifted into the Arrivals stream and missed the transfer turn. The correct transfer routing always funnels you toward security equipment (x-ray belts, metal detectors) before you re-enter the Concourse B duty-free atrium.