Dallas Fort Worth International Airport Terminal B Map (Most Up-To-Date)
DFW Terminal B is a long crescent with a “satellite” north spur (Gates B40–B49) that stretches walking times, plus two key circulation levels: Level 2 (Departures/curbside) and Level 1 (Arrivals/baggage/rail exit doors). Within the North Texas airport hub, the biggest orientation cue is north vs south: north is rail + high-B gates, south is B1–B20 and the Terminal D connector, with Skylink nodes acting as the midpoints that reset your position fast.
Map Table
| Zone | Connection | Walk Time |
|---|---|---|
| Skylink station (B28–B31) | Terminal core (airside) | 0–3 min |
| Gates B1–B20 | Skylink station (B9–B12) | 4–6 min |
| Gates B40–B49 | Skylink station (B28–B31) | 6–8 min |
| Door B43 (Lower Level) | DFW Airport Station (TexRail / Silver Line) | 5–7 min (bag claim) / 12–15 min (from Skylink north node) |
Dallas Fort Worth International Airport Terminal B Map Strategy
- Terminal B is the highest-risk time zone when you’re outside security: construction detours, garage choke points, Terminal Link variability, and weak rail wayfinding stack delays fast—treat every landside move as a timed route choice, not a casual walk.
- Rail fastest path is Door B43 on the Lower Level; plan the “vertical drop” from Skylink (Level 3) straight to Arrivals (Level 1), then commit to B43 so you don’t bleed time wandering near B30/Baggage Claim exits.
- Terminal Link boards on the Upper Level only, with split stops at B14 (low-B gates) and B43-area (high-B gates/rail); if you’re coming from rail or baggage, build the “go up to Departures first” step into your transfer plan.
- Driving requires early lane commitment: stay far right well before the terminal face to avoid being trapped into the pass-through spine, and leaving Terminal B assume “south only” until you execute the pre–South Toll Plaza U-turn back toward International Parkway North.
2026 Dallas Fort Worth International Airport Terminal B Map + Printable PDF
In 2026, Terminal B remains a high-friction terminal because active roadway construction and the north-exit closure force a southbound egress pattern, while rail access still requires an outdoor walk from the Lower Level at Door B43. Landside transfers can balloon when the B garage funnels into one exit stream and Terminal Link headways stretch beyond posted frequency during peak arrival banks.
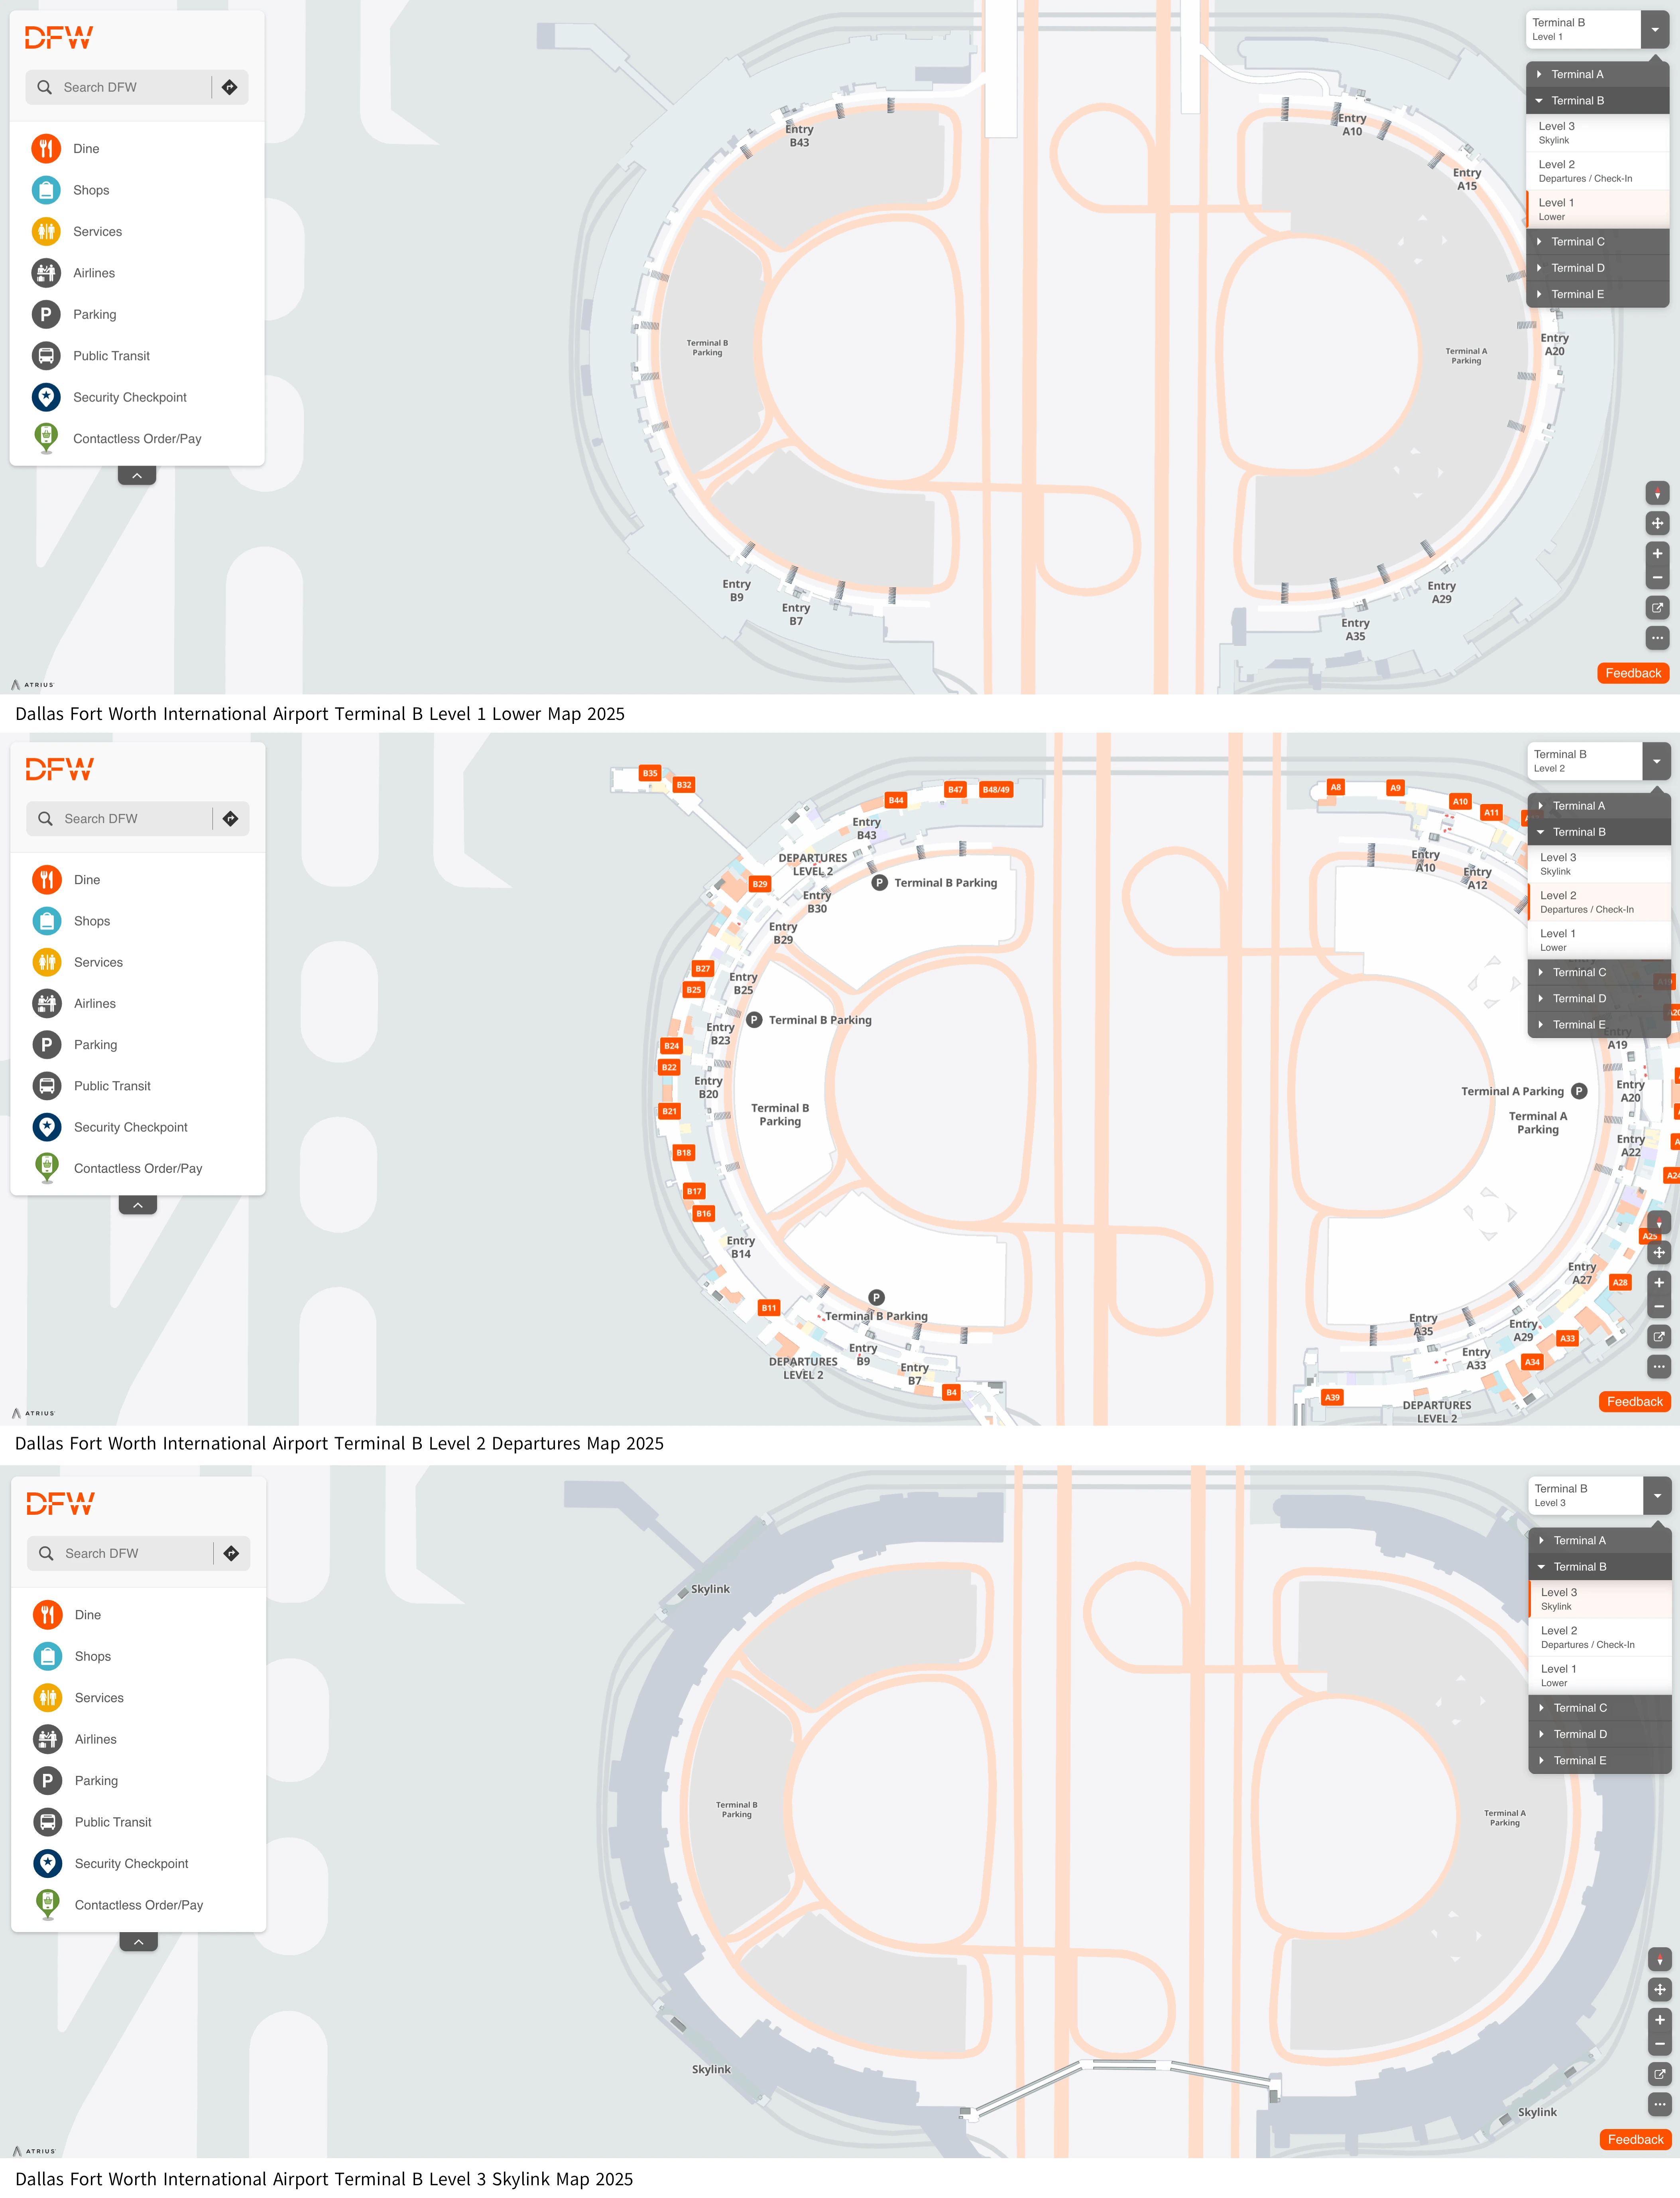
Dallas Fort Worth International Airport Terminal B Level 1 Lower Map 2025

Dallas Fort Worth International Airport Terminal B Level 2 Departure Map 2025

Dallas Fort Worth International Airport Terminal B Level 3 Skylink Map 2025

2026 Dallas Fort Worth International Airport Terminal B Map Guide
What is the exact walking route (named signs/landmarks) from Skylink drop-off for B1–B20 to the Silver Line/TexRail station entrance in Terminal B?
Re-clearing security is unavoidable because the TexRail/DART Silver Line station is landside and requires an outdoor walk from Terminal B. From Gates B1–B20, the fastest signed plan is to use the Skylink station at B9–B12 for the drop-off, then immediately descend to the Lower Level and exit at Door B43 for the rail walkway.
From the Skylink platform serving the B9–B12 area (Level 3), follow signs for Baggage Claim/Arrivals and take escalators/elevators down past Departures (Level 2) to Arrivals (Level 1). Inside the baggage-claim hall, walk north toward the high-B gates side, aiming for the Lower Level exit labeled B43 (the closest rail exit). Exit at Door B43, turn left onto the outdoor sidewalk under the covered walkway, then follow “Rail/TexRail” wayfinding through the open-air connector/tunnel approach to the DFW Airport Station entrance.
What is the exact closest terminal door/exit point (by door number or landmark) from Terminal B baggage claim to reach the Silver Line/TexRail platform path?
Door B43 on the Lower Level is the closest exit from Terminal B baggage claim to the TexRail/DART Silver Line station walkway. It beats exiting near the central baggage-claim doors because it aligns directly with the outdoor covered path to DFW Airport Station.
From your carousel (often around the B29/B30 area), stay inside the baggage-claim hall and walk north toward the high-B gates/rail side, using overhead wayfinding for rail/TexRail as your cue. Keep moving until you reach the exit labeled B43 on the Arrivals level. Go out at B43, turn left immediately, and stay on the outdoor sidewalk that feeds into the covered, open-air connector toward the station entrance and platforms.
What is the exact drivable path from the Terminal B parking garage exit to the north airport exit under the current detour pattern (including the first forced turn decision)?
Northbound ramps from Terminal B are effectively closed, so every garage exit flow is forced south first. The first forced decision is taking the southbound service-road outflow from the garage (no “turn left to go north” option), then committing early to the left lane to catch the pre–South Toll Plaza U-turn back to International Parkway North.
After you clear the garage’s south helix/merge area, follow “Exit” onto the South Service Road (you will be moving toward the South Toll Plaza). Immediately get into and hold the left lane as you pass the terminal-face gridlock zone and approach the toll gantries. Look for the signed cut-through/U-turn marked for “International Parkway North” / “Northbound Return” just before the South Toll Plaza booths—this is the only practical pivot. Take that U-turn to flip into the northbound express lanes; if you pass into the toll plaza gantries, you’ve missed the pivot and will be ejected onto SH 183, adding a major detour.
What is the exact merge/lane choice point on approach roads where drivers must commit to Terminal B versus getting trapped into the Terminal A/C flow?
The commit point is immediately after the North Toll Plaza, where the right-hand ramp split for Terminal B peels off before the Terminal A ramp and the central pass-through lanes. Missing that early right-lane split pulls you into the Terminal A queue or the International Parkway spine with no quick correction.
Coming from the north (SH 114/635 direction), treat the post-plaza stretch as “no-late-merges”: move to the far right lanes as soon as you clear the toll booths, then follow the dedicated Terminal B right-hand ramp rather than staying with the heavier Terminal A/C flow. Coming from the south (SH 183 direction), the trap is earlier—about a mile to 1.5 miles before the terminal face—where you must already be committed to the far right lanes even if you haven’t visually “found” Terminal B yet, because the detour can require a jug-handle/U-turn style maneuver instead of a simple slip exit.
Where is the exact Terminal Link bus stop location for Terminal B (outside security) relative to baggage claim (door/column/zone identifier)?
Terminal Link does not stop on the Lower Level at baggage claim, so the dealbreaker is that you must go up to the Upper Level (Departures) to board. Terminal B uses two Upper Level stops: one near Entry B14 (low-B gates) and one near the B43 area (often signed around B46/B47) for high-B gates and rail connections.
From baggage claim (Level 1), take the nearest escalator/elevator up one level to Departures (Level 2 curb). If you’re positioned near the middle/lower-number doors (typical baggage claim area around B29/B30), follow terminal-door signage toward Entry B14 for the “low gates” stop. If you’re closer to the rail side or want the high-gates/rail stop, walk along the Departures curb toward the far-north end and look for the stop posted near Entry B43-area (commonly signed as B46/B47). Do not wait at the Lower Level curb by Door B43 or the rail walkway—buses won’t board there.
What is the exact Terminal Link route sequence (terminal order) posted at Terminal B’s stop, and which terminal does it reach first?
Terminal Link from Terminal B is posted as a one-way loop that reaches Terminal D first. The typical stop order is B → D → E → C → A → B, which means trips to A are “long-loop” rides if you stay landside.
At the Terminal B Upper Level stop (near B14 for low gates, or the B43-area stop for high gates/rail), confirm the loop card on the pole/shelter and match it to your target terminal before boarding. If you need Terminal A specifically (for dedicated PreCheck elsewhere), expect the bus to hit D first, then Terminal E and Terminal C, before arriving at A—this is where “it looked close” turns into a 25–40 minute ride during congestion. If you’re already airside, Skylink is the faster cross-terminal system; Terminal Link is the landside-only fallback.
What is the exact walking time from Gate B49 to the nearest Skylink station entrance (shortest signed route)?
Walking from Gate B49 to the Skylink station at B28–B31 takes about 6–8 minutes at a brisk pace with luggage. The distance is roughly 1,500 feet, and the time risk comes from the long “satellite” connector that feels farther than it looks.
From Gate B49, follow overhead signs for “Skylink” and walk south down the north spur corridor, passing the B48–B44 gate area as you rejoin the main Terminal B concourse. Keep tracking the gate-number progression downward toward the mid-30s and high-20s until you reach the Skylink area labeled for Gates B28–B31. The station entrance is the first major vertical node you hit in that mid-terminal zone, so don’t detour toward the central food/shops cluster if you’re targeting Skylink fast.
What is the exact walking distance from Gate B1 to the closest Skylink station entrance (shortest signed route)?
Walking from Gate B1 to the closest Skylink station at B9–B12 is about 900 to 1,000 feet on the shortest signed route. The path runs along the south end of the Terminal B concourse, where the landmarks are the Admirals Club area and the corridor that points toward the Terminal D connector.
From Gate B1, follow overhead “Skylink” signs in the direction of increasing gate numbers toward B9–B12. Stay on the main concourse line, passing the Admirals Club vicinity (near Gate B3) and the Terminal D connector/yoga studio corridor cues as you move north. The Skylink entrance is clustered at the B9–B12 node, so once you hit that gate-number range, look for the vertical access point and Skylink icon signage rather than continuing deeper into the terminal.
Where is the exact TSA PreCheck entry point in Terminal B relative to the main check-in hall (which end / landmarked entrance)?
A dedicated TSA PreCheck lane is not reliably available in Terminal B, so there isn’t a true “PreCheck entry point” to aim for. Terminal B screening typically runs as standard lanes at the B9 and B30 checkpoints, sometimes offering an expedited “card” process rather than a separate PreCheck queue.
In the main check-in hall on the Departures level, the primary checkpoint alignment is toward the B9 side (the “main hall” end), with the B30 checkpoint functioning more like the satellite option deeper/north along the terminal. If the standard line at the B9-side checkpoint is visibly backed up into the stanchions, walking to check B30 is the most realistic within-terminal alternative. The only dependable dedicated PreCheck option is generally in another terminal (often A), but getting there landside via Terminal Link can take long enough to erase the benefit unless you have substantial buffer time.
What is the exact shortest indoor path from the Remote Parking shuttle drop-off in Terminal B to the nearest open security checkpoint?
The shortest indoor path runs from the Remote Parking shuttle stop near Entry B14 straight to the main checkpoint at B9 on the Departures level. From the curb, the key is to enter at B14 and immediately go up one level, because security is on Level 2, not on the Arrivals curb where shuttles unload.
After you step off the Remote Parking shuttle at the Lower Level curb by Entry B14, go through the doors at B14 into the terminal. Take the first escalator/elevator bank inside up to Departures (Level 2). Once on Level 2, turn and follow overhead signs for “Security Checkpoint” toward the B9 side (the main checkpoint area). This stays indoors the entire way after you enter at B14, and it avoids walking the Arrivals curb to hunt for another door or trying to approach security from the rail side.
What is the exact walking distance from Terminal B rideshare pickup zone to the nearest terminal entrance door (shortest safe pedestrian route)?
The walking distance from the Terminal B rideshare pickup zone (Parking Garage Level 2) to the nearest terminal entrance doors is about 250 to 300 feet. The shortest safe pedestrian route uses the designated crosswalks signed for the parking garage, then an elevator or stairs down/up as needed depending on which door you target.
From the rideshare pickup area on Garage Level 2, follow garage signage back toward the pedestrian exit facing the terminal and use the marked crosswalk to the terminal side—do not cut across traffic lanes. The nearest doors are typically in the B14/B30 area on the terminal face; once you reach the terminal sidewalk, enter at the closest labeled doorway in that cluster. If you’re starting at baggage claim (Level 1) and going to rideshare, reverse the same path: exit the doors, use the signed crosswalk into the garage, then take the elevator up to Level 2 pickup.
Where is the exact nearest restroom to Gate B20 (by landmark) that does not require backtracking across multiple gate clusters?
The nearest restrooms to Gate B20 are typically by the Gate B28 area or by the Gate B12 area, because B20 sits in a mid-concourse “amenity gap” without a restroom at the gate. The least backtracking choice is whichever direction you’re already moving for Skylink or boarding flow.
If you’re headed northbound toward the mid-terminal core, walk from B20 toward Gate B28 and use the restroom cluster near that gate zone before you reach the Skylink area (B28–B31 is the nearby vertical landmark). If you’re closer to the south flow or coming from the B1–B12 side, walk toward Gate B12 and use the restroom area in that gate cluster instead. Either option is roughly an 8-gate swing from B20, so don’t wait until final boarding groups if your next move is also toward Skylink or the B28/B12 nodes.