Charleston International Airport Map (Most Up-To-Date)
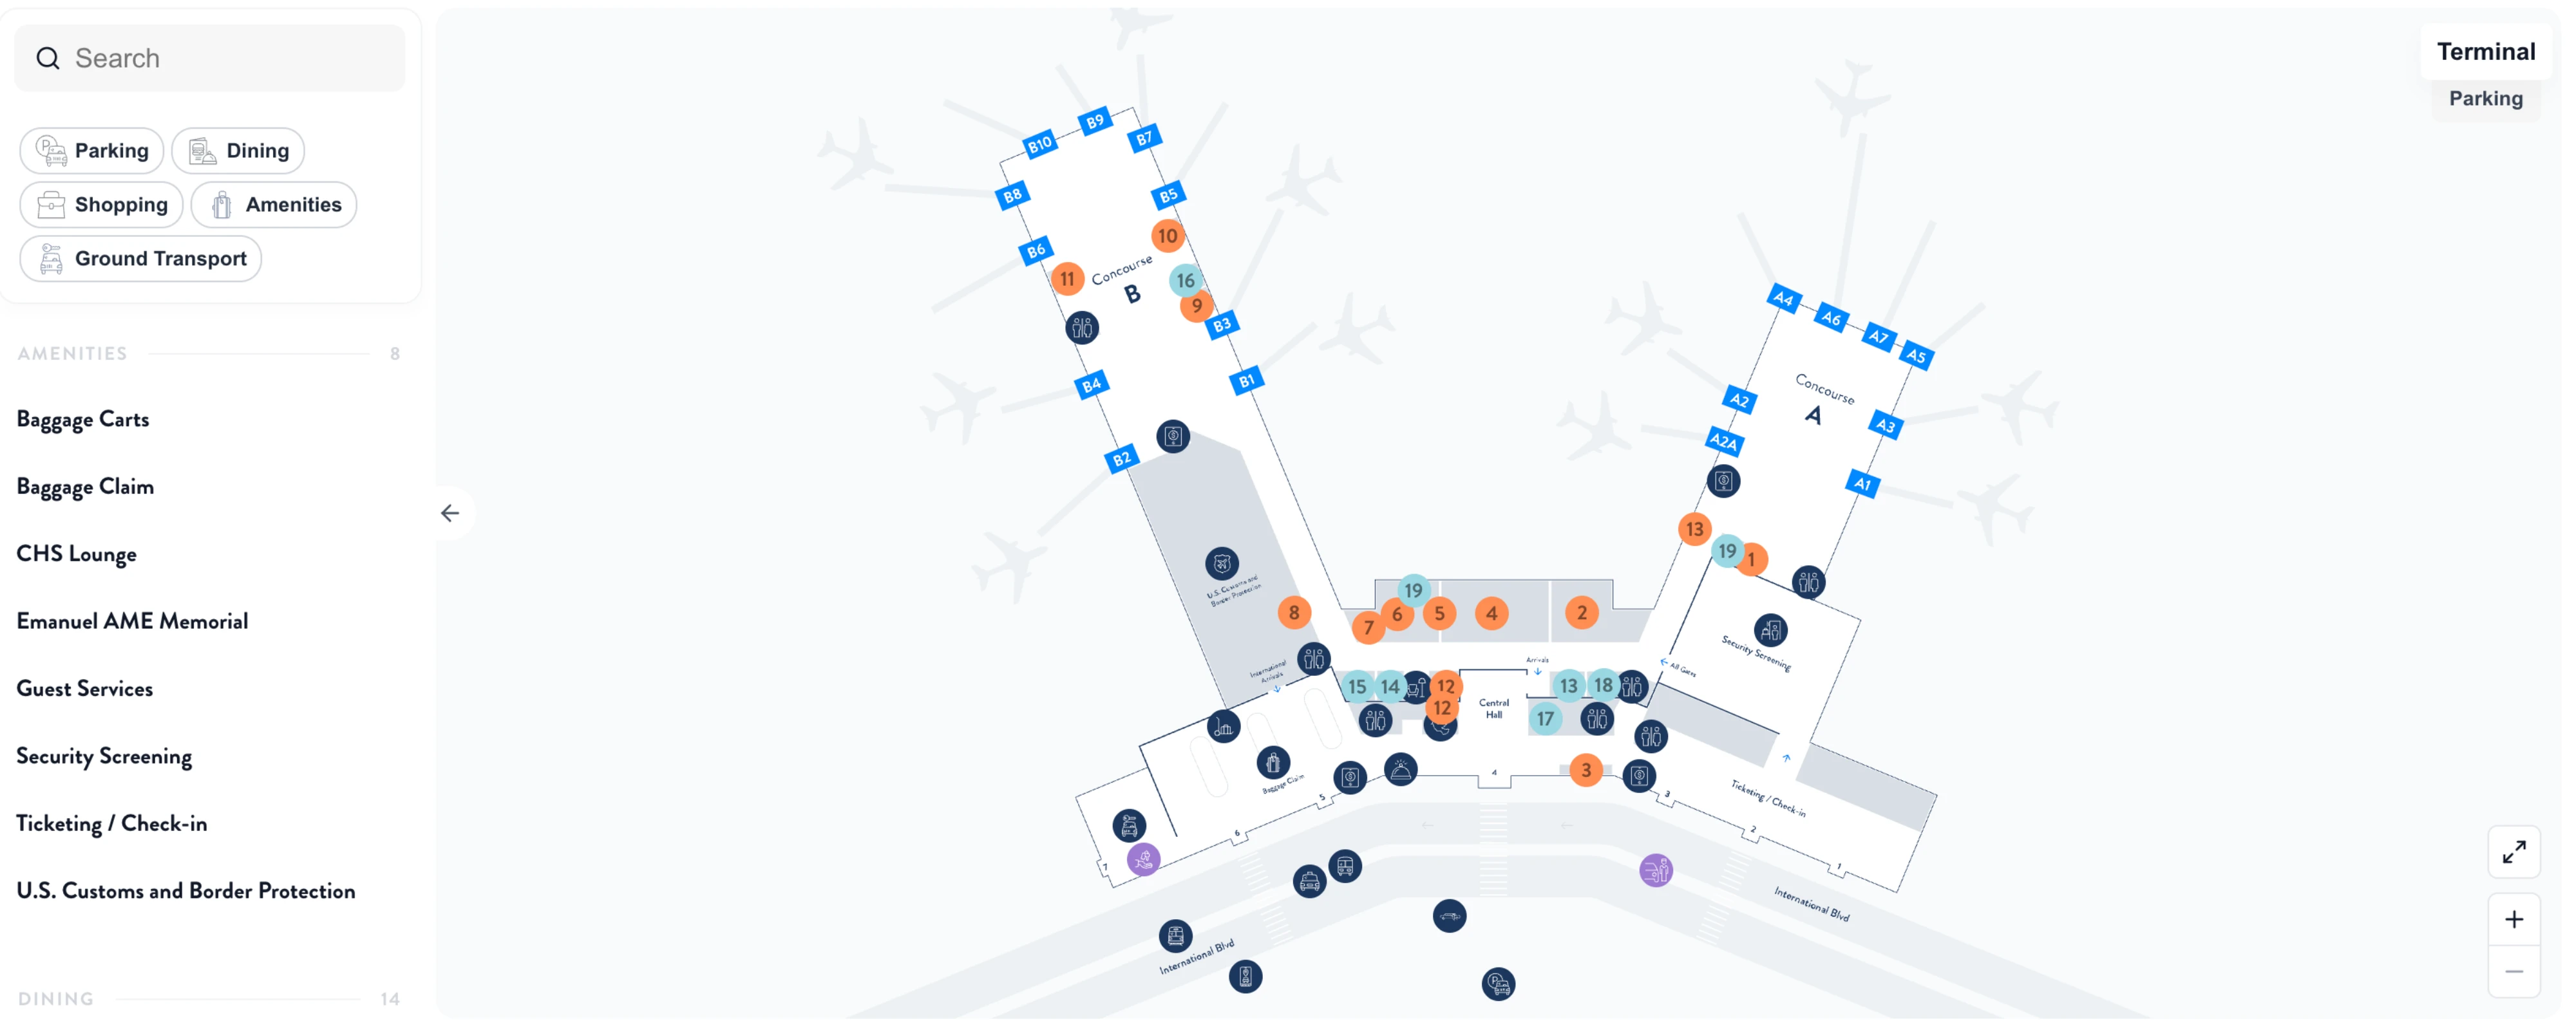
Charleston International Airport (CHS) is a compact, single-terminal layout with two concourses branching off a central atrium inside the Charleston metro air hub. Landside is stacked vertically—Departures/Ticketing and the sole TSA checkpoint on Level 2, Baggage Claim/Ground Transport on Level 1—so most navigation is straight-line walking plus one escalator ride.
Map Table
| Terminal | Key Airlines | Primary Function | Transfer Mode |
|---|---|---|---|
| Single Terminal, Central Atrium | Delta, American, Southwest, United, JetBlue | Ticketing, TSA checkpoint, concessions core | Walk, escalator (Level 2↔1) |
| Concourse A (East) | Delta | Gates, boarding, seating | Walk from atrium |
| Concourse B (West) | American, Southwest, United, JetBlue, others | Gates, boarding, international corridor | Walk from atrium |
| Ground Transport (Level 1) | Uber/Lyft, taxis, shuttles, rental cars | Baggage claim, pickup zones, shuttle interfaces | Crosswalks, short walk, shuttle |
Charleston International Airport Map Strategy
- Treat TSA as the only real variable: if the standard queue has reached Guest Services or the atrium glass railing by the central escalators, assume a 45+ minute wait and switch to a hard time budget (ID in hand before you enter stanchions).
- Beat curbside gridlock by choosing the correct drop-off zone early (east/center/west) and avoiding late lane changes near the split to Arrivals vs Departures; a wrong-lane “penalty lap” can cost 8–12 minutes in peak flow.
- Plan arrivals as a two-stage exit: gate → central atrium → down the central escalators to Level 1, then baggage claim → doors → decision point (inner curb pickup vs crosswalks to rideshare shelter).
- If baggage claim feels slow, use a “wait with space” posture: stand back from the belt until bags start moving, then step in—CHS carousels crowd fast because belts sit very close to the exit doors.
2026 Charleston International Airport Map + Printable PDF
Ongoing Parking Garage 3 work and the altered traffic-circle approach keep CHS’s curbside patterns more brittle than its “small airport” reputation suggests in 2026. Inside, the building stays simple—one checkpoint, one central atrium—but that also means a TSA overflow can quickly spill into ticketing circulation, and rideshare remains a deliberate “cross-the-road” walk from baggage claim.
2026 Charleston International Airport Map Guide
Where does the standard TSA line physically start (the back-of-line point) during peak mornings, and what fixed landmark does it reach when it overflows?
The standard TSA line starts at the Level 2 central checkpoint stanchion entrance directly in front of the ID-check podiums. During peak mornings, overflow spills backward into the central atrium; once the queue wraps to the Guest Services Desk or reaches the glass railing by the central escalator/elevator void, the wait has typically entered a critical (45+ minute) state.
Overflow can also “straighten out” along the rear of the ticketing hall when staff open extra stanchions, pushing the back-of-line past the American Airlines counter area toward the Delta (east) end. The fastest visual read is the central escalator bank: if passengers are queued beside it, circulation around ticketing is already compromised.
What is the exact walking distance (in feet/meters) from terminal entrance doors to the TSA ID-check podiums (standard lane)?
The walking distance is about 150–200 feet (45–60 meters) from the Level 2 terminal entrance doors to the TSA ID-check podiums. The path is essentially straight ahead into the ticketing hall, with the checkpoint visible in the central atrium.
From the curbside automatic doors on Departures (Level 2), walk into the shallow ticketing space toward the central checkpoint opening. The only “navigation” is threading around bag-drop lines that run across the hall in early-morning banks. If the TSA queue has spilled into the atrium, the distance stays the same, but your effective time budget becomes queue-driven the moment you reach the stanchions near the central escalator/elevator bank.
Where is the TSA PreCheck entry point relative to the standard lane (left/right/adjacent), and what is the nearest fixed landmark for spotting it fast?
The TSA PreCheck entry is typically adjacent to the standard lanes on the left side when you’re facing the checkpoint. The fastest fixed visual lock is the blue TSA PreCheck banners (and associated floor decals) within the main checkpoint cluster in the central atrium.
Because CHS runs one consolidated checkpoint, PreCheck is not in a separate room—it’s a dedicated lane inside the same stanchion field as standard screening. If you’re standing near the central escalator/elevator bank looking toward the ID podiums, scan left for the blue PreCheck signage before you commit to the longer standard stanchions. Avoid confusing airline “Priority Access” with PreCheck; Priority feeds standard screening, while PreCheck remains its own labeled lane.
From the arrivals gate area, what is the shortest marked route to baggage claim, and where are the first overhead “Baggage Claim” signs located?
The shortest marked route is to walk from your gate along the concourse spine back to the central atrium, exit the secure area, then take the central escalators down to Level 1 for Baggage Claim. The first overhead “Baggage Claim” signs appear immediately after you step off the jet bridge into the main concourse circulation lane.
From Concourse A or Concourse B, follow the flow toward the atrium “root” where concessions cluster and the checkpoint sits above the public atrium. After passing through the one-way exit chute out of security, keep moving straight to the central escalator bank in front of the atrium void. At the bottom of the escalators on Level 1, the linear baggage hall and carousels run ahead of you toward the sliding exit doors.
Which baggage carousel(s) are closest to the main exit doors, and what is the exact distance from those carousels to curbside pickup?
The carousel area closest to the main sliding exit doors is the near-end carousel set at the door-facing end of the linear baggage hall, about 30–50 feet (9–15 meters) from the exit doors and roughly 45–70 feet (14–21 meters) total from carousel edge to the inner curb pickup lane. The practical “closest” position is whichever belt is actively assigned nearest the door-side end of the hall.
CHS’s baggage claim is shallow, so the door-side carousel zone is essentially immediately adjacent to the public exit. After exiting, the inner roadway for private pickup sits just beyond the sidewalk, typically another 15–20 feet (5–6 meters) from the doors. This proximity is why the belt crowd often blocks foot traffic: passengers waiting three-deep at the near-end belts spill into the same path used by people trying to reach curb pickup or crosswalks.
Where is the rideshare pickup zone located (exact curb/door/zone label), and what is the shortest walking path from baggage claim to that pickup point?
The rideshare pickup zone is at the designated covered shelter area labeled Rideshare with Zones 1, 2, and 3, located across the double roadway from the baggage claim exit doors on Level 1. The shortest path is a straight “two-crosswalk” walk: out the baggage claim sliding doors, across the inner pickup roadway, across the outer commercial roadway, then turn right to the covered shelter.
Exit Baggage Claim to the sidewalk and head directly to the marked crosswalk in front of the doors. Cross the inner roadway first (private pickup side), then continue across the outer roadway (commercial/taxi/shuttle side). Once you reach the far-side sidewalk, turn right following the Rideshare/Ground Transport signs until you reach the covered shelter, then match your app to Zone 1, 2, or 3. Attempting curb pickup at the inner roadway is the common failure mode—drivers are routed to the zoned shelter instead.
What is the precise geometry of the arrivals curb (number of lanes plus merge points), and where do cars typically bottleneck before reaching passenger pickup?
The arrivals curb uses a double-roadway geometry with 2–3 lanes on the inner roadway for private passenger pickup and 2–3 lanes on the outer roadway for commercial vehicles, separated by a median island with pedestrian refuge. The recurring bottleneck forms first at the upstream split/merge where traffic sorts into upper vs lower approaches, then again at the inner curb loading zone where stopped cars collapse movement into a single passing lane.
On heavy arrival banks, the inner roadway loses capacity when vehicles double-park or “stack” in the outer of the inner lanes to load, forcing all through-traffic to merge left into the only moving lane. That compression backs up toward the ramp feeding the arrivals level, and it can propagate upstream into the loop when drivers miss their pickup passenger and attempt to slow-roll or re-circulate. The visual tell is the inner curb: if the lane nearest the curb is fully occupied and the next lane is also stopping to load, the system is effectively one-lane throughput.
From the Daily Garage pedestrian exit, what is the exact walking route and distance to the terminal check-in doors?
The distance is about 300–500 feet (91–152 meters) from the Daily Garage pedestrian exit to the terminal check-in doors, depending on where you park. The shortest route is to follow the signed pedestrian path from the garage toward the terminal frontage, use the marked crosswalk/bridge connection over the loop road, then enter the Level 2 (Departures/Ticketing) doors.
From your garage level, head to the pedestrian egress point nearest the terminal (follow the “Terminal” and pedestrian icon signage). Use the designated crossing point—either an upper-level bridge connection or the at-grade crosswalk alignment—so you land directly on the Departures sidewalk. The check-in hall is immediately inside those sliding doors, with counters lining the back wall and the TSA checkpoint visible ahead in the central atrium. This is the high-certainty option because it avoids shuttle timing and minimizes exposure to curbside dwell enforcement.
Where is the Economy Lot B shuttle stop located (exact bay/sign), and what is the shortest walk from the lot’s common parking rows to the shuttle queue point?
The Economy Lot B shuttle stop is at the covered shuttle shelters distributed through Lot B, marked with shuttle signage at each shelter rather than a single curb “bay.” The shortest walk is from the nearest common parking row directly to the closest covered shelter queue point, typically a few hundred feet, with the longest practical walks running about 300+ feet (90+ meters) if you park deeper in the lot.
Within Lot B, the key tactic is parking for shelter proximity, not for the lot exit: pick a row that puts you on a direct asphalt aisle to a covered shelter so you can see the queue and the bus approach. The shelter itself is the functional “stop”—that’s where passengers line up and where the shuttle doors align. If you’re towing luggage, the time penalty is the exposed walk across open pavement plus the variability of the bus cycle once you reach the shelter.
What is the exact distance from the Economy Lot B shuttle drop-off point to the TSA checkpoint entrance doors?
The distance is about 100 feet (30 meters) from the Economy Lot B shuttle drop-off to the TSA checkpoint area if the shuttle unloads on Departures (Level 2). If the shuttle unloads on Arrivals (Level 1), the walking displacement is still short but includes a vertical move: enter Level 1, walk to the central escalators, go up to Level 2, then you’re roughly 50 feet (15 meters) from the checkpoint.
On Level 2 drop-off, the path is: unload at the curb → through the automatic doors into the ticketing hall → straight toward the central atrium where the stanchions begin at the checkpoint entrance. On Level 1 drop-off, the fastest landmark is the central escalator/elevator bank in the atrium; once you ride up, the checkpoint is immediately in front of you. The distance is not the risk here—the risk is curbside congestion delaying the shuttle’s loop time.
Where are the airline check-in counters located relative to the terminal entrance, and what is the shortest path from the curb to the correct counter row?
The airline check-in counters are arranged in a single linear row along the back wall of the Level 2 ticketing hall, directly inside the Departures entrance doors. The shortest path is to use the curb zone closest to your airline, enter the nearest sliding doors, then walk straight to the matching counter bank along the rear wall.
| Curb/door zone | Fastest counter access | Straightest path landmark |
|---|---|---|
| Zone 1 (East end) | Delta | Enter east doors → counters immediately inside |
| Zone 2 (Center) | American, central access | Enter center doors → counters centered; TSA sightline ahead |
| Zone 3 (West end) | United, Southwest, JetBlue | Enter west doors → counters to the right/west along back wall |
If you enter the “wrong” door, the correction cost is small (about 1–2 minutes), but it adds friction when morning bag-drop queues are running perpendicular to the walking path. The cleanest move is aligning your curb drop to your airline so you avoid cutting across those queues.
If the main pickup curb is congested, what is the nearest alternative less-chaotic pickup spot (exact door/zone) reachable on foot from baggage claim?
The Daily Parking Garage is the nearest less-chaotic pickup spot, reached on foot from baggage claim by crossing the roadways and entering the garage pedestrian lobby, then meeting your driver on an upper level (commonly Level 2 or Level 3). This works because the garage separates you from active curb loading and removes the stop-and-go curbside enforcement loop.
From the baggage claim sliding doors on Level 1, follow the marked crosswalks toward the garage-side pedestrian access rather than waiting at the inner pickup lane. Use the garage elevator/stair lobby as the fixed rendezvous landmark, then text your driver a specific level and column/row marker once inside. The tradeoff is a small hourly fee, but it converts curbside gridlock into a controlled, covered meet point that’s easier for drivers to reach without stacking at the arrivals curb.