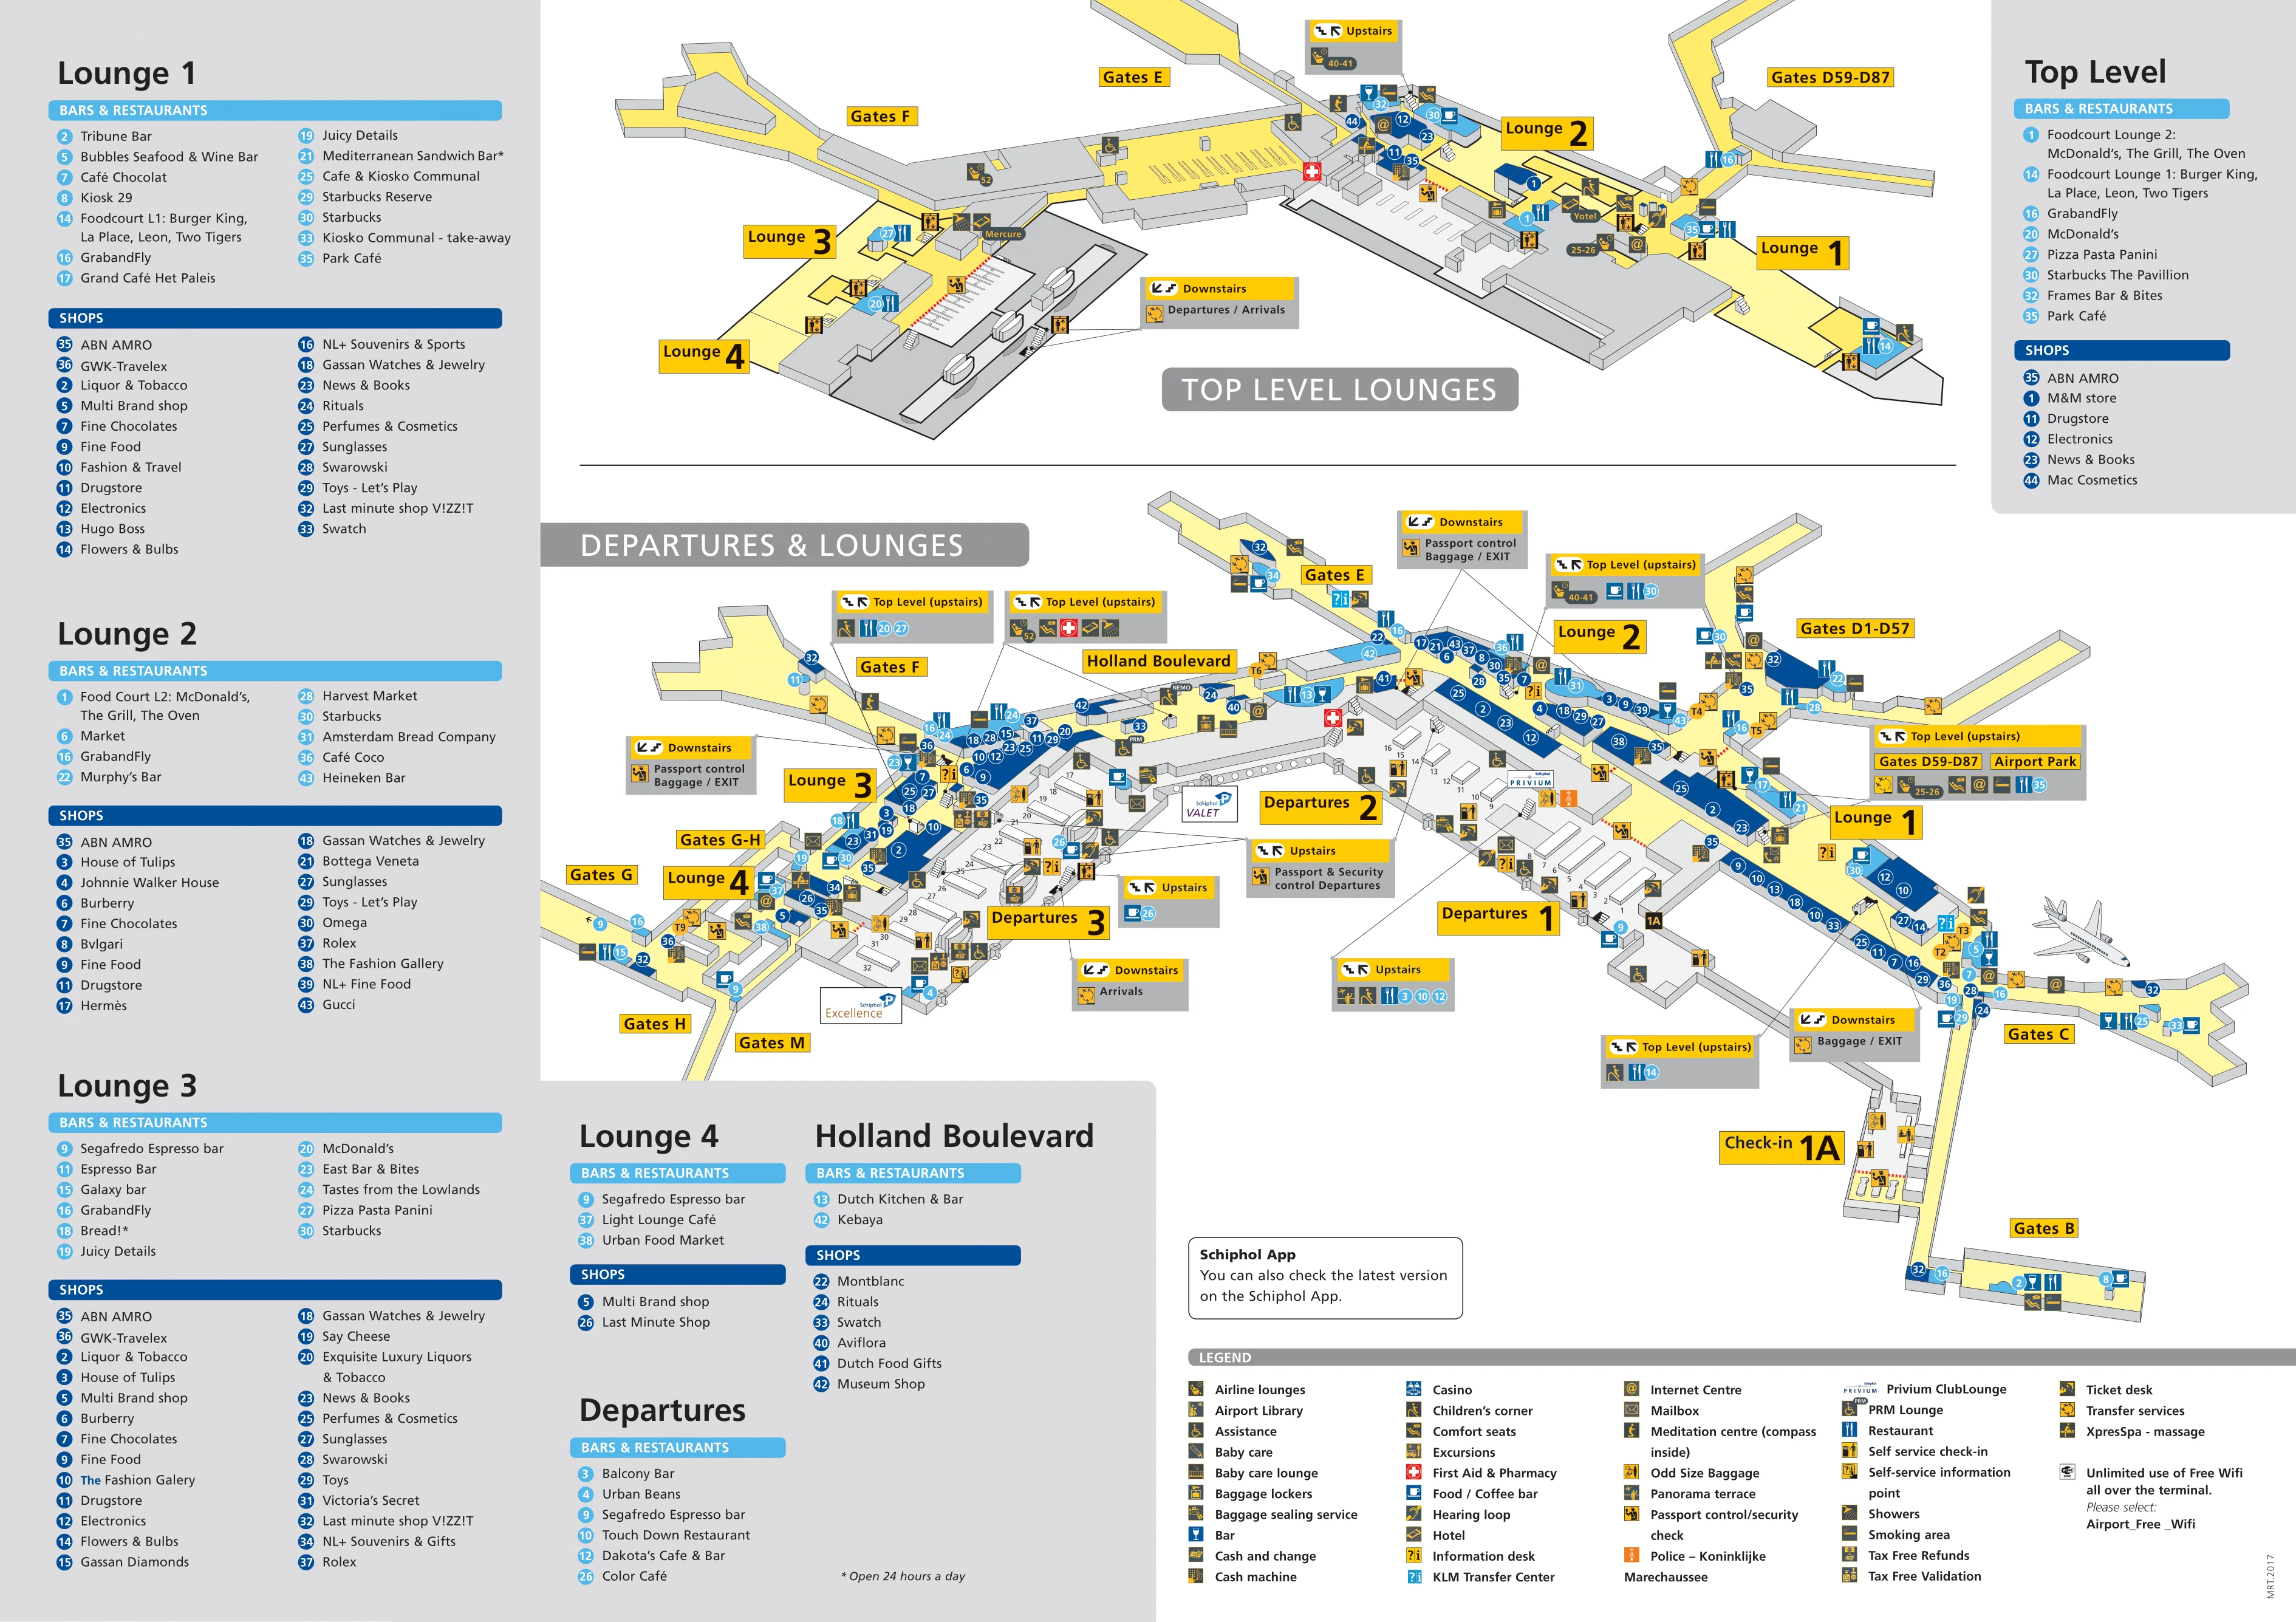
Amsterdam Airport Schiphol Map (Most Up-To-Date)
Amsterdam Airport Schiphol runs as a single-roof, one-terminal complex with a central lounge spine feeding multiple piers (B/C/D/E/F/G/M) under Amsterdam’s main airport complex. The footprint is wide and walk-heavy, with the highest-risk navigation at the Transfers-vs-Exit fork near pier roots and at the transit Schengen border-control filter that separates Schengen from non-Schengen flows—especially around hybrid Pier D’s split-level gate ranges.
Map Key
| Terminal | Key Airlines | Primary Function | Transfer Mode |
|---|---|---|---|
| Single terminal, multi-lounge | KLM, SkyTeam, Transavia, global carriers | Schengen / non-Schengen processing | Walk-only, moving walkways |
| Lounge 1 | Schengen network carriers | Schengen departures, B/C/D-Upper access | Pier roots, retail spine |
| Lounge 2 | KLM intercontinental core | Non-Schengen transfers, D-Lower/E access | Holland Boulevard link |
| Lounge 3 | Long-haul non-Schengen mix | F/G/H access, airside hotel zone | Holland Boulevard link |
Amsterdam Airport Schiphol Map Strategy
- Treat the Schengen/non-Schengen split as the first decision, not the gate number: D1–D57 and D59–D87 are different airside jurisdictions with a mandatory border crossing in between.
- Use map-verified fork points at pier roots to avoid the “Exit/Baggage Hall” trap; once you commit to Arrivals, recovering to Transfers usually forces extra security and major time loss.
- Budget connections with sprint math: long walks are normal, but passport control is the make-or-break choke point—identify exactly where it sits on your route and plan your fastest staffed-booth fallback.
- Assume security rules can change by origin: stay on the main transfer concourse unless signage explicitly routes you into a transfer-security filter, and use the Short Connection scan kiosks when your buffer is tight.
2026 Amsterdam Airport Schiphol Map + Printable PDF
In 2026, Schiphol continues operating as a single-terminal, multi-pier airport where the critical “map moments” are the Transfers-vs-Exit fork at pier roots and the transit border-control filter between the non-Schengen lounges (2/3) and Schengen Lounge 1. Pier D remains the highest-risk hybrid zone (D1–D57 vs D59–D87), so printable maps should be used to pre-commit to the correct corridor before you hit passport/security queues.

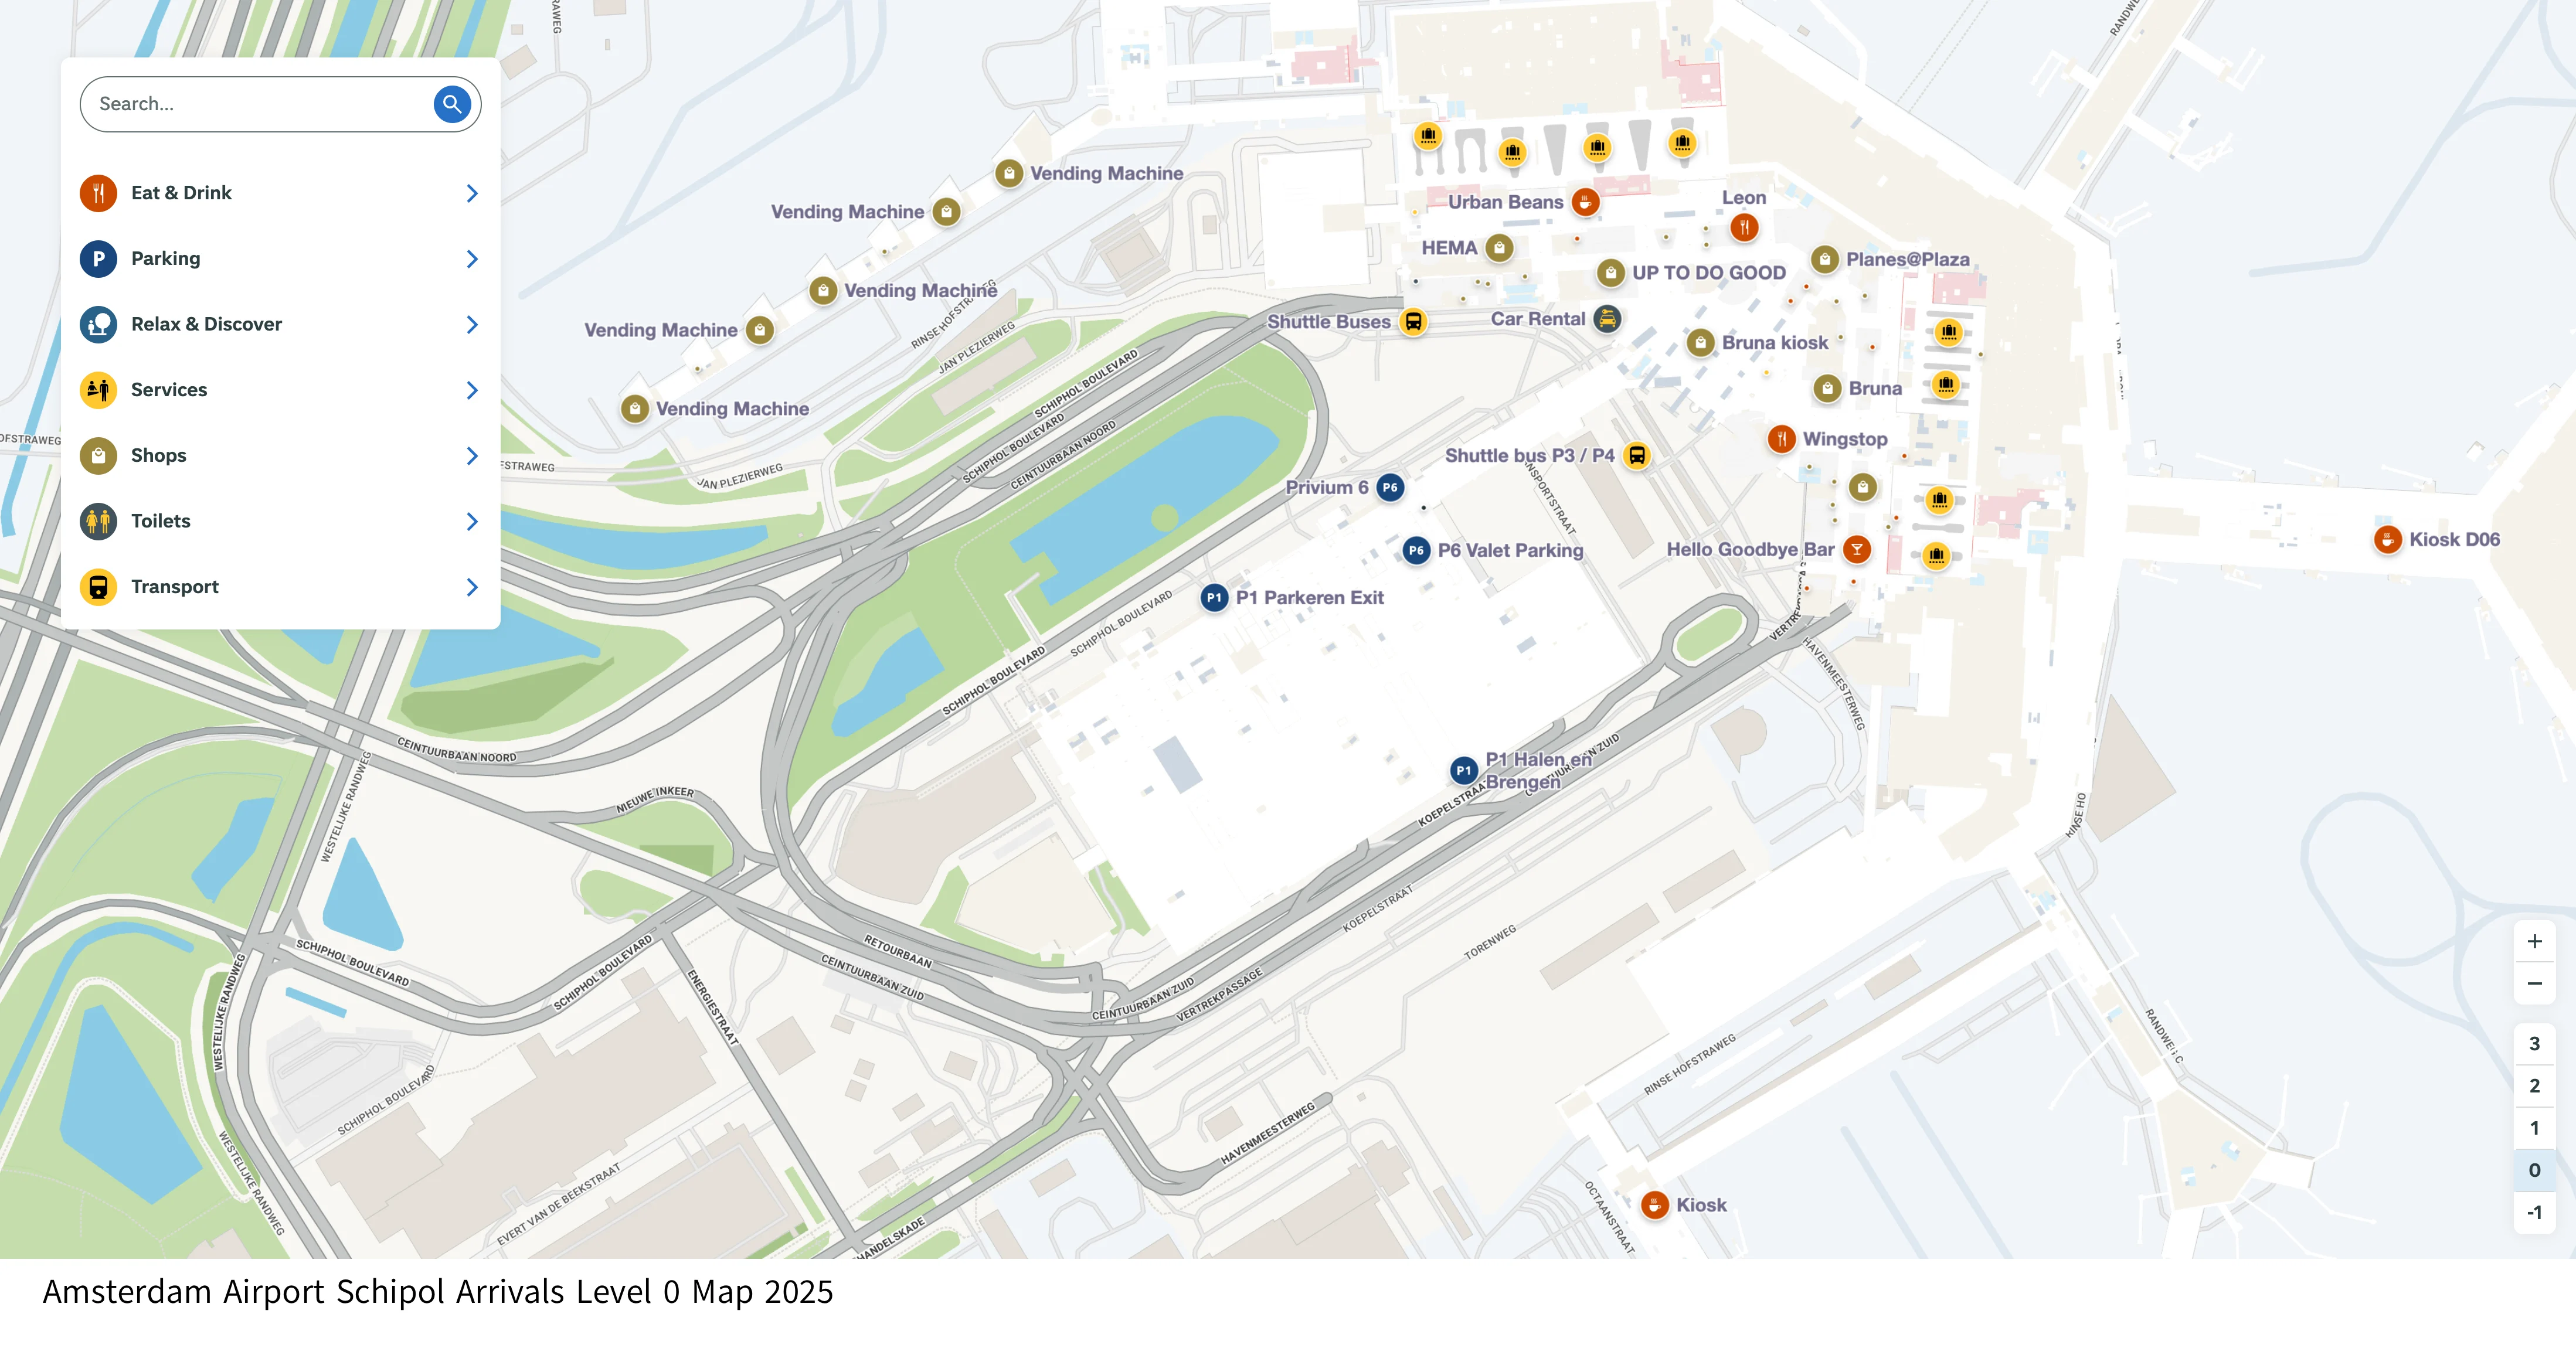
Amsterdam Airport Schipol Arrivals Level 0 Map 2025
Amsterdam Airport Schipol Level 1 Departure 1 Map 2025
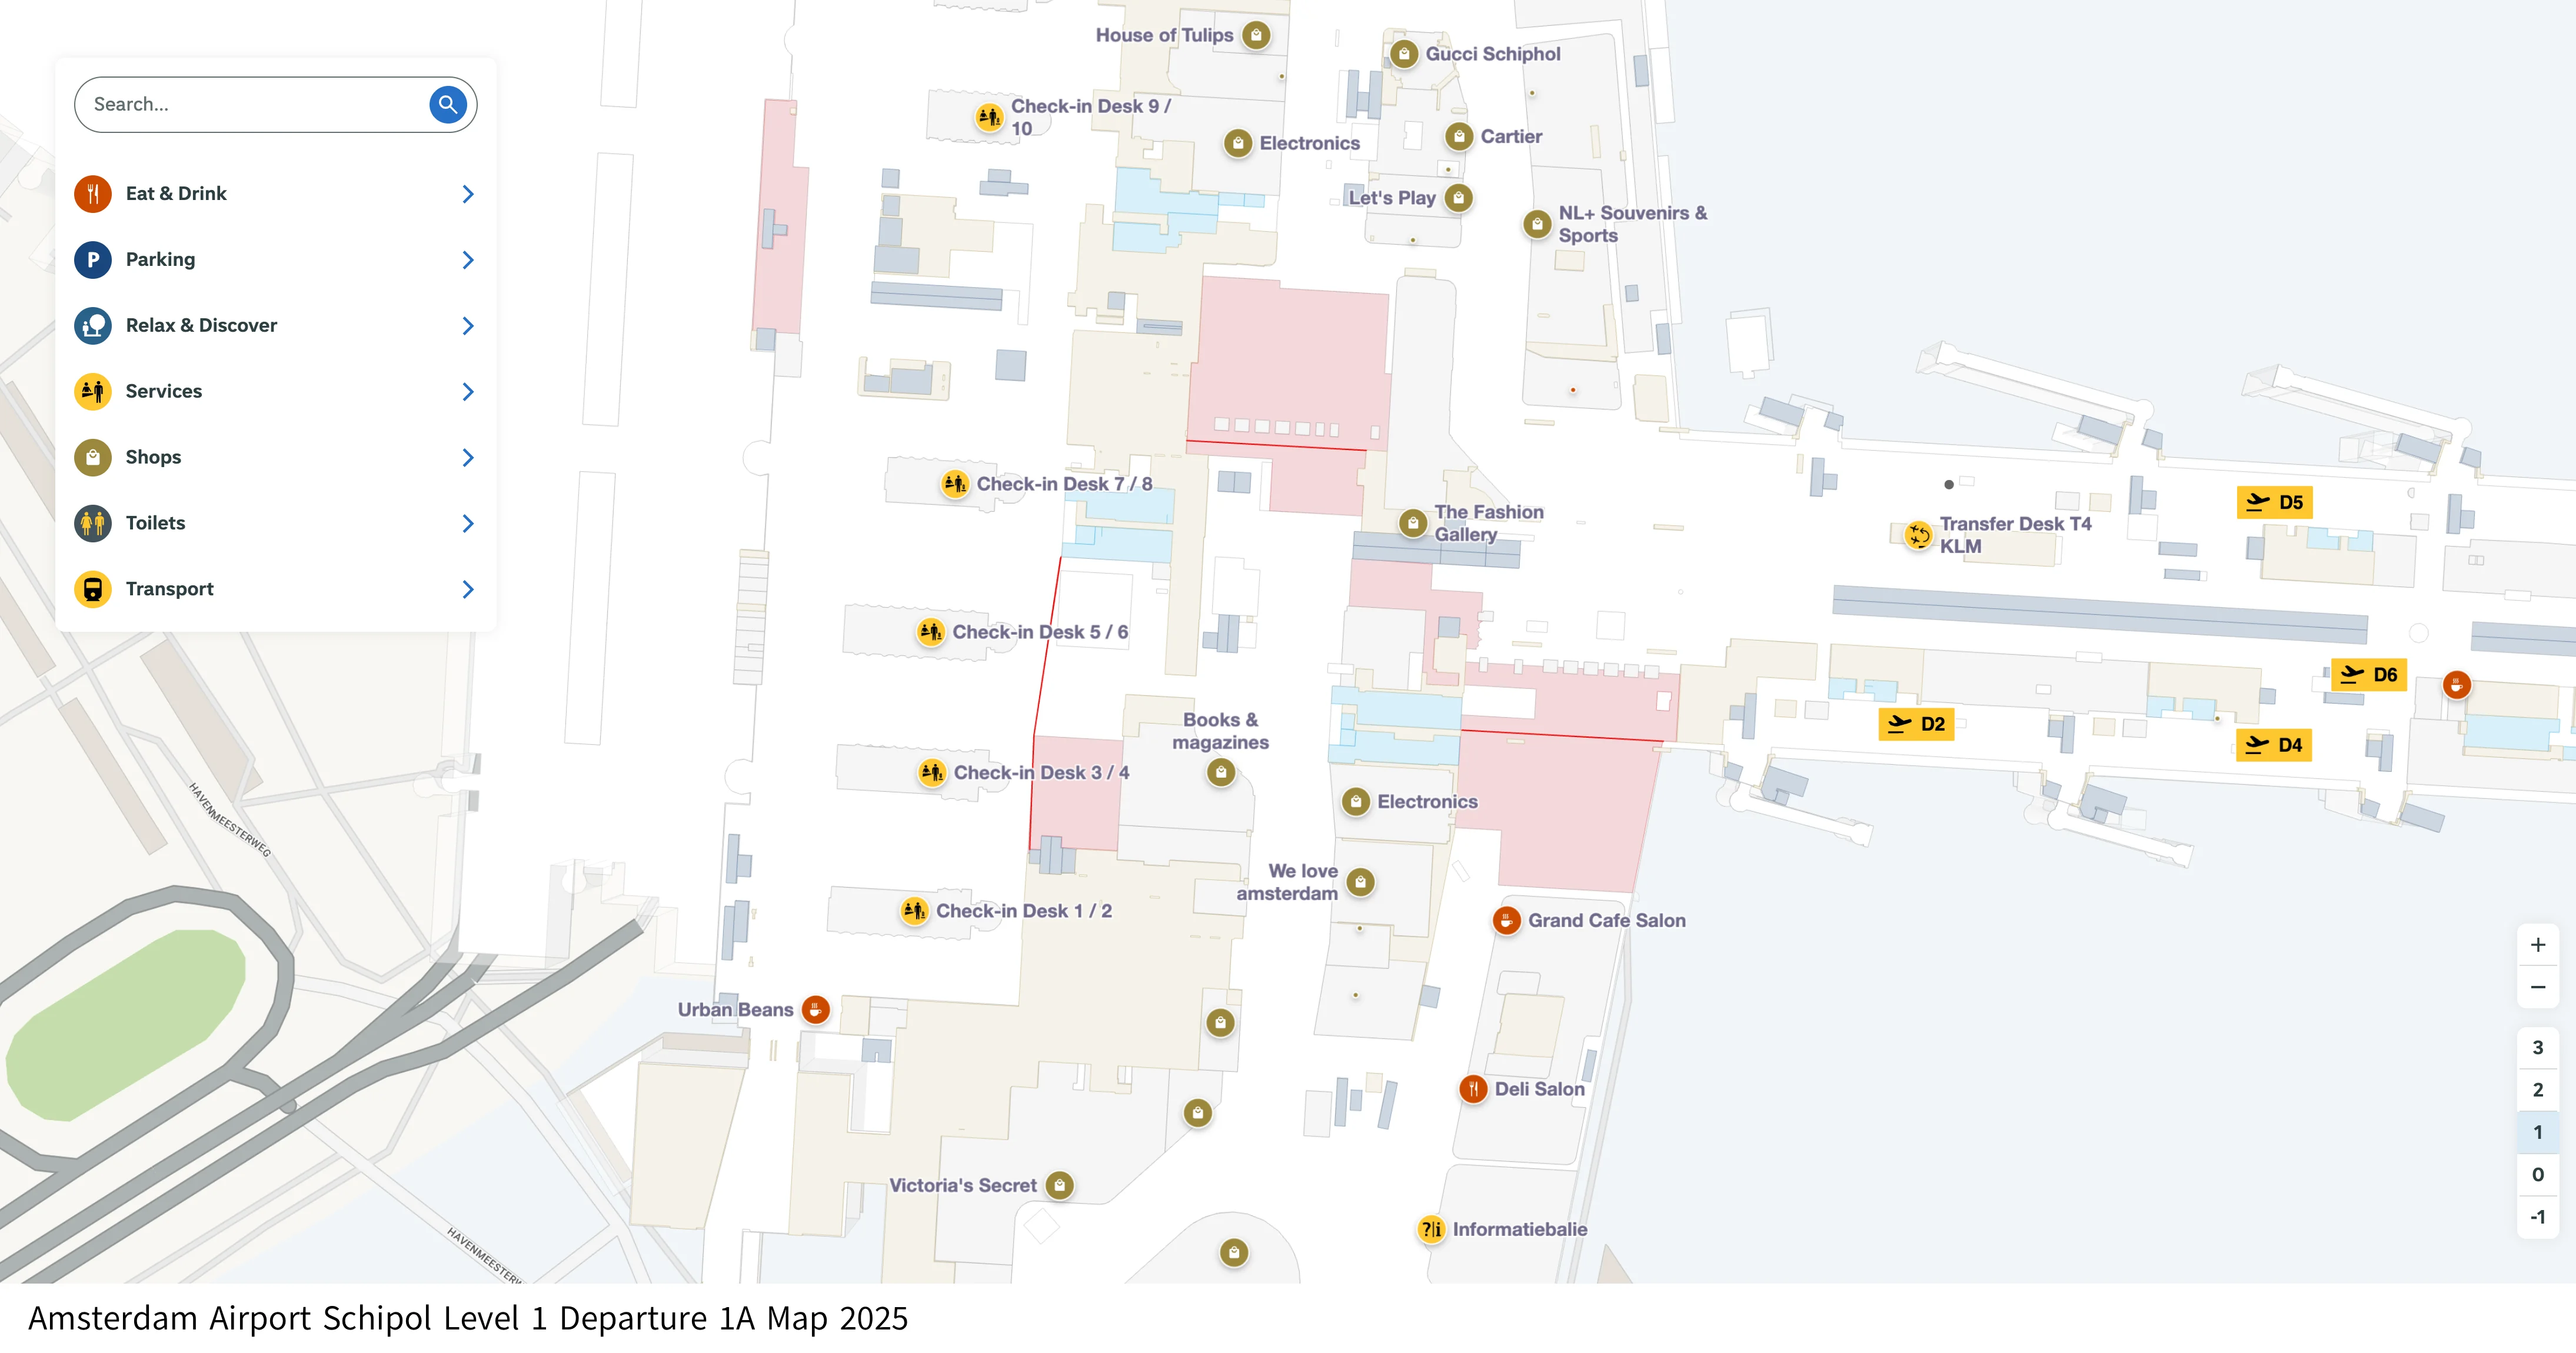
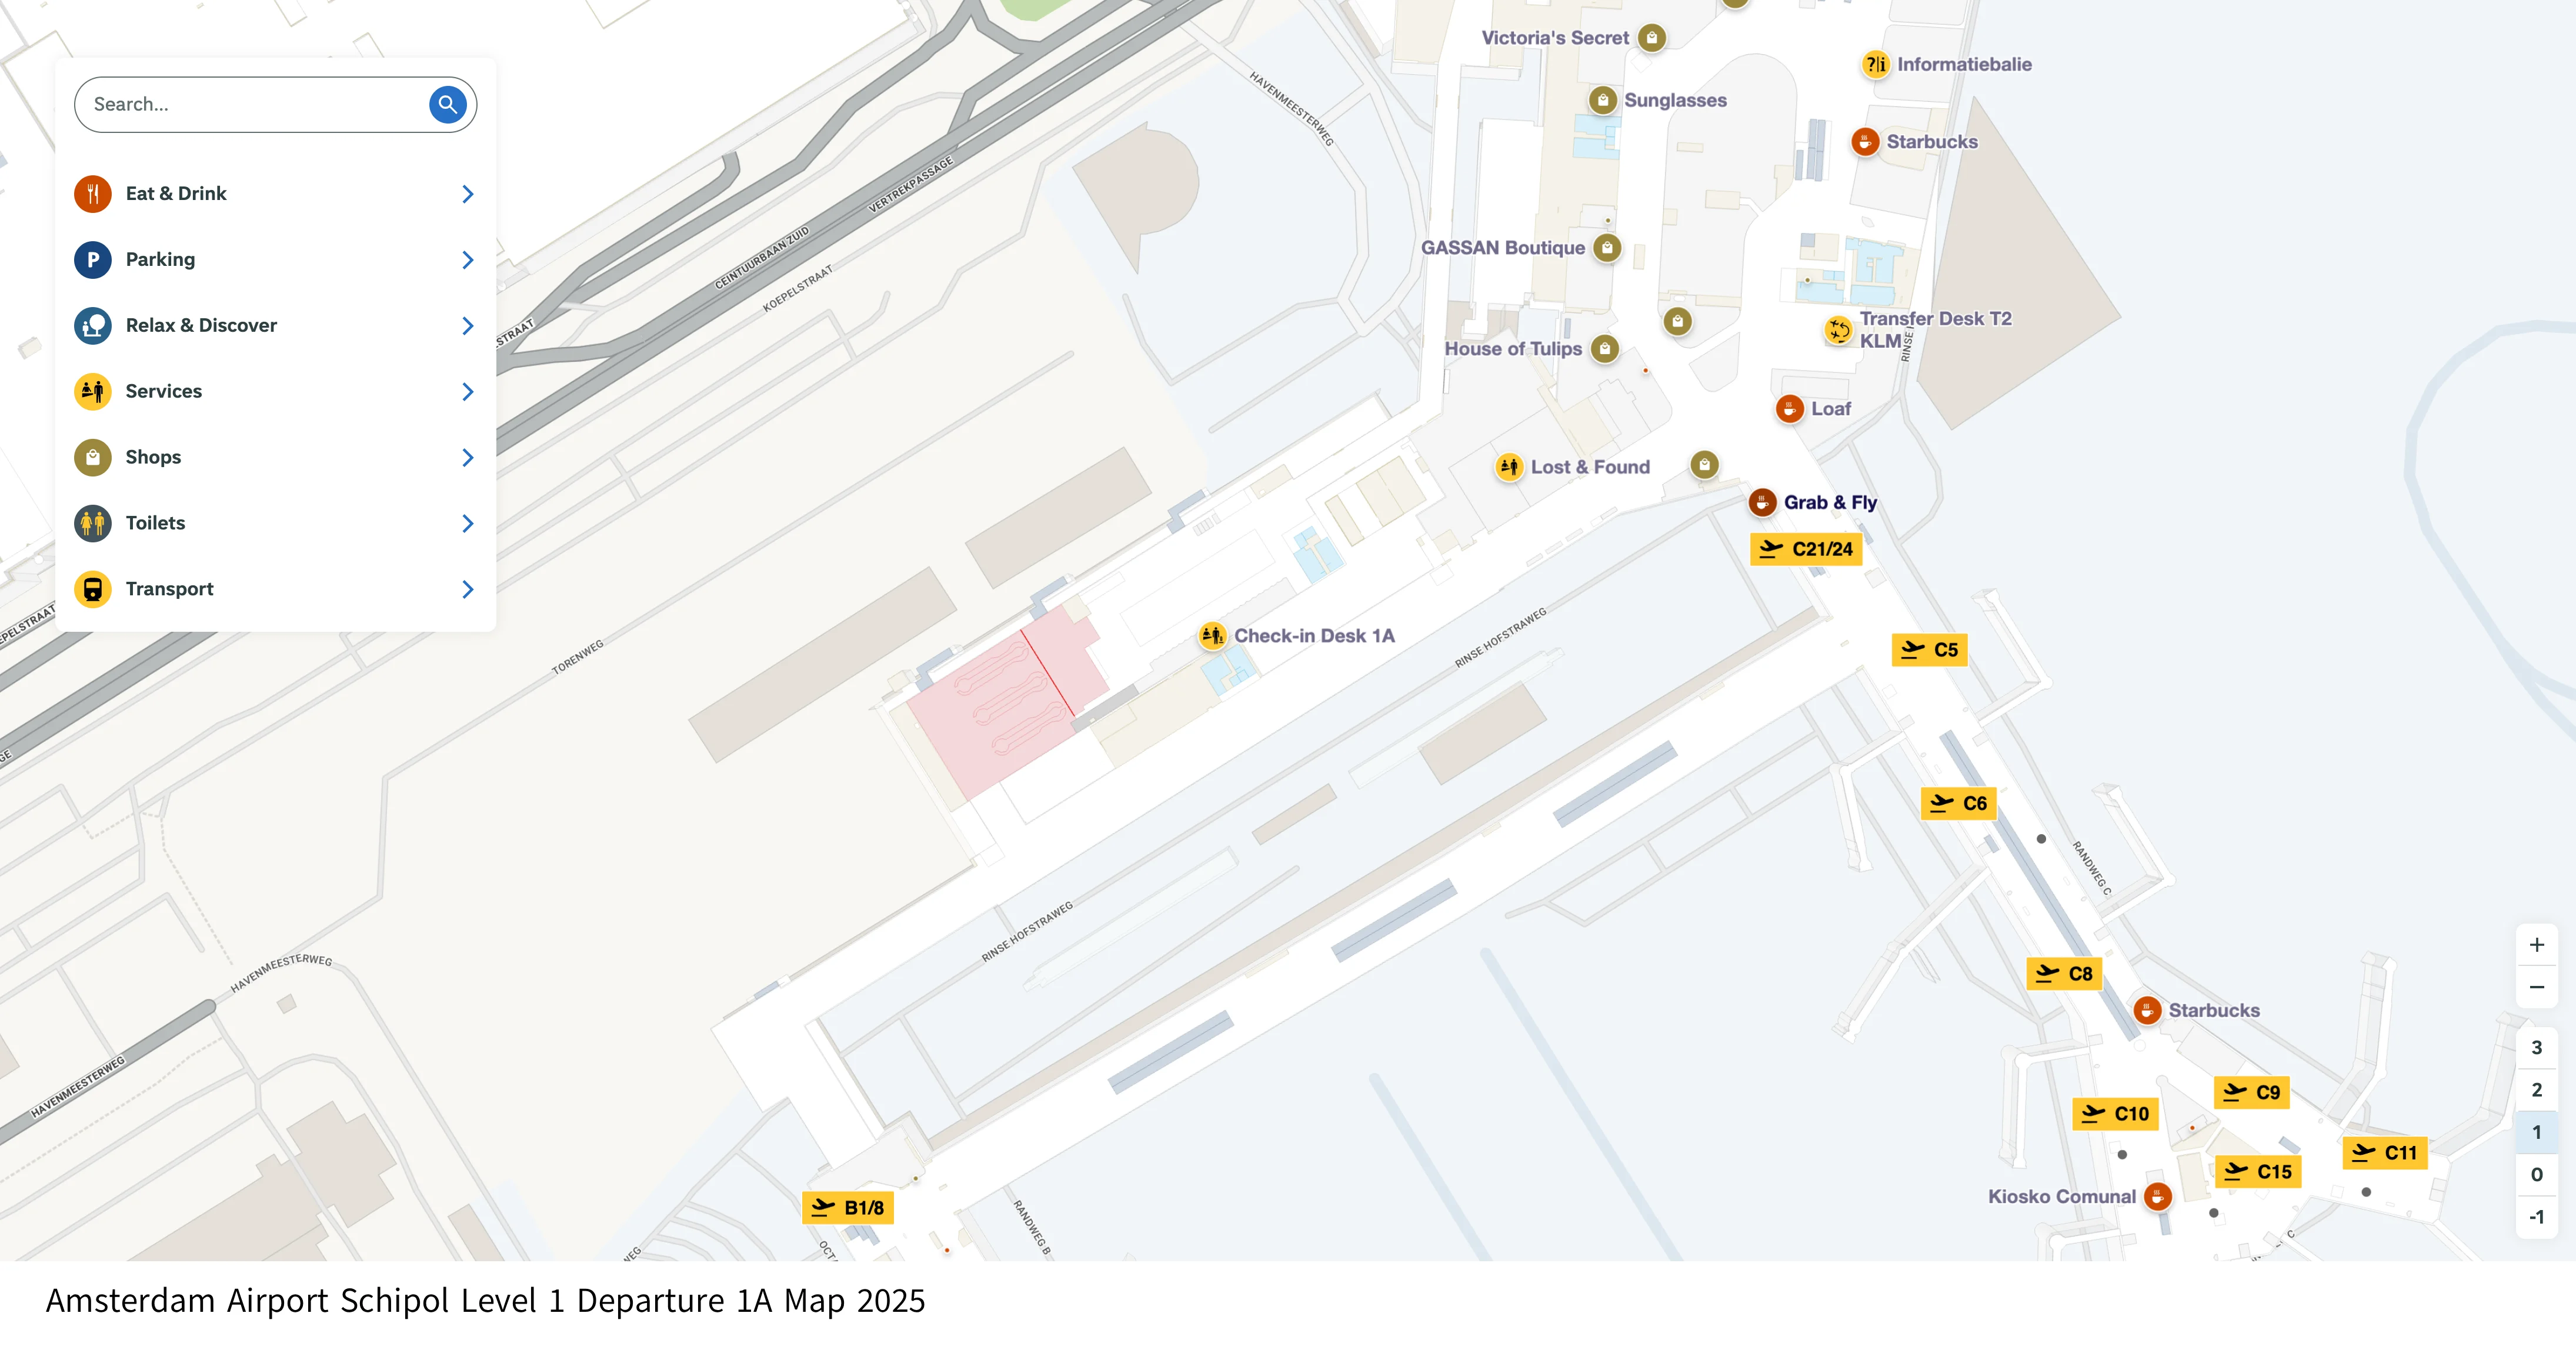
Amsterdam Airport Schipol Level 1 Departure 1A Map 2025
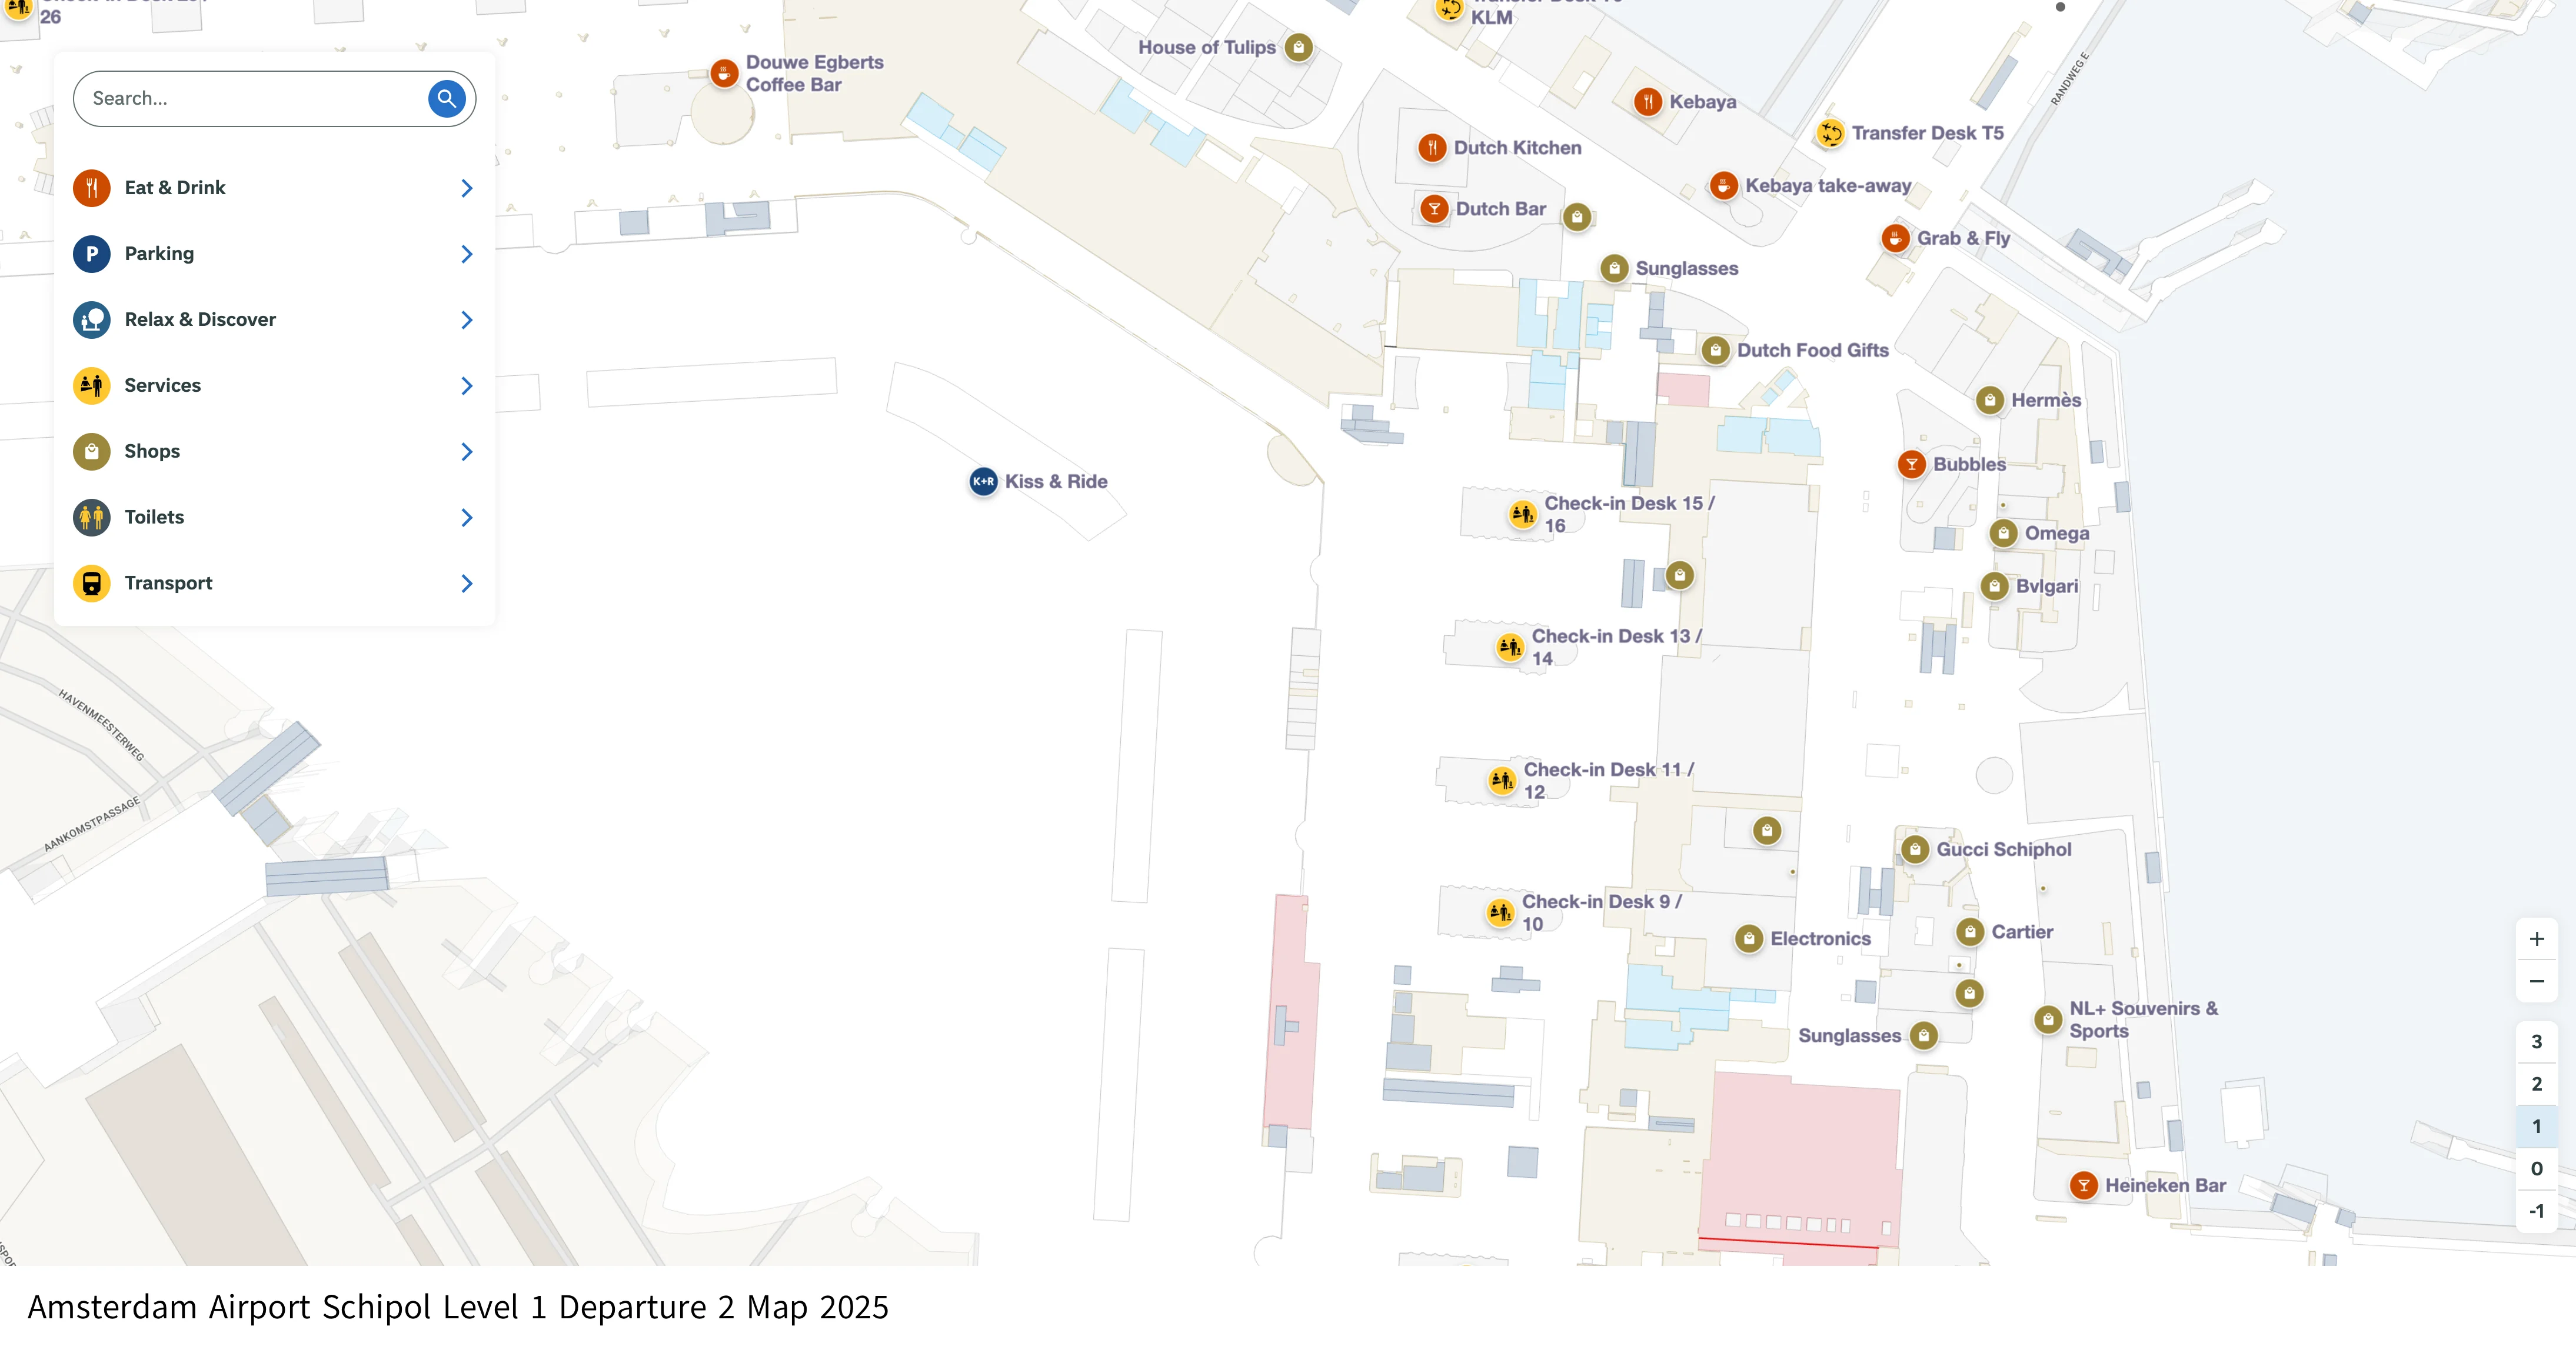
Amsterdam Airport Schipol Level 1 Departure 2 Map 2025
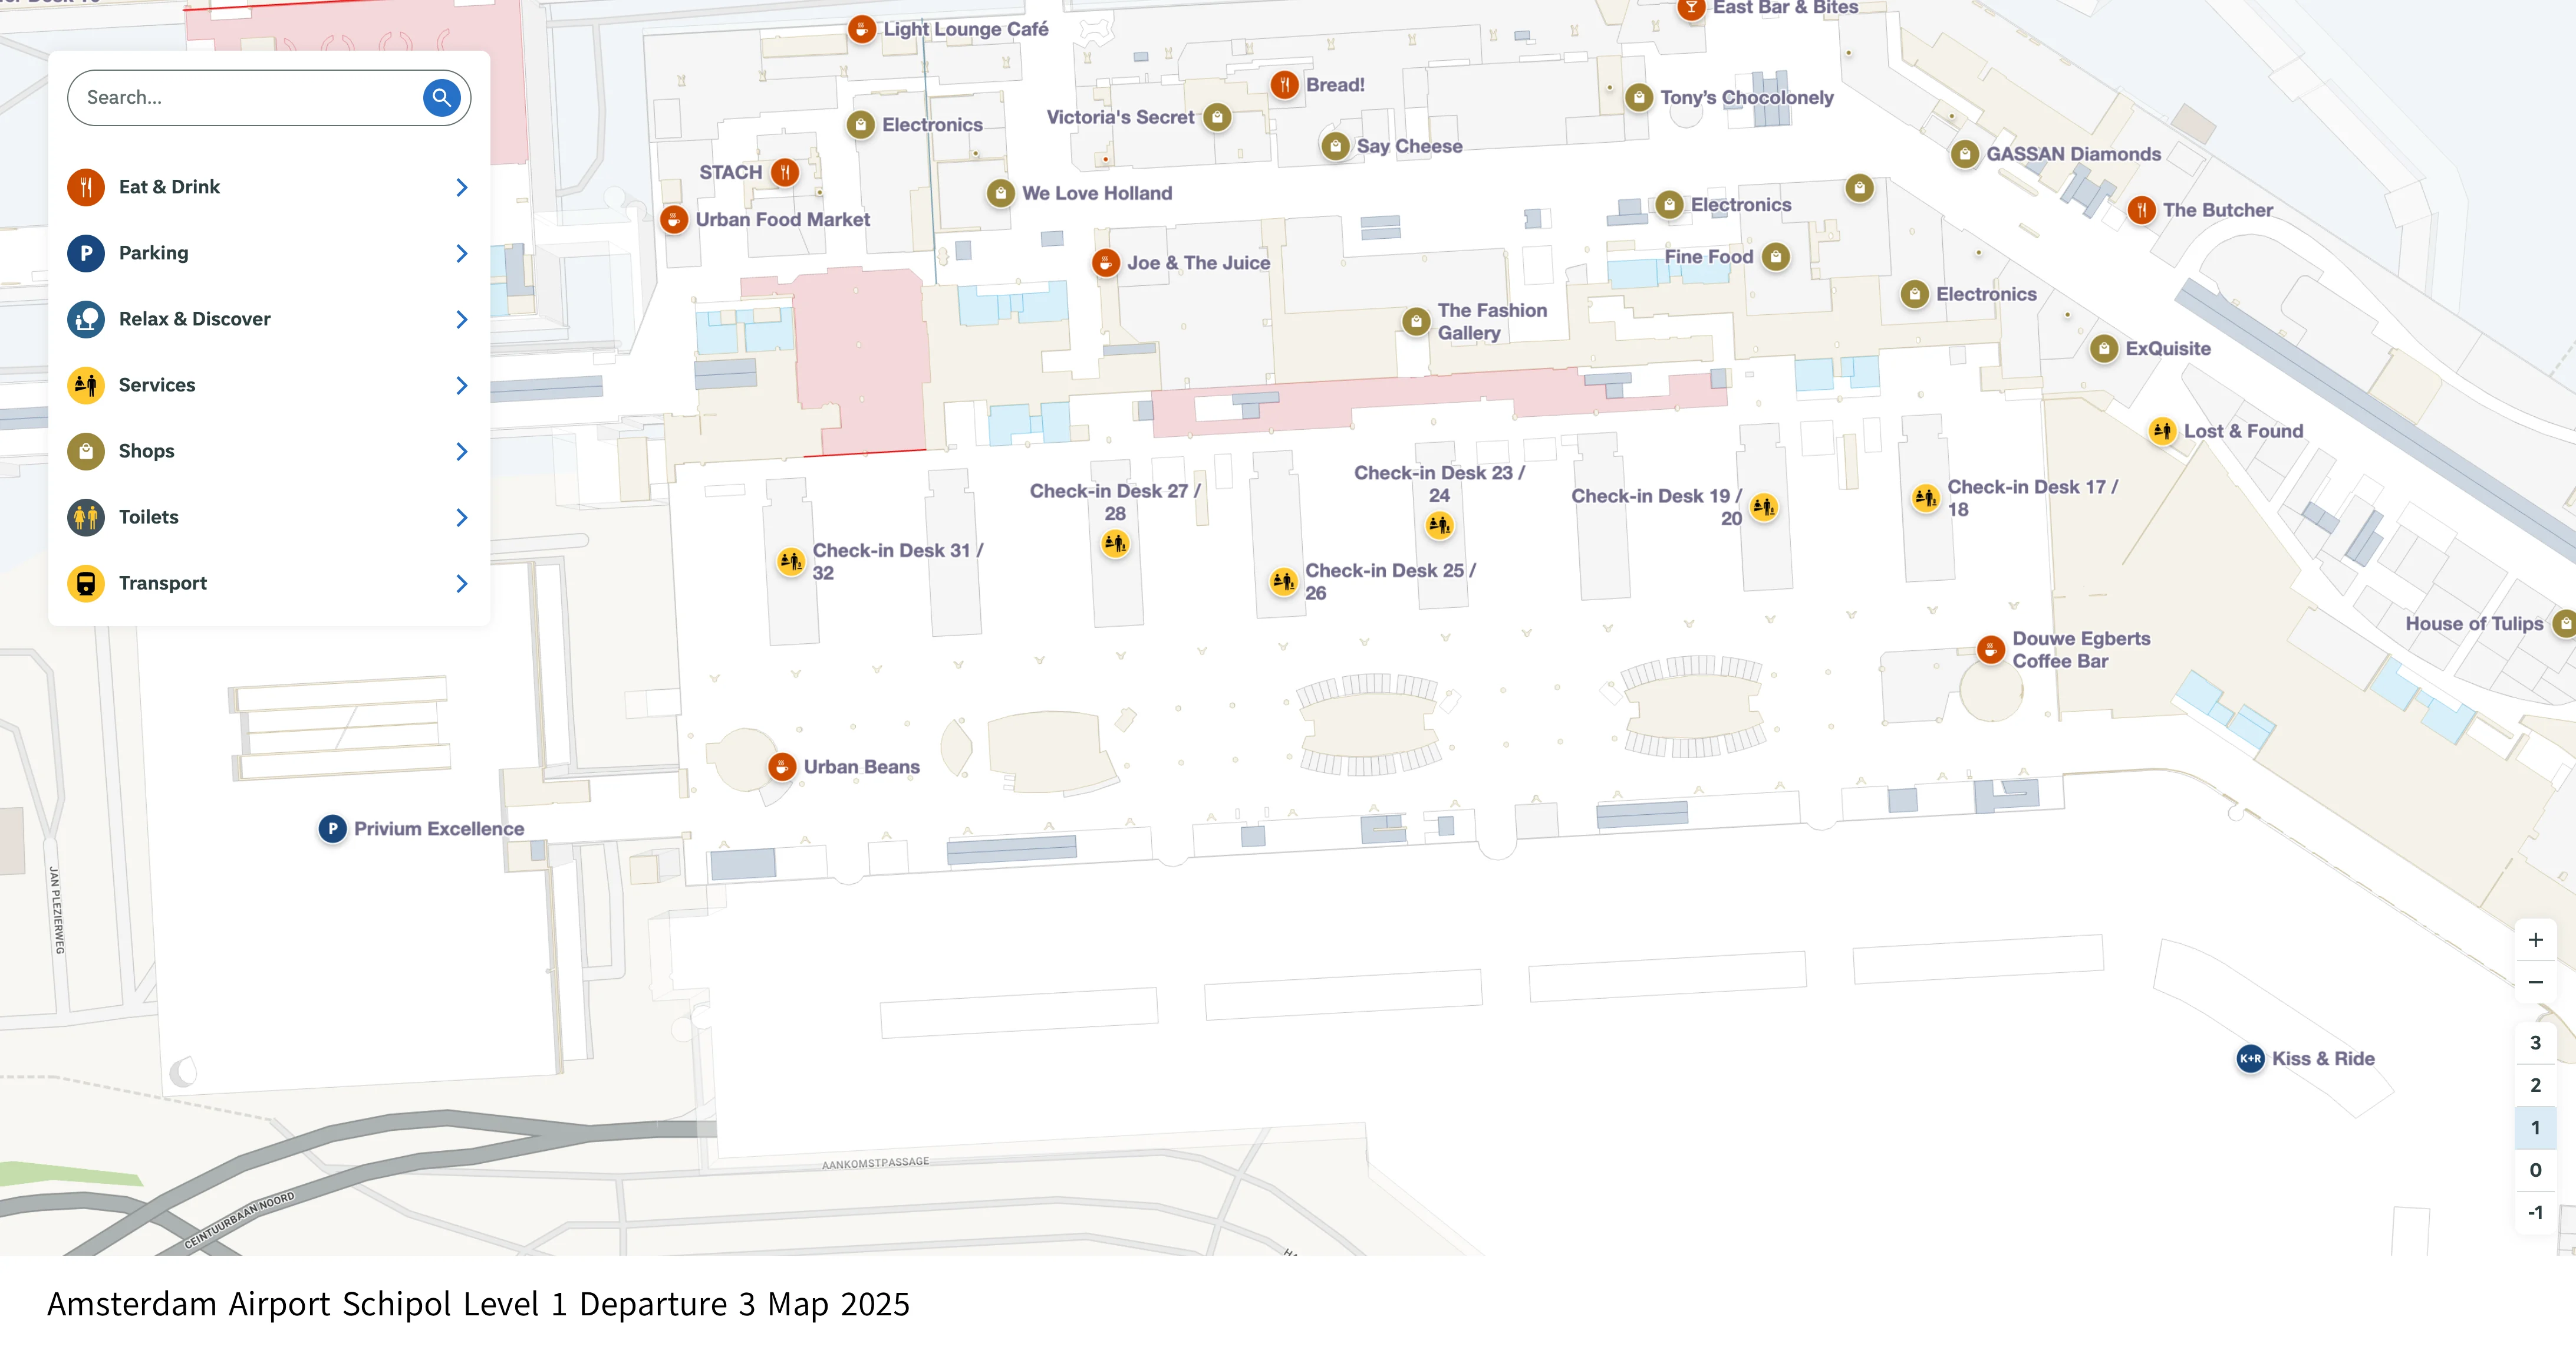
Amsterdam Airport Schipol Level 1 Departure 3 Map 2025
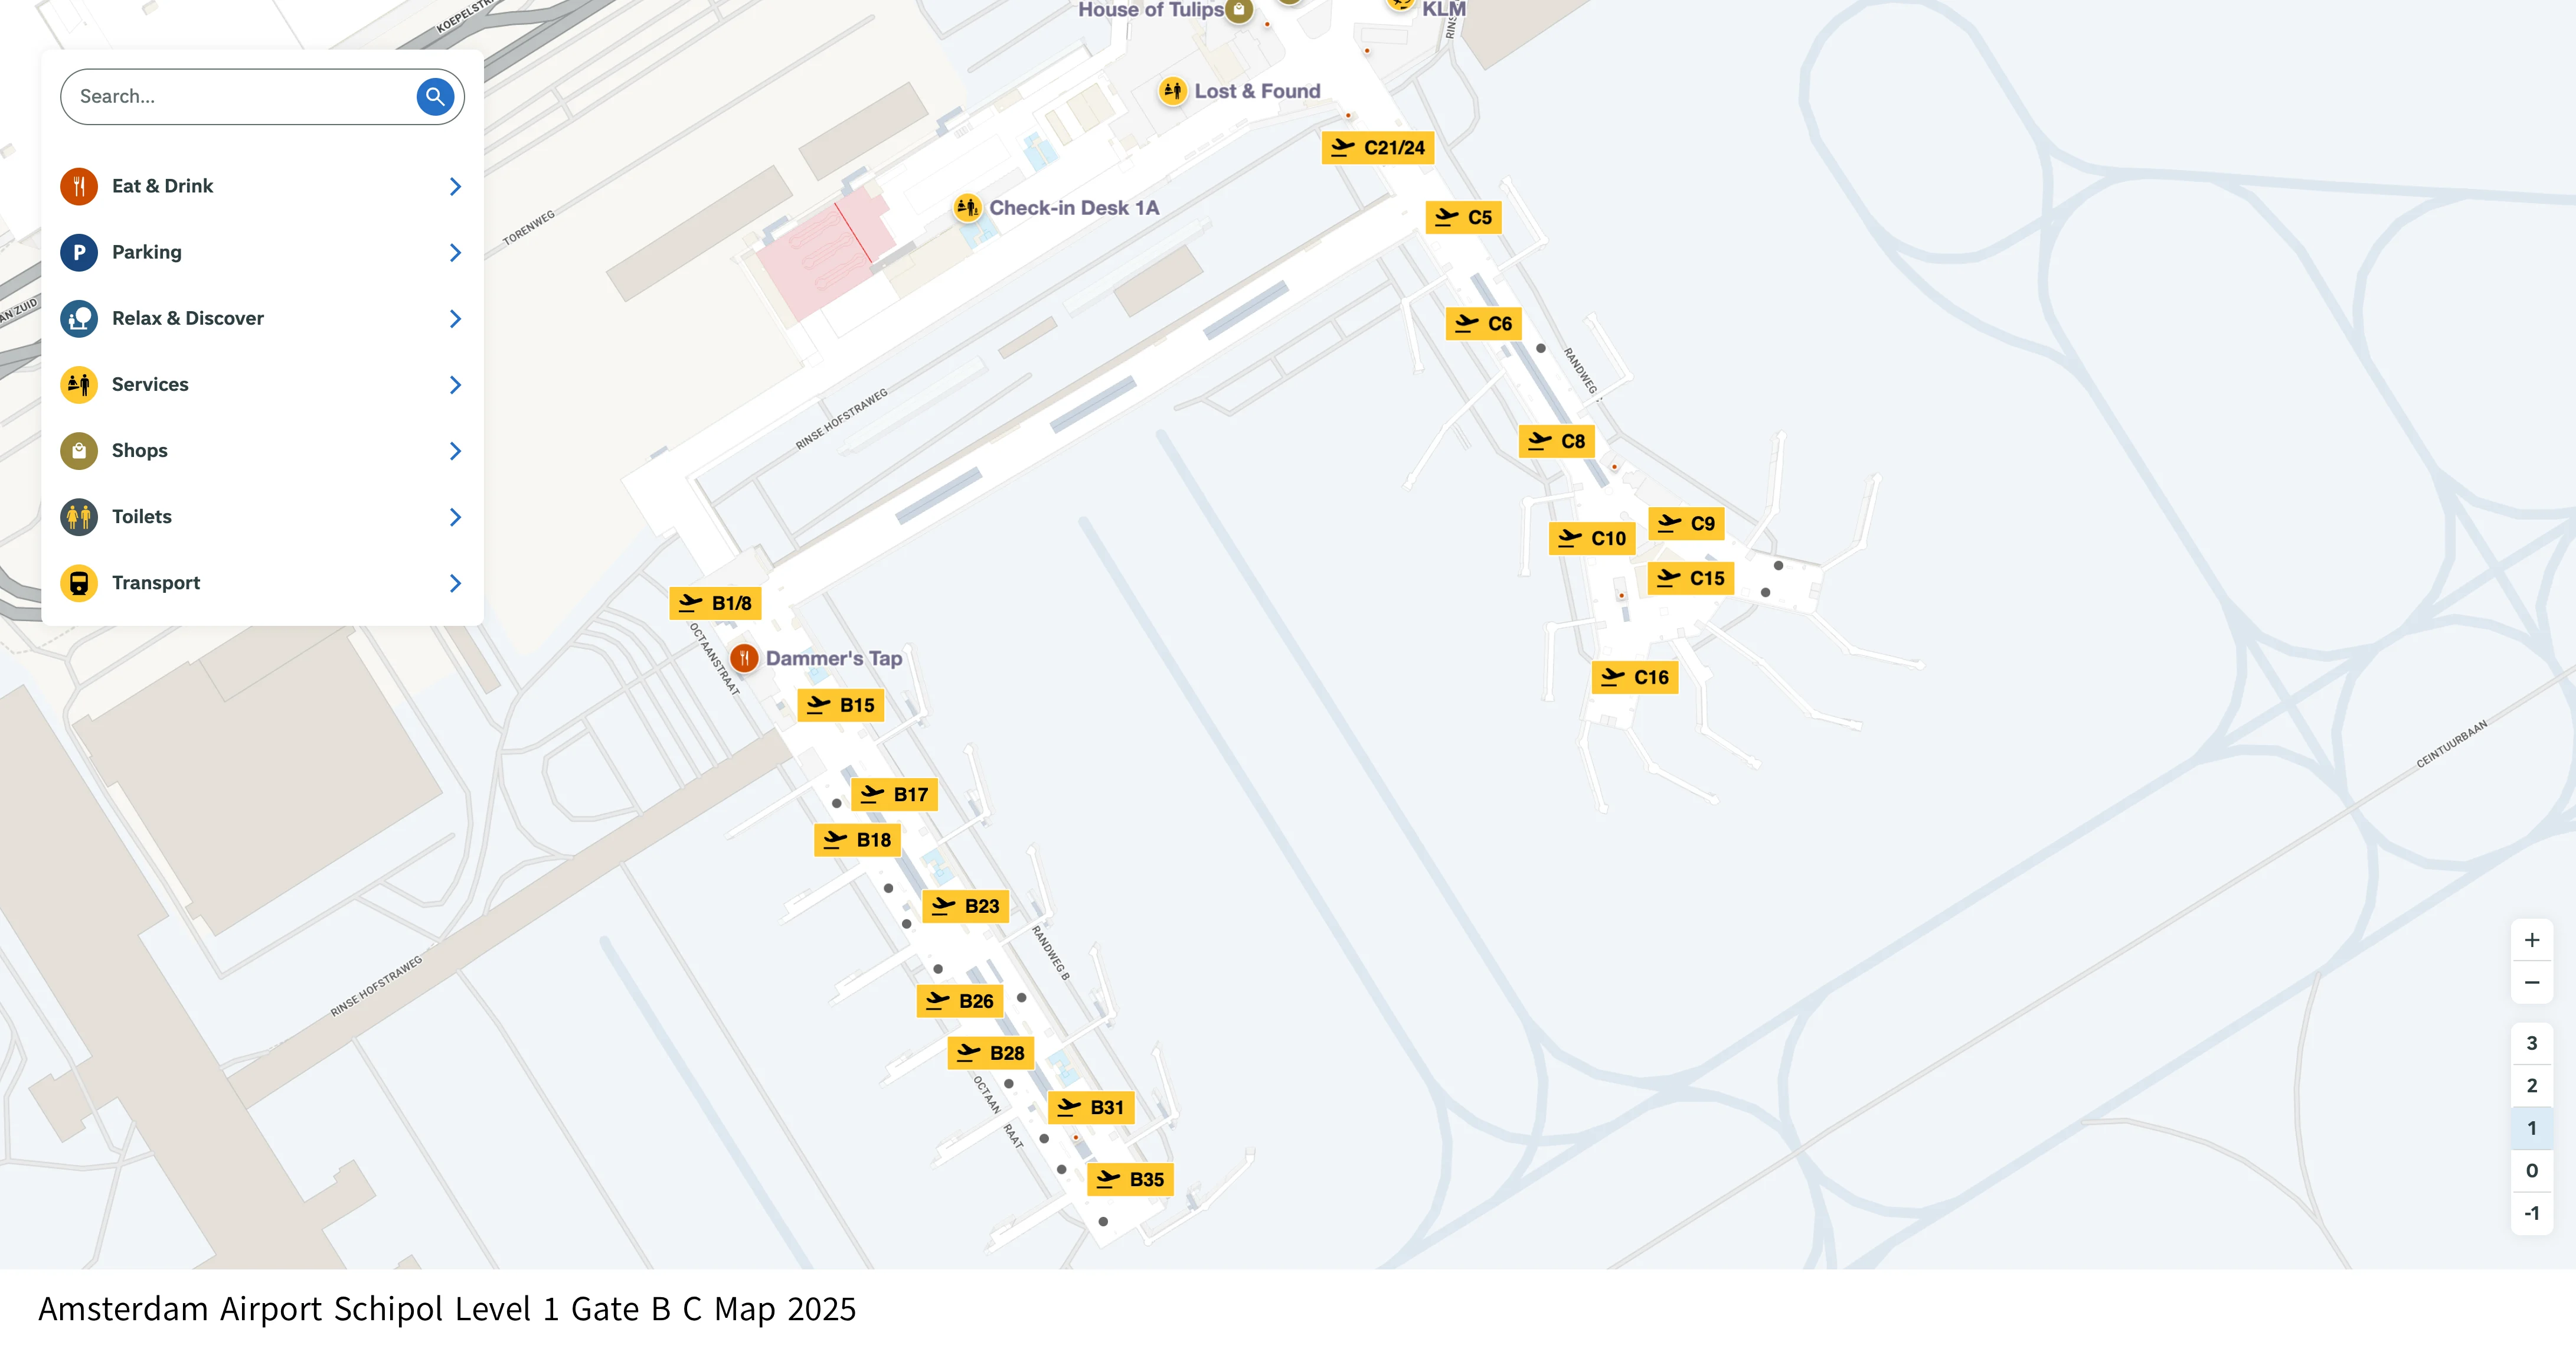
Amsterdam Airport Schipol Level 1 Gate B C Map 2025
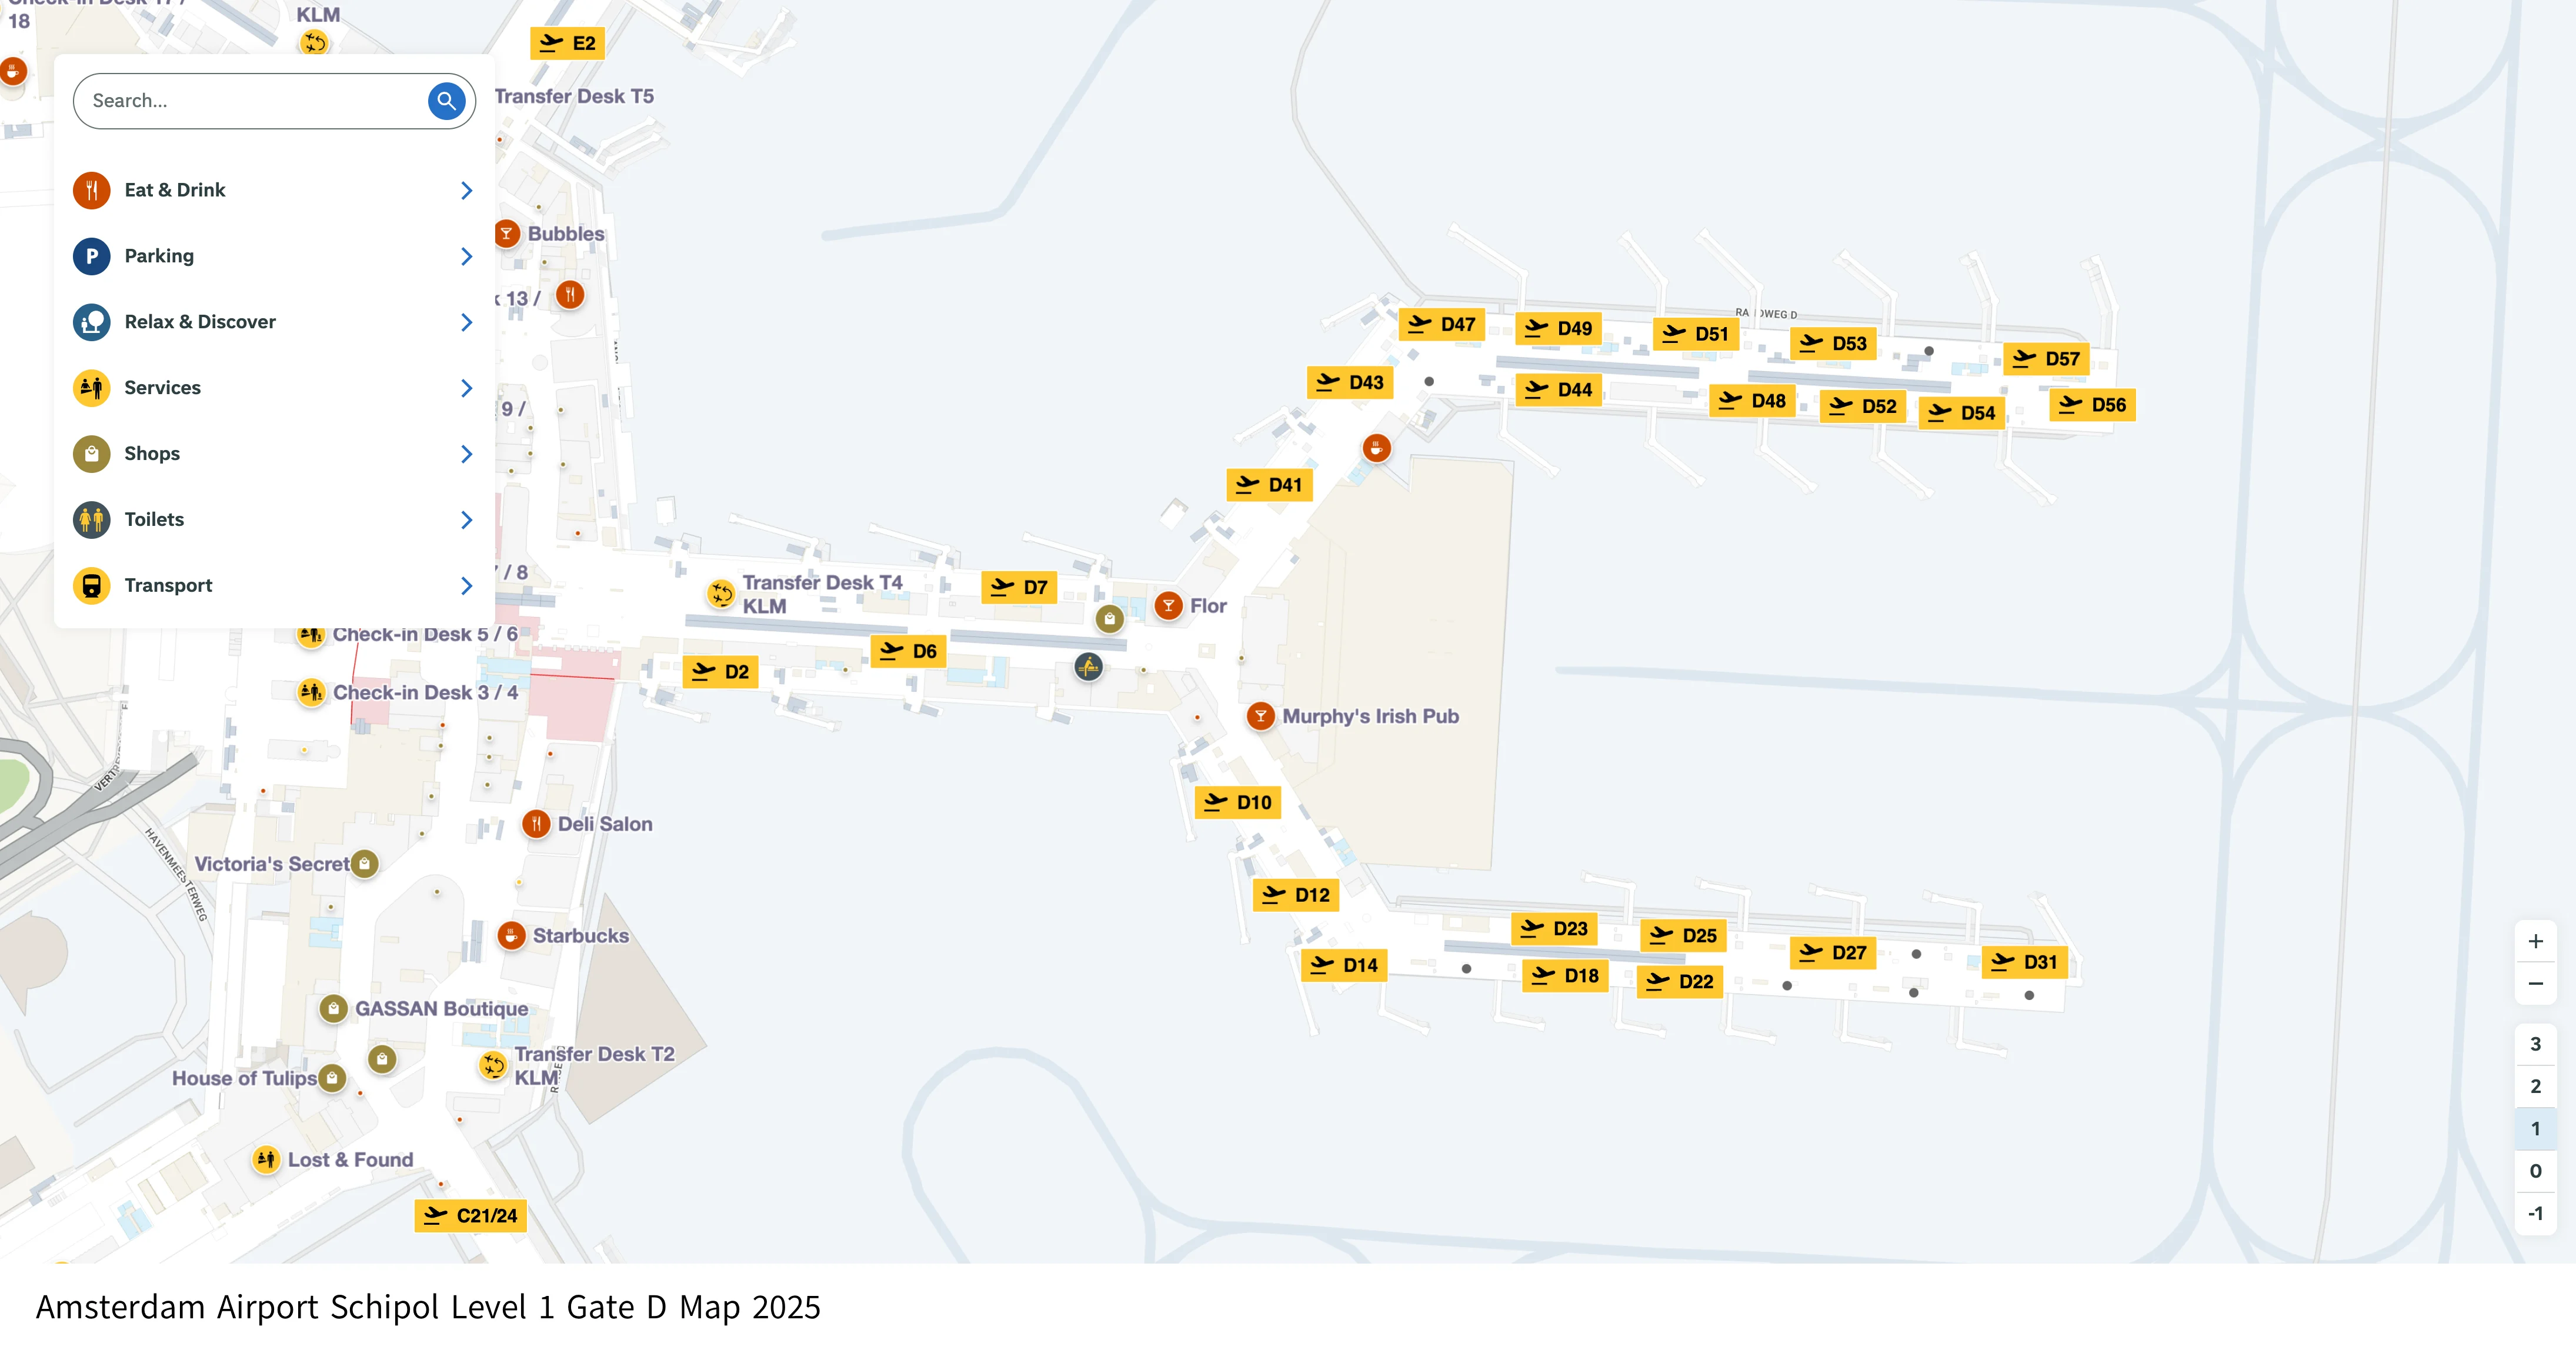
Amsterdam Airport Schipol Level 1 Gate D Map 2025
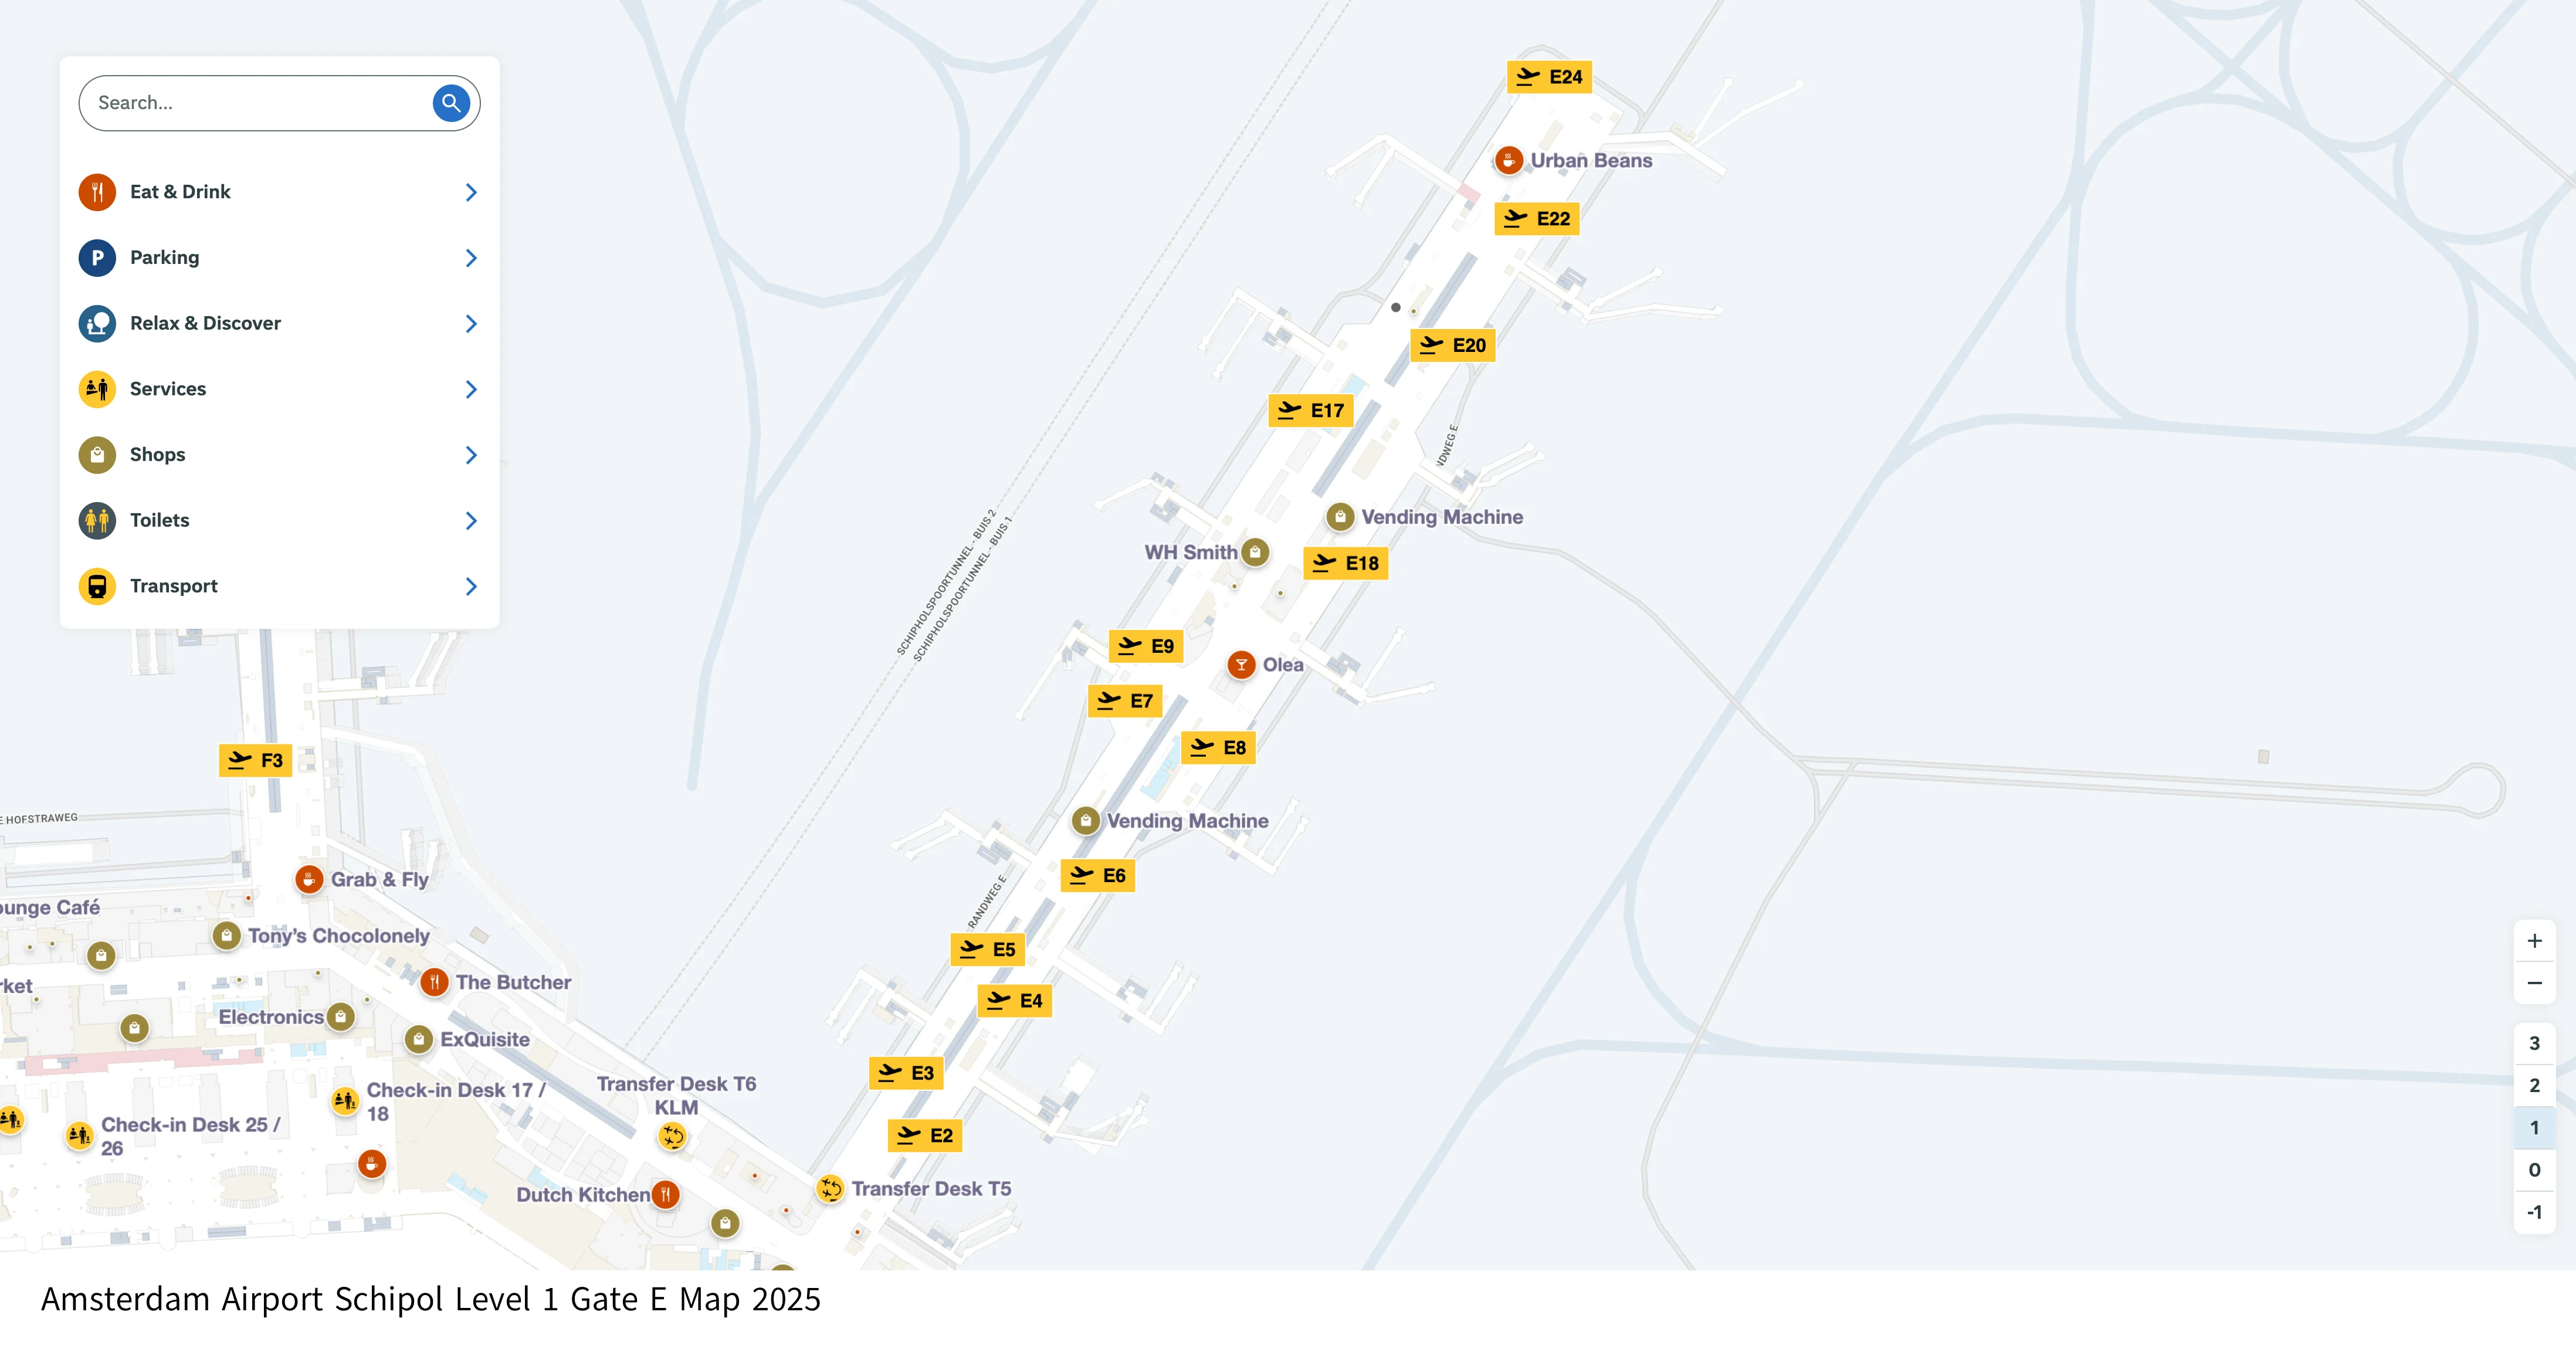
Amsterdam Airport Schipol Level 1 Gate E Map 2025
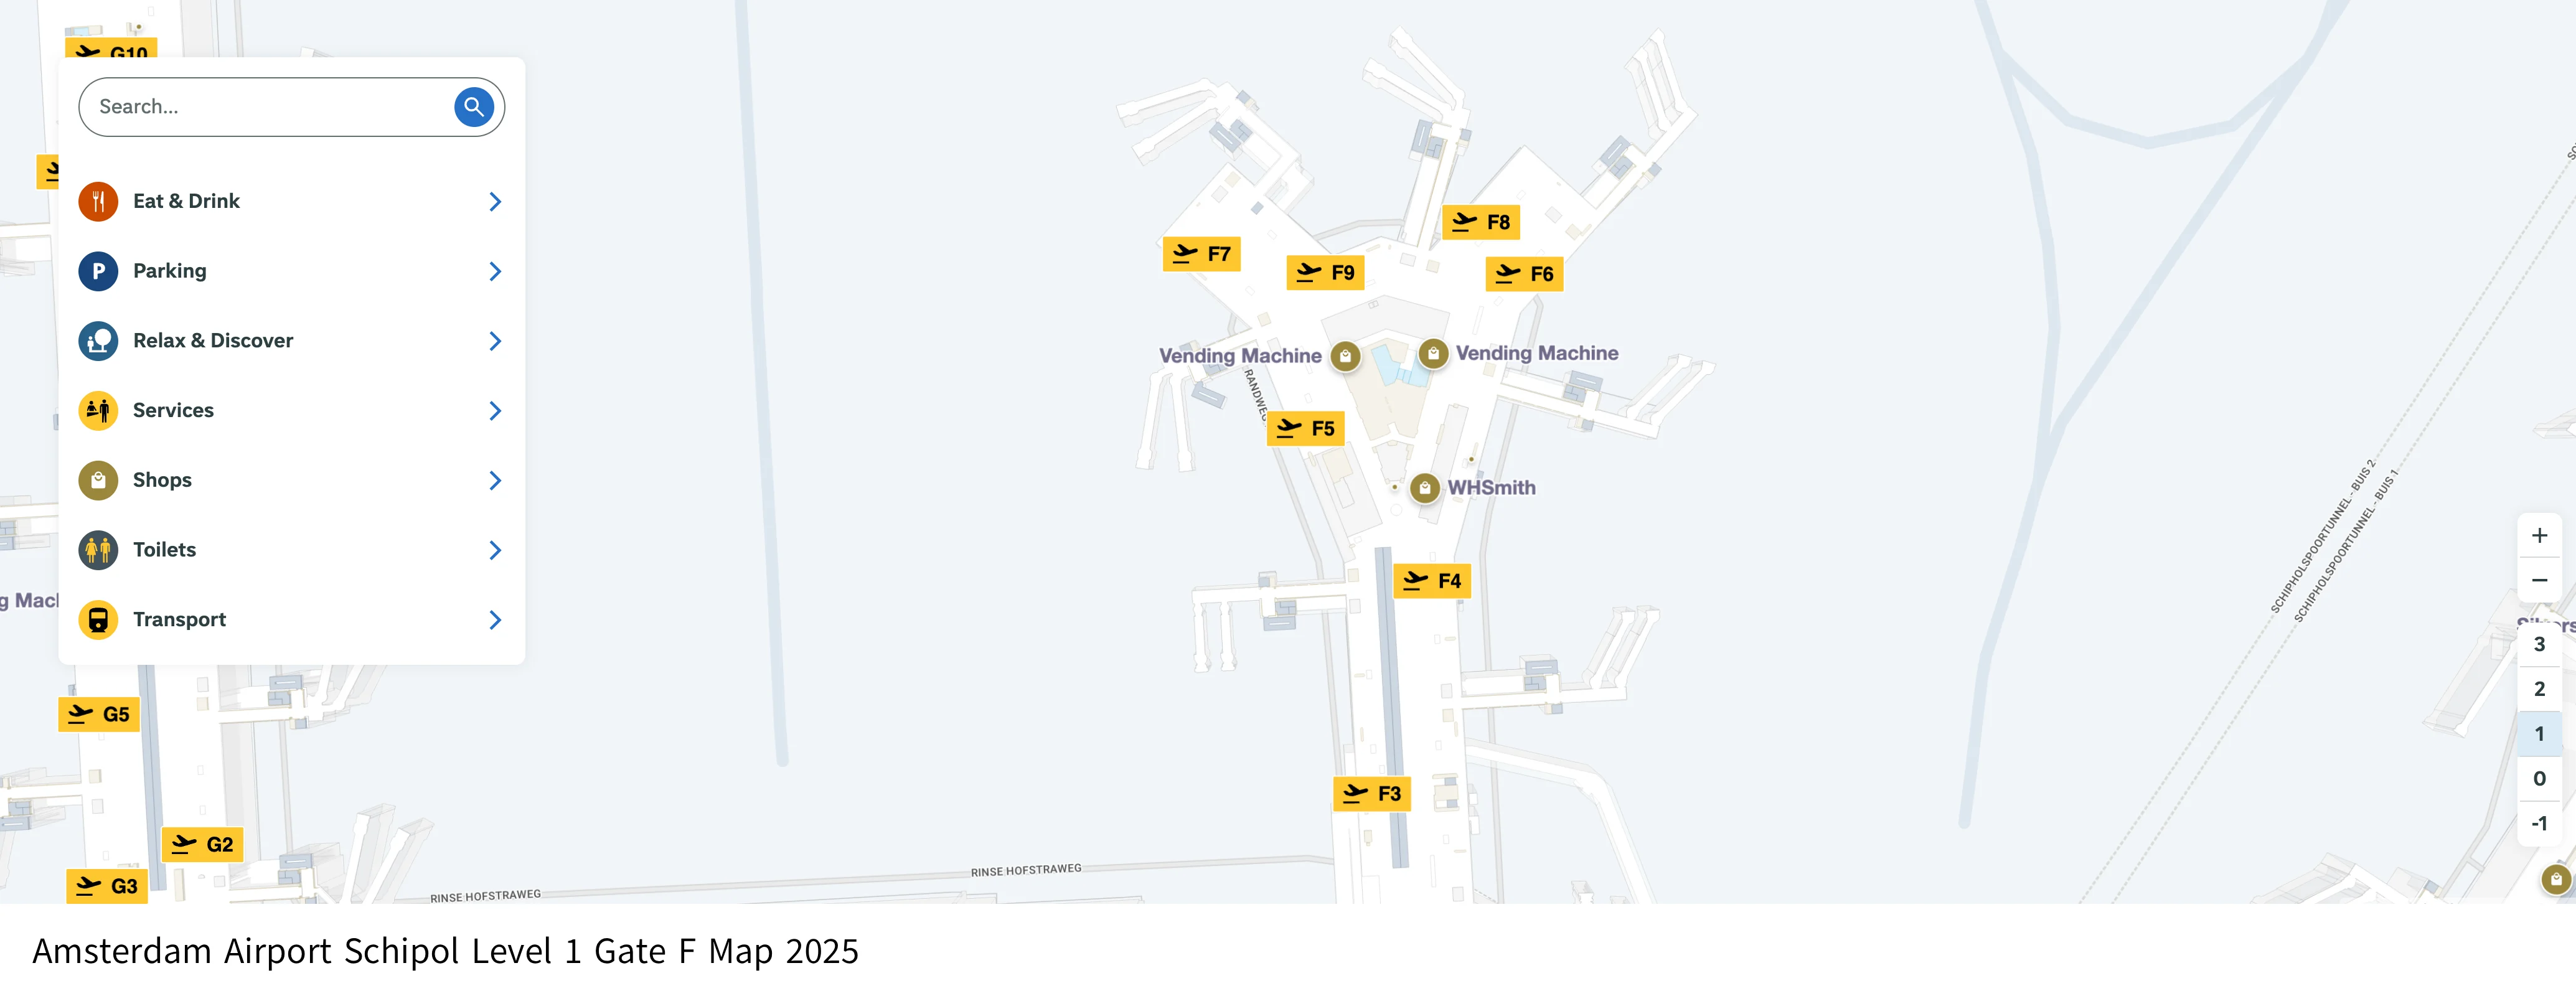
Amsterdam Airport Schipol Level 1 Gate F Map 2025
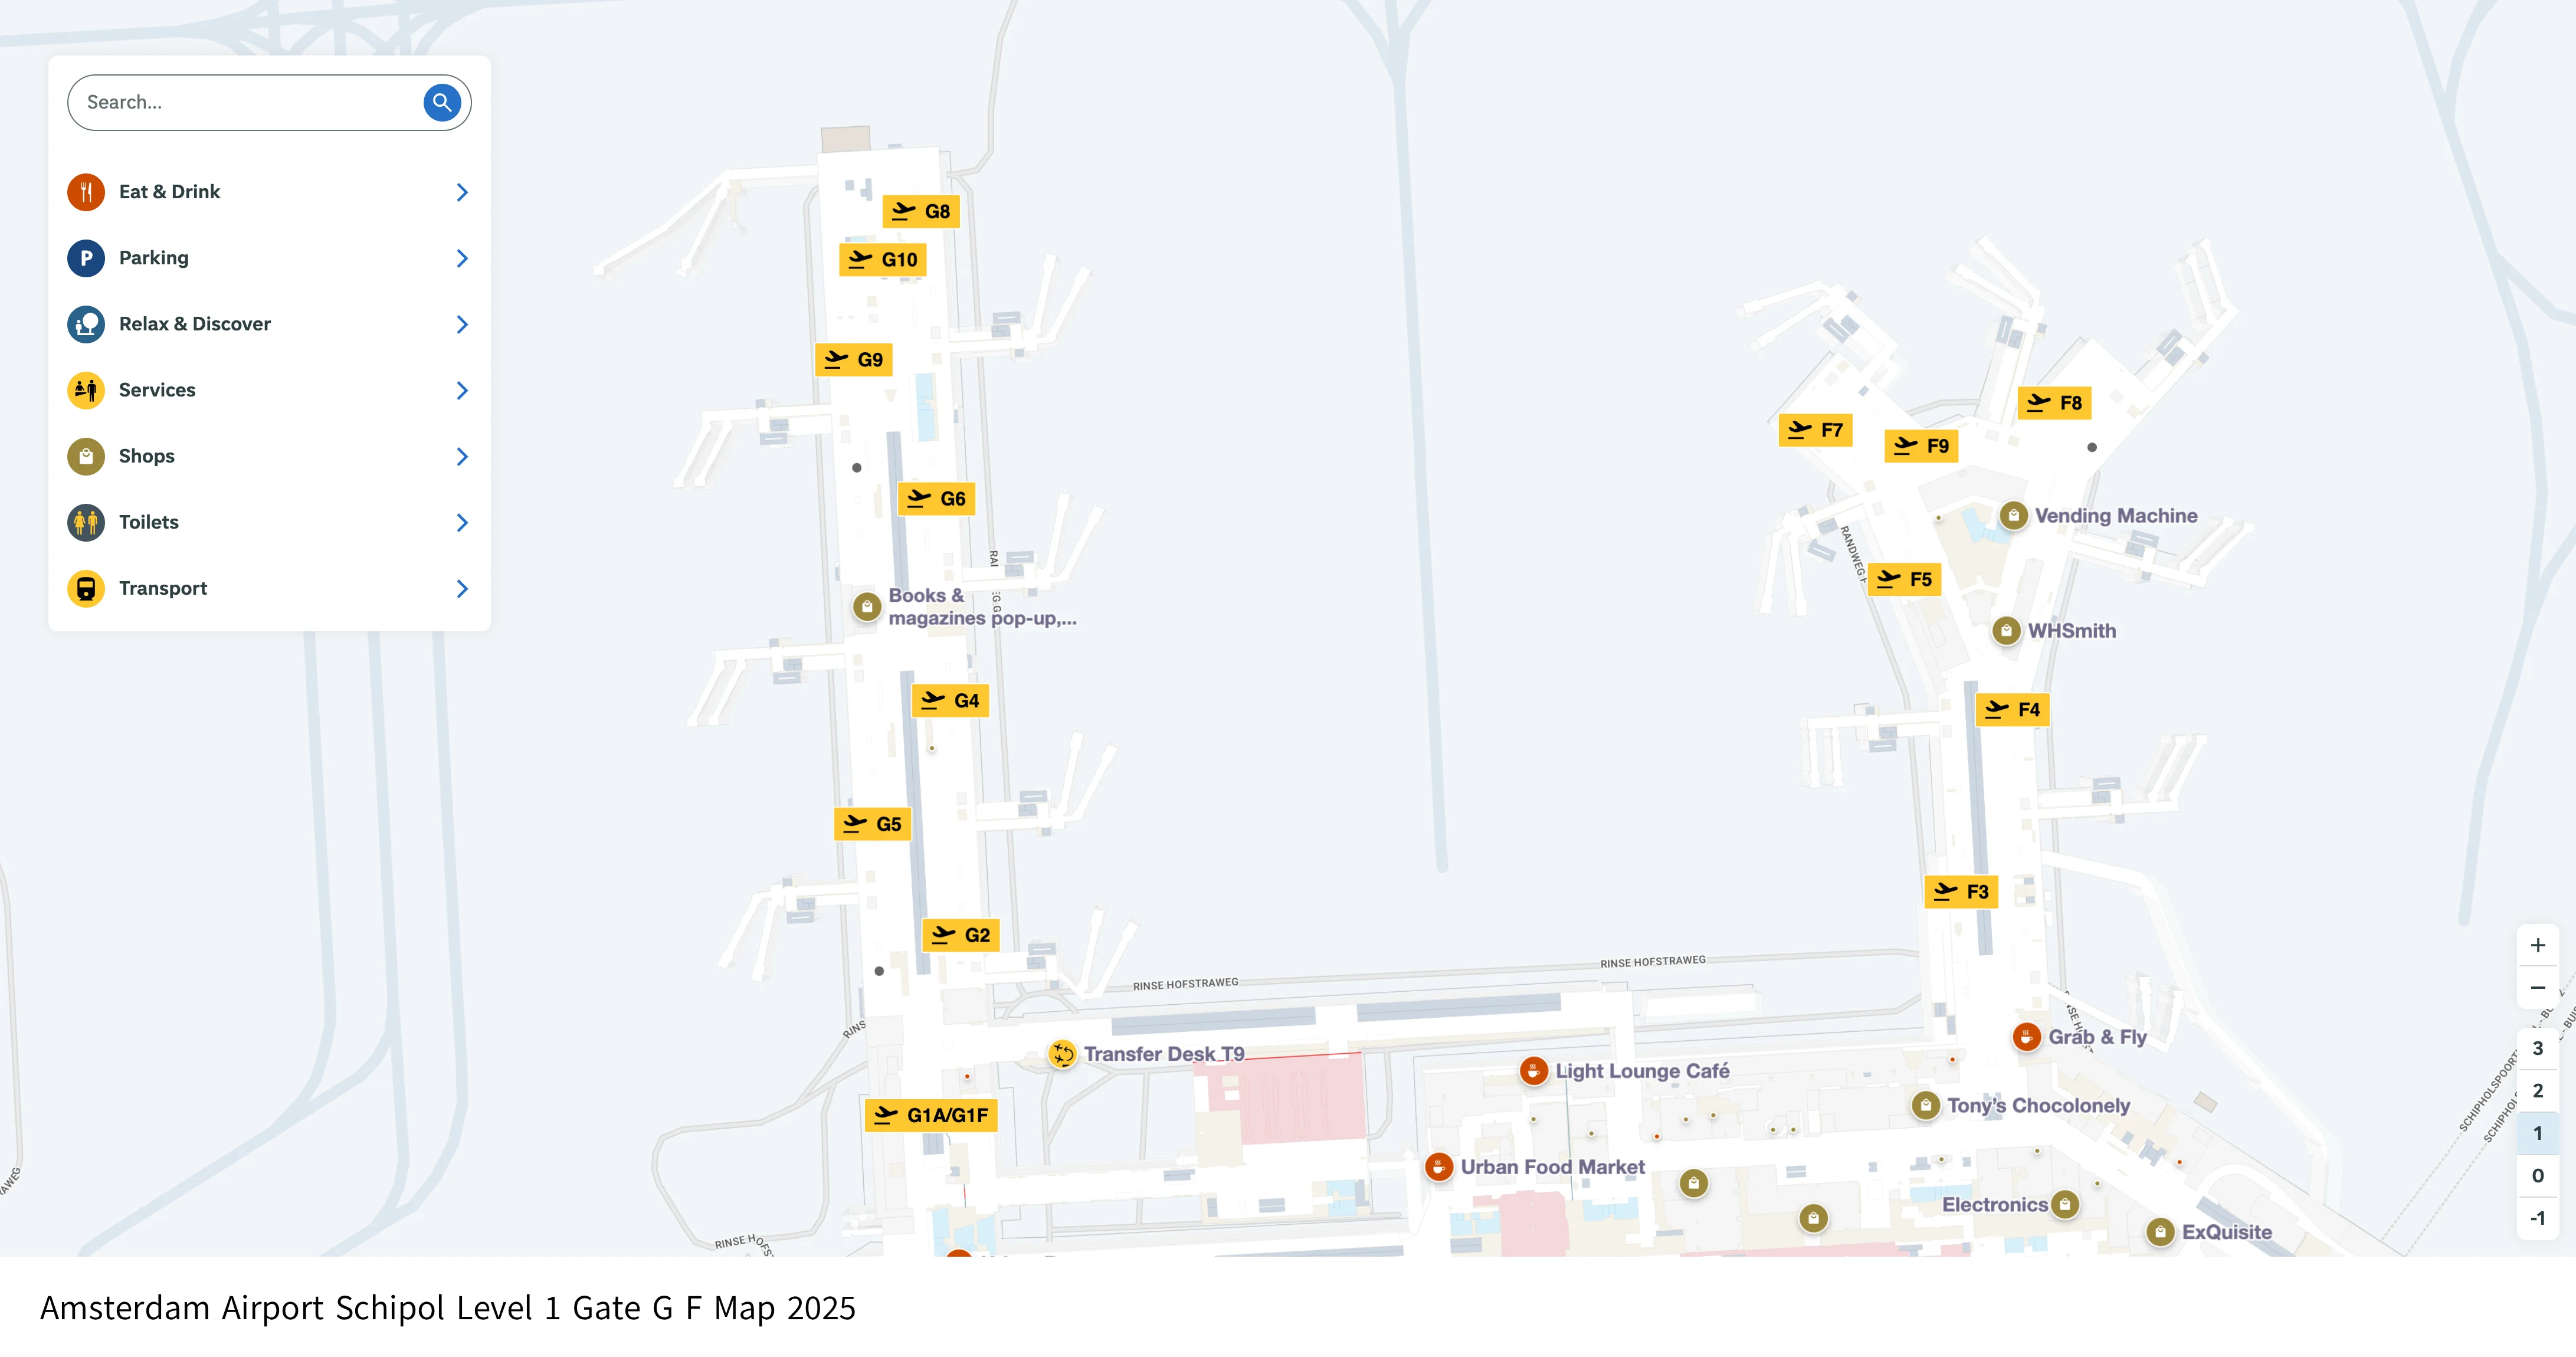
Amsterdam Airport Schipol Level 1 Gate G F Map 2025
Amsterdam Airport Schipol Level 1 Gate H M Map 2025

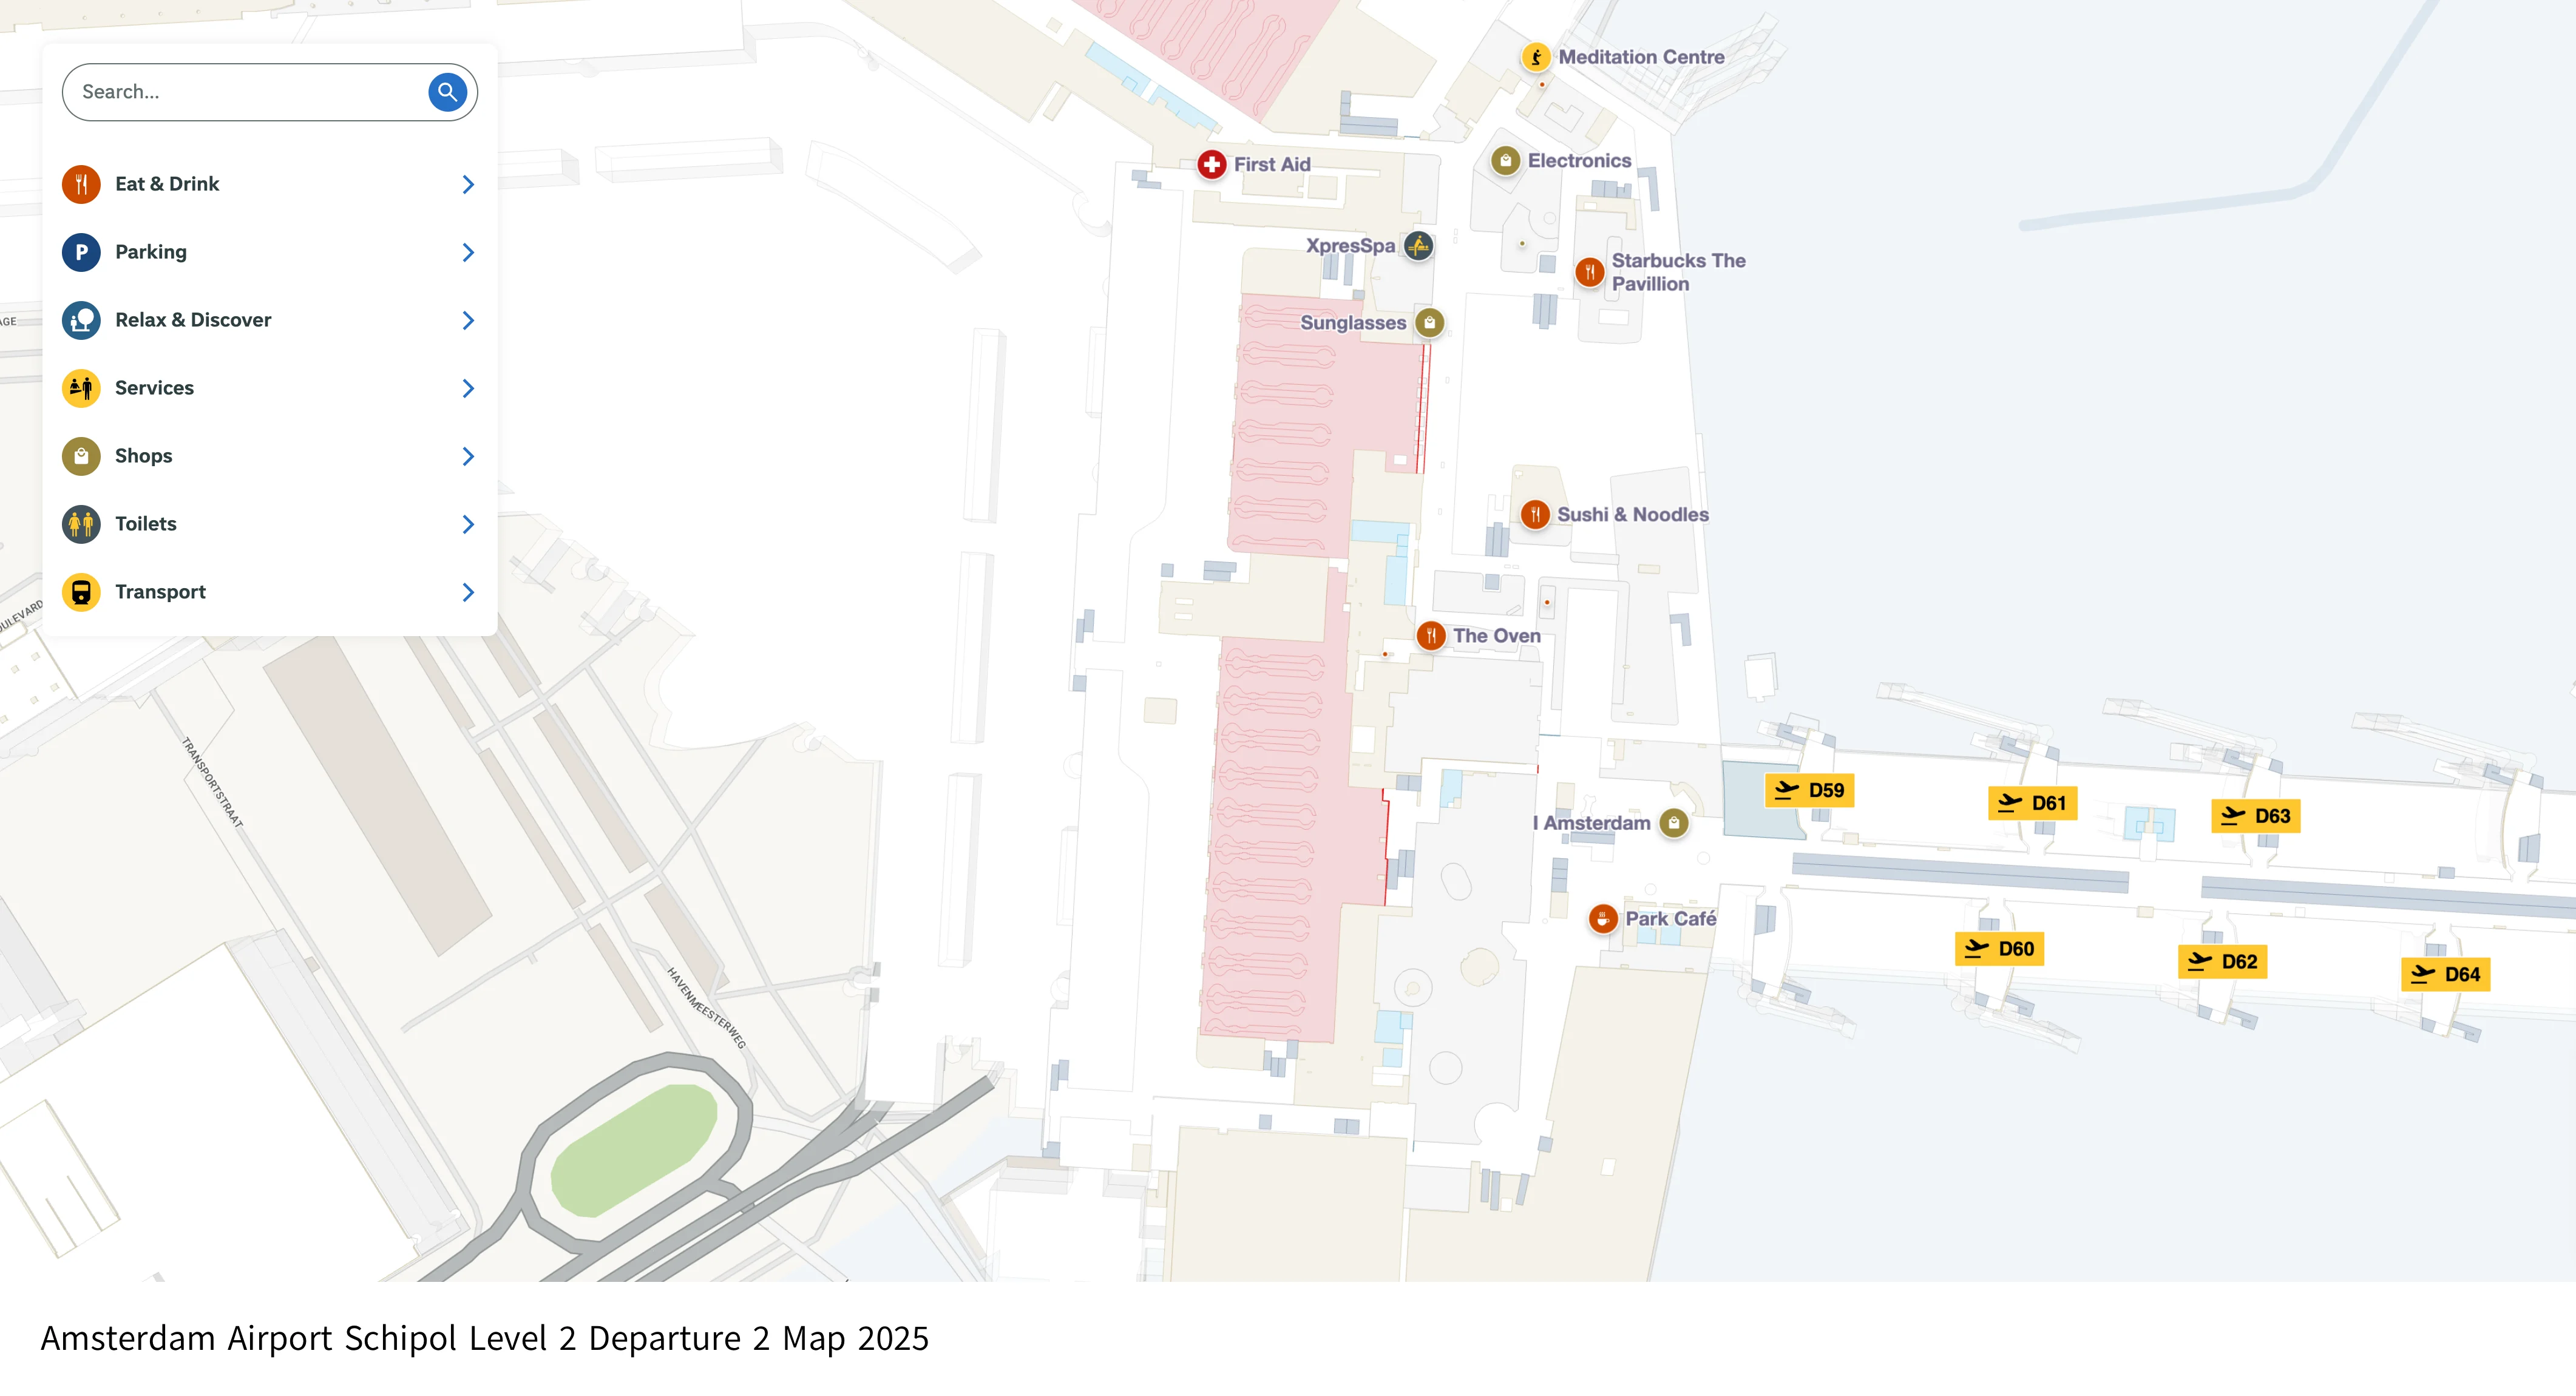
Amsterdam Airport Schipol Level 2 Departure 2 Map 2025
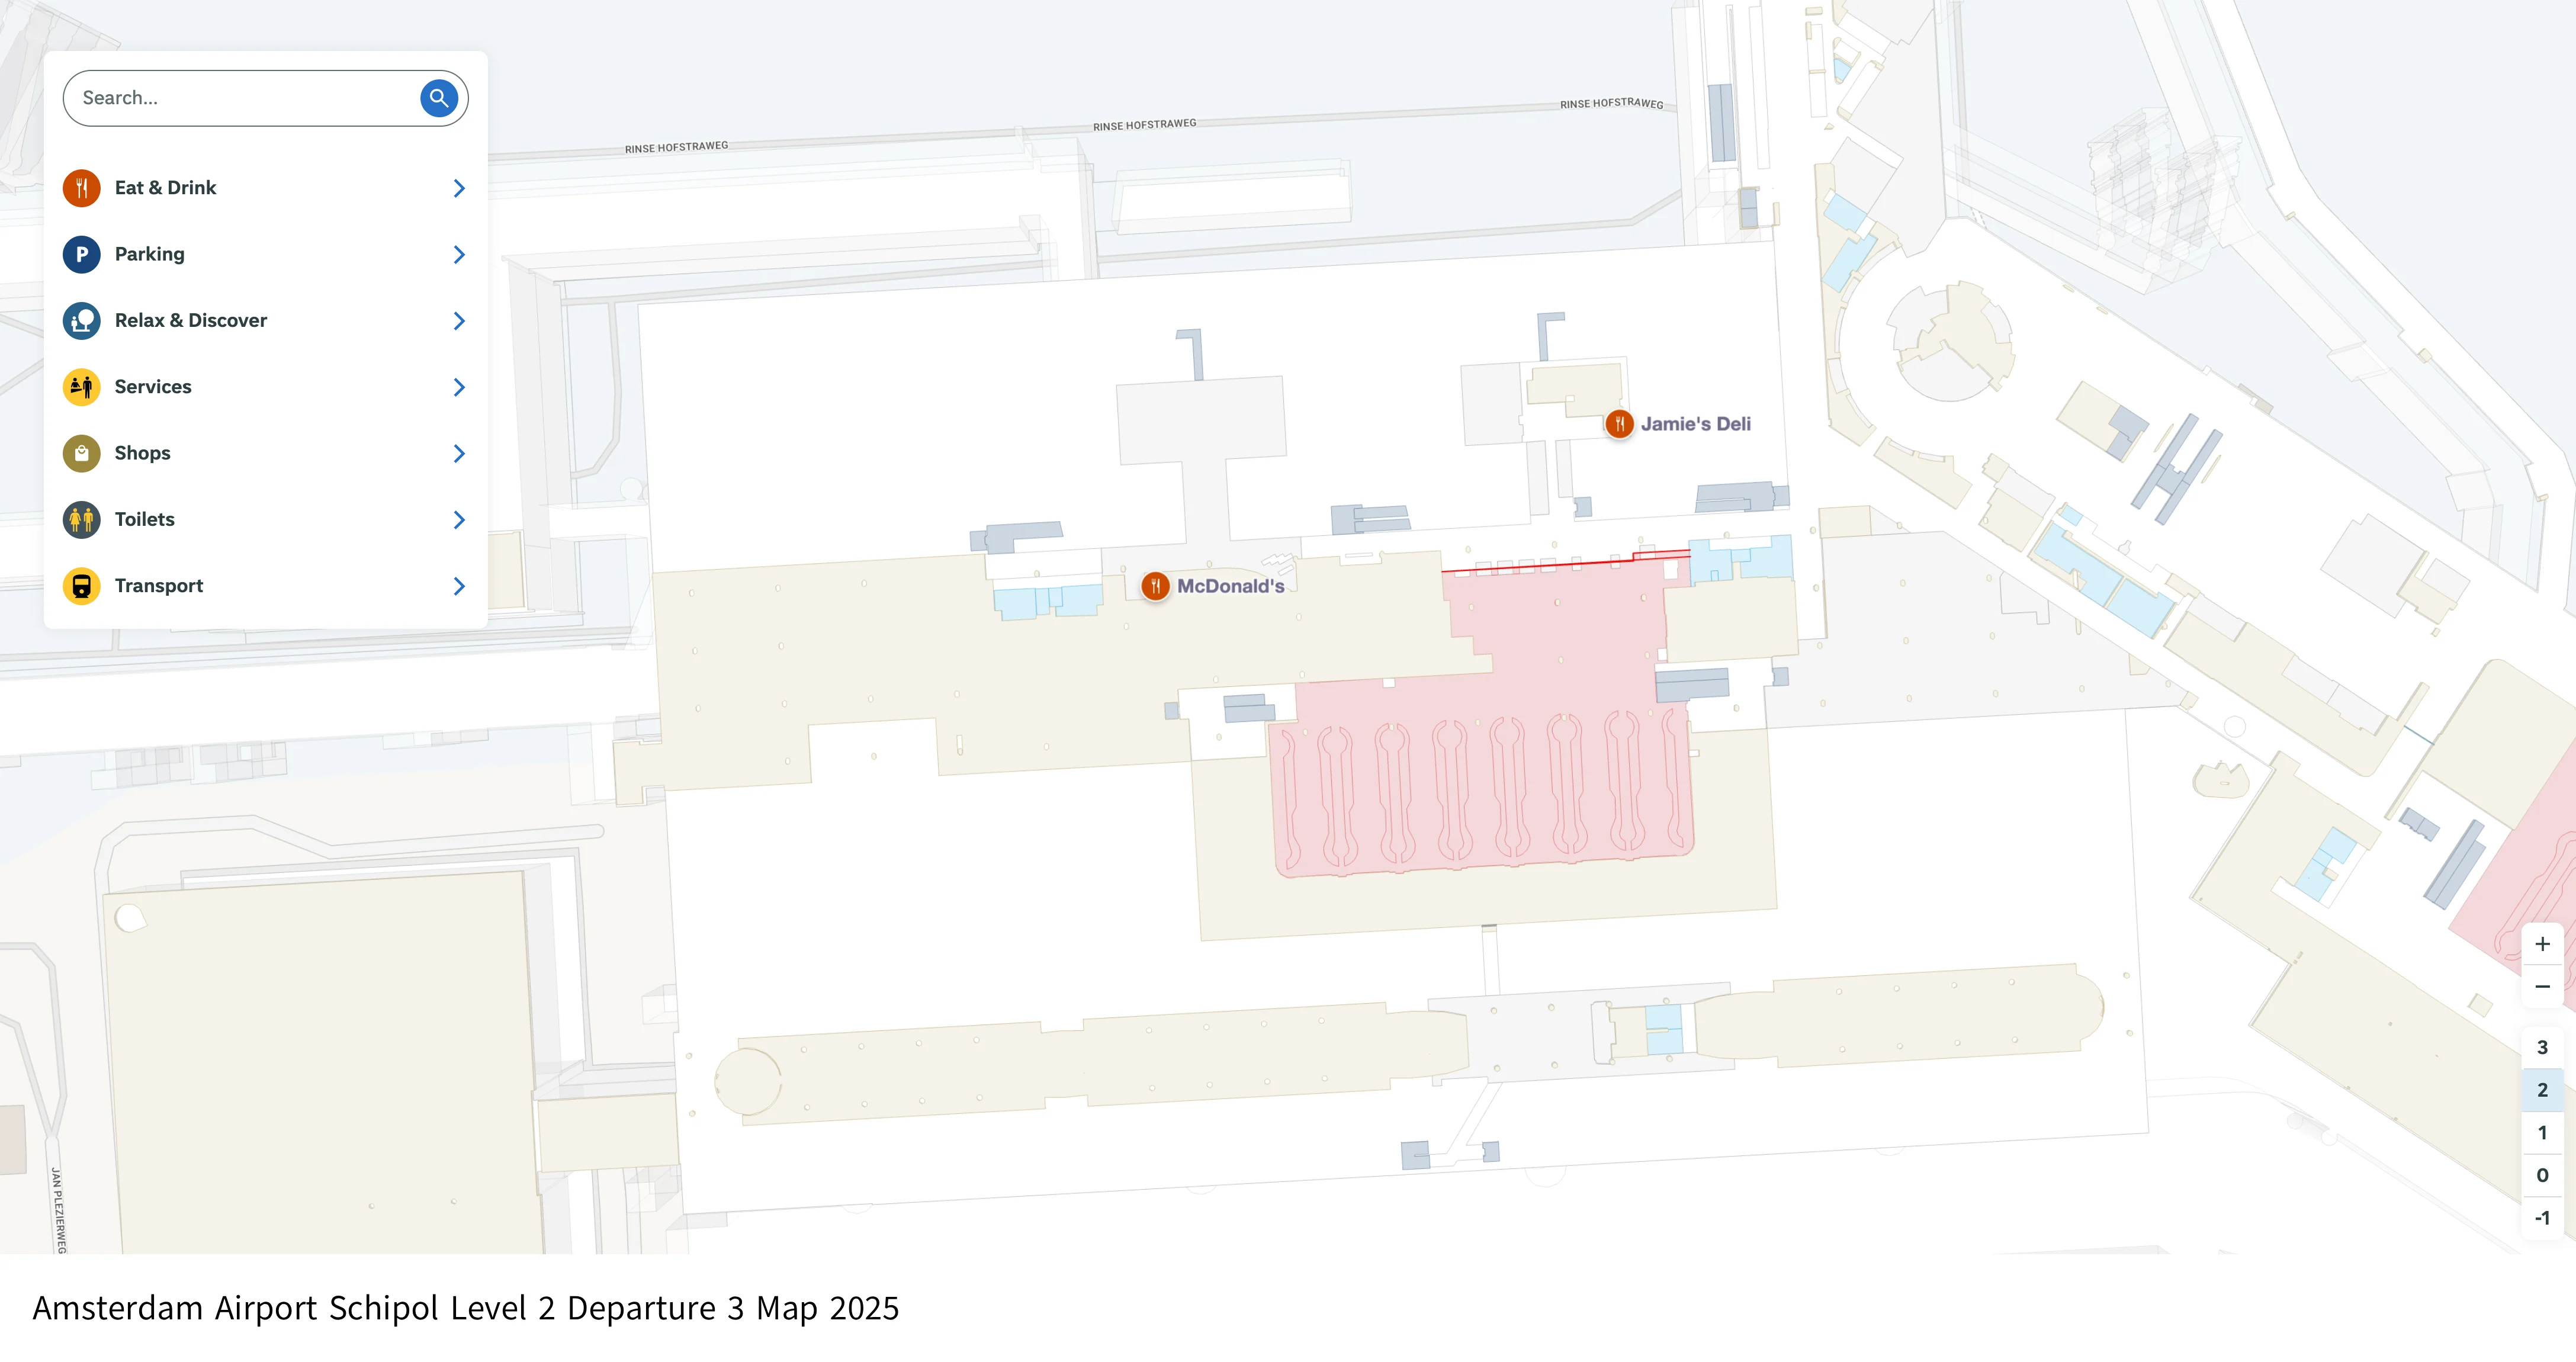
Amsterdam Airport Schipol Level 2 Departure 3 Map 2025
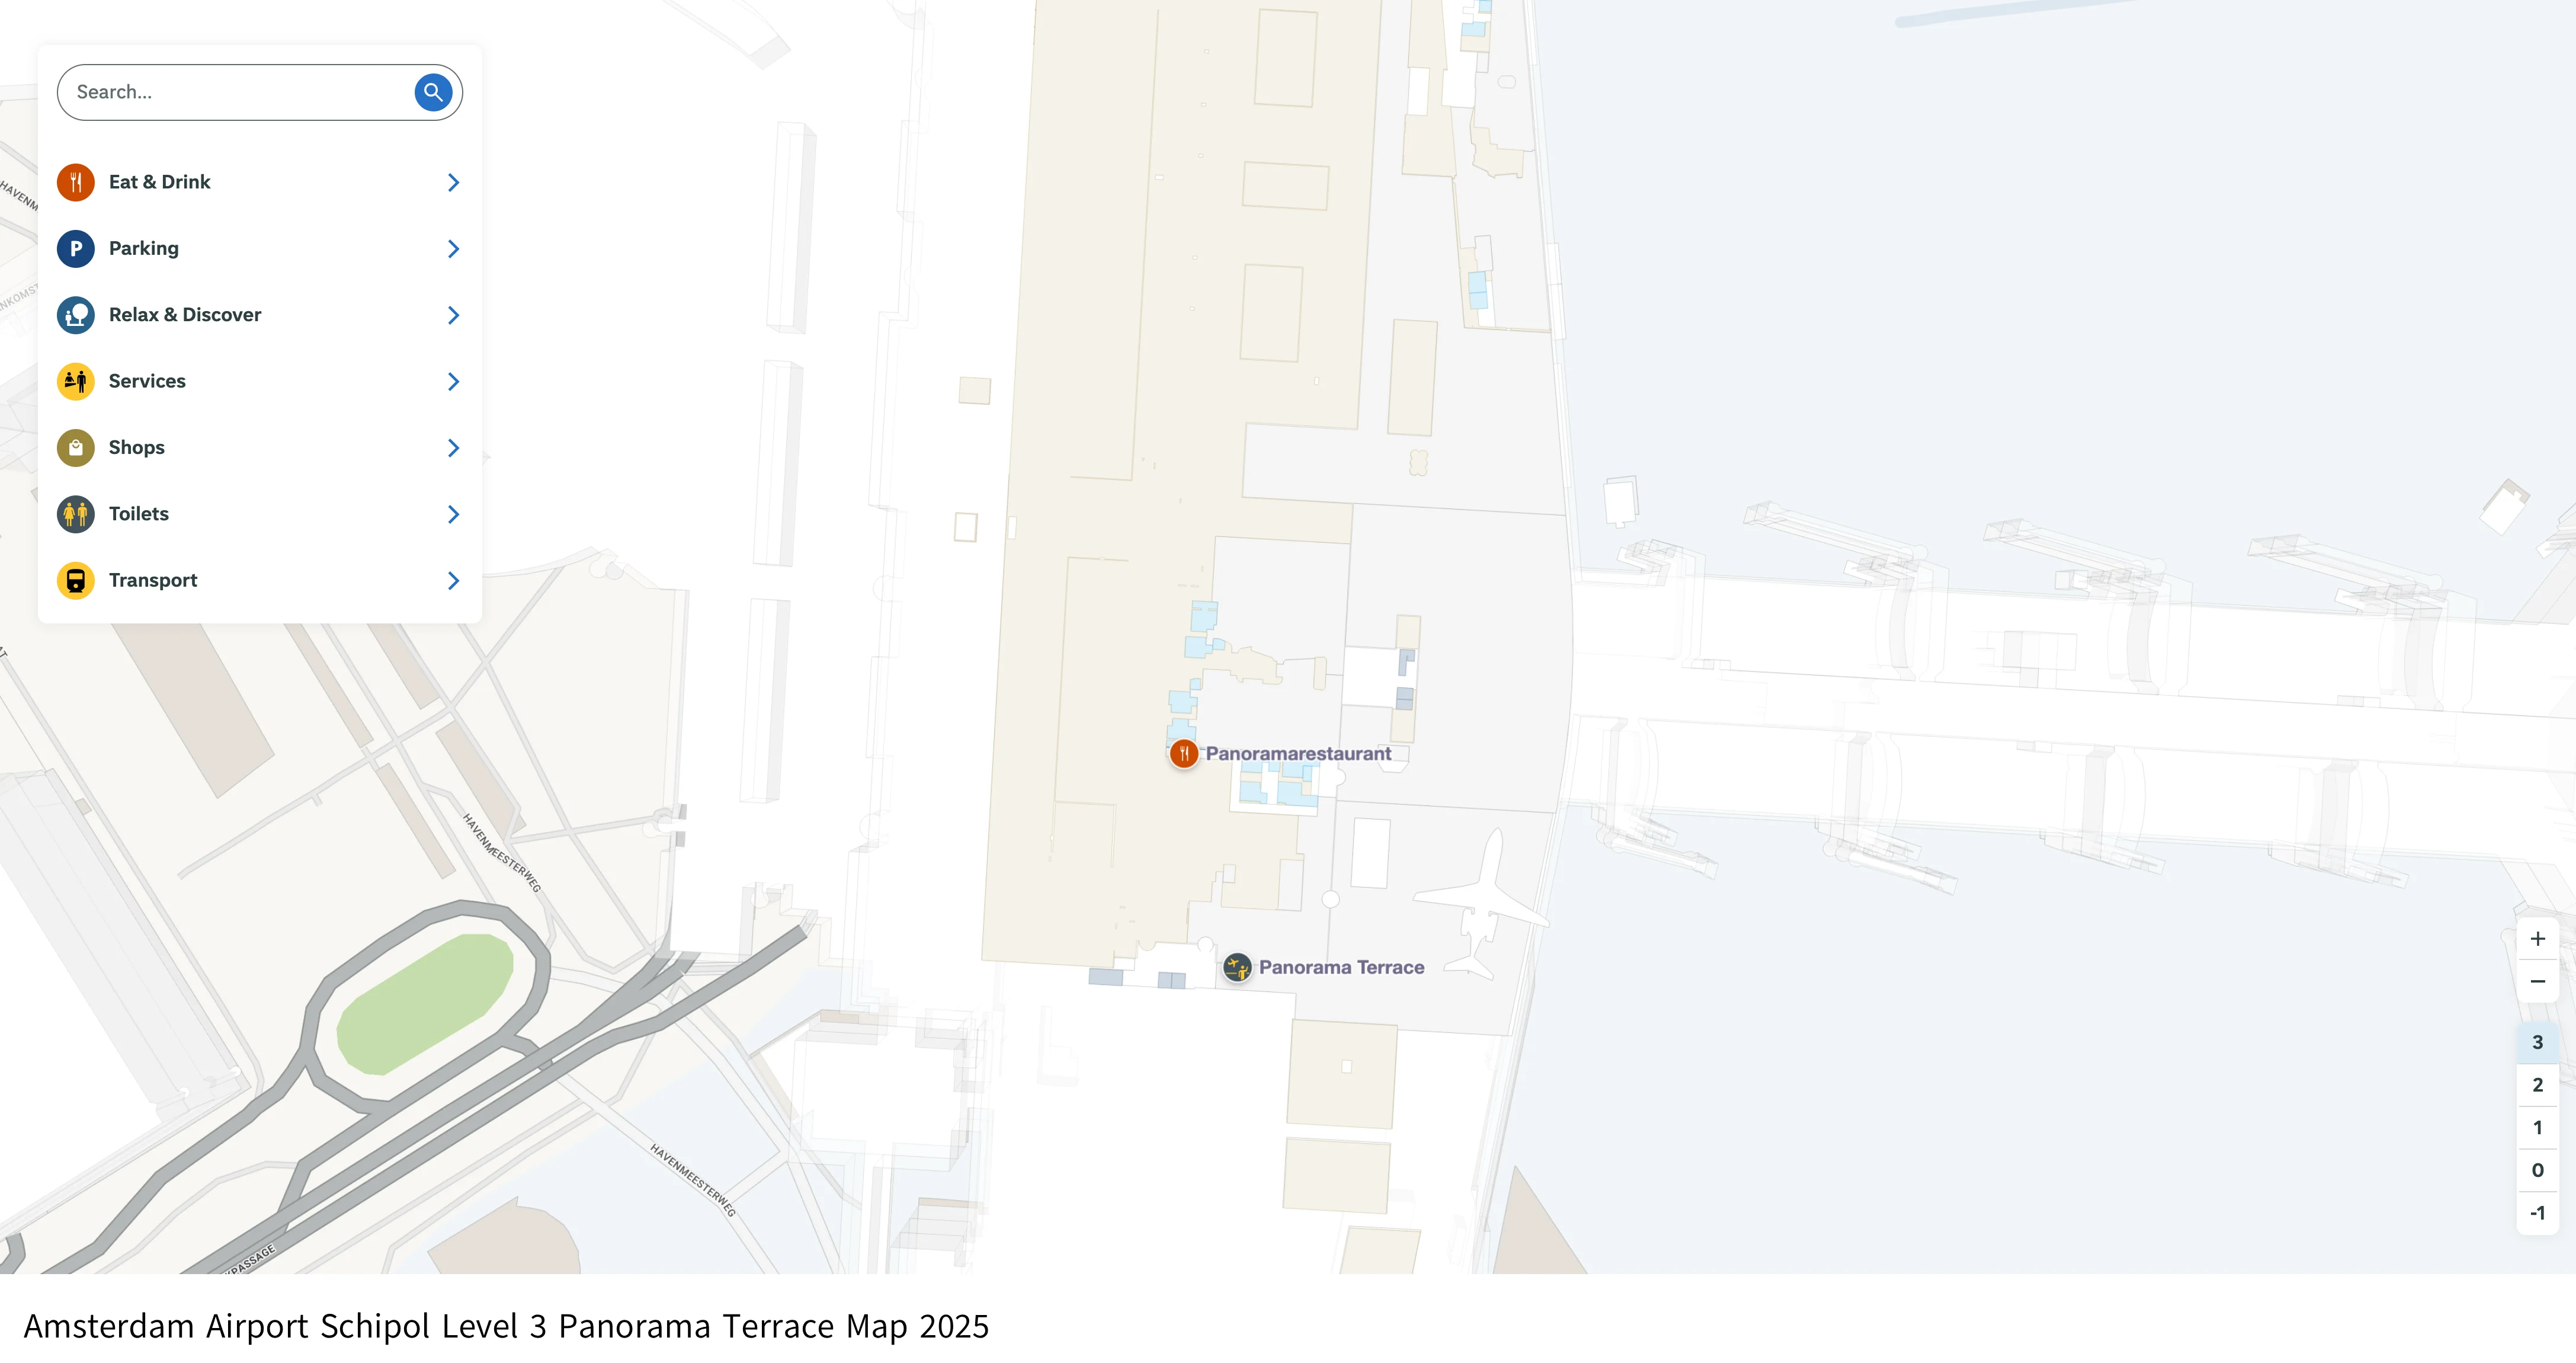
Amsterdam Airport Schipol Level 3 Panorama Terrace Map 2025
2026 Amsterdam Airport Schiphol Map Guide
Where is the exact fork where “Transfers” diverges from “Baggage claim/Exit” for arriving D-pier passengers?
The fork is at the root of Pier D where the corridor widens into Lounge 2, before you enter the Arrivals/immigration flow. This is the first major decision point after walking the full D-pier arrival corridor from the lower (non-Schengen) gates.
A wrong turn happens when you follow yellow signs toward “Arrivals / Baggage Hall / Exit” instead of staying in the airside transfer direction marked “Transfers” and onward “Gates B/C/D (Schengen).” Use the large flight-information screens clustered at the D-pier root as a landmark: the split occurs immediately around that open junction area where pier traffic meets the main Lounge 2 concourse.
What is the exact location of the transit Schengen border control relative to the D/E/F corridor?
The transit Schengen border control is the checkpoint between Lounge 2 (non-Schengen, D/E side) and Lounge 1 (Schengen, B/C side) at the western edge of Lounge 2. This is the transfer-only “bulkhead” you must pass to move from the D/E/F non-Schengen corridors into the Schengen departures zone.
Walking in from the D/E/F direction via Holland Boulevard, you hit the commercial center of Lounge 2 first, then the border-control bank sits just before the D-pier Schengen/upper entrance area. Once you clear it, you emerge directly into Lounge 1’s high-traffic retail zone with the B and C pier directions immediately accessible from that side.
What is the walking distance (meters) from Gate D4 to Gate B30, excluding queues?
Walking from Gate D4 to Gate B30 is approximately 1,450 meters door-to-door, excluding queues. This is a long cross-hub transfer that combines a full D-pier retreat, the central spine crossing, and a deep push down Pier B.
| Segment | Route | Distance |
|---|---|---|
| 1 | Gate D4 → Pier D root (Lounge 2 junction) | ~450 m |
| 2 | Pier D root → Schengen border control (Lounge 2 → Lounge 1 filter) | ~200 m |
| 3 | Post-border into Lounge 1 → Pier B root | ~300 m |
| 4 | Pier B root → Gate B30 | ~500 m |
From the start of Schengen passport control, what is the distance to the nearest B-gates entry post-control?
The distance is approximately 150–200 meters from the start of the Schengen passport-control bank to the nearest Pier B entry point. This is the fastest “post-border” access point in the terminal because Lounge 1 is effectively the headhouse for Piers B and C.
After you enter the passport-control area (the transfer border-control filter between Lounge 2 and Lounge 1), continue through the control lanes and follow the flow into Lounge 1’s retail zone. From the exit of the control lanes, the Pier B direction signs appear quickly, and the Pier B root is reached in a short straight walk through the open Lounge 1 concourse.
Where are the e-gates positioned at passport control, and what is the shortest alternate path to staffed booths when e-gates are closed?
The e-gates sit in the center of the passport-control bank at the Schengen transfer border-control filter. When they’re closed or stalled, the shortest alternate path is usually to peel to the extreme left or extreme right edges of the same checkpoint to reach the staffed “All Passports” booths.
Approaching from Lounge 2 toward Lounge 1, passenger flow naturally compresses toward the middle lanes where the Automated Border Control gates are visible and where queues look “official.” If the e-gates are blocked, keep walking past that central clump and commit early to the outer flank lanes. Use the checkpoint’s glass-wall “bulkhead” feel as your locator: you’re still at the same border-control bank, just shifting to the side banks where manual desks are set away from the center bottleneck.
Where is the extra security checkpoint located on the transfer route (when encountered), and which corridors bypass it when not required?
The extra transfer security checkpoint is at the pier entry roots on the non-Schengen side, where segregated “dirty-flow” arrivals are funneled back into the screened departure lounges. You encounter it at interfaces like the roots of Piers D/E/F/G rather than deep inside the piers.
When it’s not required, the bypass is staying on the main Level 1 airside concourse from your arrival corridor into Lounge 2, then continuing directly toward the Schengen border-control filter without being diverted up to a transfer level or into a glass-walled re-screening lane. Use the D-pier root open junction as the decision landmark: remain in the main lounge flow toward Transfers/connecting gates, and avoid escalators/signage that route specifically into transfer-security processing unless your arrival corridor is physically segregated into it.
Which D-gate ranges are Schengen vs non-Schengen, and where is the border crossing point between them?
D1–D57 are non-Schengen gates on the lower level of Pier D, while D59–D87 are Schengen gates on the upper level. The missing D58 is the numbering “red flag” that the pier is split by legal zone, not just by distance.
The border crossing point between these ranges is not inside Pier D itself but at the central transfer Schengen border control between Lounge 2 (non-Schengen) and Lounge 1 (Schengen). To move from a D1–D57 arrival into the D59–D87 area, you must exit the pier to its root, reach the Lounge 2 → Lounge 1 border-control filter, clear passport control, then route back toward the Schengen-side D-pier entrance in Lounge 1.
Where is the “short connection / expedited” passport-control queue entrance, and what landmarks identify it?
The short-connection entrance is at the transfer border-control checkpoint between Lounge 2 and Lounge 1, adjacent to the scan kiosks that validate tight connections. It’s not a separate remote checkpoint; it’s an expedited lane integrated into the same passport-control bank.
Look for the self-service “Scan boarding pass / Short Connection” kiosks positioned at the front of the border-control area, plus yellow-and-black “Short Connection” signage near the queue split. The landmark behavior is distinctive: passengers stop to scan, then are directed into a dedicated lane beside the main queues. If you do not see the scan kiosks at the approach, you’re not yet at the correct passport-control filter.
From the central terminal spine, what are the longest-walk segments to far-end E/F/G gates (by meters)?
The longest-walk segments from the central spine to far-end non-Schengen gates are roughly 900–1,000 meters to the tip of Pier G, and roughly 600–700 meters to the tips of Piers F and E. These are the distances that turn a “normal” transfer into sprint math even before any passport/security queues.
| Pier | Far-end reference | Distance from central spine |
|---|---|---|
| G | tip of Pier G (e.g., G69 area) | ~900–1,000 m |
| F | tip of Pier F (e.g., F9) | ~600–700 m |
| E | tip of Pier E (e.g., E24) | ~600–700 m |
What is the exact route to KLM Lounge 52 from the E/F corridor, and what landmark marks the entrance?
KLM Lounge 52 is on Holland Boulevard between the Pier E and Pier F junctions, reached by walking the wide connector corridor that links Lounge 2 (D/E) and Lounge 3 (F/G). The entrance is marked by escalators up to an upper level beside a large illuminated wall of Delft Blue miniature KLM houses.
From the E/F corridor, follow overhead yellow signs toward the Holland Boulevard connector and continue toward the midpoint between the E and F pier roots. The key triangulation landmark is the Dutch Bar & Kitchen area: the Lounge 52 escalators and the “52” signage appear right in that zone, with the Delft Blue house display acting as the unmistakable visual identifier for the entry.
Where are the primary flight-information display clusters along the transfer spine for last-minute gate checks?
The primary flight-information display clusters are at the root of each pier and in the central plazas of Lounges 1, 2, and 3. These are positioned to catch passengers right before they commit to a corridor choice toward a pier or toward border/security processing.
The highest-value cluster for D-pier transfers is at the D-pier root on the Lounge 2 side, where large banks of screens sit in the open junction area before the route splits toward the Schengen border-control filter or toward Arrivals/Exit flows. Additional screen banks appear at the lounge “heart” zones near Holland Boulevard and near the Lounge 2 ↔ Lounge 1 border-control approach, where last-minute gate changes can be confirmed before a long pier walk.
Where are the main landside exit portals, and which one minimizes backtracking from the arrivals flow?
The main landside exit portals are the Arrivals/Baggage Reclaim exits that funnel into Customs and then out into Schiphol Plaza. For most passengers, these exits are accessed via the baggage halls on the ground level after immigration (if arriving non-Schengen).
For D-pier arrivals, the flow naturally feeds into Arrival Hall 2, and the “Nothing to Declare” (green) Customs channel drops you closest to the central Plaza circulation toward the train station escalators. If you have no checked bags, staying aligned with the Arrivals 2 flow and choosing the green channel minimizes backtracking because it deposits you into Schiphol Plaza near the main rail access rather than pushing you to the edges of the landside hall.
Archive Amsterdam Airport Schiphol Map
Below are all historical map versions for Amsterdam Airport Schiphol. Each year includes the official map available for that period, presented as both WebP and PDF.
2017 Amsterdam Airport Schiphol Map