Sheremetyevo International Airport Terminal C Map (Most Up-To-Date)
Sheremetyevo Terminal C sits inside the Northern Terminal Complex at Moscow’s main SVO hub, built as a tall, multi-level block with long horizontal galleries that feed into Terminal B. The layout is vertically stacked (arrivals/transfer flows below, departures/gates above), so most “simple” connections still involve escalators, level changes, and at least one control point. The highest spatial risk is the north–south pivot via Terminal B down to the APM station.
Map Table
| Level | Primary Flow | Control Points | Key Connectors |
|---|---|---|---|
| Level 1 | Arrivals hall | customs corridors | Terminal B landside link, APM access via B |
| Level 2 | transfer spine | passport control | transfer desks, connecting gallery toward B |
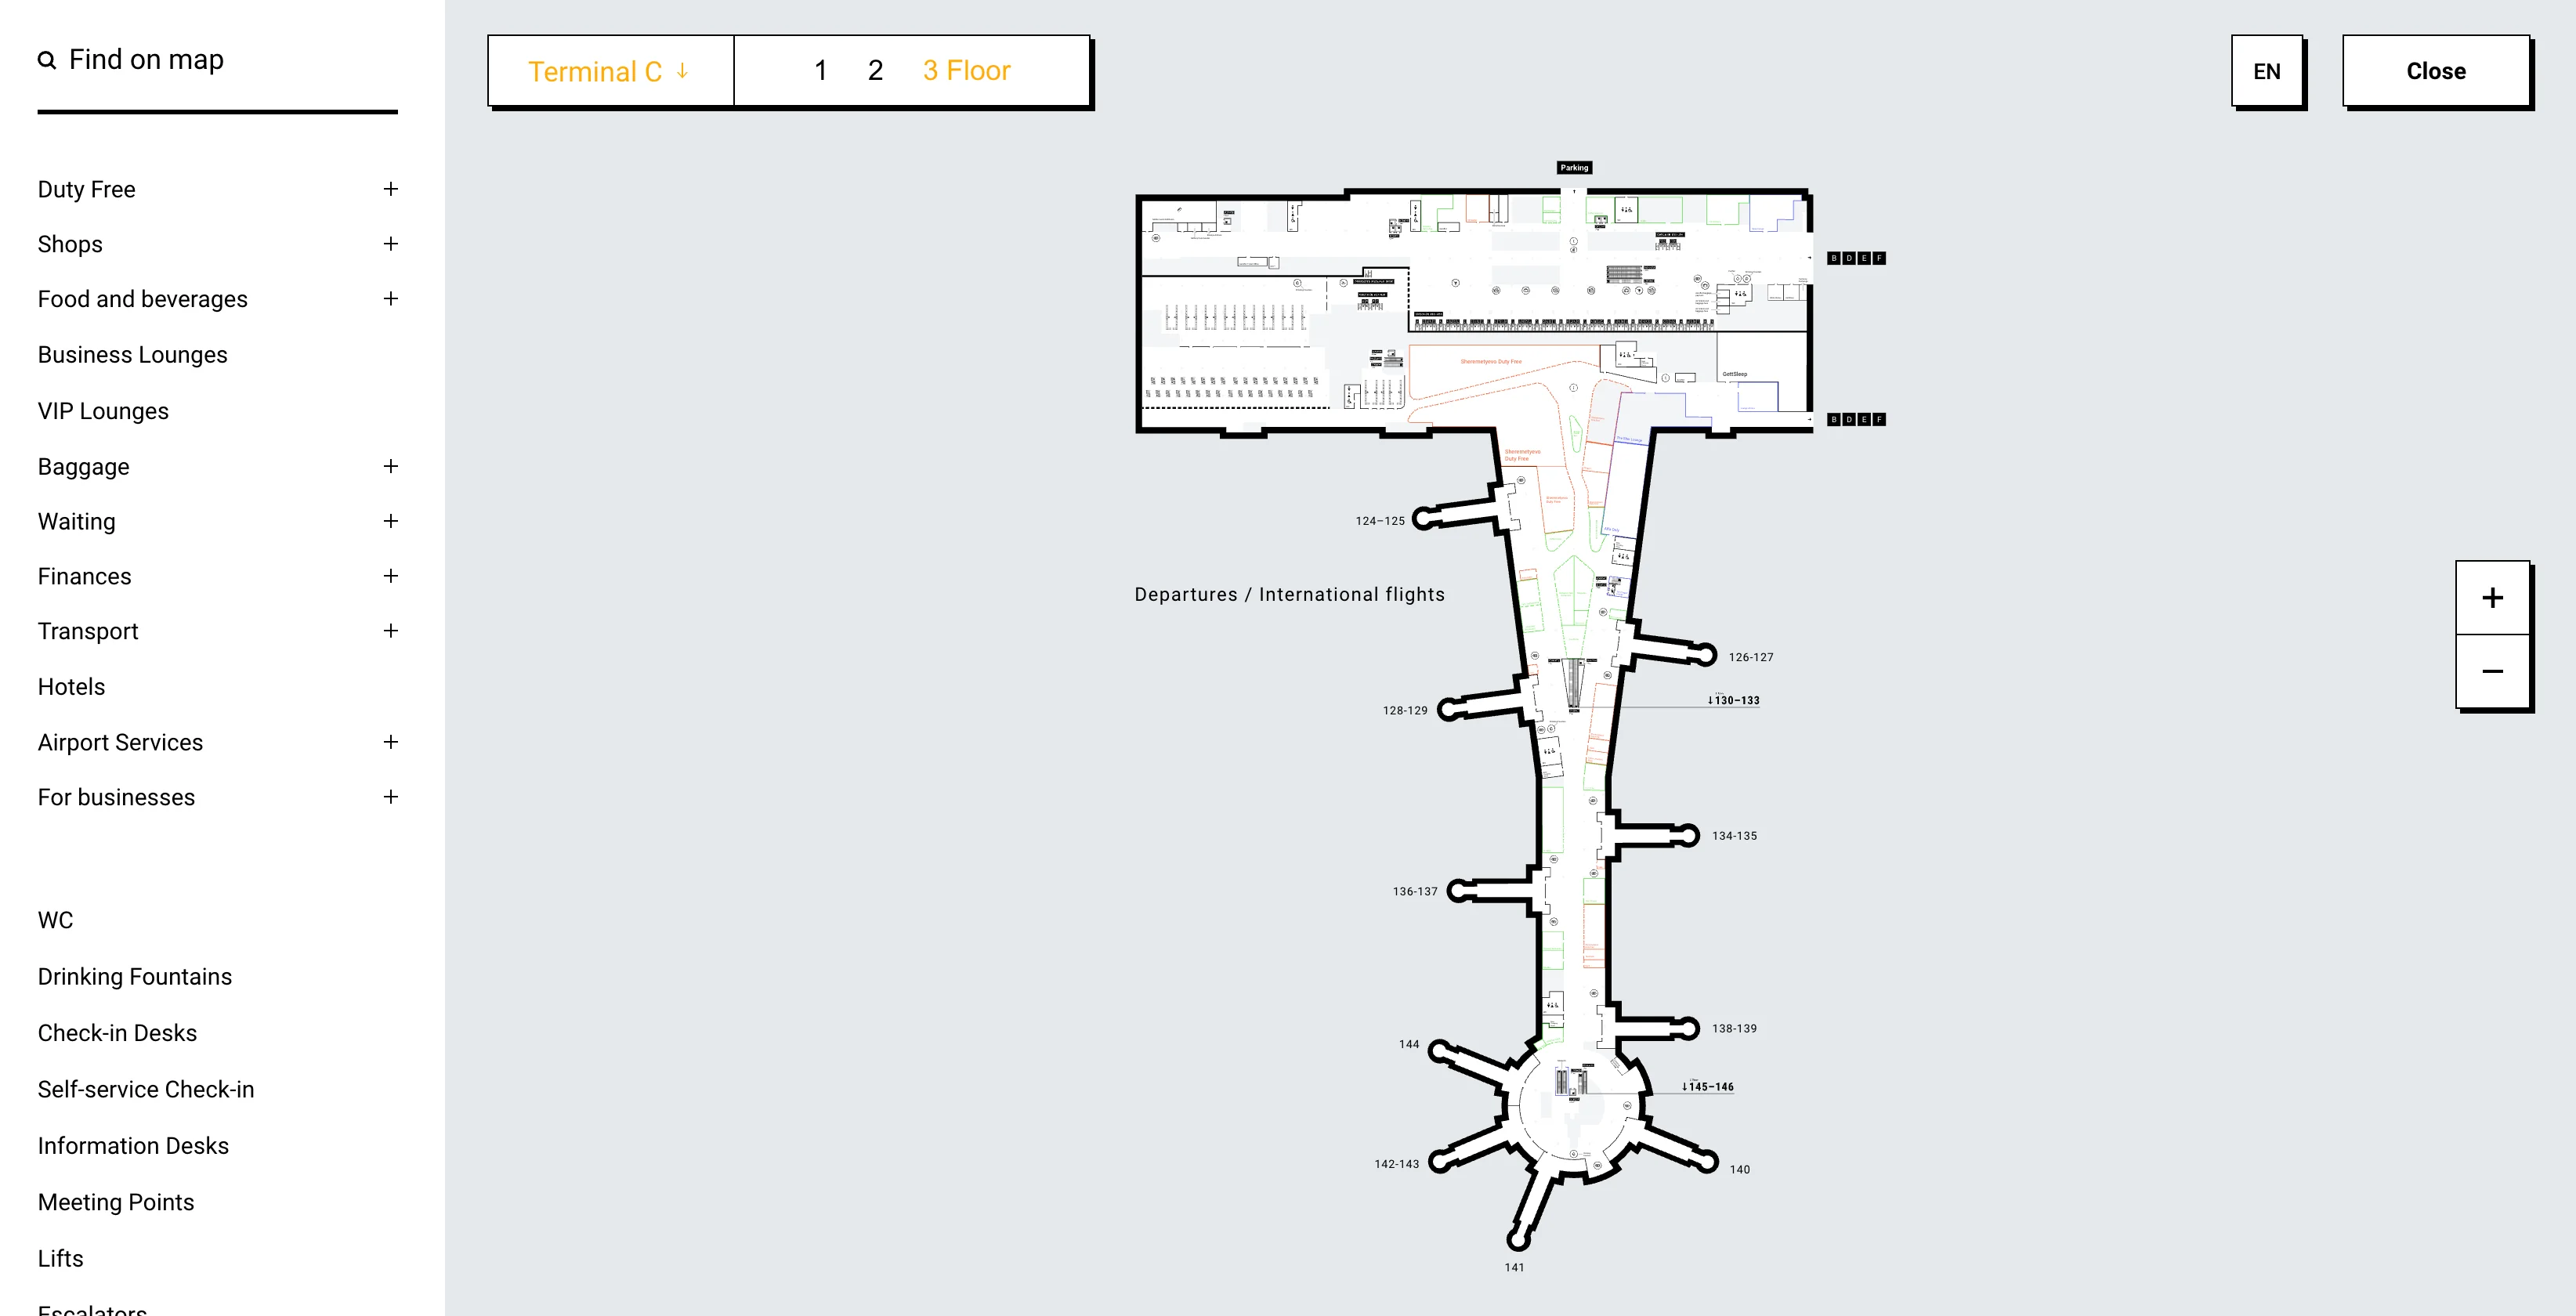
| Level 3 | departures airside | security checkpoint | duty-free entry, gate piers C141–C143 |
| Level 4 | parking access | security point | “Comfort C” parking gallery |
Sheremetyevo International Airport Terminal C Map Strategy
- Keep tight connections carry-on-first: short SVO transfers plus multi-stage controls make checked bags the most common failure point.
- Treat Terminal C ↔ Terminal D as a Terminal B problem: route to B, drop to Level 1, enter the Sheremetyevo-1 APM station; no direct APM access from Terminal C.
- Lock in the control-point order before you walk: Level 2 transfer desks, Level 2 passport control, then up to Level 3 security for the sterile departures zone.
- Use “fast route / fallback route” thinking: when crowds block Level 2 forks or APM access slows, default to the clearest signed path toward Terminal B and the Level 1 station entrance rather than lingering on Level 3 galleries.
2026 Sheremetyevo International Airport Terminal C Map + Printable PDF
Terminal C’s transfer logic in 2026 stays defined by stacked levels: transfer desks and passport control on Level 2, then security and gates on Level 3. The operational risk is rarely “process” and usually “distance + queues,” especially when you must pivot through Terminal B to reach the inter-terminal APM for Terminal D. Print a map that clearly marks Level 2 control points and the Level 1 APM path.
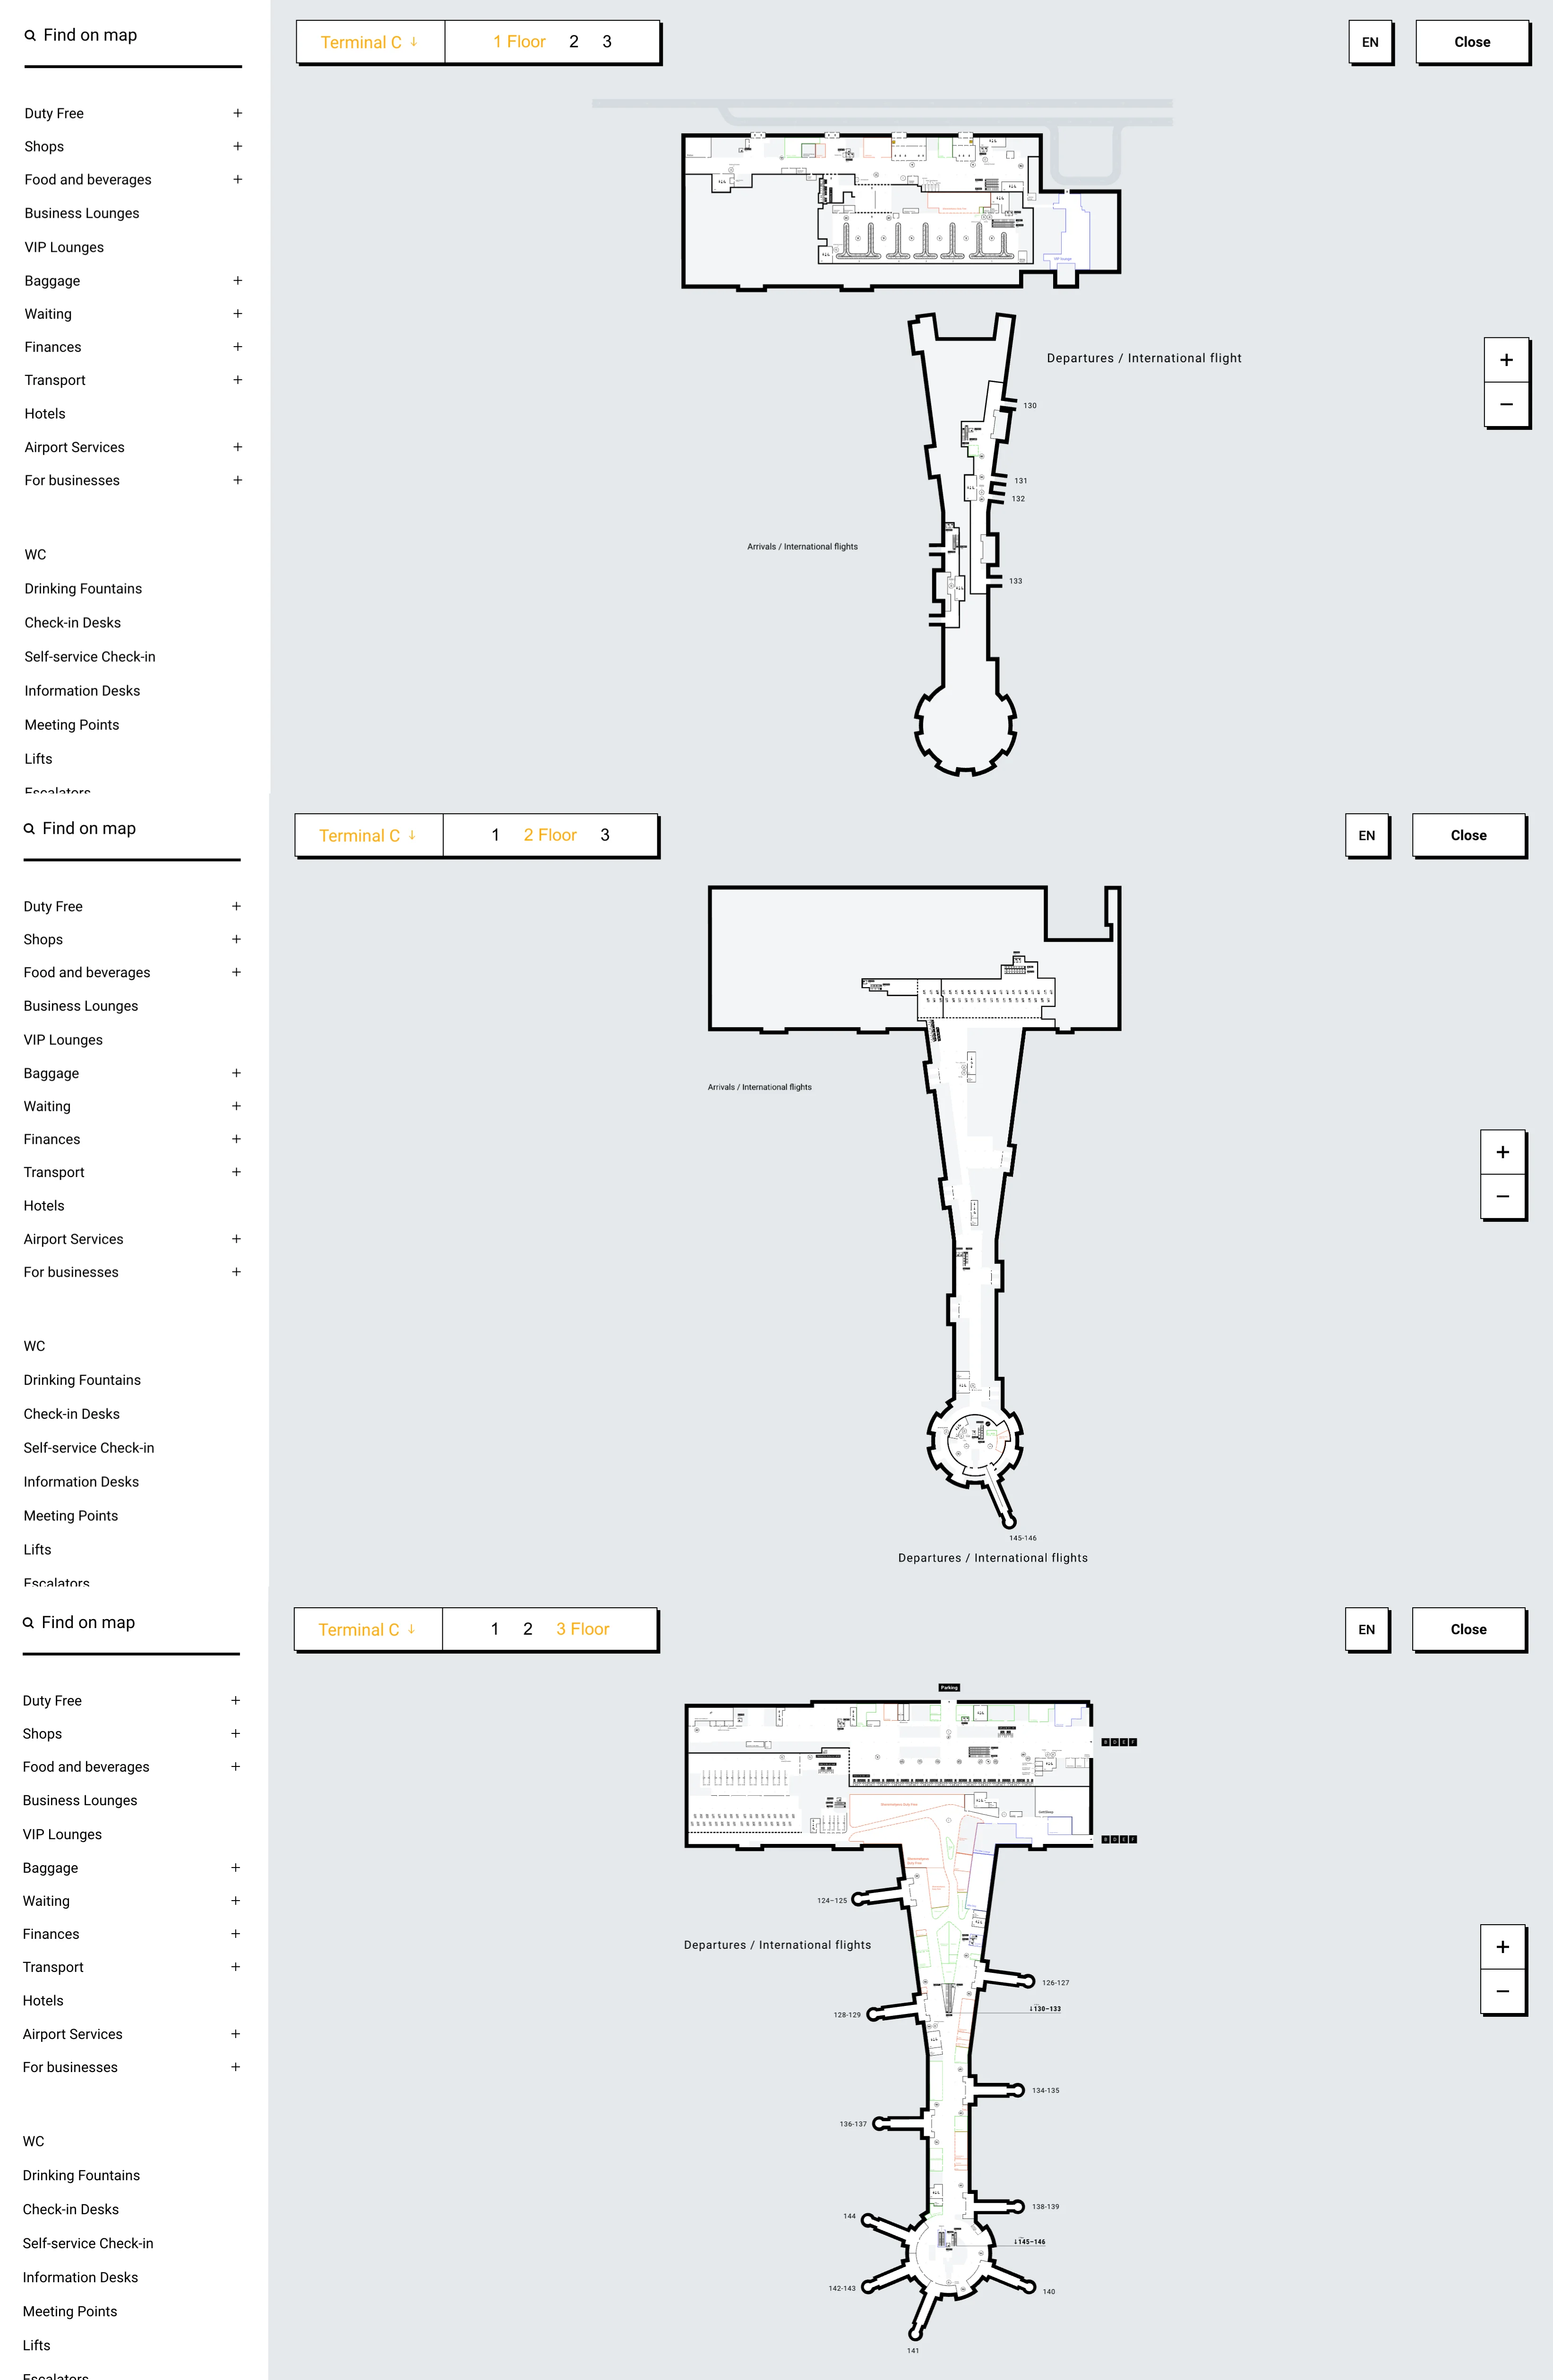
Sheremetyevo International Airport Terminal C Level 1 Map 2026
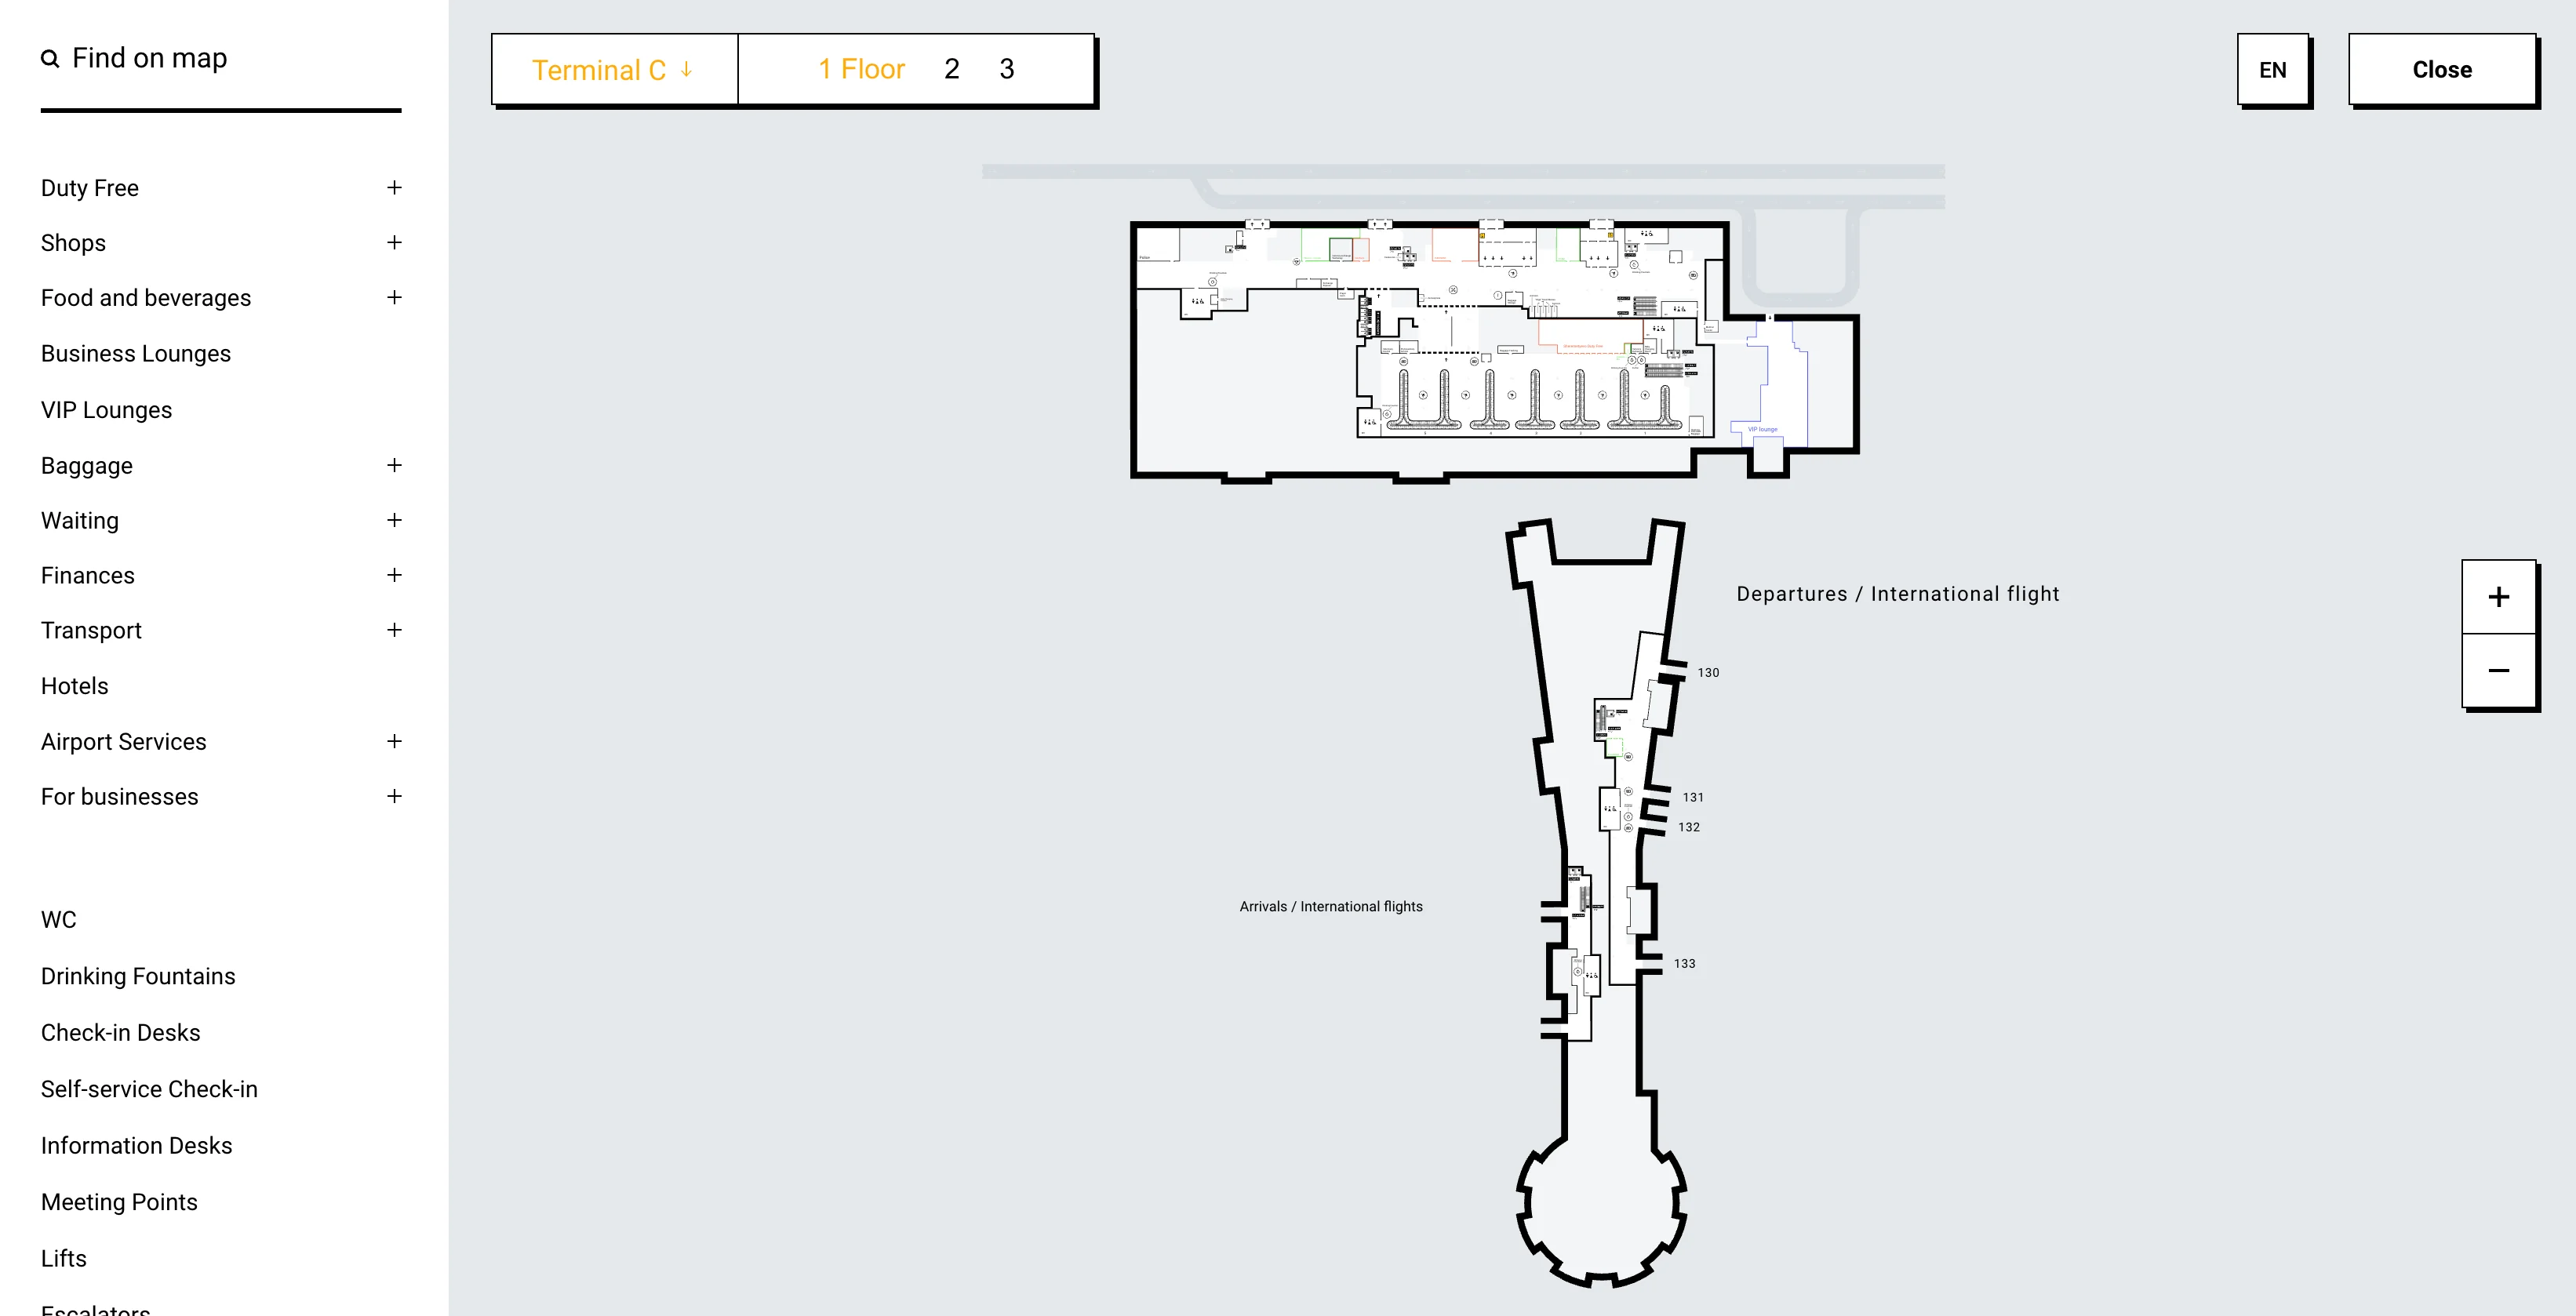
Sheremetyevo International Airport Terminal C Level 2 Map 2026
Sheremetyevo International Airport Terminal C Level 3 Map 2026
2026 Sheremetyevo International Airport Terminal C Map Guide
What is the exact walking time (minutes) from Terminal C international arrivals to the transfer desk/counter area used for connections?
Walking takes 3–5 minutes from Terminal C international arrivals (jetway exit into the Level 2 arrivals gallery) to the transfer desk/counter area signed for “Transfer/Connecting Flights.”
The transfer desks sit on Level 2 along the main arrivals-to-transfer spine, before the Level 2 passport-control zone for transit passengers. From the arrivals gallery, stay in the same Level 2 corridor and follow the “Transfer/Connecting Flights” signs toward the central transit area (the Globe LED display works as a macro-landmark). This timing assumes a normal walking pace and no crowd block at the first Level 2 fork.
What is the precise route (named corridors/landmarks) from Terminal C airside to the passport control point used during C → other-terminal transfers?
Passport control for Terminal C transfers sits on Level 2 immediately after the Level 2 transfer desk/counter zone.
From the gate arrival corridor, enter the Level 2 Arrivals Gallery and follow signs for “Transfer/Connecting Flights” toward the central transit spine (use the Globe LED display as the main orientation landmark). Stay on Level 2 past the transfer desks, then take the dedicated transfer lane at the Level 2 passport-control fork (typically the right-side lane when facing the split) rather than drifting into the general immigration hall. Continue straight into the passport-control booths that sit directly beyond the transfer-desk area.
Where is the inter-terminal train/APM access point closest to Terminal C, and what is the walking distance (meters) from Terminal C’s main transfer flow to that entrance?
No direct APM entry exists from Terminal C, so the closest access point is the Sheremetyevo-1 APM station entrance inside Terminal B on Level 1.
From Terminal C’s main transfer flow on Level 2 (transfer desks / passport-control zone), route through the connecting gallery toward Terminal B, then descend to Level 1 inside Terminal B for the station entry. The mapped horizontal walk to reach the station approach is about 450 meters from Terminal C’s core transfer area, with at least two level changes (down to Level 1) before you can enter the APM.
On which floor/level is the primary security checkpoint most transfer passengers from Terminal C must pass, and what is the shortest mapped path to it?
The primary transfer security checkpoint is on Level 3 at the entrance to Terminal C’s sterile departures area.
From Level 2 transfer flow, move from the transfer desks toward the Level 2 passport-control point for transit passengers, then continue to the vertical transition immediately after passport control. Take the nearest escalator or lift up one level to Level 3 and follow the straight-ahead flow toward the duty-free entrance; the security screening point sits at the boundary into the Level 3 sterile zone, before the main duty-free/gate lounge.
What is the door-to-door transfer time breakdown (walk → train/APM → walk) from Terminal C to Terminal D using the fastest mapped route?
A fastest C → D transfer via the APM typically takes about 25 minutes of movement time (walk → APM → walk), excluding queues at passport control and security.
| Segment | Mode | Time | Landmark cues |
|---|---|---|---|
| Terminal C transfer spine to APM entrance | walk | 7 min | Level 2 gallery toward Terminal B → down to Level 1 → Sheremetyevo-1 station entry |
| APM platform to south complex station | train/APM | 8 min | wait ~4 min + ride ~4 min (use correct car section for your clearance status) |
| APM exit to Terminal D departures/gates | walk | 10 min | south station → Terminal D building → up toward departures level and gate lounge |
What is the door-to-door transfer time breakdown (walk → connectors → walk) from Terminal C to Terminal B using the fastest mapped route?
A fastest Terminal C → Terminal B transfer typically takes 10–15 minutes of movement time, but international-to-domestic connections add border/customs steps that often push the full path to 35–45 minutes.
| Segment | Mode | Time | Landmark cues |
|---|---|---|---|
| Terminal C arrivals/transfer spine to B connection gallery | walk | 5–7 min | Level 2 arrivals gallery → “Transfer/Connecting Flights” spine → gallery toward Terminal B |
| Level change into Terminal B departures flow | escalator/lift + walk | 3–5 min | descend/ascend as signed (don’t stay parked on Level 3 if you need Level 1 arrivals functions) |
| Terminal B entry point to domestic security/gates | walk | 2–3 min | follow “Departures / Domestic” toward the primary screening entrance |
Where exactly is the checked-baggage recheck / transfer baggage drop point for passengers coming through Terminal C, and how many minutes is it from passport control on the mapped route?
The checked-baggage recheck point is the Arrivals Transfer Area near Baggage Carousel No. 5 in the Level 1 arrivals hall, used after customs for onward domestic connections.
From the Level 2 passport-control booths, descend to Level 1 baggage claim and continue toward the customs exit corridors (“Green”/“Red”). After clearing customs, route to the transfer counters by Carousel 5; the entrance can be visually easy to miss when exiting the green corridor. The walk from passport control down to the Carousel 5 transfer area is about 5–7 minutes, excluding elevator/escalator waits and any congestion in the arrivals hall.
If you arrive on a remote stand at Terminal C, where is the bus unload point and what is the mapped walking distance from that point to passport control?
Remote-stand buses unload at the designated arrivals bus disembarkation zone at the base of Terminal C on Level 1, then passengers funnel inside to an escalator up to Level 2 for transfer desks and passport control.
From the bus unload point, the mapped horizontal walk to the first control point area is about 150–200 meters, then a mandatory escalator ascent to Level 2 places you into the transfer/passport-control flow. The distance figure is walk-only; the main time risk is the “clump” effect when 50–100 passengers enter the passport-control queue at once from the same bus.
What is the shortest mapped path from Terminal C security to the furthest C gates (worst-case gate walk), and what is the walking time?
Walking takes about 12–15 minutes from Terminal C’s Level 3 security checkpoint to the furthest gates at the end of the pier (commonly in the C141–C143 area) at a normal pace.
After clearing Level 3 security, continue straight into the main departures lounge and keep moving through the duty-free entry zone rather than stopping at the first retail cluster. Follow the primary concourse down the long gate pier toward the highest-numbered C gates; use travelators where available, since the worst-case timing assumes the pier is fully in use and you’re walking to the end-cap gate area rather than mid-pier gates.
Where are the most common wayfinding failure points (forks/level changes) on the Terminal C → APM/train route, and what are the exact landmark cues to stay on-track?
No direct APM access from Terminal C is the core trap, so the most common failure points are the Level 2 transfer fork and the Level 3 vs Level 1 level-choice mistake inside Terminal B.
The first failure point is the Level 2 passport-control fork where passengers drift into general immigration instead of the transfer lane; stay with “Transfer/Connecting Flights” flow using the Globe LED display as your orientation anchor. The second failure point happens after you reach Terminal B: many travelers remain on Level 3 departures galleries, but the APM requires a drop to Level 1 for the Sheremetyevo-1 station entrance. Use the Mercedes-Benz Café as a “you’re still on the gallery toward B” cue, then commit to descending as soon as signage indicates the station/underground passage rather than continuing along departure-level retail.