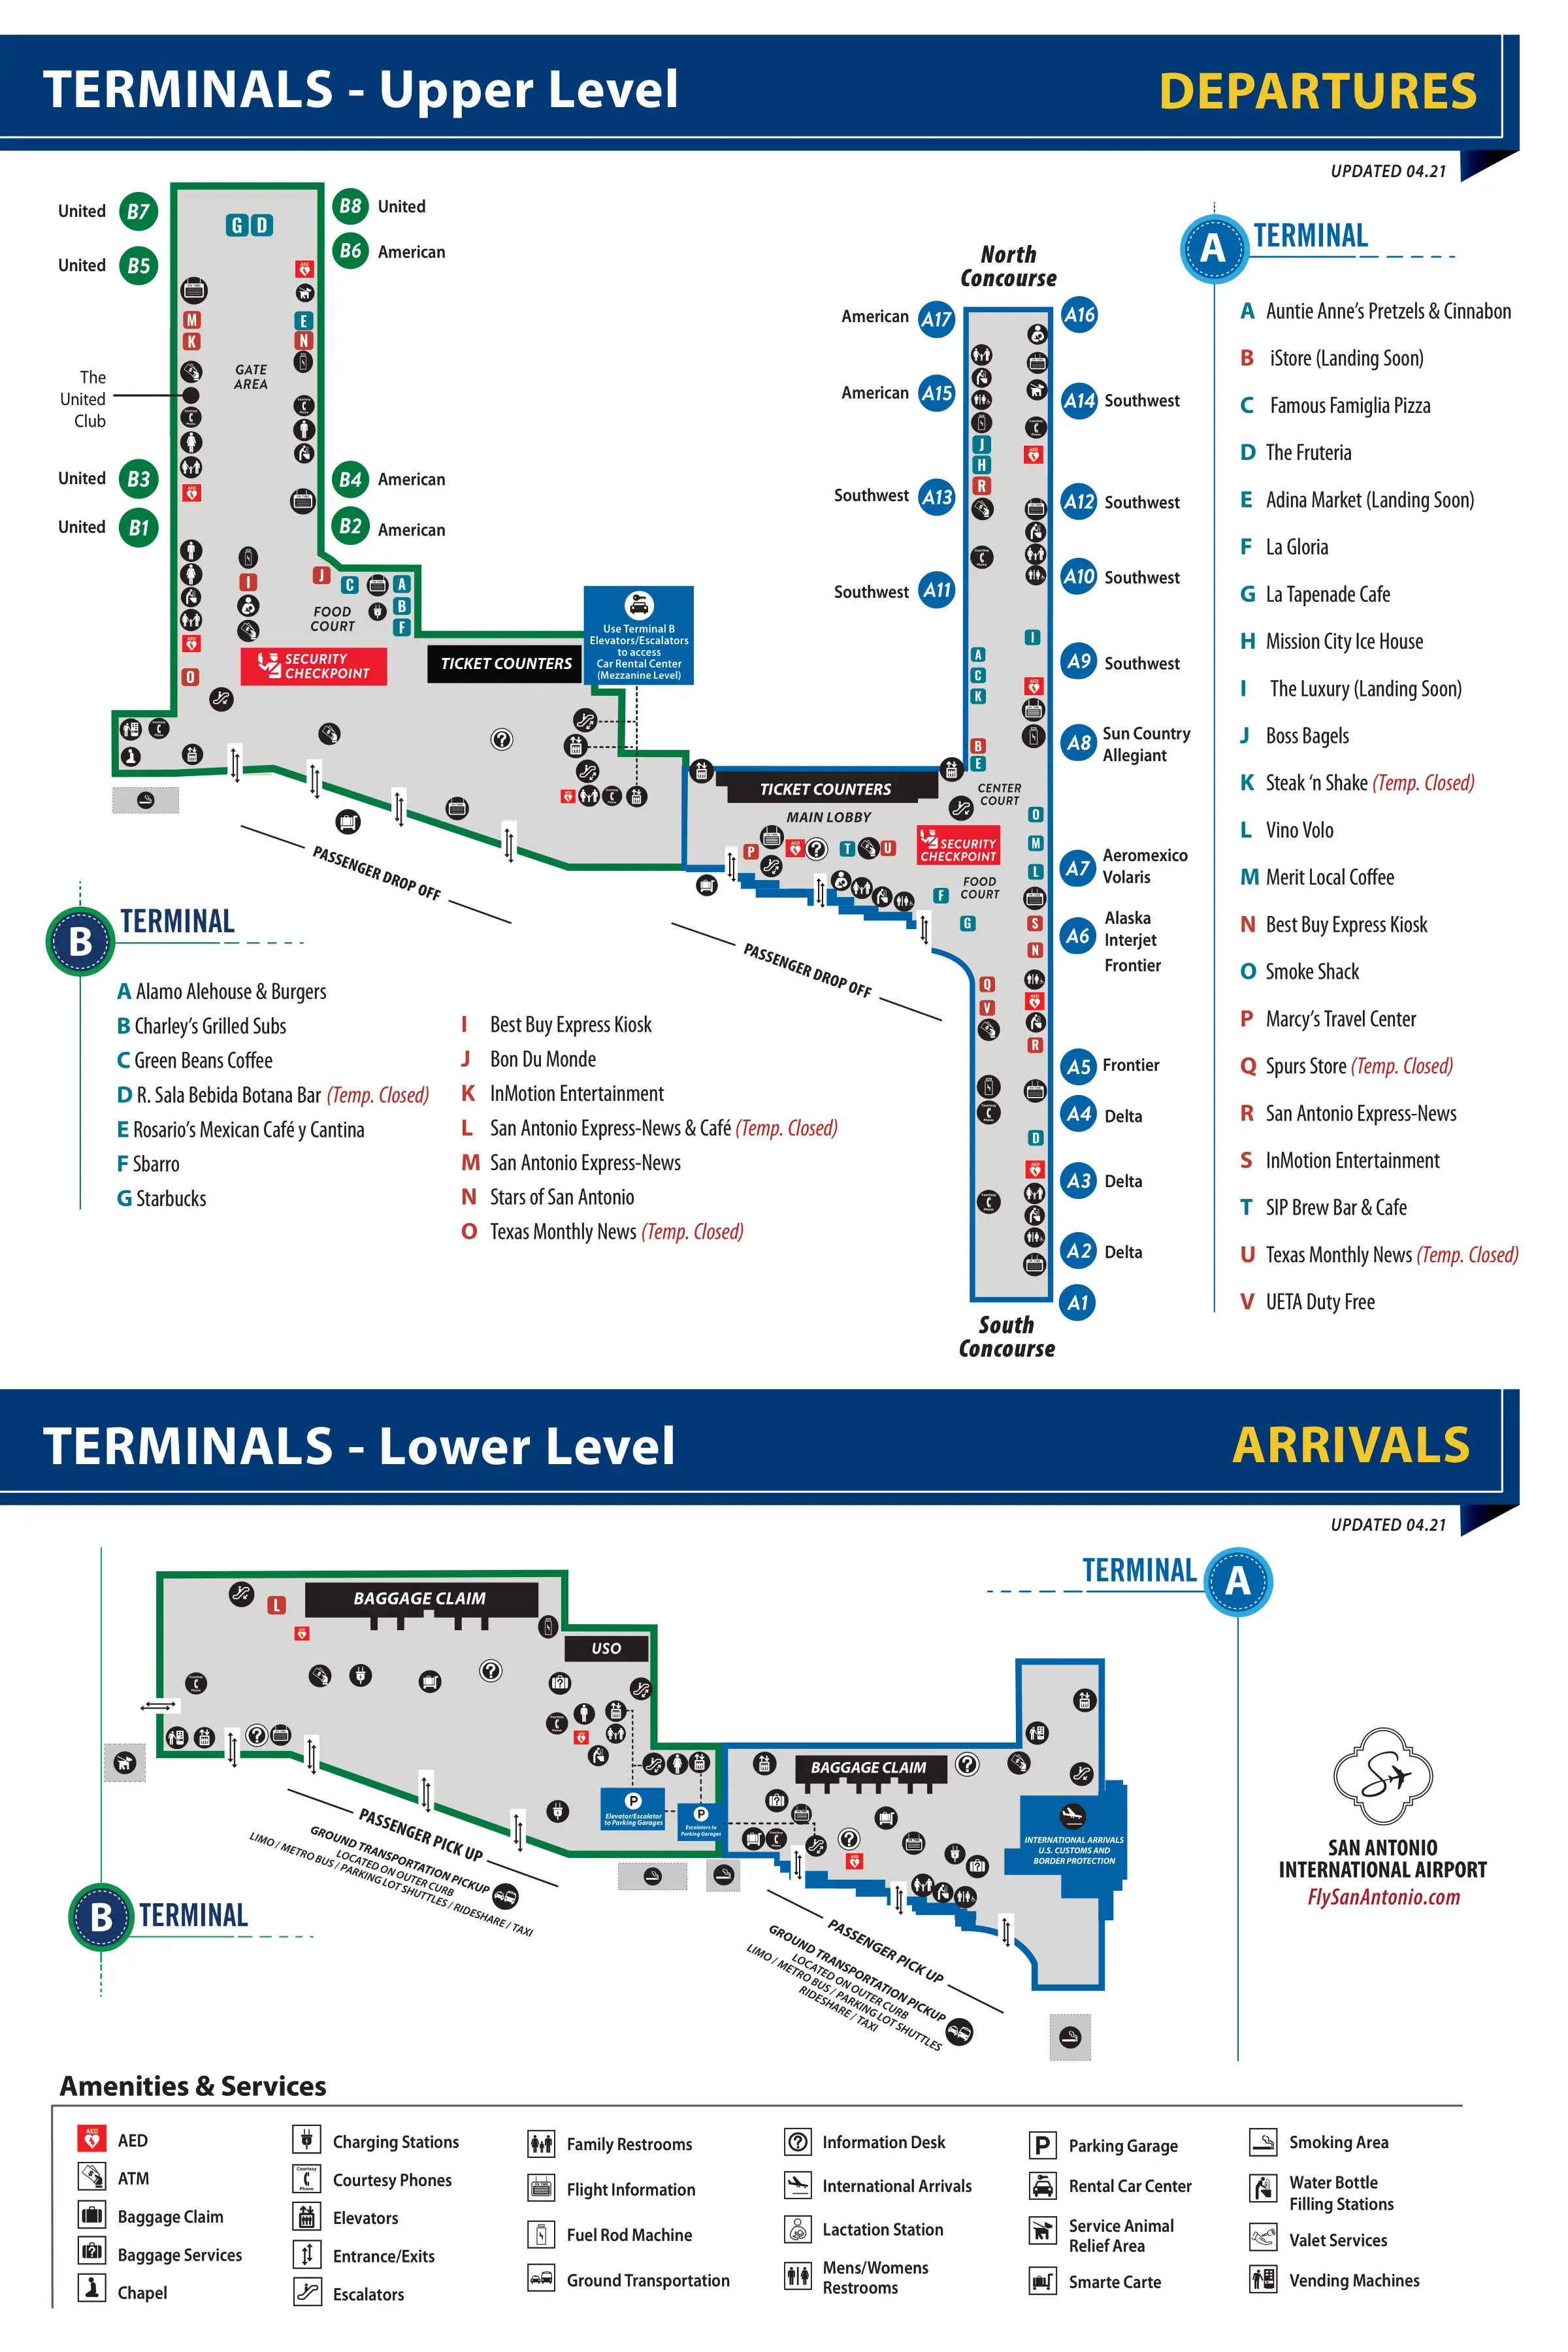
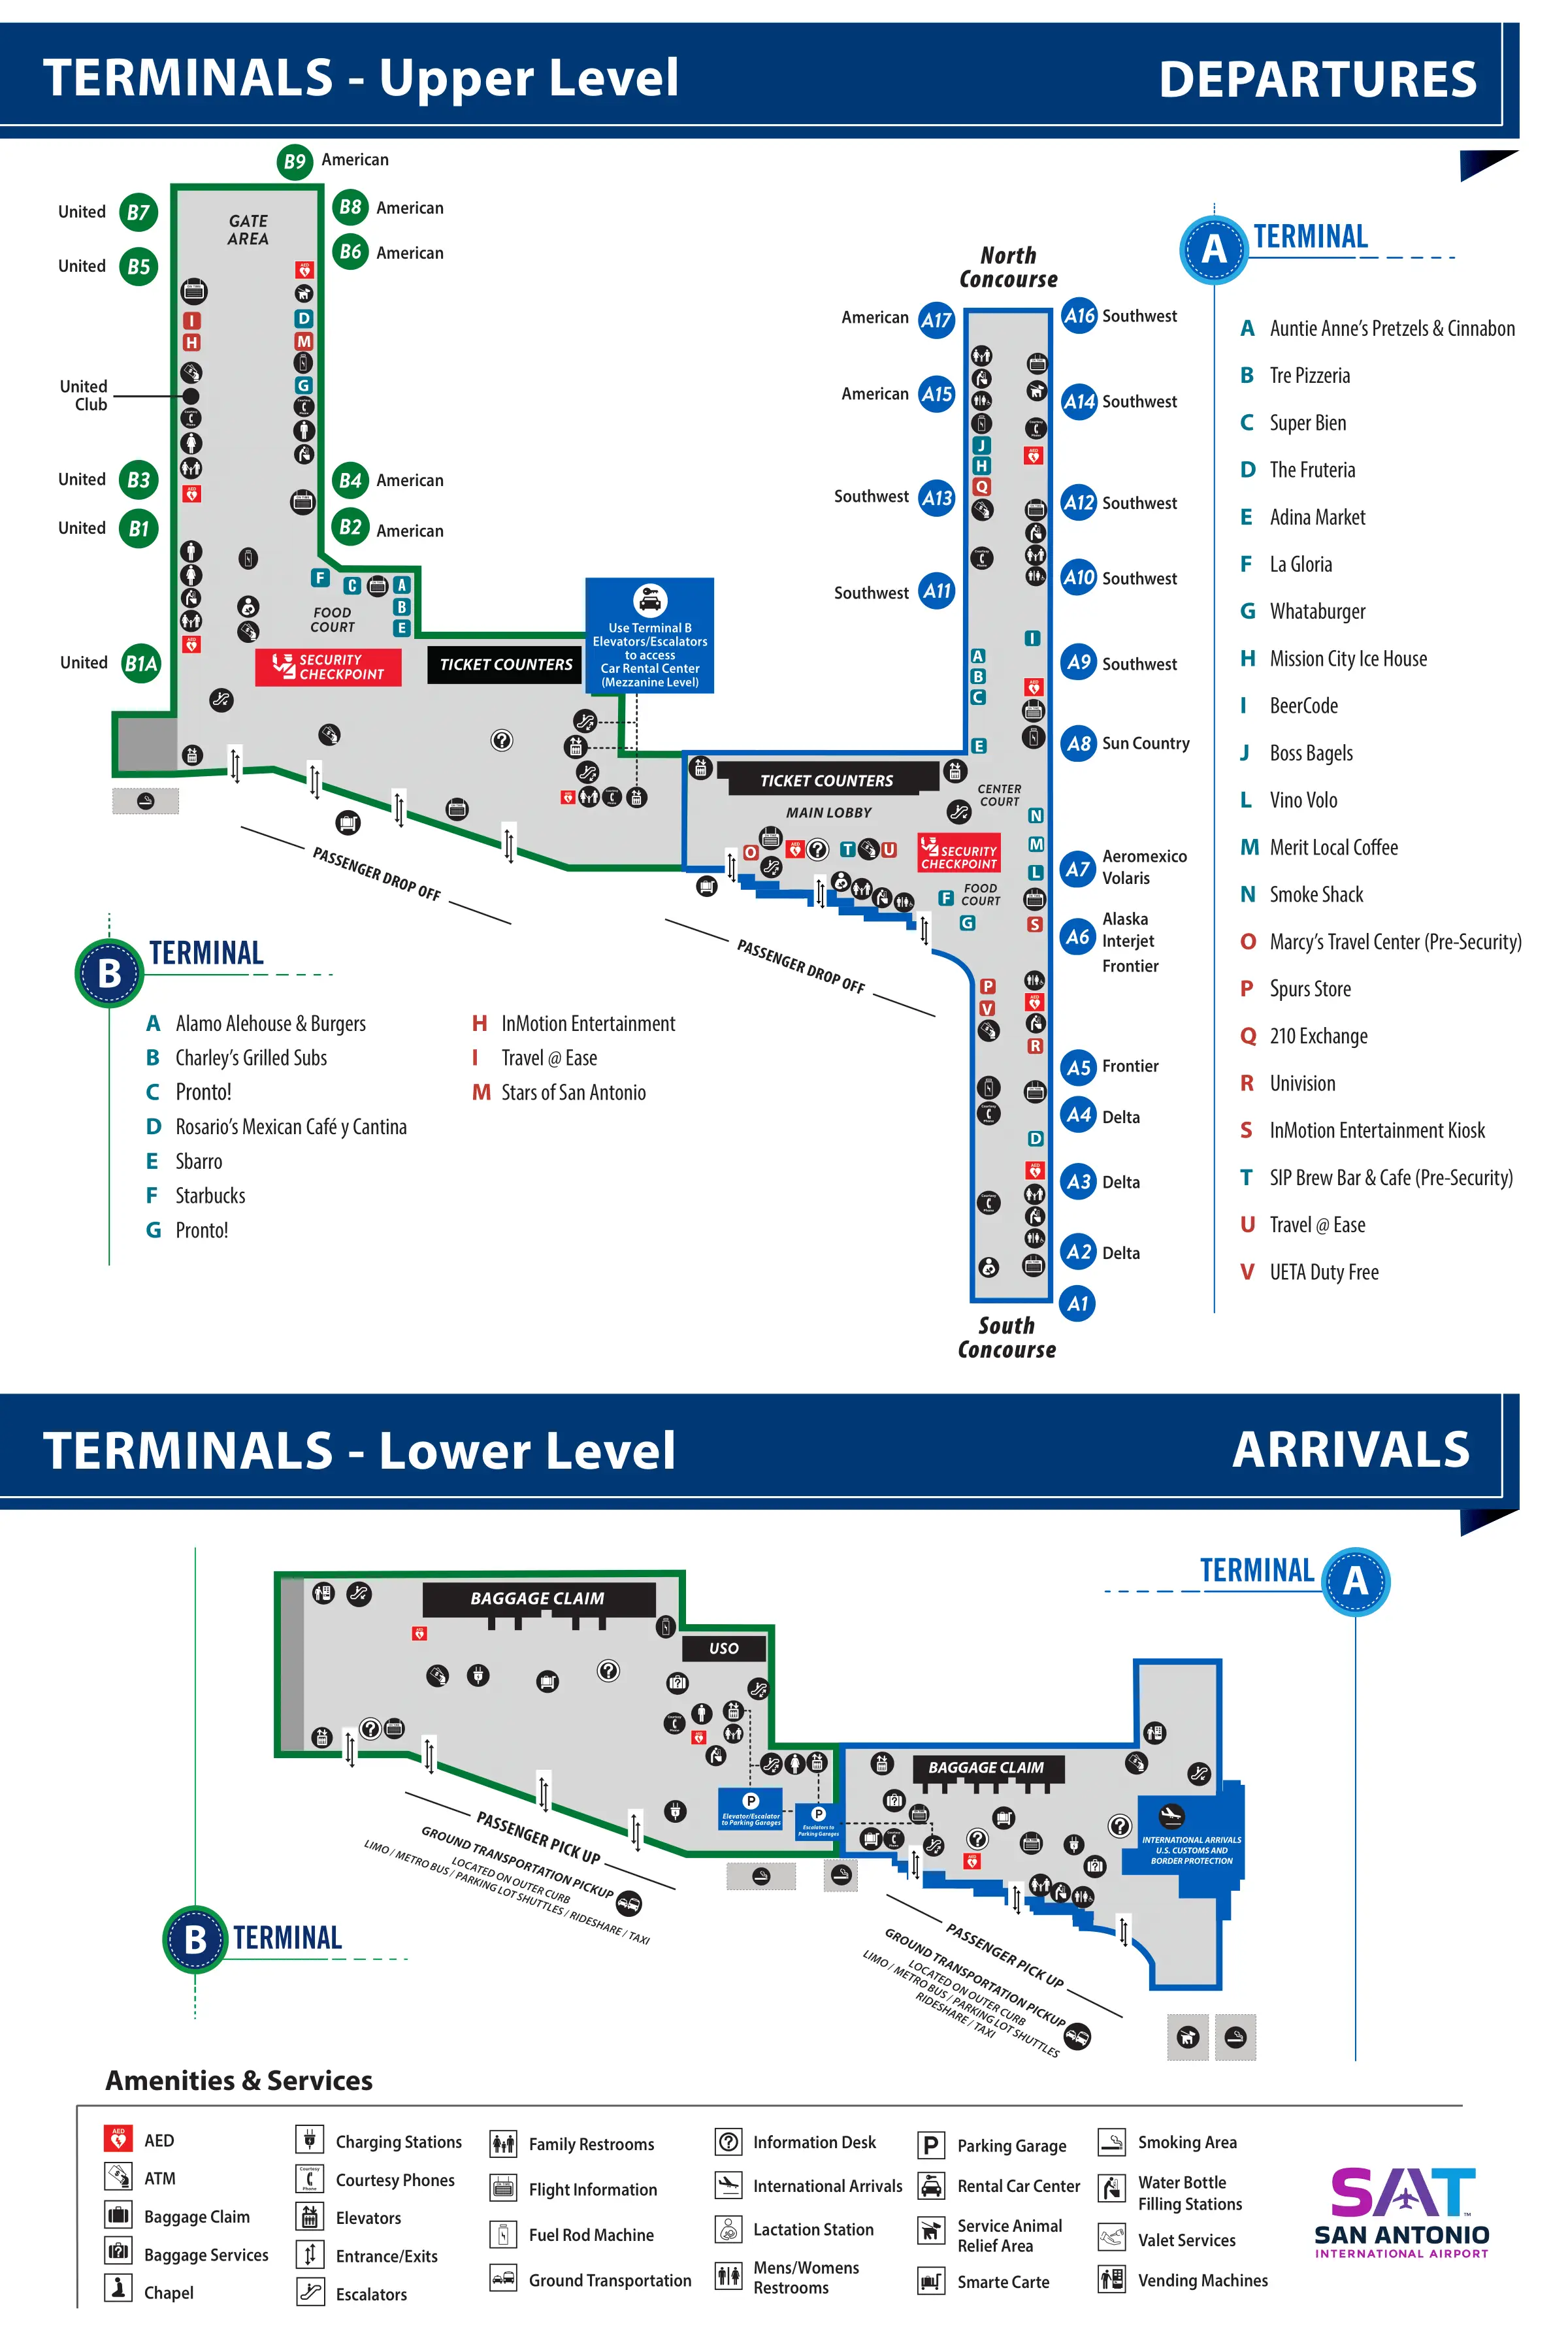
San Antonio International Airport Terminal A Map (Most Up-To-Date)
Terminal A at San Antonio’s main airport hub is a compact, older concourse with landside ticketing/curbside at the front and a linear gate corridor beyond TSA. The building’s short footprint creates crowd pinch points near the checkpoint and at the far-end gate holdrooms. The most important orientation rule is that Terminal A functions like its own secure island—your checkpoint choice locks in your airside options.
Map Table
| Zone | Primary Landmark | Walk Time | Not Possible |
|---|---|---|---|
| Curbside arrivals/departures | Terminal A door banks, split-lane curb | 1–3 min to ticketing | Drifting to Terminal B path “fixes itself” |
| Ticketing + bag drop | Airline counter line, bag-drop islands | 2–5 min to TSA | Missing cutoff, then “make it up” post-TSA |
| Terminal A TSA | Queue corral, document check podium | 1–2 min to near gates | Terminal A ↔ Terminal B post-security walk-through |
| Airside gate corridor | Narrow mid-corridor, end holdroom cluster | 4–8 min to far gates | Amenity-rich options near far-end gates |
San Antonio International Airport Terminal A Map Strategy
- Treat Terminal A and Terminal B as separate secure zones; pick the correct checkpoint before you scan a boarding pass so you never trigger an exit + re-clear TSA reset.
- Lock onto the landside decision nodes: terminal approach split, curbside door bank, then the TSA entrance landmark; if you pass the split, assume a backtrack.
- Build extra minutes for Terminal A choke points: security queue compression, narrow corridor segments, and end-of-concourse gate crowding near the far holdrooms.
- Handle food and bags as “before-the-pinch” tasks: grab food immediately after Terminal A TSA (limited later), and choose bag-drop lines that keep you closest to the Terminal A checkpoint when near cutoff windows.
2026 San Antonio International Airport Terminal A Map + Printable PDF
Terminal A’s 2026 reality is still defined by tight circulation and high-consequence checkpoint decisions: once you commit to a checkpoint and clear TSA, the wrong choice can force a full exit and re-clear that resets your timeline. For printing, use a single-page terminal diagram plus a landside approach view so your curbside entry, bag drop, and TSA door landmark all appear on the same sheet.
2026 San Antonio International Airport Terminal A Map Guide
What is the exact airside boundary showing there is no post-security connector between Terminal A and Terminal B, and where are the nearest sterile exits you must use to reset?
No post-security connector exists between Terminal A and Terminal B, so a wrong-checkpoint entry forces a sterile-area exit and full TSA re-screen at the other terminal. The practical “boundary” is the end of Terminal A’s secure corridor at its last gates—there’s no cross-corridor, bridge, or airside hallway that continues into Terminal B’s sterile zone.
Resetting requires using the one-way “Exit to Baggage Claim/Arrivals” doors nearest the Terminal A checkpoint area, which dump you back into landside public space. From there, the correction is always landside: walk outside (or through the pre-security connector paths), enter the other terminal’s ticketing hall, and re-join that terminal’s TSA queue.
On the landside map, where exactly are the Terminal A vs Terminal B checkpoint approaches split, and what is the minimum backtrack distance if you choose wrong?
The split happens at the landside connector decision point where the building/curbside flow divides toward Terminal A entrances versus Terminal B entrances, before you commit to a specific ticketing hall and TSA queue. Once you pass the wrong terminal’s entry doors and join that checkpoint’s line, the correction becomes a full backtrack to the other terminal’s front doors.
| Route correction | What you did wrong | Minimum backtrack | Anchor you should look for |
|---|---|---|---|
| Terminal A → Terminal B | Entered Terminal A doors but need Terminal B TSA | 5–10 min with bags | Terminal B ticketing hall entrance signage |
| Terminal B → Terminal A | Entered Terminal B doors but need Terminal A TSA | 5–10 min with bags | Terminal A ticketing hall entrance signage |
From the Terminal A ticketing hall, which specific door/landmark is the Terminal A TSA entrance, and what is the shortest mapped path to it?
The Terminal A TSA entrance is the main “Security Checkpoint” opening on the far (airside/east) wall of the Terminal A ticketing hall, typically marked by the largest overhead SECURITY/TSA signs and the escalator/stair core that feeds the concourse. That escalator/stair landmark is the fastest visual lock-on once you’re inside.
Enter Terminal A through the central curbside doors labeled for Terminal A departures/ticketing, then face into the hall so the check-in counters are behind or to one side. Walk straight across the open ticketing floor toward the SECURITY signage and escalators; the checkpoint entry is immediately beside that vertical circulation cluster. If you hit the far wall and see restrooms or baggage-service desks before SECURITY, you’ve drifted off the shortest line—angle back toward the escalators and the queue corral.
What is the walking distance (or time at normal pace) from Terminal A TSA exit to the farthest Terminal A gate, and which corridor segments are the tightest on the map?
Walking takes about 6–10 minutes from the Terminal A TSA exit to the far-end A-gates (typically the last gate pair at the end of the pier), with slowdowns driven more by crowding than raw distance. The tightest segments are usually the first 100–200 feet after TSA (merge zone) and the mid-corridor pinch where restrooms and concessions pull people into the main flow.
| Segment | Landmark anchor | Typical time | Tightness cue |
|---|---|---|---|
| TSA exit → main concourse | stanchions/ID check area behind you | 1–2 min | merging foot traffic, queue spillover |
| Main concourse → mid-pier | nearest restrooms/concessions node | 2–4 min | narrow corridor, people stopping/lining up |
| Mid-pier → far-end gates | last holdroom cluster at pier end | 2–4 min | gate-crowding that blocks through-walkers |
Which Terminal A gates share the same end-of-concourse holdroom cluster, and where is the narrowest pinch point immediately before that cluster?
Gates A8 and A9 share the same end-of-concourse holdroom cluster at the dead-end tail of Terminal A. The narrowest pinch point sits immediately before that cluster in the constricted corridor by Gate A6, where fixed retail/concession frontage and gate seating squeeze the through-walk lane.
The A8/A9 holdroom behaves like a cul-de-sac: boarding queues and seated passengers fill the end space while opposite-direction foot traffic has no alternate bypass. The pinch point shows up as you pass the Gate A6 zone—look for the retail/kiosk edge and the Gate A6 seating spill that narrows the main aisle to roughly two-abreast flow. If you’re walking to A8/A9 during active boarding at A6, expect stop-and-go compression right there.
Where does the Terminal A security queue physically spill when it’s backed up (hallway segments/adjacent landmarks), and what alternate walking lanes exist to bypass the queue mass?
The Terminal A security queue spills out of the TSA corral into the ticketing-floor approach lanes, then backs toward the main curbside entry doors when volume exceeds the lobby’s buffer space. The tell is a line that extends past the stanchions into the open hall near the door bank and along the main “cross-traffic” path between check-in counters and the SECURITY signs.
Bypassing works only by staying out of the queue’s footprint: hug the outer edge of the ticketing hall along the wall opposite the stanchions, then cut in toward SECURITY at the front of the line where the podiums begin. If the queue has reached the door area, use the widest clear lane along the building-side wall (not the center), and avoid weaving through counter lines—cross once, decisively, at a gap near the escalator/stair landmark rather than threading between families and bags.
Where are the first two decision nodes after curbside entry (points where a traveler can accidentally drift toward the wrong terminal path), and what signage is present at each node?
The first two decision nodes are the roadway/curbside split that commits you to Terminal A vs Terminal B, then the door-bank entry choice that commits you to a specific ticketing hall and TSA queue. Getting pulled into the wrong terminal flow at either point usually costs a full walk-back with bags before you even reach security.
| Decision node | Where it happens | What you’ll see | What to do to avoid drift |
|---|---|---|---|
| Node 1: terminal approach split | vehicle lanes dividing toward Terminal A frontage vs Terminal B frontage | overhead gantries with terminal letters/names plus Departures/Arrivals arrows | call “Terminal A” out loud and stay in the lane that keeps you on Terminal A’s curb line |
| Node 2: curbside door-bank commit | under the canopy at the Terminal A doors vs the adjacent path continuing toward Terminal B | large door-header signs for Terminal A/ticketing and smaller airline placards on pillars | stop at the first big “Terminal A / Ticketing” sign; enter there before walking past the connector direction |
For Terminal A arrivals, where are the north vs south pickup zones located relative to Terminal A exits, and which exit door numbers/signs route to each?
North pickup is directly outside Terminal A’s main arrivals exits on the Terminal A curb, while south pickup requires walking toward Terminal B-side ground transportation islands. The “north vs south” confusion happens because both zones can feel like the same frontage unless you anchor on the connector direction and the ground-transport signs.
Exit Terminal A through the primary arrivals doors (the main “Baggage Claim / Ground Transportation” signs) and you’ll land in the north-side pickup pattern by default—closest to private pickups and short-term curb stops. To reach south pickup, follow signage that explicitly points toward rideshare/taxi/shuttles (often routed toward Terminal B), keep walking past the connector frontage, and don’t stop at the first curb you see. If you’re not seeing rideshare/taxi identifiers, you’re still in the north pickup zone.
For Terminal A arrivals, where are the north vs south pickup zones located relative to Terminal A exits, and which exit door numbers/signs route to each?
North pickup sits directly outside Terminal A at Doors 1–4, while south pickup is reached by walking south to the ground-transport islands outside Terminal B. Door #1 is the north-end anchor near the primary Terminal A check-in block, and the door numbers step south along the same curbline.
| Pickup zone | Relative to Terminal A exits | Exit doors/signs that route you | What it’s best for |
|---|---|---|---|
| North pickup | immediate curb outside Terminal A frontage | Doors 1–4; “Valet / Private Pickup” and general curbside signage | friend/family curb pickup, valet meetups |
| South pickup | past the covered connector toward Terminal B islands | “Ground Transportation” arrows pointing south; rideshare/taxi/shuttle identifiers appear closer to Terminal B | Uber/Lyft, taxis, most shuttles |
Where are the Terminal A airline check-in counters and bag-drop positions relative to the Terminal A TSA entrance, and what is the shortest mapped walking route between them?
Terminal A check-in counters and bag-drop positions sit on the landside ticketing side of the hall, opposite the Terminal A TSA entrance on the airside wall. The shortest route is a direct cross-lobby line from your bag-drop island to the main SECURITY/TSA sign band at the escalator/stair landmark.
| Step | Start → End | Landmark triangulation | Typical time |
|---|---|---|---|
| 1 | Curbside doors → bag drop | door bank → your airline’s stanchions/counter header | 1–2 min |
| 2 | Bag drop → open hall crossing | end of stanchions → widest clear aisle in front of counters | 30–60 sec |
| 3 | Hall crossing → TSA entry | escalator/stair core → SECURITY/TSA overhead signs and queue corral | 1–2 min |
| 4 | TSA entry → queue commit | document-check podiums at queue front | 0–2 min (depends on line) |
Post-security in Terminal A, what are the exact locations of the limited food options relative to the gate clusters (which gates are furthest from food by map distance)?
Food is concentrated near the post-TSA core by the early A-gates (the A1–A5 plaza area), while the far-end Terminal A gates (A8/A9) are the furthest from food and require the longest backtrack. The practical constraint is that once you pass the mid-corridor pinch beyond the main concession node, options thin out fast.
| Food zone | Relative location | Closest gate cluster | Gates furthest by map distance |
|---|---|---|---|
| Main concession cluster | immediately after TSA in the wider concourse | A1–A5 | A8–A9 |
| Secondary grab-and-go / coffee | mid-corridor near the A6 area | A6–A7 | A8–A9 |
| Far-end holdrooms | end-of-pier dead end | A8–A9 | A8–A9 (no nearby food) |
Archive San Antonio International Airport Terminal A Map
Below are all historical map versions for San Antonio International Airport. Each year includes the official map available for that period, presented as both WebP and PDF.