Zürich Airport Terminal D Map (Most Up-To-Date)
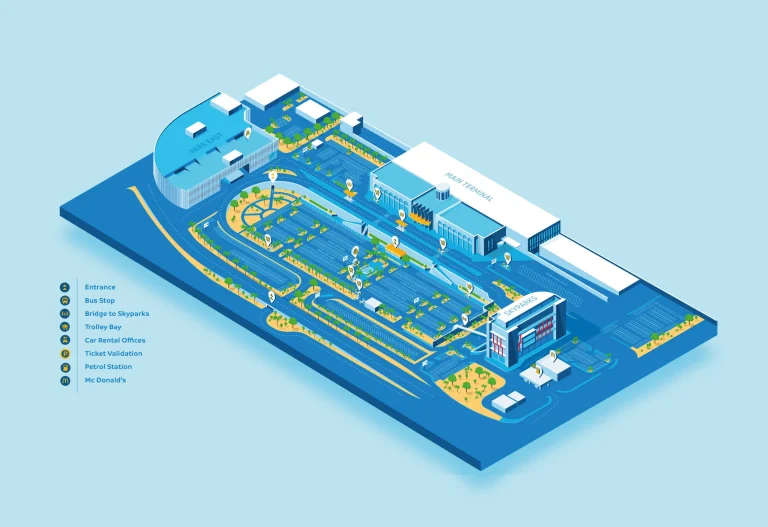
Zürich Airport Terminal D (Dock D) is a long, finger-style pier that runs out from the Airside Center and functions as the airport’s non-Schengen “edge zone” within Zurich’s main airport complex. It’s compact in footprint but split vertically: Schengen Gates B above, non-Schengen Gates D below, with the key pinch point at passport control near the pier root. Within this layout, most D flights use bus gates, so the important geometry is “root node → long corridor → down-to-bus descent.”
Map Table
| Zone | Connection | Walk Time |
|---|---|---|
| Airside Center merge point | Gates B / D / E vector | — |
| Passport Control Hall | Schengen → non-Schengen access to D | queue-dependent |
| Dock D main corridor | D31–D59 bus-gate spine | long-walk risk |
| Skymetro node | Gates E (Midfield) | minutes from pier root |
Zürich Airport Terminal D Map Strategy
- Treat “Terminal D” as the bus-gate, non-Schengen lower level of the B/D pier; follow gate letters (A/B/D/E), not “terminal” language, to avoid the wrong zone.
- Clear passport control early, then decide immediately: either turn for Skymetro/Gates E near the pier root, or commit down the long D corridor—don’t drift past duty-free and realize you missed the connector.
- Pad your buffer for two hard stops: passport control swings and bus-gate boarding cycles that effectively close earlier than departure, with extra document checks at the gate.
- Use map anchors to reduce re-screening uncertainty: Skymetro platform access is at the pier-root node, while “unclean” arrivals get funneled to re-screening before mixing with departures.
2026 Zürich Airport Terminal D Map + Printable PDF
Terminal D remains the lower-level, non-Schengen side of the Pier B/D structure at 2026, with most operations centered on bus-gate staging (not jet bridges). The critical fixed anchors haven’t moved: passport control at the pier entrance, the D corridor extending to higher-numbered gates, and the Skymetro access for Gates E near the root node. Time reliability still hinges on border queues and bus-cycle boarding cutoffs.
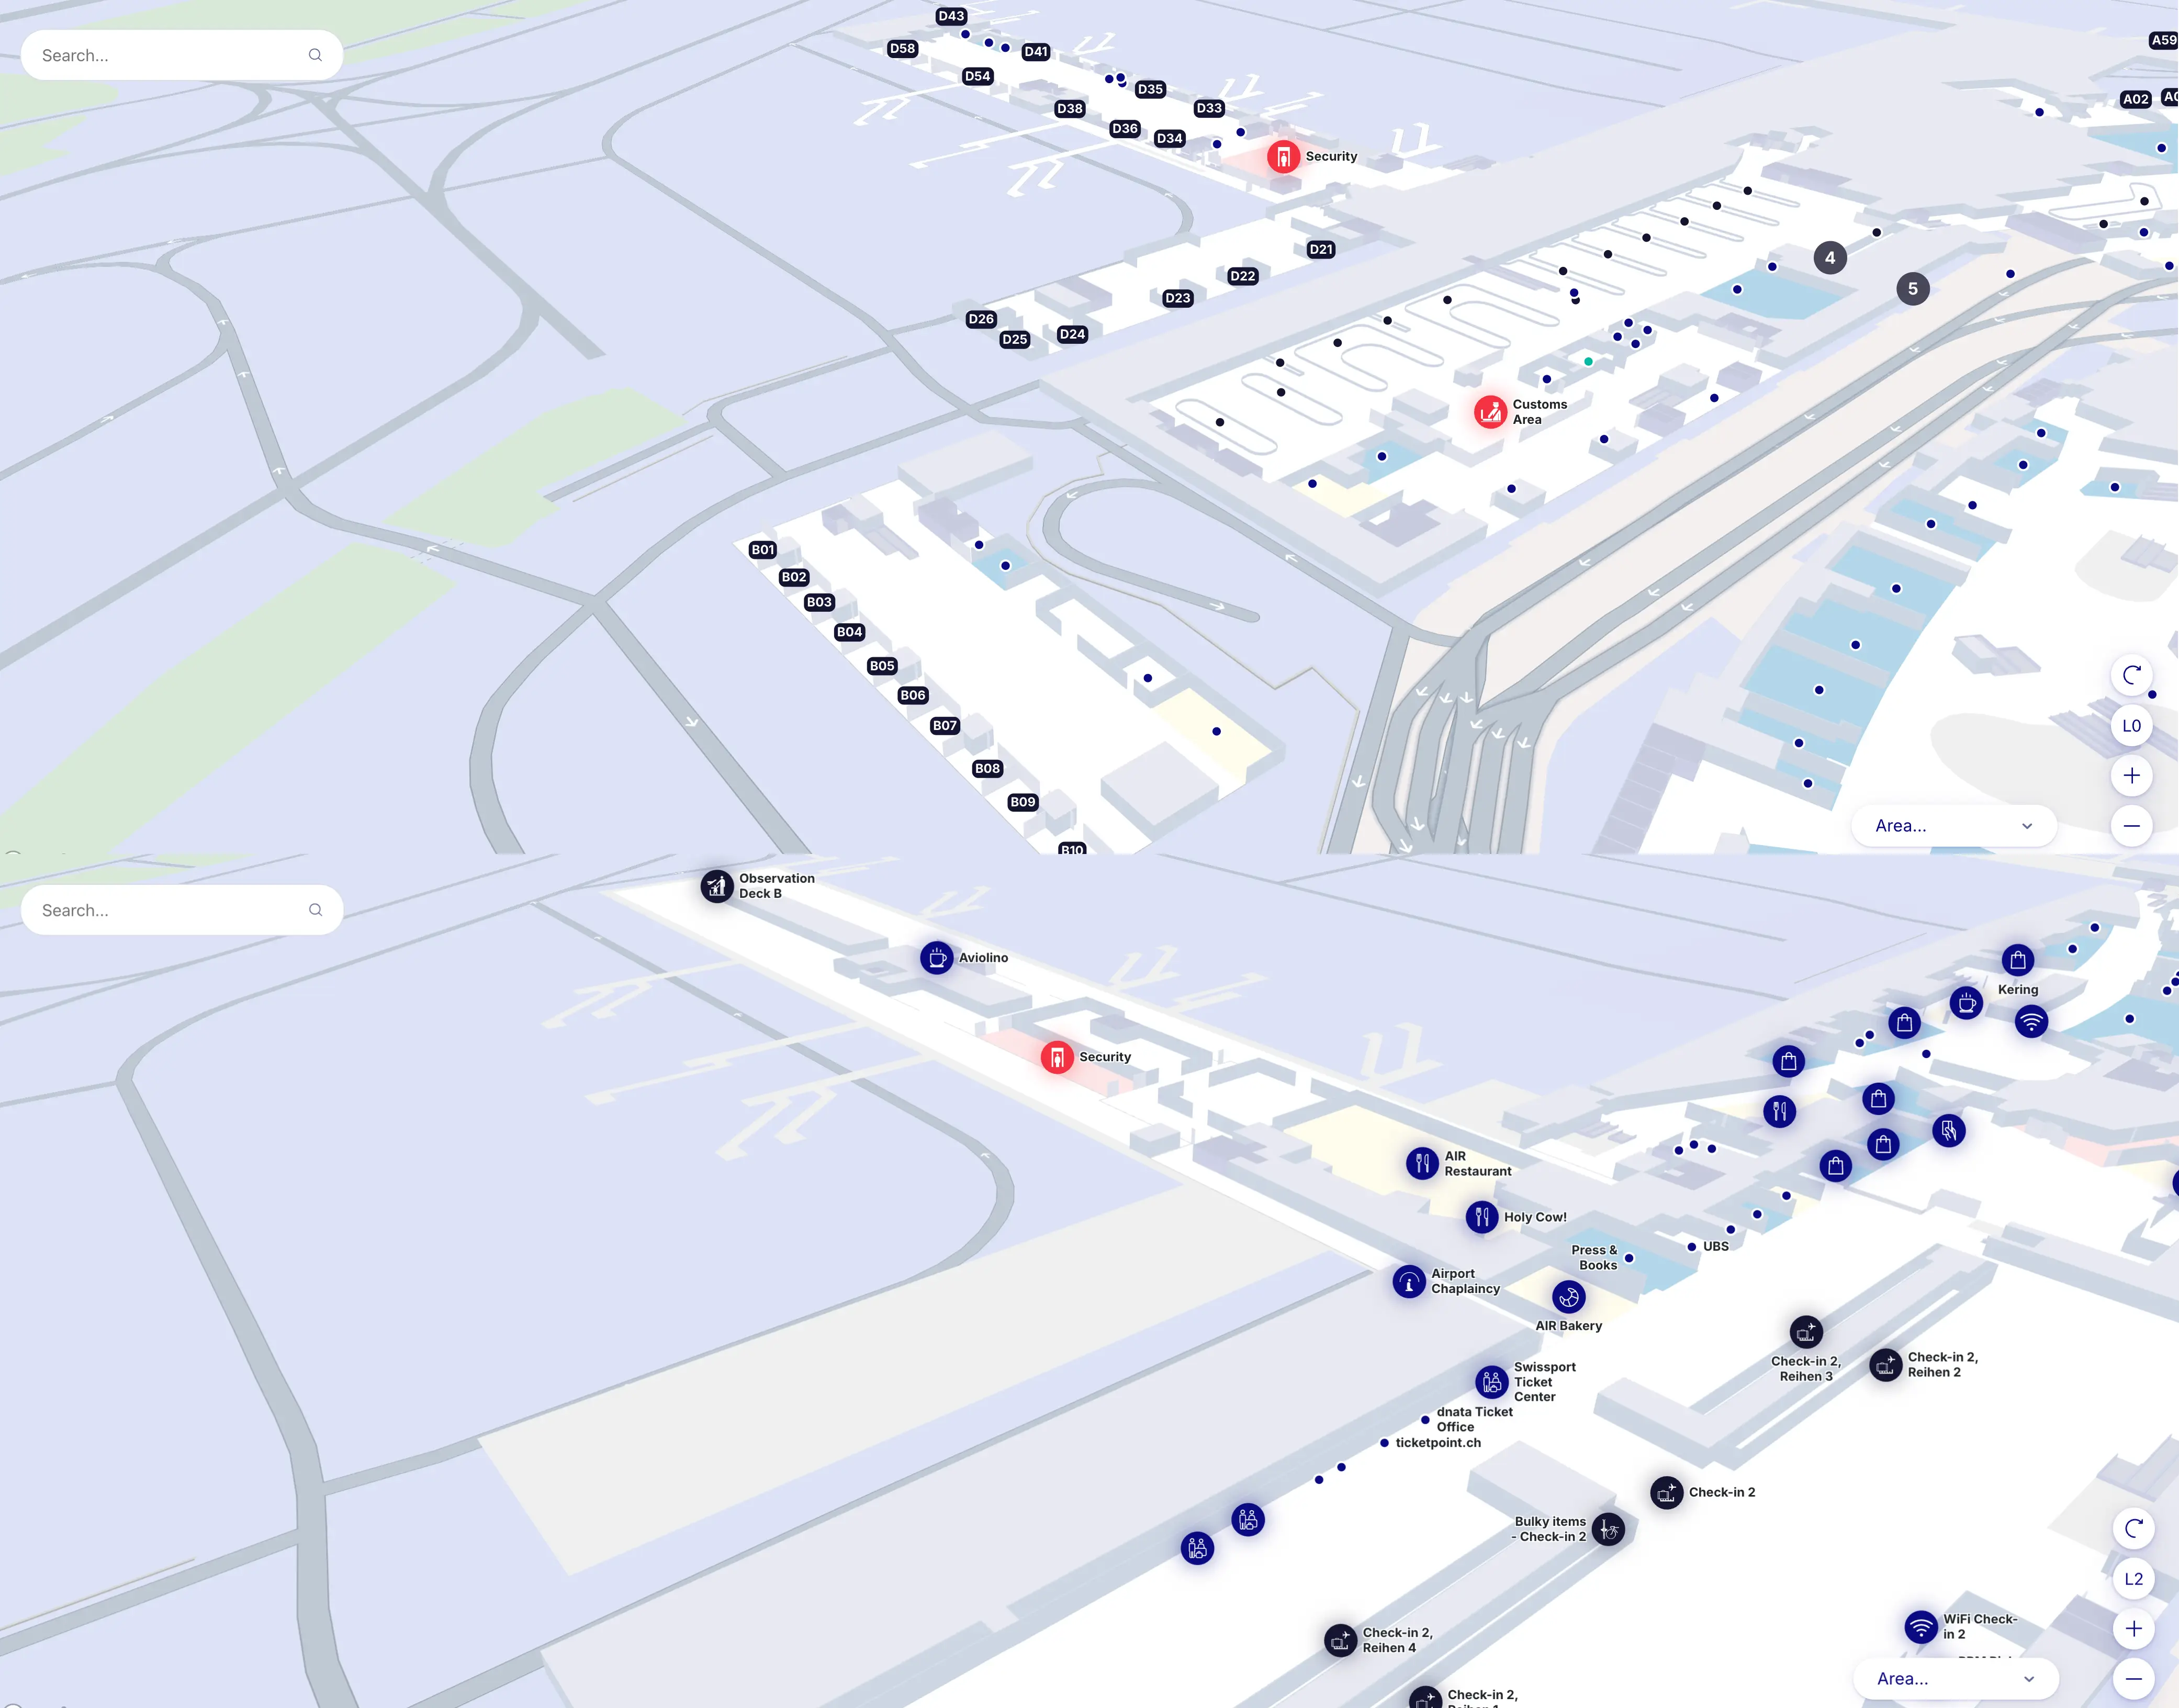
Zurich Airport Terminal D Level 0 Map 2025

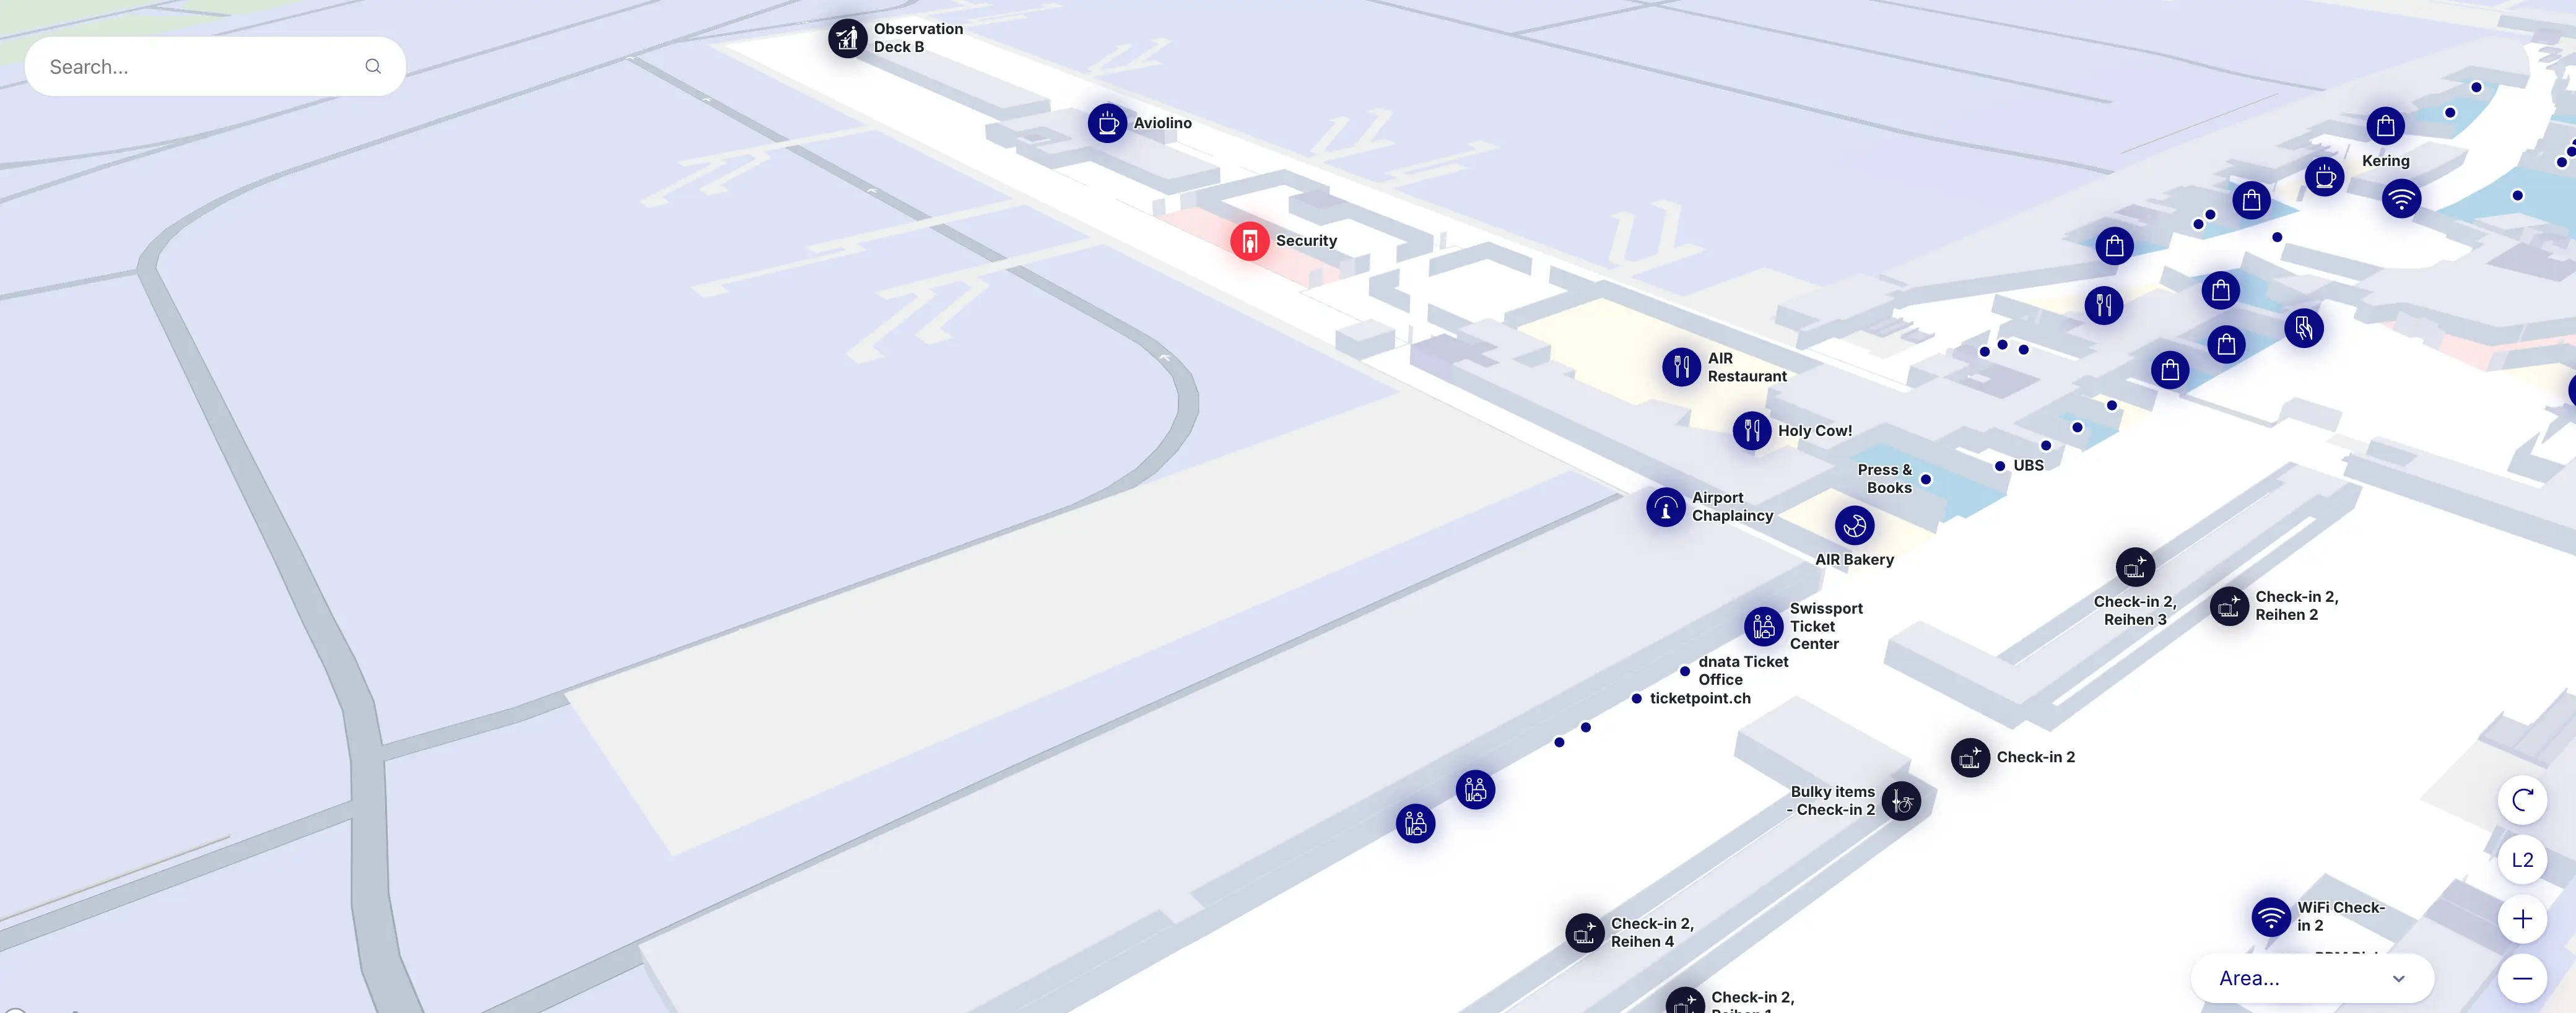
Zurich Airport Terminal D Level 2 Map 2025
2026 Zürich Airport Terminal D Map Guide
What is the exact walking route (turn-by-turn) from Gate D arrivals corridor to the Skymetro entrance for Gates E (including the correct level)?
The Skymetro entrance for Gates E sits at the pier-root transfer node, reached by following “Transfer / Gates E” signs from the D arrivals corridor and descending to the underground train level. From the D arrivals corridor, stay in the airside transfer flow and avoid any path signed to “Exit/Baggage claim,” which commits you toward landside immigration.
| Step / decision point | What to follow | Landmark anchor |
|---|---|---|
| Leave the D arrivals corridor | “Transfer” / “Gates E” | glass-walled transfer corridor, not exit lanes |
| Stay airside (do not exit) | avoid “Exit” / “Baggage claim” | branching where passengers peel off toward landside |
| Reach the pier-root transfer node | “Skymetro” + train icon + “E” | near the D passport-control area at the pier entrance |
| Go to the correct level | descend by escalator/elevator to the underground station level | escalators down to the Skymetro platform |
| Enter the Skymetro station | “Gates E” | platform access at the train icon signage cluster |
Where is the D-gates passport control checkpoint located relative to the D gate numbers, and what is the shortest path from the central D concourse to reach it?
The D-gates passport control checkpoint is upstream of all D gates, positioned at the entrance to Dock D near the pier root before you can reach any gate in the D31–D59 range. From the central D concourse, the shortest route is back toward the Airside Center-facing end of the pier, staying on the main corridor spine until the passport-control hall appears just before the first stretch of D-gate numbering.
Follow the main D corridor toward the pier entrance (the end with the Airside Center connection), using “Passport Control” signage as your confirmation cue. The checkpoint sits right where the environment changes from the open transfer node into the lower-ceilinged Dock D corridor. If you can already see mid-pier landmarks like the D43 retail/restroom node, you’ve gone too far down the pier and need to reverse back toward the root.
Where is the bus-gate staging area for D (the point where you go from terminal corridor to down the ramp/stairs/elevator to bus loading) and which landmarks/signs confirm you’re at the correct descent point?
The bus-gate staging area for Dock D begins at your specific D gate counter on the D concourse, where boarding pass scanning funnels you into a sterile holding pen and then down to apron-level bus loading. The correct descent point is not a shared “one big stair” location—it’s tied to the individual bus gate (common in the D31–D59 range), immediately after the gate’s boarding control.
- A boarding-pass scan pedestal and glass-door entry into a holding pen confirm you’re at the start of bus-gate staging.
- Stairs/ramp/elevator immediately beyond the gate control lead downward to bus loading, with no jet-bridge corridor ahead.
- A direct sightline to the apron through glass doors at the bottom of the descent confirms “bus lane/tarmac,” not a pier hallway.
- A hard constraint confirms you’re past the point of no return: no restrooms or shops once you’ve entered the holding pen area.
What is the exact separation point between D arrivals bus flow and D departures bus flow, and what is the shortest internal route between them?
The separation point between D arrivals bus flow and D departures bus flow is enforced by segregated corridors and level-controlled doors near the pier-root transfer node, where arrivals are kept in a glass-walled channel until they either route to transfer processing or landside exit. The shortest internal route between them exists only for clean-transfer passengers, using the pier-root transfer node to pivot back into departures without leaving the Dock D structure.
Arriving passengers coming off a bus are directed into an arrivals-only corridor that prevents mixing with the D departures corridor until controlled merge points near the transfer node. Clean arrivals can use the internal U-turn at the pier-root node (adjacent to the passport-control/connector area) to rejoin the departures side. Unclean arrivals do not have an internal shortcut: the routing forces them to the re-screening channel before they can access the departures concourse again.
If the Skymetro is not operating, where is the backup bus transfer pickup point for D → E, and what is the precise walking path from the D concourse to that pickup?
The backup bus transfer pickup point for D → E is typically signed to the inter-terminal “Bus Transfer E” staging area near Bus Gate B10 or the dedicated transfer bus stands at the base of the Pier B/D bus-gate infrastructure. From the D concourse, the correct path is the one that looks like a standard bus-gate descent but is labeled for inter-terminal transfer rather than a specific flight gate.
From the D concourse, go toward the pier-root transfer node (the same end as passport control and the Skymetro access), then follow temporary disruption signage—often yellow/black—reading “Bus Transfer E” instead of “Skymetro.” Expect to be directed down (stairs/ramp/elevator) to apron/bus level, where staff marshal passengers at a marked transfer stand. If you find yourself deep in the D31–D59 gate corridor away from the pier root, you’re walking the wrong direction for the outage pickup.
Where does the “international transit connector” from D toward E physically begin (doorway/portal), and what sign text should a traveler follow to find it without entering the wrong zone?
The international transit connector from Dock D toward Gates E begins at the pier-root node immediately after the D-side passport control area, where a lateral turn leads to the Skymetro station access rather than straight down the D gate corridor. The correct sign text to follow is “Gates E” paired with a train icon and “Skymetro,” taken as soon as you clear border control.
The key spatial tell is that the connector is a side portal near the entrance to the pier, not something you reach after a long walk. If you walk straight ahead into the duty-free/long corridor that leads toward higher-numbered D gates (D3x–D5x), you’ve missed the connector and will have to backtrack to the pier root. Staying loyal to “E / Skymetro” signage (and ignoring “terminal” language) prevents the wrong-zone commit.
Where is the re-screening / secondary security checkpoint located when arriving into E gates via the “unclean” path, and what is the shortest route from Skymetro exit to that checkpoint?
The re-screening / secondary security checkpoint for “unclean” arrivals is in the Airside Center, placed immediately after the Skymetro arrival flow merges into the controlled transfer channel, before you can access the main departures retail level. From the Skymetro exit, the shortest route is the forced “Transfer” funnel that directs you straight to security—there is no parallel corridor that bypasses it.
From the Skymetro exit on the unclean side, follow “Transfer” signage up from the platform area toward the arrival-level merge point, then continue along the barriered lane directly into the security checkpoint entrance. The landmark triangulation is simple: if you can see open duty-free space or free-flow access to gates without passing security, you’re not in the unclean channel; the unclean routing keeps you in a controlled corridor until screening is complete.
What is the walking distance (meters) and typical walk time from the main post-security merge point to the furthest commonly used D bus gates (e.g., D5x range), using the signed route?
The signed walk from the main post-security merge point in the Airside Center to the far-end D bus gates in the D5x range is roughly 600–800 meters and typically takes 15–20 minutes of walking. That distance assumes you follow the B/D pier vector, clear the D-side passport control, and then continue down the full length of the Dock D corridor.
The time risk is less the corridor itself and more the stacked friction near the pier root. Passport control can add unpredictable delay before you even start the long D-walk, and bus-gate operations often impose an earlier effective cutoff once your gate begins staging. The most reliable landmark check is the mid-pier node around Gate D43 (retail/restrooms): if you haven’t passed that anchor yet, you’re not in the far D5x segment.
Where are the passport-control alternatives (D vs E checkpoint locations) on the map, and which one is spatially closest to the D→E connector for a departing long-haul passenger?
The D-side passport control is at the entrance to the B/D pier (the pier-root border hall) and sits adjacent to the D→E connector decision area, making it the closest passport-control option to the Skymetro access for Gates E. The E-side passport control is associated with the Skymetro/Airside Center approach to the Midfield (E) system and is encountered on the “direct to E” routing rather than at the D pier entrance.
| Option | Where it sits on the map | Closest to the D→E connector? |
|---|---|---|
| D passport control | pier-root hall at the entrance to Dock D | Yes |
| E passport control | on the E access routing tied to the Skymetro/Airside Center side | No |
For a departing long-haul passenger aiming for Gates E, the practical map move is clearing border control at the D-side pier-root hall, then immediately taking the lateral “E / Skymetro” connector before walking deep into the D gate corridor.
Where is the decision fork on the map where a traveler can accidentally get routed toward the wrong “terminal” signage instead of following gate-letter navigation (A/B/D/E), and what exact sign sequence prevents that error?
The decision fork is immediately after central security at the Airside Center merge point, where the flow splits toward “Gates A” versus the combined vector for “Gates B / D / E.” The sign sequence that prevents the error is staying exclusively on gate-letter routing: first “Gates B / D / E,” then “Passport Control” (for non-Schengen), then “Gates D” or “Skymetro / Gates E” depending on your target.
The fork is easy to misread if you’re thinking in landside terms like “Terminal 2,” because that language doesn’t map cleanly to airside gate areas. Use the large duty-free block as a spatial anchor: the B/D/E direction typically tracks along the right/straight side of the retail zone, while “Gates A” peels off the other way. If you’re not seeing “B / D / E” together on overhead signs within seconds of the merge, you’re drifting into the wrong stream.
Where is the non-Schengen D-concourse lounge located relative to D gates and passport control, and what is the shortest signed route from the D concourse to reach it?
The non-Schengen lounge in Dock D (SWISS Lounge D) is positioned immediately after the D-side passport control at the pier root, before the long walk down the corridor to higher-numbered D bus gates. From the D concourse, the shortest route is back toward the pier entrance until you reach passport control, then follow “Lounges / SWISS Lounge D” signage in the immediate post-control area.
From the main D corridor, walk toward the end that reconnects to the Airside Center (the pier-root node), using the passport control location as your anchor. Right after you clear that border-control threshold, look for overhead lounge signs close to the entrance area. A simple confirmation rule: if you’re already down near gates like D40–D5x, you’ve passed the lounge zone and would need to backtrack toward the pier root.
From Gate D bus gates, what is the exact path to the nearest restrooms without backtracking past passport control (identify the closest restroom icon cluster on the map)?
Restrooms are only available in the Dock D public corridor on the concourse side, not inside the bus-gate holding pens or after the boarding-pass scan point. From the D bus-gate entrances, the nearest restrooms are reached by staying outside the scanner line and walking along the main corridor to the closest restroom icon cluster—typically the mid-pier cluster near Gate D43 or the smaller far-end cluster near the D5x segment, depending on your exact gate position.
- Do not scan your boarding pass; scanning commits you into the holding pen with no restroom access.
- From the gate entrance area, turn along the main D corridor toward the closest restroom icon cluster.
- Use Gate D43 as the strongest mid-pier anchor (retail/restroom node) if you’re not already at the far end.
- If you are already positioned in the D5x area, use the far-end restroom cluster before returning to the gate to scan and descend.