Washington Dulles International Airport Concourse AB Map (Most Up-To-Date)
Concourse A/B at the Dulles main airport complex is a single, straight “midfield” building—one continuous corridor about 2,800 feet long—where the label flips from A to B near the central retail core. The layout is essentially east–west: “Low A” (A1–A6) sits off the west end via a down-ramp, while the two AeroTrain injection points sit off-center (near A15 and B45), not at the A/B middle.
Map Table
| Zone | Connection | Walk Time |
|---|---|---|
| A/B Junction (A32/B37) | Pedestrian Walkway to Main Terminal | ~7–10 min to terminal |
| AeroTrain Station A (near A15) | AeroTrain A/C loop | ~3–4 min from A/B junction |
| AeroTrain Station B (near B45) | AeroTrain B loop | ~3–4 min from A/B junction |
| Mobile Lounge node (A6) | Shuttle to D Gates | ~8–12 min from mid-B |
| High B extension (B60–B81) | no exits beyond | ~8–10 min back to B45 |
Washington Dulles International Airport (IAD) Concourse A/B Map Strategy
- Treat A/B as one hallway, then pick a node: A15 for AeroTrain Station A, B45 for AeroTrain Station B, A32/B37 only for the Walkway, A6 only for the D-Gates shuttle.
- Ignore the “center instinct” under pressure: the down-access at A32/B37 is a point-of-no-return toward the Main Terminal Walkway, not a train shortcut.
- Choose AeroTrain vs. walking by counting level changes: the train “vertical tax” is two escalator descents to the platform (and two back up), which can erase any advantage for short A↔B moves.
- Before boarding any mobile lounge, read the destination words overhead: “A Gates / Midfield Concourses” is the safe connection cue; “Main Terminal / Baggage Claim / Ground Transportation” is the high-penalty wrong direction that can force landside exit and re-screening.
2026 Washington Dulles International Airport Concourse AB Map + Printable PDF
The 2026 Concourse A/B map is only “easy” if you treat it as three separate access nodes, not one central hub: AeroTrain entry near A15 and B45, the Pedestrian Walkway down-access at A32/B37, and the D-Gates shuttle at A6. The highest-risk mistake remains taking the central down-escalator expecting AeroTrain, then realizing it commits you to the Walkway to the Main Terminal.
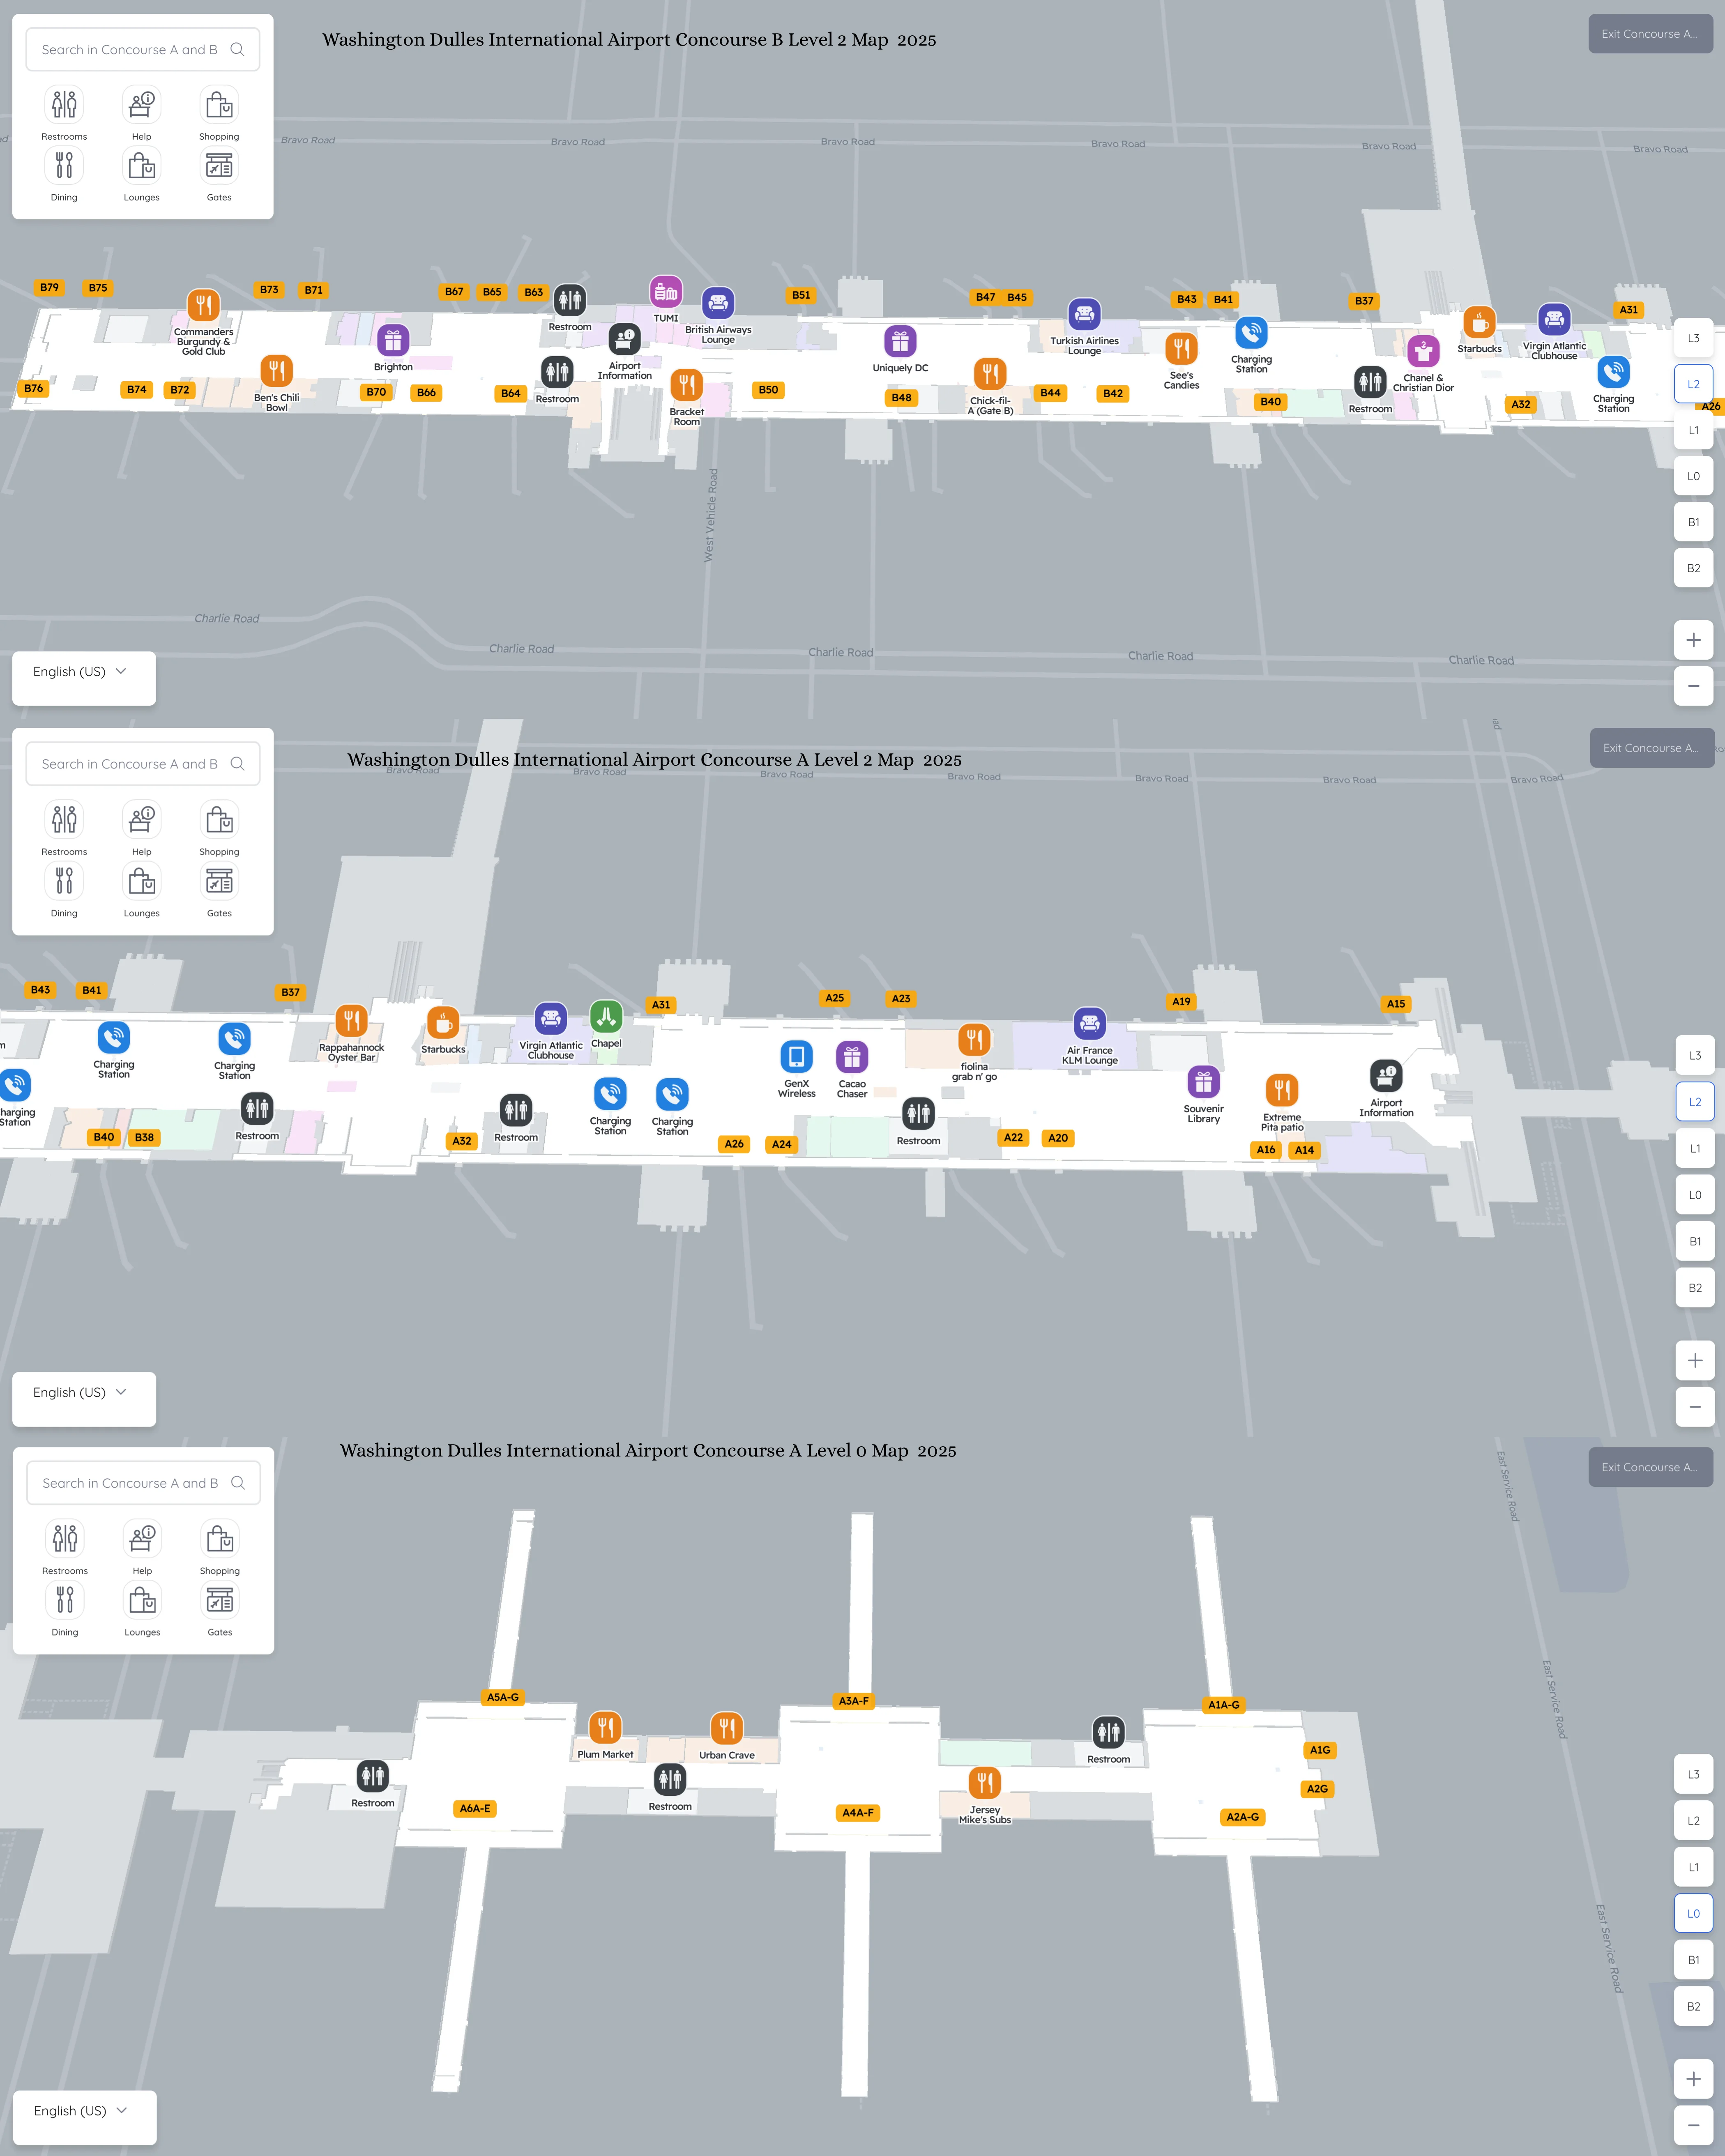
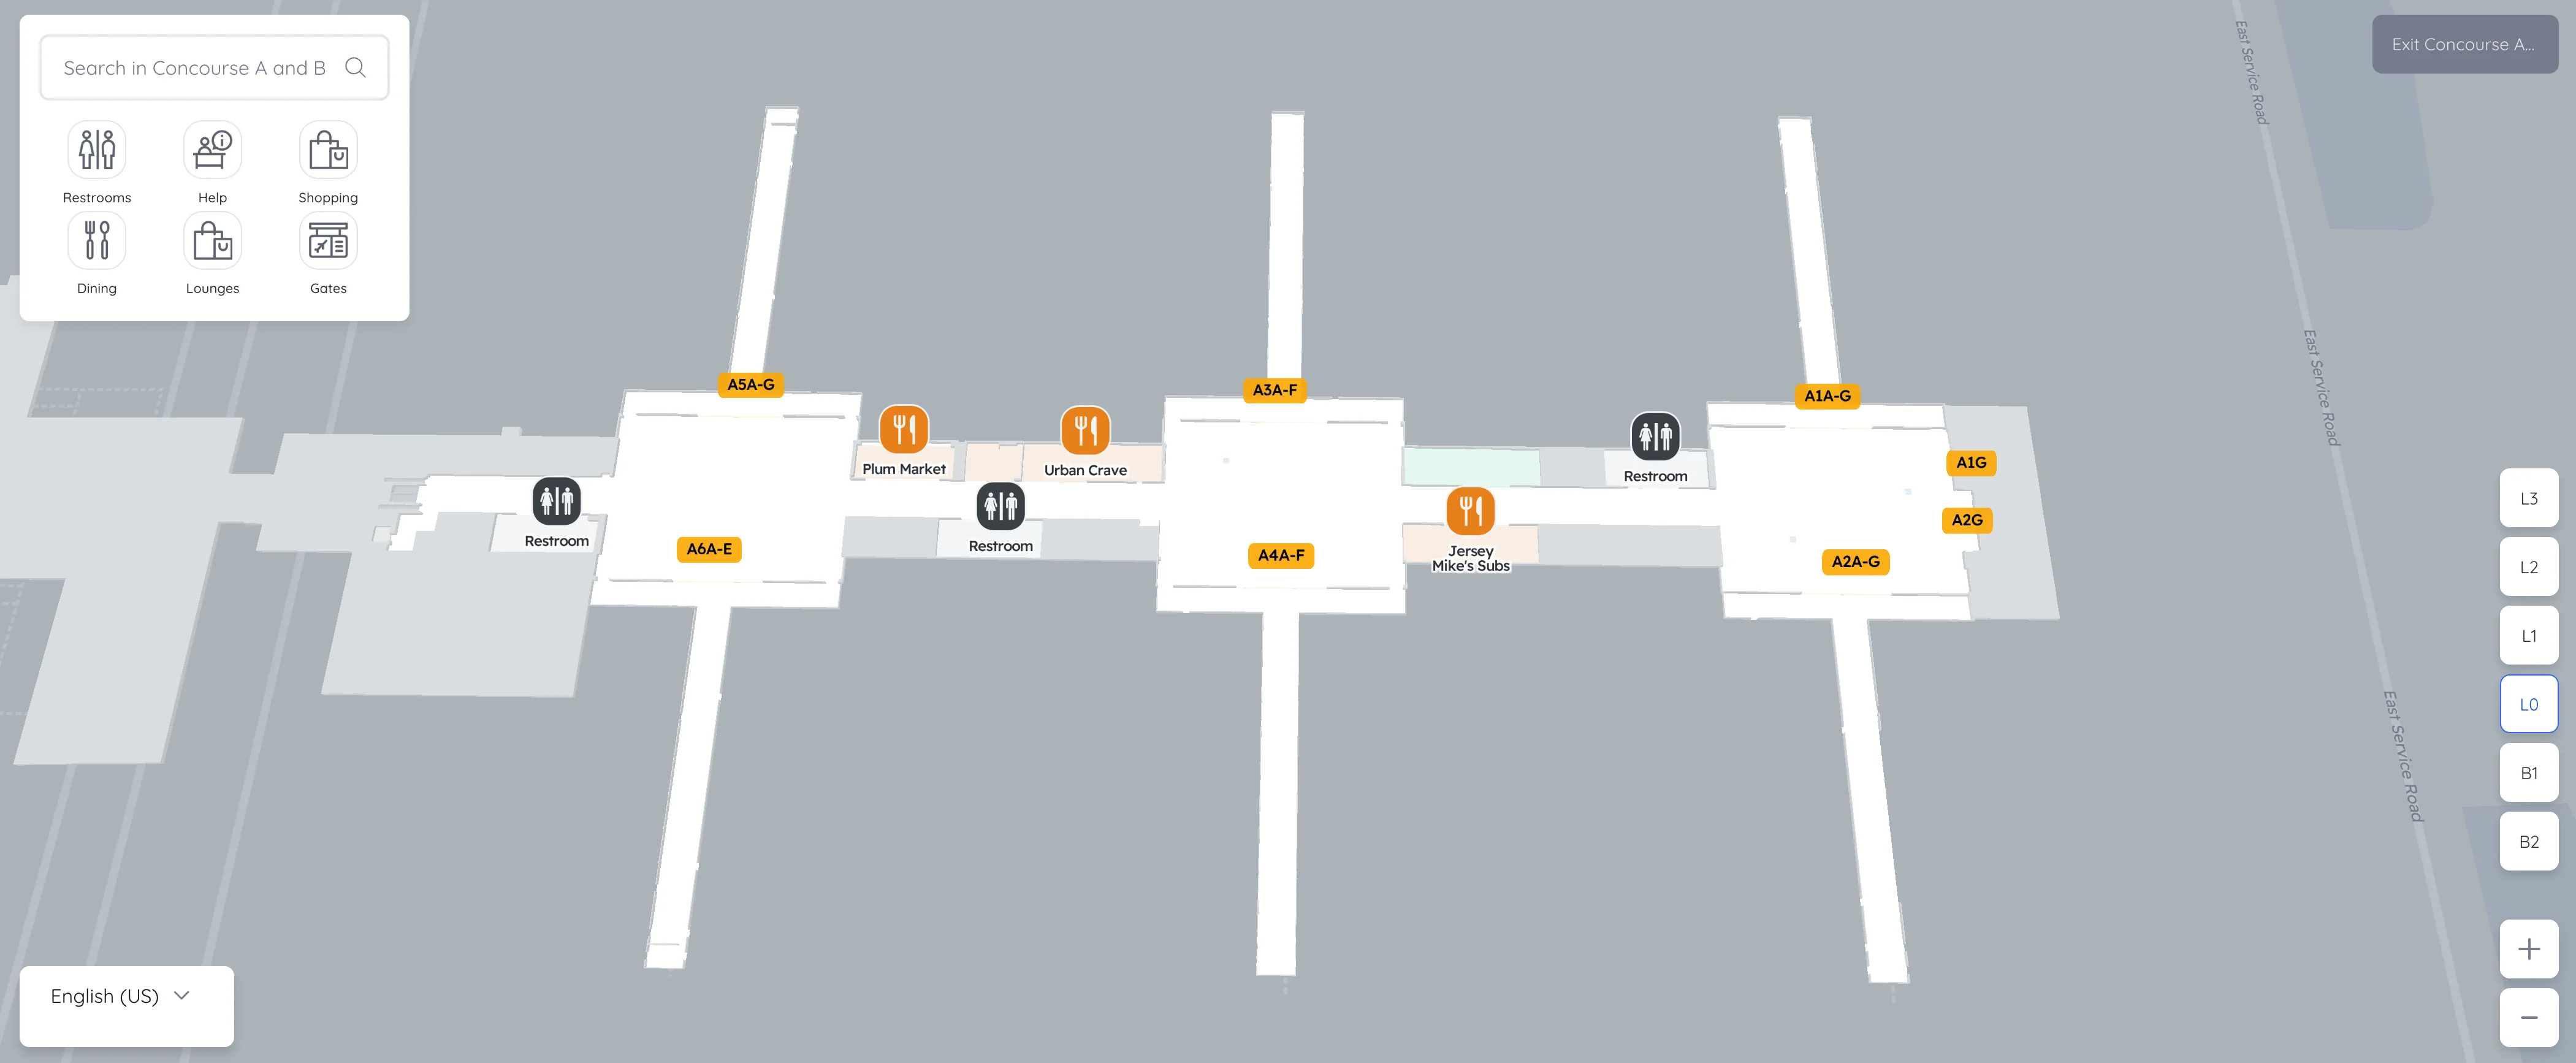
Washington Dulles International Airport Concourse A Level 2 Map 2025
Washington Dulles International Airport Concourse A Level 0 Map 2025
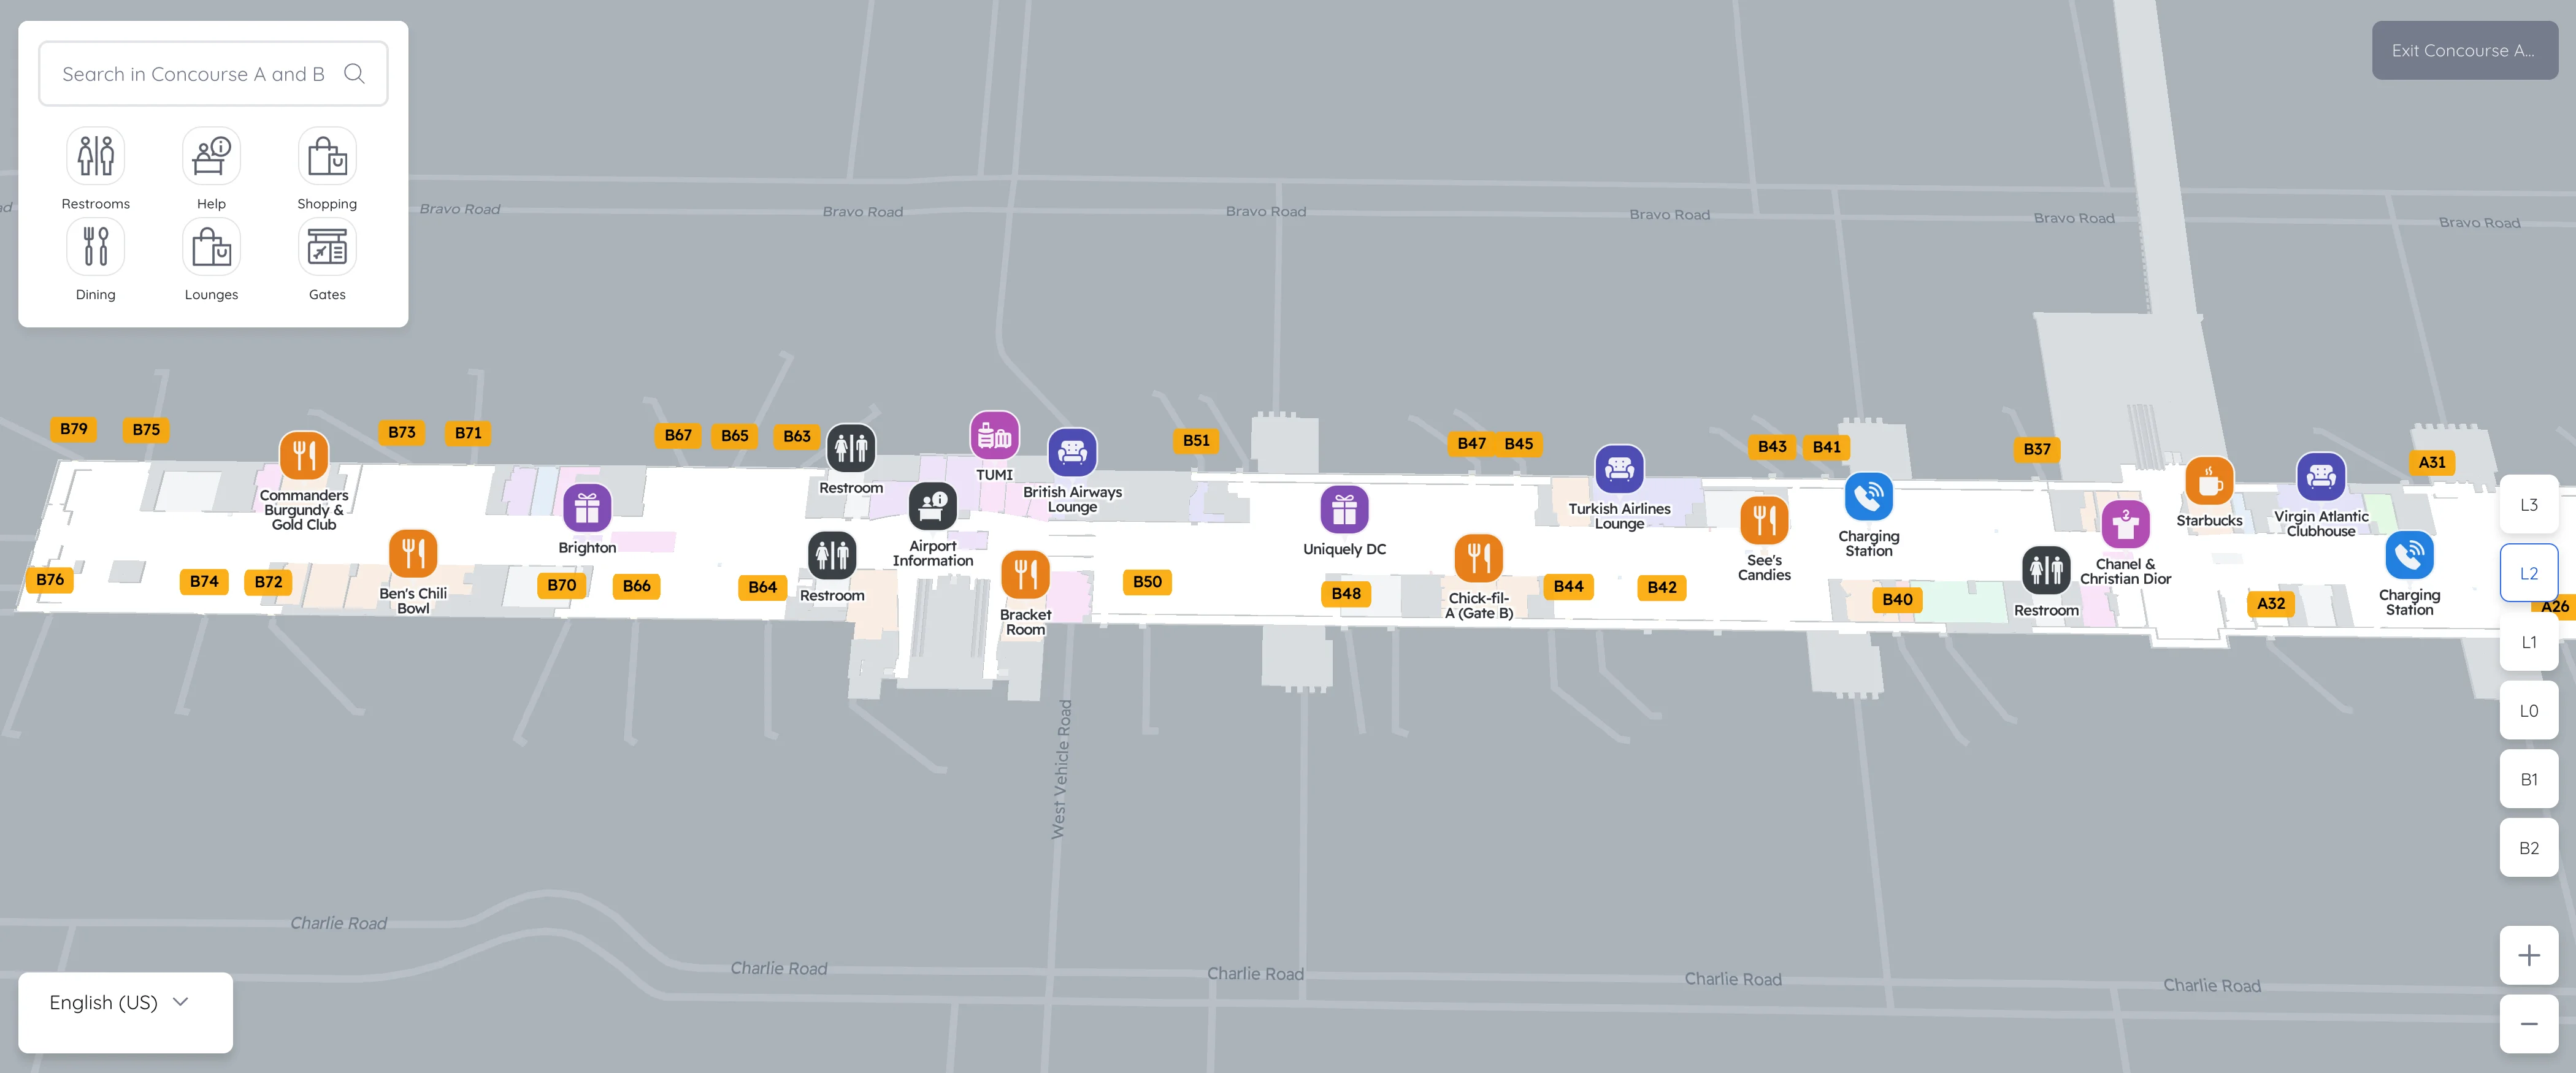
Washington Dulles International Airport Concourse B Level 2 Map 2025
2026 Washington Dulles International Airport Concourse AB Map Guide
Where is the exact “go-down” access point (stairs/escalator/elevator) at the Concourse A/B junction that leads to the AeroTrain/people-mover level?
There is no “go-down” access point at the Concourse A/B junction (near Gates A32 and B37) that leads to the AeroTrain level. The only vertical descent at this exact junction drops into the Pedestrian Walkway tunnel to the Main Terminal, not to the train.
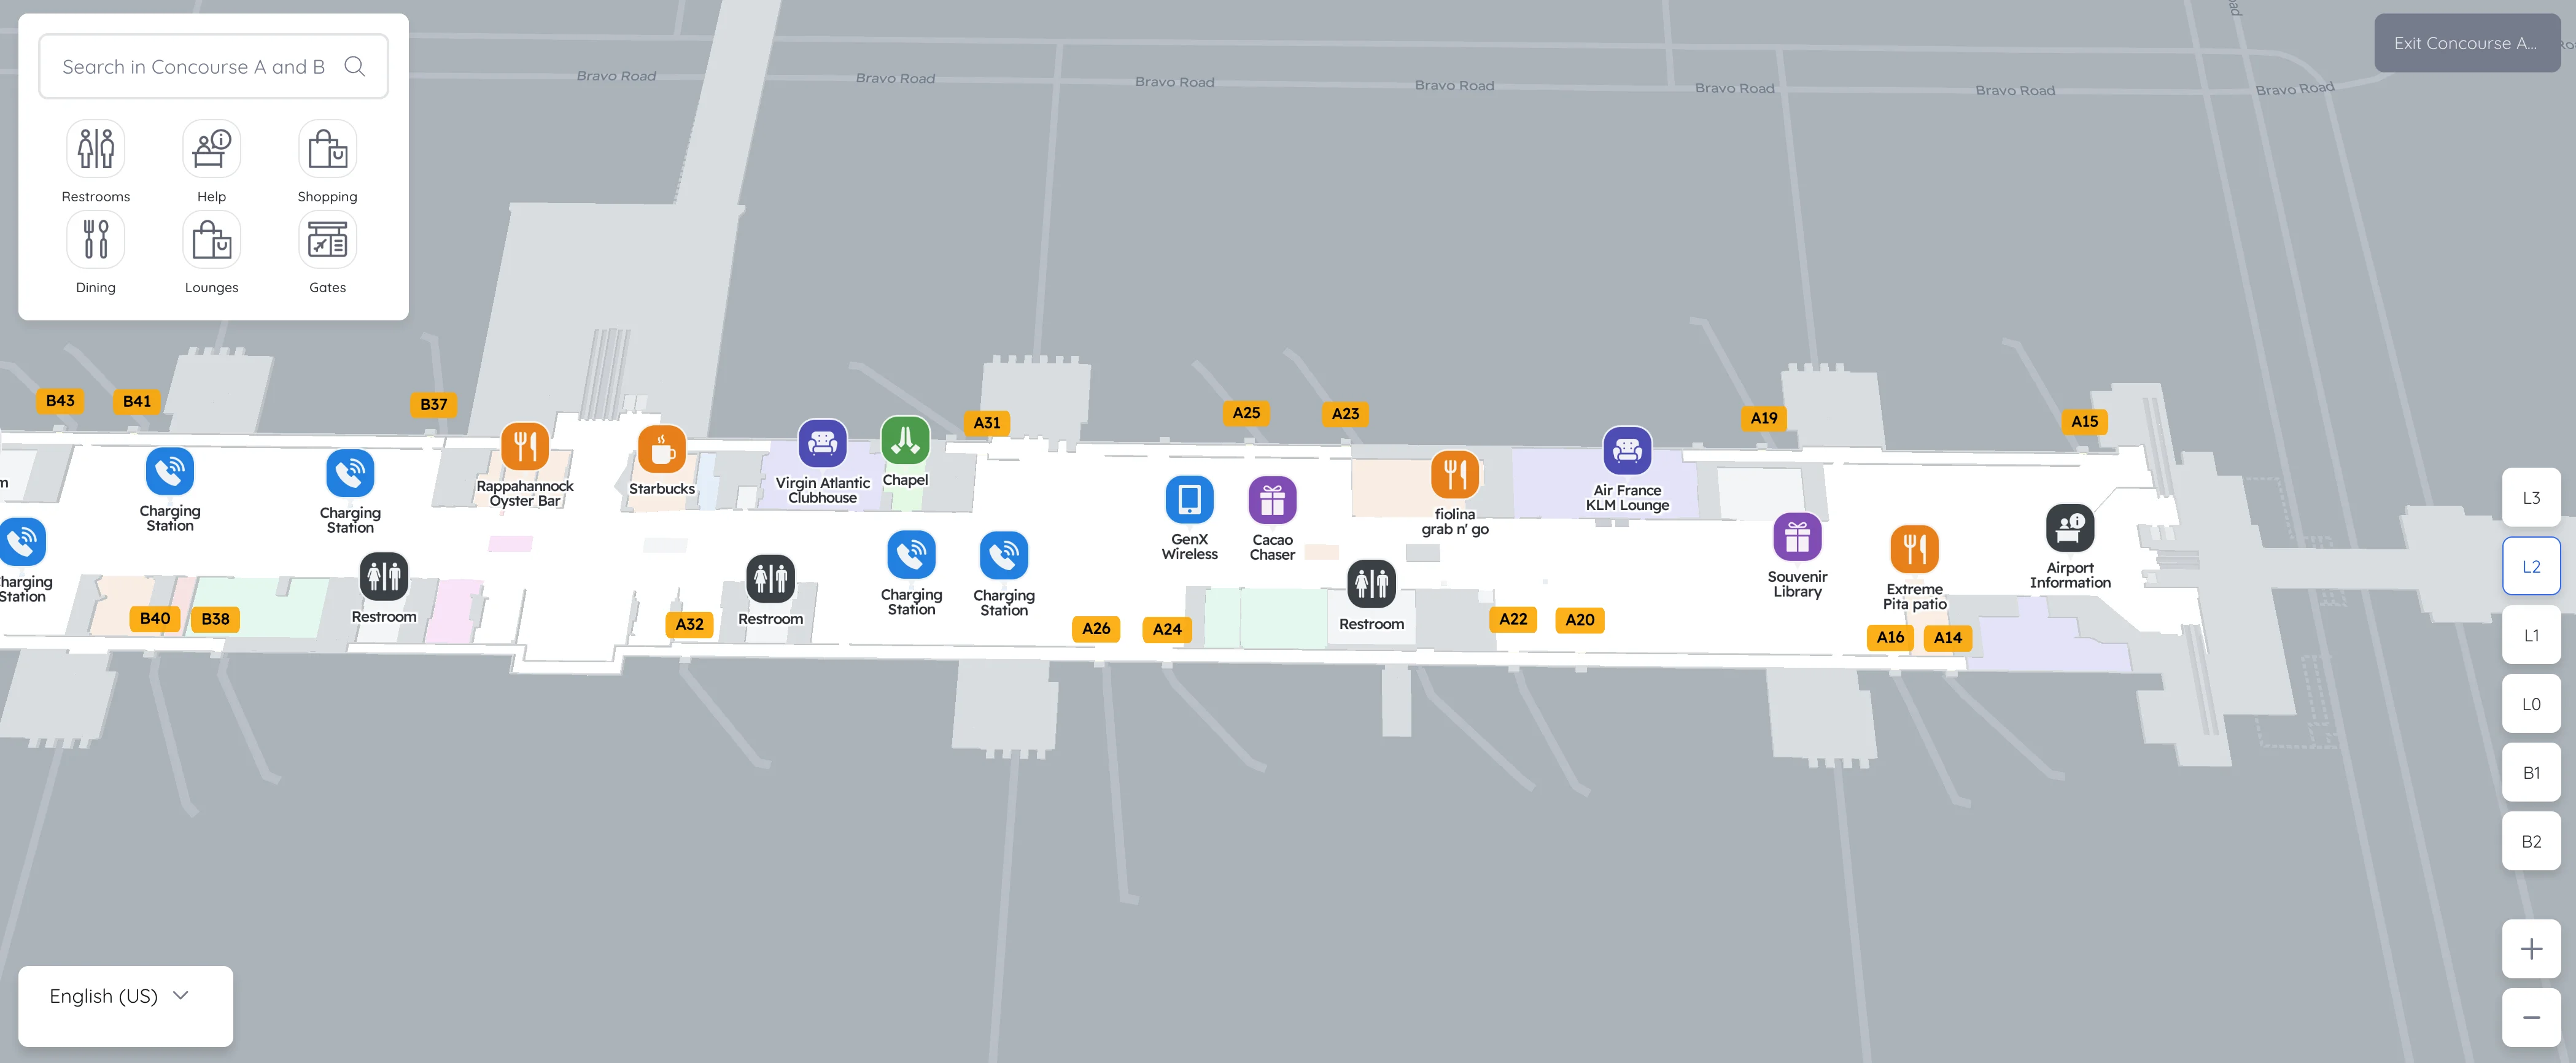
The AeroTrain entrances are offset from the junction in both directions. Station B access is near Gate B45 (opposite the British Airways Lounge), and Station A access is near Gate A15 (near the Etihad Lounge area). From the A32/B37 retail core, reaching either station is roughly an 800-foot (245-meter) walk along the main corridor, so the “center” down-escalator is the wrong move if you need AeroTrain.
What is the exact walking distance (in feet/meters) from the center of Concourse B to the AeroTrain station entrance serving A/B?
Walking distance is about 300 feet (90 meters) from the operational center of Concourse B (around Gate B50) to the AeroTrain Station B entrance near Gate B45. This is the shortest “mid-B” access to the train serving the A/B complex.
| Origin point | Adjacent anchor | Distance to AeroTrain Station B (near B45) | Est. walk time |
|---|---|---|---|
| Gate B50 | retail cluster / Lufthansa Business Lounge area | ~300 ft (90 m) | ~1–2 min |
| Gate B37 | A/B junction near A32 | ~800 ft (245 m) | ~3–4 min |
| Gate B70 | high-number B gates | ~1,200 ft (365 m) | ~5–6 min |
| Gate B81 | end dead-end | ~2,000 ft (610 m) | ~8–10 min |
Where is the exact boarding doorway for the people mover from Concourse A/B toward Concourse D (the one not labeled for baggage claim)?
The boarding doorway for the Concourse A/B → Concourse D people mover (mobile lounge shuttle) is at Gate A6. This is the dedicated D-Gates shuttle node and is not located at either AeroTrain station (A15 or B45) or at the A/B junction (A32/B37).
Reaching it requires going to the west end of Concourse A, then dropping into the lower “Low A / commuter wing” area. From the main A/B corridor, use the overhead “Gates A1–A6” / “Shuttle to D” direction cue near the A14 area, then take the ramp or escalator/elevator down into the A1–A6 holding area. The boarding door is marked for “Shuttle to D Gates” / “Mobile Lounge to D.”
What are the exact on-map identifiers/sign words at the people-mover split that distinguish “A gates” vs “Baggage Claim” before you board?
Boarding the “Baggage Claim / Main Terminal” mobile lounge is the high-penalty mistake because it can force a landside exit and re-screening, so the first check is the destination words over the boarding door. The split is resolved by reading the overhead sign and the vehicle placard before stepping onto the lounge.
- A Gates / Concourse A
- Midfield Concourses
- Main Terminal
- Baggage Claim
- Ground Transportation
What is the shortest mapped route (sequence of corridors + turns) from the Concourse B gate area to the Concourse A people-mover boarding point used for fast transfers?
Walking takes about 2,000–2,200 feet (600–670 meters) from mid-Concourse B (around Gate B50) to the Concourse A people-mover boarding point at Gate A6. This is the most reliable fast-transfer path because it avoids the AeroTrain’s deep two-level descent/ascent “vertical tax.”
| Step | Corridor / turn sequence | Landmark anchor |
|---|---|---|
| 1 | Walk west in the main corridor toward lower B gate numbers | Gate B50 area |
| 2 | Pass the AeroTrain Station B entrance without descending | near Gate B45 / British Airways Lounge |
| 3 | Continue straight through the A/B junction, ignoring “Exit to Terminal” down-access | Duty Free core near Gates A32/B37 |
| 4 | Pass the AeroTrain Station A entrance without descending | near Gate A15 / Etihad Lounge area |
| 5 | At the A14 area, turn into the connector signed for “Gates A1–A6 / Shuttle to D” | near Gate A14 |
| 6 | Descend to the lower commuter-wing level, then continue to the shuttle door | Gate A6 |
What is the exact vertical-change count (number of level changes) on the fastest route from Concourse A/B gates to the AeroTrain platform?
Two distinct level changes are required from the Concourse A/B gate level to the AeroTrain platform. The fastest standard path is a first descent to the mezzanine/intermediate level, followed by a second, longer descent to the deep-bore train platform.
The two-step drop is why short hops often aren’t faster by train: you pay the same fixed descent time even if you’re only riding one stop. At Station A (near A15) and Station B (near B45), expect the same pattern: concourse level → mezzanine → platform. This is also the key “point-of-no-return” moment—once you commit to the second descent, reversing direction costs the full climb back up.
Where is the closest re-entry to Concourse A/B after exiting the AeroTrain (which corridor/stairwell places you back into A vs B first)?
Re-entry from the AeroTrain deposits you back into Concourse A/B only at two nodes: Station A returns you near Gate A15/A22, and Station B returns you near Gate B45/B48. There is no AeroTrain re-entry at the central A/B junction near Gates A32/B37.
Station B’s escalators bring you up into the corridor by Gate B45/B48, opposite the British Airways Lounge. Station A’s escalators bring you up into the corridor by Gate A15/A22, near the Etihad Lounge area. If you surface at the wrong station, the fastest correction is usually to stay on the main corridor and follow gate numbers, because the “center” of A/B is still a long walk away.
What is the exact distance from the main TSA/security exit to the first point where Concourse A and Concourse B diverge (the “decision fork”)?
Distance is effectively zero because the decision fork happens at the security checkpoint choice itself. Picking the East vs. West checkpoint determines which AeroTrain access you’re funneled toward before you ever walk into the post-screening corridor.
After clearing the scanner, the physical distance from the exit of screening to the nearest AeroTrain escalators is about 100–150 feet (30–45 meters), depending on which checkpoint you used. East security feeds the AeroTrain path aligned with the A/C loop, while West security feeds the AeroTrain path aligned with the B loop. The Pedestrian Walkway access remains centrally reachable post-security, but choosing the “wrong” checkpoint can add a corrective cross-walk across the Z-gates area.
On the map, where are the time-critical “dead-end” mistake zones in A/B (places where continuing forward forces you away from the train/people mover and costs the most backtrack distance)?
The two most time-critical dead-end zones are the High B extension beyond the last AeroTrain access and the Low A commuter-wing cul-de-sac. Both punish “keep going forward” instincts by forcing a full reverse back to the last usable node.
| Mistake zone | Where it starts | What you miss | Backtrack penalty anchor |
|---|---|---|---|
| High B extension | past the mid-B core toward Gates B60–B81 | no exits past Station B | ~2,000 ft (610 m) back from B81 to Station B at B45 |
| Low A commuter wing | descent toward Gates A1–A6 when you don’t need D shuttle | no through-connection to main A flow at gate level | must climb back up via the same ramp/elevator to rejoin near A14/A15 |
Where is the nearest staffed help point (info desk / airline desk) to the A/B down-access node, based on the terminal map?
The nearest staffed help point to the A/B down-access node is the Travelers Aid / Information Desk at the central junction near Gate A31/B37, adjacent to the Pedestrian Walkway entrance. This is the closest “human fix” if you’re standing in the A32/B37 retail core and can’t determine whether you should be heading to A15, B45, or down into the Walkway.
Other nearby staffed counters are farther and more airline-specific. United customer service sits closer to the Station A side near Gate A20, while Lufthansa/Star Alliance services cluster closer to mid-B around Gate B50. If you’re already at the junction, the Travelers Aid desk is the quickest staffed point without committing to either AeroTrain station walk.
What is the mapped route from Concourse B international gates to the people-mover path toward customs/main terminal (i.e., the first forced-direction point that prevents staying airside)?
There is no airside choice point because international arrivals from Concourse B are funneled into a one-way sterile route that commits you to U.S. Customs. The first forced-direction point is the deplaning exit into the segregated corridor that bypasses the normal departure concourse.
After leaving the aircraft, follow the glass-walled/segregated path to the “International Arrivals” mobile lounge dock for U.S. Customs processing. That mobile lounge takes you directly to the International Arrivals Building at the Main Terminal. From that sterile corridor, you cannot access Concourse B shops, the AeroTrain entrances (B45/A15), or the Pedestrian Walkway (A32/B37); the map constraint is a one-way valve into customs.
Where exactly is the best “bail-out” shortcut from deep inside Concourse A/B back to the main terminal if the intended connection route is closed (map-verified alternate path only)?
The Pedestrian Walkway accessed at the Concourse A/B junction (near Gates A32/B37) is the best map-verified bail-out route to the Main Terminal. This down-access is the reliable alternative when AeroTrain service is delayed or unusable because it’s a continuous tunnel route with moving sidewalks.
From anywhere in A/B, navigate to the central retail core by Gate A32/B37, then take the vertical descent signed for the Walkway/Main Terminal. The tunnel delivers you to the Main Terminal (Z Gates area), avoiding dependence on train headways or platform access. The key constraint is directional: once you go down here, you are committed to the Walkway path, so only use it when your goal is the Main Terminal (or you’ve decided to reset your route from there).