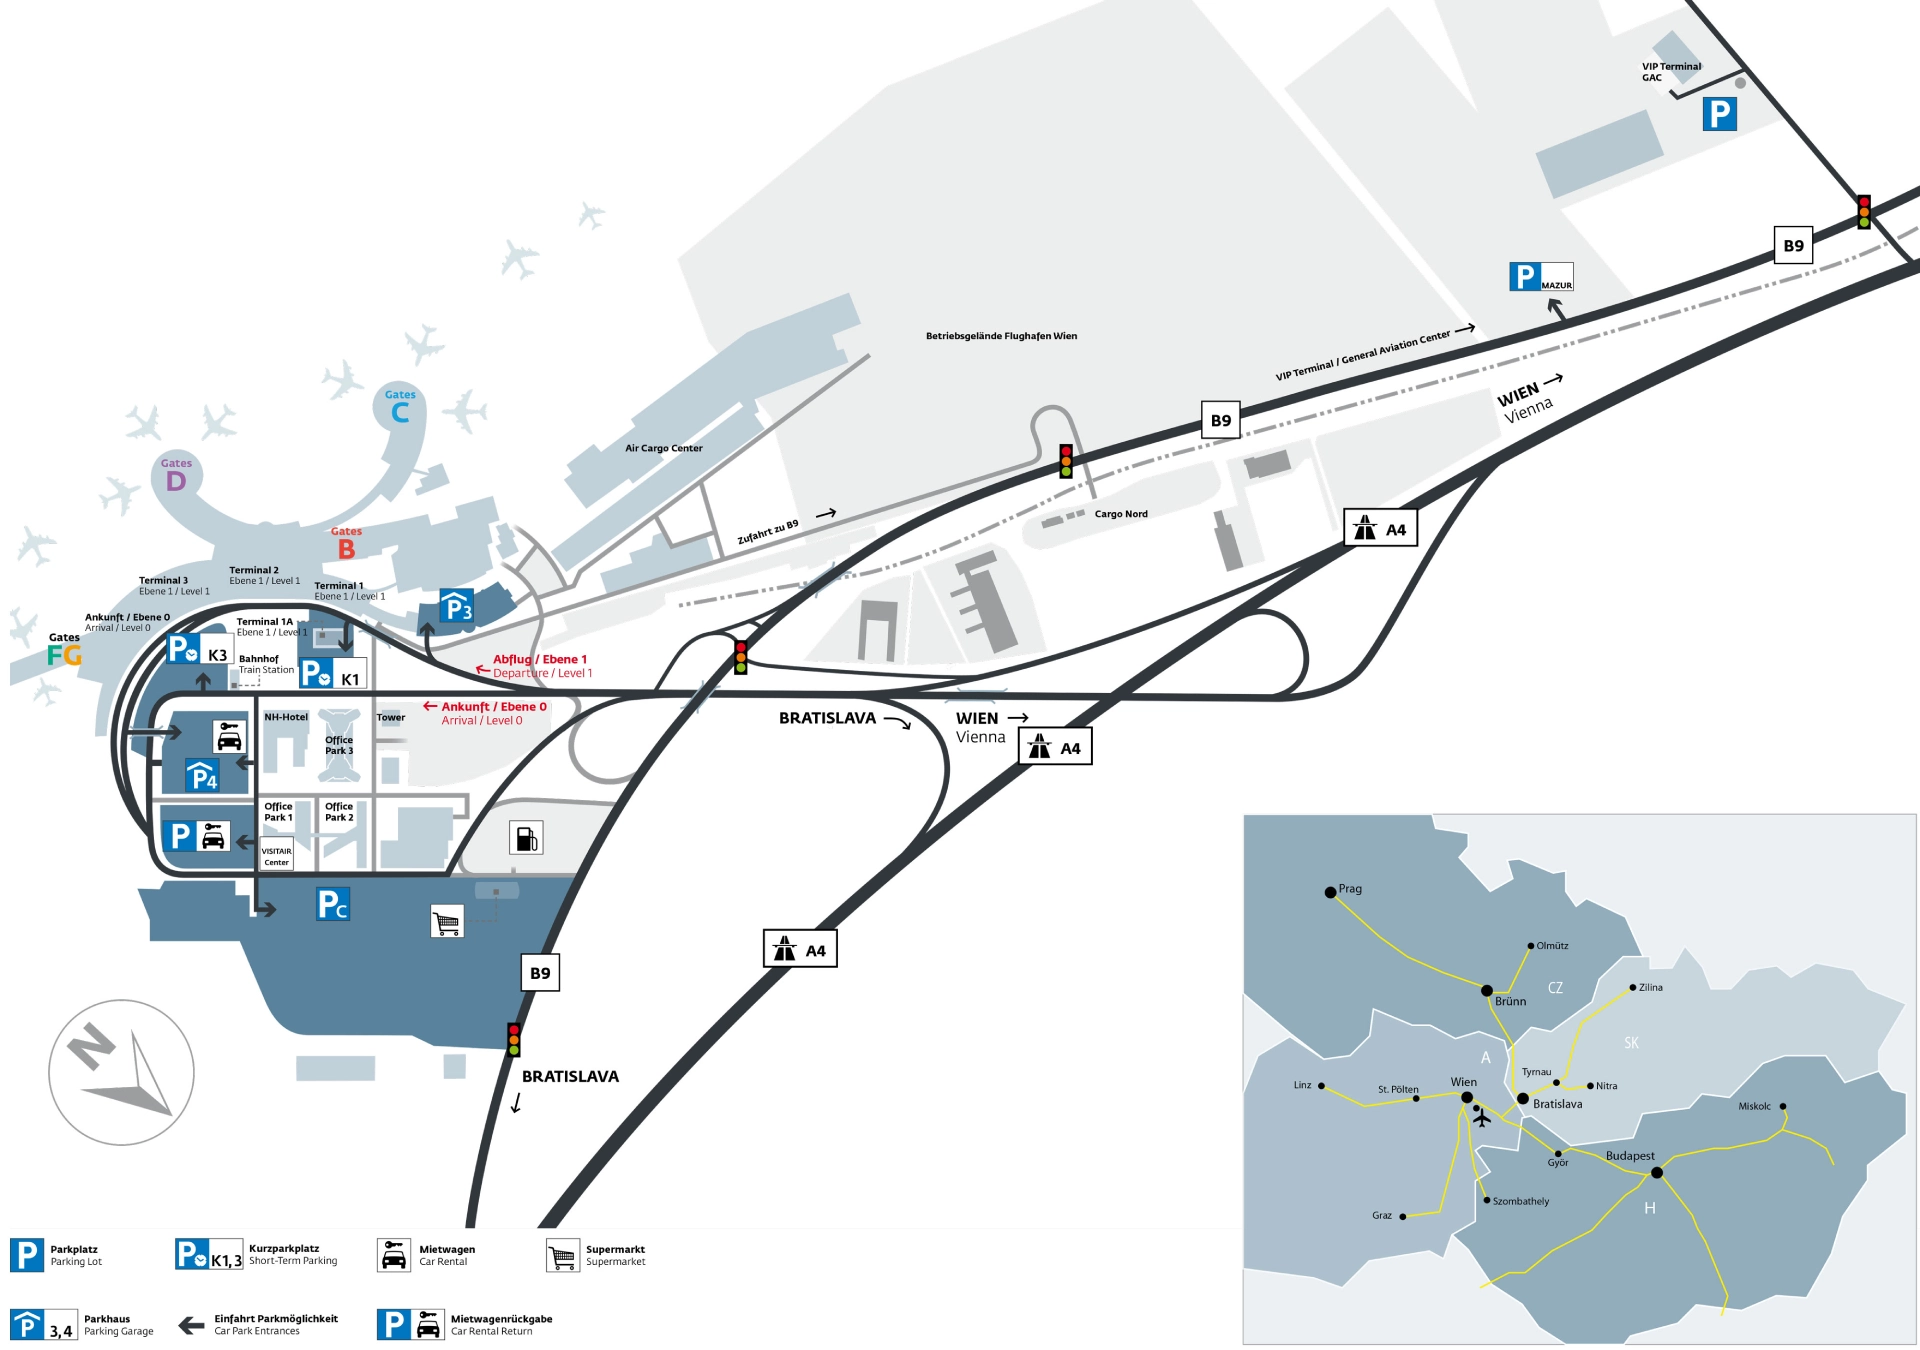
Vienna International Airport Map (Most Up-To-Date)
Vienna International Airport (VIE) is a single-roof terminal complex with multiple concourses branching off a central landside hall, built on an east–west axis. The Star Alliance pier (F/G) sits on a vertically stacked north pier, while the legacy piers (C/D) extend off the older connector zone, creating a longer horizontal gap between gate clusters than first-time travelers expect. Within Vienna’s Schwechat airport hub, most passenger flows funnel through one central Arrivals Hall and one main rail/bus interface.
Map Table
| Terminal | Key Airlines | Primary Function | Transfer Mode |
|---|---|---|---|
| Terminal 3 | Austrian, Star Alliance | Hub transfers, F/G piers | Vertical transfer, passport control, transfer security |
| Terminal 1 | oneworld, SkyTeam, independents | C/D piers, legacy concourses | Longer corridor walks, airside shuttle bus |
| Terminal 1A | low-cost, charter | budget check-in annex | Landside walk, shared security entry |
Vienna International Airport Map Strategy
- Treat VIE as two problems at once: a vertical F/G stack and a horizontal C/D separation, then commit early to the correct gate cluster so you don’t “walk the wrong direction” under a short connection.
- Identify the two control points before moving fast: the passport-control barrier for Schengen ↔ Non-Schengen changes and the transfer-security re-screening checkpoint for arrivals that must re-clear security.
- Anchor any remote-stand arrival to its true indoor starting point: the bus intake into Arrivals Level 0, then trace the shortest path back to the first Connections/Transfer corridor entrance.
- Use map-verifiable navigation cues to reduce anxiety: meters between corridors, level numbers, and sterile-side boundaries—especially when connecting between D and the F/G complex or when assigned to bus-gate blocks.
2026 Vienna International Airport Map + Printable PDF
A reliable 2026 Vienna Airport map is the one that makes control points and gate clusters unmissable: where Schengen vs Non-Schengen splits, where transfer security re-screening sits, and where airside bus flows inject arriving passengers into the building. Print-friendly layouts work best when they emphasize fixed geometry—pier names (C/D/F/G), level changes, sterile-side boundaries, and the exact corridor entrances that prevent accidental landside exits.
2026 Vienna International Airport Map Guide
What is the exact walking distance (meters) from the F-gates arrivals corridor to the G-gates departures corridor (sterile-side)?
Passport control is mandatory before you can enter the G-gates sterile-side departures corridor from the F-gates sterile-side arrivals corridor. Walking distance is 170 meters, with a single vertical rise via escalators/lifts at the Pier North central transfer node.
| Segment | Landmark anchor | Distance |
|---|---|---|
| F arrivals corridor → Pier North transfer node | pier “spine” just before the Schengen/Non-Schengen split | 60 m |
| Transfer node → passport control entry | base of the passport-control bank for Level 3 access | 55 m |
| Passport control exit → escalators/lifts up | immediately beyond the control line | 15 m |
| Level 3 top landing → G departures corridor | first “G gates” corridor continuation | 40 m |
What is the exact physical location of the non-Schengen → Schengen transfer passport control checkpoint in Terminal 3 (nearest landmark/gate/level)?
The non-Schengen → Schengen transfer passport control is at the Pier North central core in Terminal 3, immediately before you can descend into the F-gates sterile-side. It sits at the Schengen/Non-Schengen boundary that also feeds Level 3 (G) access.
The checkpoint is positioned at the head of the F/G pier, not down by mid-pier gates. Follow “Transfer / Connecting Flights” toward Pier North, then aim for the vertical circulation cluster (banks of escalators and lifts) where the pier levels stack. The passport-control line is directly in that core zone, with the Schengen side continuing down onto Level 1 toward the F concourse.
Where is the first “Transfer / Connecting Flights” decision point after deplaning into the F-gate area (earliest sign fork that matters)?
The first decision point is the arrivals corridor fork where “Transfer / Connecting Flights” splits away from “Arrivals / Exit / Baggage claim” before you reach the public-facing Arrivals funnel. It appears within the first minute of walking off the jet bridge into the F-level arrivals passage.
Follow the corridor until the first overhead sign bank that offers two vectors: one continuing toward Arrivals (Level 0 flow), and one directing you back toward the Pier North core. The transfer direction is the one that keeps you on the sterile-side circulation toward the central escalators/lifts (the same vertical core used to reach the G-level). If you pass into the Arrivals stream, you’ve gone too far and will need to backtrack to re-find the sterile transfer route.
What is the exact indoor drop-off point for remote-stand shuttle buses (door/zone where you enter the terminal)?
Remote-stand shuttle buses drop passengers into Terminal 3, Level 0, at the Bus Arrivals intake doors feeding directly into the main Arrivals processing stream. The entry point is inside the building, not at the public Arrivals Hall exits.
The drop-off flow brings you through the marked bus-arrivals corridor into the Level 0 arrivals zone where the paths split toward passport control (Non-Schengen processing) or baggage claim belts (Schengen arrivals). Use the first overhead sign bank you see after the intake doors—if it offers “Passport Control” and “Baggage Claim” as immediate directions, you are at the correct indoor bus entry point.
What is the shortest mapped path from the remote-stand bus drop-off point to the nearest Connections / Transfer corridor entrance?
The shortest path is a Level 0 → Level 2 move from the Bus Arrivals intake doors to the first “Transfer / Connecting Flights” corridor entrance at the base/top of the nearest escalator/lift core. Total distance is 140 meters (about 2–3 minutes at a normal pace) because the route is mostly straight corridor plus one vertical rise.
| Step | Exact move | Landmark anchor | Distance |
|---|---|---|---|
| 1 | Enter through Bus Arrivals intake doors, stay inside the controlled arrivals corridor | first overhead sign bank showing “Passport Control” / “Baggage Claim” | 25 m |
| 2 | Follow “Transfer / Connecting Flights” direction away from the Arrivals Hall funnel | corridor edge where Arrivals flow thickens toward baggage belts | 55 m |
| 3 | Take the nearest escalator/lift core up toward the transfer level | vertical circulation core feeding the transfer route | 0 m |
| 4 | Exit at Level 2 and enter the first marked Connections/Transfer corridor | Level 2 landing with “Transfer / Connecting Flights” overhead signage | 60 m |
What is the exact location of the primary waiting/seating area outside the F-gate boarding pen used for widebody boarding (nearest shop/marker)?
The primary overflow seating zone is the soft-seating corridor by Gates F27–F30 on Concourse F (Level 1), used as the nearest “wait here” area when a gate hold room is saturated. It sits on the pier spine, not back in the central terminal hall.
From the main F-gates retail spine, keep walking toward the higher-numbered F gates until you reach the long, quieter hallway segment aligned with F27–F30. The landmark cue is the sudden shift from shop-front density to an open corridor with couches rather than the standard metal benches and laptop chairs. If you can see F27 and F30 wayfinding on the same overhead sign run, you’re in the correct waiting zone just outside the busiest boarding-pen cluster.
Where are the nearest toilets to the F-gate boarding lounges, and what is the shortest walking route to them?
The nearest toilets to the F-gates are in the F/G pier entrance zone on Concourse F (Level 1), positioned before the long walk down the pier. Walking route is the fastest when you backtrack toward the Pier North core rather than continuing deeper toward higher-numbered F gates.
To stay map-consistent at any F gate, use these nearest-anchor options on Concourse F (Level 1):
- F/G entrance area toilets (family + accessible) — walk toward the Pier North entrance where F and G split vertically; follow the first WC pictograms near the entrance zone before the pier narrows.
- Early-pier toilets near Gate F03 — from nearby boarding lounges, walk toward the Kids Zone at F03, then follow WC signage clustered in that early gate segment.
- Mid-pier toilets along the main spine — if you’re already near the soft-seating corridor around F27–F30, don’t backtrack to the entrance; follow WC pictograms along the same curved spine to the next restroom block in that mid-pier segment.
What is the exact location of the transfer security re-screening checkpoint used for arrivals that must re-clear security during a connection (non-OSS routings)?
The transfer security re-screening checkpoint is on Terminal 3 Level 2, on the sterile transfer route that lifts arriving passengers up from Level 0 (bus/arrivals intake) back toward the departure levels. It sits before you can re-enter the Schengen departure side toward the F concourse.
From a non-OSS arrival flow, follow “Transfer / Connecting Flights” upward out of the Level 0 arrivals corridors until you reach the Level 2 transfer corridor. The checkpoint is placed in-line on that Level 2 path, immediately before the corridor continues toward the Pier North vertical core (escalators/lifts) that feeds back down to F on Level 1. If you are seeing cabin-bag X-ray lanes and liquid rules signage while still inside the transfer route (not in the public check-in hall), you’re at the correct re-screen point.
What is the exact walking distance (meters) from the F/G gate complex to the D-gates corridor entrance (fastest sterile-side route)?
Walking distance from the F/G gate complex to the D-gates corridor entrance is 900 meters on the fastest sterile-side route. The path is a long horizontal traverse from Pier North (F/G) through the central connector zone to Pier East (D), with the D-gates corridor beginning at the Pier East entry pinch-point.
| Segment | Landmark anchor | Distance |
|---|---|---|
| F/G pier spine → Pier North core exit toward connector | head of Pier North, before the retail density thickens | 180 m |
| Connector traverse → approach to Pier East (D) entry | central connector/plaza run between the pier systems | 520 m |
| Pier East entry → D-gates corridor entrance | start of D-zone wayfinding cluster at the pier mouth | 200 m |
Where are the Terminal 1 self check-in kiosks located relative to the first security entrance (exact hall/row position)?
Self check-in kiosks are in Terminal 1’s main check-in hall, spread across counter Rows 150–199, positioned on the landside floor in the same sightline as the first “Security” entrance at the end of the hall. The closest kiosks are the ones you reach without turning into any side corridors—straight up the main aisle toward “Security.”
The kiosks sit in islands in front of the linear counter rows, so you use them before you commit to the security queue. If you’re facing the security entrance doors and the overhead “Security” signs, the kiosk islands are behind you in the open hall space, aligned with the Row 150–199 counter frontage. For the fastest setup, pick the kiosk island nearest the central aisle that feeds directly into the first security entrance line.
What is the exact location of baggage claim (carousels) relative to the passport control exit (first visible landmark + direction)?
Baggage claim carousels are straight ahead from the passport control exit on Level 0, entering the belt hall immediately after you clear the control line. The first visible landmark is the row of overhead carousel number boards, with the belt hall opening out in front of you.
After passport control, follow the flow forward into the arrivals baggage area rather than turning toward the public Arrivals Hall. The carousels are arranged as a bank of belts (commonly numbered), and the space widens into the belt hall within a short corridor-length from the control exit. Oversize baggage counters sit at the edge of the belt hall rather than back at the passport booths, so if you see oversize signage, you’re already inside baggage claim.
Which arrival-hall exit door leads most directly to the coach/bus station (bus gates) outside the terminal?
The most direct exit is the right-hand bank of doors when you step into the public Arrivals Hall on Level 0, following signs for “Bus Terminal” and “Vienna Airport Lines.” Walking line is essentially straight out with a slight right vector, keeping you on the eastern side of the hall.
From the baggage-claim exit into Arrivals, do not turn left toward rail ramps. Instead, track the first clear overhead wayfinding that lists buses/taxis, then keep right until you reach the main exterior door bank facing the bus platforms. If you can see bus platform canopies and multiple marked “Steig” stands immediately outside, you used the correct exit line; if you see ramp/lift access down toward CAT/ÖBB instead, you veered left toward rail.
What is the shortest indoor walking route from the arrivals hall to the Flughafen Wien railway station access point (no outdoor segment)?
The shortest indoor route is a left/straight move from the public Arrivals Hall on Level 0 to the rail ramps/lifts descending to Level -2 for CAT and ÖBB platforms. Walking takes about 5–7 minutes end to end with no outdoor segment.
From the baggage-claim exit into Arrivals, follow the train pictograms and “CAT / ÖBB” signage rather than the bus/taxi exits. Keep to the main interior corridor until you reach the first ramp system dropping below the Arrivals floor. Take the ramp or lift down (staying indoors the entire time) to the station concourse on Level -2, where platform signage splits CAT (branded prominently) versus ÖBB/S-Bahn identifiers.
Where is the Terminal 3 Schengen lounge near the F-gates located (level + nearest gate/landmark)?
The Terminal 3 Schengen lounge is on Level 1 on the F-gates side, positioned near the Pier North core before the long walk down to the mid- and high-numbered F gates. It sits closest to the main F concourse entry zone rather than deep in the pier.
Use the Pier North entrance landmarks to triangulate it: from the F concourse, walk back toward the central vertical core that also connects up to the G level. The lounge access is signed in that same head-of-pier area, so if you are still within the densest retail/wayfinding cluster at the start of the F pier (before the gate numbers climb), you’re in the correct zone to find the Schengen lounge entrance.