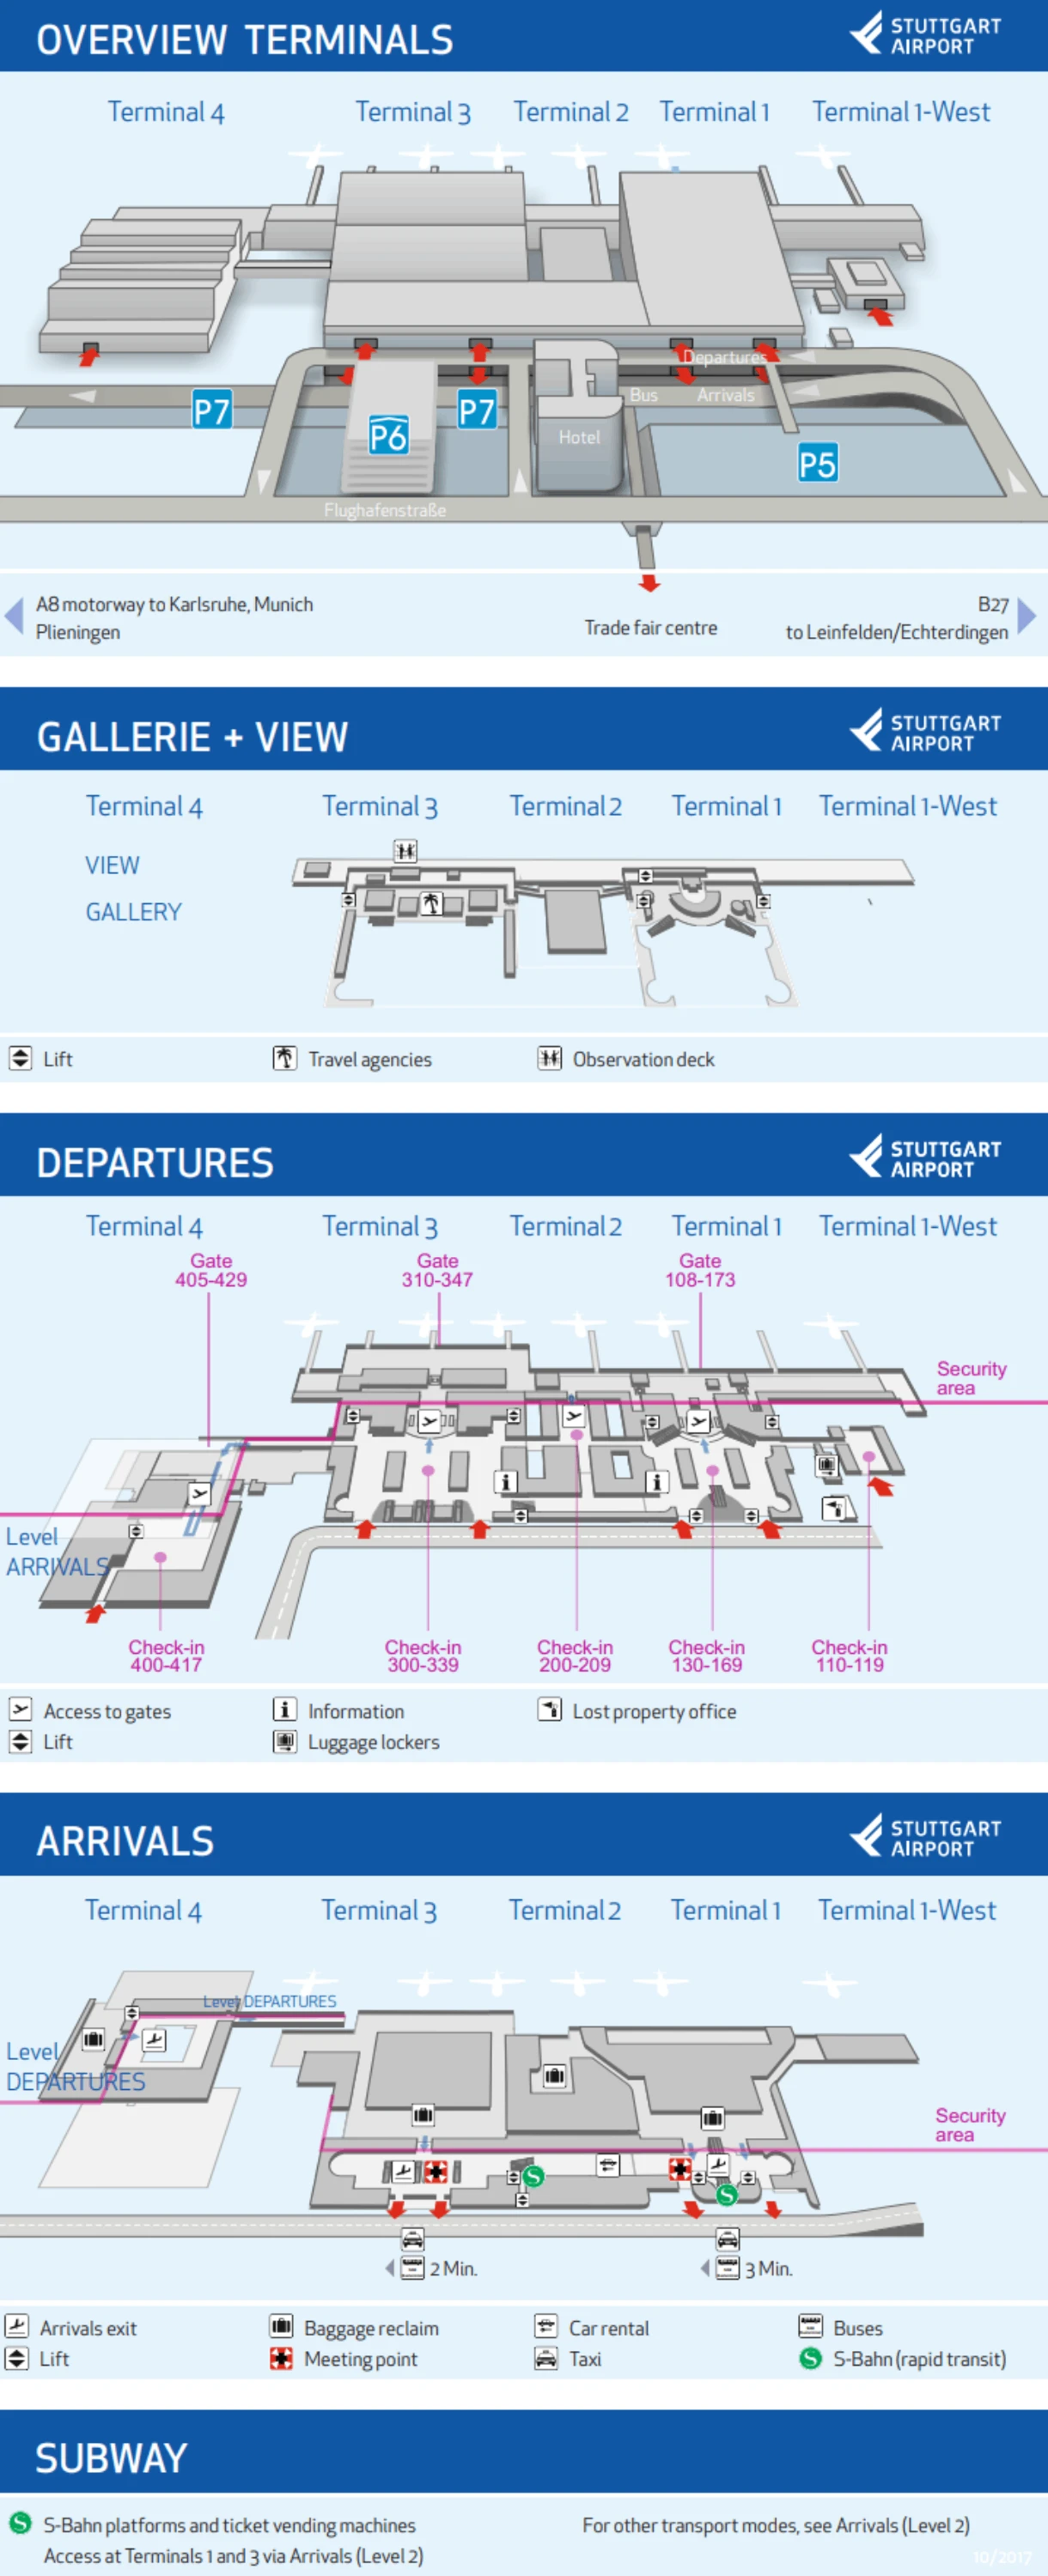
Stuttgart Airport Terminal 2 Map (Most Up-To-Date)
Stuttgart Airport Terminal 2 is a compact, landside processing hall centered in the STR terminal row within the main Stuttgart air hub, sitting between Terminal 1 to the west and Terminal 3 to the east under the same continuous roofline. The space reads as a short, linear east–west concourse with check-in facing the frontage and security on the interior edge. Most “Terminal 2” journeys still require lateral movement into adjacent halls for faster security, bag drop, or gate access.
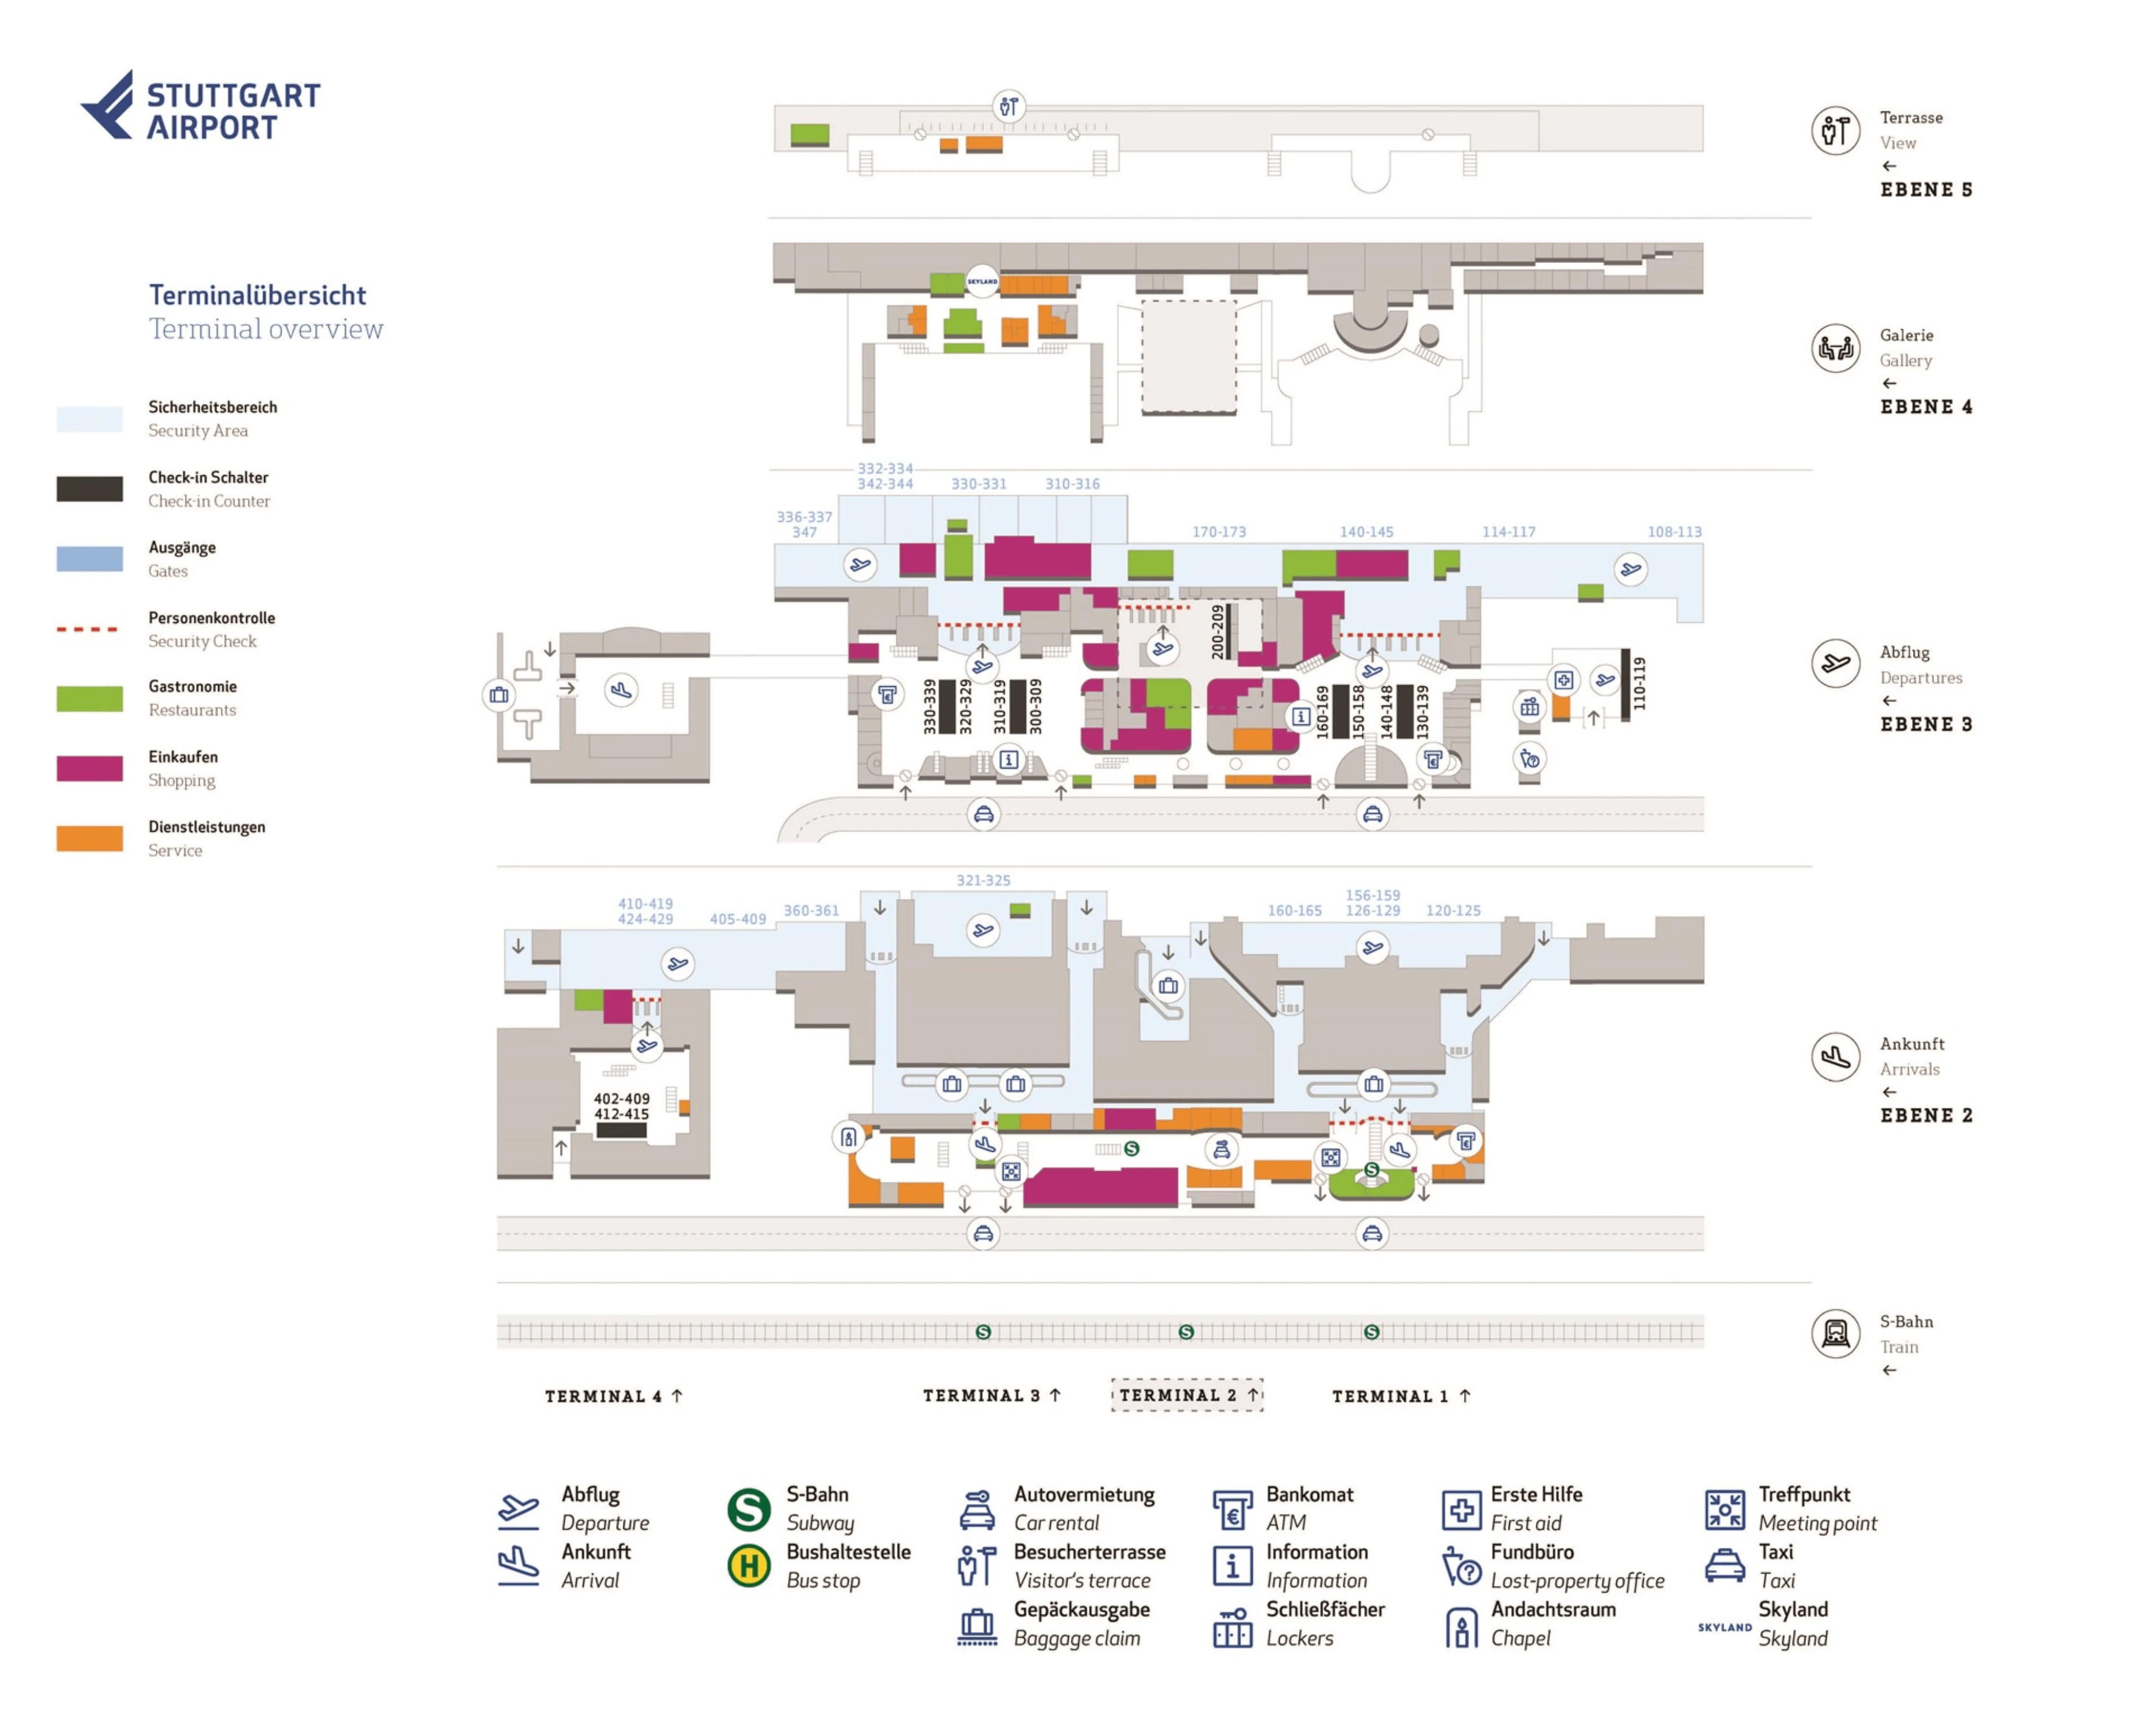
Map Table
| Zone | Key nodes | Connection | Walk time |
|---|---|---|---|
| L3 Departures | Check-in 200–209 | Smart Lane entrance | < 1 min |
| L3 Departures | Check-in 200–209 | Terminal 1 security (CT) | 2–3 min |
| L3 Departures | Bag drop 320–329 (T3) | Terminal 2 security frontage | 4–5 min |
| L2 Arrivals | T2 arrivals corridor | S-Bahn access via T1/T3 atriums | 4–6 min |
Stuttgart Airport Terminal 2 Map Strategy
- Treat Terminal 2 as your check-in node, then make a checkpoint choice: Smart Lane only if you have a valid slot; otherwise budget the short westward walk to Terminal 1 for CT scanners and faster divestment.
- Use the Level 3 continuous concourse as your “safe” connector: Terminal 2 ↔ Terminal 1 is an open-plan indoor walk on Departures with no stairs, tunnels, or outdoor segments.
- Expect gate clustering to jump by hundreds: post-security flow from the Terminal 2 exit feeds west into the 100/150–170 ranges and east into the 300s, with 400-series gates signaling the long walk to Terminal 4.
- Bus-gate risk is a level-change problem: if your gate is bus-operated (common in the 170s/340s/400s), identify the nearest down-escalator from the main Level 3 concourse early and don’t wait at the upstairs signboard when boarding happens downstairs.
2026 Stuttgart Airport Terminal 2 Map + Printable PDF
Terminal 2 remains a check-in and security decision point rather than a dedicated gate pier, so the “2026 map” is most useful for choosing the right checkpoint and predicting your post-security walk. The operational pattern to plan around is Smart Lane (reservation-based) in T2, CT-scanner throughput in Terminal 1, and closed/limited screening capacity in Terminal 3—making lateral routing the core of an on-time departure.
2026 Stuttgart Airport Terminal 2 Map Guide
What is the exact walking route (and distance) from Terminal 2 check-in desks to the Terminal 2 Smart Lane entrance on Departures?
Walking takes under 1 minute and covers roughly 30–50 meters on Level 3 (Departures), because Smart Lane sits directly in front of the Terminal 2 check-in frontage.
Start at Terminal 2 check-in counters 200–209, then turn around to face the terminal interior/security frontage (a 180° turn from the desks). Walk straight toward the dedicated Smart Lane branding/monitors and the e-gate scanners that sit slightly offset from the general security queue. Stay on the same floor plate (no stairs, escalators, or lifts); if you hit retail or drift toward the T1/T2 concourse seam, you’ve angled too far west.
From Terminal 2 check-in, what is the exact walking distance to the Terminal 1 security checkpoint (the “new scanners” checkpoint travelers recommend)?
Walking takes about 2–3 minutes and covers roughly 100–150 meters indoors on Level 3 (Departures) from Terminal 2 check-in to Terminal 1 security.
From counters 200–209, face the airfield/windows and turn left (west) into the continuous Departures concourse that connects Terminal 2 to Terminal 1 under the same roofline. Stay on Level 3 and follow overhead “Security” flow toward Terminal 1’s checkpoint entrance; you’ll pass the retail seam between T2 and T1 (often anchored by duty-free/travel retail like “Travel Value” at the interface). Avoid going downstairs—Terminal 1 security is accessed directly off the same Departures level.
Where is the pedestrian connection between Terminal 2 and Terminal 1 located (which level, which side), and what is the shortest path to it from Terminal 2 Departures?
The Terminal 2 ↔ Terminal 1 connection is a continuous, open-plan indoor concourse on Level 3 (Departures) on the landside (pre-security) side.
From Terminal 2 Departures, orient yourself at check-in counters 200–209 and walk west (left when facing the terminal interior/airfield side) along the same Level 3 floor plate. There is no tunnel, bridge, or doorway transition—the space simply blends across the T2/T1 seam through the retail/concession strip. The shortest path is the straight concourse line toward Terminal 1’s security frontage; if you encounter stairs/escalators, you’ve drifted away from the direct connector.
On the terminal map, which gate number ranges are physically grouped together near Terminal 2’s post-security access point (to avoid “numbers jump” confusion)?
The Terminal 2 security exit opens into a central airside “point zero” where the closest clustered ranges are the 150–173 gates to the west and the 310–320 gates to the east.
From the Terminal 2 post-security exit, a left turn (west) feeds into Terminal 1’s pier where signage quickly resolves into the higher 100-series, especially the 150–173 band. A right turn (east) feeds into Terminal 3’s pier where the first clustered signs typically fall into the low 300-series, around 310–320, before extending deeper toward the 330s/340s and onward toward the Terminal 4 connector. The key map cue is that there is no “Terminal 2 gate pier,” so you should expect a jump from “Terminal 2” to either 100/150-range or 300-range numbering almost immediately.
Which specific gate numbers are bus gates versus jet-bridge (“finger”) gates, and where are those bus-gate corridors located relative to Terminal 2’s post-security flow?
Bus gates require a descent from the main Level 3 concourse, while jet-bridge gates stay on Level 3 in the Terminal 1 and Terminal 3 piers. At STR, jet bridges are most consistently found around Gates 110–130 (Terminal 1) and 310–330 (Terminal 3), while bus operations dominate Terminal 4’s 405–429 range and appear frequently in the higher 170s and 331–347 ranges.
| Gate range | Likely boarding type | Where it sits from T2 post-security | Access level |
|---|---|---|---|
| 110–130 | Jet-bridge (“finger”) | West (into Terminal 1 pier) | L3 |
| 150–173 | Mixed, often bus | West (deeper Terminal 1) | L3 then down for bus |
| 310–330 | Jet-bridge (“finger”) | East (into Terminal 3 pier) | L3 |
| 331–347 | Mixed, often bus | East (deeper Terminal 3) | L3 then down for bus |
| 405–429 | Bus | Far east via T3→T4 connector | L3 walk, then bus-level holding |
From the Terminal 2 security exit, treat “downstairs access” as the bus-gate tell: the bus-gate corridors are reached via escalators/stairs that drop from the main Level 3 shopping/gate concourse into apron-level boarding areas. If your boarding pass shows a 400-series gate, commit early to the eastbound walk through Terminal 3 toward the Terminal 4 connector, then look for the first down-escalator near the T4 holding areas rather than waiting at the upstairs signboard.
Where exactly are the security wait-time display screens located (pre-security) for Terminal 2, and where are they positioned relative to the entrances to each checkpoint?
Security wait-time screens are positioned at the entrances to Terminal 1 and Terminal 3 main halls and at the Terminal 2 security queue induction point, so you can compare options before committing to a lane.
In Terminal 2 Departures (Level 3), the most actionable screen is the one near the Terminal 2 security entrance where the queue begins, close to the Smart Lane/general-lane split. Use it as a last-second “commit point” before you join the physical queue. For earlier decision-making, the monitors by the Terminal 1 and Terminal 3 hall entrances are visible off the main circulation paths coming from curbside and the S-Bahn rise; they let you decide to walk west into Terminal 1 (CT scanners) rather than locking into Terminal 2’s general security flow.
Where are the self bag drop / bag drop points located relative to Terminal 2’s security approach, and what is the shortest walking path from those points to Smart Lane?
Self bag drop for key Terminal 2 airlines is often in Terminal 3 at counters 320–329 on Level 3 (Departures), about 200–250 meters (4–5 minutes) east of Terminal 2’s Smart Lane.
From Terminal 3 Departures, complete your bag drop at counters 320–329, then turn west (toward Terminal 2) and follow the same continuous indoor Level 3 concourse back through the connector/shopping zone. Keep moving until you re-enter the Terminal 2 Departures frontage and can see the Terminal 2 security area; Smart Lane sits immediately in front of the Terminal 2 check-in/security frontage with its own branding and e-gate scanners. Do not attempt to enter security in Terminal 3 for this flow—Terminal 3 security is operationally treated as closed in the audit scenario, which creates the classic “double backtrack” if you queue there.
What is the shortest walking route from Terminal 2 security exit to the most commonly used gate corridors (by straight-line distance on the map), to estimate worst-case “late to gate” sprint time?
Walking takes under 1 minute to reach the start of the main gate corridors from the Terminal 2 security exit, because the exit sits at the central junction between the westbound (Terminal 1) and eastbound (Terminal 3) piers.
From the Terminal 2 post-security exit, the shortest “common corridor” moves are simply your first directional choice: turn left (west) and you immediately enter the Terminal 1 gate spine toward the 150–173 cluster, or turn right (east) and you immediately enter the Terminal 3 gate spine toward the 310–320 cluster. The worst-case sprint is not these first corridors but the far-east extension to Terminal 4: continue east through the full Terminal 3 concourse and cross the connector walkway to Terminal 4 (400-series), roughly 650–700 meters total—about 4–5 minutes at a sprint, 8–10 minutes at a brisk walk.
From Terminal 2 Arrivals, what is the exact indoor walking route (and distance) to the S-Bahn station entrance (including level changes)?
There is no direct vertical descent from Terminal 2 Arrivals to the S-Bahn, so the indoor route requires a lateral walk to the Terminal 1 or Terminal 3 atriums and then two level drops. The total distance is about 150–200 meters and typically takes 4–6 minutes.
From the Terminal 2 Arrivals hall (Level 2) after baggage reclaim, walk 50–75 meters along the main arrivals corridor toward either Terminal 1 (west) or Terminal 3 (east) until you reach the larger atrium area with the escalator banks and the green “S” signage. Descend one level to the ticket hall/mezzanine (Level 1), pass the ticket machines, then descend again to the platforms (Level 0) for S2/S3 at “Flughafen/Messe.” Stay indoors the entire time; exiting to the curbside adds confusion and detours.
From Terminal 2 Arrivals, what is the exact walking route (and distance) to the Stuttgart Airport Bus Terminal (SAB) platforms area?
Walking takes about 7–10 minutes and covers roughly 400–600 meters, because the SAB platforms sit under the P14 parking structure beyond Terminal 3 and near Terminal 4.
From Terminal 2 Arrivals (Level 2), exit the terminal via the sliding doors to the curbside/street-level frontage (Flughafenstraße). Turn left (east) and follow the exterior sidewalk along the terminal face, passing the full length of Terminal 3 and continuing toward the Terminal 4 building. Keep going to the P14 car park structure; the Stuttgart Airport Bus Terminal is at ground level beneath P14, with bays typically organized as Lanes 1–3 (regional) and Lanes 4–18 (long distance). This route is largely outdoors, so weather and curb crossings are the main friction points.
Archive Stuttgart Airport Terminal 2 Map
Below are all historical map versions for Stuttgart Airport. Each year includes the official map available for that period, presented as both WebP and PDF.
2025-2026 Stuttgart Airport Terminal 2 Map (Official 2025 Edition)
2017 Stuttgart Airport Terminal 2 Map (Official 2017 Edition)