Sacramento International Airport Terminal A Map (Most Up-To-Date)
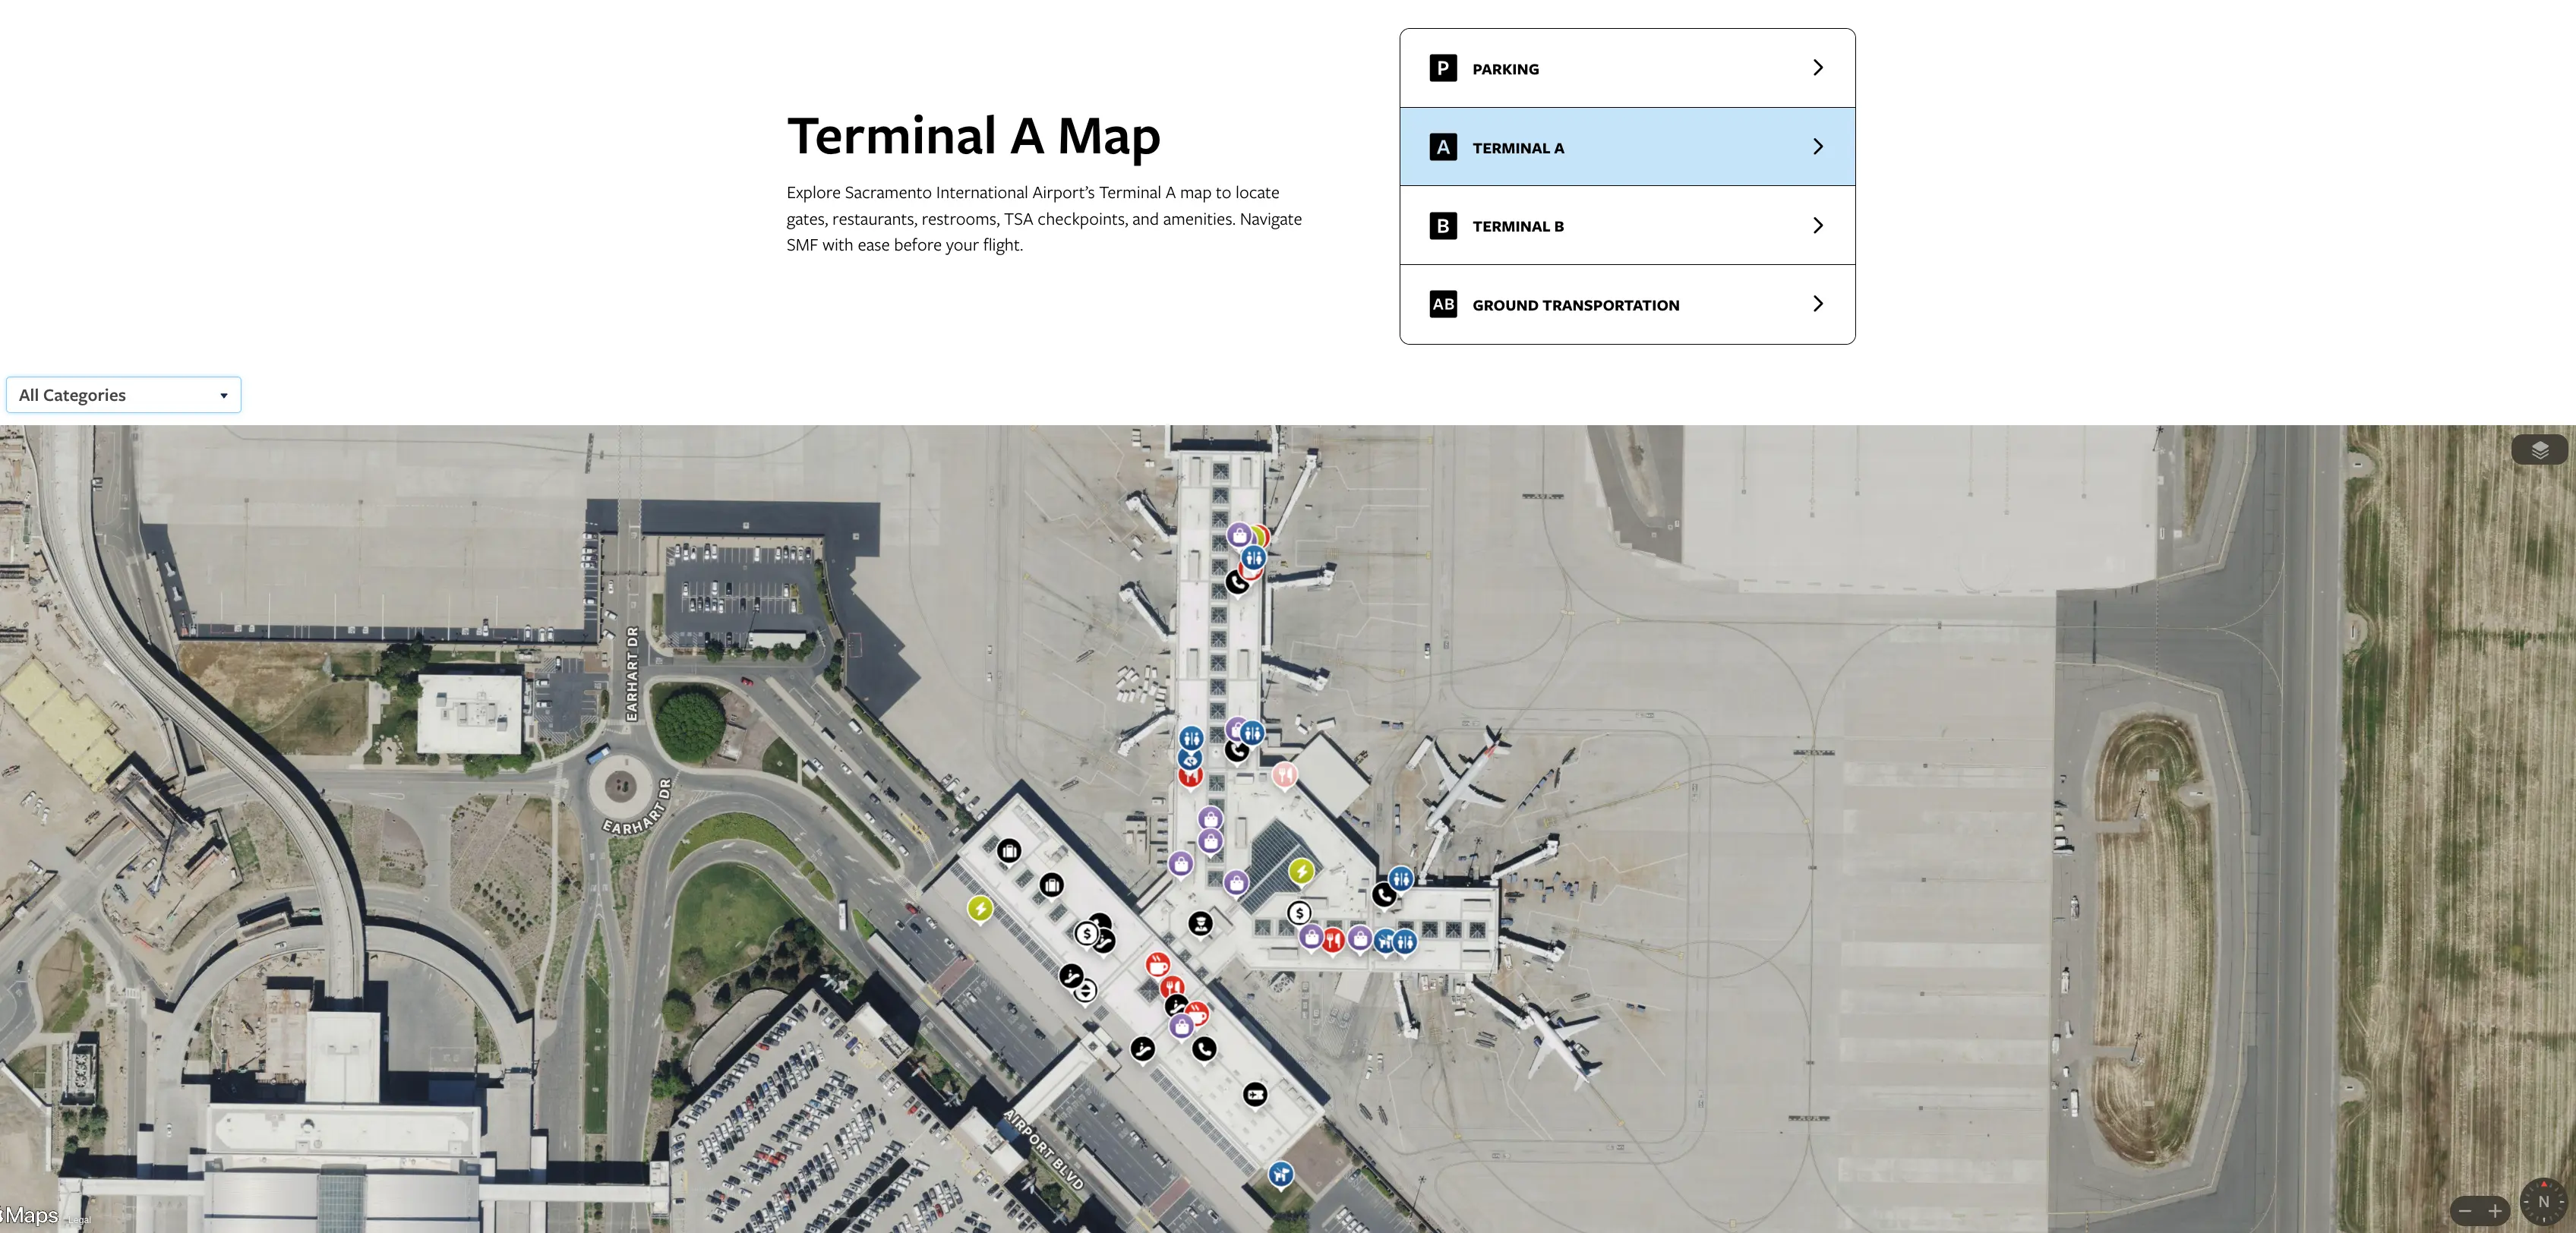
Terminal A at Sacramento International Airport is a compact, linear terminal with two public roadway levels and a single attached concourse (Gates A1–A17), set within Sacramento’s main airport hub. Arrivals and baggage claim sit on Level 1, while ticketing and security are on Level 2. The terminal’s key orientation is north–south along the curb, with the West Curb rideshare island at the northwest corner and the main Garage 1 skybridge connection between Terminal A and the central parking structure.
Map Table
| Zone | Connection | Walk Time |
|---|---|---|
| Level 1 (Arrivals) | baggage claim, inner curb pickup, center-island shuttles | curb-to-doors: short |
| Level 2 (Departures) | ticketing, security, Garage 1 skybridge | bridge-to-ticketing: short |
| West Curb (Rideshare) | app-based pickup island, TNC geofence | 2–4 min |
| Garage 1 (Connector) | Terminal A bridge level, Terminal B transfer path | 7–10 min to Terminal B |
Sacramento International Airport Terminal A Map Strategy
- Find the Terminal A spur early: stay lane-disciplined on Airport Blvd so you don’t get committed into the Terminal B/Garage loop.
- Follow the level logic: use Level 1 for pickups (baggage claim curb) and Level 2 for drop-offs (ticketing/security) to avoid hesitation and last-second merges.
- Use named nodes instead of “go outside”: follow signs to the West Curb “App-Based Rideshare” island at the northwest corner, not the main inner curb.
- Use Garage 1 as the router: take the Garage 1 bridge (Terminal A side) for predictable terminal access, and use the garage vertical move (up to the Terminal B bridge level) for A↔B transfers.
2026 Sacramento International Airport Terminal A Map + Printable PDF
Terminal A’s layout remains a two-level curb (Arrivals below, Departures above) with the biggest navigation penalties coming from a missed terminal split and the non-intuitive West Curb rideshare walk. For printing, prioritize a map that shows the Terminal A/B roadway fork, the Level 1 curb islands, the Garage 1 bridge level, and the West Curb “App-Based Rideshare” node.
2026 Sacramento International Airport Terminal A Map Guide
What is the exact roadway split/turn decision point drivers must take to reach Terminal A Arrivals without looping back?
Keeping right at the Terminal A/Terminal B Y-split on Airport Boulevard is the commit point that prevents a forced loop. The decisive moment is when Airport Blvd widens under overhead airline gantries and splits: Terminal A peels off to the right, while Terminal B and Garage 1 continue straighter/left.
After taking the Terminal A spur, stay on the lower-level path for Arrivals by following the Level 1 / Baggage Claim signs and avoiding the ramp up to Departures. The practical tell is the second split: the upward ramp channels you to Level 2 (ticketing), while the grade-level lanes continue to Level 1 curb by the baggage-claim doors.
What is the walking distance from the Terminal A baggage-claim exit doors to the designated rideshare pickup zone?
Walking is approximately 300–500 feet from Terminal A baggage claim to the West Curb “App-Based Rideshare” pickup island. The distance varies by which carousel and exit doors you use, with the shortest path coming from the north-end exits.
From baggage claim on Level 1, use the terminal sidewalk as your anchor: head north (right when facing the roadway) to the furthest north doors, then follow the “App-Based Rideshare” signage past the end of the building footprint to the West Curb island at the northwest corner. The walk typically takes 2–4 minutes and is partially exposed until you reach the pickup platform.
What is the exact garage level and pedestrian bridge entrance that connects Garage 1 to Terminal A departures/ticketing?
Garage 1 Level 3 is the pedestrian bridge level that connects directly to Terminal A Level 2 (Departures/Ticketing). The usable “bridge entrance” is the Level 3 skybridge portal on the Terminal A side of Garage 1, aligned with the Terminal A departures/ticketing core.
From inside Garage 1, anchor on the Terminal A-facing edge of the structure and look for the signed skybridge corridor on Level 3 leading into Terminal A. If you park above or below Level 3, use the nearest elevator bank to get to Level 3 first, then take the bridge straight into the departures lobby area.
Where is the Terminal A curb segment (exact position) where arrivals pickup is permitted without mixing into departures traffic?
Arrivals pickup is permitted at the Level 1 inner curb directly outside Terminal A baggage claim, before you take any ramp up to Level 2 departures. The cleanest “no-mixing” target is the inner curb on the lower roadway, adjacent to the baggage-claim doors, not the upper departures curb.
To reduce stop-and-go congestion, use a landmark inside the building: have the passenger exit from the far north end of the baggage-claim hall, then meet at the downstream end of the inner curb (northbound flow). This keeps you away from the upstream entrance pinch point where cars hesitate and merge late into the pickup lane.
What is the exact shuttle stop location outside Terminal A for the rental car shuttle (door/crosswalk reference point)?
The rental car shuttle stop is on Terminal A Level 1 at the center island (median), reached by crossing from the baggage-claim doors at a marked crosswalk. The most reliable reference is the signed “Rental Car Shuttle” boarding area on that median island directly opposite the baggage-claim curb.
Exit baggage claim on Level 1, use the nearest painted crosswalk as your anchor, and cross the private-pickup lane to the center island rather than waiting at the inner curb. The buses are large, clearly branded “Rental Car Shuttle,” and queue along the median so you board from the island side, not from the terminal sidewalk.
What is the walking distance from the Terminal A rental car shuttle stop to the rental car facility loading point (boarding area)?
Walking is about 30–50 feet from the rental car shuttle drop-off curb to the Rental Car Facility customer-service building entrance, with boarding/loading happening directly at that curb. The shuttle stops immediately in front of the facility doors, so there’s no long transfer walk once you arrive.
After you step off the bus, follow the curb line straight to the sliding glass doors of the customer-service building. The only additional walking is agency-dependent: counters are inside the building, and most vehicle rows begin just behind it, typically another 50–150 feet past the counters depending on brand and stall assignment.
Where is the ground transportation curb outside Terminal A for the inter-terminal shuttle to Terminal B?
The inter-terminal shuttle boards at Terminal A Level 1 on the center island (median) outside baggage claim, in the same median zone used by other shuttles. The anchor to look for is the “Daily Parking / Inter-Terminal Shuttle” signage on the center island directly across from the baggage-claim doors.
Exit baggage claim to the Level 1 sidewalk, then use the nearest marked crosswalk to reach the center island rather than staying at the inner curb. Queue on the island at the posted stop sign so buses can load from the median without blocking the private pickup lane along the terminal-side curb.
What is the shortest walking route between Terminal A and Terminal B through the parking garage (which bridge-to-bridge path)?
Walking takes about 7–10 minutes using the Garage 1 bridge-to-bridge route with a required elevator change between bridge levels. The shortest path is Terminal A’s Level 2 bridge to Garage 1 Level 3, then an elevator up to the Terminal B bridge level, then the Terminal B skybridge into Terminal B.
| Segment | Route | Typical time |
|---|---|---|
| Bridge A | Terminal A Level 2 → Skybridge → Garage 1 Level 3 | 2–3 min |
| Vertical shift | Garage 1 elevators → Level 5 (Terminal B bridge level) | 1–2 min |
| Bridge B | Garage 1 Level 5 → Skybridge → Terminal B Level 3 (near APM area) | 2–4 min |
Stay on pedestrian-marked walkways on Garage 1 Level 3, then anchor on the Terminal B-side elevator bank to reach the Level 5 bridge without backtracking.
What is the walking distance from Terminal A security exit to the furthest gate in Terminal A’s concourse?
Walking is approximately 600–800 feet from the Terminal A security exit to the furthest gate (A17). The walk is direct along a single linear pier, with no train or people mover inside Terminal A.
After clearing security on Level 2, anchor on the central recomposure area where the concourse opens up, then follow the main corridor toward the A10–A17 side to reach the end node at Gate A17. At a moderate pace, most travelers cover it in about 3–6 minutes, with time mainly driven by crowd density and how quickly you can merge into the main concourse flow.
Where is the closest elevator bank from Garage 1 that drops you onto the Terminal A departures level with the fewest turns?
Lobby C or Lobby D elevator banks on the Terminal A side of Garage 1 are the closest drops to the Level 3 skybridge for Terminal A departures. Using these lobbies minimizes cross-garage walking and keeps your route “elevator → Level 3 bridge → Terminal A Level 2” without extra turns.
Park in the southeast quadrant of Garage 1 and look for the signed garage lobbies nearest the Terminal A-facing edge. Take the elevator to Level 3, then follow the skybridge corridor straight into Terminal A Level 2 (ticketing/security). If you exit at a lobby on the opposite side of the garage, you’ll add a long lateral walk across Level 3 before you even reach the bridge entrance.
Where is the best no-fee quick pickup path for Terminal A using the parking garage (entry ramp → closest exit/elevator to baggage claim)?
No-fee quick pickup via Garage 1 is not possible because entry triggers an immediate paid session with no usable grace period. The only reliable no-fee strategy is staging in the free Cell Phone Lot, then driving straight to Terminal A Level 1 inner curb once the passenger is at the doors.
Use the Cell Phone Lot near the AM/PM gas station as your anchor point: wait there until your passenger confirms they’re outside baggage claim. Then approach Terminal A, take the Terminal A spur at the Airport Blvd Y-split, stay on the Level 1 (Arrivals/Baggage Claim) roadway, and load at the inner curb with a minimal dwell. This avoids both garage fees and the hesitation spiral that happens when drivers enter the garage hoping to “dip in and out” for free.
Where is the least-congested alternate pickup point adjacent to Terminal A that still keeps the passenger’s walk fully covered?
Garage 1 Level 3 is the least-congested alternate pickup point that keeps the passenger’s walk fully covered via the Terminal A skybridge. It replaces curbside chaos with a sheltered garage stall pickup reached from Terminal A departures level.
Have the passenger anchor on Terminal A Level 2 (Departures): go up to Departures, enter the skybridge corridor, and cross directly into Garage 1 Level 3. The driver enters Garage 1 and goes to Level 3 near the Terminal A bridge portal, then picks up in a marked stall area away from active curb traffic. This option is calmer and weather-protected, but it is not free—garage entry starts a paid stay immediately.