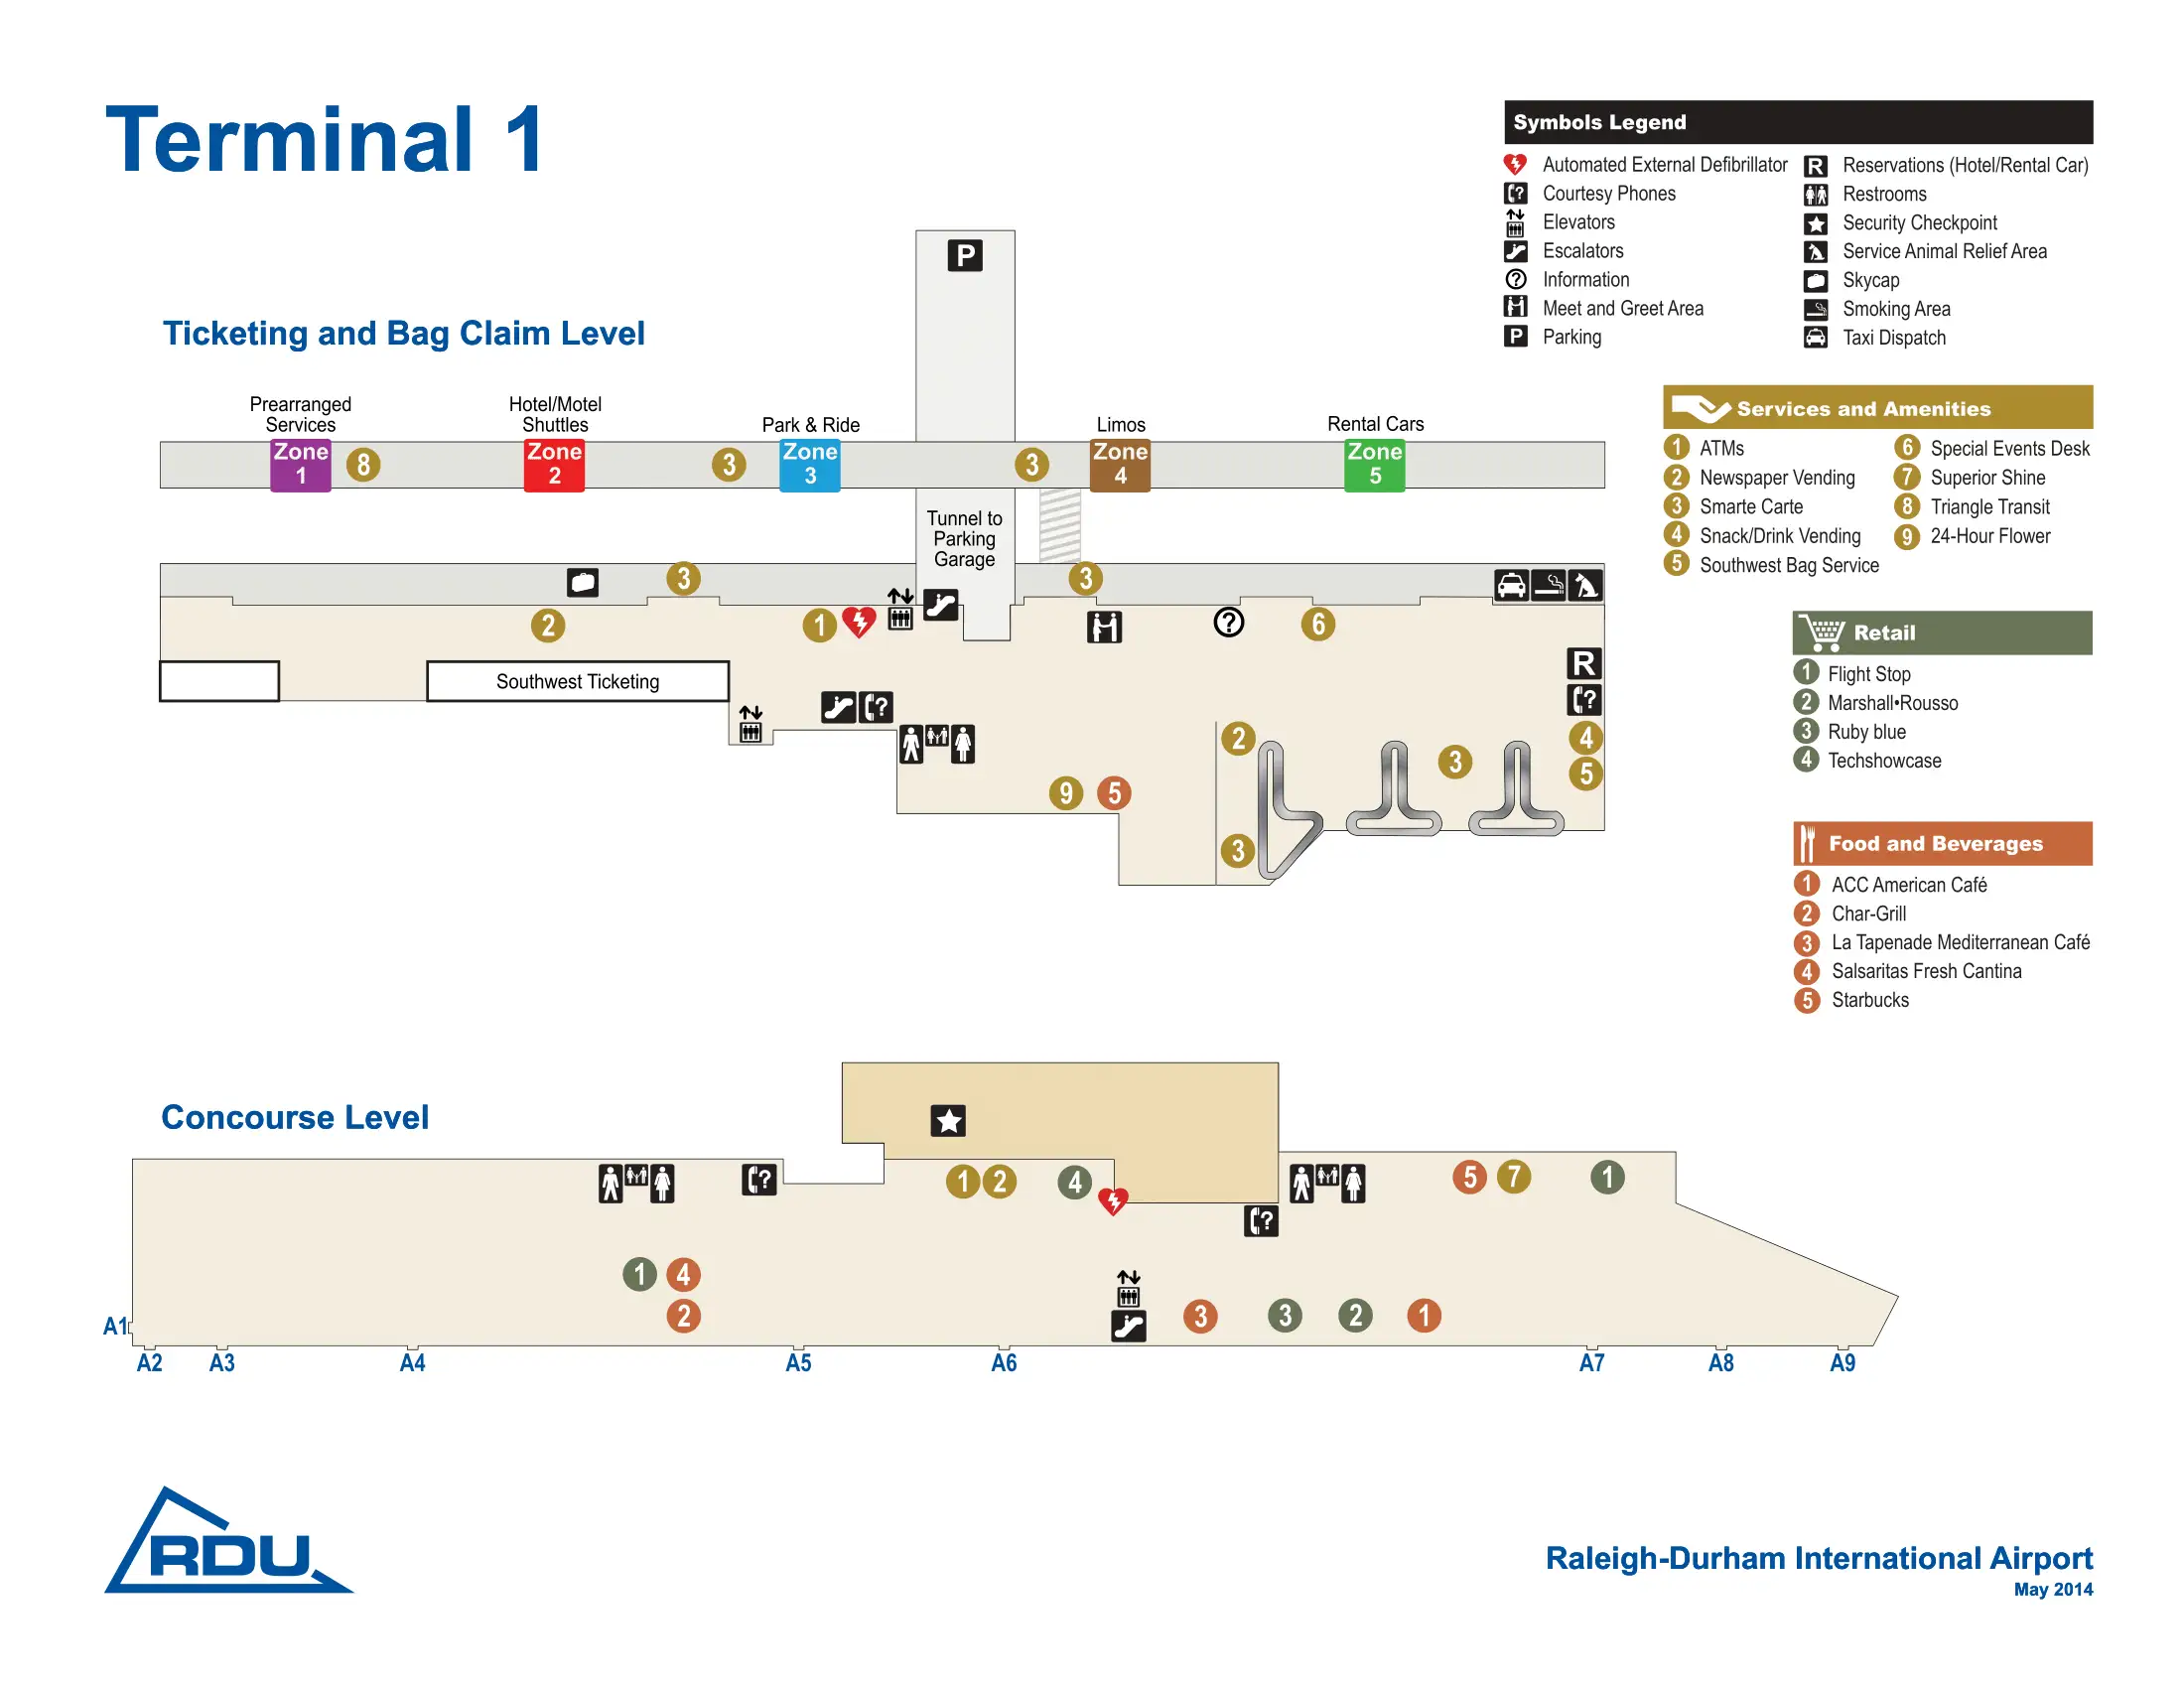
Raleigh Durham International Airport Terminal 1 Map (Most Up-To-Date)
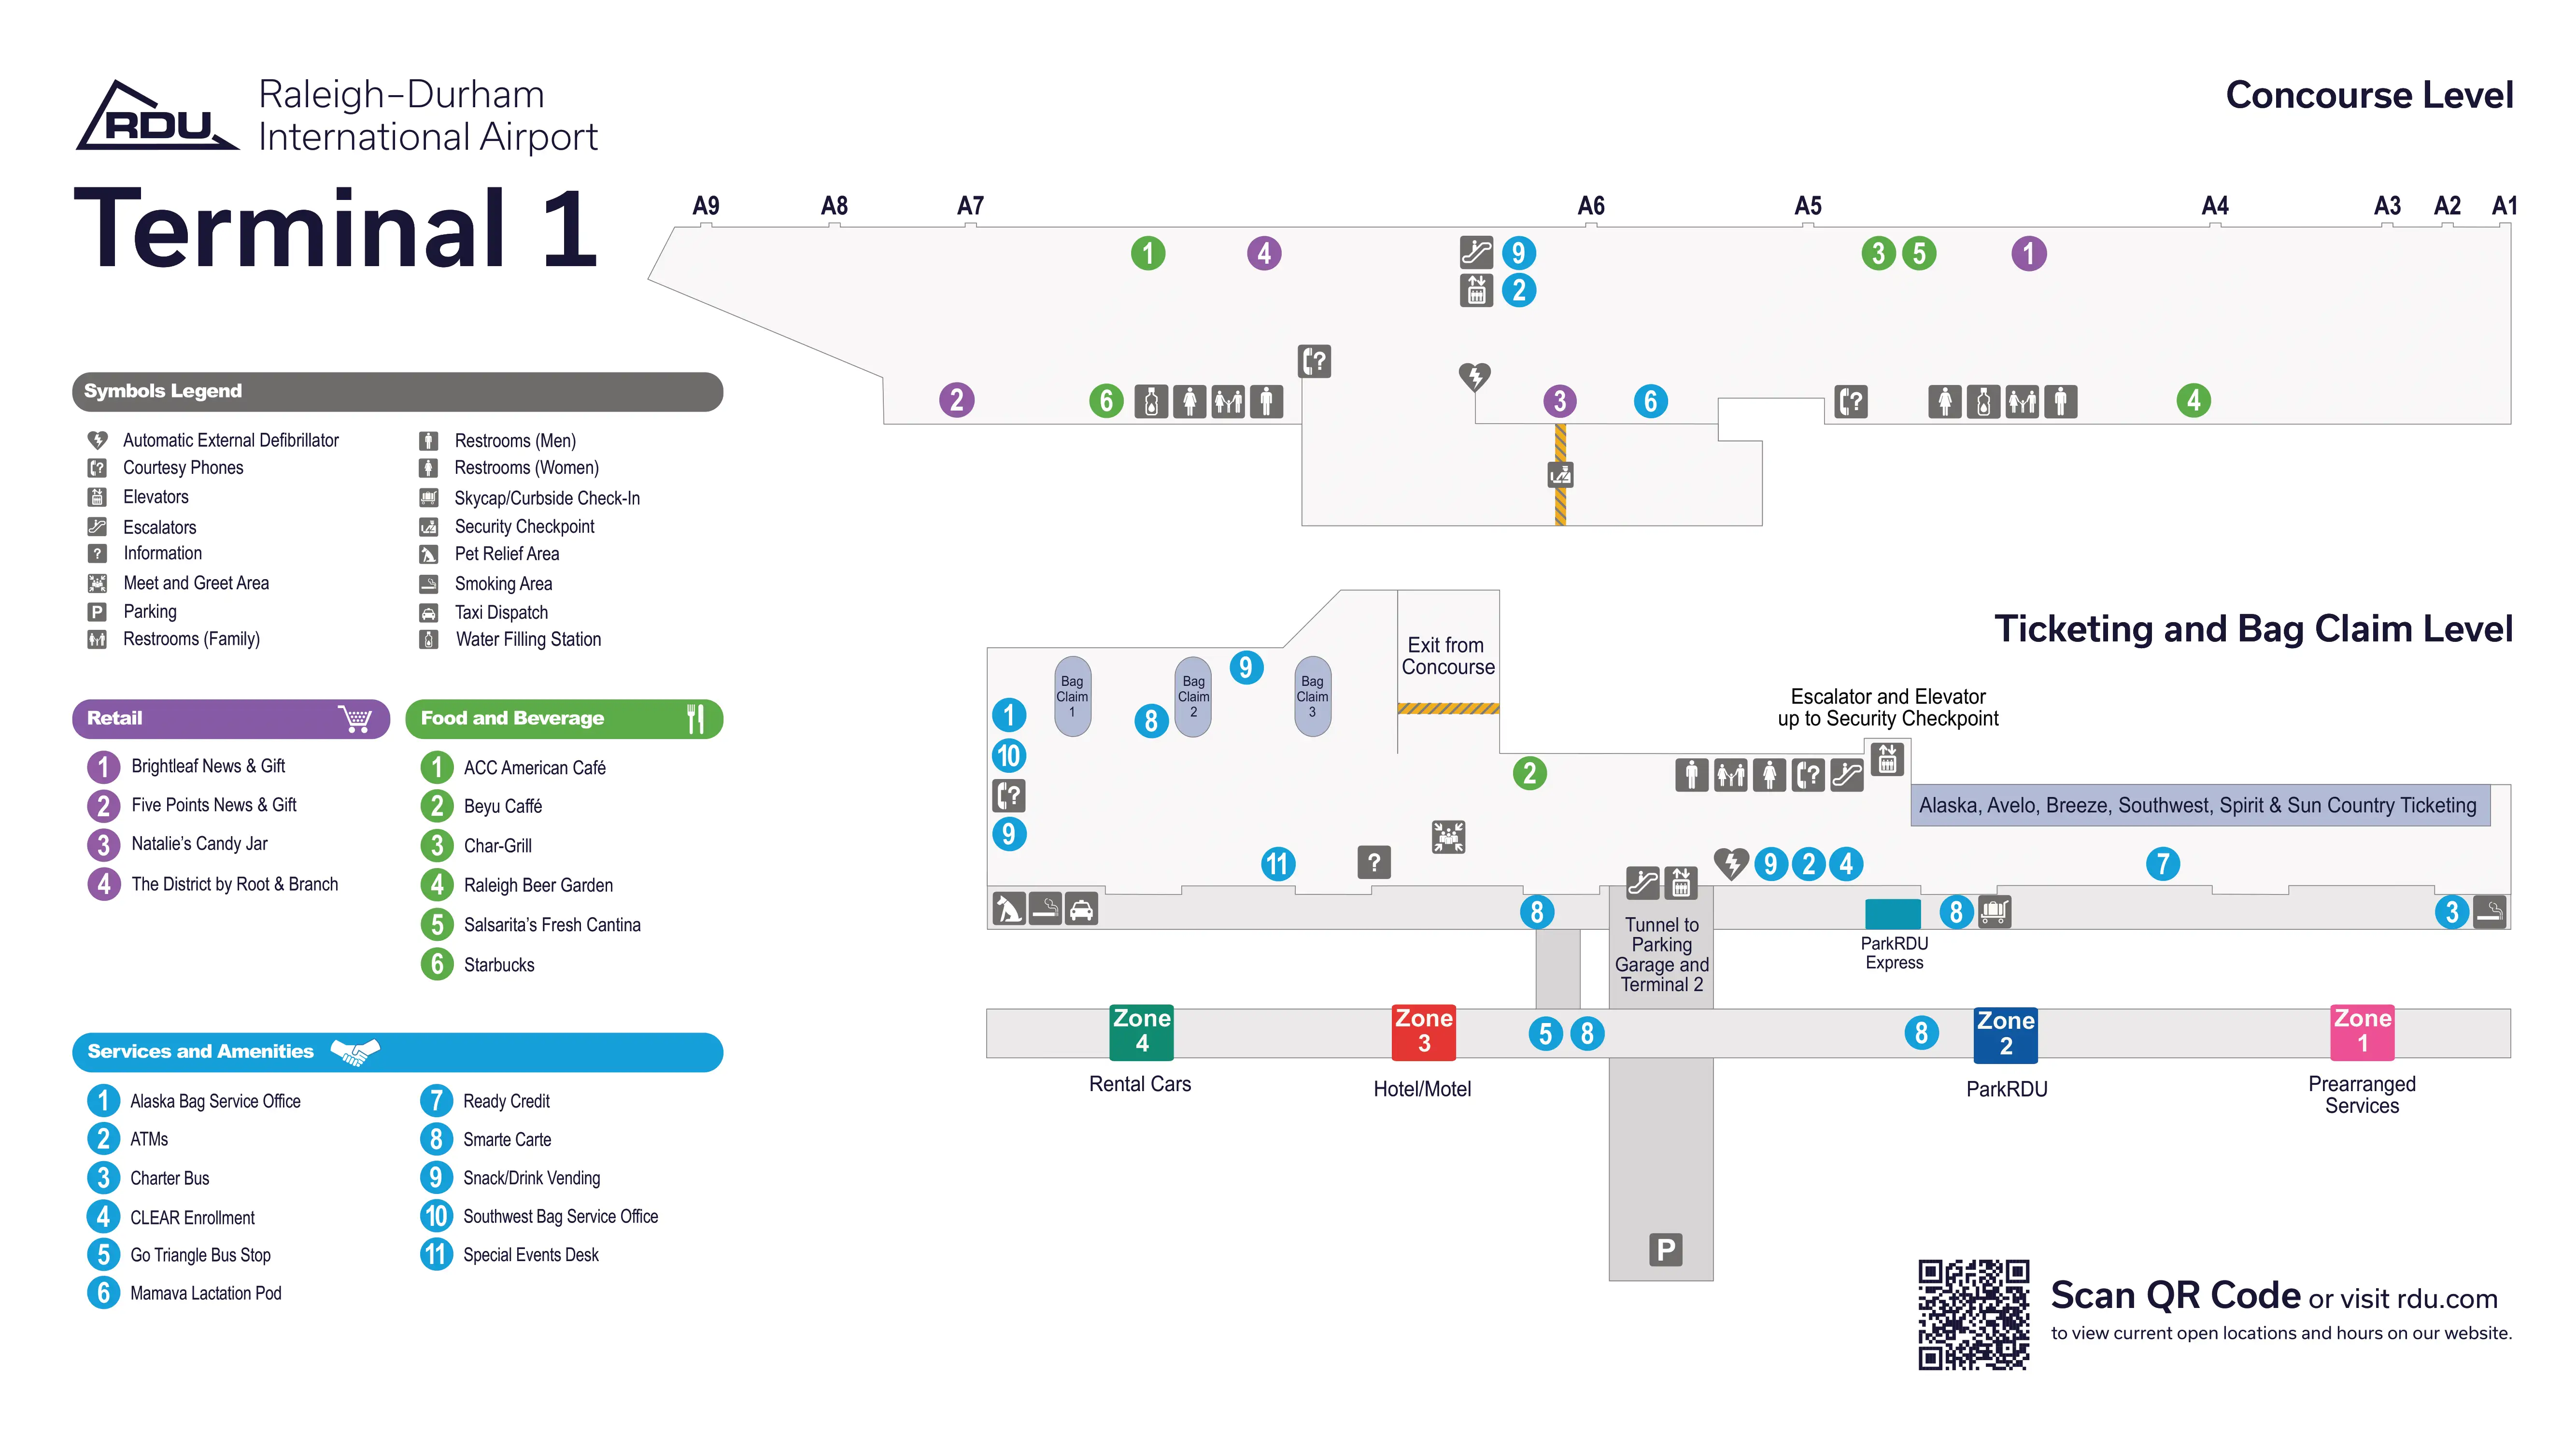
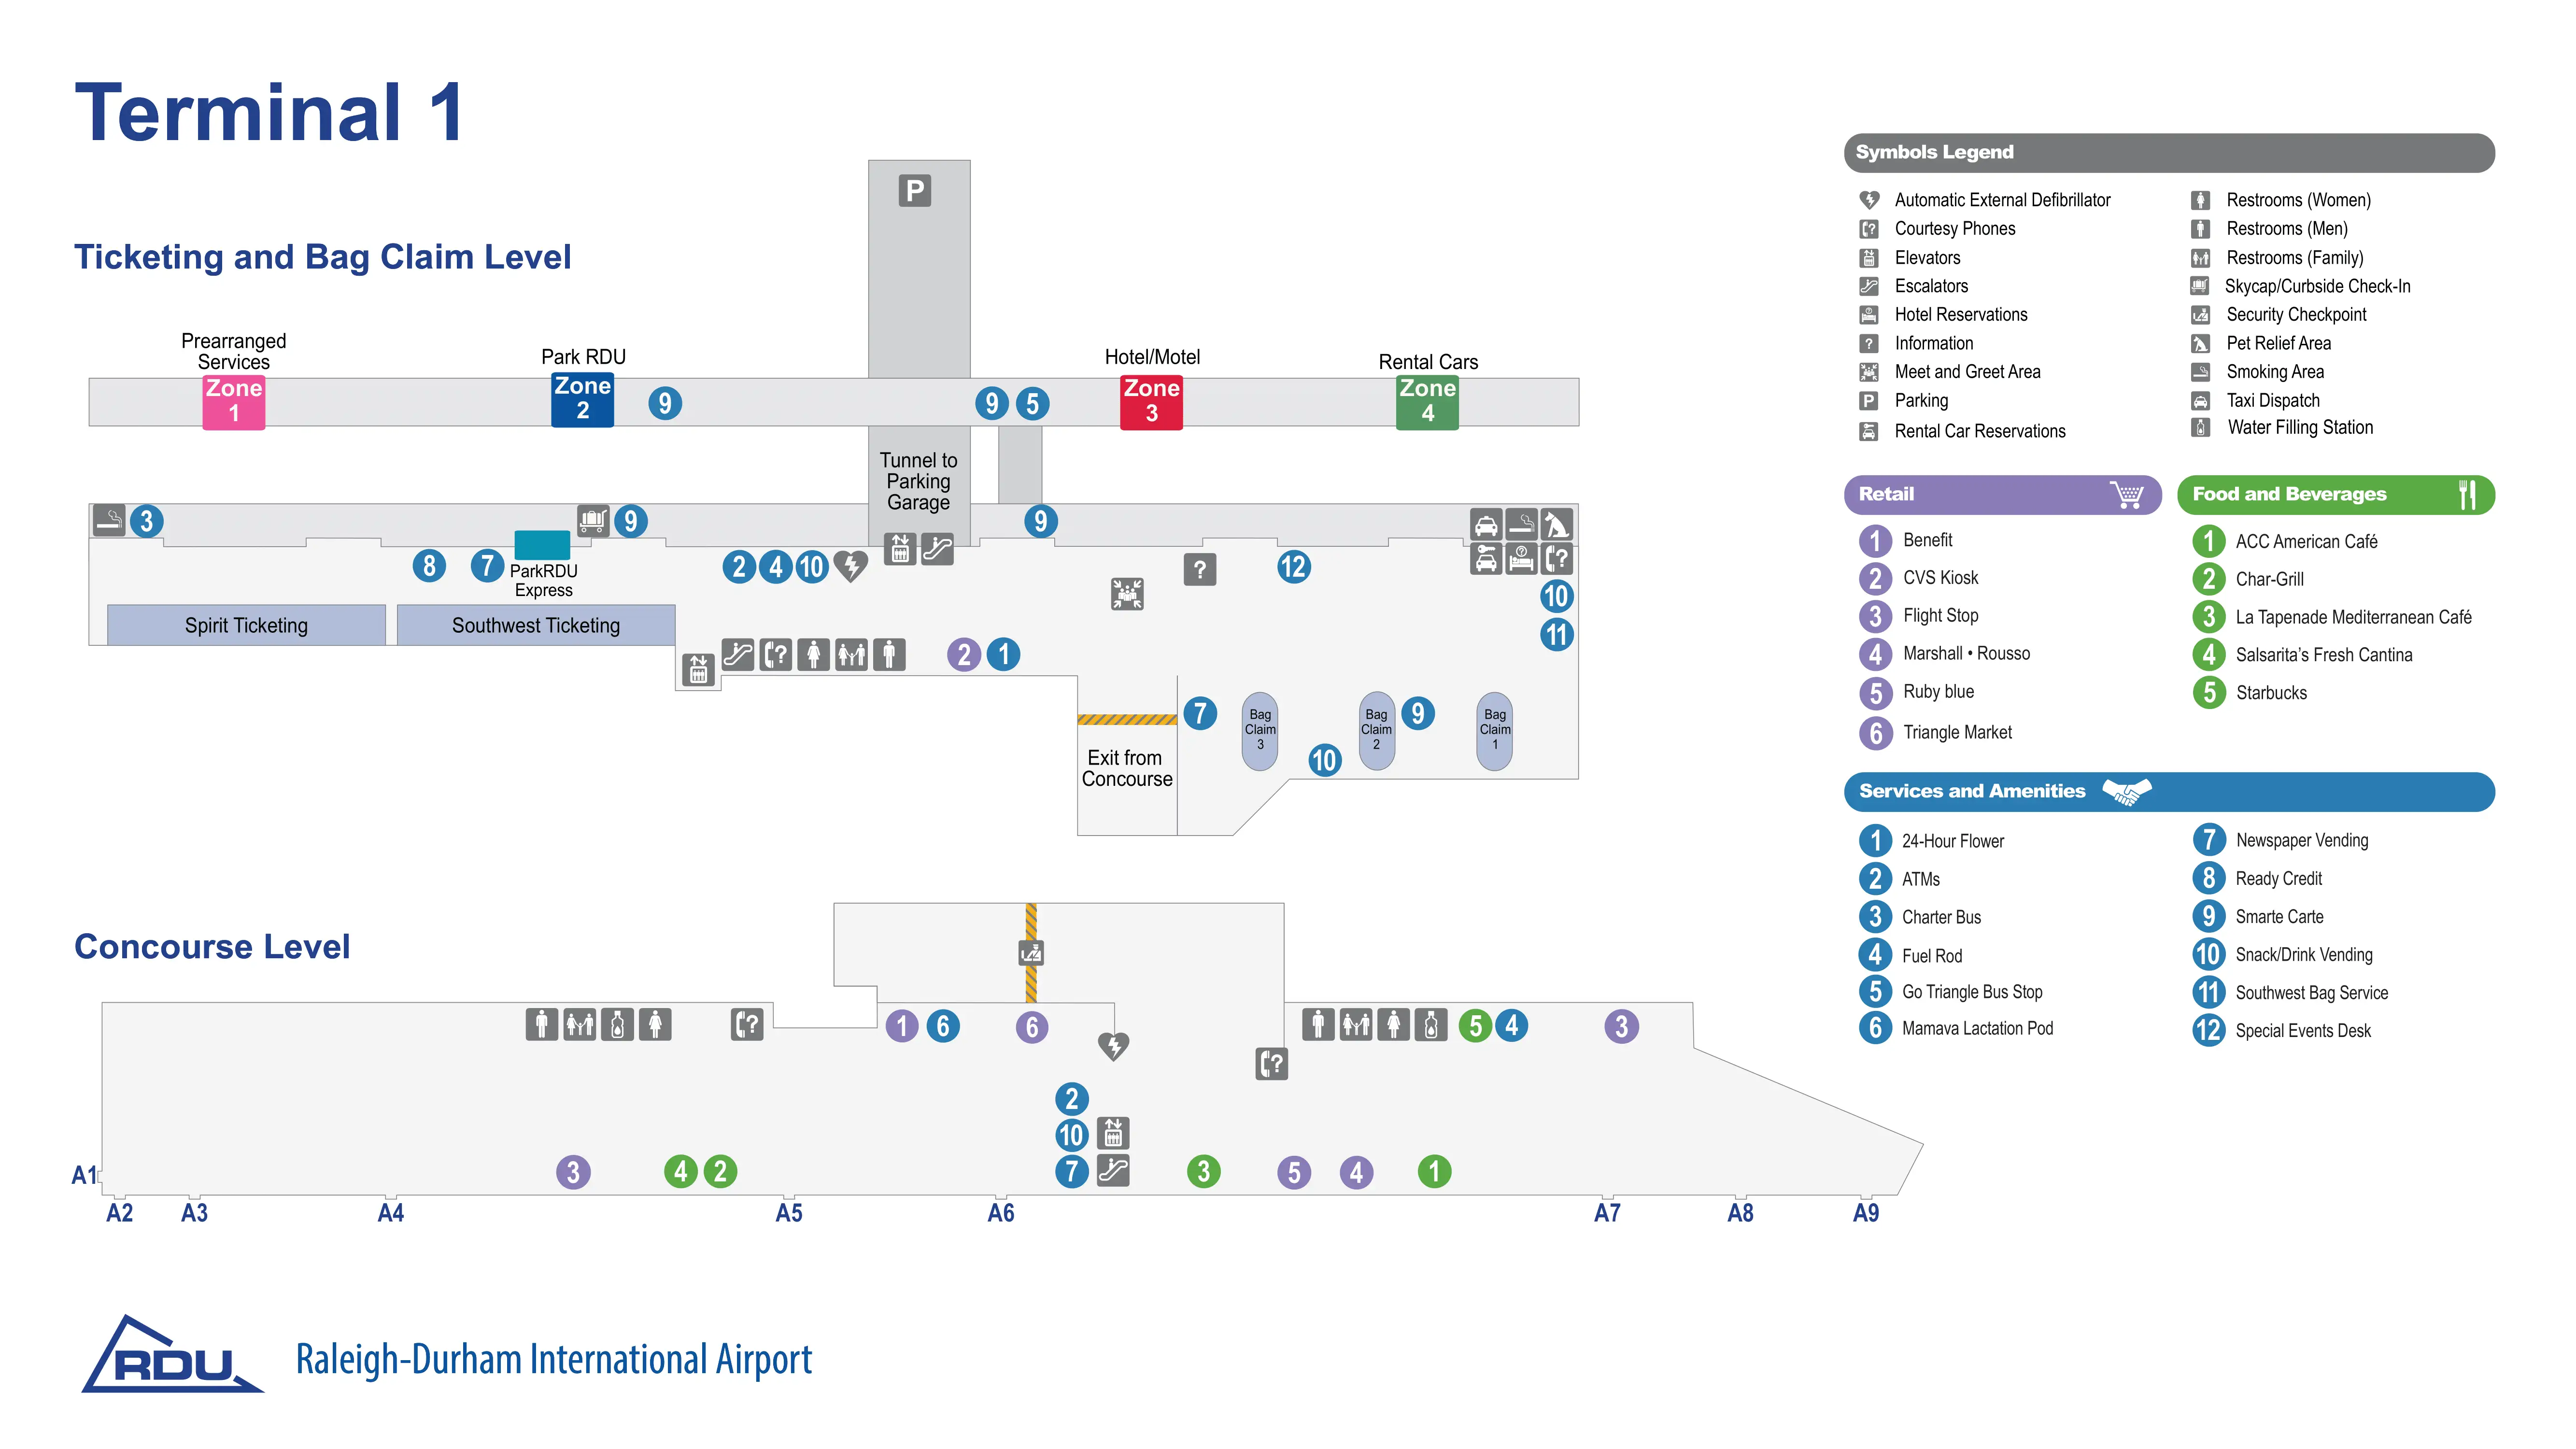
Raleigh–Durham International Airport Terminal 1 is a compact, linear A-concourse with nine gates (A1–A9) laid out in a straight line from the TSA exit to the far end at A9. Security feeds directly into the central retail/food cluster, then the corridor continues gate-by-gate. Terminal 1 sits across the parking core from Terminal 2 within the Triangle’s main airport grounds, and any transfer between terminals is forced landside via the tunnel-to-garage pedestrian corridor.
Map Table
| Level | Key Nodes | Primary Flow | Notes |
|---|---|---|---|
| Upper (Airside) | TSA exit, shops/dining cluster, Gates A1–A9 | Straight-line concourse | No moving walkways; A9 far end |
| Lower (Landside) | Baggage claim, curb zones 1–4, shuttle pickup | Door-to-curb frontage | Public bus Zones 2/3; rental car Zone 4 (green) |
| Transfer corridor | Under-road tunnel, central garage walkway | Covered cross-terminal path | Terminal 1 ↔ Terminal 2, landside only |
Raleigh Durham International Airport Terminal 1 Map Strategy
- No airside Terminal 1 ↔ Terminal 2 connection: treat the two terminals like separate airports; any terminal switch means exit + full TSA re-screening.
- Choose the transfer method by risk, not effort: the tunnel → central garage walkway route removes shuttle wait-time uncertainty; the shuttle adds headway risk.
- Lock your curbside zone before stepping outside: Zones 2/3 for GoTriangle/public bus, Zone 4 (green) for rental car shuttles, Zone 1 for rideshare/prearranged.
- Reduce missed-flight exposure at decision points: commit early to the garage-walk path, avoid “wrong bus” traps (Lot 3 vs other lots), and budget extra time for Terminal 2 screening variability.
2026 Raleigh Durham International Airport Terminal 1 Map + Printable PDF
Terminal 1 continues operating as a standalone terminal with its own TSA checkpoint and a single linear gate pier (A1–A9). The defining constraint remains unchanged: there is no airside connection to Terminal 2, so any switch between terminals requires going landside and re-clearing security. For printing, prioritize a map that shows the tunnel-to-garage pedestrian link, curbside zones, and the A-gate spine from TSA to A9.
2026 Raleigh Durham International Airport Terminal 1 Map Guide
What is the exact walking route and distance (feet/meters) from Terminal 1 TSA exit to Gate A9 (farthest A-gate)?
Walking from the Terminal 1 TSA exit to Gate A9 is approximately 1,000–1,200 feet (300–365 meters) along a straight, linear concourse. After clearing security, stay on the main airside spine past the post-TSA retail cluster (news/gifts and the central “Shops of RDU” area) and continue forward as gates increment from A1 upward. Pass the Gate A1–A3 holdrooms, continue by the mid-concourse area around Gates A4–A6, and keep walking until the corridor dead-ends at the Gate A9 holdroom. At normal flow, this is about a 4–5 minute walk with no moving walkways.
What is the exact landside route and walking distance from Terminal 1 baggage claim exit doors to the Terminal 2 TSA checkpoint entrance using the covered parking-deck connection?
No airside connection exists, so this transfer requires going landside and re-clearing TSA at Terminal 2. Exit Terminal 1 on the lower level (Arrivals/Baggage Claim) and follow signs to the pedestrian tunnel/subway entrance adjacent to the baggage claim area, which takes you under the arrivals roadway into the central parking garage. Continue straight through the garage pedestrian corridor using the moving walkways toward Terminal 2 Arrivals (lower level), then enter Terminal 2 and go to the central escalator/elevator bank to reach Departures (upper level) and the TSA checkpoint entrance.
| Segment | Route anchor | Distance (est.) | Time (typ.) |
|---|---|---|---|
| T1 baggage claim → tunnel | Doors by baggage claim → tunnel/subway entrance | ~50–150 ft (15–45 m) | 1–2 min |
| Tunnel → garage corridor | Under-road tunnel into central garage | (included in total) | 2–4 min |
| Garage corridor → T2 Arrivals | Moving-walkway corridor through central garage | ~2,100–2,600 ft (640–790 m) | 5–10 min |
| T2 Arrivals → T2 TSA | Escalator/elevator to Departures → TSA entrance | (included in total) | 3–6 min |
| Total | Covered garage-link route | ~0.4–0.5 mi (2,100–2,600 ft / 640–790 m) | ~10–15 min (budget 15) |
At Terminal 1, which curbside Zone (by number) is the GoTriangle/public bus pickup located, and what is the shortest path from baggage claim to that zone?
GoTriangle/public bus pickup at Raleigh–Durham International Airport Terminal 1 is at curbside Zones 2 and 3. From the baggage claim hall, exit through the central arrivals doors to the lower-level curb, then walk along the terminal frontage toward the “Public Transit” signs until you reach the curb columns marked Zone 2 / Zone 3. The bus stop cluster sits adjacent to the other high-volume pickups near the north end of the Terminal 1 curb, so staying on the curbside (rather than crossing traffic lanes) reduces wrong-turn wandering. Watch for evening branding confusion: the same stop may be labeled “RDU Shuttle” earlier and “Route 100” later, while the zone stays the same.
Where exactly are the economy/parking shuttle stops at Terminal 1 that can be used to transfer toward Terminal 2, and what is the walking distance from Terminal 1 baggage claim to those stops?
The economy/parking shuttle stop used for a Terminal 1 → Terminal 2 transfer is on the Terminal 1 lower-level curb, immediately outside the baggage claim exit doors, where the Lot 3 bus loads. From inside baggage claim, exit to the arrivals curb and look for the shuttle loading area at the curb edge directly in front of the terminal frontage; the key decision is boarding the Lot 3 bus (not other lot routes) to avoid a detour into remote parking fields.
| Node | Exact placement cue | Walk from baggage claim | Transfer risk |
|---|---|---|---|
| Economy/parking shuttle pickup | Ground-level curb directly outside Terminal 1 baggage claim exit doors | ~50–100 ft (15–30 m) | Wrong bus choice (Lot 3 vs other lots) |
What is the shortest curb-to-curb driving path from the Terminal 1 arrivals pickup curb to the Terminal 2 departures curb, and where are the most common wrong-turn decision points on that loop?
Driving from the Terminal 1 arrivals curb to the Terminal 2 departures curb is roughly 0.6–0.8 miles and typically takes about 2–4 minutes in light traffic. Pull out from the Terminal 1 lower-level arrivals curb, follow the terminal roadway to merge onto John Brantley Boulevard (the main airport loop), then stay on the loop following “Terminal 2” signage until you reach the Terminal 2 roadway split and take the up-ramp for Departures (upper level) to reach the departures curb. The two most common mistakes are exiting the airport loop by taking the wrong lanes at the early split, and staying on the lower level at Terminal 2 instead of taking the departures up-ramp.
| Decision point | What you’ll see | Correct move | What goes wrong if missed |
|---|---|---|---|
| Early loop split after leaving Terminal 1 | Lanes diverge toward airport exits vs terminal loop | Stay right on the airport loop toward Terminal 2 | Forced airport exit + re-entry, ~10–15 minute penalty |
| Terminal 2 level split | Ramp choice for Arrivals (lower) vs Departures (upper) | Take the up-ramp to Departures/Upper Level | Ends up at arrivals/pickup area, then must loop again |
At Terminal 1, where is the rental car shuttle stop (Green zone) located, and what is the exact walking distance from Baggage Claim to that stop?
The rental car shuttle stop at Raleigh–Durham International Airport Terminal 1 is curbside at Zone 4, marked as the Green zone. From baggage claim, exit to the lower-level arrivals curb and walk along the curb frontage to the columns/signs labeled “Zone 4” with green color-coding for rental cars. The walk from the baggage claim exit doors to the Zone 4 loading point is approximately 150 feet (about 45 meters), with Zone 4 clustered near the adjacent public bus zones (Zones 2/3).
For a passenger forced to exit Terminal 1 and re-clear security in Terminal 2, what is the most direct exit → cross → re-enter path, and which doors/stair/escalator nodes minimize backtracking?
No airside connection exists, so you must exit Terminal 1 and complete a full TSA re-screening at Terminal 2. The most direct path is to leave Terminal 1 down to Arrivals/Baggage Claim, use the pedestrian tunnel under the roadway into the central parking garage, follow the moving-walkway corridor straight into Terminal 2 Arrivals, then go up the central escalator/elevator bank to Departures for the Terminal 2 TSA checkpoint. Minimizing backtracking depends on choosing the tunnel entrance closest to the baggage claim core (not the curb loop) and, once inside Terminal 2, heading immediately to the central atrium vertical circulation rather than wandering along the lower-level curb doors.
Where is the closest seating cluster to Terminal 1 Gate A1–A3 with visible power outlets, and what is the walking distance from that cluster to the gates?
The closest reliable seating cluster with visible power outlets near Gates A1–A3 is the seating area by the Starbucks near Gate A3. This cluster sits immediately along the main concourse spine adjacent to the Gate A3 holdroom, making it the highest-value “plug-in” node in the A1–A3 area. From that Starbucks seating cluster, the walk is about 200–250 feet (60–75 meters) back toward Gate A1, and roughly 0–100 feet (0–30 meters) to reach the Gate A3 boarding area, depending on where you’re seated within the cluster.
At Terminal 1, what is the exact location of the nearest restrooms to the TSA checkpoint exit, and what is the walking distance to them (post-security)?
The nearest post-security restrooms at Raleigh–Durham International Airport Terminal 1 are located immediately after the TSA exit along the perimeter wall beside the first retail/newsstand cluster, before you reach the Gate A1 holdroom area. After you step out of the TSA lanes and enter the recomposure area, angle toward the initial shops (news/gifts) and you’ll hit the restroom entrance on that same edge of the concourse. The walking distance is under 100 feet (about 30 meters) from the TSA repacking benches.
At Terminal 1, what is the shortest path from Gate A5 to the nearest food counter, and what is the walk time at normal passenger flow?
Walking from Gate A5 to the nearest food counter takes less than 1 minute because Gate A5 sits in the central dining cluster. From the Gate A5 holdroom, step out to the main concourse and head into the immediately adjacent atrium where the primary counters (including Char-Grill, Salsarita’s Fresh Cantina, and Raleigh Beer Garden) are visible from the gate area. The shortest path is essentially a direct line across the concourse to the nearest open counter window, with no turns beyond orienting toward the central food court frontage.
Archive Raleigh Durham International Airport Terminal 1 Map
Below are all historical map versions for Raleigh Durham International Airport. Each year includes the official map available for that period, presented as both WebP and PDF.
2022 Raleigh Durham International Airport Terminal 1 Map
2014 Raleigh Durham International Airport Terminal 1 Map