Philadelphia International Airport Terminal F Map (Most Up-To-Date)
Terminal F at Philadelphia’s main airport complex is a semi-detached, trident-shaped regional terminal: one central atrium (“hub”) with three short concourse arms radiating to the highest-numbered gates. The secure-side decision point is concentrated at the hub near Gate F10, where the airside shuttle and main wayfinding converge. A long, enclosed connector links F to Terminal E airside, while the landside building sits apart, connected by a pedestrian bridge.
Map Table
| Zone | Connection | Walk Time |
|---|---|---|
| Gate F10 Atrium | Airside shuttle hub | 0 min |
| F–E Connector entrance | Terminal E/D walk path | 1–2 min |
| Gate F39 end | Farthest spoke tip | 3–5 min |
| Pedestrian bridge doors | Landside baggage/ticketing | 2–4 min |
Philadelphia International Airport Terminal F Map Strategy
- Treat Terminal F as a semi-detached satellite: decide early between the Gate F10 airside shuttle and the F–E walking connector so you don’t burn time second-guessing mid-transfer.
- Anchor every transfer to specific nodes: Gate F10 for boarding, Gate A1 for A/B access, Gate C16 for C/D access, and the F–E connector entrance near the hub for E/D walks.
- Protect the secure boundary: never follow “Exit/Baggage Claim” flow or cross the Terminal F pedestrian bridge unless you’re done airside, because that’s the point that forces re-clearing TSA.
- Build a failure-proof fallback: if Terminal F screening is closed or constrained, route landside to another terminal’s checkpoint first, then stay airside and use the shuttle/connector from the correct gate-level nodes.
2026 Philadelphia International Airport Terminal F Map + Printable PDF
Terminal F’s core layout in 2026 still revolves around the central Gate F10 atrium (food hub + shuttle queue), with the airside shuttle feeding Gate A1 (A/B side) and Gate C16 (C/D side). The F–E connector remains the walkable airside link toward E/D. Connection planning still needs a backup for times when Terminal F security is limited, forcing screening in another terminal.
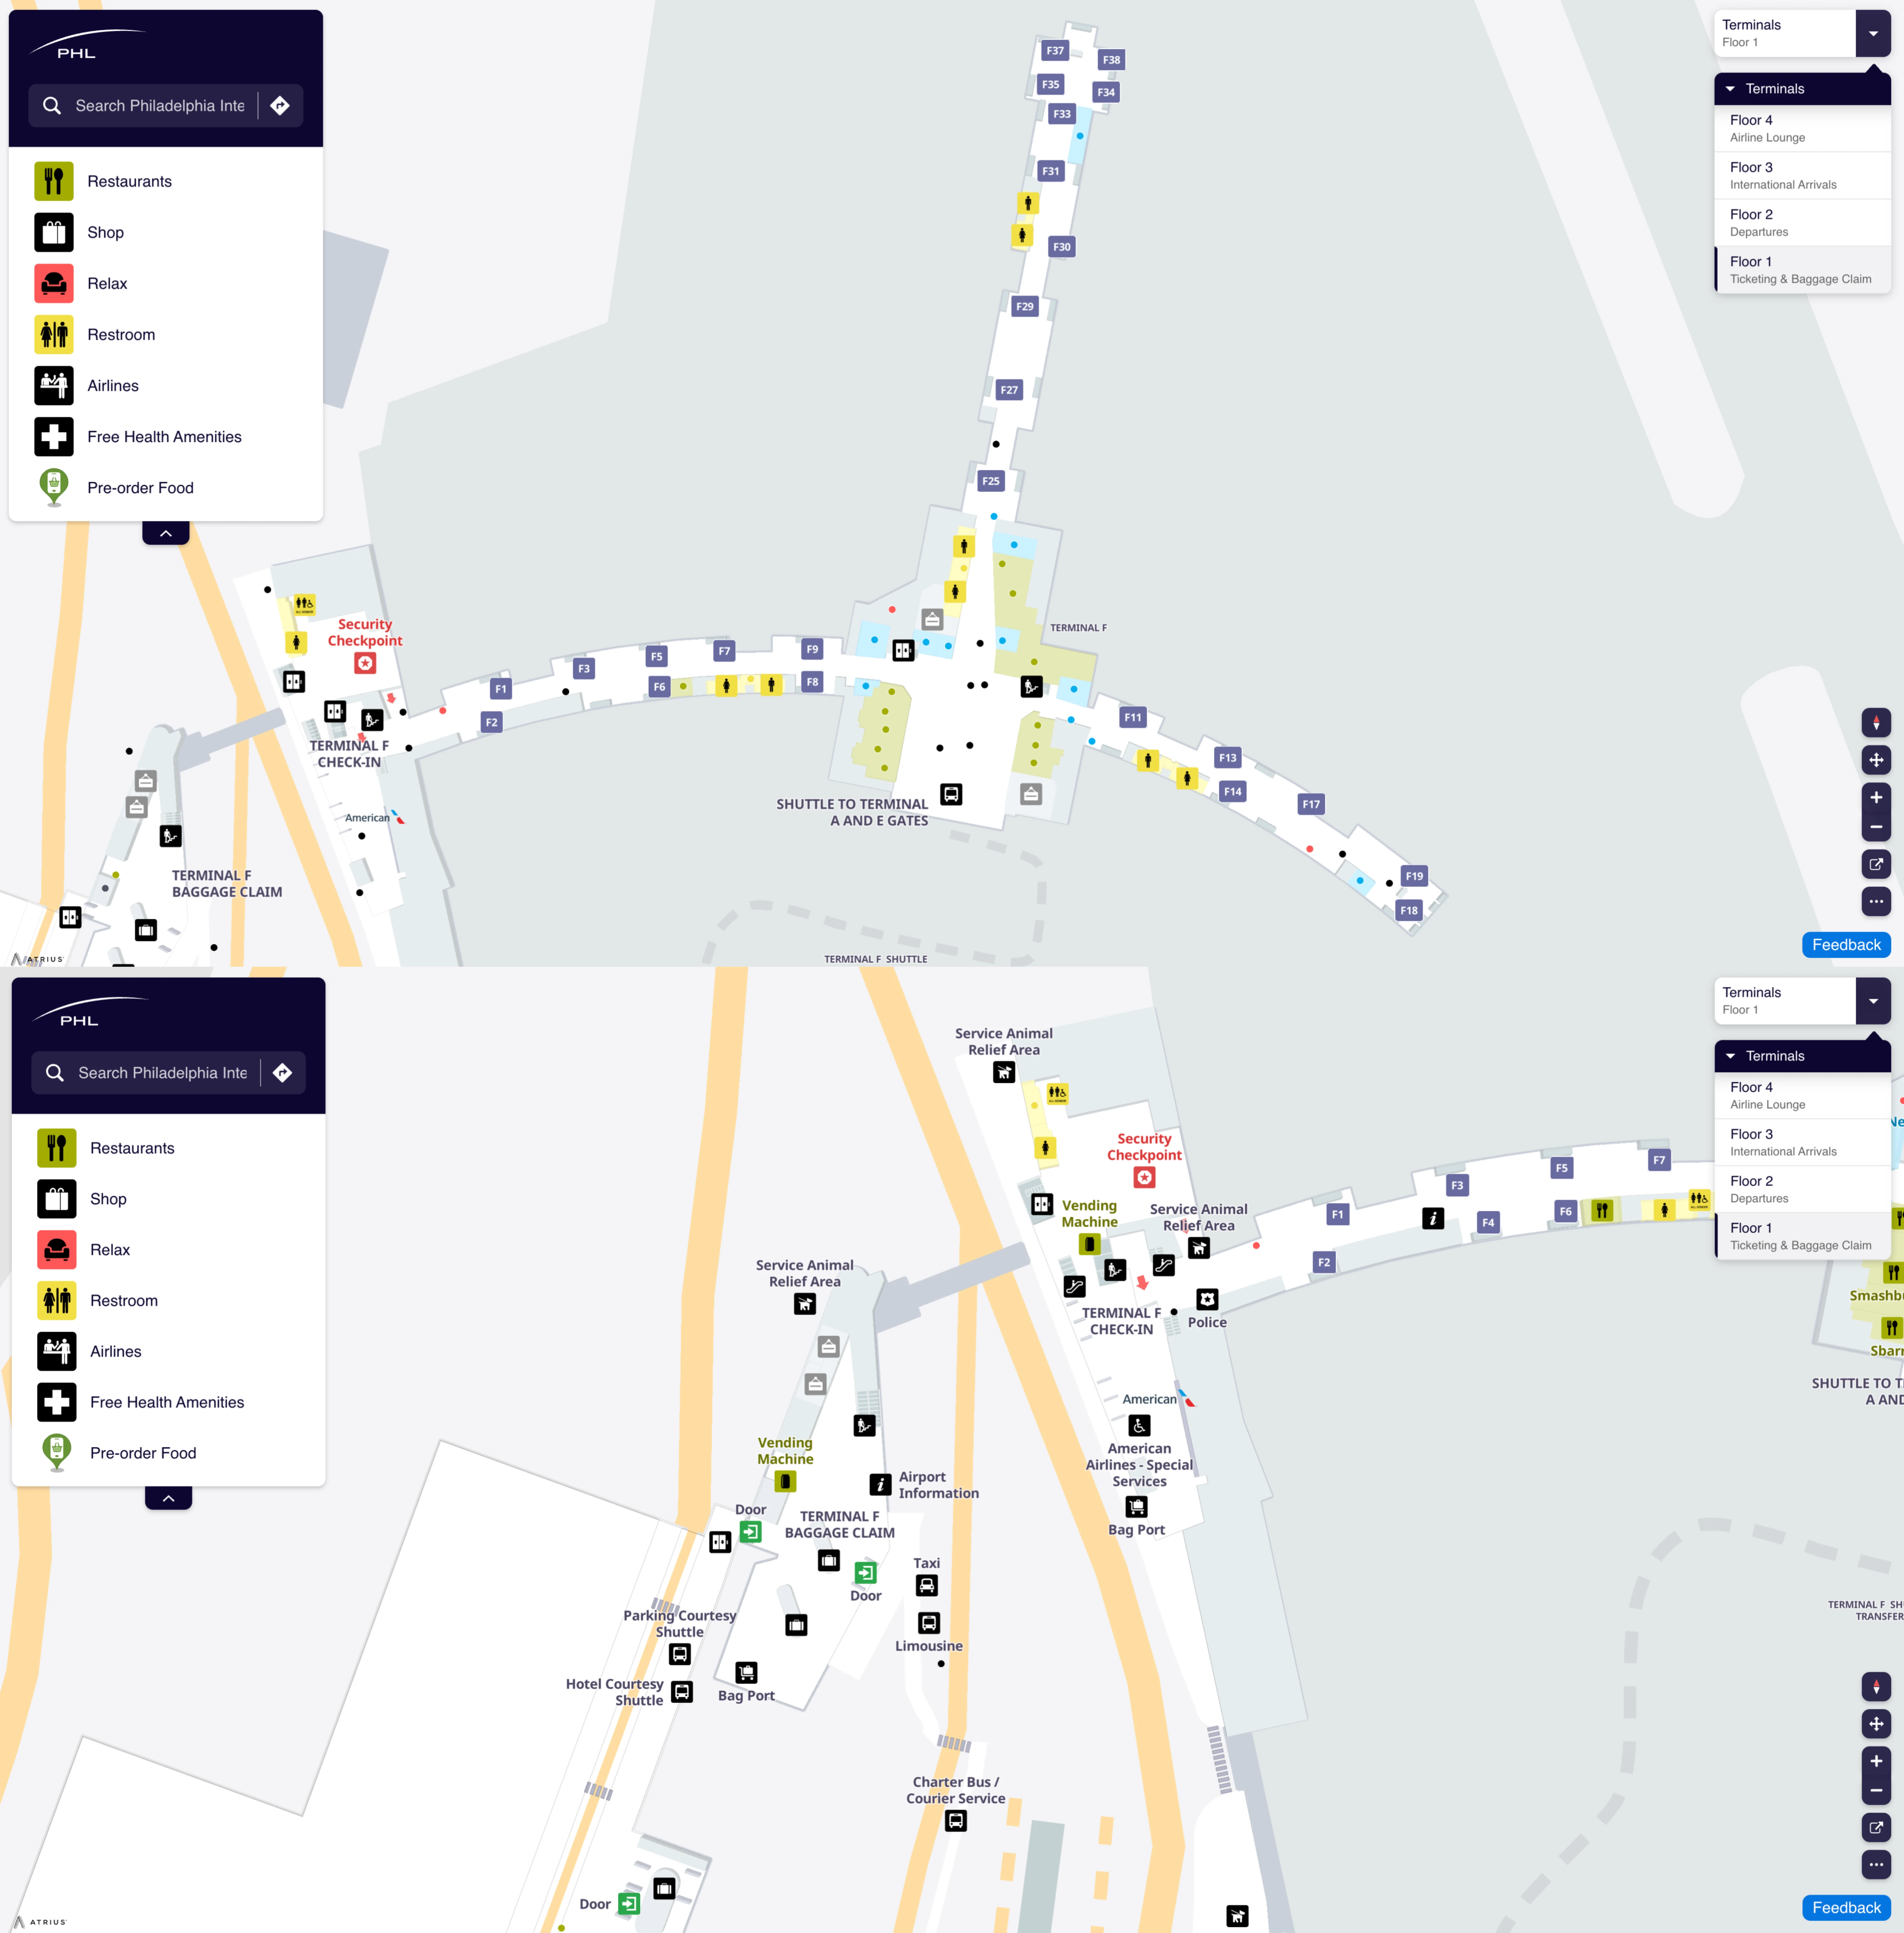
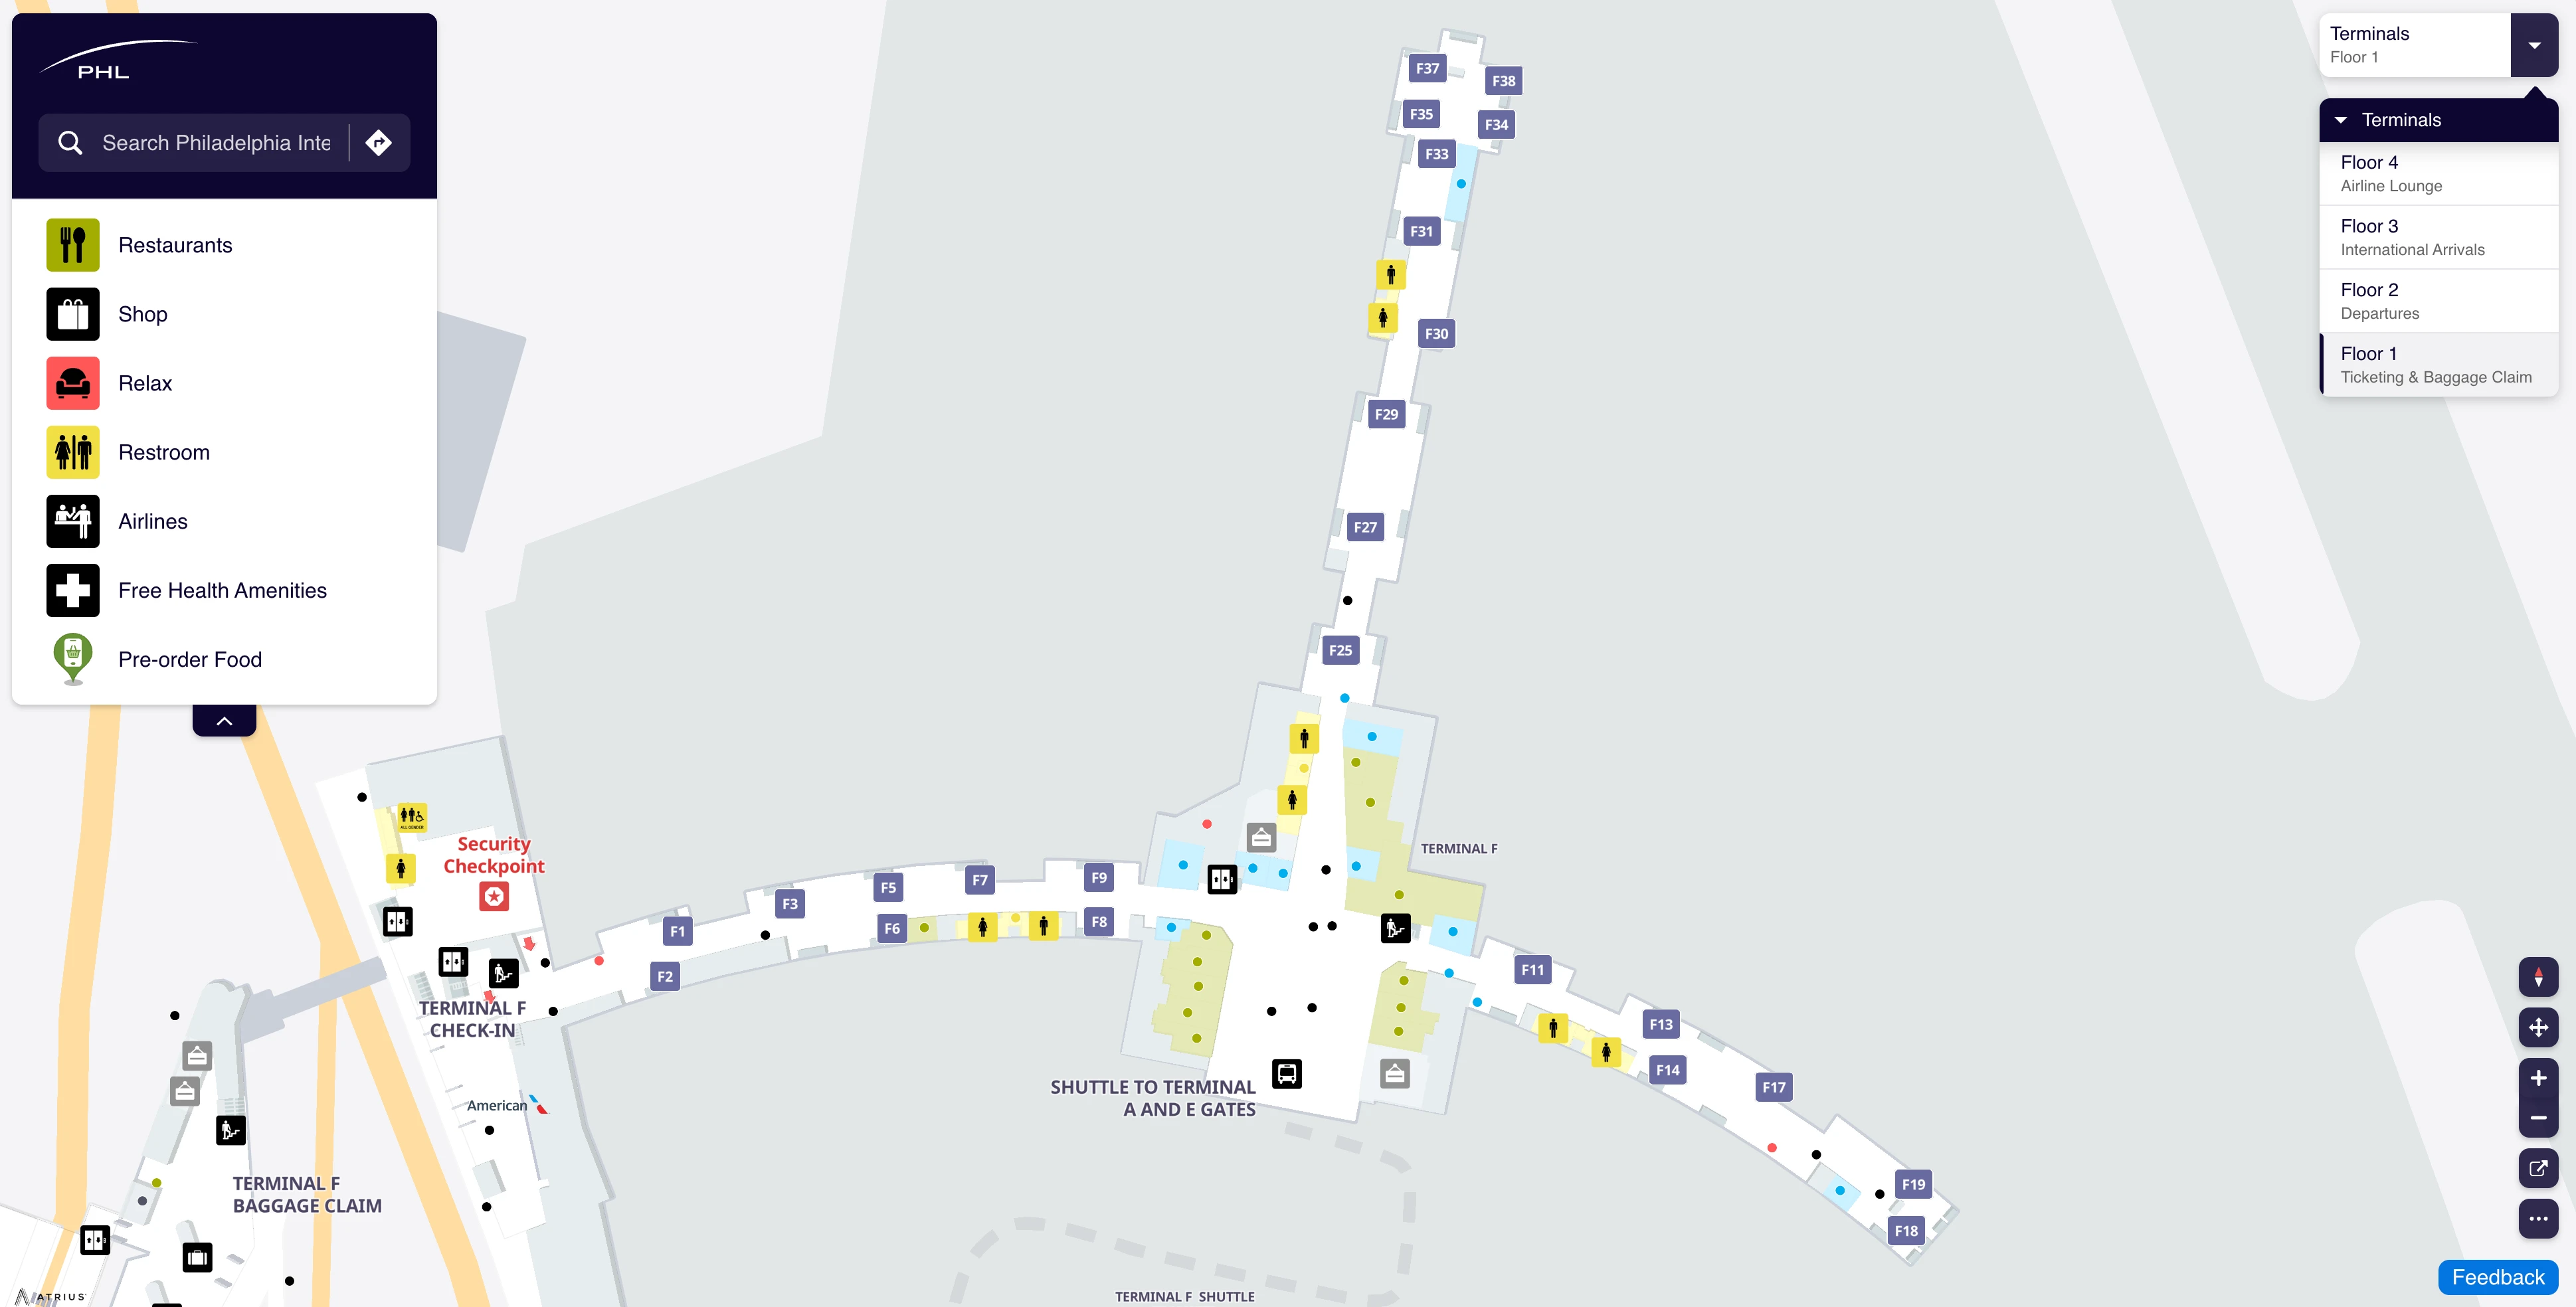
Philadelphia International Airport Terminal F Level 1 Departures Map 2025
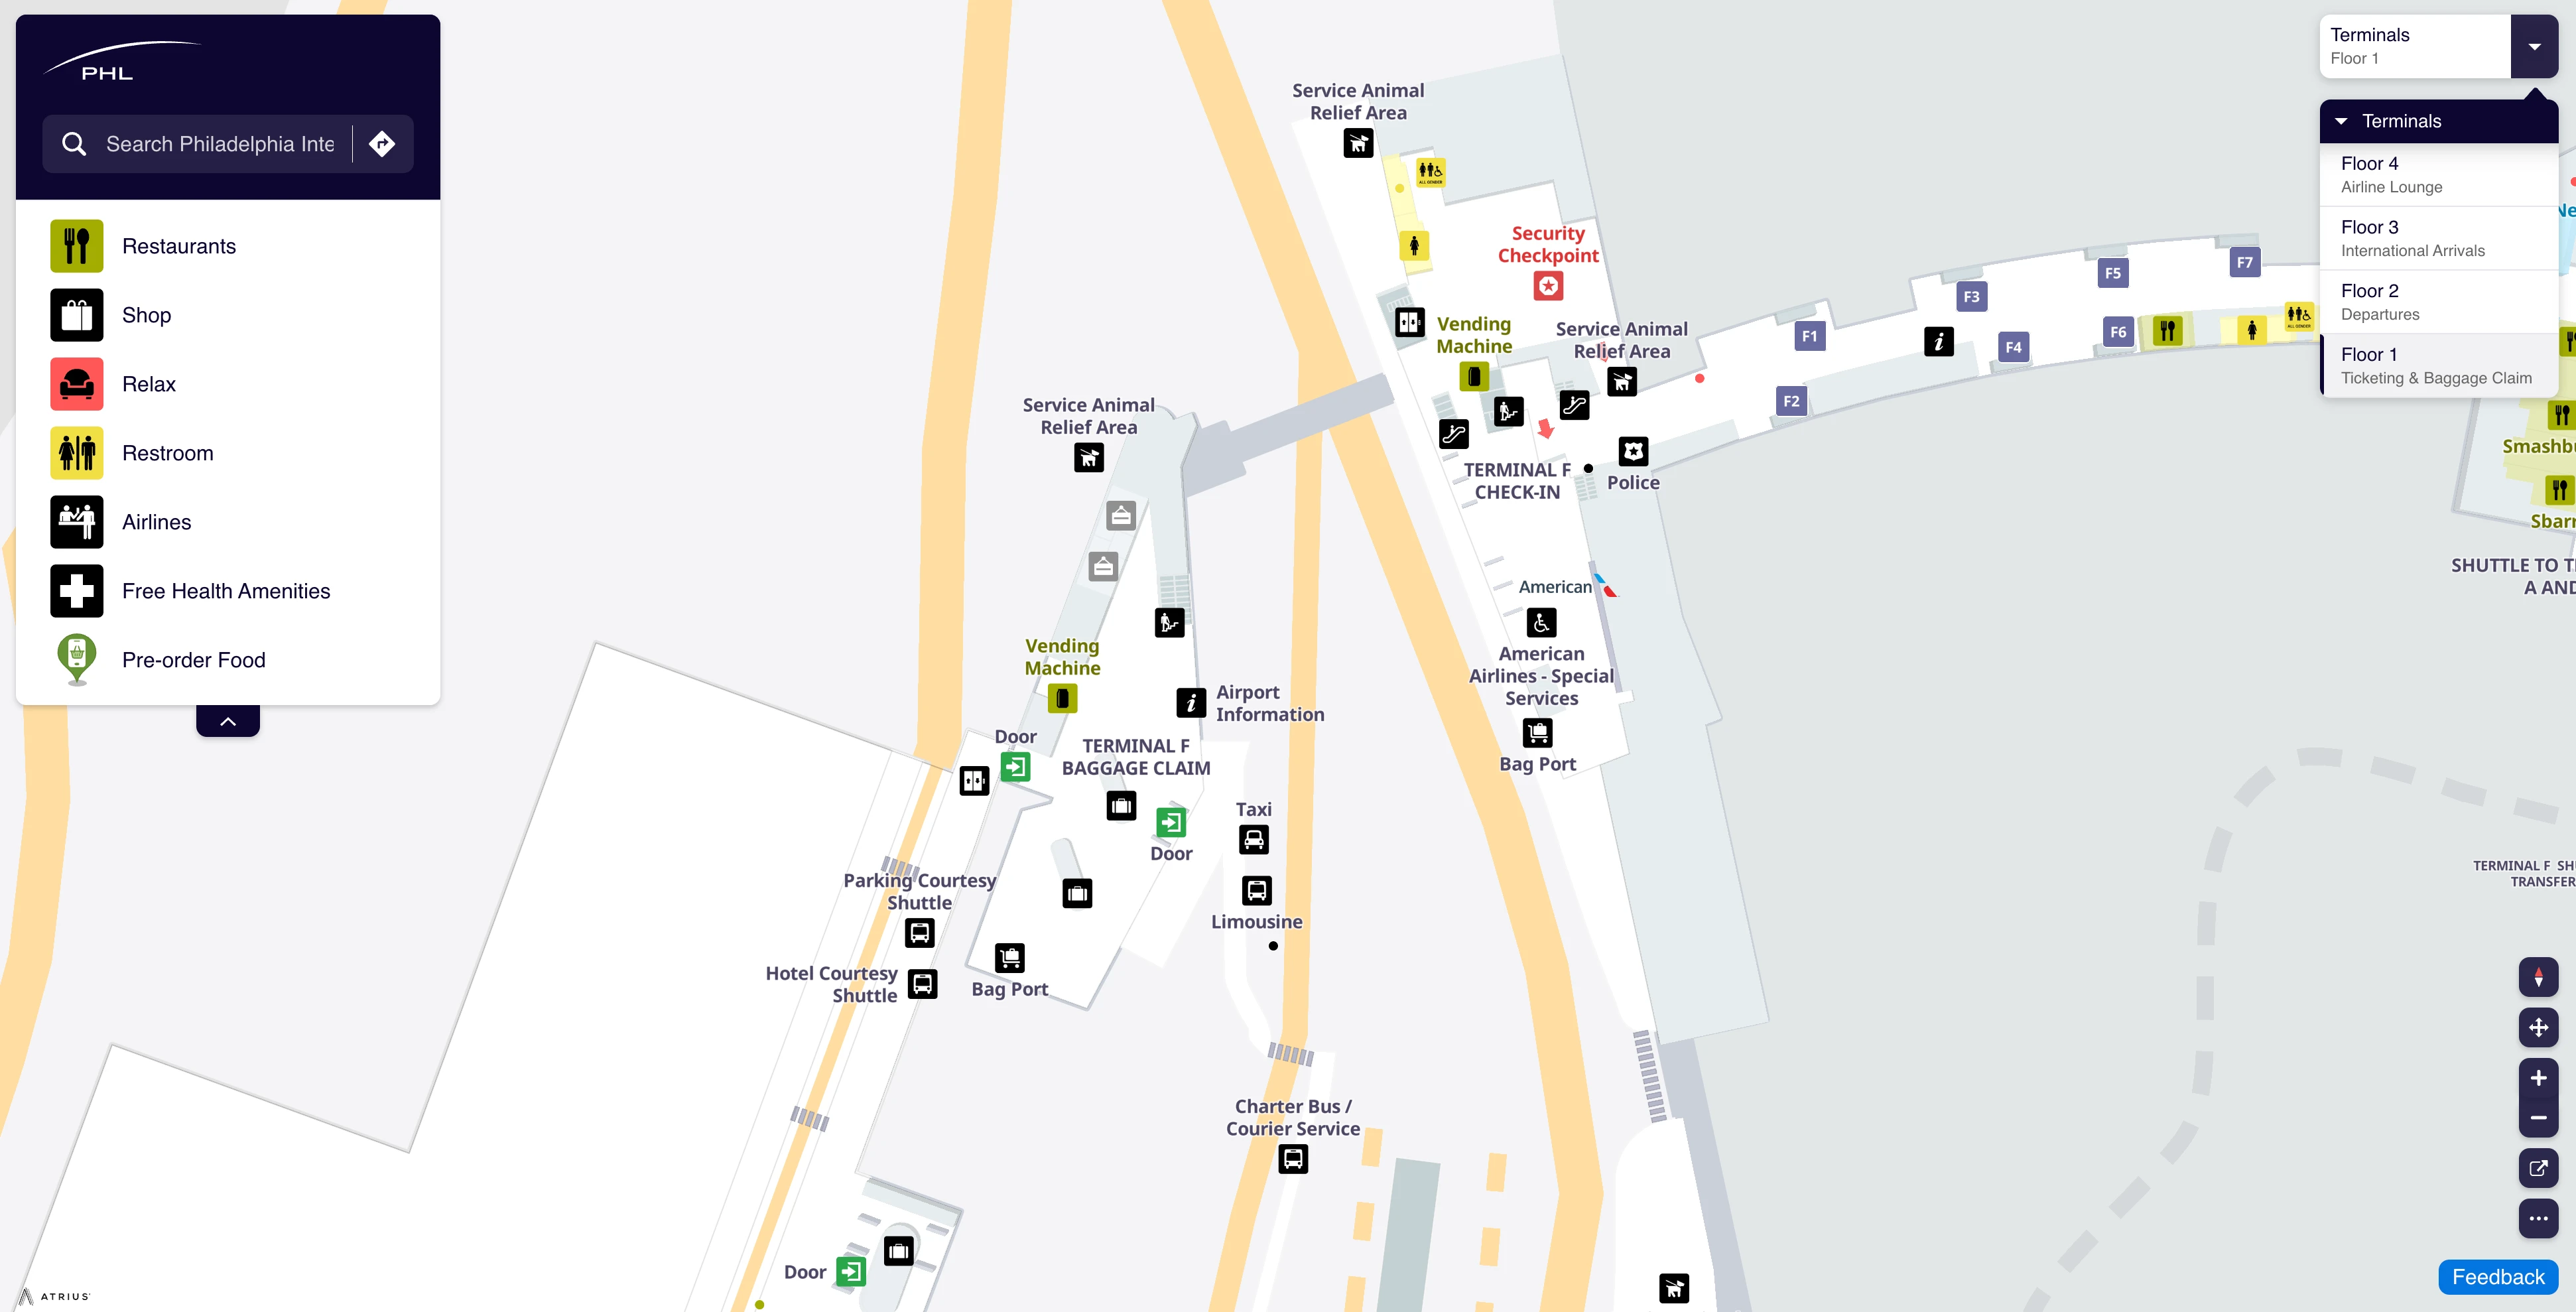
Philadelphia International Airport Terminal F Level 1 Ticketing and Baggage Claim Map 2025
Philadelphia International Airport Terminal F Map Guide
What is the exact airside route from Terminal F gates to Terminal A-East, including the specific connector/shuttle decision point on the map?
The airside shuttle from Gate F10 to Gate A1 is the exact route that reliably gets you from Terminal F to Terminal A-East without re-clearing TSA. The key decision point happens at the Terminal F hub: choose the shuttle doors/queue at the Gate F10 atrium instead of committing to the long, fully-airside walk through E/D/C/B.
Use this node order on the map: start at your F gate → walk to the central atrium at Gate F10 (food hub) → follow “Shuttle Bus” signs to the airside boarding doors beside the atrium → ride the secure shuttle → exit at Gate A1. Gate A1 is the seam between Terminal A-East and Terminal B; turn into A-East from that connector node and continue to your A-East gate.
Where is the Terminal F airside shuttle boarding location (exact landmark/gate-area) shown on the terminal map?
The Terminal F airside shuttle boards at the Gate F10 area in the central atrium. The boarding doors and queue sit right off the food hub where the three concourse arms meet, making F10 the fastest, most reliable “shuttle target” from any F gate.
From any gate in Terminal F, route inward to the circular food-court atrium and aim for Gate F10 signage. The shuttle entry is beside the atrium’s main open seating cluster and near the central information/wayfinding zone, not out at the end of a spoke. If you reach the quiet corridor toward the F–E connector or the one-way flow toward the pedestrian bridge to baggage claim, you’ve gone past the shuttle decision area—turn back to the atrium.
What is the exact walking distance (map-measured) from the Terminal F hub area to the nearest walkable connector toward Terminal E/D?
The Terminal F hub to the Terminal E entry via the F–E connector is about 0.25 miles (about 400 meters). That distance runs from the Gate F10 hub area into the connector and out to the first Terminal E gate-area node near Gate E1.
On the map, treat this as a straight, airside-only corridor move: start at the central atrium (Gate F10) → walk toward the connector entrance near the hub/security-side edge → stay in the enclosed connector corridor the entire way → emerge into Terminal E near Gate E1. The connector can feel “like an exit” because it’s long and quiet, but the re-clear risk only happens if you leave the concourse level and follow arrivals/exit signage down toward baggage claim.
Where does the Terminal F airside shuttle drop off on the A/B-side (exact gate/connector node on the map)?
The Terminal F airside shuttle drops off at Gate A1. Gate A1 is the connector node at the seam between Terminal A-East and Terminal B, so it functions as the A/B-side distribution point.
After you get off at A1, your direction choice is the map’s real “decision point”: turn toward Terminal A-East to reach A-East gates, or head the other way into Terminal B. For Terminal A-West gates, continue airside through the A-East corridor toward the west end; this is a longer walk than reaching A-East itself, but it still stays inside security the entire time.
Where is the precise “you must re-clear TSA” boundary if someone tries to walk from D/E into F the wrong way (exact checkpoint/door line on the map)?
The “must re-clear TSA” boundary is the one-way exit from the secure concourse level to landside baggage claim—most notably the Terminal F pedestrian bridge exit doors that lead into the detached ticketing/baggage building. Airside walking between D/E and F does not have a TSA re-clear point as long as you stay on the gate/concourse level.
On the map, the no-go line is any route labeled as Exit/Arrivals/Baggage Claim that takes you off the airside connector path. From the D/E side, the equivalent trap is following the one-way doors/ramps down into the baggage halls; once you pass those exit doors, you’re landside and cannot return to the F shuttle/connector without going back through a checkpoint. The safe path keeps you on the concourse level: D/E connector → Terminal E gate level → F–E connector → Terminal F hub.
What is the exact walking time/distance from the Terminal F security checkpoint to Gate F39 (farthest-gate validation)?
Walking takes about 3–5 minutes, covering roughly 350–400 meters from the Terminal F security checkpoint to Gate F39. The route is short because Terminal F is a compact regional “hub-and-spoke” concourse rather than a long mainline pier.
From the checkpoint exit, follow the main flow across the short interior span into the central hub area, then continue down the F24–F39 spoke to the highest-numbered gates. The most useful map anchor is the central atrium zone (Gate F10): if you can see the food hub, you’re on the correct spine, and Gate F39 is simply the far end of the highest-numbered arm beyond the mid-spoke landmarks like Gate F25.
Where is the Terminal C airside shuttle stop to Terminal F located (exact gate-area/landmark on the map)?
The Terminal C airside shuttle stop to Terminal F is at Gate C16. This stop sits in the connector corridor between Terminal C and Terminal D, making it the central complex’s secure-side boarding node.
On the map, route to the C/D connector and look for Gate C16 signage rather than trying to find a “Terminal F” stop deeper in C. The landmark logic is simple: if you’re in the transition hallway that feeds both Terminal C and Terminal D, you’re in the right place; the shuttle boarding area is positioned there so passengers can distribute to either side immediately after arriving or departing.
What is the shortest airside path from Terminal F to the B/C connector, and what is the map-measured distance?
Shuttling from Gate F10 to Gate C16, then walking west into the B/C connector (B/C Marketplace) is the shortest airside path. The map-measured all-walking distance from Terminal F to the B/C connector is about 0.65 miles (1.0 km).
| Option | Map node order | Map-measured distance |
|---|---|---|
| Shortest airside path (fastest) | F gates → Gate F10 atrium → shuttle → Gate C16 → walk through Terminal C → B/C connector (B/C Marketplace) | Shuttle segment (tarmac) + short walk from C16 |
| Walk-only (no shuttle) | F hub → F–E connector → Gate E1 → D/E connector → Terminal D → C/D connector → Terminal C → B/C connector | ~0.65 miles (1.0 km) |
Where is the Terminal F landside entrance from curbside/drop-off (exact door/level) on the terminal diagram?
The Terminal F landside entrance is through the Level 1 (ground-level) automatic doors of the detached ticketing/baggage building. Unlike the multi-level curb patterns common in other terminals, Terminal F’s public-facing entry and processing stack are centered on that ground-level lobby.
From the curb/drop-off area outside the Terminal F landside building, enter the glass doors directly into the ticketing hall. Ticket counters and the security checkpoint are inside this same structure, and the post-screening path continues across the enclosed pedestrian bridge to the airside hub. If you find yourself following “Arrivals/Baggage Claim” flow away from the ticketing lobby, you’re on the wrong side for departures—turn back toward ticketing and TSA.
What is the exact map route from rideshare/ground transport pickup to Terminal F ticketing/security (single continuous path, no assumptions)?
Entering Terminal F via the Level 1 landside doors and walking straight through the detached lobby to the TSA checkpoint is the continuous, assumption-free route from rideshare/ground transport pickup to security. The route stays entirely landside until screening, then crosses the pedestrian bridge to the gates.
From the pickup zone on Commercial Road/Arrivals Road, walk to the Terminal F landside building entrance and go through the ground-level glass automatic doors. Continue inside past the baggage claim hall area toward the ticketing counters, then follow airport signs for “Security/TSA” to the checkpoint within the same building (often reached via a short interior ramp/grade change). After clearing TSA, continue forward onto the enclosed pedestrian bridge that delivers you directly into the Terminal F airside hub near the central atrium.
Where is baggage services / airline baggage office for Terminal F located (exact position relative to baggage claim carousels on the map)?
The Terminal F baggage services office sits inside the Terminal F baggage claim hall on the same level as the carousels, positioned along the perimeter wall immediately beside the carousel area. It’s the counter travelers use for delayed/damaged bags right after they step off the pedestrian bridge into baggage claim.
On the map, route to Terminal F Baggage Claim, then look for the small airline-service counter zone that faces the carousel floor rather than the ticketing counters. The easiest triangulation is carousel floor + exterior curb doors: the baggage office is typically placed between the carousels and the landside exit doors so you can report an issue before leaving the hall.
Which baggage claim carousel zone(s) correspond to Terminal F arrivals on the official terminal/baggage map?
Terminal F arrivals use the dedicated Terminal F baggage claim carousels inside the Terminal F landside (ticketing/baggage) building. Bags for flights arriving at F do not get routed to the A–E baggage halls as a default; they are delivered into F’s own baggage claim space.
The map logic to avoid confusion is: follow “Baggage Claim” from the F gates → pass through the exit flow into the pedestrian bridge → arrive in the Terminal F baggage claim hall with its own carousel bank. Ground-transport signage can still point you toward different curb zones (some transit pickups reference Terminal E zones), but that doesn’t change where Terminal F baggage is delivered: the F baggage claim carousel area.
Where is the closest restroom to the highest-numbered F gates (exact between-gates placement on the map)?
The closest restroom to the highest-numbered F gates is placed mid-spoke near the Gate F30/F32 area. That between-gates restroom node is positioned so passengers at the far end (up to Gate F39) don’t need to backtrack all the way to the central atrium.
From the F24–F39 concourse arm, walk back only a short distance from the highest-numbered gates until you reach the clustered gate-number zone around F30–F32, where the restroom icon typically appears on the map. If you reach the central hub food court at Gate F10, you’ve gone too far; the “deep gates” restroom is meant to serve the far concourse without pulling people into the atrium crowd.
Where are the largest seating clusters in Terminal F (map-verified) that reduce “nowhere to sit near the gate” crowding risk?
The largest seating clusters are in the central atrium food hub around Gate F10. That open rotunda area functions as Terminal F’s overflow waiting room because it has the densest concentration of tables, chairs, and open floor space compared with the smaller seating pods at individual gates.
If your gate area is standing-room-only, the most reliable map-based move is to walk inward to the Gate F10 hub and stage there until boarding. A secondary “quieter” seating fallback is near the base of the concourse by Gate F1, close to the F–E connector side, which tends to be less congested because it’s away from the food hub and shuttle queue.
Where is the Mamava nursing pod / family area located in Terminal F (exact gate range/landmark on the map)?
The Mamava nursing pod is located airside near Gate F25, positioned behind the Terminal F information desk. That places it on the F24–F39 concourse arm, roughly mid-spoke, instead of back in the crowded central atrium.
On the map, route from the Gate F10 hub down the high-numbered concourse toward Gates F24–F39 until you reach the Gate F25 landmark area, then look for the nursing/family icon near the information desk. This placement is intentionally convenient for travelers headed to the far gates (F30–F39) because it avoids a full return walk to the hub.
Where are the primary concessions/food nodes in Terminal F (exactly which gate zone they sit in), so a traveler can route there without backtracking?
The primary concessions cluster sits in the central food hub at the Gate F10 atrium zone. That hub is the only dense, all-in-one node where Terminal F’s concourse arms converge, so it’s the place to route for food without guessing which spoke has what.
Use the map as a “backtrack limiter”: if you’re heading toward Gates F1–F9, F15–F23, or F24–F39, grab food at the F10 atrium before you commit down the arm. The ends of the spokes are designed mainly for gate seating and boarding, not for a full concession lineup, so relying on “maybe there’s something near my gate” is what causes the wasted out-and-back walk.
What is the map-verified minimum walk distance from the Terminal F shuttle arrival point to the farthest F gates, to estimate worst-case connection risk after the bus?
Walking from the shuttle arrival area at the Terminal F hub (Gate F10) to the farthest gates (up to Gate F39) is roughly 350–400 meters, about a 3–5 minute walk. That makes the post-bus “worst-case” inside Terminal F relatively low-risk compared with the transfer itself.
After the shuttle drops you at the F hub area, the map path is simple: orient to the Gate F10 atrium → take the F24–F39 concourse arm → continue to the highest-numbered gates at the end of the spoke. The only meaningful variability is crowding at the hub; the physical distance stays compact because Terminal F’s trident layout keeps all spokes short.
What is the exact map route that keeps a traveler fully airside from Terminal F to Terminal E/D (no accidental exits), including each connector node in order?
Walking via the F–E connector keeps you fully airside from Terminal F to Terminal E/D with no TSA re-clear, as long as you stay on the concourse (gate) level and ignore any “Exit/Baggage Claim” downward routes. The safe route is a continuous secure corridor move from the F hub into E, then onward through the E/D connector.
Follow this node order on the map: Terminal F hub (Gate F10 area) → enter the F–E connector corridor near the hub/security-side edge → stay in the enclosed connector until you emerge into Terminal E near Gate E1 → remain on the secure side as you pass the Terminal E checkpoint area (do not go down to arrivals) → enter the D/E connector → continue into Terminal D gate level. The failure mode is leaving the concourse level through one-way exit doors or ramps to baggage claim; once you do that, you’re landside and must re-clear TSA to get back.