Palma de Mallorca Airport Map (Most Up-To-Date)
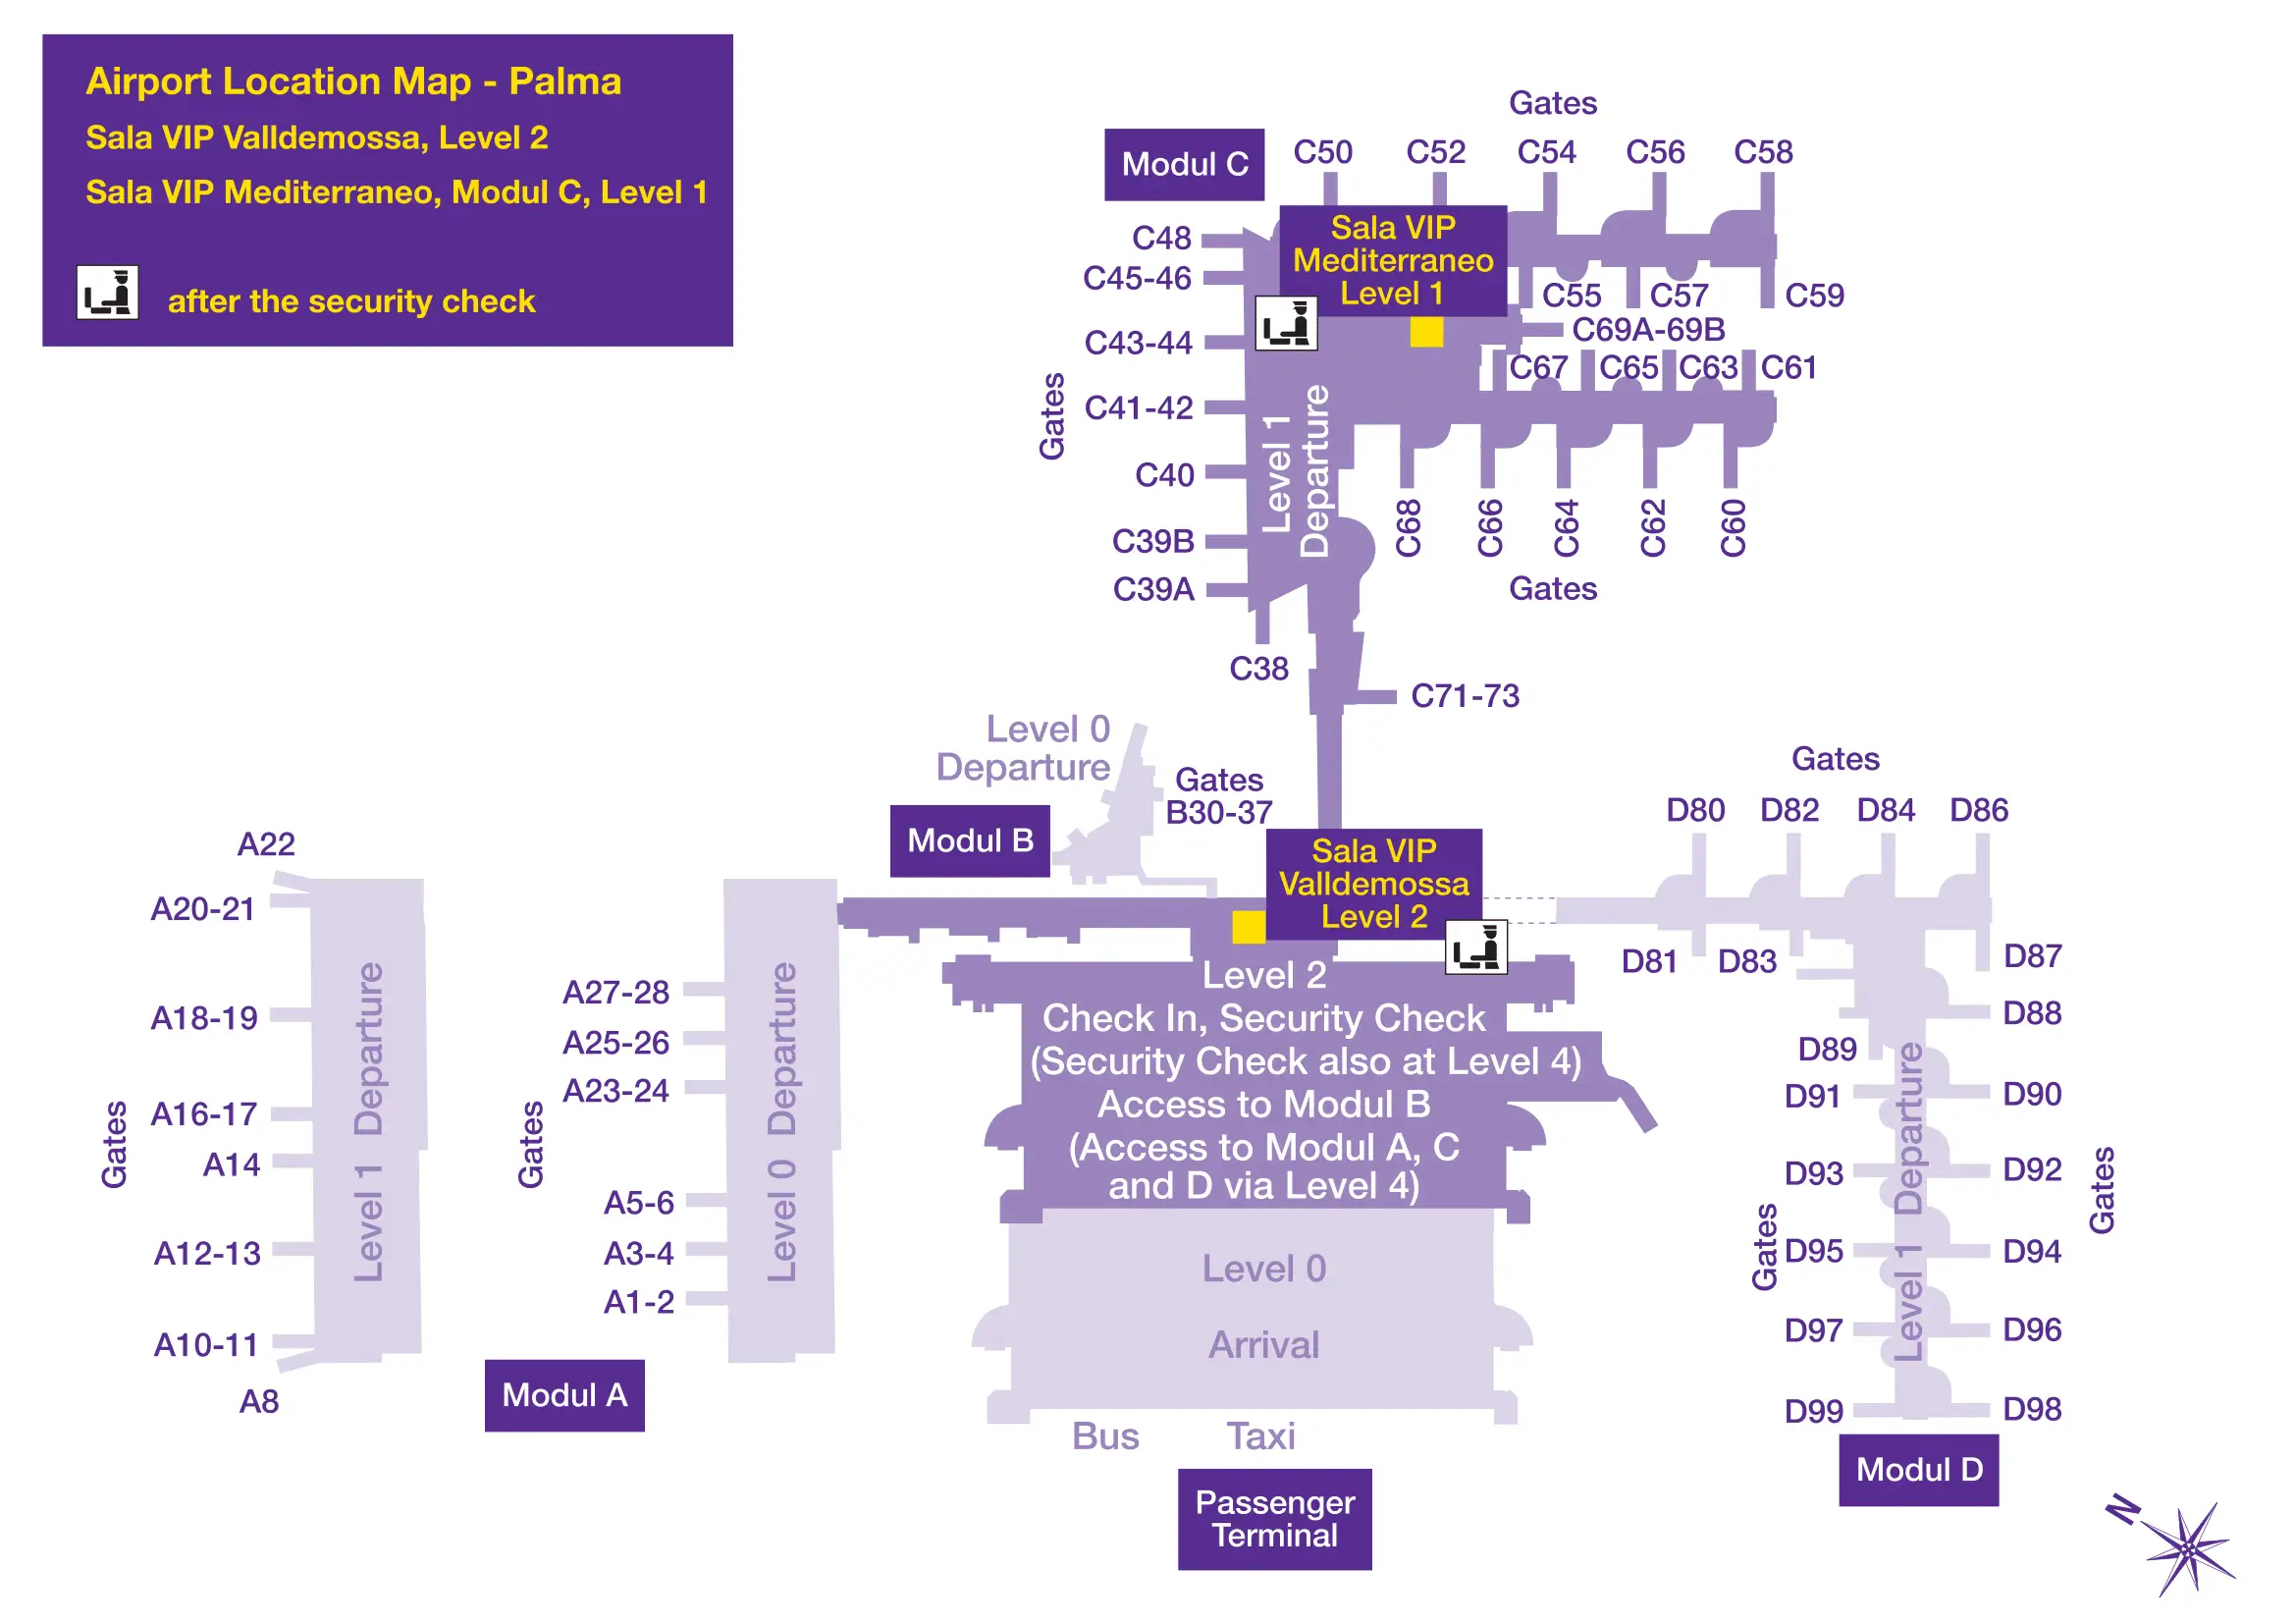
Palma de Mallorca Airport uses a single-terminal “hub + spokes” layout within Mallorca’s main airport complex, with one central processing building feeding long walking piers to Modules A/B/C (Module D closed). The airside journey runs up-and-out: security on Level 2, then escalators to Level 4, a forced Duty Free maze, and a high-stakes split where Module A branches left to passport control while Modules B/C continue straight/right.
Map Table
| Terminal | Key Airlines | Primary Function | Transfer Mode |
|---|---|---|---|
| Single terminal hub | Ryanair, easyJet, Jet2, Vueling | Check-in, security, Duty Free core | Vertical (L2→L4), escalators |
| Module A (Blue) | Jet2, easyJet, Ryanair, TUI | Non-Schengen, UK/third-country | Walk-only, passport control |
| Module B (Green) | Air Nostrum, regional operators | Short-haul, inter-island | Walk-only, ramp to tarmac |
| Module C (Purple) | Eurowings, Condor, Lufthansa Group, Vueling | Schengen high-volume gates | Walk-only, segmented travelators |
Palma de Mallorca Airport Map Strategy
- Anchor your timeline to the Level 4 distribution hall right after Duty Free; that’s the irreversible split where a wrong turn becomes a 15–25 minute recovery walk.
- Treat Module A as a one-way commit: passport control is the hard boundary, so use lounges/food in the main core before you cross.
- Budget walking like a gate-to-gate hike: far Module C gates can approach a kilometer from the central core, and Module A adds a long pier after passport control.
- Solve landside stress with fixed landmarks: Arrivals Door 4 for taxis and the central bus station, plus the “P Parking / Car Rental” approach and right-side ramp for rental returns.
2026 Palma de Mallorca Airport Map + Printable PDF
Security remains on Level 2 with the “airside climb” back up to Level 4 before you even reach the Duty Free exit and module split. Module D stays out of play during renovation, pushing more traffic into Module C corridors. For UK/non-Schengen departures, biometric EES processing at Module A passport control is the time wildcard that the map helps you plan around.
2026 Palma de Mallorca Airport Map Guide
What is the exact walking distance (in meters) from the main Security exit to the entrance of Passport Control for Module A?
Walking distance is approximately 650 meters from the main Security exit to the Module A Passport Control entrance.
That span includes three distinct segments anchored by fixed waypoints: the exit from Security on Level 2, the escalators up to Level 4, and the forced route through the Duty Free retail maze before you reach the Level 4 distribution hall and the blue-signed turn toward Module A. The Passport Control bank sits at the Module A threshold, so the final approach is along the north-bound connector after the Duty Free exit.
What is the exact walking distance (in meters) from Duty Free (post-security retail core) to the first gate cluster in Module A?
Walking distance is approximately 400 meters from the Duty Free retail core to the first Module A gate cluster (A1–A5).
The route starts at the Duty Free exit into the Level 4 distribution hall, then follows the blue-signed left/north branch toward Module A. Passport Control is the physical boundary at the Module A entrance; after clearing it, the first gates arrive shortly into the pier. A practical breakdown is about 300 meters from Duty Free exit to Passport Control, then about 100 meters from Passport Control to the first gates.
Where is the first irreversible decision point (the “wrong turn”) after Duty Free where you either commit to Module A or stay in Modules B/C/D?
The first irreversible decision point is the Level 4 central distribution hall immediately after you exit the main Duty Free shop.
That exit drops you into the main post-retail corridor where overhead “Boarding Gates” signage switches to color-coded module directions. Turning left/north under the blue “A” signs sends you down the Module A connector toward Passport Control (the hard border), while going straight/right keeps you in the Schengen flow for Modules B (green) and C (purple). Once you proceed down the A corridor to the passport control bank, backtracking to the main core is not a realistic option.
Where is the physical entrance/portal to Module A located relative to the main post-security corridor (e.g., left/right branch at the first split)?
The Module A entrance is on the left-hand (north) branch at the first split immediately after the Duty Free exit.
Exiting Duty Free on Level 4 places you into the central distribution hall; with the main flow continuing straight/right toward the green (Module B) and purple (Module C) directions, Module A is the sharp left turn following blue signage. The actual portal boundary is the Passport Control bank at the start of the Module A corridor, where UK/non-Schengen passengers queue for EES and border checks.
What is the exact walking distance (in meters) from the furthest end of Module A gates to Passport Control (Module A side)?
Walking distance is approximately 450 meters from the furthest end of Module A (for example near gate A28) back to Passport Control on the Module A side.
Passport Control is the fixed threshold at the entrance to the Module A pier, and the pier then runs as a long straight corridor north to the higher-numbered gates. If you’re seated or shopping near the far end, use the gate numbers as your triangulation: the further you move toward the A20s, the more you’re committing to a roughly half-kilometer walk back to the passport desks and the main hub-side junction.
What is the exact walking distance (in meters) from the central food/retail core to the furthest commonly-used gate area in Modules B/C/D?
Walking distance is approximately 1,000 meters from the central food/retail core to the furthest commonly-used gate area in Modules B/C/D, which is the tip of Module C.
The starting anchor is the Level 4 distribution hall just beyond the Duty Free exit where the main food/retail concentration sits; from there, follow the purple-signed corridor toward Module C. The distance compounds because travelators are segmented and congestion increases when gates are reassigned from the closed Module D into Module C. Plan this as a full-length pier walk: the furthest C gates can take 15–20 minutes at normal pace, longer if you get boxed into slow foot traffic.
Where is the Taxi rank pickup point located relative to the Arrivals exit doors (which side/zone of the curb)?
The taxi rank pickup point is curbside on Arrivals Level 0 directly outside Exit Door 4.
Door 4 is the practical landmark because it lines up with the geofenced, authorized taxi queue area rather than the private pickup lane. If you are on the Departures curb (Level 2), you are on the wrong level for taxi pickup: taxis can drop off there, but the legal/managed pickup line operates at Arrivals. Follow “Taxi” signage inside Arrivals toward Door 4 and step straight out to the rank.
Where is the public bus stop area located relative to the Arrivals hall exit (which curbside bay/side of the roadway)?
The public bus stop area is at the centralized bus station directly opposite the Arrivals hall outside Exit Door 4.
After leaving Arrivals via Door 4, use the designated pedestrian crossing to traverse the service road; the bus station is the large covered structure straight ahead. This is not a simple curbside bay on the Departures road—if you are standing on the Level 2 Departures curb looking for a bus, you’re on the wrong floor. The consolidated station is the single injection point for A1/A2 and TIB routes.
Where is the rental car return vehicle entrance located relative to the terminal approach roads (which access road/turnoff)?
The rental car return vehicle entrance is reached from the main airport approach by following “P Parking” and “Car Rental / Rent a Car,” then taking the outside ramp on the right-hand side of the parking building.
The critical landmark is the parking structure opposite the terminal: do not commit to the Arrivals/Departures curbside lanes. As you approach the garage, the correct return path is the right-flank ramp that bypasses the public ticket gates and feeds directly into the rental return decks (typically Levels 0–1 depending on agency). Missing that ramp forces a recirculation through the public short-stay loop.
What is the exact walking distance (in meters) from the rental car return parking/garage pedestrian exit to the Departures check-in hall?
Walking distance is approximately 250 meters from the rental car return garage pedestrian exit to the Departures check-in hall.
The route runs from the garage up to Level 4, across the covered skybridge into the terminal at Level 4, then immediately down to Level 2 for the check-in hall and the relocated security zone. The skybridge landing point is the key triangulation anchor: you arrive “high,” but departures processing happens two floors lower, so elevator/escalator time is part of the real-world walk budget.
Where are the rental car service counters located landside relative to Departures check-in (which end/zone of the hall)?
The rental car service counters are in the Arrivals hall on Level 0 along the back wall of the public landside area.
Relative to Departures check-in on Level 2, this is two floors down and not in the main check-in desk lanes. Use the Arrivals-level door cluster as your anchor: the counters sit behind the public flow near the exit doors rather than upstairs by the airline desks. For returns, the functional handoff is usually the garage “Check & Go” kiosks and key drop, not these landside desks.
Where are the VIP lounges located relative to Passport Control (specifically: are they reachable without crossing passport control, and where is that boundary on the map)?
Most VIP lounges are reachable without crossing Passport Control because they sit in the main Schengen-side airside core or in Module C, with Passport Control forming the hard boundary at the Module A entrance.
Valldemossa VIP Lounge is positioned in the main airside hub area near the Module B/Module C split, so Module A passengers can use it before committing left to the blue corridor. Mediterraneo VIP Lounge is inside Module C on the Schengen side, so it is not usable once you’ve committed to Module A. Llevant VIP Lounge is inside Module A after Passport Control, but it is the only lounge past the border and is not reliable for planning if hours or access are restricted.