Norfolk International Airport Map (Most Up-To-Date)
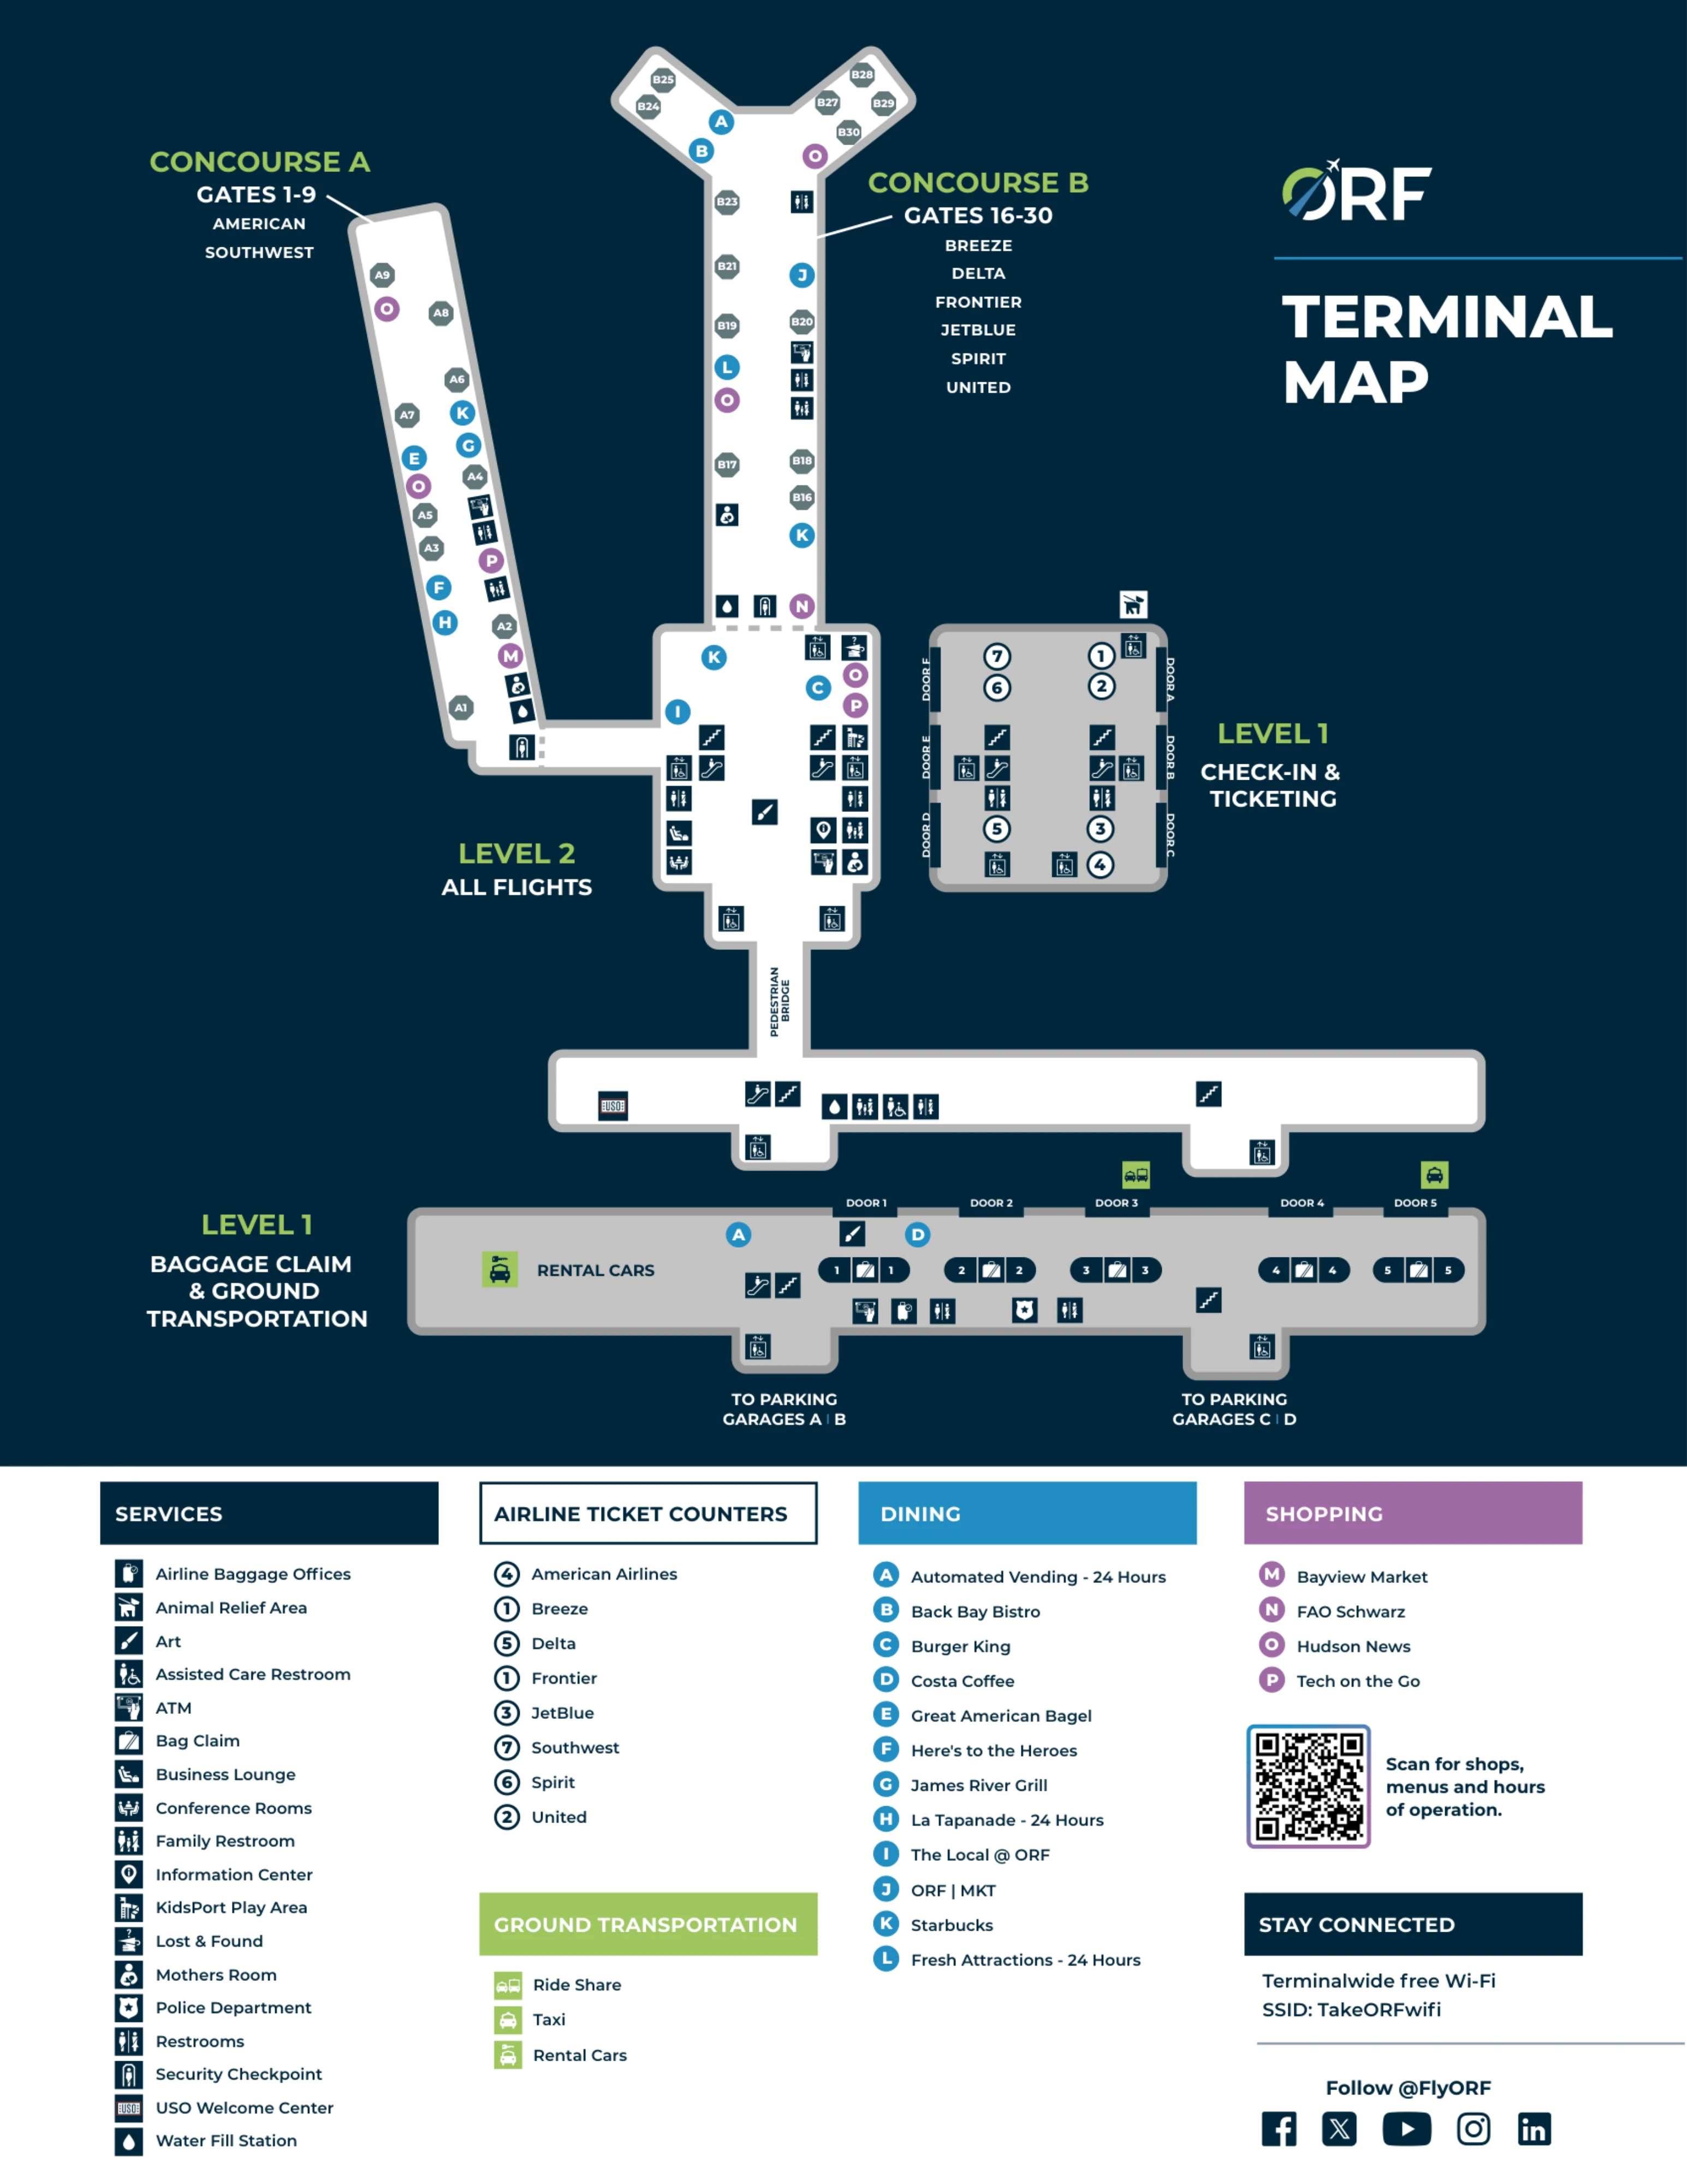
Norfolk International Airport operates as a split-terminal campus within Hampton Roads’ main airport grounds, with Departures in the Main Passenger Terminal and Arrivals/Baggage Claim in a separate Arrivals Terminal across a multi-lane service road. Most pedestrian movement is forced up to Level 2, across the enclosed sky bridge, then back down—especially for parking and rental cars. The layout is compact in distance but high in vertical “up-over-down” friction.
Map Table
| Terminal | Key Airlines | Primary Function | Transfer Mode |
|---|---|---|---|
| Main Passenger Terminal | Delta, American, Southwest, United, Spirit | Ticketing, TSA, gates | Level 2 sky bridge |
| Arrivals Terminal | All arrivals | Baggage claim, pickup curb | Level 2 sky bridge |
| Parking Garages A–D | — | Hourly/daily parking, rental hub | Level 2 sky bridge |
Norfolk International Airport Map Strategy
- Treat the Norview Avenue split as a one-way decision node: commit to Arrivals early for pickups to avoid the full departures-level loop penalty.
- Use map-based curb zoning to escape congestion: plan Door 5 meetups for private pickup and treat the Park & Wait lot as the buffer, not the curb.
- Default to the garage “quick pickup” path when timing is uncertain: Garage A (hourly) plus the Level 2 bridge beats circling when curb lanes are clogged.
- Assume vertical choke points create time variance: elevator/escalator locations and the Level 2 bridge entrance govern exit speed more than raw walking distance.
2026 Norfolk International Airport Map + Printable PDF
Active split-terminal operations remain the defining navigation constraint at Norfolk International Airport in 2026, with most garage, rental, and terminal-to-terminal moves still routed through the Level 2 sky bridge. TransformORF improvements may shift signage, curb rules, or interior routing, so the reliable “bridge-first” mental model stays the safest way to print and navigate the map in 2026.
2026 Norfolk International Airport Map Guide
What is the exact walking route and distance from the most commonly used parking garages (C/D) to the Arrivals/Baggage Claim doors?
Walking takes about 2–5 minutes from Parking Garages C/D to the Arrivals/Baggage Claim doors, routed through the Level 2 pedestrian bridge rather than street level. The usable path is “up to bridge level, across, then down,” because the service roadway and bus/shuttle traffic make a ground crossing impractical.
Start in Garage C or Garage D and follow signs to the Level 2 enclosed walkway/sky bridge connection. Cross the bridge into the Arrivals Terminal on Level 2, then take the nearest elevator/escalator down to Level 1 for Baggage Claim and the numbered Arrivals doors. Garage C is roughly ~360 feet to the Arrivals-side entry point via the bridge; Garage D is typically another ~2–3 minutes farther, depending on where you parked and which stair/elevator bank you hit first.
Where is the Park & Wait (cell phone) lot entrance, and what is the exact drive path from that lot to the Arrivals curb pickup lane (no departures-level detour)?
The Park & Wait lot entrance sits on the inbound, pre-terminal approach just before you fully commit to the terminal loop, so the exit can feed you back into the ground-level Arrivals lanes without forcing an up-ramp to Departures. The critical rule is to leave the lot only when your passenger is standing at a specific Arrivals door.
From Norview Avenue on the airport approach, follow signs for Park & Wait / Cell Phone Lot and enter the lot before the Arrivals/Departures split fully locks you in. When your passenger calls “at the curb,” exit the lot back to the loop road and stay in the ground-level Arrivals stream (do not merge toward the elevated Departures ramp). Continue on the Arrivals frontage road to the numbered Arrivals doors—Door 5 works best as a downstream pickup point when the central curb is clogged.
Where is the ride-hail (Uber/Lyft) pickup zone relative to private passenger pickup, and what is the walking distance from Baggage Claim exit doors to the ride-hail pickup point?
Ride-hail pickup is on the Arrivals curb at the numbered doors, but posted instructions can conflict between Door 3 and Door 5, so the app-designated door is the controlling pickup point. Private passenger pickup uses the same Arrivals curbline, which is why curb congestion and “stagers” create conflict at the central doors.
Most passengers exit Baggage Claim near Doors 2–3, then walk along the curb to the ride-hail door assignment. The typical walk from the main Baggage Claim exit area (Doors 2/3) to Door 5 is about 150–200 feet, roughly 1 minute on foot even with luggage. If the ride-hail zone is operating at Door 3, it is essentially adjacent to the central Baggage Claim exits; if it is pushed to Door 5, the extra short walk usually trades for faster vehicle access because Door 5 sits downstream of the worst curb blockage.
What is the precise indoor path from Baggage Claim to the rental car pickup area in Garage A (Level G) (including which elevators/stairs connect the levels)?
No street-level walk works for rental pickup at Norfolk International Airport, because fencing and the service roadway block a direct ground crossing, so the Level 2 sky bridge is mandatory. Rental cars are in Parking Garage A on Level G, even though the arrivals hall is on Level 1.
From Baggage Claim (Arrivals Terminal, Level 1), go to the nearest elevator or escalator bank and ride up to Level 2, following overhead signs for Parking / Rental Cars. Walk across the enclosed Level 2 sky bridge into Parking Garage A and stay on Garage A’s Level 2 bridge entry area until you reach the garage’s main elevator/stair core. Take that garage elevator (or the adjacent stairwell) down to Level G for rental car pickup. The re-orientation landmark is the bridge entry: once you step off the bridge into Garage A, the correct vertical move is down to Level G.
Where is the TSA checkpoint queue start point, and how far can the line physically extend toward/into garage-connected areas (i.e., what space is actually used for overflow)?
The TSA checkpoint line starts in the Main Passenger Terminal on Level 2 in the open Main Lobby atrium, not in a confined hallway, so overflow uses public lobby circulation space. During early-morning peaks, the queue can push past the stanchions and visually “snake” through the atrium.
From the Level 2 escalators/elevators that rise from ticketing, the TSA entry is in the same Level 2 lobby zone under the main atrium/skylight area. When the line overflows, it can wrap back around lobby fixtures and retail (for example, toward the concessions/newsstand area) and extend in the direction of the Level 2 pedestrian bridge entrance that connects to parking and the Arrivals Terminal. The practical limit is the lobby geometry: once the line reaches the bridge-adjacent circulation zone, queued passengers begin mixing with through-walkers headed to parking, which is the real indicator you’re in “overflow” mode.
Where is the secondary screening / flagged-bag inspection area located, and what is the exact re-entry point back into the outbound passenger flow after inspection?
Secondary screening happens inside the secure TSA footprint at the checkpoint on Level 2, typically at the inspection tables immediately beside the X-ray belt exits. The re-entry point is the same post-checkpoint merge where cleared passengers recombine after the belts, before they continue into the common secure-airside area.
At Norfolk International Airport, the inspection tables sit adjacent to the conveyor/belt lanes so officers can pull bags aside without sending passengers elsewhere. If you are cleared after inspection, you rejoin the outbound flow at the end of the screening lanes—collect belongings, then follow the main corridor into the shared secure area that feeds Concourse A and Concourse B. If you are sent out of the secure area to resolve an issue (for example, to discard an item), the only re-entry is back through the public-side TSA queue start in the Level 2 lobby, which effectively means re-queuing.
What is the walking distance from Delta check-in/bag drop to the TSA entry point, measured along the actual passenger route (not “as the crow flies”)?
Walking takes about 300–500 feet from Delta check-in to the TSA entry point, including the required vertical move up to Level 2. The distance feels longer than it measures because the path forces a “go to the atrium core, then up” pattern rather than a straight corridor.
From the Delta ticket counter on Level 1, walk toward the central atrium where the main escalators and elevators are located. Ride the escalator/elevator up to Level 2, then continue forward within the Main Lobby to the TSA checkpoint entrance area under the atrium/skylight zone. The practical variability comes from where you start at the counter line and which vertical conveyance bank you catch; if the lobby is crowded, weaving adds time even though the footprint is compact.
Where are the baggage carousels located relative to the ground transportation counters, and specifically, where is Carousel 3 positioned inside the Arrivals hall?
Carousel 3 sits in the Arrivals Terminal baggage hall near the ground transportation/shuttle counters, acting as a high-traffic landmark zone. The ground transportation counters cluster along the same arrivals hall perimeter, so the Carousel 3 side tends to be denser with people waiting on shuttles.
Inside the Arrivals hall on Level 1, the carousels occupy the central floor area while the ground transportation counters line the adjacent wall zones. Carousel 3 is positioned at an internal “anchor” point referenced as C3 and is specifically adjacent to the shuttle/transportation counter area (including the James River Transportation counter zone). If you’re trying to avoid crowding, the Carousel 3 side is the place where waiting groups and shuttle passengers concentrate; Carousel 2 is a secondary landmark noted near the Smarte Carte rental rack.
What is the exact curbside segment (by door/zone) where private pickups are least likely to be blocked by “stagers,” based on the physical curb layout at Arrivals?
Private pickup is least likely to be blocked at the downstream end of the Arrivals curb, centered on Door 5. “Stagers” tend to compress into the first central curb openings near Doors 1–2, which makes the far end structurally more available for active loading.
On the Arrivals frontage, the numbered doors run along a single curbline with the highest dwell time at the upstream/central doors closest to the main baggage exits. The least-blocked segment is the Door 4–Door 5 stretch because it is farther from the initial curb choke point and less attractive to drivers trying to “hover” near the busiest exits. The simplest geometry-based tactic is to text your driver “Door 5 only,” then walk along the curb from the central baggage exits to that far-end door to meet a cleaner lane.
From the Arrivals curb, what is the shortest walking route to the short-stay parking area used for “quick pickup” (the “first 30 minutes free” strategy)?
Walking takes about 3–5 minutes from the Arrivals curb to short-stay parking in Parking Garage A by using the Level 2 sky bridge, not a street-level crossing. The fastest path is “Arrivals curb → up to Level 2 → bridge → Garage A,” because the service road between buildings is not designed for safe pedestrian desire paths.
Enter the Arrivals Terminal from the nearest numbered door and go immediately to the closest elevator/escalator bank up to Level 2. Follow overhead signs to Parking and cross the enclosed Level 2 sky bridge into Parking Garage A, then choose a nearby parking row on the closest levels (commonly Level 2–3 for speed). This route keeps you fully indoors and converts curb chaos into a predictable, covered walk that fits the “first 30 minutes free” timing window.