Ninoy Aquino International Airport Terminal 3 Map (Most Up-To-Date)
NAIA Terminal 3 is a long, linear terminal (about 1.2 km end-to-end) with a “mall-style” airside spine and stacked landside levels that force vertical moves at key moments. The biggest navigation wins come from treating it like a choke-point map: where queues spill backward, where bridges narrow, and where official pickup zones actually begin. As part of Manila’s primary airport hub, Terminal 3’s fastest paths are usually the cleanest-signed ones—not the most direct-looking ones.
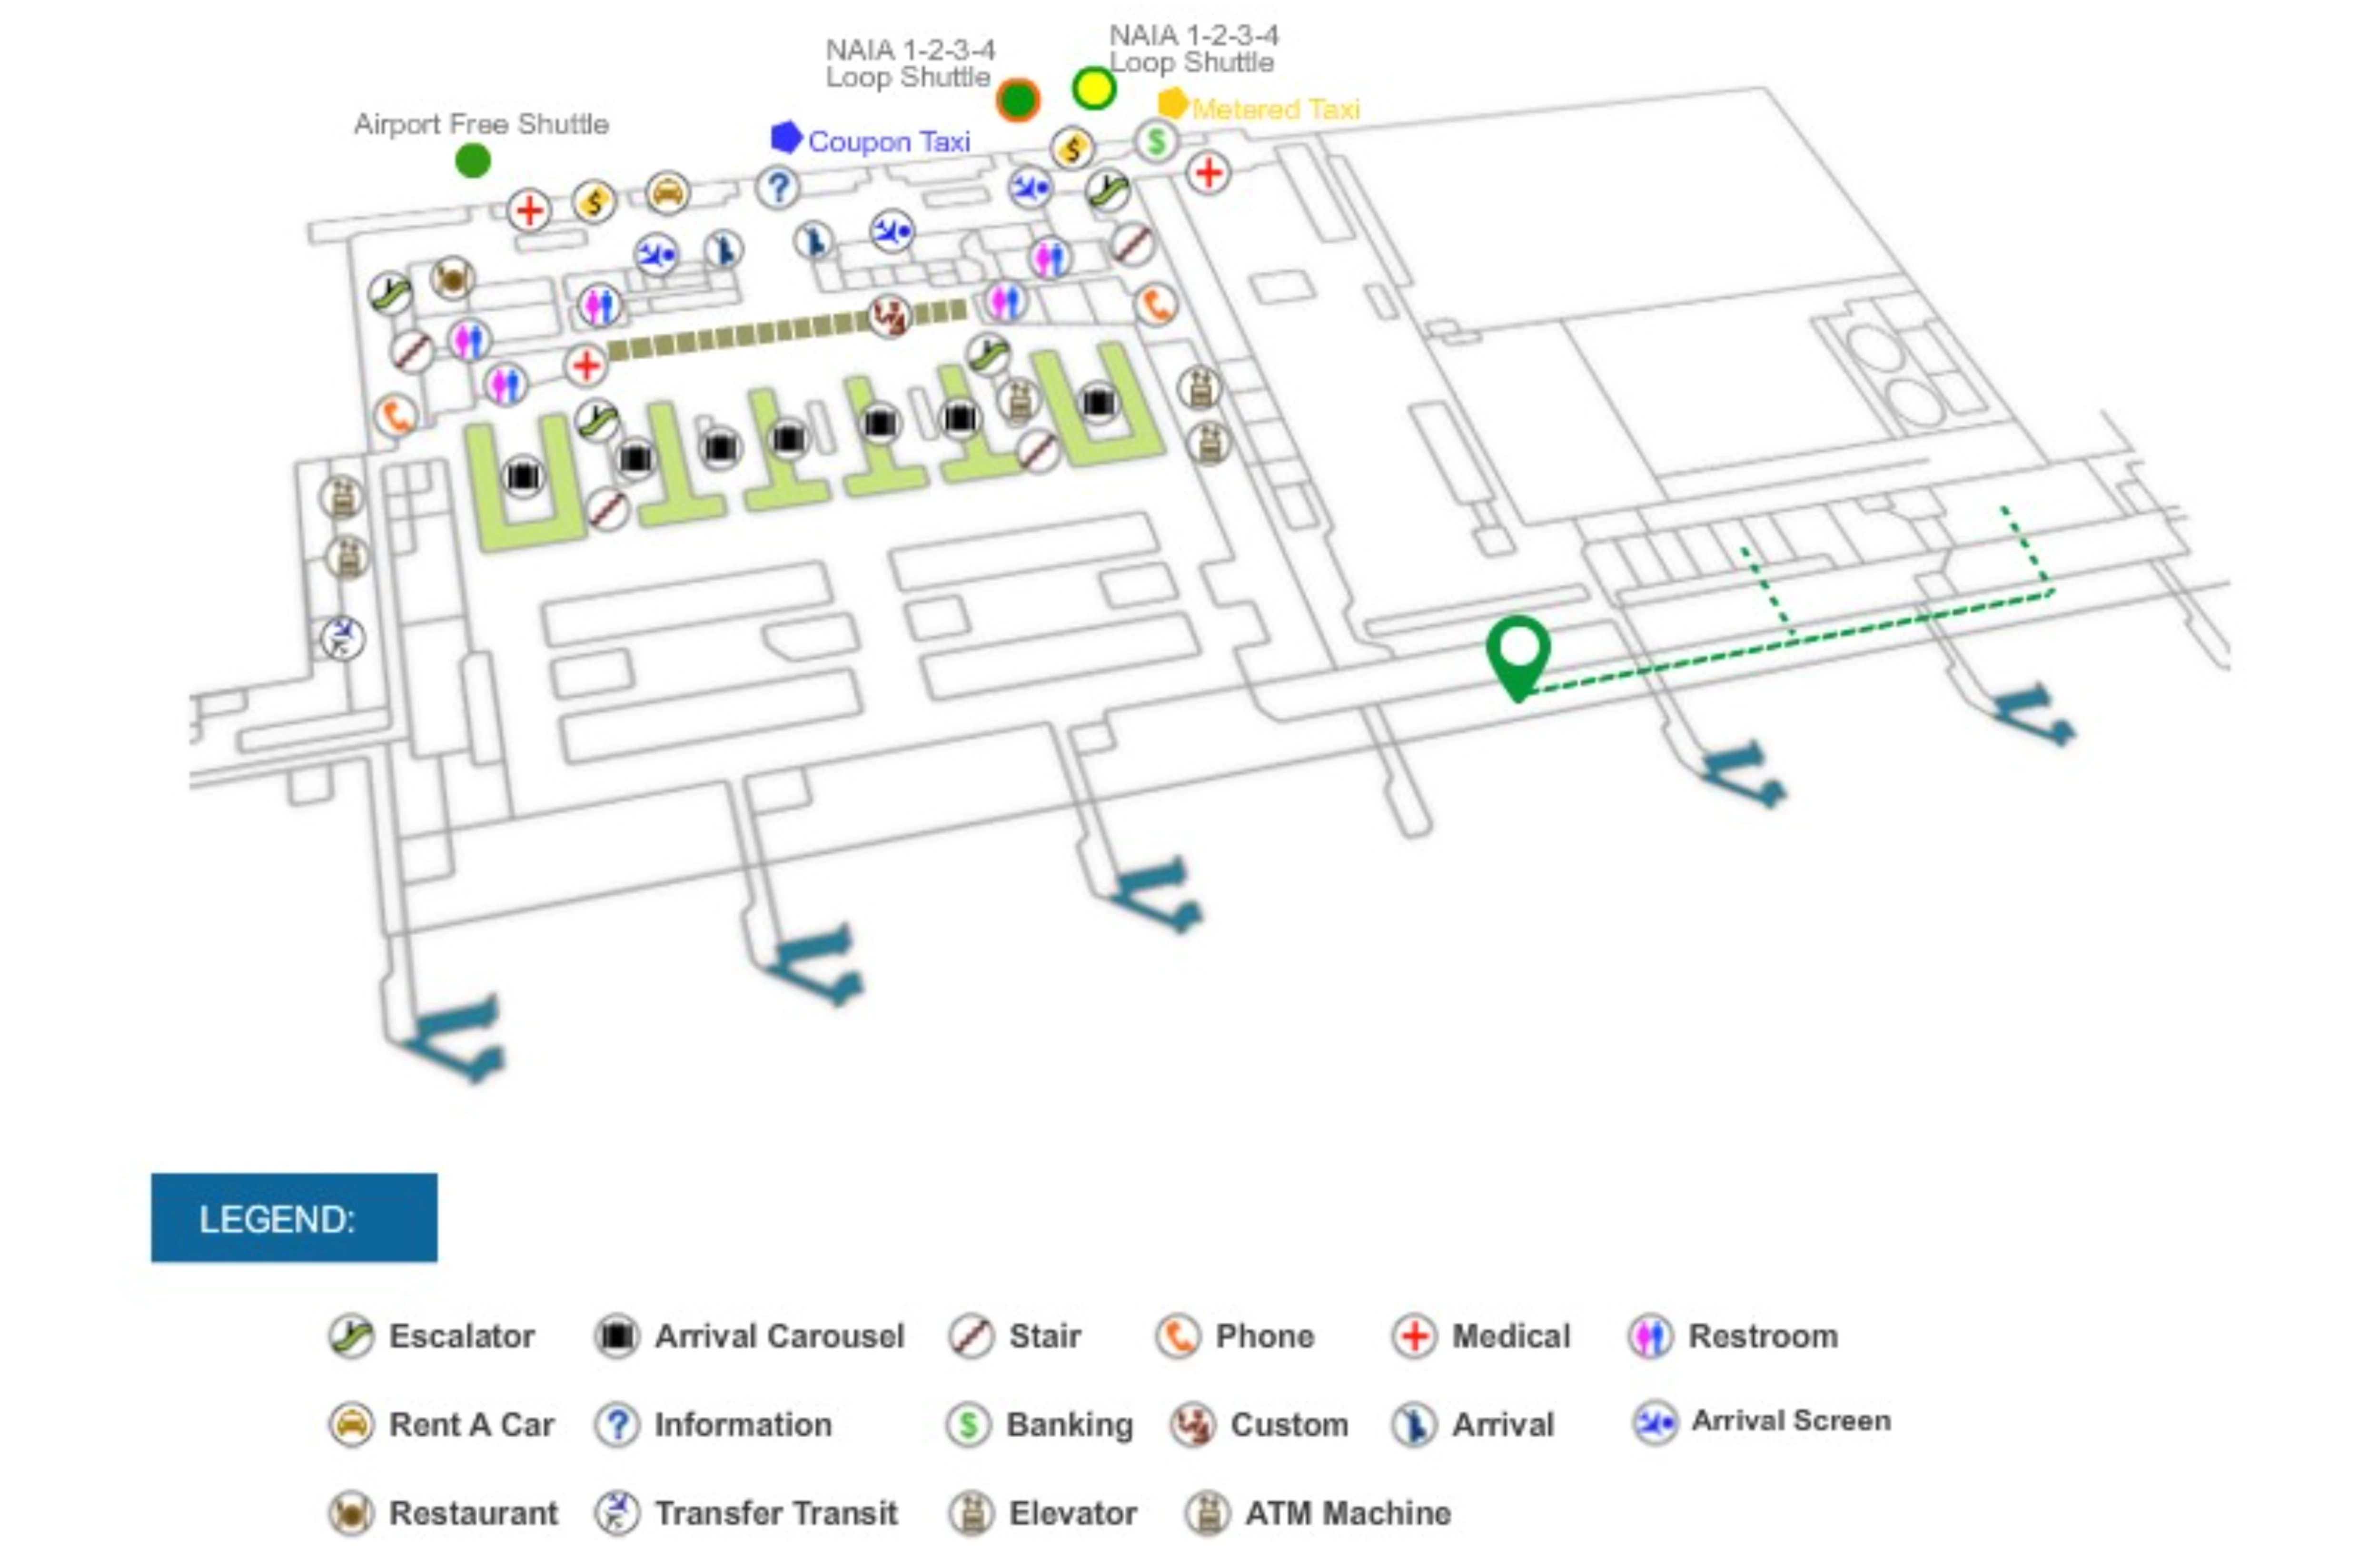
Map Table
| Level | Core Zones | Known Choke Points | Ground Transport Link |
|---|---|---|---|
| L1 | baggage claim, customs, arrivals lobby | carousel crowd rings, eTravel scan pinch | taxi bays, arrivals curb |
| L2 | mezzanine connectors, Runway Manila access | bridge funneling, hidden vertical access | Newport City bridge, MLP connector |
| L3 | check-in hall, security, immigration, airside retail | immigration surges, secondary screening for some flights | departures curb |
| L4 | lounges, mezzanine gates | split-level gate confusion | none |
Ninoy Aquino International Airport Terminal 3 Map Strategy
- Treat this map as a choke-point finder: mark the Link Bridge pinch on the MLP/TNVS route and the exact point where foot traffic compresses with luggage carts.
- Use spillback landmarks to time decisions: if the immigration line reaches the small Duty-Free kiosk at the corridor end, plan for a long hold before committing (water/restroom first).
- Follow official pickup boundaries, not crowds: move past the arrivals-door “solicitor zone” (Bays 8–10) and anchor yourself on the authorized taxi lanes (Bay 11–13) or Coupon Taxi (Bay 6).
- Prefer map-verified shortest clean routes: for escaping curb congestion, route to Level 2 Runway Manila access near the Bay 1/food-court area, then exit into Newport City for calmer pickups.
2026 Ninoy Aquino International Airport Terminal 3 Map + Printable PDF
Terminal 3’s 2026 reality is defined by relocated ride-hail logistics and queue volatility at processing nodes. Grab/TNVS pickup is no longer a simple curb step-out; it’s a connector-and-parking-structure walk that can feel longer when the bridge compresses. Immigration performance still swings hard by arrival waves, and eTravel QR scanning at customs can create a last-meter backup even after bags.
2026 Ninoy Aquino International Airport Terminal 3 Map Guide
What is the exact walking distance (meters) from International Arrivals exit to the official Grab pick-up point in Terminal 3, following the signed passenger route (no staff shortcuts)?
The signed walking distance is approximately 450–550 meters from the International Arrivals exit to the official Grab/TNVS pick-up in the Multi-Level Parking (MLP) hub. This route is longer than it looks because it requires a level change and a connector crossing rather than a curbside pickup.
The standard signed flow runs from the Arrivals Hall (Level 1) toward the right wing, up via elevator/stairs to Level 2, across the Link Bridge into the MLP building, then down to MLP Level A where the TNVS boarding bays are staged. The tightest slow zone is usually the Link Bridge, where luggage carts reduce walking speed and create stop-and-go compression.
Where is the single most common choke point on the Terminal 3 ‘Arrivals → ride-hail pickup’ path (the exact corridor/turn where foot traffic compresses)?
The most common choke point is the Link Bridge funnel between Terminal 3 and the Multi-Level Parking (MLP) building. This is where foot traffic compresses into a narrower corridor and walking speed drops sharply, especially when luggage carts meet oncoming clusters.
The compression typically forms at the bridge’s tightest section as passengers transition from the terminal-side connector into the parking-structure side. Use the bridge entrance as your landmark: once you commit onto the elevated connector toward the MLP/Grab hub, expect stop-and-go movement when multiple flights discharge at once, because carts and wide suitcases force single-file merges through the narrowest span.
Where is the end of the immigration queue overflow located when waits stretch past 1 hour (the furthest physical point the line reaches)?
The furthest practical end of the immigration overflow is the small Duty-Free kiosk at the end of the arrivals corridor right before the turn into the Immigration Hall. When the line has spilled back to that shop, waits commonly exceed an hour and can push into the 60–90+ minute range.
This overflow happens when the Immigration Hall reaches saturation and the queue reverses direction into the Level 2 inbound corridor. The Duty-Free kiosk functions as the binary landmark: if you are standing at or behind it, you’re no longer “in the hall,” and you’re effectively queued in the corridor space where restroom access becomes difficult because the nearest facilities are back down the corridor, against the incoming passenger flow.
What is the exact distance (meters) from the immigration counters to the nearest restroom that is accessible without leaving the controlled area?
The nearest restroom is typically about 50–100 meters from the immigration counters, but accessibility depends on whether you’re already trapped in an overflow that has spilled into the arrivals corridor. When queues surge, the closest usable restroom is often behind you along the inbound corridor rather than ahead.
Restrooms sit along the Level 2 arrivals corridor near the gate-cluster zones, so the “controlled-area” option usually means walking back toward the corridor anchors instead of forward. If the line has backed up to the Duty-Free kiosk landmark near the hall turn, reaching a restroom usually requires moving upstream against inbound foot traffic or forfeiting your place; the next reliable restrooms are after immigration, downstairs in the baggage claim hall.
Where exactly is the secondary/security re-check point that travelers describe encountering (the physical boundary where bags/shoes get re-screened before proceeding)?
The secondary re-check is at the glass-walled gate holding area entrance for U.S.-bound departures, where passengers pass a final screening boundary before being allowed into the enclosed boarding pen. This is the point where manual bag checks and shoe removal are most consistently enforced.
These holding areas sit directly at the affected gates (not at the main central checkpoint), so the landmark is the temporary-looking glass partition and controlled entry door adjacent to the boarding queue. Once you cross that threshold, movement is restricted—leaving to use a restroom or buy water typically requires re-entering through the same re-screening point, which is why this boundary feels like a “terminal within a terminal.”
What is the precise walking distance (meters) from initial security screening to the first cluster of departure gates/seating, along the standard passenger flow?
The walking distance is approximately 150–200 meters from the final pre-airside security checkpoint to the first cluster of departure gates and seating (typically around Gates 101–105). This is a short, direct segment before the concourse opens into the main retail atrium.
After screening, the flow pushes into the airside “mall” zone, so the first seating pockets appear quickly near the start of the concourse spine, before the longer walks to the far extremities. Use the central retail atrium edge as the anchor: once you reach the duty-free/retail core, you’re essentially at the first gate cluster, while the long-haul distance risk begins only if you’re assigned deeper down the terminal fingers (upper-numbered or mezzanine-access gates).
Which specific baggage carousel zone(s) in Terminal 3 most often handle multiple flights in rotation (identify the carousel numbers/area where overflow crowds form)?
The most consistently overloaded baggage claim zones are Carousels 3, 4, and 5, where multi-flight rotation and high-volume loads most often create overflow crowds. These belts are the repeat congestion magnets because they commonly handle dense leisure/LCC arrivals with a higher bag-per-passenger ratio.
Carousels 3–5 sit in the central run of the baggage hall, and the crowd pattern is usually a deep “ring” pressed against the belt lip that expands outward into the walking lanes as flights stack. If you see a shoulder-to-shoulder ring forming at these numbers, it’s a strong signal that the belt is either dual-tasking across arrivals or recovering from a prior unload—both conditions that amplify dwell time and crowd density.
Where is the best low-congestion viewing/waiting position near baggage claim that avoids the tight crowd ring at the belt edge (exact side/landmark reference)?
The best low-congestion waiting spot is 10–15 feet back from the carousel lip, tucked behind the large structural pillars or in the wide middle aisle between carousel rows. This position avoids the tight belt-edge ring while keeping a clear sightline to the bag chute.
Use a pillar as your anchor: stand on the pillar-side of the open aisle so you can look over the front ring and step forward only when your bag appears. This works especially well around the busy central belts (Carousels 3–5), where the crowd presses tight to the edge; staying back in the aisle keeps you out of the shoulder-to-shoulder zone and reduces the risk of getting boxed in by carts and clusters.
Where is the official authorized taxi queue/lane boundary relative to the arrivals exit doors (the exact point where ‘solicitors’ typically stand outside the controlled lane)?
The authorized white metered taxi queue begins at Bay 11–13, while the most aggressive solicitor activity clusters closer to the arrivals exit around Bays 8–10. The practical boundary is the moment you move past the central exit-door frontage and reach the start of the Bay 11 controlled queue area.
From the arrivals doors, treat the space immediately outside the central bays as a “no-decision corridor”: the highest solicitation pressure is between the doors and Bay 11. Use Bay 11 signage and the formed queue lanes as the anchor point for legitimate metered taxis; if you are still standing in the Bay 8–10 stretch, you are still in the typical tout-intercept zone rather than the regulated queue.
What is the shortest signed walking route from Terminal 3 arrivals to the Runway Manila bridge access point (distance + the specific door/landmark where the route begins)?
The shortest signed route starts at the Arrivals Hall (Level 1) exit near the Bay 1 side of the arrivals extension, then goes up to Level 2 (Mezzanine) to the clearly marked Runway Manila entrance; the bridge itself is about 220 meters long. The key is making the vertical move early instead of staying on the curb-level flow.
Follow the Bay 1/food-court-side landmarks to find the elevator/escalator up to Level 2, then track the Runway Manila signage to the enclosed, air-conditioned bridge entry. Once on the bridge, the travelators carry you across to Newport City (near Belmont Hotel/Resorts World side), which is the point where you’ve effectively exited the terminal’s curb congestion ecosystem.
Where is the multi-level parking access entrance that creates the most vehicle queue spillback (the exact ramp/entry point tied to gridlock patterns)?
The worst spillback point is the entry ramp into the Multi-Level Parking (MLP) structure from the ground-level arrivals driveway. This is where vehicles bound for parking and vehicles entering for TNVS (Grab/JoyRide) pickups converge, creating a single choke that can back up onto the arrivals road.
The ramp is reached via the arrivals-side internal road fed by the Andrews Avenue/Nichols approach, after vehicles funnel through the terminal-side circulation and commit toward the parking structure entrance. The giveaway landmark is the moment traffic “stacks” before the ramp mouth: when the queue is visible on the arrivals driveway itself (not yet inside the garage), you’re at the spillback node that triggers broader curbside gridlock.
In the departure gate area, where is the primary passenger-flow compression point during boarding calls (the exact spot where lines knot up and block through-traffic)?
The primary boarding-time compression point is the Gate 115 area, where the corridor geometry is tight enough that boarding lines spill into the main through-walkway. When a wide-body or high-load flight boards here, the queue often becomes a “knot” that blocks passengers trying to pass behind it.
The pinch forms at the interface between the gate’s seating pocket and the adjacent concourse lane—look for the point where stanchions and the boarding queue intrude into the only clear walking channel. If you need to transit past Gate 115 during active boarding, the cleanest move is to stay on the far edge of the concourse early (before the line thickens) rather than trying to squeeze through the middle after the queue has expanded.