Newark Liberty International Airport Terminal B Map (Most Up-To-Date)
Newark Terminal B, within the broader Newark–New Jersey gateway complex, is a single landside check-in hall that “fans out” into three separate post-security mini-terminals: B1 to the north (40s gates), B2 in the middle (50s gates), and B3 to the south (60s gates). Each concourse has its own security checkpoint feeding a long connector corridor into a rotunda-style gate cluster. Once you pick a checkpoint, you’re effectively locked into that concourse until you exit and re-clear.
Map Table
| Zone | Gate Range | Connection | Walk Time |
|---|---|---|---|
| B1 | B40–B47 | Security checkpoint, Level 2, near Door 2; north end | Security exit → Gate B47: 2–4 min |
| B2 | B51–B58 | Security checkpoint, Level 2, near Door 5; central hall | Varies; not consistently posted |
| B3 | B60–B68 | Security checkpoint, Level 2, near Door 8; south end | Varies; not consistently posted |
| Landside hall | — | Door 2 ↔ Door 8 corridor | 3–5 min brisk walk |
Newark Liberty International Airport Terminal B Map Strategy
- Treat “Terminal B” as three separate terminals: match your gate decade (40s/50s/60s) before joining any security line.
- If you realize you picked the wrong checkpoint, bail out landside early: the fix is a Door 2 ↔ Door 8 walk, then a full re-screen.
- For PreCheck, don’t assume one consistent setup across B1/B2/B3; visually confirm the PreCheck entry at the checkpoint face before committing to the stanchions.
- After international arrivals, prioritize the first split: bag re-check vs public exit; the wrong choice can add a luggage dragback loop before you can reach AirTrain.
2025 Newark Liberty International Airport Terminal B Map + Printable PDF
In 2025, Terminal B still functions as three security “pods” (B1/B2/B3) feeding isolated concourses, so the key operational reality remains: you can’t reliably switch between 40s/50s/60s gate areas after screening. Ongoing airport-wide projects (including AirTrain replacement-related impacts) can shift shuttle and curb procedures, so day-of signage inside the terminal matters as much as the static map.
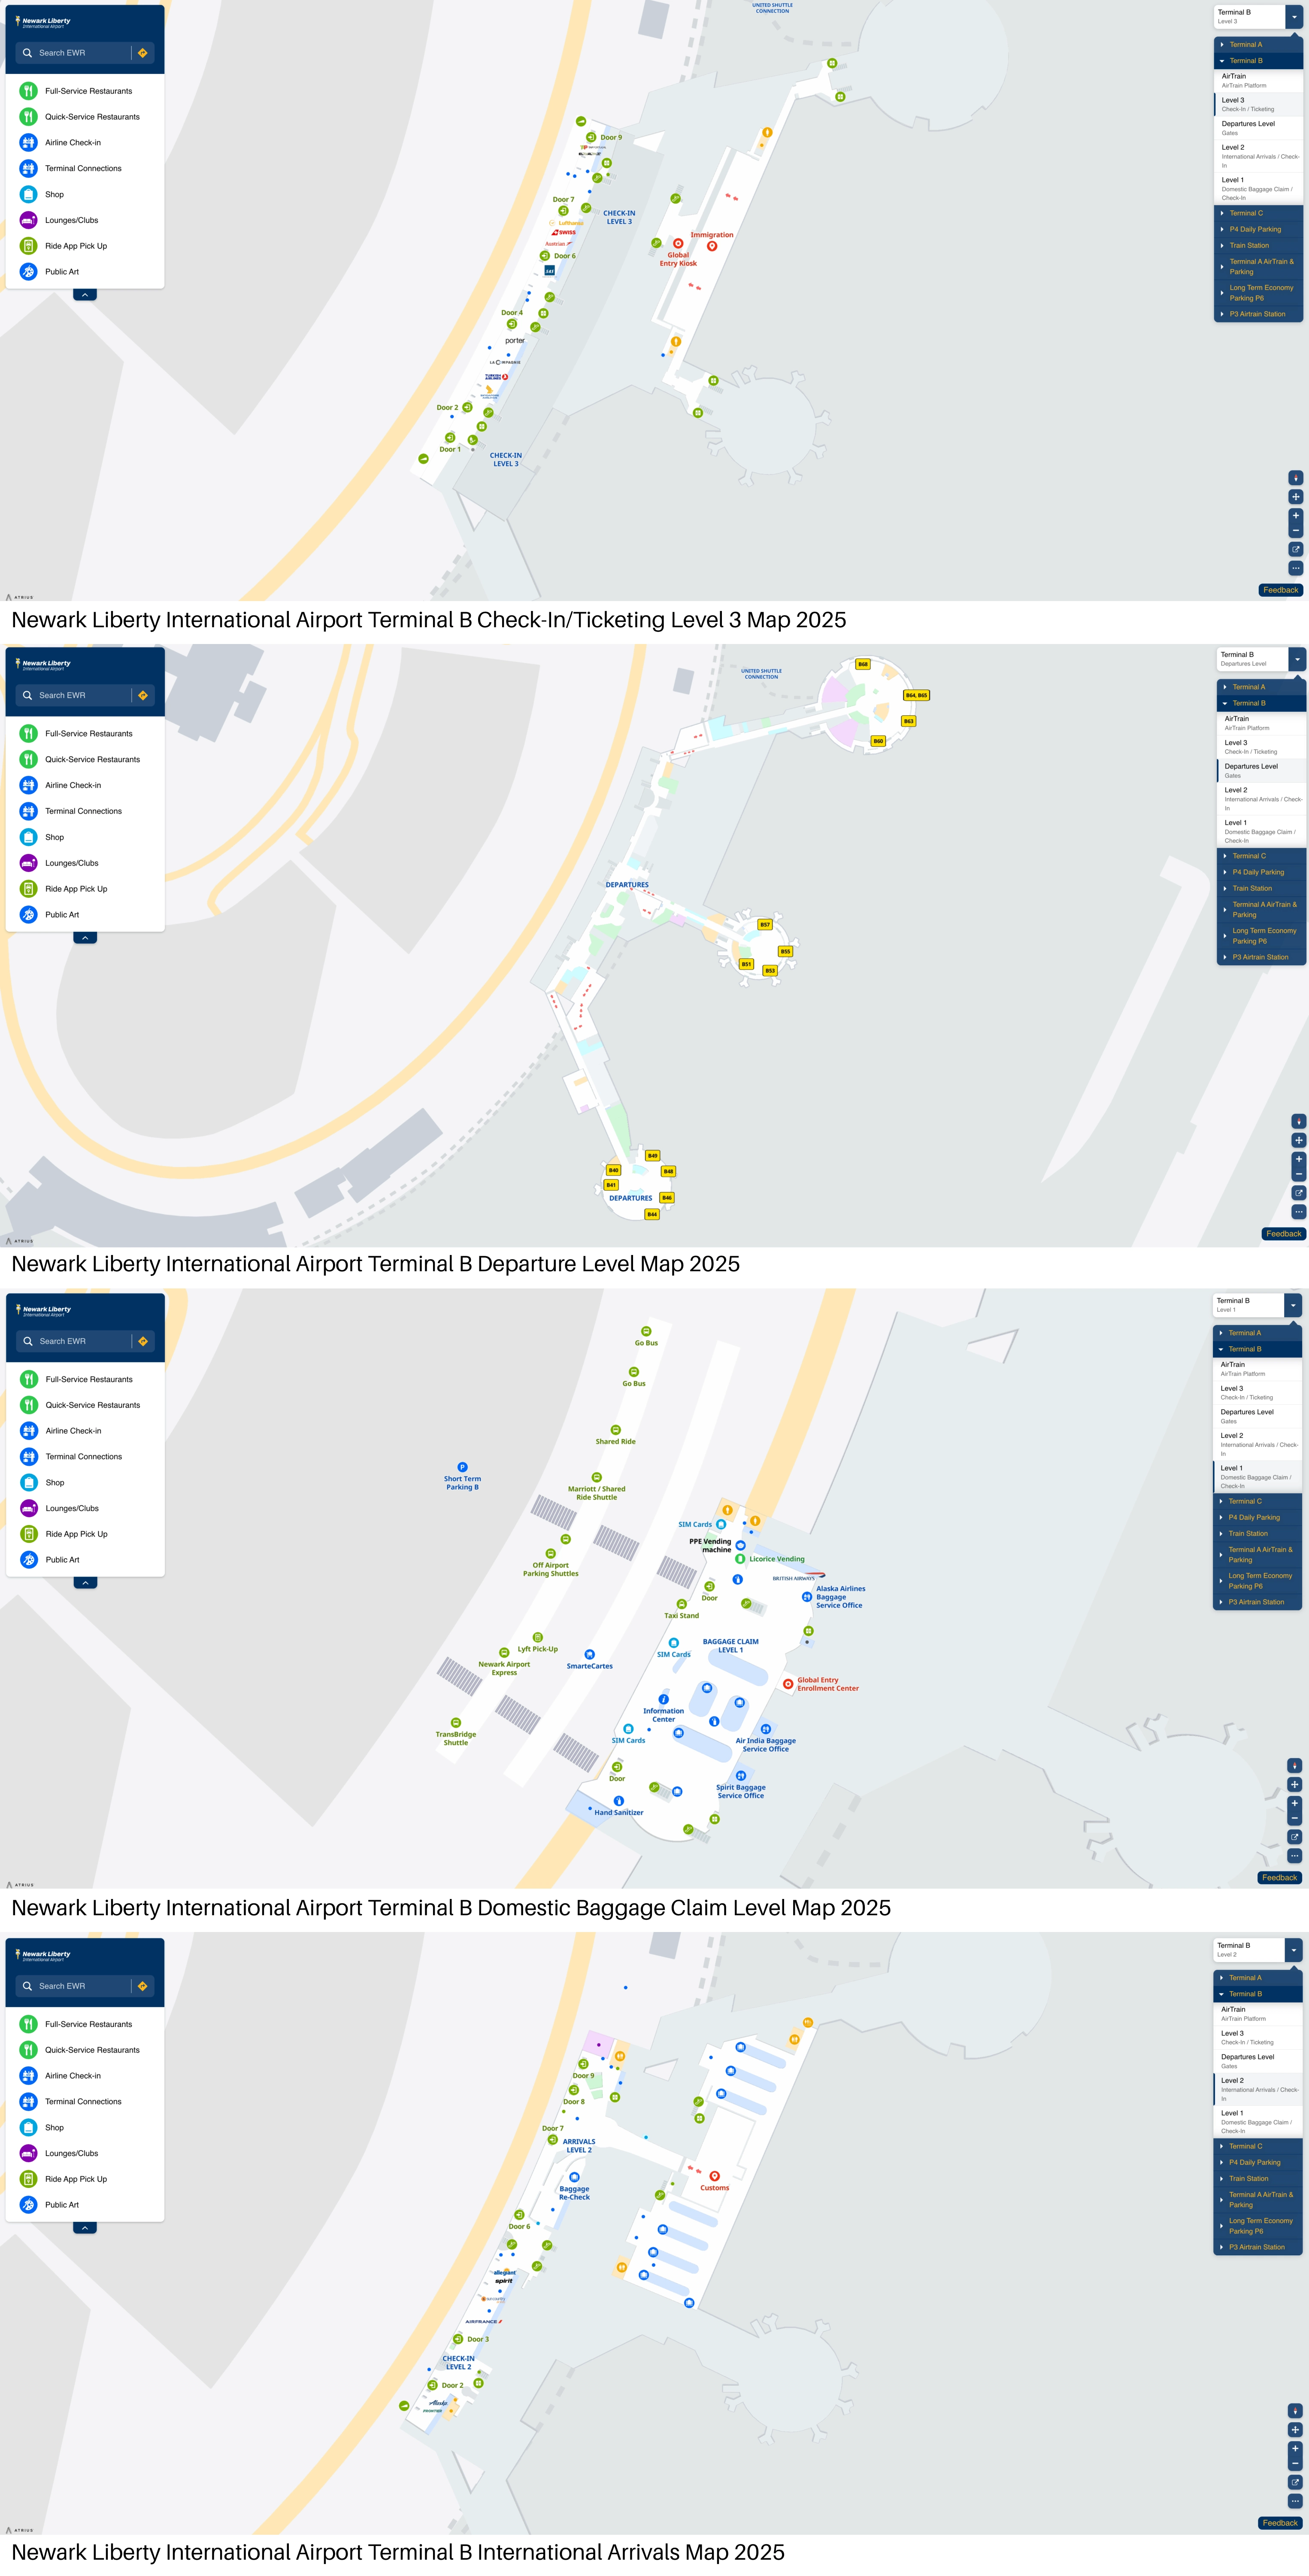
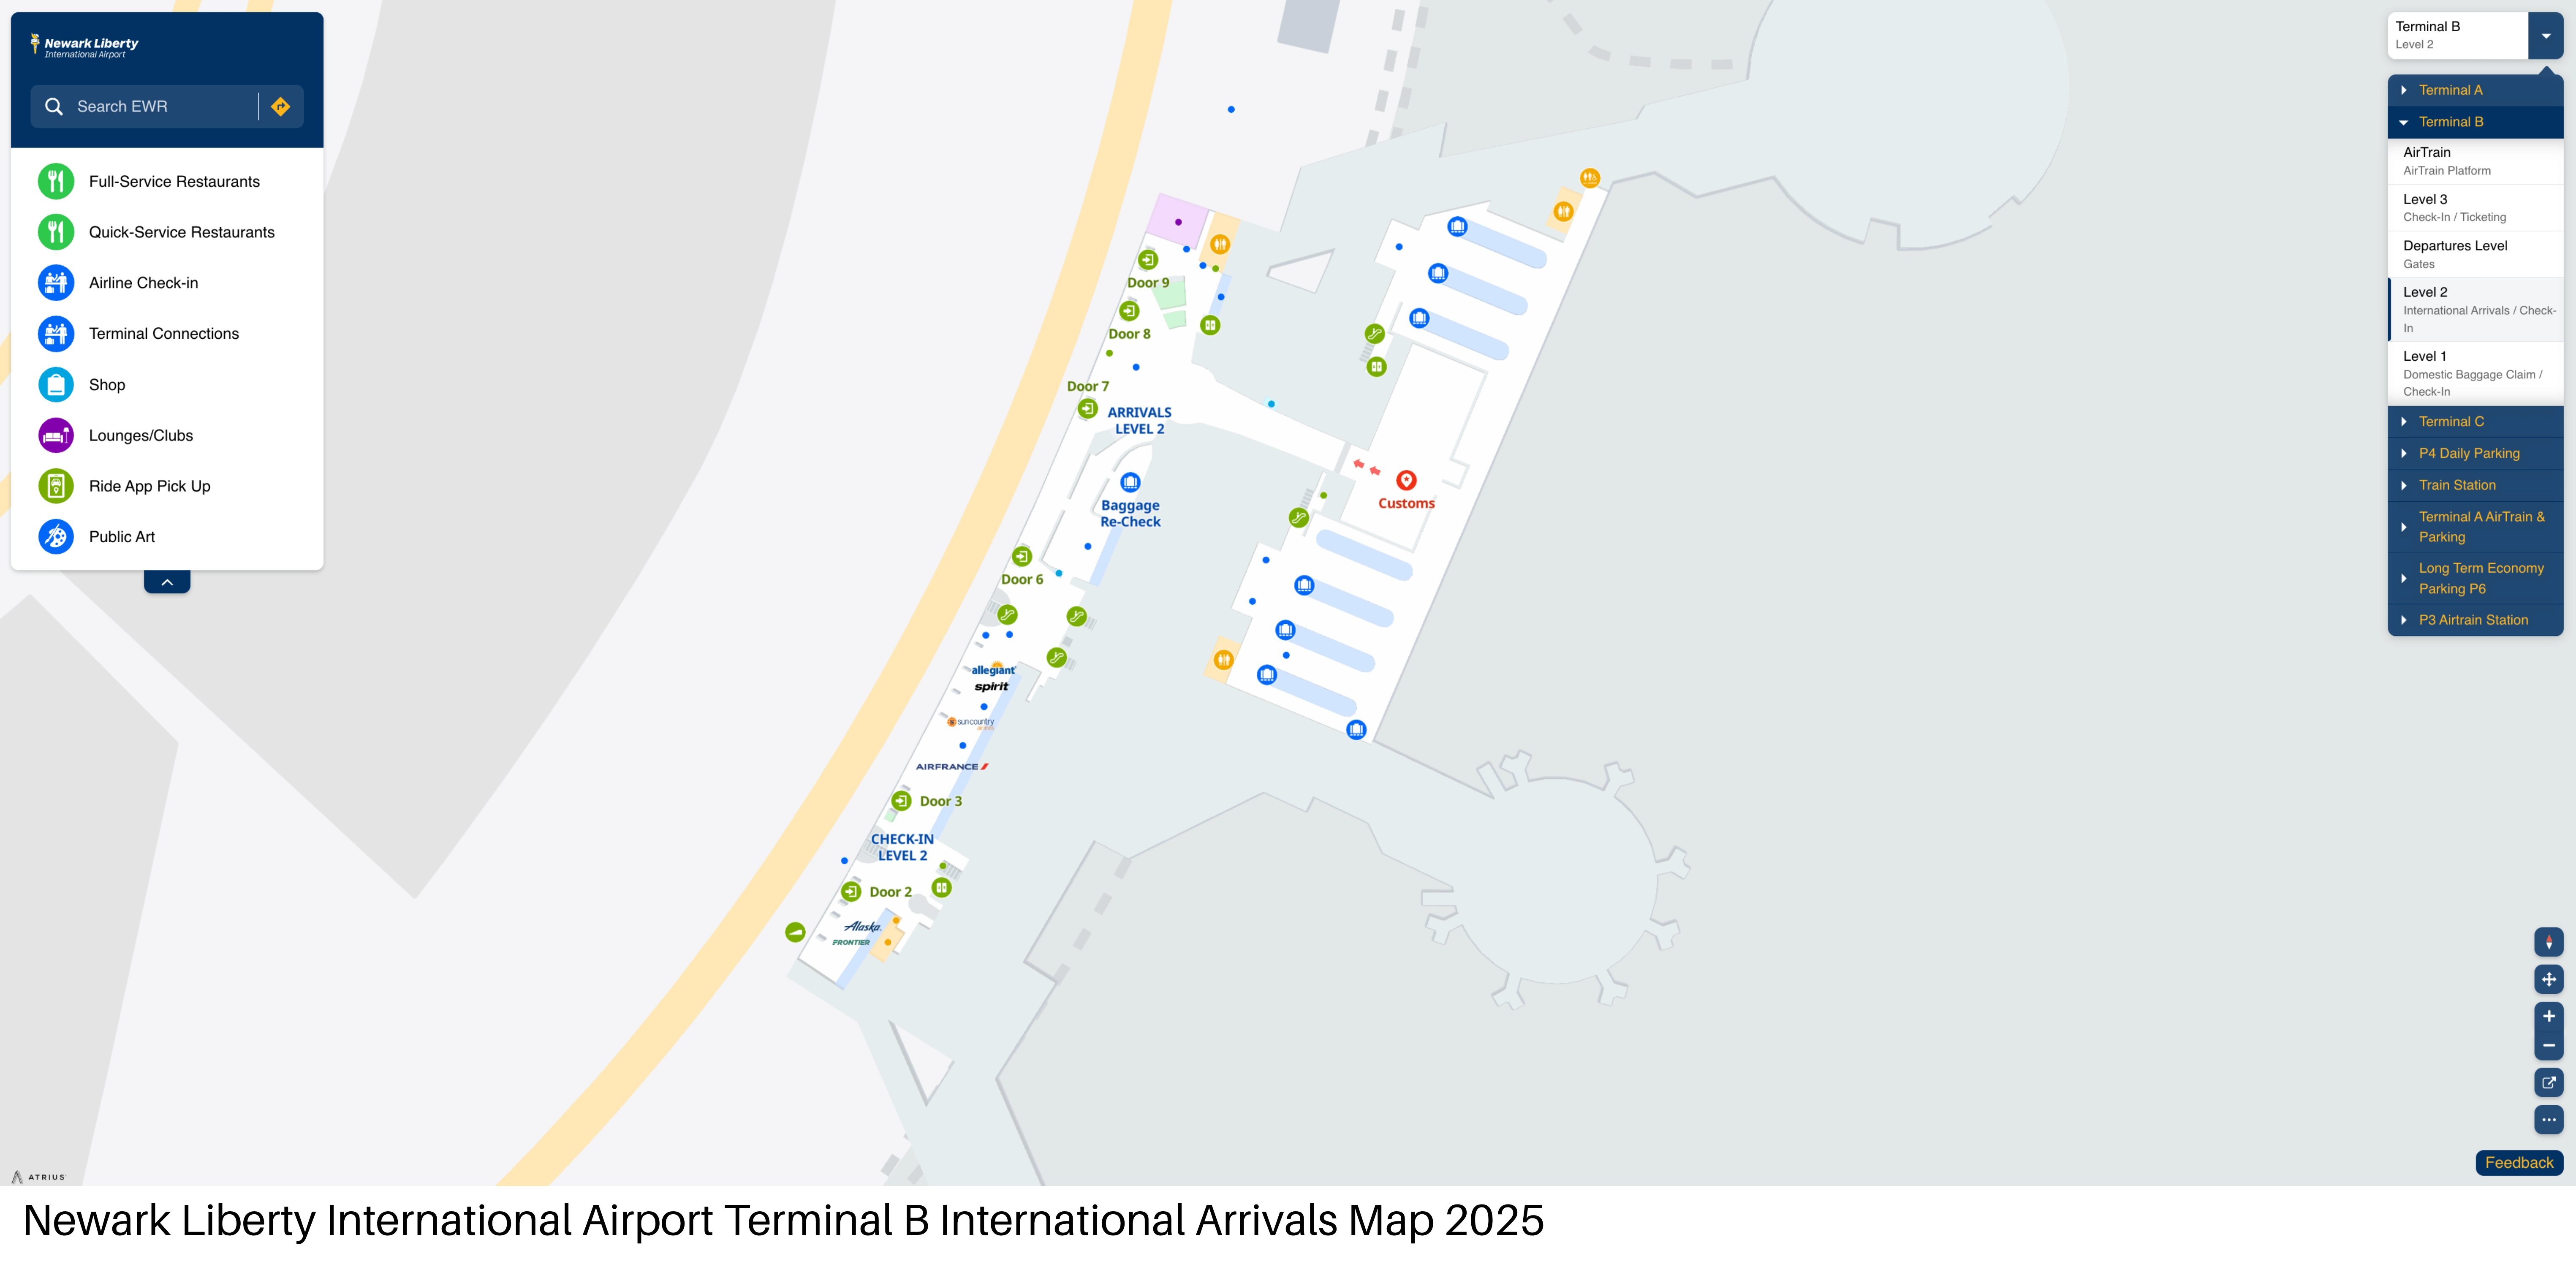
Newark Liberty International Airport Terminal B International Arrivals Map 2025
Newark Liberty International Airport Terminal B Departure Level Map 2025

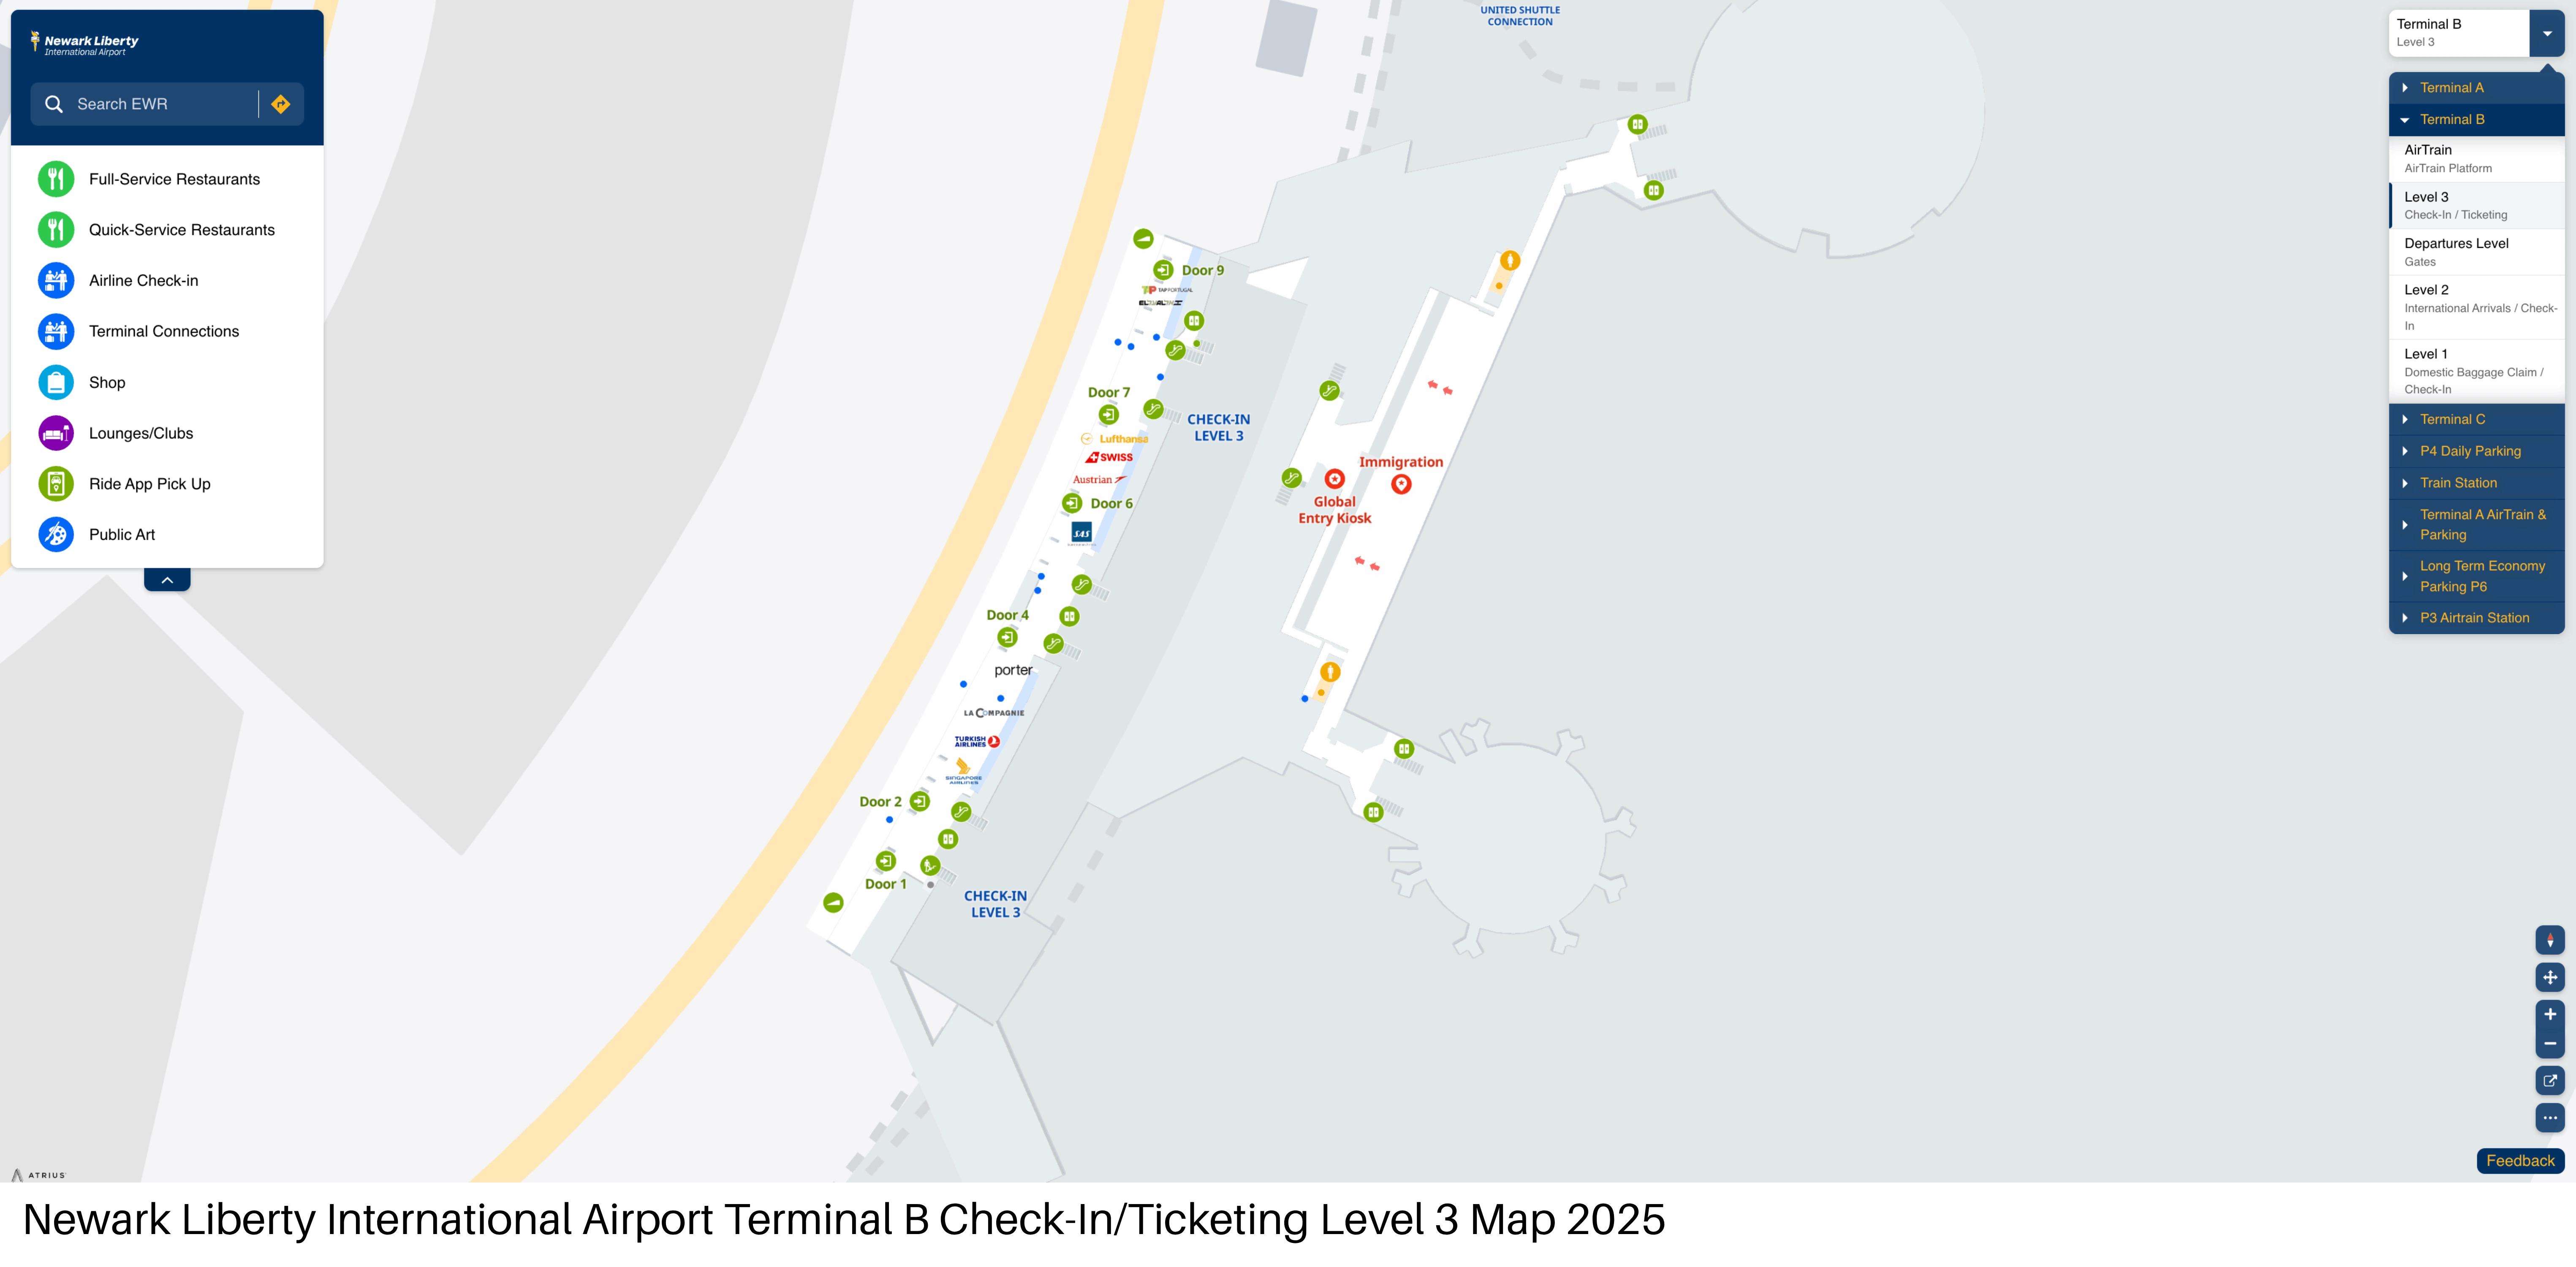
Newark Liberty International Airport Terminal B Check-In/Ticketing Level 3 Map 2025
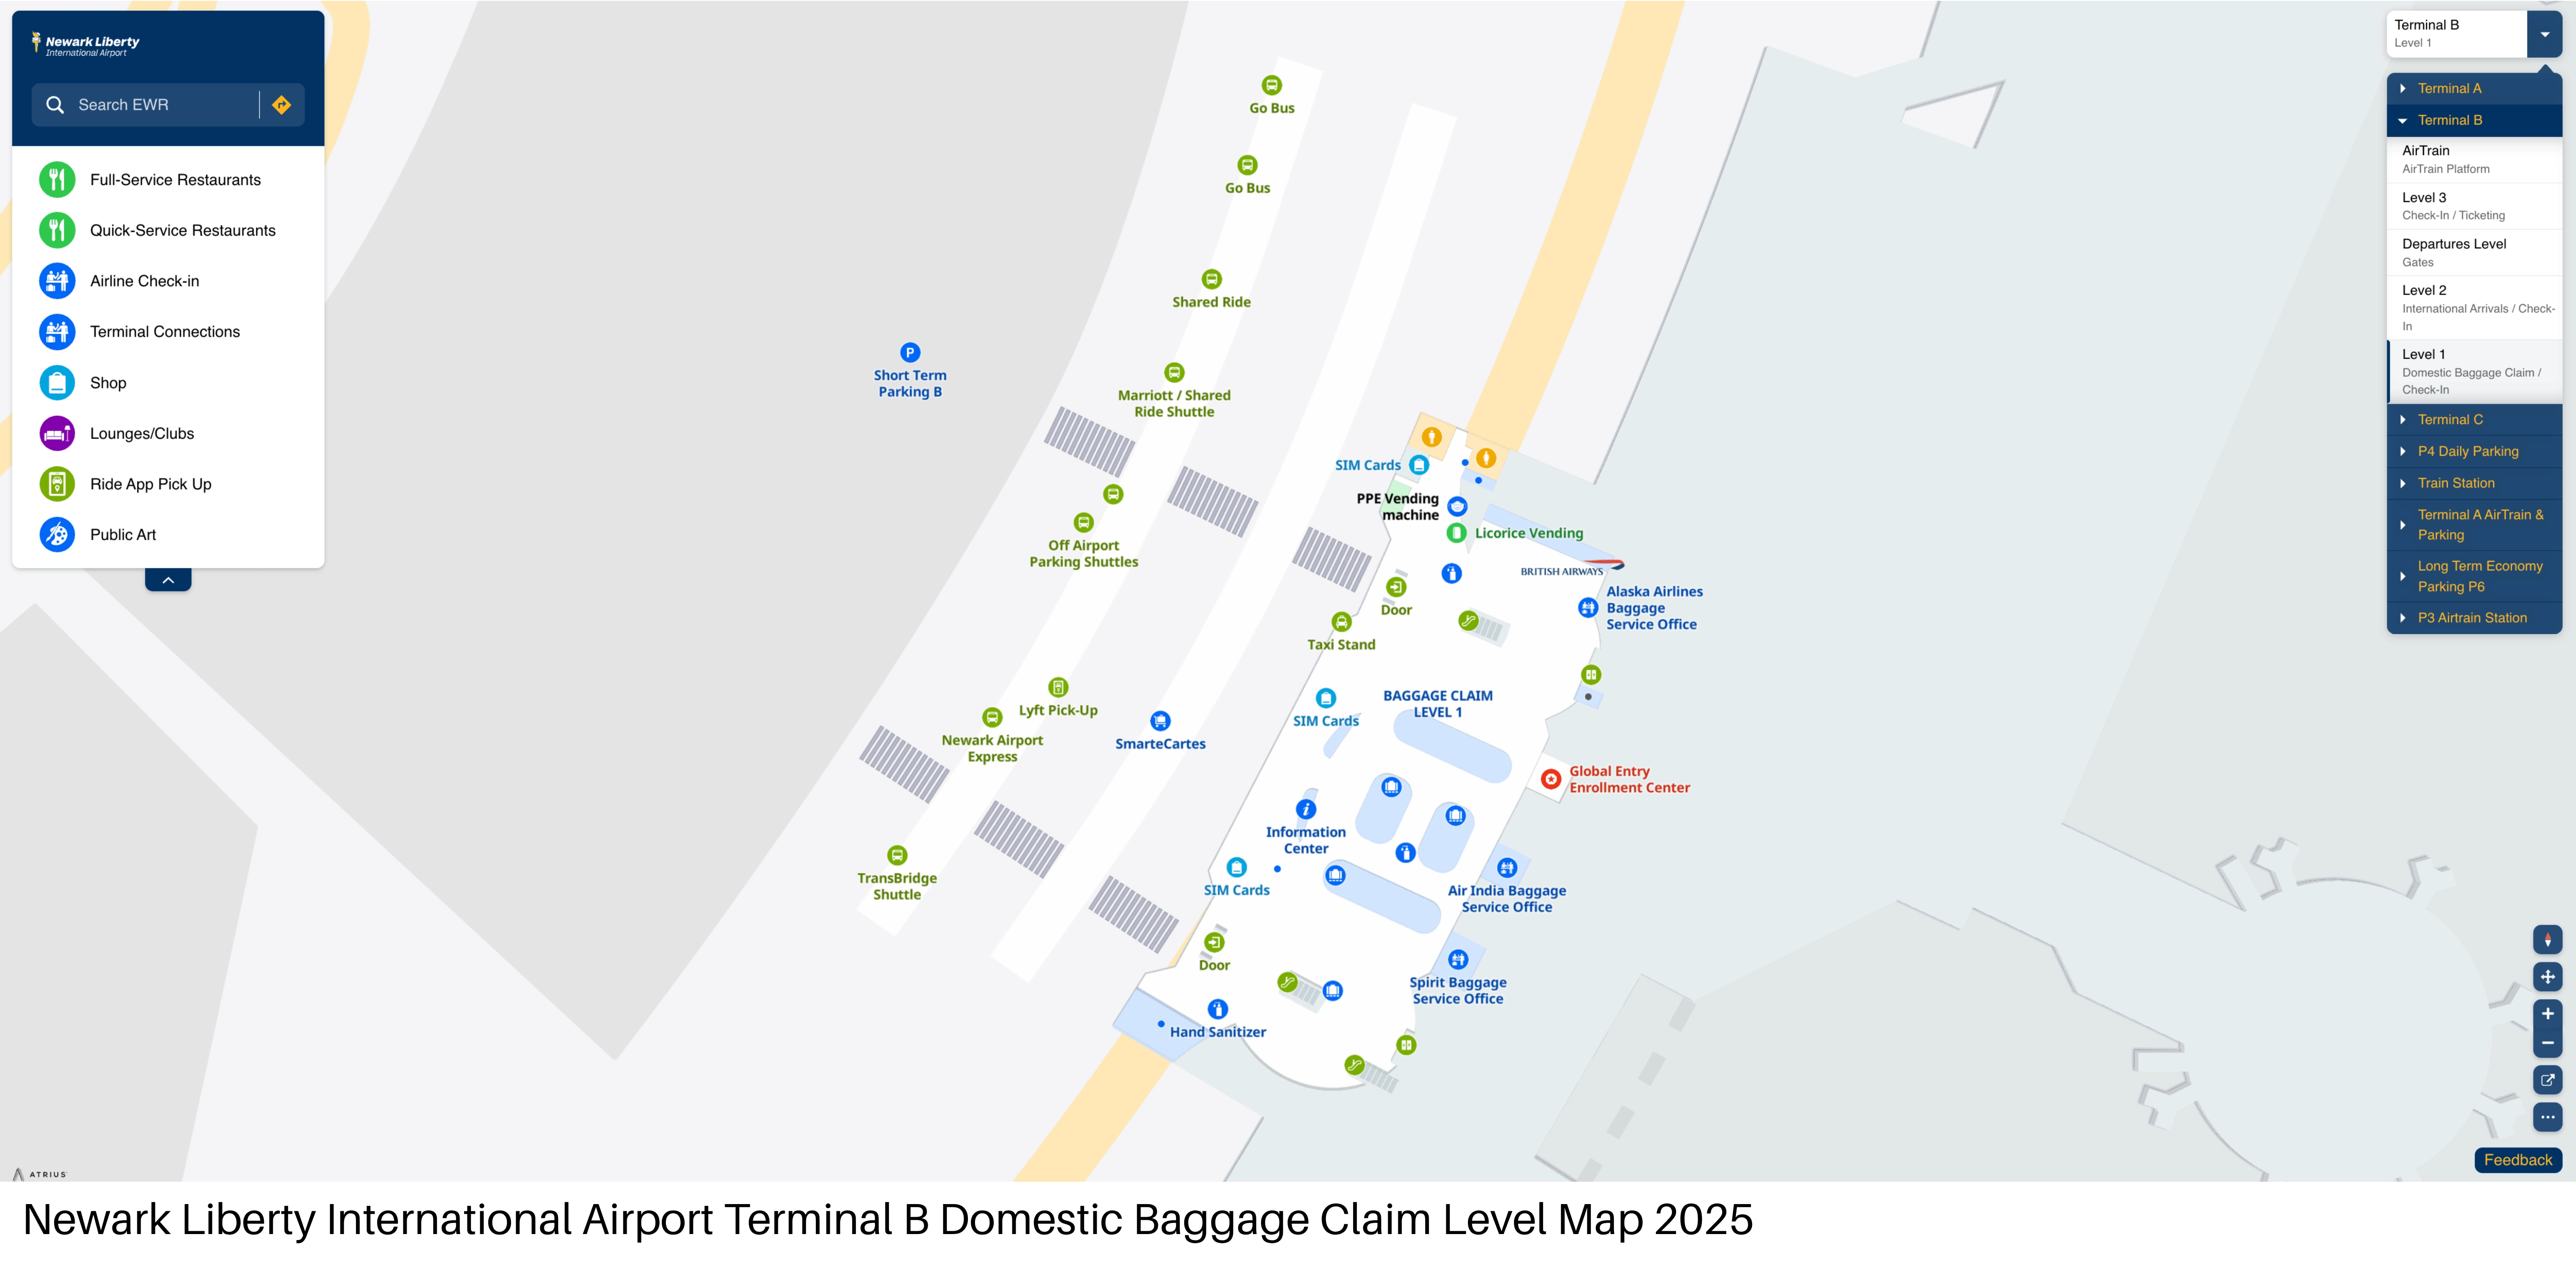
Newark Liberty International Airport Terminal B Domestic Baggage Claim Level Map 2025
2025 Newark Liberty International Airport Terminal B Map Guide
What is the exact security-checkpoint entrance location (landmark + door/level) that serves Concourse B1 (gates B40–B47)?
The Concourse B1 security checkpoint is on Level 2 (Departures), at the north end of Terminal B, aligned closest to Door 2. Look for the checkpoint queue directly under overhead signs listing “Gates 40–49.”
It sits beside the north-side restrooms and a Hudson News in the northern quadrant of the main check-in hall. From the ticketing counters, orient toward the north end; the checkpoint mouth feeds straight into the connector corridor leading to the B1 rotunda (B40–B47). If the line is long, it often spills into the Level 2 circulation corridor right in front of that Door 2 area.
What is the exact security-checkpoint entrance location (landmark + door/level) that serves Concourse B2 (gates B51–B58)?
The Concourse B2 security checkpoint is on Level 2 (Departures), roughly centered in Terminal B, aligned closest to Door 5. It’s the middle checkpoint behind the central block of ticket counters, where foot traffic from both the north and south drop-off areas converges.
Visually, it presents as the widest checkpoint frontage in the main hall, with stanchions often filling the space directly behind the central counters. A useful triangulation point is that it sits “inland” from the Welcome Center area on Level 1 below (not visible from Level 2, but vertically aligned), making it the most central of the three security injection points feeding the B51–B58 connector corridor.
Where is the first physical “no-crossing” boundary post-security that prevents walking from the B40s gate area into the B50s gate area?
There is no post-security crossover at all between B1 (B40s) and B2 (B50s), and the first “no-crossing” boundary is the moment you step out of the B1 TSA screening exit into the B1-only connector corridor. If you cleared B1 security, you are physically funneled into the B1 sterile hallway and cannot laterally enter the B2 sterile hallway.
Immediately after the body scanner/metal detector, follow the flow into the long connector labeled for “Gates 40–49”; the corridor walls/partitions and controlled doors make it a one-concourse channel. In the B1 rotunda gate area, there is no internal passage signed toward “Gates 51–58,” only circulation within the B40–B47 cluster plus the exit path back through the same connector to landside. To reach B2, you must exit the secure area and re-clear at the B2 checkpoint.
Where is the closest landside reroute point (exact corridor/door) to switch from B1 to B3 after discovering you entered the wrong checkpoint?
The closest landside reroute is the Level 2 (Departures) public corridor immediately outside the B1 checkpoint exit area near Door 2, where you can turn and walk straight down the main check-in hall toward the south end to Door 8 for B3. This is the fastest “reset” because it keeps you on the same level and avoids any Level 1/Level 3 detours.
| Step | Landmark | Direction | Typical Time |
|---|---|---|---|
| 1 | B1 checkpoint area, Door 2 zone (Level 2) | Exit sterile area back to public hall | 1–3 min from rotunda back through connector |
| 2 | Main Level 2 check-in hall spine | Walk south through the hall (past central counters) | 3–5 min |
| 3 | B3 checkpoint frontage near Door 8 (Level 2) | Join B3 screening/PreCheck as signed for 60s gates | — |
Where exactly does TSA PreCheck processing begin at the B40s checkpoint (the point you would visually identify as “PreCheck start” on the map)?
TSA PreCheck at the B40s (B1) checkpoint begins at the left-side lane entrance at the front of the checkpoint area on Level 2, where the stanchions split and blue “TSA PreCheck” banners mark the dedicated entry. As you face the B1 checkpoint mouth (toward the corridor for Gates 40–49), the PreCheck queue forms along the wall-side edge, left of the general boarding-pass/ID check flow.
Look for the first set of stanchions that peel off from the main serpentine and feed into a separate ID-check position under the PreCheck signage. If you’re seeing only the main central zig-zag line with no side split, you’re not yet at the PreCheck start—keep moving forward along the checkpoint frontage until the signed PreCheck lane entrance appears.
What is the exact location of the shortest PreCheck-eligible path through the B50s checkpoint (specific lane/entry position relative to standard screening)?
The shortest PreCheck-eligible path at the B50s (B2) checkpoint is typically the far-edge PreCheck entry at the checkpoint frontage, not the central serpentine used for standard screening. The “fastest” entry point is whichever extreme side (far left or far right) is actively signed “TSA PreCheck” that day, because it bypasses the main crowd funneling into the middle lanes.
Use the checkpoint face like a storefront: stand in front of the B2 screening area on Level 2 near Door 5, then scan both ends for the PreCheck sign/banners and stanchions that split away from the central zig-zag. If CLEAR is operating, it’s commonly positioned at an edge as well—don’t follow CLEAR unless you’re enrolled; instead, take the adjacent edge lane that is explicitly marked PreCheck and feeds into a separate ID-check position.
What is the exact indoor walking route (turn-by-turn landmarks) from Terminal B AirTrain entry to the B1 ticketing/check-in area?
Walking from the Terminal B AirTrain entry to the B1 check-in area is a Level 2 (Departures) indoor route that starts at the pedestrian bridge doors and ends at the north end of the main hall near Door 2. The key is to enter Level 2 and then orient “north” toward the Gates 40–49 signage.
From the AirTrain platform, go down to the enclosed pedestrian bridge level, then walk across the enclosed bridge over the roadways to the terminal. Enter Terminal B on Level 2 through the bridge doors into the departures hall. Stay on Level 2 (don’t go down to arrivals), then turn toward the north end of the hall: if you face the airfield-side windows, go left; if you face back toward the bridge doors/roadway side, go right. Follow overhead signs for “Gates 40–49” toward the B1 zone near Door 2 and the north-side restrooms/Hudson News area where B1 carriers’ ticketing/check-in counters cluster.
What is the exact curbside pickup location (door/zone) for rideshare/app pickup at Terminal B, as shown on terminal maps/wayfinding diagrams?
Rideshare/app pickup at Terminal B is on Level 1 (Arrivals), at the outer curb in the signed “Ride App Pick Up” zones, not on Level 2. The pickup point is the row of curbside zones on the arrivals roadway where the terminal wayfinding signs designate app-based pickups and where the apps geofence your location.
Follow “Ground Transportation / Ride App Pick Up” signs to Level 1, exit to the outer curb, and look for the zone placards (commonly assigned as Zone numbers in the app, often in the Zone 5–Zone 9 range for Terminal B). The inner curb is typically for other traffic (including taxis/private vehicles), so use the posted “Ride App Pick Up” signs at the outer curb to match the exact zone your Uber/Lyft app assigns.
On the Terminal B arrivals map, where is the first decision point after exiting customs that determines whether you end up at the correct baggage claim / arrivals hall exit?
The first decision point is immediately outside the Customs/FIS exit doors on Level 1, where signage splits you toward “Bag Re-Check/Connections” versus the public Arrivals Hall exit. Missing that split is what sends you into the wrong flow for connecting baggage and the main arrivals doors.
Step out of the Customs exit doors into the International Arrivals Hall and stop before you merge into the public meeter/greeter space. Look to either side right away for the “Bag Re-Check” counter setup (connection bag drop) positioned just outside the exit doors. If you’re terminating, continue straight toward the main Arrivals Hall path and the sliding doors into the public greeting area; that straight-ahead movement is the “exit flow,” not the connection flow.
What is the exact route from international arrivals exit to the AirTrain entrance in Terminal B (including the first escalator/elevator choice)?
The route is Level 1 Customs exit → vertical up to Level 2 → pedestrian bridge to the AirTrain station, and the first critical choice is taking the elevators/escalators up immediately after you enter the public Arrivals Hall. You cannot reach AirTrain directly from Level 1.
From the Customs/FIS exit doors, enter the Level 1 International Arrivals Hall and orient to the central Welcome Center desk as your anchor. From that Welcome Center area, take the nearest bank of escalators or elevators up to Level 2 (Departures). On Level 2, follow the yellow/black “AirTrain” signs along the central hall spine to the enclosed pedestrian bridge entrance. Walk across the enclosed bridge over the roadways to the AirTrain Terminal B station structure, then continue up to the platform level for your train.
Where is the closest post-security food/coffee option to gates B40–B47 (exact position relative to gate cluster), given the “can’t switch concourses” constraint?
Starbucks in Concourse B1 is the closest reliable coffee option for the B40–B47 gate cluster, positioned post-security in the B1 connector corridor before you reach the rotunda gates. It’s the main “grab coffee” point you’ll pass on the straight walk from the B1 security exit toward the circular B1 gate area.
For a sit-down meal, Malone’s Fish Market is also in the B1 post-security path, located along the same connector corridor feeding into the rotunda (not back in the landside food court). If you’re already standing in the rotunda near the B40s, the practical move is to head back up the connector a short distance until you hit the Starbucks/Malone’s frontage, because there isn’t a separate cross-concourse food court you can pivot to after screening.
Where is the largest seating concentration near the B40s gates (exact area on the concourse map), to reduce “nowhere to sit” delays?
The largest seating concentration for the B40s in Concourse B1 is in the rotunda—the circular gate-hold area at the end of the B1 connector corridor where the B40–B47 gates ring the perimeter. Seating is densest in that central circular waiting zone, not in the narrow straight connector hallway.
After clearing B1 security, walk straight down the B1 connector corridor toward the gates and keep going until the space opens into the round gate circle. That “open circular hub” is where you’ll find the biggest continuous blocks of chairs; the corridor sections leading to it have limited or fragmented seating and clog up easily during Spirit/Delta departure banks.
Where is the exact Terminal B hotel/parking shuttle stop location (door number/curb zone) that a traveler can verify on a map before going outside?
Most off-airport hotel and parking shuttles for EWR are consolidated at the AirTrain “P-stations,” and the map-verifiable control point to use is AirTrain Station P3, not the Terminal B curb. If you wait at the Terminal B doors/curb for a shuttle that only serves P3, you can end up waiting indefinitely.
From Terminal B, follow signs to AirTrain, ride to Station P3, and use the posted shuttle-bus bays there (the station-level signage is the reliable “verify before going outside” reference). Because shuttle staging can shift with airport projects, treat any Terminal B door-specific pickup as hotel-specific only—verify it directly with the hotel if they claim “Terminal B Door ___,” otherwise default to Station P3.
What is the exact map-verified walking distance from B1 security exit to the farthest B1 gate (single longest walk in that concourse)?
Walking from the B1 security exit to the farthest B1 gate (Gate B47) is approximately 250 meters (820 feet), typically 2–4 minutes at a moderate pace. The route is a straight, flat walk down the B1 connector corridor into the circular rotunda where gates B40–B47 sit around the perimeter.
Once you clear the B1 checkpoint for “Gates 40–49,” stay in the same corridor (no turns), continue until the hallway opens into the rotunda, then follow the rotunda ring to Gate B47. There are no stairs or elevators after you exit screening—just corridor-to-rotunda movement—so time variance is mostly crowd density and whether the corridor is partially blocked by queues near the post-security Starbucks frontage.