Newark Liberty International Airport Terminal A Map (Most Up-To-Date)
Newark Terminal A is a three-level “trident” terminal with a central processor (check-in → one main security bank) feeding three gate concourses within the main Newark airport complex. The stress point is outside the building: the AirTrain “Terminal A” station sits by the A Garage/CONRAC area, not the terminal, so your trip becomes a decision tree (shuttle vs. walk via garage + bridge). Scale Warning: the AirTrain-to-terminal gap can be roughly 500–700 meters.
Map Table
| Zone | Connection | Landmark | Walk Time |
|---|---|---|---|
| AirTrain “Terminal A” Station | shuttle curb | street-level exits, “Shuttle to Terminal A” signs | 2–4 min |
| AirTrain “Terminal A” Station | covered walkway → A Garage | exterior covered path into parking structure | 8–15 min |
| A Garage (Level 2) | enclosed pedestrian bridge → Terminal A | bridge entry on Garage Level 2 | 3–6 min |
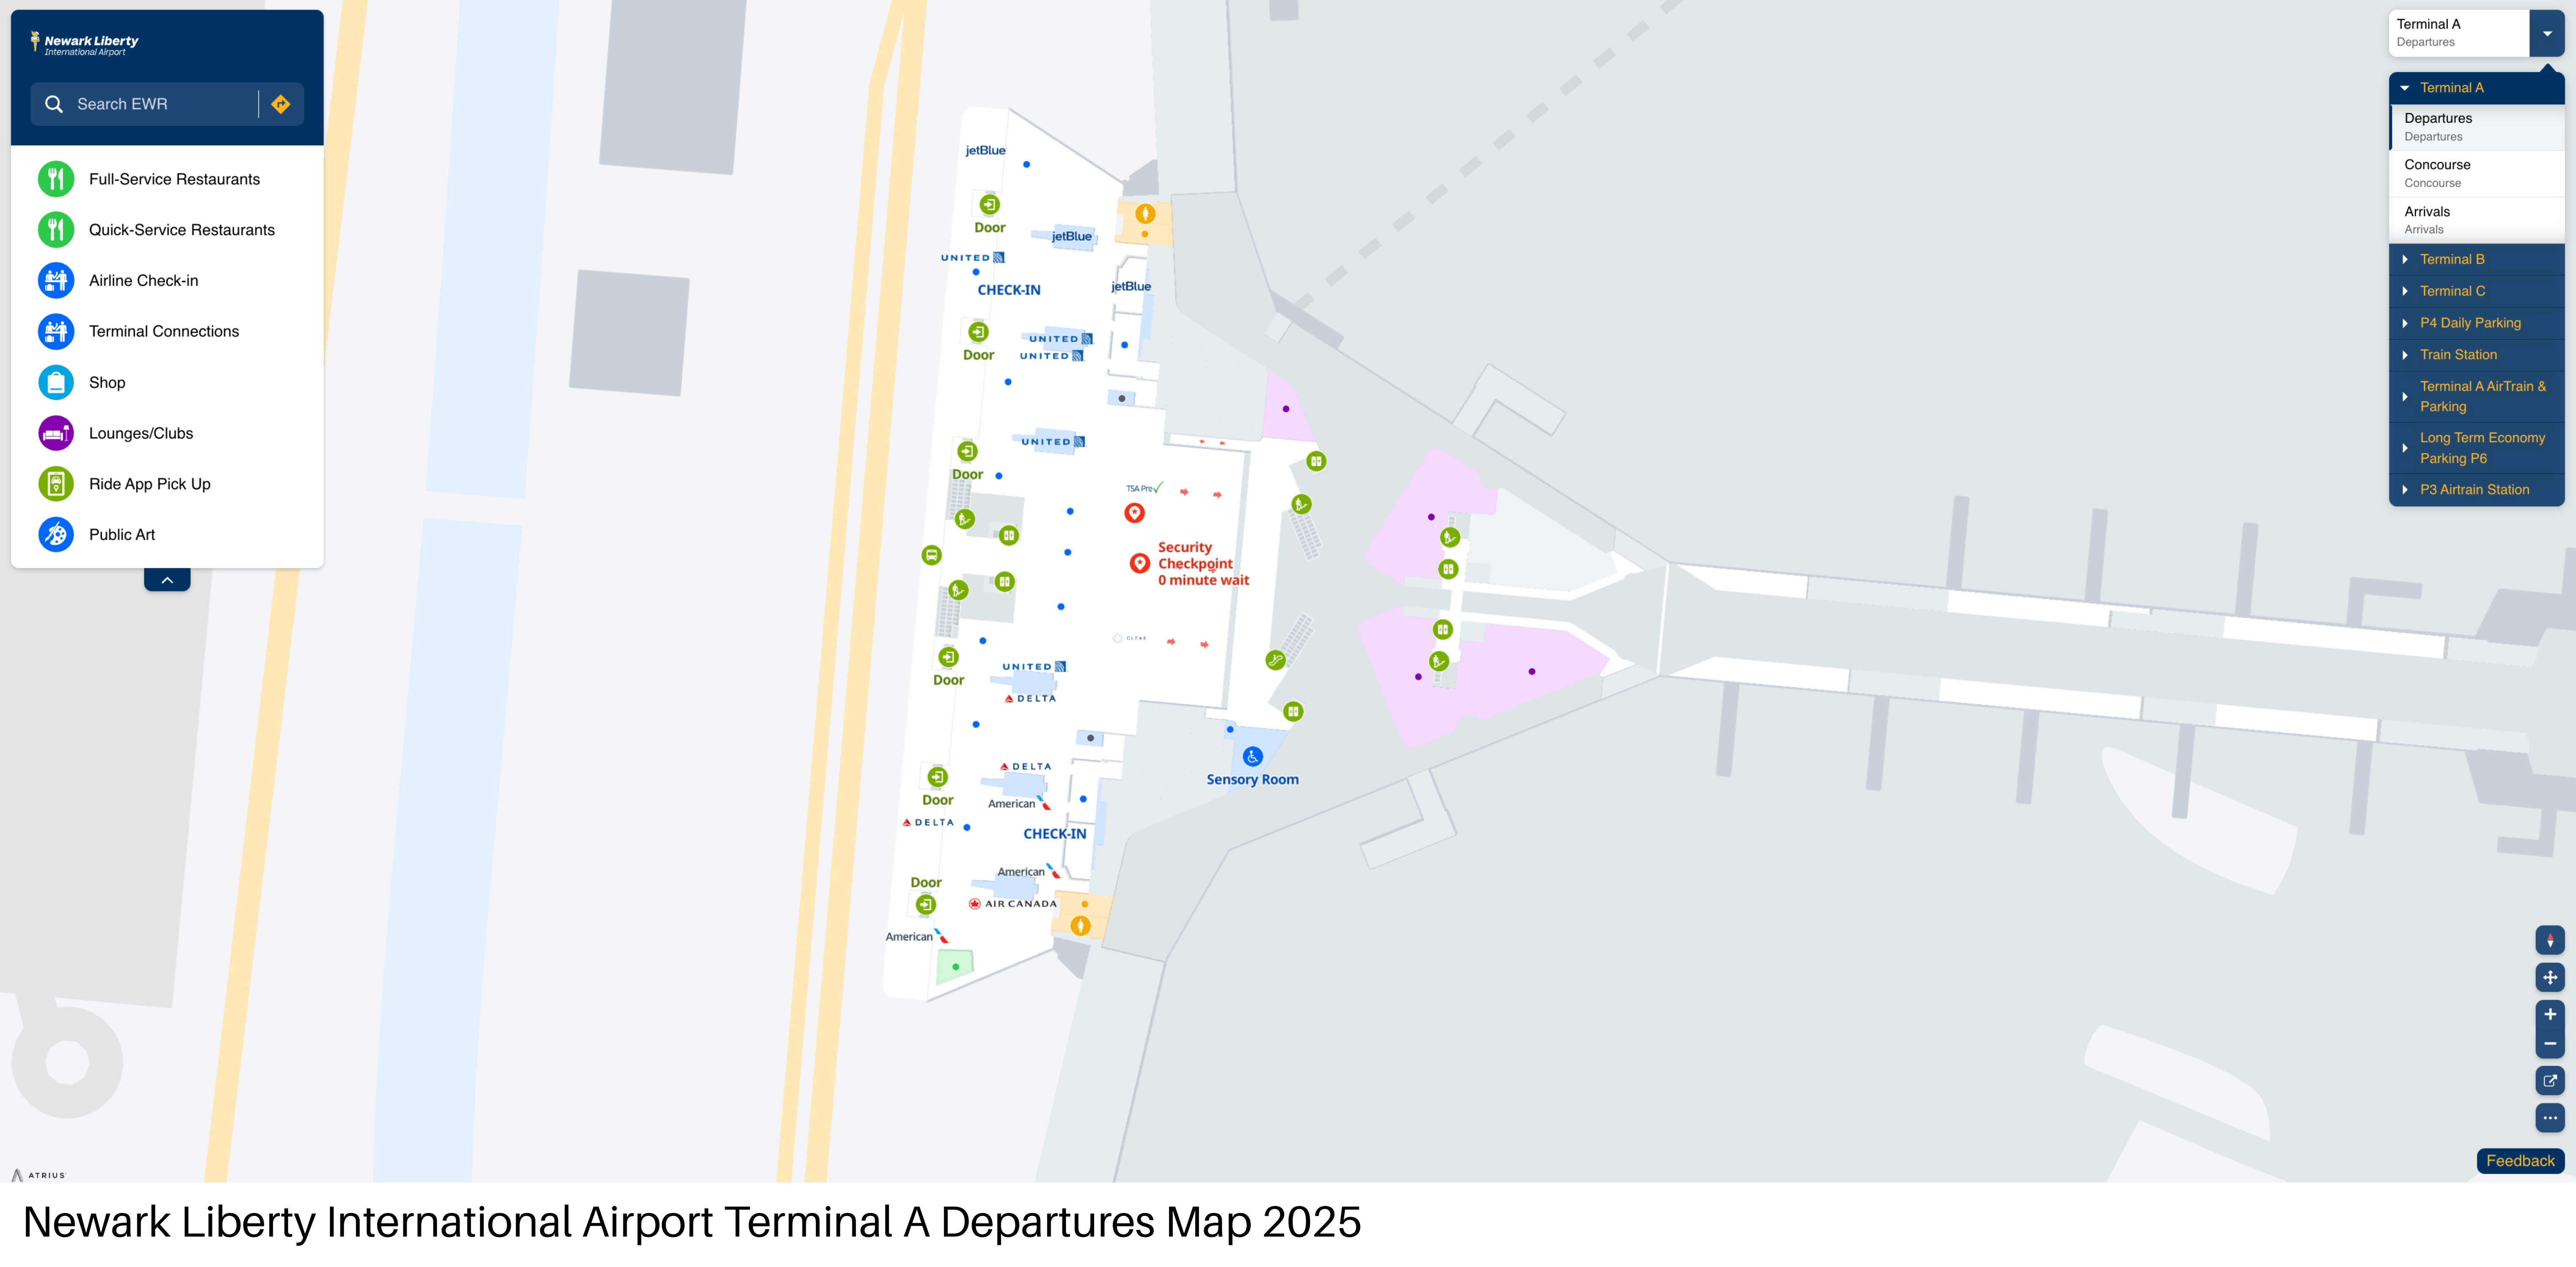
| Terminal A (Level 3) | departures check-in hall | main check-in islands | 0–3 min |
| Terminal A (Level 3) | centralized security | PreCheck/CLEAR right side, standard center/left | 2–6 min |
| Post-security | Gates A1–A7 | left after security | 3–6 min |
| Post-security | Gates A29–A34 | right after security | 3–6 min |
| Post-security | Gate A28 | far end of central/east concourse | 8–15 min |
| Gate A28 | airside Terminal Transfer Shuttle | ground-level bus gates below A28 | 1–4 min |
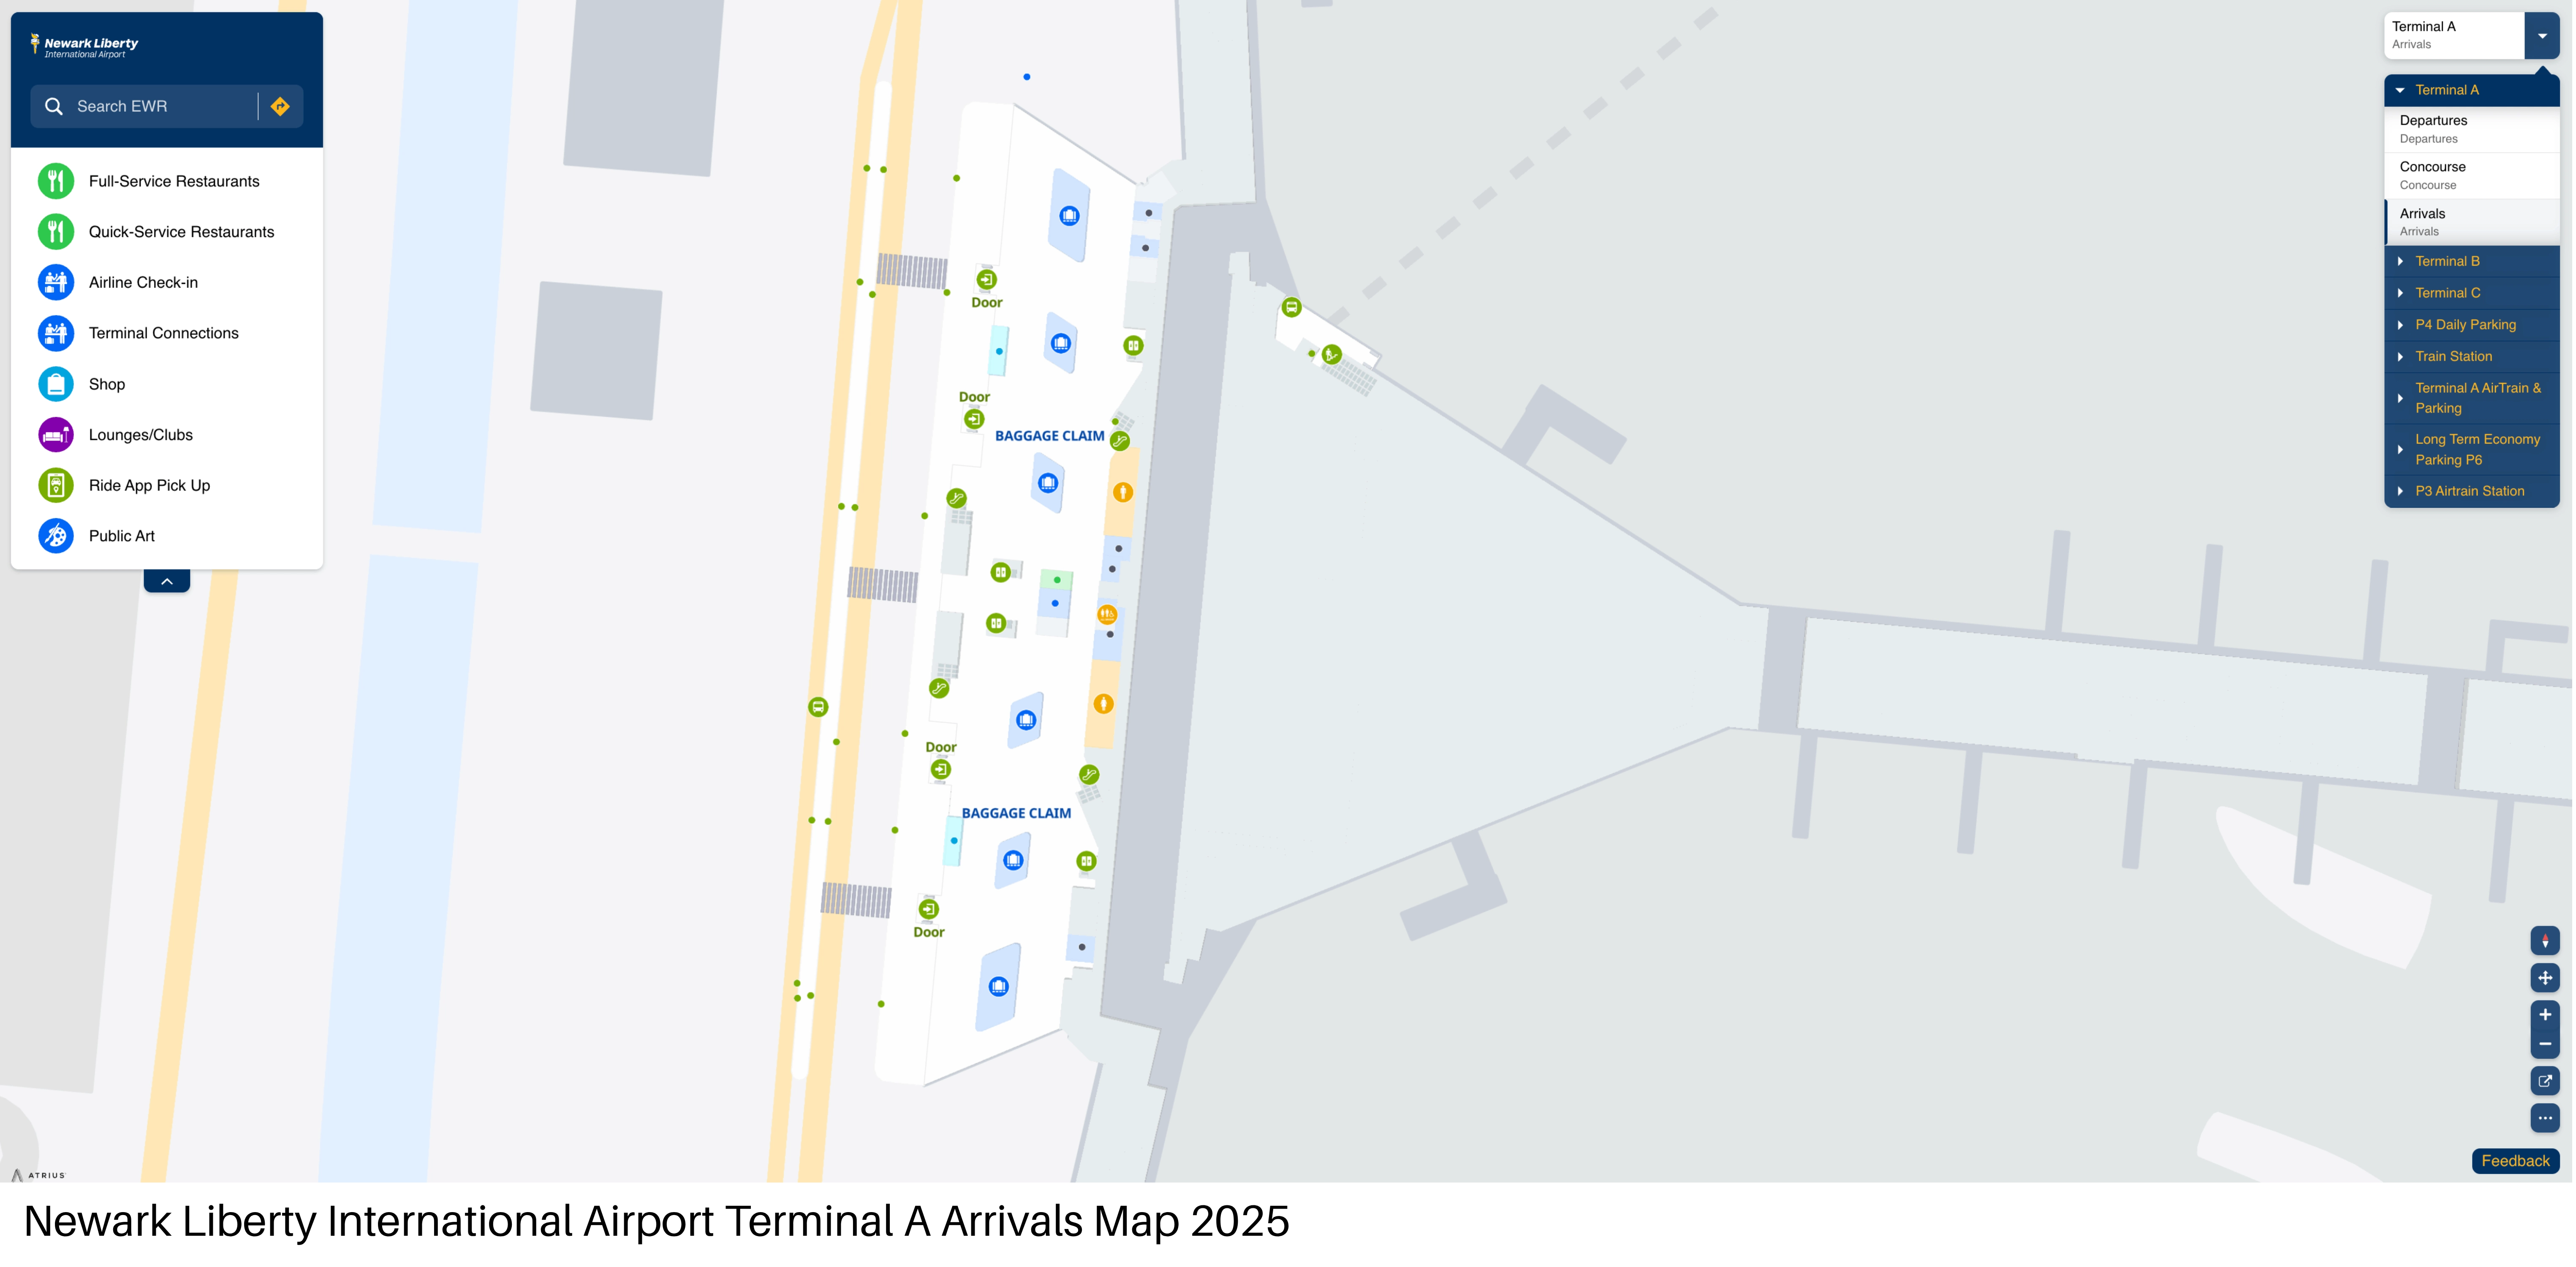
| Terminal A (Level 2) | baggage claim | arrivals level claim hall | 0–4 min |
| Terminal A (Level 1) | rideshare pickup | Zones 9–10 | 4–10 min |
| Terminal A (Level 1) | AirTrain/P6 shuttles | Loading Zone 15 | 3–8 min |
| Terminal A (Level 3) | private pickup “hack” | Departures Door 4 | 0–3 min |
Newark Liberty International Airport Terminal A Map Strategy
- Treat AirTrain arrivals as a two-step transfer (train + last-mile). Default to the walk via A Garage Level 2 bridge when you can’t tolerate shuttle wait variance.
- At security, orient first: PreCheck/CLEAR far right; standard center/left. Don’t commit to a line until you confirm the lane bank.
- For inter-terminal connections, lock onto Gate A28 early. If you need Terminal C, stay airside and follow “Terminal Transfer Shuttle” signage to the ground-level bus gates.
- On arrivals, don’t request rideshare until you’re physically walking toward Zones 9–10; avoid mixing up rideshare with Loading Zone 15 (AirTrain/P6 shuttle area).
2025 Newark Liberty International Airport Terminal A Map + Printable PDF
Terminal A remains the “new” terminal (operational since 2023) with the same core layout: one main security bank, trident concourses, and the key constraint that AirTrain’s “Terminal A” station is still separated from the building. The big 2025 reality is still transitional access: shuttle-to-terminal or walk via A Garage + Level 2 bridge, with the longer-term AirTrain replacement aiming to fix the mismatch around 2030.
Newark Liberty International Airport Terminal A Arrivals Map 2025
Newark Liberty International Airport Terminal A Concourse Map 2025

Newark Liberty International Airport Terminal A Departure Map 2025
2025 Newark Liberty International Airport Terminal A Map Guide
What is the exact walking distance (in meters) from the AirTrain “Terminal A” station to the Terminal A departures check-in hall entrance (shortest signed route)?
The shortest signed walk is about 500–700 meters from the AirTrain “Terminal A” station to the Terminal A departures check-in hall entrance, because the station serves the A Garage/CONRAC area rather than the terminal building.
| Route segment | Landmark anchor | Approx. distance |
|---|---|---|
| Station exit → covered walkway | street-level exits from “Terminal A” station | 100–200 m |
| Walkway → A Garage interior | entry into Parking A Garage | 100–200 m |
| Up to Garage Level 2 → pedestrian bridge | Level 2 bridge signage/entry | 100–200 m |
| Bridge → terminal entry → up to Level 3 check-in | bridge into terminal (Level 2), escalators to Departures (Level 3) | 150–250 m |
Where is the exact shuttle-bus boarding point (door/level/landmark) for the AirTrain → Terminal A shuttle, relative to the AirTrain station exits?
The AirTrain → Terminal A shuttle boards at street level immediately outside the AirTrain “Terminal A” station exits, at the curb by the station’s escalator/elevator down from the platform.
It’s positioned right after you exit the station and descend to roadway level, in the curb lane marked with “Shuttle to Terminal A” / “AirTrain–Terminal A” signage. Stay at the station-side curb (not inside the A Garage lanes) and look for the queue forming beside the posted shuttle sign rather than hotel/parking shuttle placards.
What is the exact location (gate number + nearby landmark) of the airside Terminal Transfer Shuttle entrance inside Terminal A?
The airside Terminal Transfer Shuttle entrance is at Gate A28, with boarding down at the ground-level bus gates directly below the Gate A28 area.
Follow the “Terminals B/C via Shuttle” or “United Shuttle” signs through the secure concourse toward the far end of the central/east spine where Gate A28 sits. At Gate A28, look for the nearby escalator/elevator that drops to the lower (ground) level—this is the actual shuttle boarding area, not the main gate-level corridor. If you’re standing at Gate A28 signage and you don’t see a down-escalator/elevator access point, you’re still one turn away from the bus-gate entrance.
What is the exact drop-off gate/portal location where the airside shuttle from Terminal A arrives in Terminal C?
The airside shuttle from Terminal A arrives in Terminal C near Gate C71 at a ground-level receiving door/portal that feeds directly back into the secure concourse.
In Terminal C, follow “Terminal Transfer Shuttle” signs toward the Gate C71 area and look for the ground-level corridor/doorway used for bus arrivals. The key triangulation is “C71 + ground-level shuttle portal,” not a regular passenger boarding gate podium—if you’re seeing only standard gate seating and no signed bus-door access, you’re one pier off.
What is the exact walking distance (meters) from the Terminal A security checkpoint exit to the farthest common A-gates (end-of-concourse point)?
Walking is roughly 600–750 meters from the Terminal A security checkpoint exit to the farthest common A-gates at the end of the main spine (Gate A28 area). This isn’t published as a single fixed meter value on the terminal map, so the best map-backed figure is a tight range based on the checkpoint-to-A28 walk time and concourse geometry.
| Segment | Landmark anchor | Approx. distance |
|---|---|---|
| Security exit → main post-security split | end of screening, first concourse direction signs | 50–120 m |
| Split → central rotunda/main spine | large open hub before the long straight concourse | 100–180 m |
| Rotunda → Gate A28 area | long central/east concourse toward the A28 gate cluster | 450–550 m |
Where are the TSA PreCheck and standard queue starts positioned relative to each other at Terminal A security (which side/which bank), based on the checkpoint map/layout?
TSA PreCheck starts on the far right side of the main security checkpoint entrance when you’re facing the screening area from the departures check-in hall. Standard screening queues start in the center and left portions of the checkpoint bank.
CLEAR is co-located on the right side near the PreCheck lanes, so the visual cue is “right = PreCheck/CLEAR cluster.” If you walk up and see CLEAR podiums and PreCheck placards, you’re in the correct right-side bank; if you’re centered under the main overhead signs with longer stanchions, you’re in the standard entry area.
What is the exact walking distance (meters) from the Terminal A Parking Garage (A Garage) pedestrian bridge entry to the main departures doors/check-in?
Walking is about 300–400 meters from the A Garage pedestrian bridge entry to the main departures doors and check-in area in Terminal A.
| Segment | Landmark anchor | Approx. distance |
|---|---|---|
| Garage Level 2 bridge entry → terminal-side bridge exit | enclosed pedestrian bridge | 100–150 m |
| Bridge exit → arrivals/mezzanine interior path | terminal entry off the bridge (Level 2) | 50–120 m |
| Level 2 → Level 3 escalator climb + approach | up to Departures/Check-in hall | 80–150 m |
From baggage claim in Terminal A, what is the exact mapped pedestrian route (turn-by-turn landmarks) to the rideshare pickup area, without using elevators that dead-end?
The mapped route goes from Terminal A baggage claim (Level 2) down to Ground Transportation (Level 1), then right along the curb to Ride App Zones 9–10.
- Baggage claim (Level 2) → follow “Ground Transportation / Ride App Pickup” signs toward the down escalators near the claim hall exits.
- Take the escalator down to Level 1 (Ground Transportation) and stay inside until you reach the curbside exit doors (avoid crossing the pedestrian bridge toward A Garage).
- Exit to the curb and immediately turn right, staying on the sidewalk that runs along the terminal frontage.
- Walk past the earlier curb zones and continue to the far-end Ride App pickup area labeled Zones 9 & 10, where the rideshare crowd clusters by the posted zone signs.
Where exactly are the “exit corrals/holding pens” located in Terminal A (relative to baggage claim exits and curb doors) on the interior layout?
The “exit corrals/holding pens” are on the Arrivals curb level (Level 1) directly outside the curb doors, where the curb is segmented into numbered pickup zones separated by barriers.
After you come down from baggage claim (Level 2) to Level 1 and exit through the curb doors, the controlled corrals appear immediately along the sidewalk edge—fenced/bollarded sections that funnel passengers into specific zone queues. The densest “holding pen” behavior typically forms at Ride App pickup Zones 9–10 (farther right along the curb) and at Loading Zone 15 (AirTrain/P6 shuttle area), where signage and crowding keep people clustered in place.
What is the exact location (door/curb zone/level) of private-car pickup at Terminal A that avoids the most congested loop, according to the terminal curb map?
Private-car pickup that avoids the worst Level 1 arrivals congestion is best done on the Departures level (Level 3) at Door 4.
Door 4 on Level 3 is a proven pickup point because scheduled shuttle operations (including the P6 Economy shuttle) list a Departures-level stop there, which confirms curb access and workable stopping space. The practical effect is fewer “corral” barriers and less gridlock than the Level 1 arrivals frontage—coordinate the pickup as “Terminal A Departures, Door 4” and have the driver stay in the departures curb lane.
What is the exact walking distance (meters) from the AirTrain Terminal A station to the Terminal A shuttle drop-off point (if you don’t walk the whole way to the terminal)?
Walking is only about 60–150 meters, because the long “gap” is covered by the shuttle bus, not on foot. The only required walking is inside the AirTrain station down to street level and out to the curbside shuttle stop.
| Step | Landmark anchor | Walk distance |
|---|---|---|
| Platform → street level | escalators/elevator down from AirTrain platform | 20–60 m |
| Street level → shuttle queue | curbside “Shuttle to Terminal A” sign immediately outside station exits | 20–60 m |
| Terminal-side walking | none to reach the drop-off point (it is the bus stop) between Door 3 and Door 4 on Departures Level | 0 m |
What is the exact location (door/curb zone/level) of the rental-car / CONRAC shuttle boarding area from Terminal A, based on the terminal ground transport map?
The rental-car / CONRAC path boards from Arrivals level (Level 1) at Loading Zone 15, signed as the “Shuttle to AirTrain.”
From Terminal A baggage claim (Level 2), go down to Ground Transportation (Level 1) and exit to the curb following “Shuttle / AirTrain” signage rather than “Ride App.” At the curb, look for the posted “Loading Zone 15” marker and the queue under “Shuttle to AirTrain” signs. That shuttle takes you back to the AirTrain “Terminal A” station area, where you transfer to AirTrain for the Rental Car Center/CONRAC stops (station naming can vary by phase, but the first anchor you need is still Zone 15 on Level 1).