Narita International Airport Map (Most Up-To-Date)
Narita International Airport is a three-terminal “island” layout spread across a wide perimeter road system, not a single connected mega-terminal. The airport’s navigation scale is defined by two separate rail stations (Terminal 1 vs Terminal 2·3) and a landside shuttle-bus network that operates in loops. Within Tokyo’s main Narita gateway, the biggest time losses come from picking the wrong level (B1F vs 1F) or assuming an airside walk exists when it doesn’t.
Map Table
| Terminal | Key Airlines | Primary Function | Transfer Mode |
|---|---|---|---|
| Terminal 1 | SkyTeam, Star Alliance | full-service international hub | Narita Airport Station (B1F), shuttle bus (Stop 6) |
| Terminal 2 | Oneworld, full-service carriers | mainline international + domestic | Airport Terminal 2·3 Station (B1F), shuttle bus (Stops 8/18), corridor to T3 |
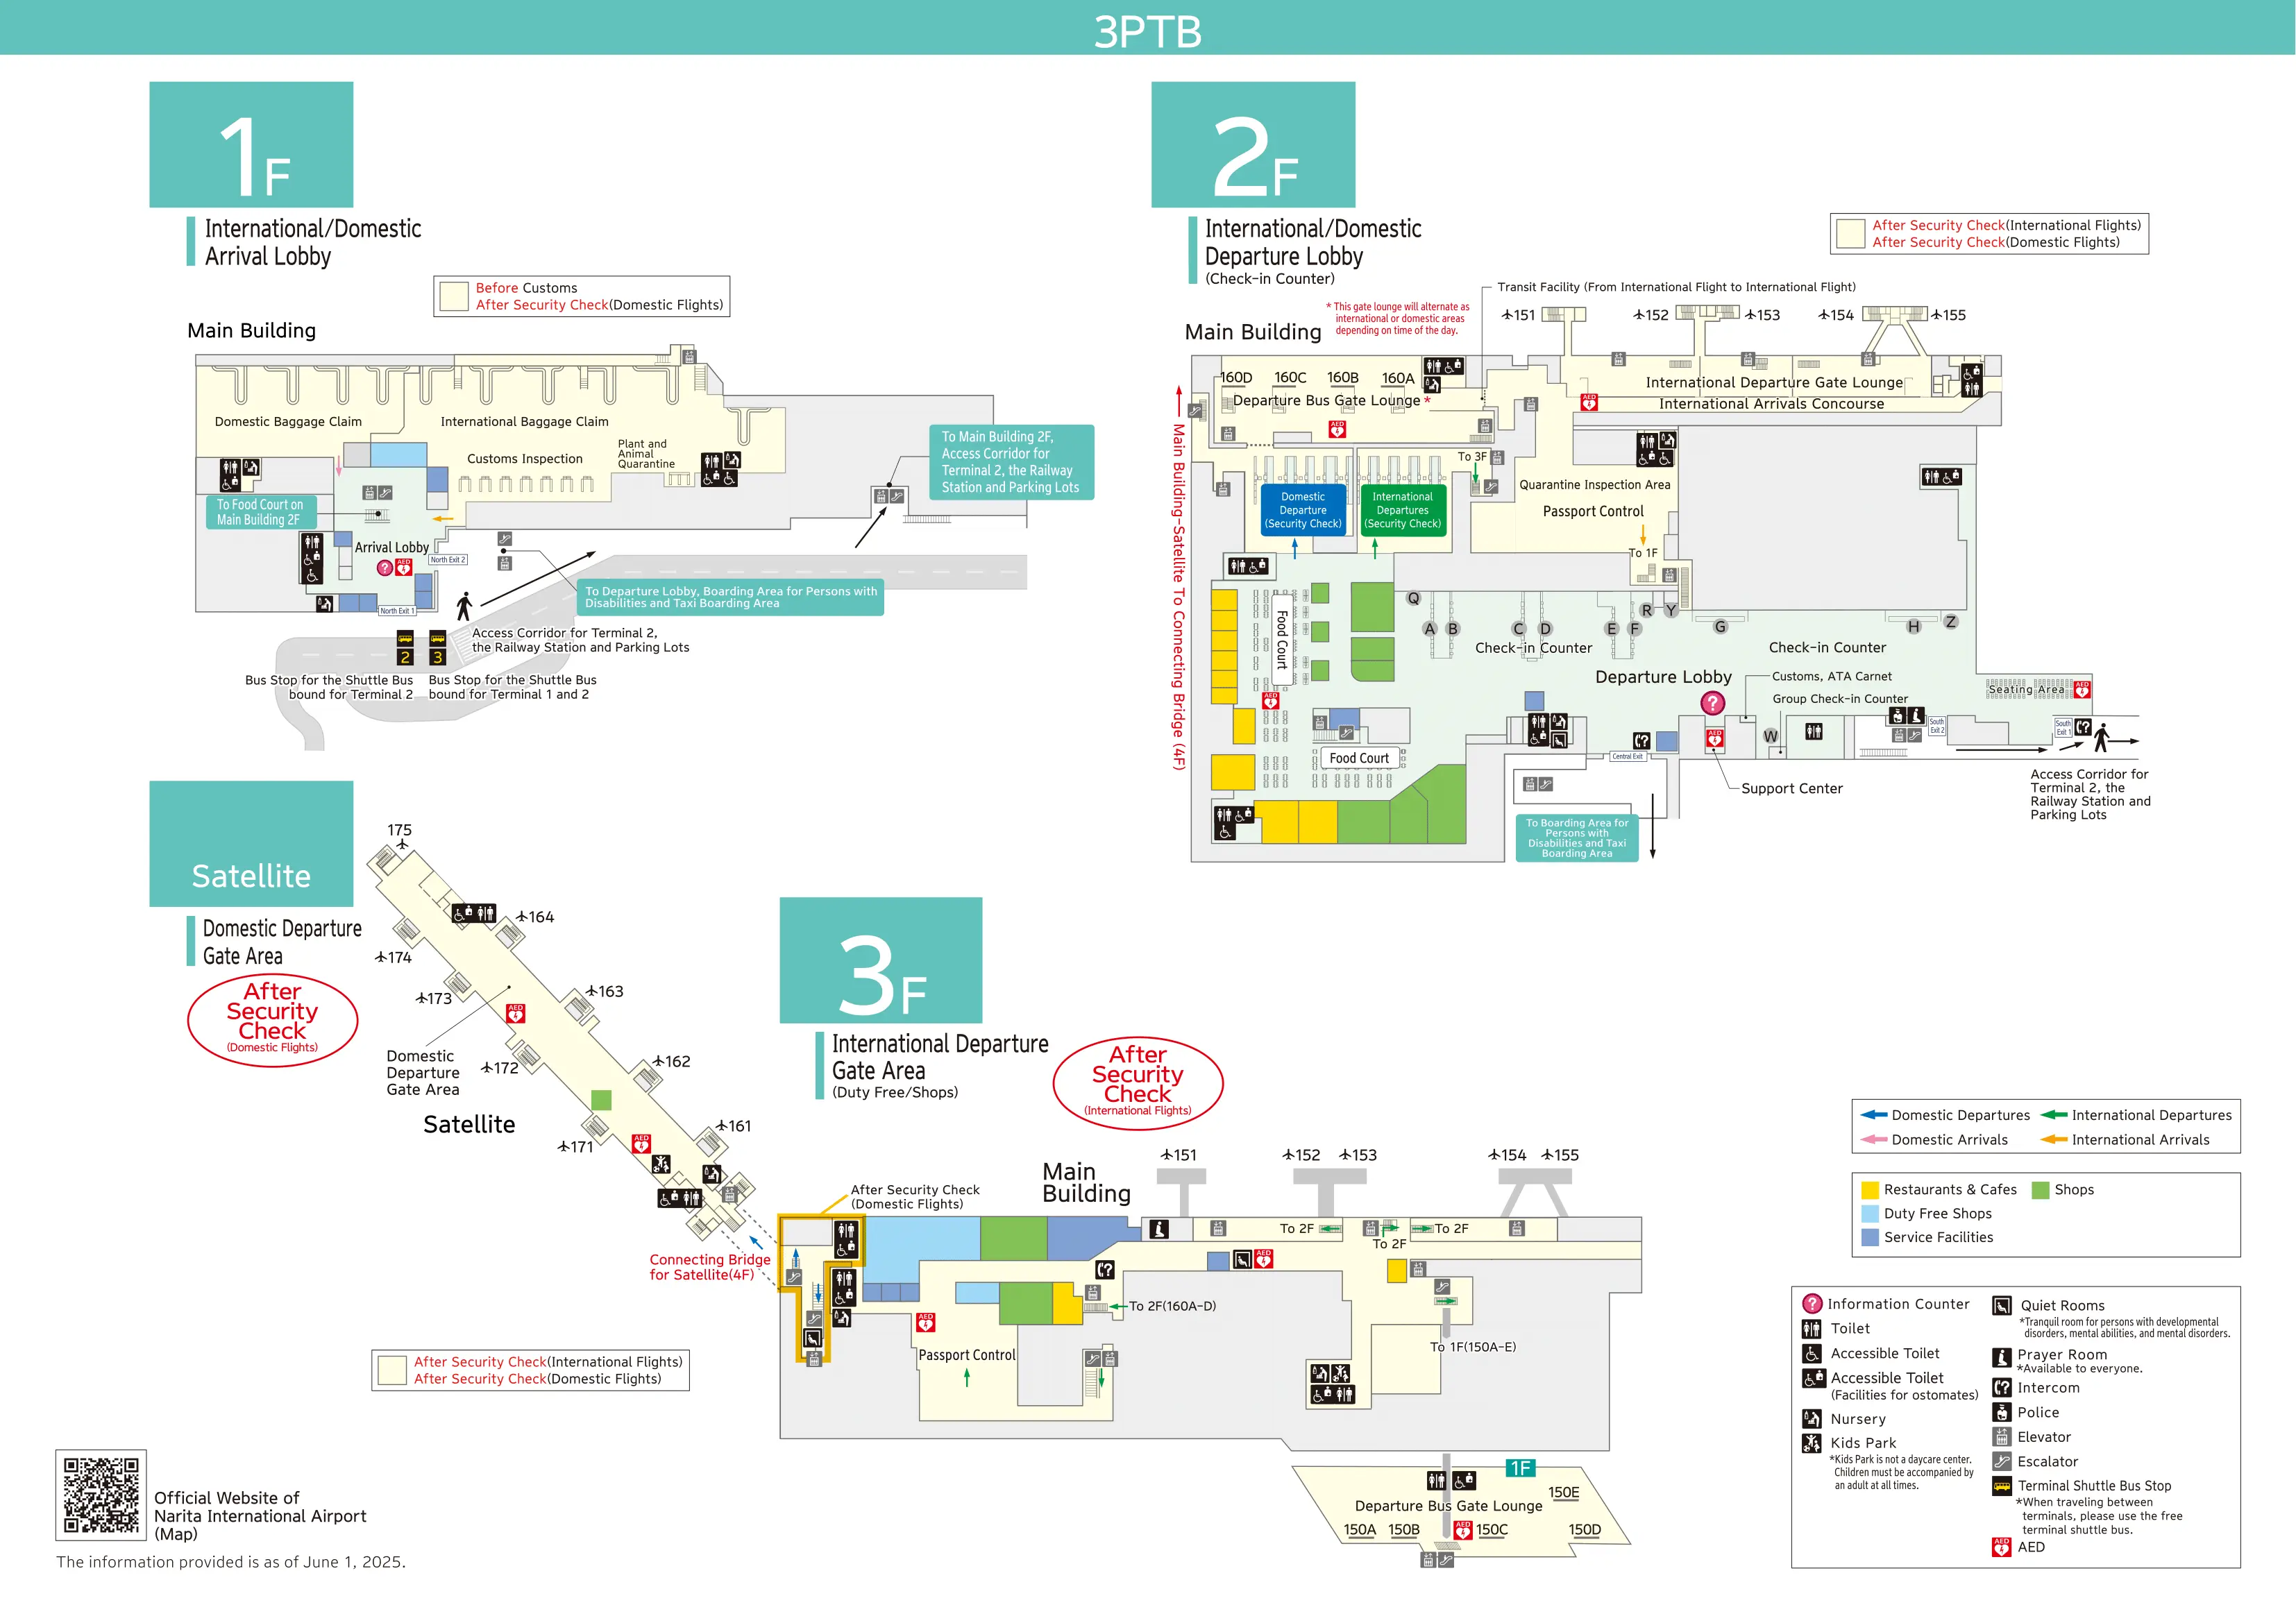
| Terminal 3 | LCC carriers | low-cost terminal | corridor to T2, shuttle bus (Stop 3), rail via T2·3 Station |
Narita International Airport Map Strategy
- Treat inter-terminal movement as mode-based: shuttle bus, corridor walk, or rail access; do not rely on “it looks close” across terminals.
- Use stop numbers and levels as your compass: shuttle-bus boarding is tied to specific curb stops, and rail access is anchored on B1F—not outside on the curb.
- Assume airside walking between terminals is not an option unless you are explicitly routed to an inter-terminal bus gate; the wrong airside assumption can force a landside exit and re-screening.
- Budget the walking penalty as part of the transfer, not after it: long internal approaches plus one wrong stop/level choice can cascade into a missed flight.
2026 Narita International Airport Map + Printable PDF
Printing the 2026 Narita map is the fastest way to lock in the two traps that cause most missed connections: the split rail stations (Terminal 1 vs Terminal 2·3) and the shuttle-bus loop mechanics (wrong stop number or direction). The current layout still rewards “mode-first” decisions—rail vs shuttle vs corridor—before you commit to a curb, escalator bank, or gate corridor.
Narita International Airport Terminal 1 Level B1 1 2 3 Map 2025
Narita International Airport Terminal 1 Level 4 5 Map 2025

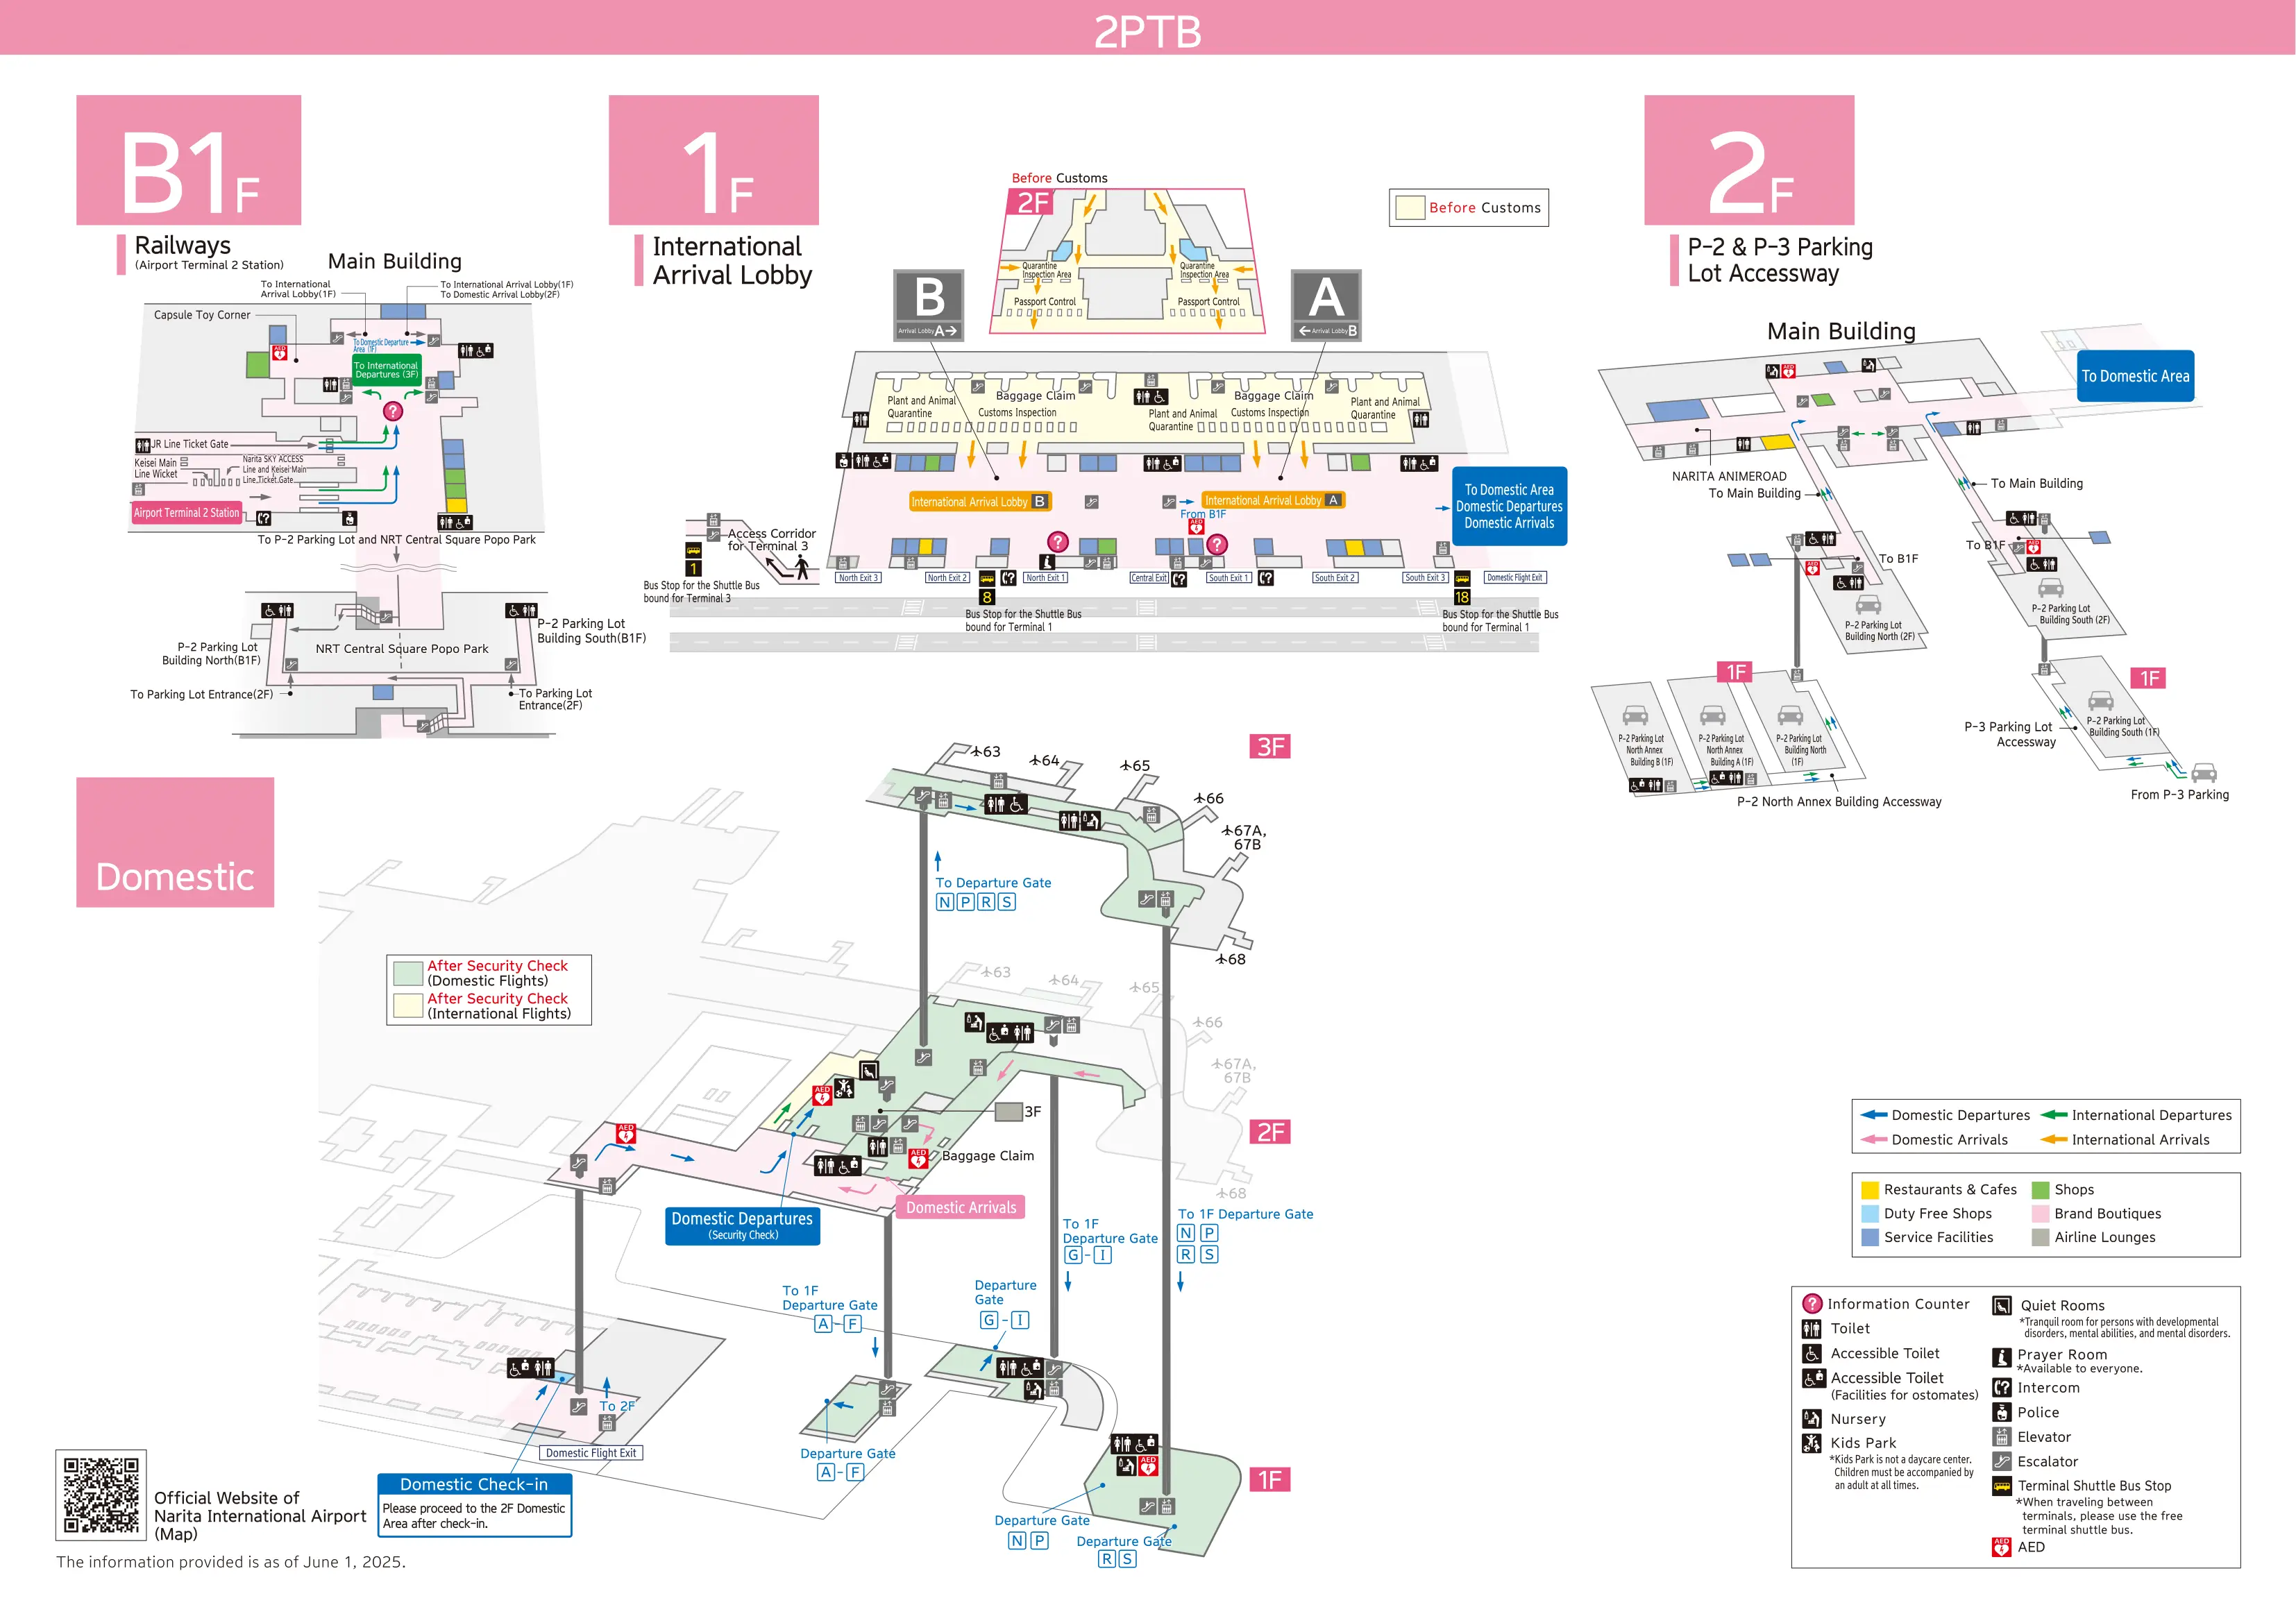
Narita International Airport Terminal 2 Level B1 1 2 Map 2025
Narita International Airport Terminal 2 Level 3 4 Map 2025
Narita International Airport Terminal 3 Level 1 2 3 Satellite Map 2025
2026 Narita International Airport Map Guide
What is the exact walking distance (meters) from Narita Terminal 1 Arrivals exit to Terminal Shuttle Bus Stop 6 (as labeled on-site)?
The walking distance is approximately 80 meters from the Terminal 1 Arrivals exit doors to Terminal Shuttle Bus Stop 6. That distance assumes you exit into the 1F Arrival Lobby curb area, head directly to the shuttle-bus island, and cross the first curb lane to reach the stop-number signage.
| Start point | End point | Route cue | Distance |
|---|---|---|---|
| T1 Arrivals exit doors (1F) | Shuttle Bus Stop 6 (curbside island) | straight out to the numbered shuttle stop area | ~80 m |
What is the exact shuttle-bus travel time from Terminal 1 Stop 6 to Terminal 3 on the official terminal loop route?
The shuttle-bus travel time is 14–16 minutes from Terminal 1 Stop 6 to Terminal 3 on the official “All Terminals” loop. This is the longest leg of the landside loop and can’t be shortcut by walking from Terminal 1.
| Origin | Route | Destination | Travel time |
|---|---|---|---|
| T1 Stop 6 | All Terminals loop (T1 → T3 → T2 → T1) | Terminal 3 | 14–16 min |
What is the exact walking time from Terminal 1 Immigration exit to Gate 47 using the shortest passenger route (including moving walkways)?
Walking takes approximately 10–12 minutes from Terminal 1 Immigration exit to Gate 47 using the shortest passenger route with moving walkways. The fastest path stays on the South Wing airside spine, runs past the main duty-free corridor and the Narita Nakamise retail stretch, then continues into the Gate 47 corridor toward the Satellite 4 side.
| Start point | Landmark anchor | End point | Walking time |
|---|---|---|---|
| T1 Immigration exit (South Wing airside) | Narita Nakamise / main duty-free spine | Gate 47 | ~10–12 min |
What is the exact walking distance from Terminal 1 Security checkpoint exit to the furthest departure gates (identify the furthest gate zone on the map)?
The walking distance is approximately 900–1,000 meters from the Terminal 1 South Wing security checkpoint exit to the furthest departure gate zone, Satellite 5 (Gates 51–58), with Gate 58 at the far tip. This is the longest straight-line “pier walk” in Terminal 1 and has no public internal shuttle to reduce the distance.
| Start point | Key pass-by anchor | End point | Distance |
|---|---|---|---|
| T1 South Wing security exit | South Wing main spine | Satellite 4 junction | ~500–600 m |
| Satellite 4 junction | continue straight past the final pier split | Satellite 5 far tip (Gate 58) | ~400–500 m |
| Total | Satellite 5 (Gates 51–58) | ~900–1,000 m |
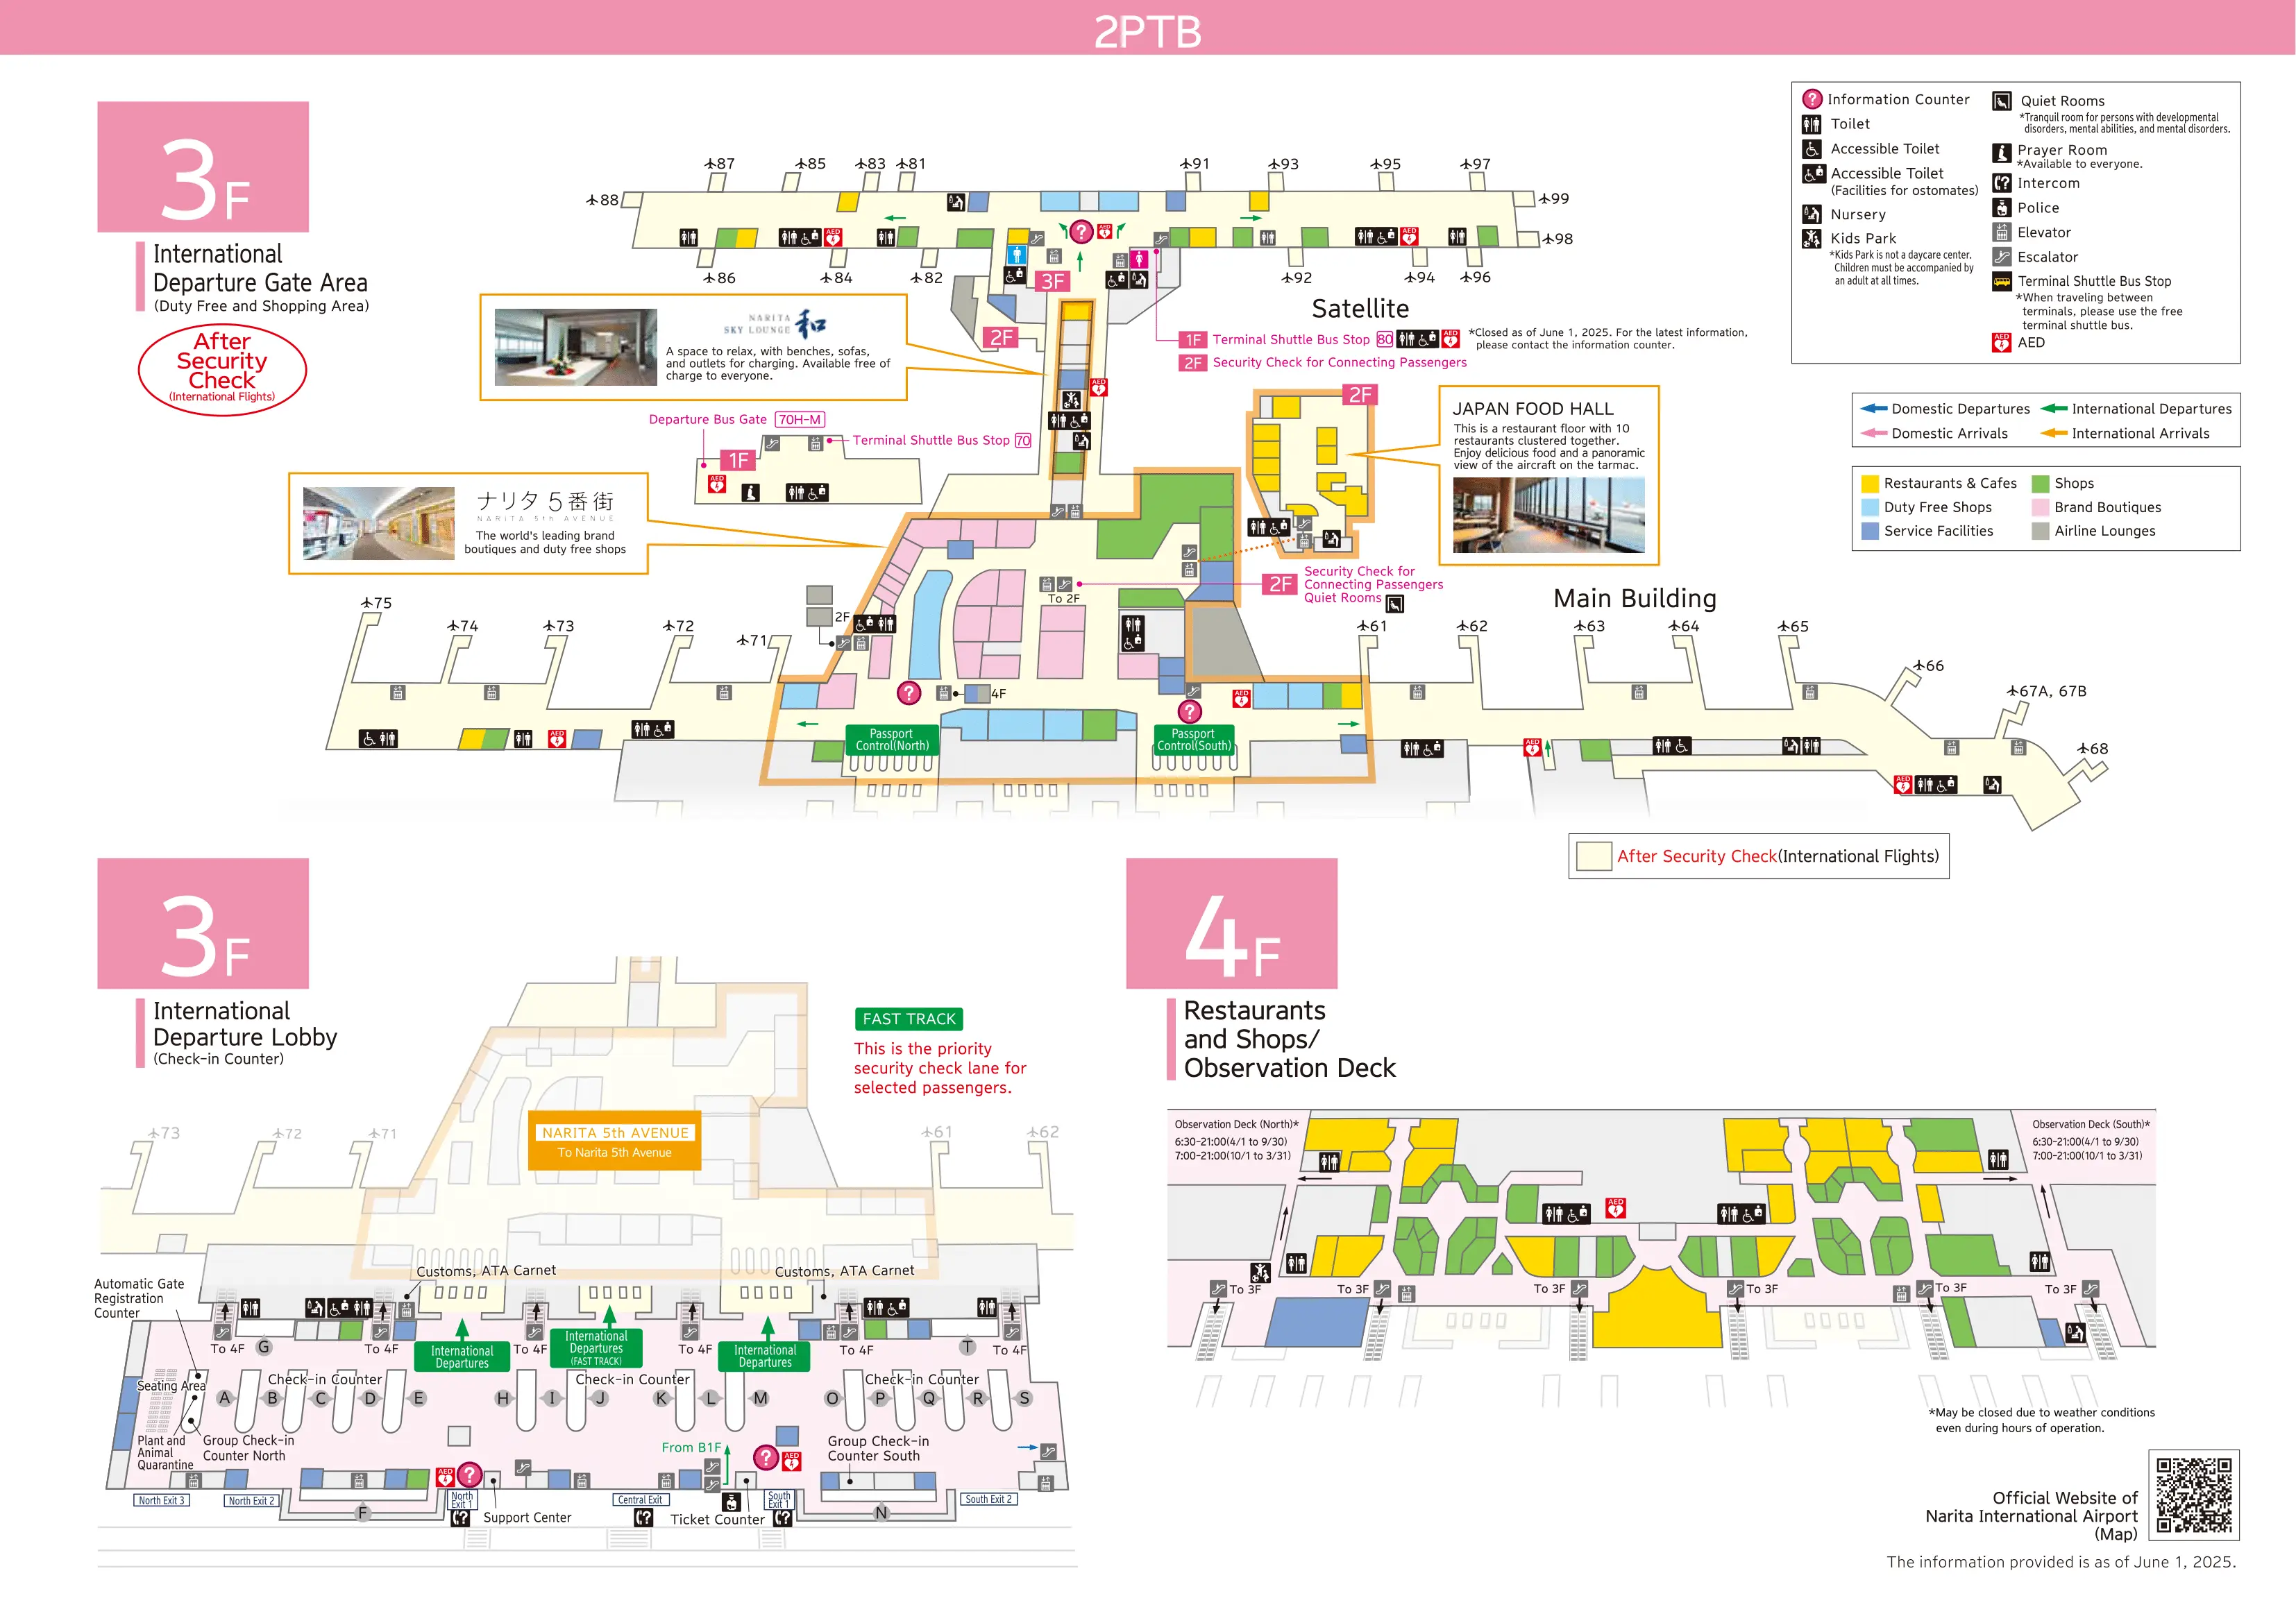
Where is the physical boundary point where a traveler must exit secure/airside to transfer from Terminal 2 to Terminal 1 (pinpoint the exact exit/level on the terminal map)?
There is no airside pedestrian connection between Terminal 2 and Terminal 1; the boundary point is the inter-terminal transfer bus boarding gate itself. The functional “exit” from Terminal 2’s secure zone is stepping through the bus-boarding door at the designated gate, not a corridor or concourse junction.
The boundary is at Terminal 2’s Main Building on the departures level, where “Terminal Transfer” routing sends you to the inter-terminal shuttle bus gates on the north side. After scanning your boarding pass at the gate area on 2F, you are routed down to the 1F tarmac bus-loading area to board. If you walk into the Terminal 2 Satellite connector (toward Gates 81–99), you’ve passed the practical decision point and must backtrack to reach the transfer-gate area.
Where is the airside inter-terminal bus boarding point in Terminal 2 (exact location name + level), as shown/confirmed on maps or official diagrams?
The airside inter-terminal bus in Terminal 2 boards at Gate 70 in the Terminal 2 Main Building on the 2F departures level (north side), with Gate 80 used as a secondary/overflow boarding point. Boarding is not from a corridor or walkway; it is tied to these specific gate positions.
“Terminal Transfer” wayfinding routes you to the Gate 70 / Gate 80 area on 2F, where boarding-pass control happens before you are sent down to the 1F tarmac bus-loading level to physically board. The key triangulation point is to stay in the Main Building gate area on the north side; entering the Satellite connector toward Gates 81–99 moves you away and forces a backtrack to reach Gate 70/80.
What is the exact walking route length through the Terminal 2 ↔ Terminal 3 access corridor (door-to-door from terminal entrance to terminal entrance)?
The walking route length is approximately 600 meters through the Terminal 2 ↔ Terminal 3 access corridor measured door-to-door from terminal entrance to terminal entrance. This figure is for the corridor segment itself, not the longer “station-to-terminal” walk that adds internal distance inside Terminal 2.
The corridor is the covered, semi-open “track” walkway that starts at the Terminal 2 side exit toward Terminal 3 and ends at the Terminal 3 entrance doors. The best on-the-ground confirmation is the painted running-track guidance: the blue lane flows toward Terminal 3 and the red/terra-cotta lane flows back toward Terminal 2, keeping you on the direct corridor line rather than drifting into curb lanes or bus bays.
What is the exact walking time for Terminal 2 ↔ Terminal 3 via the corridor when dragging luggage, based on corridor length and typical walking speeds (map distance required)?
Walking takes approximately 12–15 minutes via the Terminal 2 ↔ Terminal 3 corridor when dragging luggage, based on the corridor’s ~600 m door-to-door length. This assumes a slowed luggage pace on the covered, semi-open “track” surface with no moving walkways.
The corridor time is usually more predictable than waiting for a bus because it’s immune to loop routing and curb congestion. Follow the painted track lanes to stay on the straightest line: blue toward Terminal 3, red/terra-cotta back toward Terminal 2. The main “mistake point” is drifting toward bus bays instead of committing to the corridor entrance doors on the Terminal 2 side, which adds extra curbside distance before you’re even on the 600 m segment.
From Terminal 2 international arrivals, what is the exact walking distance to the Terminal Shuttle Bus boarding area used for Terminal 1 transfers (map-verified)?
The walking distance is approximately 50 meters from Terminal 2 international arrivals to the Terminal Shuttle Bus boarding area used for Terminal 1 transfers. This assumes you exit into the 1F curbside arrivals frontage and walk directly to the nearest Terminal 1-bound stop cluster.
Terminal 2 has two practical, redundant boarding points for the same Terminal 1 route: Bus Stop 8 by the International Arrivals B (north) exit and Bus Stop 18 by the International Arrivals A (south) exit. From either arrivals exit, the path is a short curbside move to the numbered stop sign—close enough that the real risk is not distance, but choosing the wrong stop family among other curbside buses.
What is the exact distance from Terminal 2 baggage claim exit to the JR/Keisei access path (the first clearly marked rail entrance point) on the terminal map?
The walking distance is approximately 300 meters from the Terminal 2 baggage claim exit to the JR/Keisei rail access path (the first clearly marked entrance to the station/ticket-gate approach). This route runs from the 1F arrivals/baggage-claim exit area toward the central escalator/elevator bank down to B1F, where the “Airport Terminal 2·3 Station” access begins.
The key triangulation point is to stay inside and follow “Railways/Train” routing toward the main vertical core rather than drifting out to the curb. Once you commit to the B1F descent, the rail access corridor leads directly into the shared JR/Keisei station zone that serves Terminal 2 and Terminal 3.
In Terminal 1, where is the shortest map-verified path from Arrivals to the JR Narita Express boarding area (identify decision nodes where travelers choose the wrong direction)?
The shortest path runs indoors from the 1F Arrivals Lobby to the Central Building escalators down to B1F, then turns right at the Keisei/JR split to reach the JR Narita Express area. The main failure point is exiting to the curb looking for trains instead of staying inside for the B1F descent.
The route starts at the 1F Arrivals Lobby and heads toward the Central Building atrium by the Visitor Service Center and the overhead “Railways/Train” signs. The critical decision node is the escalator/elevator bank down to B1F; missing it keeps you circulating at curb level where no rail entrance exists. On B1F, the second decision node is the fork at the bottom of the escalators: Keisei facilities are to the left, while the JR side (including the JR East Travel Service Center and the Narita Express boarding access) is to the right.
In Terminal 1, what is the exact walking distance from the JR/Keisei rail arrival point to the International check-in hall (the “wrong terminal booking” recovery route)?
The practical distance is a short horizontal walk of about 50 meters from the JR/Keisei rail arrival point on B1F to the central elevator/escalator bank, followed by a vertical climb to the 4F International check-in hall. The time penalty is driven by vertical transit and elevator queues rather than horizontal walking.
From the B1F ticket-gate arrival area, head to the Central Building atrium core where the main elevator bank and long escalator runs begin. The “wrong terminal booking” recovery failure point is choosing escalators while holding a luggage cart—carts can’t go on escalators—forcing a return to the elevator queue. Typical combined walking/standing time for the B1F → 4F move is about 5–8 minutes, with longer delays if elevators are congested.
What is the exact location and walking distance from Terminal 1 Arrivals to the correct “meet-up/pickup” curb zone used by terminal transfer shuttles (map-verified curb/door labels)?
The correct terminal transfer shuttle pickup is Bus Stop 6 on the 1F curbside shuttle-bus island outside Terminal 1 Arrivals, about 80 meters from the arrivals exit doors. This is the numbered stop used for the free inter-terminal shuttle, not the limousine-bus stops.
From the 1F Arrivals exit, stay aligned with the central curb frontage and look for the shuttle-bus stop-number signage on the curbside island. The key confusion point is that many commercial “Limousine Bus” stops sit on the same frontage with similar curb geometry; the decision node is the first stop-number cluster you reach after exiting—Bus Stop 6 is the inter-terminal target. If you are standing under a limousine-bus route board rather than a terminal-shuttle stop sign, you are in the wrong pickup zone.
What is the exact map distance between the furthest-arrival-gate zones and the terminal exit decision point where travelers report getting “lost in long hallways”?
The map distance is approximately 800–1,000 meters between the furthest arrival-gate zones and the main immigration/terminal-exit decision point where travelers report “long hallway” disorientation. This applies to remote arrival corridors such as Terminal 1’s far satellite ends that funnel passengers through long, segregated passageways before they rejoin the core processing area.
The critical triangulation anchor is the point where the dedicated arrivals corridor finally releases you into the immigration approach/processing zone—this is where wayfinding choices (follow “Arrivals/Exit” flow vs drifting toward other corridor branches) stop feeling obvious. The perceived “lost” moment typically happens mid-corridor because the route is repetitive, windowless in sections, and separated from departures by glass partitions, so there are few distinct landmarks until the immigration area signage cluster reappears.
Which specific map-labeled junction inside Terminal 1 departures is the last clear split before passengers commit to the wrong concourse direction (identify by shop/landmark names shown on the map)?
The last clear split is the Central Building departures mall junction by the Traveler’s Factory Airport shop and the Pokémon Store. This is the final low-friction place where you can correct direction before committing to the wrong wing’s security entrance.
From the Central Building 4F shopping mall area, those two landmarks sit at the hinge point where signage begins directing you toward the North Wing vs South Wing international departures/security. The practical “point of commitment” is passing beyond this landmark cluster into a wing-specific security stream; after that, correcting a wrong-wing choice is costly because the wings do not reconnect airside. If you do not see Traveler’s Factory / Pokémon Store nearby, you are already past the clearest map-labeled correction node.
What is the exact walking distance from Terminal 3 check-in area to the Terminal 3 shuttle bus pickup point for Terminal 1 (pinpoint door/stop labels)?
The walking distance is approximately 150–200 meters from Terminal 3 check-in (2F) to the Terminal 1-bound shuttle bus pickup at Bus Stop No. 3 on the Terminal 3 1F curbside. This includes the internal walk to the vertical connection and the descent from 2F to 1F.
From the 2F check-in hall, route to the main escalators down to the 1F arrivals/transport lobby, then continue straight to the curbside stop-number signage. The key anchor is the stop label itself: Bus Stop 3 is the Terminal 3 curb pickup point used for Terminal 1 transfers (often via the shuttle routing logic), while nearby stops are used for other terminal loops. If you’re at a stop labeled for Terminal 2 only, you’re one stop family off.