Munich Airport Terminal 1 Map (Most Up-To-Date)
Munich Airport Terminal 1 is a long, linear terminal (about 1.1 km end-to-end) split into lettered Modules A–E, with most passenger flow running north–south along the landside Level 04 corridor. The big orientation trap is vertical: Schengen areas largely stay on Level 04, while Non-Schengen departures in B/C shift up to Level 05. This layout sits within Munich’s main airport complex, connected through the Munich Airport Center (MAC) between T1 and T2.
Map Table
| Module | Primary Zone | Gate Level | Key Transfer Node |
|---|---|---|---|
| A | Schengen / domestic | Level 04 | T1↔T2 airside shuttle: Gate A28 |
| B | Non-Schengen | Level 05 gallery | Passport control: Level 05 above B security |
| C | Non-Schengen | Level 05 gallery | T1↔T2 airside shuttle: Gate C08 |
| D | Schengen / domestic | Level 04 | T1↔T2 airside shuttle: Gate D08 |
| E | Arrivals only | N/A | Arrivals E exit zone |
Munich Airport Terminal 1 Map Strategy
- Treat the MAC Forum split as your first hard decision: “Terminal 1 A–B” (left/north) vs “Terminal 1 C–E” (right/south). A wrong choice typically costs 300–400 m of backtracking before you can correct.
- For Modules B/C, assume a mandatory vertical sequence: Security on Level 04 → immediate move to Level 05 (passport control + gates). Do not hunt for B/C gates on Level 04; that’s how you burn time in the wrong corridor.
- For Terminal 2 connections airside, don’t search for a “shuttle station.” The shuttle is boarded at specific gates (A28, C08, D08), and reaching C08 from B typically runs about 300–350 m plus up/down level changes.
- Treat Module E as a dead-end for departures: “Arrivals E” only. Any plan that sends a departing passenger toward E risks a ~600–650 m one-way walk (and a painful return) before you reach a working departures module.
2026 Munich Airport Terminal 1 Map + Printable PDF
Terminal 1’s map logic in 2026 still hinges on choosing the correct module letter before you commit to a corridor, then matching your flight’s zone (Schengen vs Non-Schengen) to the right level. The most common time-loss patterns remain: wrong turn at the MAC split, missing the immediate ascent to Level 05 for B/C, and getting pulled into bus-gate or shuttle workflows that look like “normal gates” on signs.
Munich Airport Terminal 1 Level 3 Map 2025

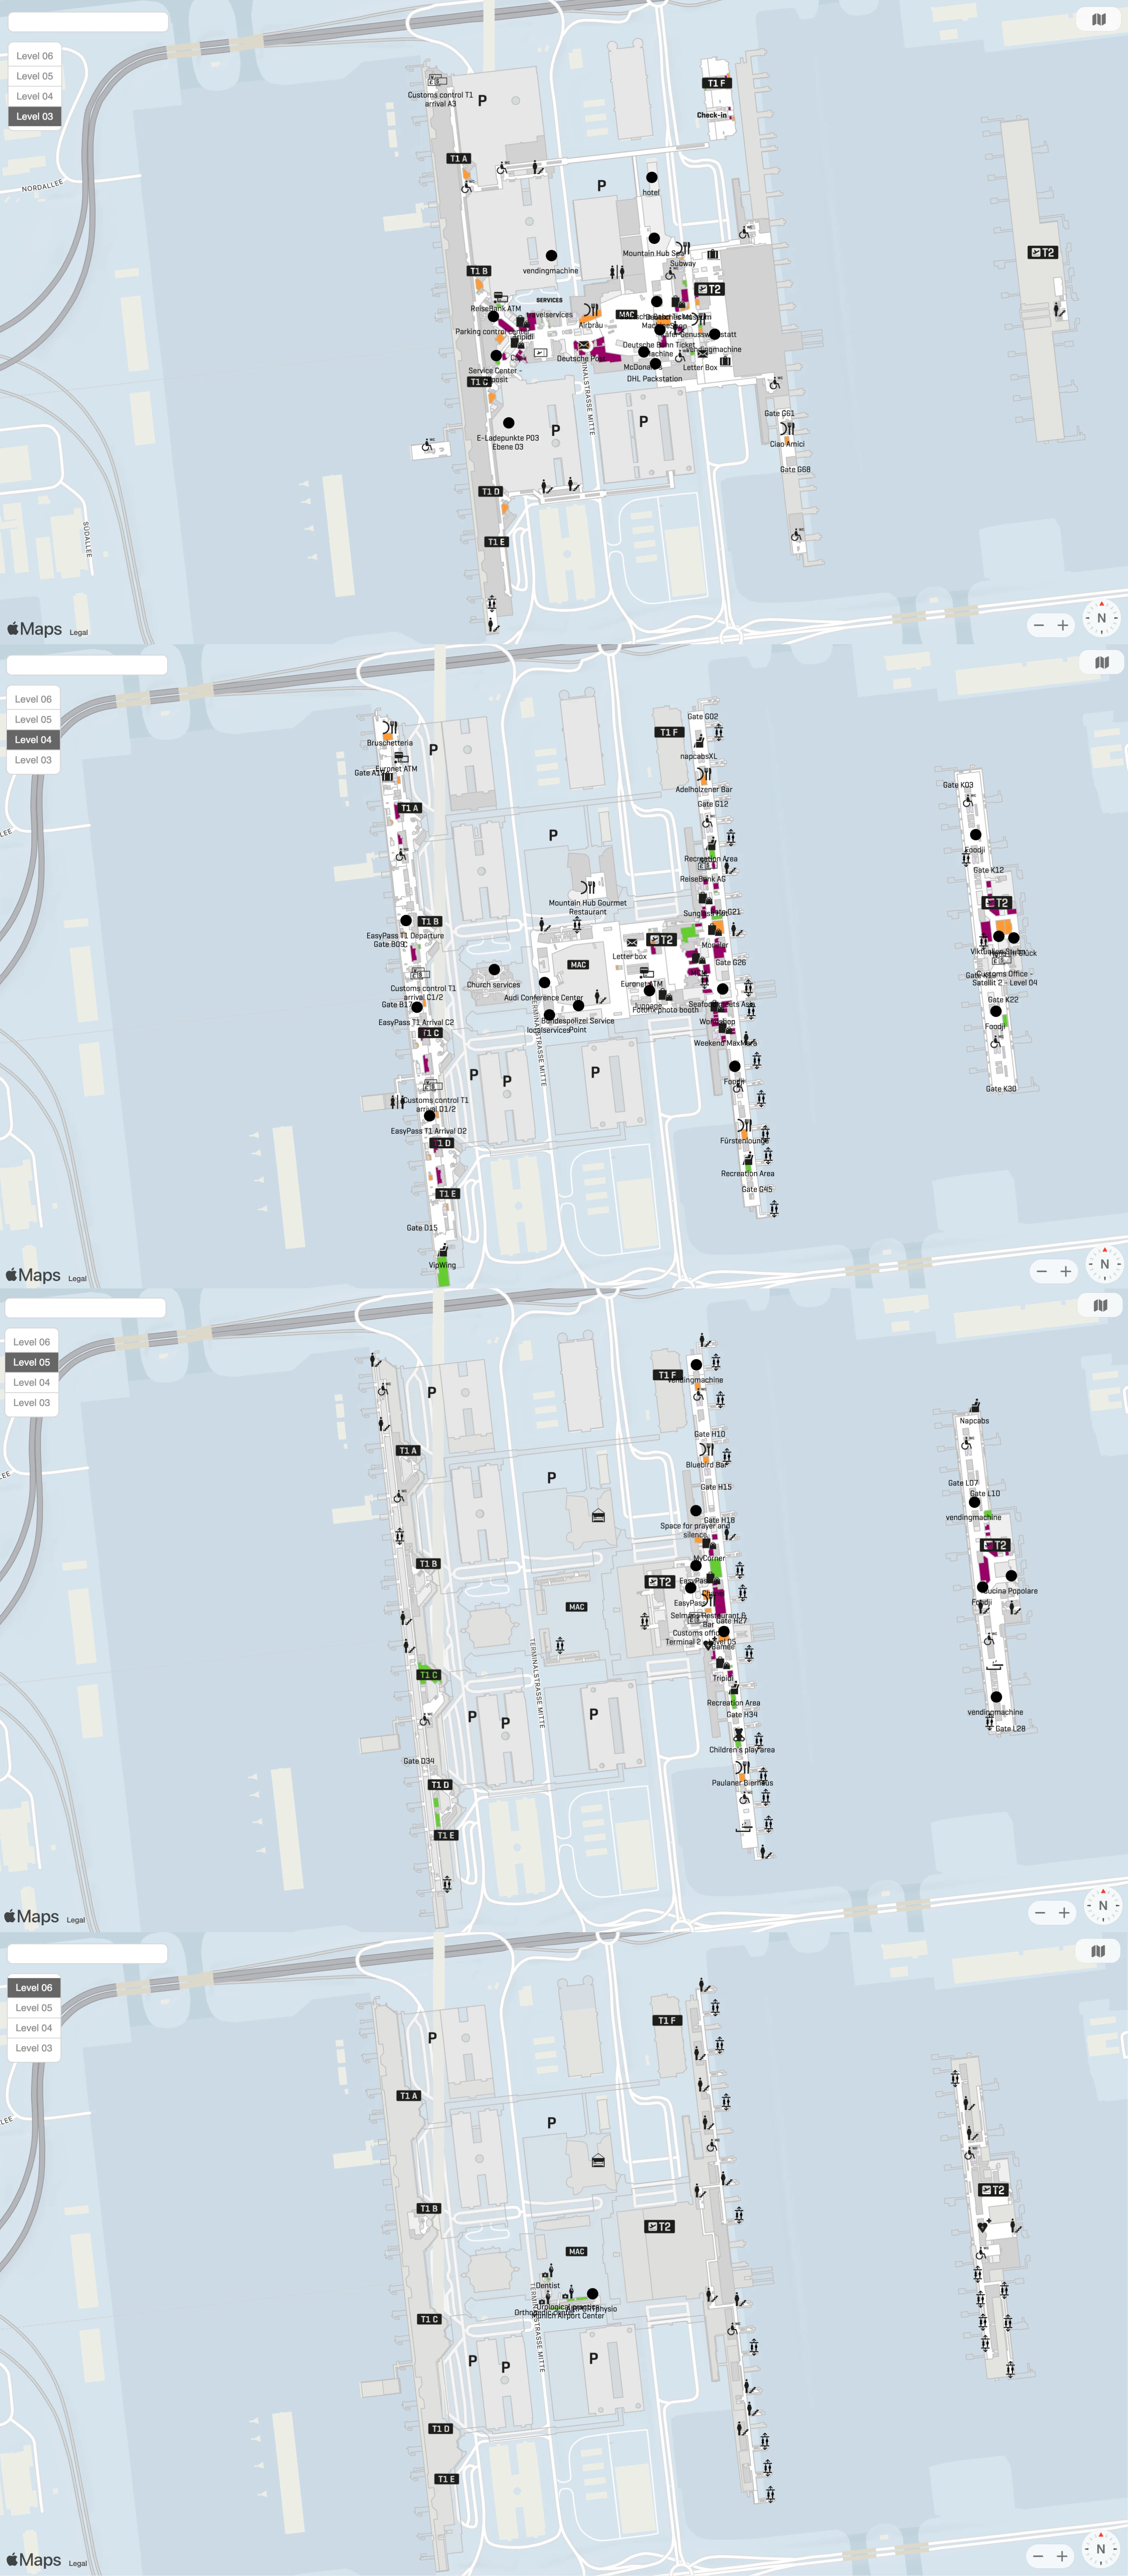
Munich Airport Terminal 1 Level 4 Map 2025
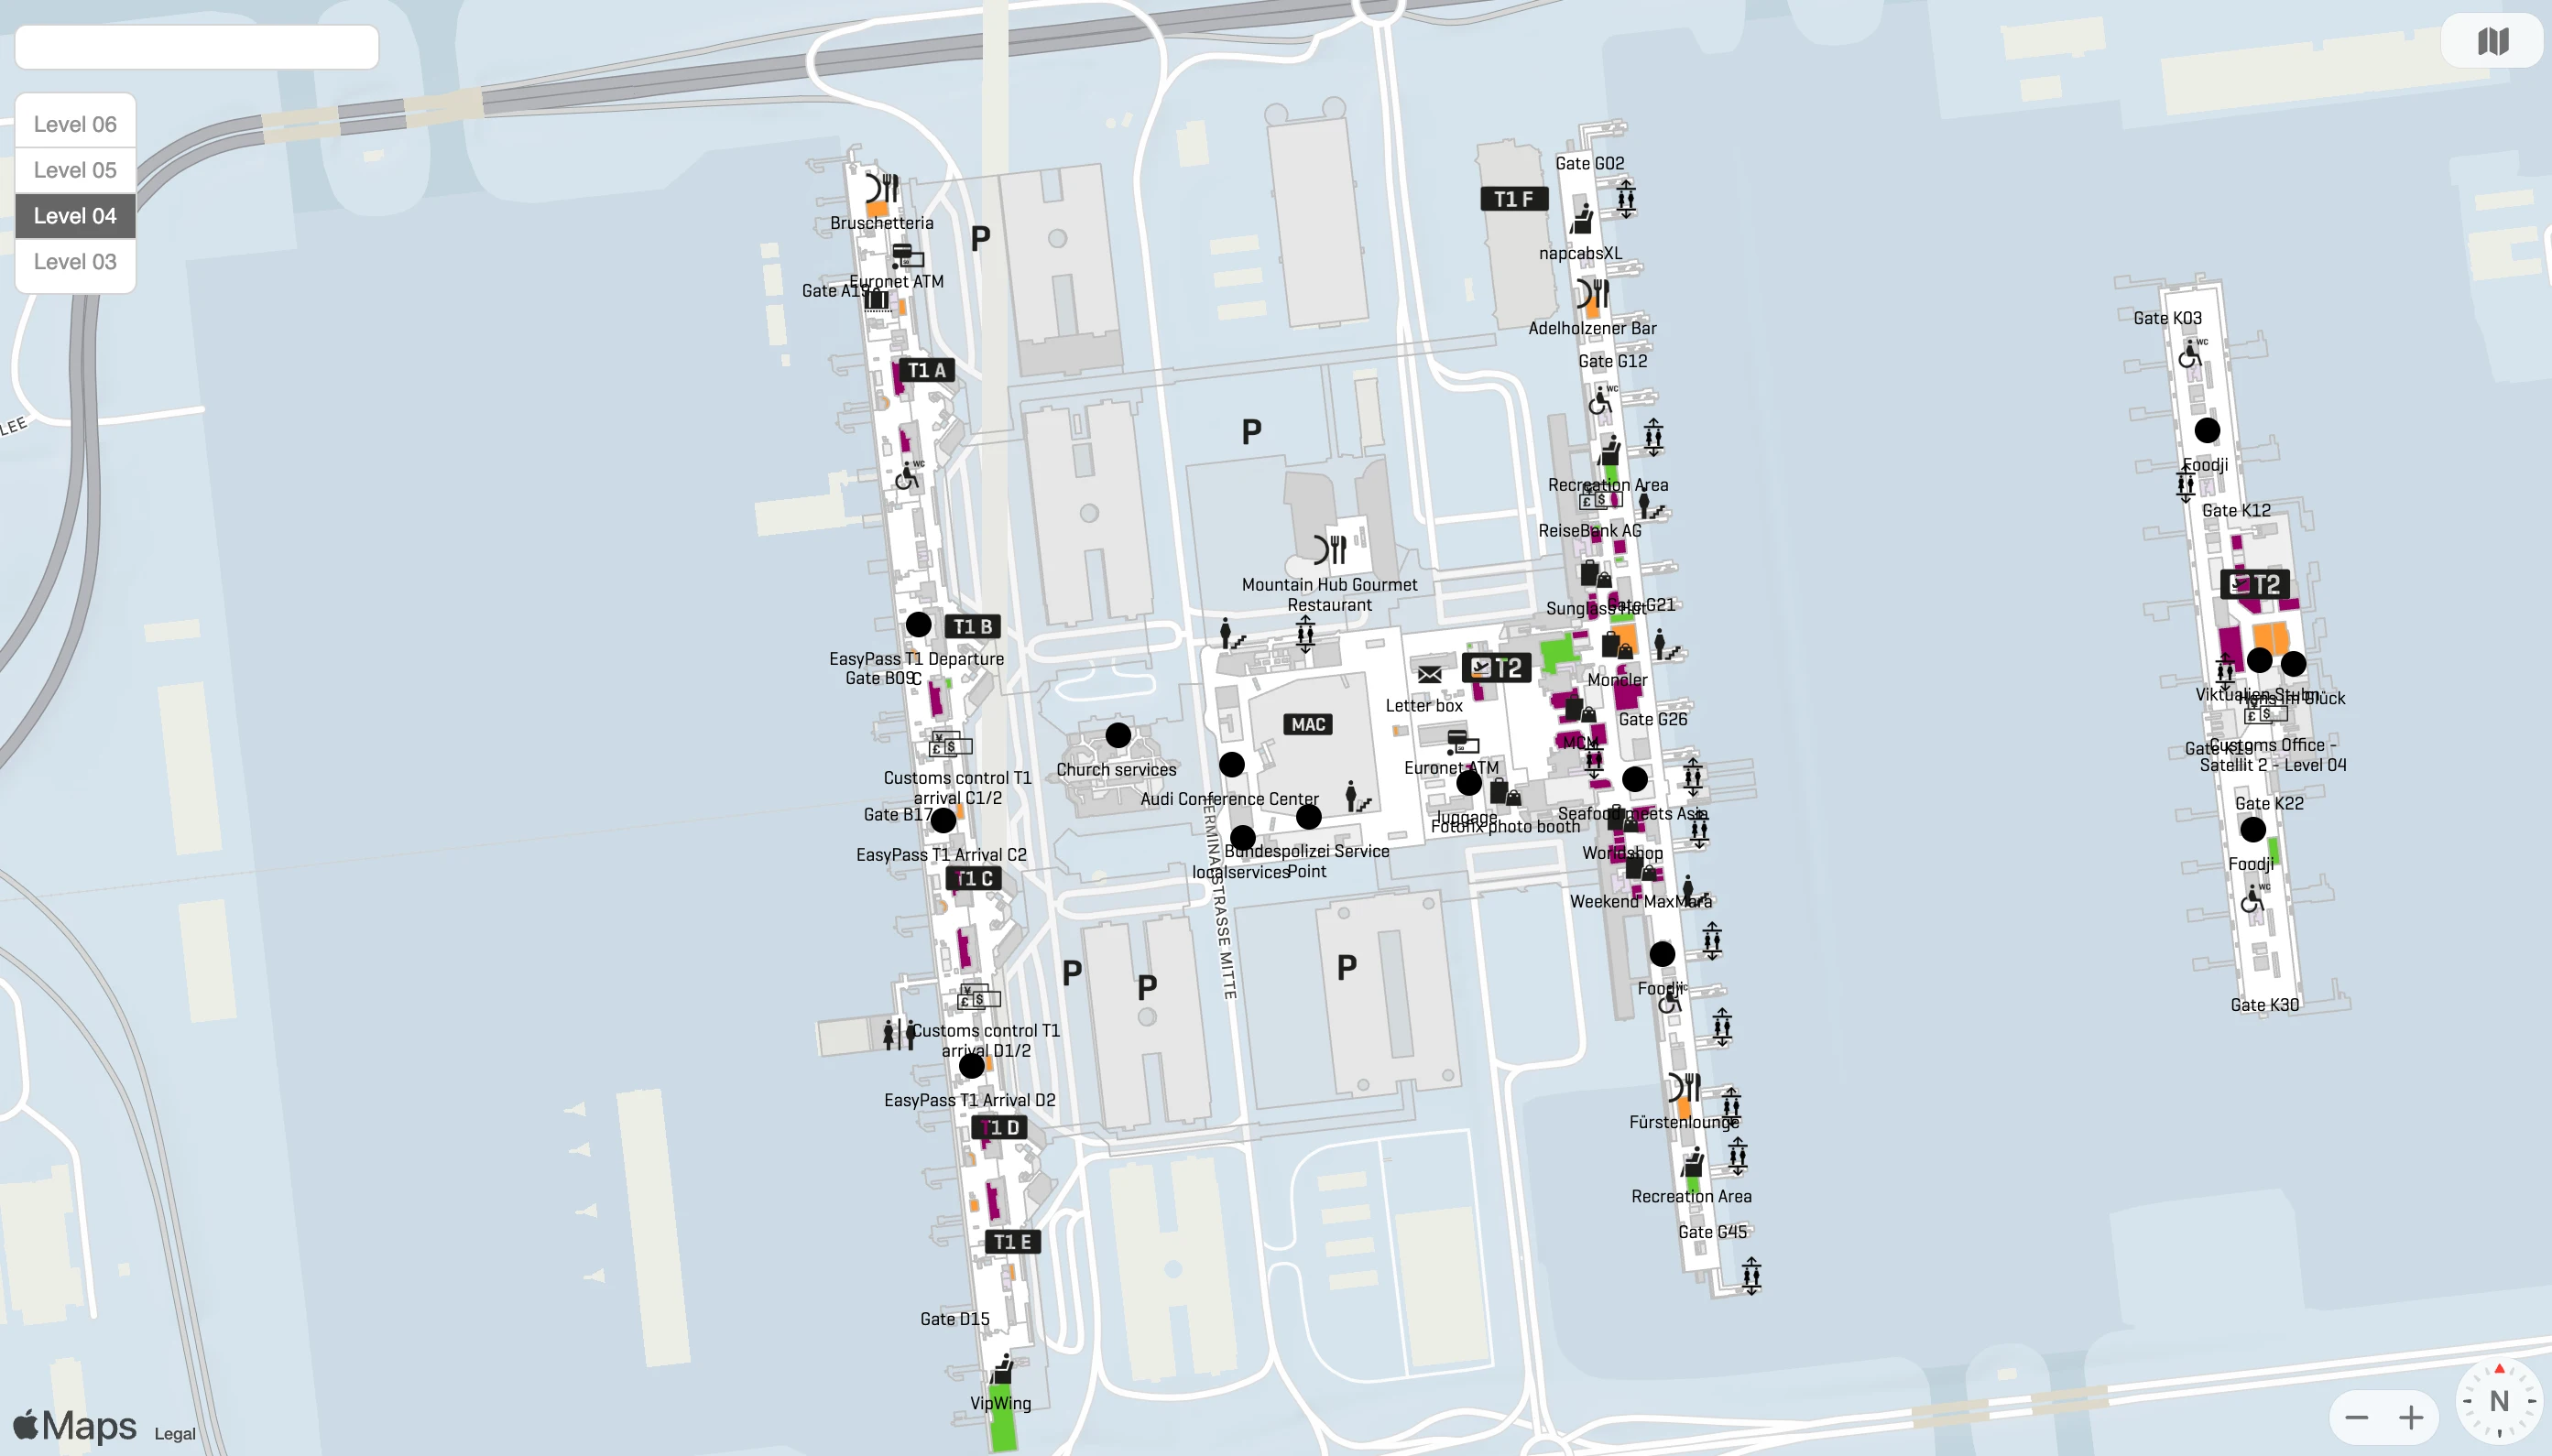
Munich Airport Terminal 1 Level 5 Map 2025
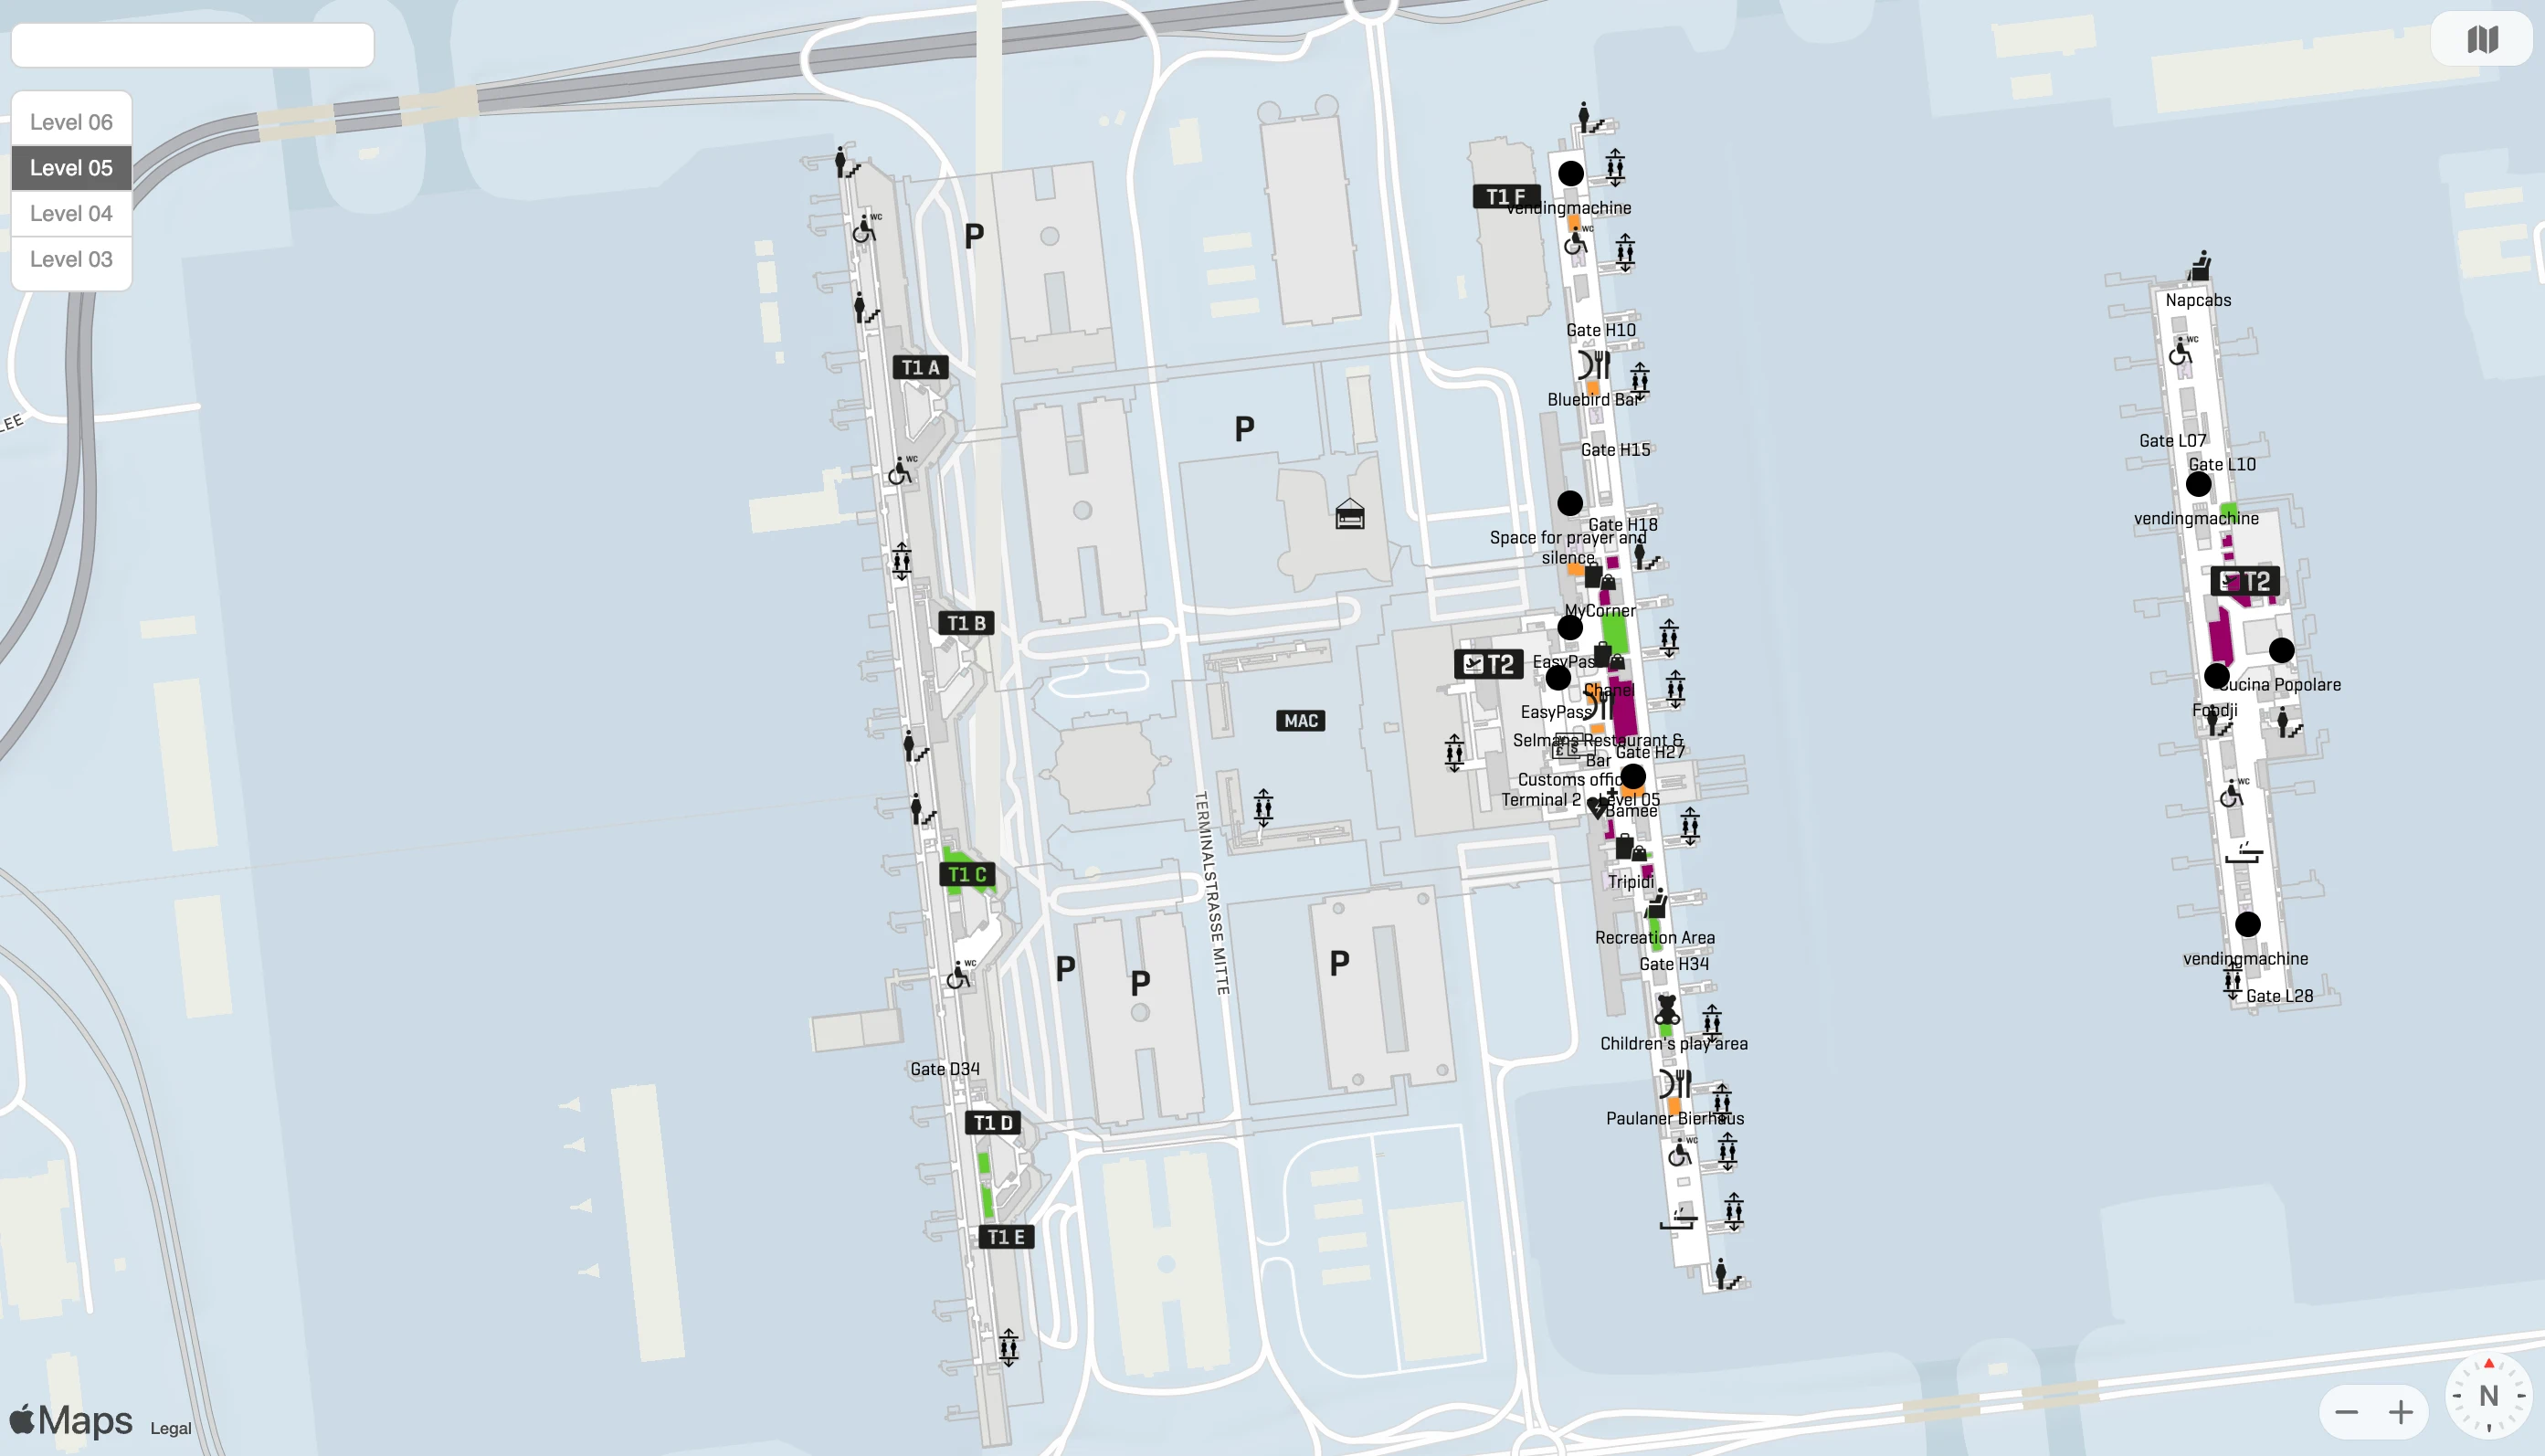
Munich Airport Terminal 1 Level 6 Map 2025
2026 Munich Airport Terminal 1 Map Guide
What is the exact walking distance (meters) from Terminal 1 Module A security exit to the farthest A-gate?
The farthest walk from Module A’s security exit to the end of the A pier is about 130 meters. That measurement runs from the post-screening re-pack area (where you collect trays) into the main airside corridor and out to the extreme end-gate cluster at the pier tip. In practice, the same 130 meters can feel longer because boarding lines often spill into the corridor near the first few A-gates, forcing detours and slower walking. If you’re trying to validate you’re in the right place, use the first large FIDS bank immediately after security as the confirmation point before committing down the pier.
Where is the first decision point (the exact sign/branch) where travelers accidentally go the wrong direction when following “Gates B/C/D/E” inside Terminal 1?
The first wrong-turn decision point is the MAC Forum split at the top of the S-Bahn escalators on Level 03. The exact branch is a left turn under the sign “Terminal 1 A–B” versus a right turn under “Terminal 1 C–E” (often paired with Terminal 2).
This happens as you crest the escalators into the glass-roof MAC atrium: the crowd flow usually trends right toward Terminal 2 and Modules C/D/E, so Module B passengers follow it and miss the “A–B” grouping on the left. If you turn right by mistake, the first obvious “you’re in the wrong vector” cue is reaching the Module C frontage, typically after about 150–200 m; correcting it means a 180° turn and roughly 300–400 m of backtracking to reach Module B.
Where exactly is the airside Terminal 1 ↔ Terminal 2 shuttle bus stop located (module + level + nearest landmark) when starting from Terminal 1?
No single airside shuttle “station” exists in Terminal 1; the Terminal 1 ↔ Terminal 2 bus boards from specific gate stands. Shuttle boarding points show up on signs as normal gates, so the gate number is the locator.
- Module A, Level 04, Gate A28 area, on the Module A pier near the A-gate corridor.
- Module C, Level 05 gallery to reach the zone, then down to the Gate C08 holding/boarding point in the central Module C block.
- Module D, Level 04, Gate D08 area, in the early D-gate zone off the Module D post-security corridor.
What is the exact walking distance (meters) from Terminal 1 Module B security to the Terminal 1 ↔ Terminal 2 airside shuttle stop?
Walking from Module B security to the airside Terminal 1 ↔ Terminal 2 shuttle boarding point is about 300–350 meters. The shuttle stop you’re aiming for from Module B is Gate C08 (Module C), not a dedicated “shuttle” desk.
| Segment | Path anchor | Distance |
|---|---|---|
| B security → vertical up | immediately after Module B screening exit | ~20 m |
| Level 05 → toward C zone | Level 05 gallery, walk south toward Module C | ~150–180 m |
| C zone → down to C08 | descent route off the gallery into Gate C08 area | ~50 m |
| approach to boarding/holding | Gate C08 holding area | ~50 m |
The time risk isn’t just the 300–350 m: it’s the up-then-down level change plus bus intervals, so treat this as a buffer-heavy transfer even when the corridor is clear.
Where is the entrance to the Terminal 1 bus-boarding area (“bus gates” / “bus finger”) relative to the main post-security corridor?
The bus-boarding area entrance is a stair/elevator descent off the main post-security corridor, dropping from the bright gate level down to Level 03. These entries sit perpendicular to the primary flow, so you’ll see them as openings “into the floor” rather than as a long hallway you naturally drift into.
In practice, you stay on the module’s main airside spine (Module A/D on Level 04, Module B/C on Level 05), then watch for a marked stairwell or elevator bank that takes you down to the remote-stand holding area. The key constraint is psychological as much as spatial: the correct move looks wrong because you leave the normal gate corridor and descend into a lower-ceilinged, service-like level—exactly the hesitation point that causes people to overshoot and then backtrack.
What is the exact walking distance (meters) from Check-in Z (MAC / T1Z) to the nearest Terminal 1 security checkpoint entrance?
Walking from Check-in Z (T1Z/MAC) to the nearest Terminal 1 security checkpoint entrance is about 150–200 meters. The closest checkpoints are typically Module B (north vector) or Module C (south vector), since Check-in Z sits in the neutral MAC area between the terminals rather than inside any module.
That distance matters because it’s not a straight “queue-to-queue” handoff: you move from the open MAC space into the narrower Terminal 1 corridor where security lines can spill outward. If the queues extend past the module frontage, the effective “distance” becomes longer because you’ll be walking to the back of the line, not to the checkpoint doors.
Where is the passport control location that serves non-Schengen departures from Terminal 1 (exact position relative to modules/lettered zones)?
Passport control for Terminal 1 non-Schengen departures is on Level 05, directly above the Module B and Module C security checkpoints. The functional position is the Level 05 “Gallery” zone that you reach immediately after clearing security on Level 04 in B or C.
The critical spatial cue is sequence: Security exits you onto Level 04, but non-Schengen processing does not continue forward on that plane. You must take the primary escalators/elevators just past the checkpoint up to Level 05, where the Bundespolizei passport control sits as the next barrier before the B/C departure lounge and gates. If you’re still walking Level 04 looking for “B” or “C” gates, you’re on the wrong floor.
What is the shortest mapped path from Terminal 1 Arrivals to Terminal 1 Departures within the same module (minimizing level changes)?
Staying airside via “Connecting Flights/Transfer” is the shortest path from Arrivals to Departures within the same module. That route keeps you inside the secure corridor instead of following “Exit/Baggage Claim” out to landside, which forces a full loop back and re-screening.
For Schengen-to-Schengen within the same module (typical in Module A or D), the clean path remains on Level 04: step off the jet bridge into the arrivals corridor, follow “Transfer/Connecting Flights,” and walk directly along the same pier to your next gate with no level change. For Non-Schengen-to-Non-Schengen within Modules B/C, the equivalent “stay inside” move keeps you on Level 05 in the gallery zone; leaving toward landside is the mistake that creates the longest recovery.
Where are the largest flight information displays located on the Terminal 1 departures side (exact spots to confirm module letter + gate)?
The largest “source of truth” flight information displays are in the MAC Forum at the S-Bahn interface on Level 03. That board is positioned so you can read it right after exiting the underground station area, before you commit north toward Modules A/B or south toward Modules C/D/E.
Two other high-value confirmation points backstop that MAC board: large FIDS arrays suspended above each module entrance on Level 04 (A, B, C, D), and a major FIDS bank immediately post-security inside each module. The tactical rule is to confirm gate + module at the MAC display first; checking only after you enter a module is what triggers the long correction walks when the module letter is wrong.
Which vertical connection point (specific escalator/stair/elevator bank) provides the fastest level change between Departures and Gates in Module C?
The fastest level change in Module C is the primary escalator bank immediately behind the Module C security checkpoint. That escalator is the designed “capture point” for passengers exiting screening on Level 04, feeding directly up to Level 05 (the non-Schengen gallery where passport control and gates live).
The reason it wins is proximity and throughput: you step out of the re-pack area and you’re effectively already at the escalator throat. Elevators exist but sit more peripherally and tend to be visually obscured by kiosks/columns, adding wait and load time. The negative constraint to avoid is walking forward on Level 04 looking for “C gates” without ascending—if you miss this escalator bank, you’re usually on the wrong plane and lose time to backtracking to find the Level 05 access point.
What is the exact walking distance (meters) from Module D security to the first D-gate seating/holding area?
Walking from Module D security to the first D-gate seating/holding area is about 20–40 meters. That measurement runs from the security re-pack exit (tray return area) directly into the first gate cluster seating zone, typically in the D01–D04 vicinity.
Because Module D’s Schengen gates sit on the same Level 04 plane as the checkpoint, there’s no mandatory vertical transition and almost no corridor commitment before you hit seating. The main practical variable is congestion: if a boarding queue is already formed at the first gate, you may need to thread around it, but the physical distance remains in the 20–40 m range.
Where is the closest re-entry / alternate security checkpoint a traveler can physically reach on foot if the checkpoint for their own module is congested (exact location)?
The closest alternate security move for a Module B passenger is Module C security, reachable by a short landside walk along the Level 04 corridor (about 50–100 meters). This works best because both B and C feed the same Non-Schengen Level 05 gallery system, so you’re not betting on a fragile cross-zone airside corridor.
For a Module A passenger, the physically closest checkpoint on foot is Module B security (roughly 50–100 meters south along the same Level 04 landside corridor), but it’s operationally risky because B’s post-security routing is designed for Non-Schengen flows up to Level 05. The “safe but expensive” fallback is walking landside to the correct module entrance (often hundreds of meters) rather than clearing the wrong module and discovering you can’t reach your Schengen gate without a barrier or re-screening.
What is the exact walking distance (meters) from the Terminal 1 central landside corridor to the correct module entrance for Module E (arrivals-only area), to prevent entering the wrong zone?
Walking from the central Terminal 1 landside corridor (MAC/S-Bahn hub area) to the Module E entrance is about 600–650 meters. The path runs south past the Module C frontage, past Module D, and then into the “Arrivals E” interface at the terminal’s southern end.
The practical constraint is that Module E is arrivals-only with no departures infrastructure (no check-in/security), so this walk is a one-way trap for departing passengers. If you realize the mistake only upon arrival at E, the recovery is essentially the same distance back north to reach a working departures module—turning the error into roughly a 1.2 km round trip plus the mental reset that comes with reversing direction in a long, visually repetitive corridor.


