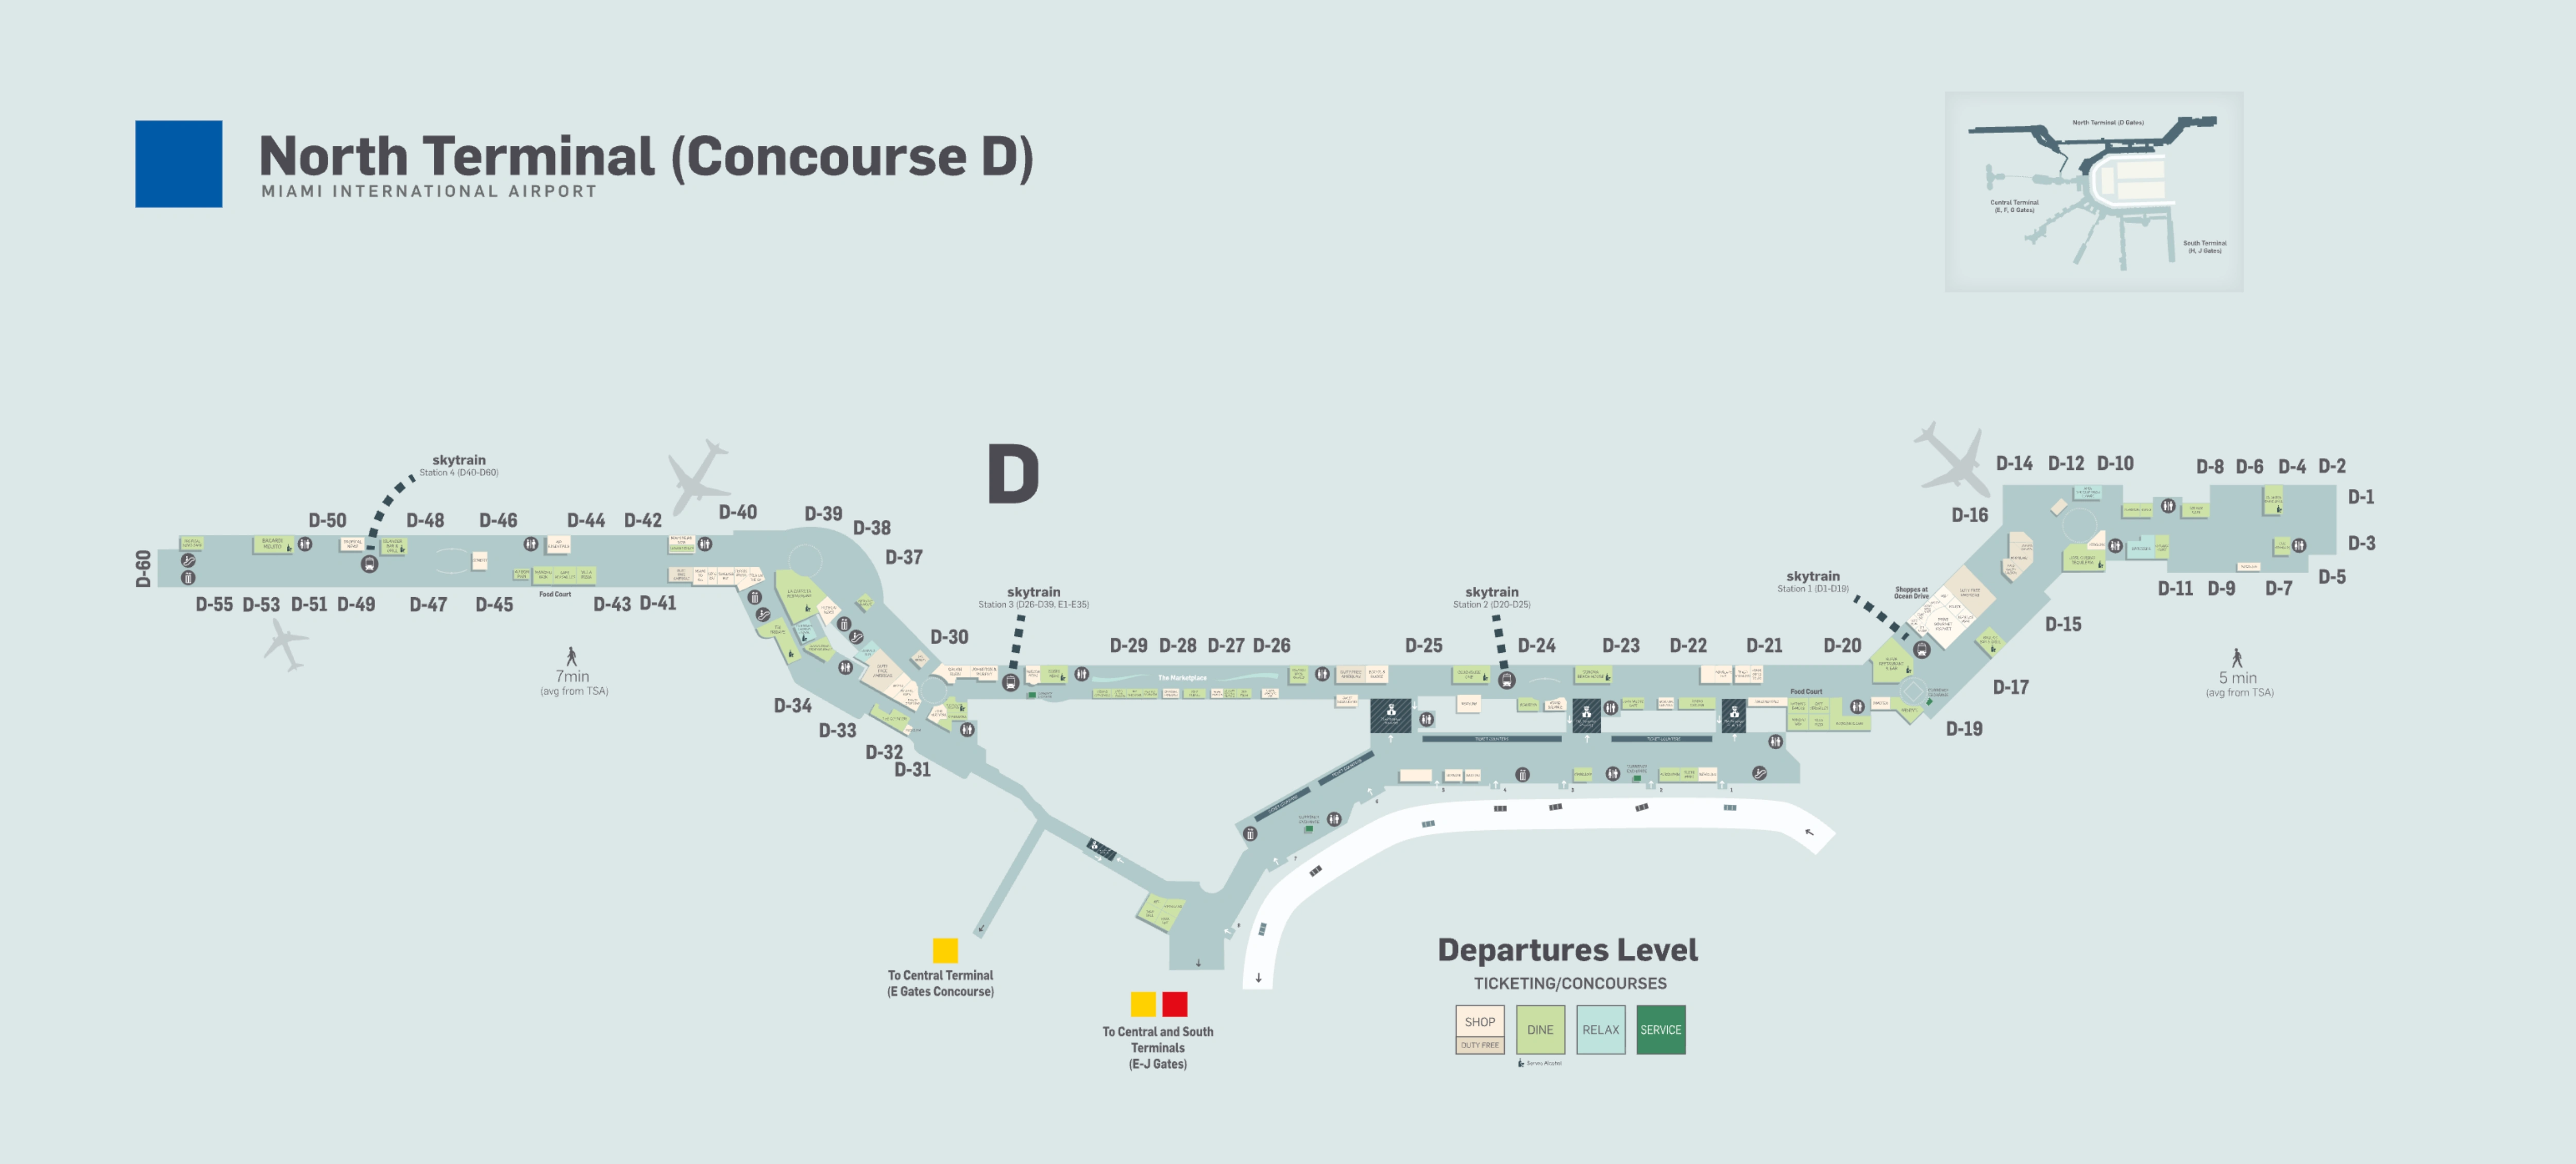
Miami International Airport North Terminal Map (Most Up-To-Date)
Miami International Airport’s North Terminal is a straight, mile-long pier that stretches from the terminal core out to the “High D” gates, with the far end (D40–D60) feeling geographically separate when the Skytrain or walkways fail. The concourse runs as a single spine with clustered nodes around D17, D24, and the D30 junction. Within Miami’s main airport complex, most wayfinding hinges on Skytrain stations, checkpoint choice, and the D–E connector at the D30 block.
Map Table
| Zone | Connection | Walk Time |
|---|---|---|
| D1–D19 “Root” | Skytrain Station 1 (D17); Checkpoint 1 | 0–10 min core access |
| D20–D25 “Marketplace” | Skytrain Station 2 (D24); Checkpoint 2 (24-hour); Level 3 Skyride bridges | 5–12 min to most core services |
| D26–D39 “D30 Nexus” | Skytrain Station 3 (D30); D–E airside connector; Checkpoint 4; DFIS re-entry nearby | 8–15 min from central hall |
| D40–D60 “High D” | Skytrain Station 4 (D47) | 20–30 min walk to core; <5 min Skytrain |
Miami International Airport North Terminal Map Strategy
- Treat D40–D60 as a “walk-only risk zone” and plan around Skytrain Station 4; if you can’t ride, budget a full end-to-end walk time immediately.
- Anchor your navigation on the D30 junction: Skytrain Station 3, the D–E airside connector, and the international/FIS interfaces all cluster in the D29–D31 block.
- Avoid airside/landside traps: North↔South is landside via Level 3 Skyride, meaning security exit and re-screening; keep your re-entry checkpoint target fixed before you start moving.
- Win the checkpoint lottery by matching gate block to entrance and hours: default to Checkpoint 2 for late-night/early-morning access, then use Skytrain to prevent a post-security endurance walk.
2026 Miami International Airport North Terminal Map + Printable PDF
In 2026, Concourse D navigation still hinges on Skytrain continuity and Level 3 connector reliability. The full four-station Skytrain network is operational after late-summer 2025 restoration, but the North Terminal remains vulnerable to single-station downtime that turns D40–D60 into a long-walk zone. Landside, the Level 3 Skyride moving-walkway system is still in active replacement, so expect intermittent “walk-only” segments between North, Central, and South.
Miami International Airport North Terminal Map Guide
Where are the four Skytrain station locations along Concourse D, and which gate ranges does each station serve?
Skytrain has four stations along Concourse D, and the station choice determines whether you’re in a short hop or a mile-long walk—especially for the isolated D40–D60 block. Each station sits at a specific gate landmark and “owns” a catchment range that’s easiest to serve without backtracking.
| Skytrain Station | Landmark location | Gate range served |
|---|---|---|
| Station 1 | near Gate D17 | D1–D19 |
| Station 2 | near Gate D24 | D20–D25 |
| Station 3 | near Gate D30 | D26–D39 |
| Station 4 | near Gate D47 | D40–D60 |
Where exactly are the two entrances to the D–E airside connector bridge, and what are the nearest gate landmarks on each side?
The D–E airside connector bridge enters Concourse D at the D29–D31 junction and enters Concourse E opposite Gate E2. This bridge is the key “stay airside” path between the North Terminal D gates and Concourse E without exiting to landside.
On the Concourse D side, use the corridor signed for “Connecting Flights” / “Concourse E” near Skytrain Station 3, with the nearest gate landmark between Gate D29 and Gate D31 (by the D30 node). On the Concourse E side, the bridge exits into the main E-core on Level 2, directly across from Gate E2, just past the E-side checkpoint area.
Which North Terminal security checkpoint entrance is closest to Gate D__ (user fills gate), and what is the exact walking distance from that checkpoint to the gate?
The closest checkpoint depends on your D-gate block, with Checkpoint 1 best for D1–D15, Checkpoint 2/3 for D16–D30, and Checkpoint 4 for D30–D60 via the D30 Skytrain node. For High D gates, the “closest” choice only works if you immediately ride Skytrain from Station 3 to Station 4.
| Gate D__ target | Closest checkpoint | Landmark you should aim for after screening | Walk distance to gate |
|---|---|---|---|
| D1–D15 | Checkpoint 1 | Gate D17 / Skytrain Station 1 elevators | ~100–500 ft |
| D16–D30 | Checkpoint 2 or Checkpoint 3 | D-Marketplace (D20–D25) for 2; central-east hall for 3 | ~200–600 ft |
| D30–D39 | Checkpoint 4 | Gate D30 / Skytrain Station 3 / D29–D31 junction | ~200–1,500 ft |
| D40–D60 | Checkpoint 4 | Gate D30 / Skytrain Station 3 → ride to Station 4 (D47) | ~0.7–0.8 mi if walking; <5 min ride + short walk if Skytrain running |
What is the walking distance from the farthest D-gate cluster to the International Arrivals / passport control path used for North Terminal arrivals?
Walking from the farthest D-gate cluster (the High D end around Gate D60) to the International Arrivals / passport control path is about 0.6–0.7 miles. This is the longest internal vector in the North Terminal and becomes a “dealbreaker” when Skytrain Station 4 or Station 3 is down.
From Gate D60, the practical on-foot route is straight east along the main Concourse D spine toward the D30 node (Skytrain Station 3 area), then follow the overhead “U.S. Customs” / FIS routing into the sterile corridor descent toward passport control. In normal crowd conditions with bags, budget roughly 15–25 minutes; in heavy congestion or reduced walkway availability, it can push toward 30 minutes.
If Skytrain is down, where are the courtesy trolley/shuttle pickup points along Concourse D, and what are their nearest gate landmarks?
Courtesy trolley/shuttle pickup points stage at the Skytrain Station 1 area near Gate D17 and the Skytrain Station 2 area near Gate D24 during Skytrain outages. These are the most repeatable “known” collection points used when the automated system fails.
In practice, look for golf-cart style “courtesy trolley” queuing in the main Concourse D corridor at those two nodes: the Gate D17 cluster (the Station 1 vertical access zone) and the Gate D24 cluster (the Station 2 / D-Marketplace edge). During major disruptions, demand often exceeds supply, so able-bodied travelers with tight boarding windows should treat trolleys as limited-mobility priority and default to walking if time is under pressure.
From Gate D__, what is the shortest landside route to reach South Terminal (H/J), including the exact Level 3 moving-walkway access point you must use before re-clearing security?
North↔South requires exiting security and re-screening, because the transfer is landside via the Level 3 Skyride corridor. The shortest path is to leave Concourse D to the public terminal, go up to Level 3 at the nearest Skyride bridge, traverse east past Central Terminal nodes, then drop to Level 2 at H/J to re-clear security.
| Start on Concourse D | Level 3 moving-walkway access point to use | Landside traverse landmark sequence | Where you re-clear security |
|---|---|---|---|
| D1–D19 | West Bridge near Checkpoint 1 / American Priority check-in | Level 3 Skyride → past Central (E/F/G) → continue toward H/J | South Terminal Checkpoint H or Checkpoint J |
| D20–D25 | Central Bridge near Checkpoint 2 / D-Marketplace | Level 3 Skyride → pass E/F/G → pass MIA Mover node between Dolphin & Flamingo garages → continue to H/J | South Terminal Checkpoint H or Checkpoint J |
| D26–D60 | East Bridge near Checkpoint 4 / D30 node | Level 3 Skyride → pass Central (E/F/G) → continue to H/J | South Terminal Checkpoint H or Checkpoint J |
Where are the Level 3 moving walkway entry points inside the North Terminal, and where do they exit relative to the Central/South terminal ticketing/security areas?
Level 3 moving walkway entry points in the North Terminal are at three garage-bridge nodes: West Bridge near Checkpoint 1, Central Bridge near Checkpoint 2/D-Marketplace, and East Bridge near Checkpoint 4. These bridges are the practical “on-ramps” to the Skyride corridor that runs between the terminal and the parking garages.
West Bridge access sits by the American priority/ticketing side of the North Terminal and feeds you onto Level 3 heading toward Central Terminal. Central Bridge access is the most intuitive for most travelers because it’s anchored at the D-Marketplace core (D20–D25) and funnels you into the main Level 3 connector stream. East Bridge access is the closest Level 3 entry for travelers staged around the D30 node. All three routes carry you toward Central (E/F/G) and onward to the South Terminal (H/J), where you drop back down to Level 2 near the H/J ticketing halls and their security checkpoints.
On the airport layout, what is the fastest landside “garage cut-through” path from Central Terminal (G area) to the North Terminal (D), and where do you re-enter security?
The fastest landside “garage cut-through” from Central Terminal (G area) to the North Terminal (D) is via the Flamingo/Dolphin garage interior, bypassing the crowded ticketing hall. This route trades indoor congestion for a straighter, less obstructed line.
Exit the Central Terminal (G) area to the Arrivals Level (Level 1) curb, then cross into the Flamingo Garage (or adjacent Dolphin Garage) and walk north inside the garage parallel to the terminal frontage. Continue until you align with the North Terminal (D) bridge doors, then re-enter the terminal from the garage side. For security re-entry, the most reliable target is Checkpoint 2 (the central North Terminal checkpoint), which is the standard re-screening point after the cut-through.
Where is Checkpoint DFIS (connecting international passengers) located relative to Concourse D gate blocks, and what is the shortest route from customs exit to that checkpoint?
Checkpoint DFIS is on Level 2 near the D20–D25 block, positioned to feed connecting international passengers back into the secure North Terminal close to the D-Marketplace core. It’s not a general landside checkpoint; it’s the controlled re-entry valve for post-customs connectors.
From the customs exit on Level 1, the shortest route is direct and vertical: exit Customs, immediately drop checked bags at the baggage re-check belt outside the Customs doors, then take the adjacent escalator/elevator up to Level 2. DFIS is at the top of that vertical transition, and once you clear it you re-enter airside near the D20–D25 zone, allowing quick access toward the D30 node (Station 3 / connector) or back toward lower-number D gates.
Where is the nearest open 24-hour checkpoint access within North Terminal, and what is the walking distance from that checkpoint to the furthest D-gate?
The nearest 24-hour checkpoint in the North Terminal is Checkpoint 2, and the walk from there to the furthest D-gate (around Gate D60) is about 0.75 miles (roughly 4,000 feet). This is the fail-safe entrance for late-night and very early departures when other checkpoints are closed.
Checkpoint 2 sits in the central North Terminal hall by the D-Marketplace / Station 2 zone, so it’s ideal for access reliability—but it carries a distance penalty for High D gates if Skytrain is unavailable. If you clear Checkpoint 2 during off-hours and Skytrain isn’t running, treat the post-security movement as a full-length trek: proceed east along Concourse D toward the D47/D60 end and budget a 20–25 minute brisk walk in normal conditions.
Which specific elevator/escalator banks and vertical paths connect Level 1/2/3 in North Terminal near the main D-gate clusters (for avoiding broken sections), and where are they on the map?
The most reliable vertical-circulation redundancy is at the D-Marketplace (D20–D25), because it has the densest cluster of escalators and elevators connecting Levels 1, 2, and 3. If an escalator bank at D15 or the D30 node is barricaded, routing yourself to the Marketplace core is the fastest way to “find a working lift” without guesswork.
Near the D1–D19 cluster, use the vertical access at the Skytrain Station 1 node by Gate D17, with elevator backup tucked near the Gate D15 Admirals Club area. Near the D26–D39 cluster, use the D30 node by Skytrain Station 3, where the primary escalators sit in the centerline and the high-capacity elevator banks adjacent to the FIS/international flow provide the best redundancy (they’re designed for heavy passenger and baggage-cart volume). For Level 3 access to the landside connector, the three bridge nodes—West (near Checkpoint 1), Central (near Checkpoint 2/D-Marketplace), and East (near Checkpoint 4/D30)—are your map anchors for reaching the Skyride corridor even when a local vertical bank is down.
Where is the closest lounge-access path from Concourse D to Concourse E (airside), and what is the shortest walking distance from the D–E connector to the lounge area?
The closest lounge-access path from Concourse D to Concourse E is the D–E airside connector at the D29–D31 junction, and the shortest walk from the connector to the lounge zone in Concourse E is about 3–5 minutes (around 800 feet). This is the “stay airside” move that avoids any landside exit or re-screening.
From Concourse D, position yourself at the D30 node (Skytrain Station 3 area), then enter the connector corridor near Gate D31 and cross the bridge into Concourse E opposite Gate E2. Once you enter the E-core on Level 2, the lounge cluster is immediately in the central Concourse E area; the Turkish Airlines Lounge is the common target because it’s visible/nearby soon after entering E from the connector. For returns to High D gates, reverse the path back to D31, then use Skytrain (Station 3 → Station 4) to avoid the long-walk penalty toward D40–D60.