Miami International Airport Map (Most Up-To-Date)
Miami International Airport (MIA) uses a wide horseshoe/U-shaped terminal loop wrapped around the Dolphin and Flamingo garages, with three stacked public levels (Arrivals L1, Departures L2, Connector L3). The scale is large enough that one wrong checkpoint, people-mover, or curb-level choice can add major minutes. This map layout matches how MIA actually works within Miami’s primary airport hub: distinct terminal “biomes” with a few critical transfer bridges.
Map Table
| Terminal | Key Airlines | Primary Function | Transfer Mode |
|---|---|---|---|
| North Terminal (Concourse D) | American Airlines, oneworld | longest concourse, primary hub | Skytrain, Level 3 Skyride |
| Central Terminal (E/F/G) | mix of carriers | connector zone, legacy piers | D↔E airside bridge, Level 3 Skyride |
| South Terminal (H/J) | international mix | international + widebody flows | Level 3 Skyride, landside walk |
| Miami Intermodal Center (MIC/RCC) | rental cars, rail | rental cars, Metrorail/Tri-Rail | MIA Mover |
Miami International Airport Map Strategy
- Treat checkpoints as a choice, not a default: if the connecting-only re-screen line is surging post-CBP, use the loop to Level 2’s main security banks instead of committing to the first queue you see.
- Protect the point-of-no-return doors: prioritize “Connecting Flights” routing at Concourse D, especially around the D-arrivals/greeter zones where an exit mistake forces a full re-screen penalty.
- Navigate by vertical layers: do lateral moves on Level 3 (Skyride corridors), do security on Level 2, and do bags/curbs on Level 1—plan every route with the elevator/escalator node you’ll use.
- Build outage-proof options: if Skytrain or the MIA Mover is disrupted, switch immediately to the nearest stationless walking plan (D is a long linear pier) or the required shuttle/bus contingency from the Intermodal/Rental Car Center—no “walk-it” shortcut exists.
2026 Miami International Airport Map + Printable PDF
In 2026, MIA’s navigation still hinges on a few high-impact nodes: Concourse D’s Skytrain stations (especially the D30 pivot), the D↔E airside connector, and Level 3’s Skyride spine between terminal zones. International arrivals remain a one-way valve (CBP → bags → recheck → re-screen), and the MIA Mover remains the single-link connection to the Miami Intermodal Center and Rental Car Center.
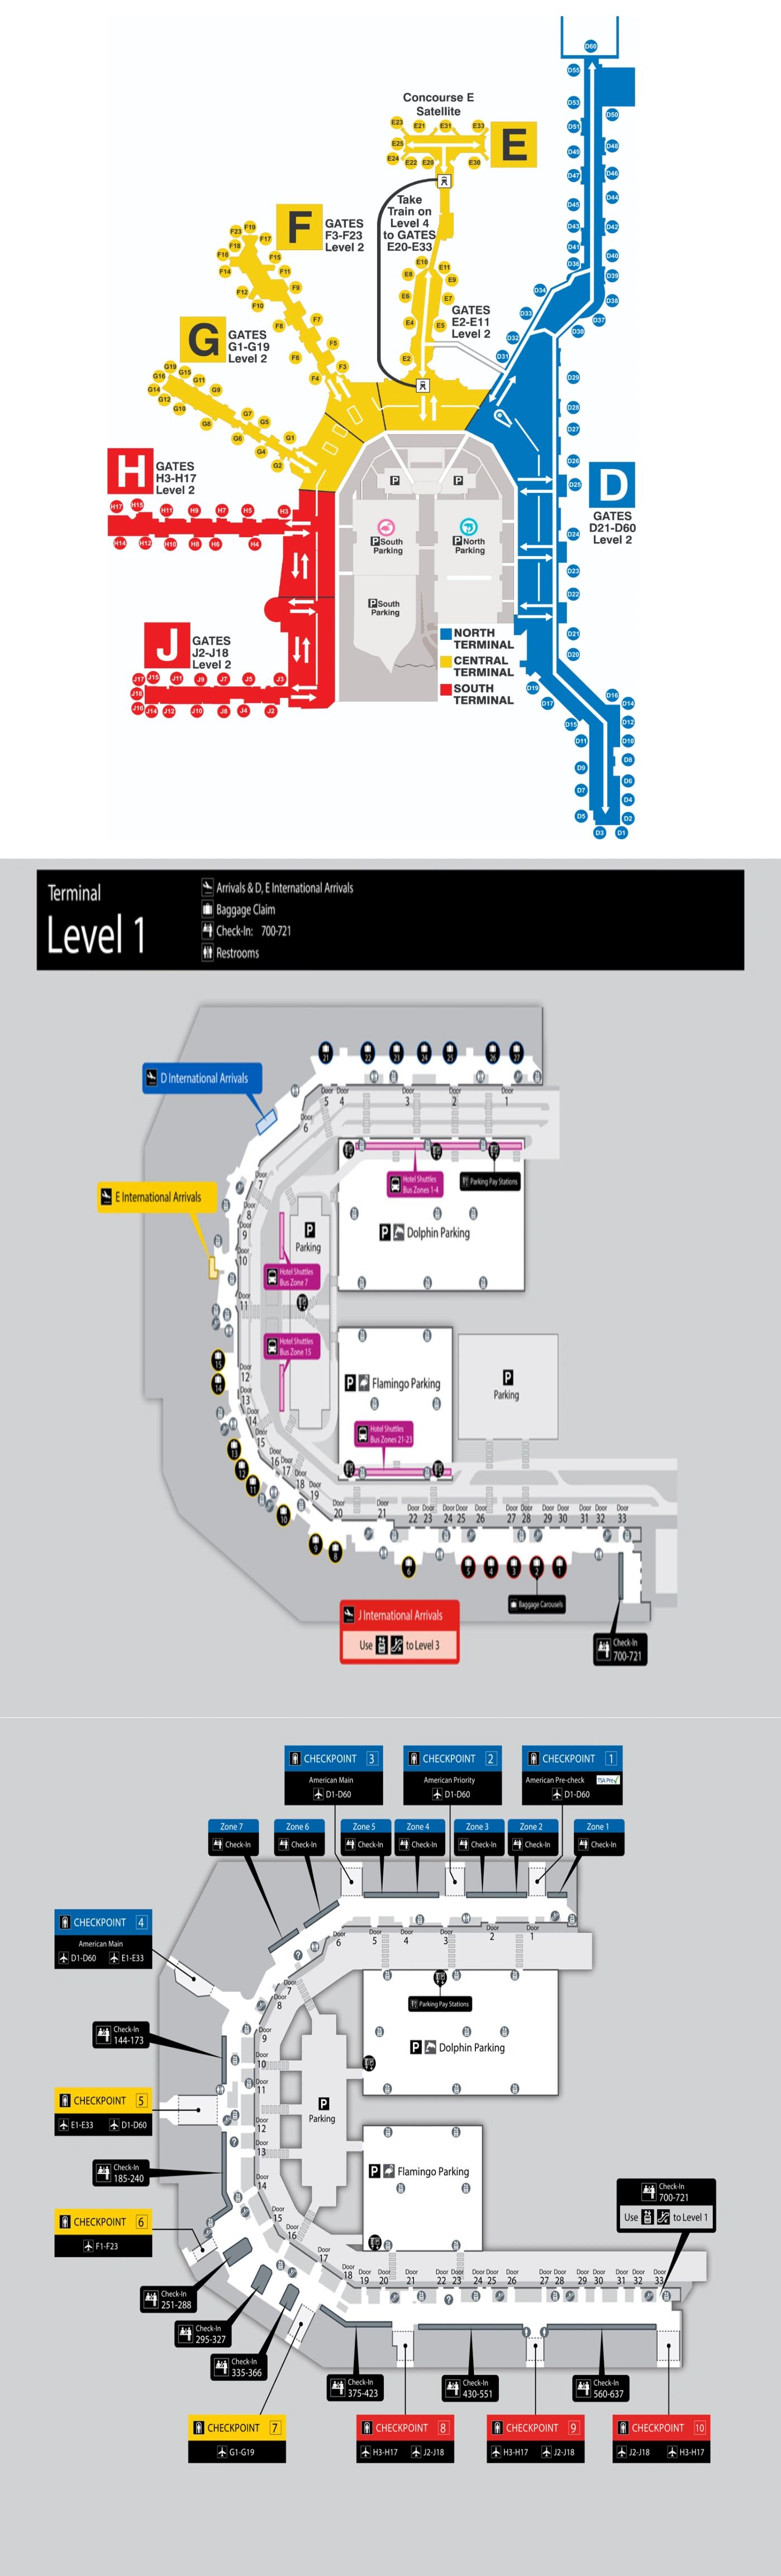
Miami International Airport Terminal Gates Map 2025

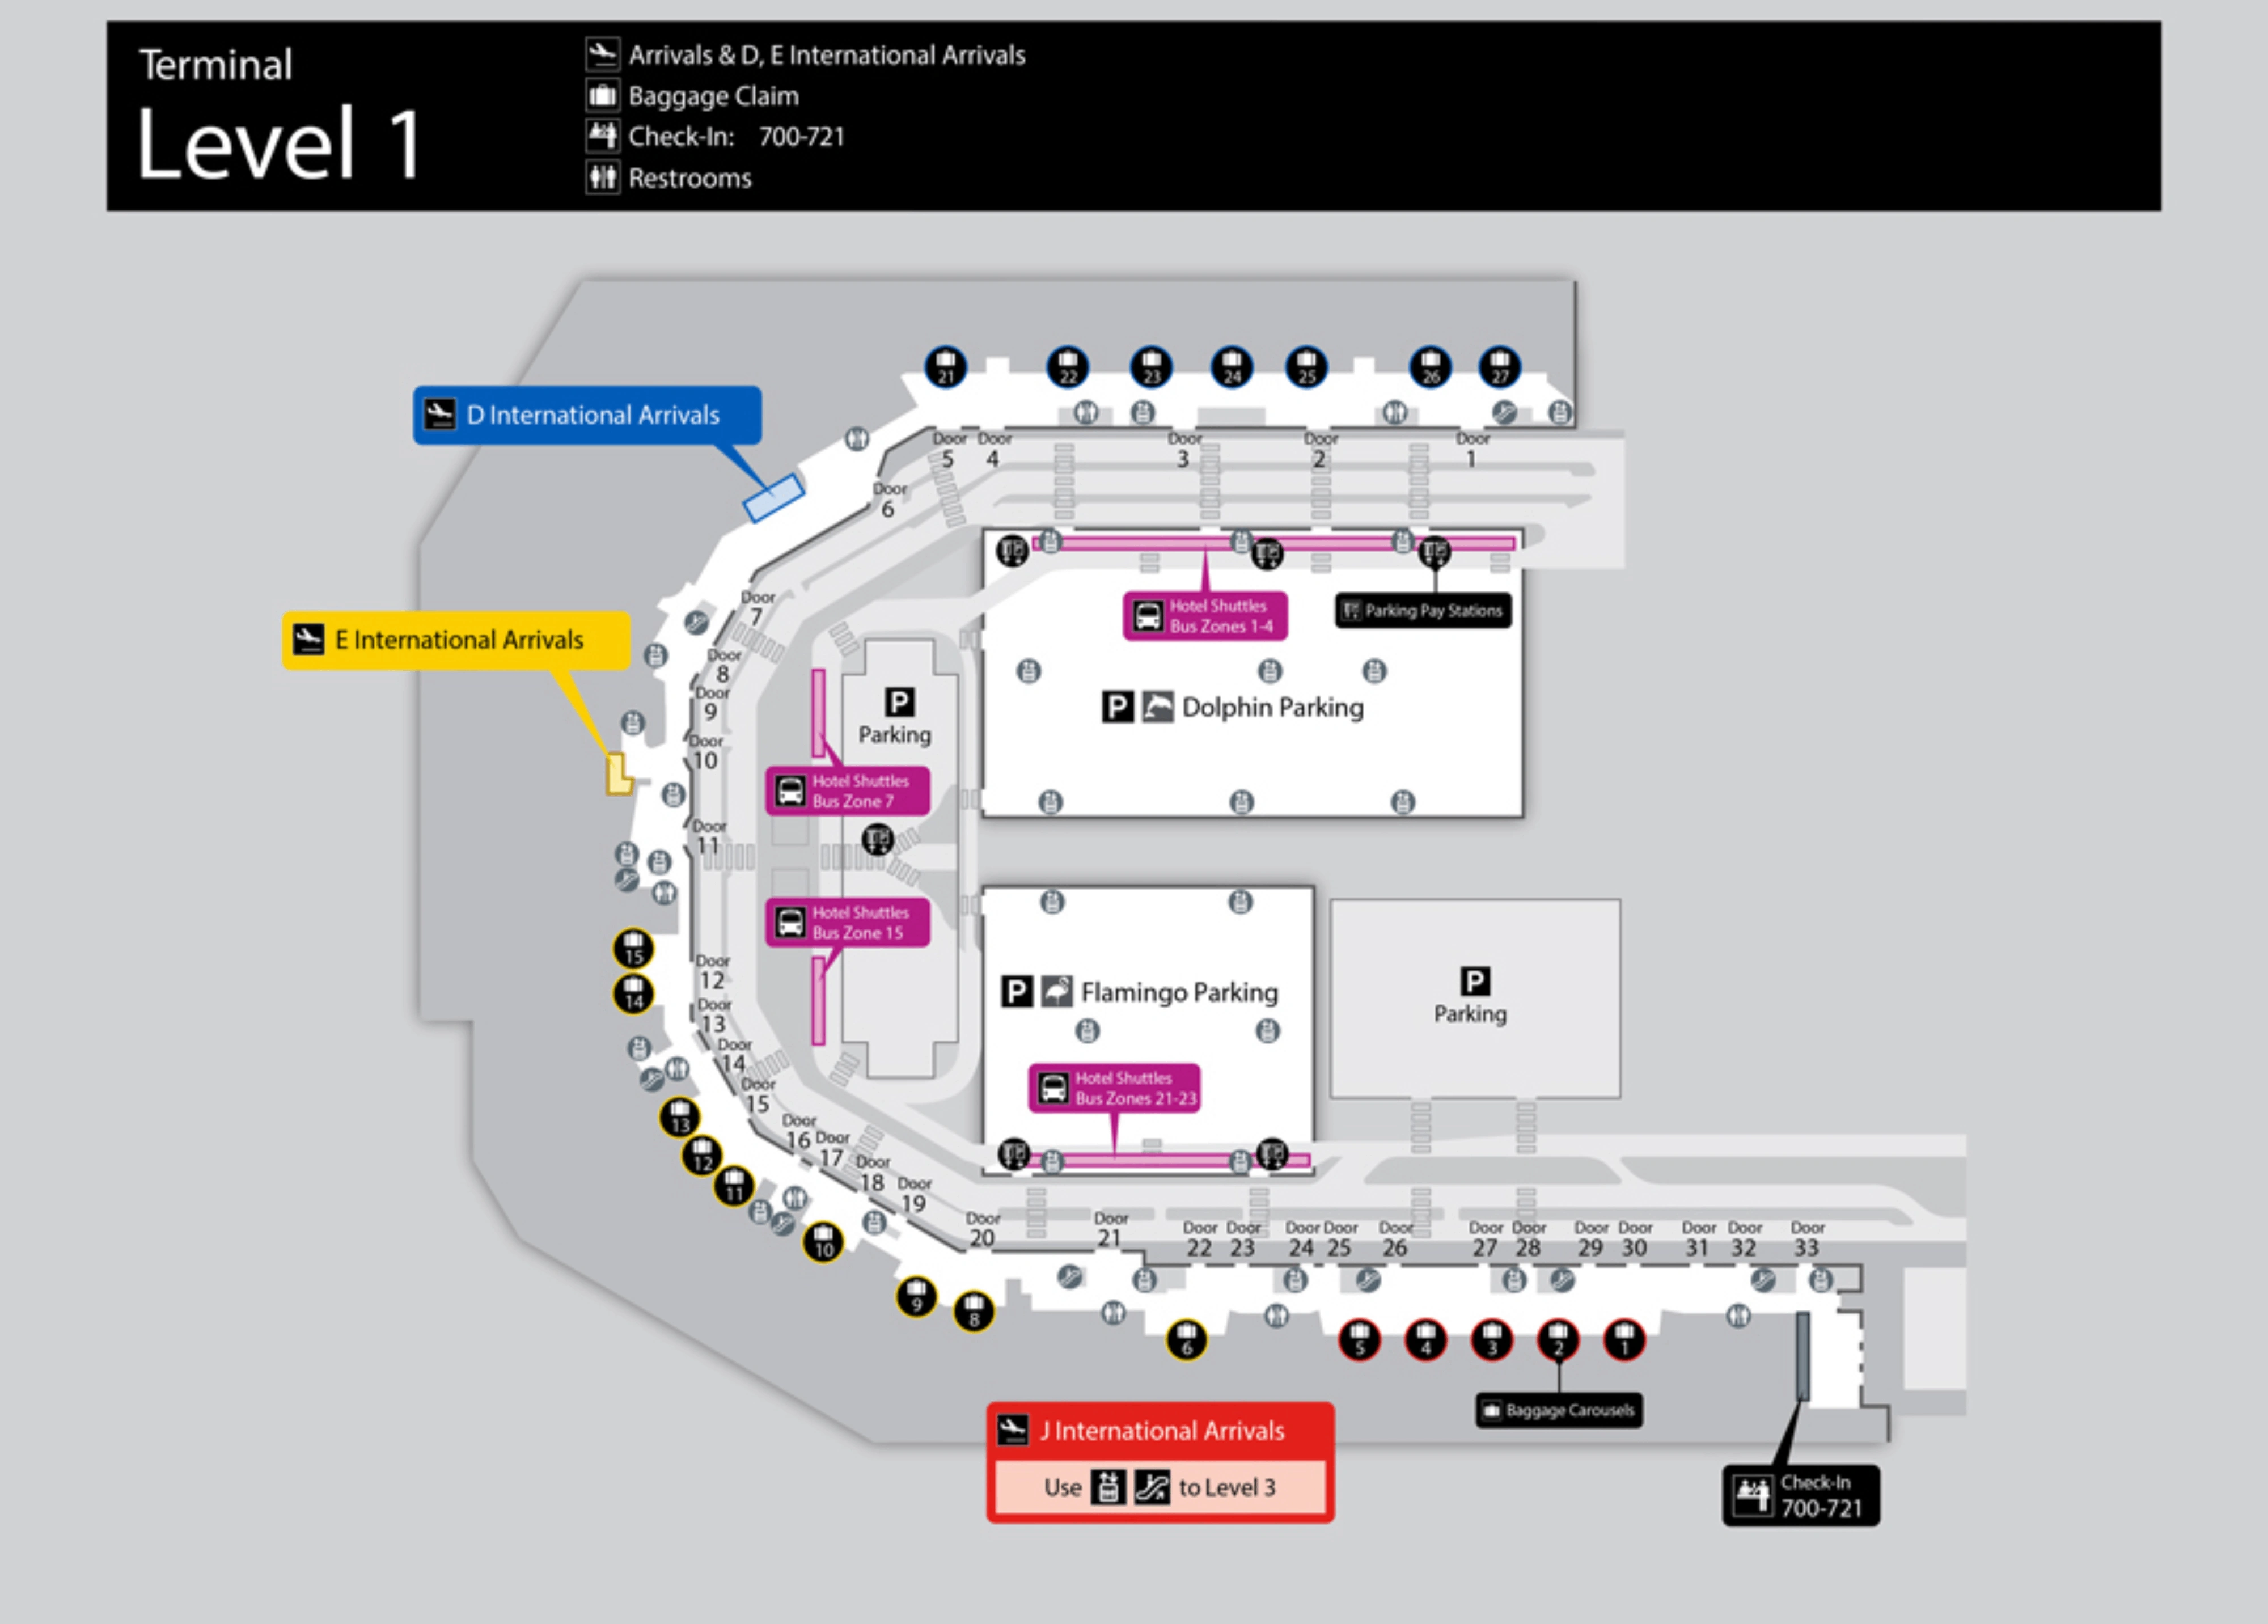
Miami International Airport Terminal Baggage Claim Level 1 Map 2025
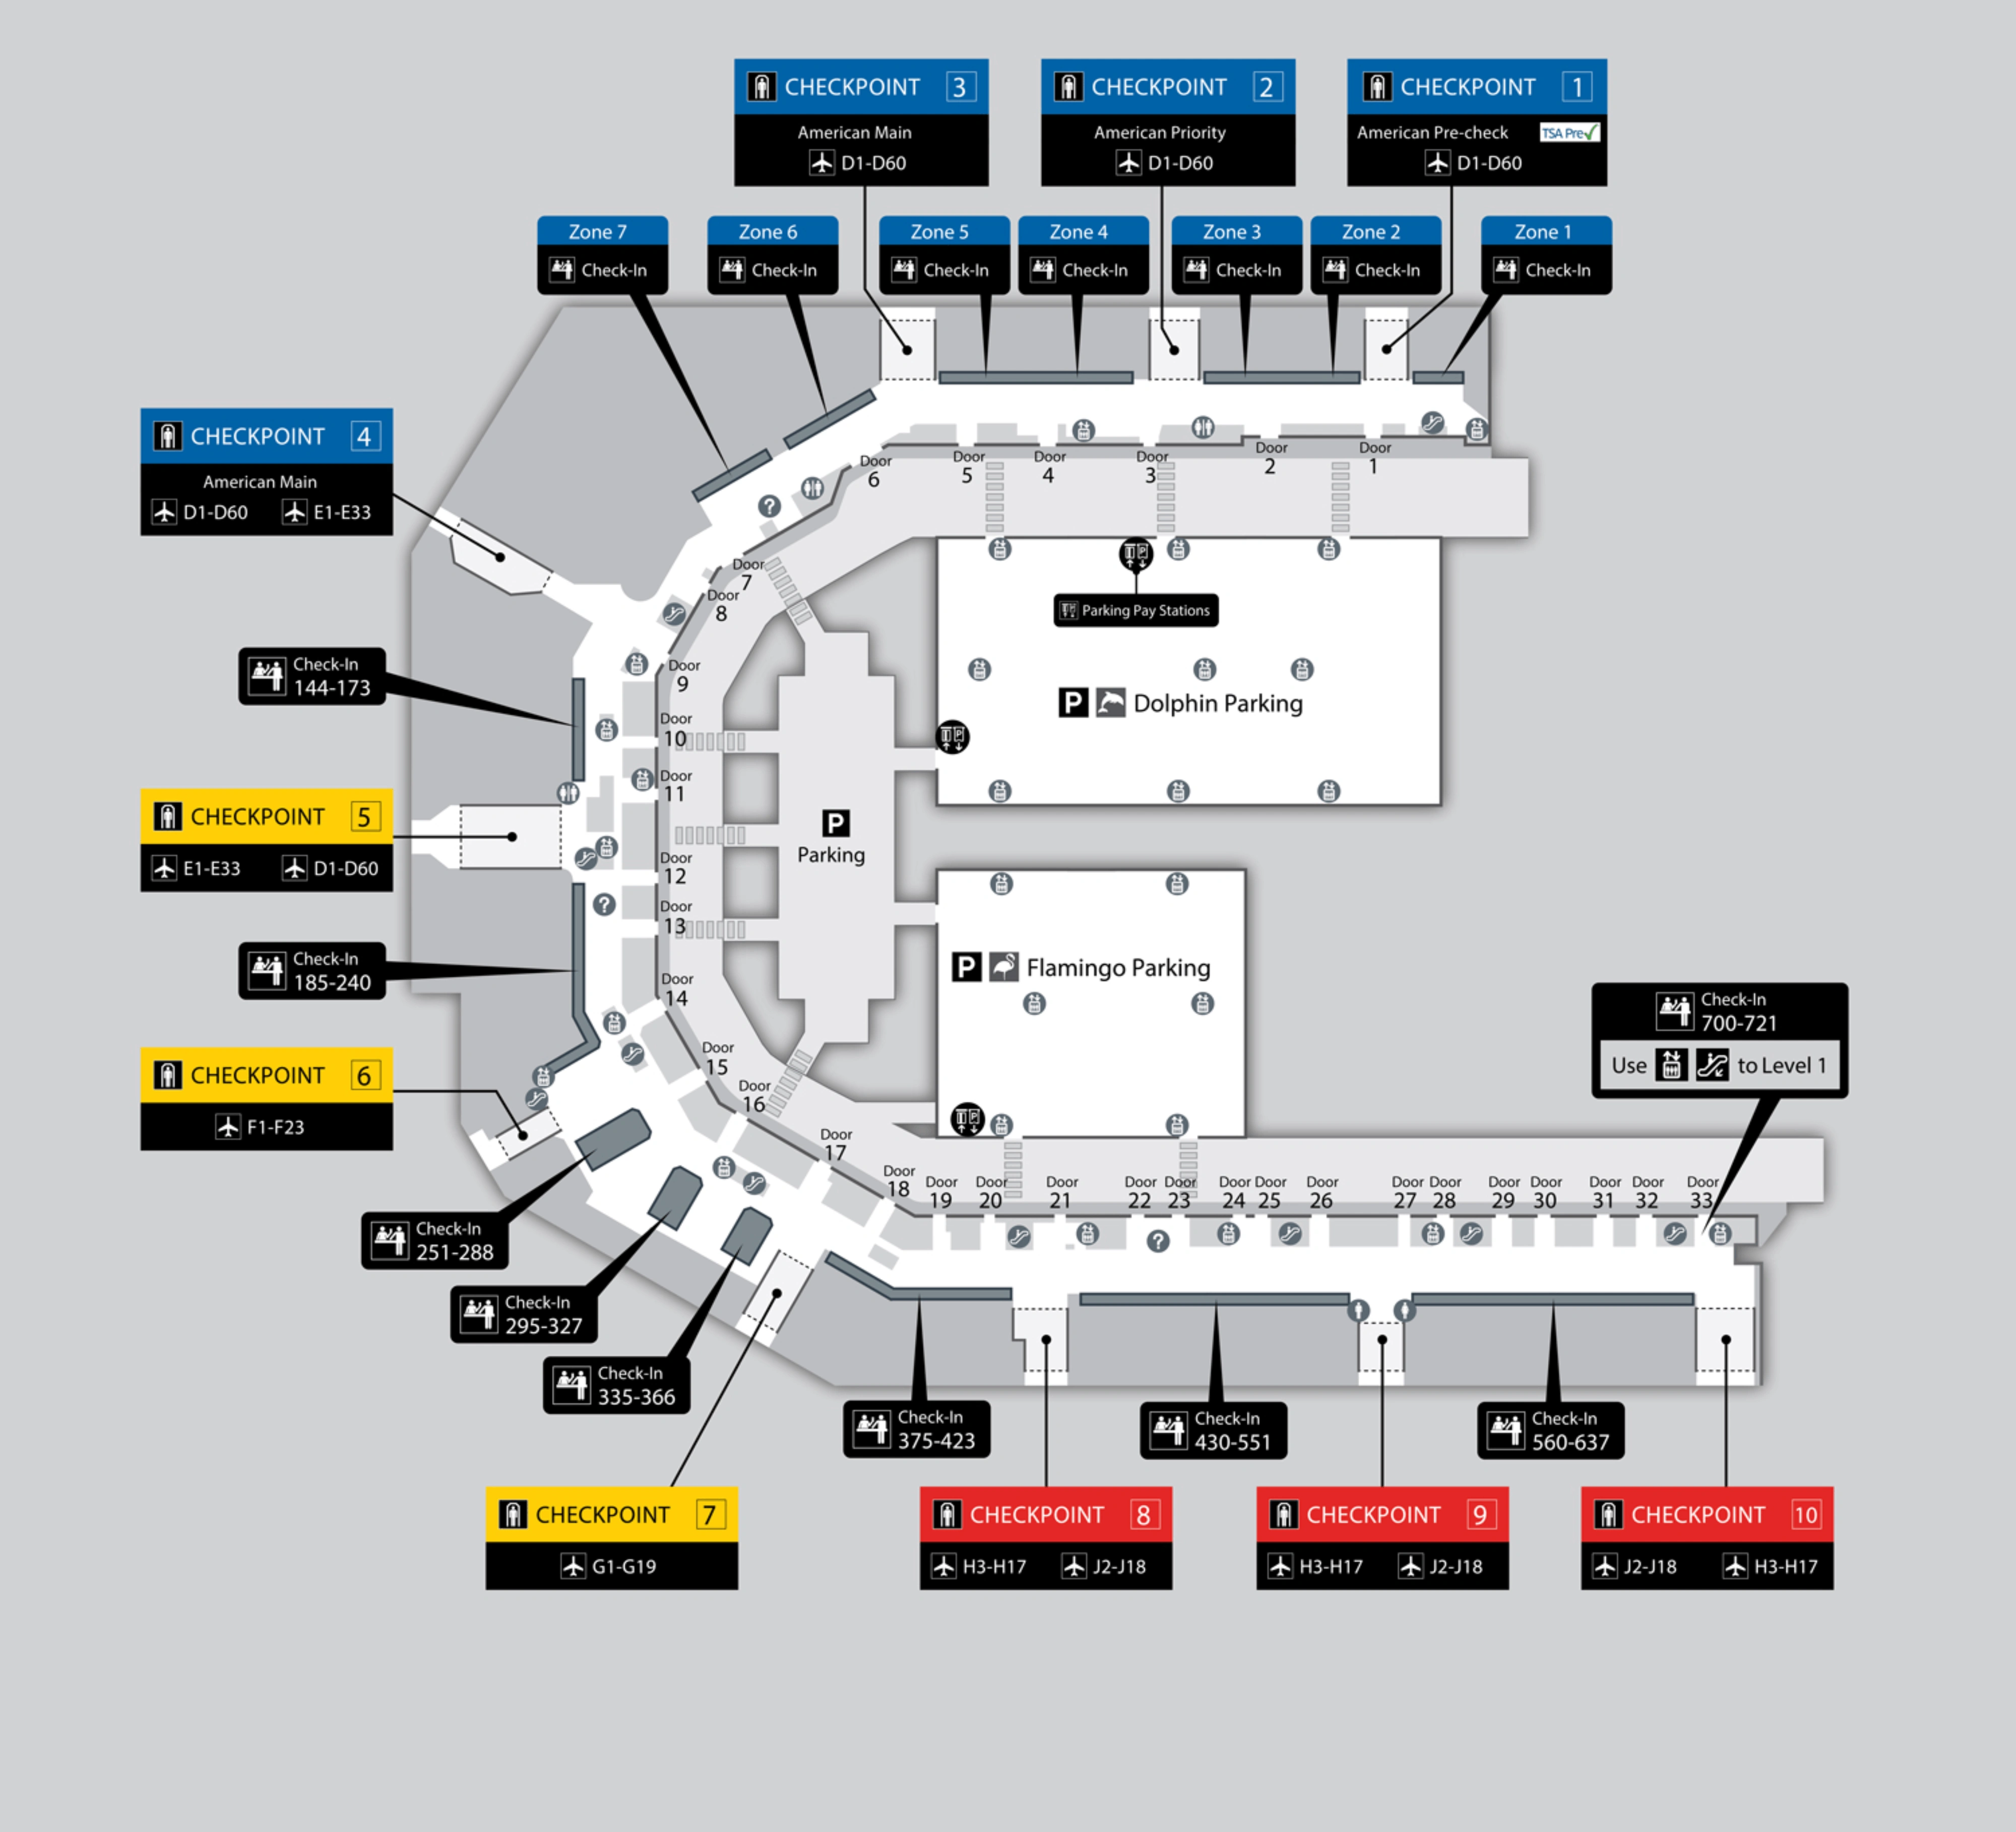
Miami International Airport Checkpoints Map 2025
2026 Miami International Airport Map Guide
What is the exact walking distance from Concourse D arrivals (post-CBP exit) to the first baggage recheck drop point used for onward connections?
The walking distance is under 50 meters from the CBP exit doors to the first American Airlines baggage recheck belt used for onward connections. The recheck drop sits essentially inside the CBP exit antechamber on Level 1, before you fully enter the public arrivals/greeter lobby.
Expect a straight, short transition: you pass the sliding/frosted glass CBP exit doors into a small lobby, and the recheck belts are directly ahead and slightly left, staffed by airline agents. The walk itself takes under a minute; the real variable is the recheck queue surge when multiple widebodies clear CBP at once.
What is the exact route (turn-by-turn landmarks) from the post-CBP exit to the nearest TSA re-screen checkpoint entrance for continuing airside?
The nearest TSA re-screen checkpoint is the dedicated “connector” TSA checkpoint immediately adjacent to the baggage recheck belt, roughly 10 meters from bag drop. This entrance sits in the same Level 1 controlled transition area, before you fully merge into the public greeter lobby.
After clearing CBP and exiting the frosted/sliding glass doors, walk into the small transition lobby and go to the American Airlines recheck belt (ahead, slightly left). From the recheck belt, pivot left toward the clearly separated TSA screening入口 for “Connecting Flights” (the checkpoint runs parallel to the recheck area). If that connector line is backed up to the bag belt, the better landmarked alternative is to continue straight through the automatic doors marked “Exit to Terminal” into the public greeter lobby, turn right to the first elevator/escalator bank, go up to Level 2, and enter the main security bank at Checkpoint 2.
Where is the closest TSA checkpoint entrance to Concourse E gates (by door number / level), and what is the walking distance from E’s central gate spine to that checkpoint?
Checkpoint 5 on Level 2 is the closest TSA entrance for Concourse E gates, aligned with Door 11 on Level 1 (Arrivals) directly below it. Walking from Concourse E’s central post-security spine to the Checkpoint 5 entrance is about 150 meters.
From the central E-gates spine (the immediate post-security duty-free/shop cluster near Gates E2–E10), walk back toward the main terminal block until you reach the checkpoint portal feeding that same concourse. Landside, target the Central Terminal curve and use the Door 11 vertical reference: Door 11 on Level 1, then up to Level 2 for the Checkpoint 5 entry. If you’re headed to the E-satellite gates (E20–E33), you still start at Checkpoint 5, then continue inside the secure zone to the satellite train.
Where is the closest TSA checkpoint entrance to Concourse F gates, and what is the walking distance from the midpoint of Concourse F to that checkpoint?
Checkpoint 6 or Checkpoint 7 on Level 2 is the closest TSA entrance for Concourse F, typically aligned with Doors 15–17 on Level 1 directly below the Central Terminal section serving F. Walking from mid-Concourse F (around Gate F10) to the checkpoint entrance is about 250 meters.
From the midpoint of the pier, walk back toward the “knuckle” where Concourse F joins the main terminal building, keeping the food-court junction (Pei Wei / central food court area) as your landmark. The checkpoint portals for F are in the Level 2 departures/ticketing hall above this junction; which one is usable depends on operating hours, but both are the nearest access points for F compared with routing toward E or the North Terminal checkpoints.
Where is the nearest Skytrain station to Concourse D gates D50–D60, and what is the walking distance from those gate clusters to the station entrance?
Skytrain Station 4 near Gate D47 is the nearest station for gates D50–D60, with a walking distance of about 400 meters from Gate D60 to the station entrance. The station sits vertically above the gate level, so your route ends at the Station 4 entrance/escalator node near D47.
From D50–D60, walk eastbound (back toward the main terminal) until the signage and vertical access for Skytrain Station 4 appears near Gate D47. Plan this as a “last mile” even when you’re using the train: the station-to-gate walk is often longer than expected, and there are no moving walkways in the final spur from roughly D55 to D60, so the backtrack is fully on foot.
What is the shortest verified path from Concourse D (mid-concourse) to the checkpoint used for E-gates access (including any level changes / elevator-escalator nodes)?
The shortest verified path is the D↔E airside connector at Gate D30, which reaches Concourse E near Gate E2 without any TSA re-screening. This route stays on the same secure level (Level 2) and avoids elevators/escalators unless you detour to Skytrain or lounge levels.
From mid-Concourse D, walk to the D30 pivot node using the Skytrain Station 3 area as your landmark (near the D30 rotunda). Enter the corridor adjacent to the D30 Skytrain station escalators marked for “Connecting Flights to Concourse E,” continue east through the secure connector bridge, pass through the automated glass doors, and emerge in Concourse E opposite Gate E2. The connector span itself is roughly 200 meters; the main time variable is how far you are from D30 when you start.
From the MIA Mover drop-off inside the terminal complex, what is the shortest walking route to the American Airlines check-in hall (with the first ‘point-of-no-return’ corridor choice identified)?
The shortest route is via Level 3 from the MIA Mover platform to the North Terminal corridor, then down to Level 2 ticketing for American Airlines. The first point-of-no-return is the T-junction where the corridor splits to “North Terminal / D” versus “Central/South.”
Exit the MIA Mover train onto Level 3 and take the Skyride moving walkway heading west toward the terminal building, crossing the pedestrian bridge over the taxi lanes. At the T-junction as you enter the terminal shell, turn left for “North Terminal / D” (turning right commits you toward Central/South). Continue along the Level 3 corridor and use the first elevator bank marked “Ticketing / Departures” to descend to Level 2, emerging near Doors 1–4 for the American Airlines check-in hall. Total distance is about 500 meters.
If the MIA Mover is down, what is the map-verified fallback route from the Rental Car Center / MIA intermodal area to the terminal departures level (exact pickup point + walking distance)?
No walking route exists from the Rental Car Center/MIC to the terminal when the MIA Mover is down; a vehicle transfer is mandatory. The map-verified fallback starts at the Bus Plaza on the ground level of the Rental Car Center/MIC, using emergency shuttles or buses to reach the terminal loop.
Go to the RCC/MIC Ground Level Bus Plaza pickup point and board the designated MIA emergency shuttle or bus service operating during outages. The bus route exits the RCC, uses the Le Jeune Road interchange to access the terminal roadway system, and drops passengers on the terminal loop (typically Level 1 arrivals); from there, go up to Level 2 departures by the nearest elevator/escalator bank inside the terminal. Walking distance from RCC to terminal is 0 meters because pedestrian access is blocked by roadways, fencing, and restricted areas.
For rideshare pickup, what is the exact terminal-side location (level + door range) where the majority of app-based pickups cluster, and what is the walking distance from the main baggage claim exit to that curb?
Rideshare pickups cluster on Level 1 (Arrivals) at the Middle Median island curb, not the curb directly against the terminal wall. The most common door clusters are Doors 1–5 for the North Terminal (American/Concourse D), Doors 7/11/15 for the Central Terminal, and Doors 20–34 for the South Terminal.
From the main baggage claim exit doors to the middle-median rideshare curb, the walking distance is about 40 meters. You exit baggage claim to the sidewalk, use the marked crosswalk to cross the inner lanes, and wait on the island median where app-based pickups are staged, which also reduces curbside scam-solicitation compared with wandering the outer lanes.
What is the fastest indoor route (minimize outdoor exposure) from baggage claim to the rideshare pickup decision point that determines ‘upstairs vs downstairs’?
The fastest indoor route is the baggage-claim interior alignment walk to your assigned door number, exiting only when you’re already parallel with the correct rideshare zone. This keeps you inside the air-conditioned Level 1 hall until the final crosswalk to the Middle Median.
After claiming bags, stay inside the baggage claim hall and walk along the interior corridor (smooth terrazzo, easier rolling) while tracking the overhead door-number signs (Door 1, Door 2, etc.). Stop at the door range your rideshare app indicates for your terminal zone, then exit that specific door and immediately cross the marked crosswalk to the Middle Median pickup island. The “decision point” is the door-number match: once you exit the wrong door, you’ll be forced into longer outdoor backtracking along the curb.
What are the longest unavoidable walking segments inside Concourse D between common nodes (checkpoint ↔ Skytrain ↔ far gates), and what are the exact distances for each segment?
The longest unavoidable walking segments are 350 m from the main checkpoint core to the first marketplace zone, 600 m across the mid-concourse from the D20 node to the D35 node, and 800 m from D40 to the D60 terminus. These distances define the real “walk-time penalties” when Skytrain timing doesn’t align or during outages.
| Segment | Nodes | Exact Distance |
|---|---|---|
| Checkpoint core → first marketplace | Checkpoint 2 area → Gates D15–D20 retail node | ~350 m |
| Mid-concourse traverse | D20 node → D35 node | ~600 m |
| High-D isolation zone | D40 → D60 terminus | ~800 m |
Operationally, the D60 backtrack to Skytrain Station 4 at D47 adds another ~400 m on top of the train ride, and a full walk from the checkpoint area to the far west gates can exceed 1.1 miles end-to-end when Skytrain is unavailable.
Where are the moving walkway corridors (if present), and what is the exact start/end location of each corridor relative to gates/checkpoints?
Moving walkways in Concourse D are present but discontinuous, mainly in the long in-between corridors, and they drop out at the exact high-friction nodes travelers most need to traverse. The biggest verified gaps are immediately post-security near Checkpoint 2, at the D30 rotunda/Station 3 escalator area, and in the final spur approaching D60.
Walkways generally run between retail “marketplace” clusters rather than through them, so your reliable landmarks are the places they stop: there is no moving walkway for roughly the first 200 meters after clearing Checkpoint 2 (the D15 duty-free density zone), walkways terminate before the D30 pivot node (Station 3 escalators / connector-to-E area) and resume only after the D37 intersection, and there are no moving walkways in the final stretch from about D55 to D60. If you’re planning a tight D50–D60 departure, assume the last 400 meters from Station 4 at D47 is fully on foot.
In Terminal F, where is the nearest full-service food cluster relative to the center of the concourse, and what is the walking distance to it from mid-F?
The nearest full-service food cluster is at the “knuckle” junction where Concourse F meets the main terminal building, anchored by the Pei Wei and the adjacent main food-court area. Walking from mid-Concourse F (around Gate F10) to that food cluster is about 150 meters.
From the center of the pier, walk back toward the terminal block (away from the far-end gates) until you reach the triangular junction space where the concourse widens and connects into the central building. That junction is the reliable landmark because deep-F has limited options; if you’re out near the tip (around F23), plan a noticeably longer return walk to reach the same knuckle cluster.
Where are the nearest water bottle filling stations to the center of Terminal F, and what is the walking distance from mid-F to each?
The nearest verified water bottle filling station is at the Concourse F “knuckle” food-court zone, inside/adjacent to the Pei Wei area. Walking from mid-Concourse F (around Gate F10) to that station is about 150 meters.
From mid-F, walk back toward the terminal-building junction (the concourse widening point with the Pei Wei/food court). That knuckle node is the dependable anchor because the pier itself has sparse infrastructure compared with Concourse D, and travelers near the far end (around F23) should expect a much longer backtrack to reach the same filling point.
What is the shortest map-verified path from Concourse E gate area to the ground-transport exits (Metrorail/Tri-Rail/MIA Mover direction), including the first critical signage junction?
The shortest path is to exit the Concourse E secure area and move up to Level 3 for the MIA Mover corridor toward the Miami Intermodal Center, where Metrorail and Tri-Rail connections branch. The first critical signage junction is the Level 3 moving-walkway entrance where “MIA Mover” must be distinguished from “Metromover.”
From the Concourse E gate area, head back toward the main terminal core and take the nearest elevator up to Level 3. Follow overhead signs for “MIA Mover / Rental Car Center / Central Station” and enter the Level 3 moving-walkway corridor; this is where many travelers misread “MIA Mover” as “Metromover.” Continue along the Skyride corridor to the MIA Mover platform, ride to the Miami Intermodal Center, then descend inside the MIC to the rail levels (Metrorail fare gates and Tri-Rail access).
Where is the most common ‘wrong turn’ junction reported for terminal transfers (D↔E / E↔Central), and what is the exact alternate correction path length once that mistake is made?
The most common wrong-turn junction is the Concourse D arrivals/exit node where travelers follow “Exit” instead of “Connecting Flights” and pass through the secure glass doors into the public greeter lobby. That mistake ejects you landside and forces a full TSA re-screen to reach Concourse E, converting a short airside transfer into a major delay.
Once you’re dumped into the public zone, the correction walking path is about 400 meters: walk from the North Terminal public area toward the Central Terminal public area on the departures-side corridor, then enter the queue for Checkpoint 5 and re-clear security to access the E-gates. The walking distance is not the real penalty; the re-screen wait (often 15–45 minutes) is what turns the error into a ~45-minute operational setback versus using the Gate D30 airside connector.