Melbourne Airport Terminal 1 Map (Most Up-To-Date)
Melbourne Airport Terminal 1 (Qantas) is a linear, two-level domestic terminal within Melbourne’s main airport hub, with Departures on the upper roadway level (Departure Drive) and Arrivals/Baggage Claim on the ground level facing the forecourt. The key spatial reality is a single, centralized security “fortress” feeding a long airside concourse: small wrong turns landside (doors, lanes, ranks) create outsized time penalties because backtracking often means traffic loops or full re-walks.
Map Table
| Zone | Connection | Walk Time |
|---|---|---|
| Departures (Level 1) | Departure Drive curb → Check-in/Bag Drop hall | 1–3 min |
| Security “fortress” | Check-in hall → Central screening lanes | 2–6 min (queue dependent) |
| Airside concourse | Security exit → Central gates (1–12) | 1–3 min |
| Northern pier | Security exit → Regional/QantasLink gates (20–24) | 8–15 min |
Melbourne Airport Terminal 1 Map Strategy
- Treat Terminal 1 as a wrong-choice penalty zone: once you commit to the wrong curb lane, pickup rank, or queue, recovery time is measured in loops and re-walks, not steps.
- Use fixed anchors, not vibes: Departures = Departure Drive upper level; Arrivals = ground level doors; rideshare/taxi = forecourt “Split Rank” outside T1; Terminal Car Park bridges = controlled fallback.
- Security volatility means you confirm the queue start before joining: find the actual lane mouths and the priority/standard split first, then commit—don’t join a snake you can’t see the origin of.
- Assume no magic cut-throughs: exit-only lanes at the forecourt, enforced 1-minute pickup, and bag-drop hard cutoffs mean your safest move is staging (Wait Zone / car park grace) and walking the correct frontage once.
2026 Melbourne Airport Terminal 1 Map + Printable PDF
CT security screening and the “Split Rank” ground-transport layout remain the two biggest map-changers at Terminal 1 in 2026. Automated bag drop still enforces hard cutoffs (domestic T-30), so the landside path must minimize wrong-door and wrong-queue errors. Forecourt and pickup/drop-off works continue to shift lane behavior, making landmark-based navigation more reliable than “follow the crowd.”
Melbourne Airport Terminal 1 Domestic Arrivals Ground Floor Map 2025
Melbourne Airport Terminal 1 Domestic Departures First Floor Map 2025
Melbourne Airport Terminal 1 Domestic Departures Gates Mezzanine Floor Map 2025
2026 Melbourne Airport Terminal 1 Map Guide
What is the exact physical start point of the Terminal 1 security queue (landmark-to-landmark), so a traveler can confirm they’re in the correct line before it snakes?
The Terminal 1 security queue starts at the mouth of the central screening “fortress” on the Departures level, immediately beyond the Qantas check-in hall’s front edge where the open hall compresses into the fenced lane entrances. The confirm-you’re-right test is: you can see the lane portals (CT X-ray + body scanner entry points) and the belt/tray prep benches ahead of the first stanchions.
In Terminal 1, the queue origin is not “somewhere in the middle of the hall”—it’s the point where the stanchions begin directly in front of the security lane entrances, before the line snakes back into the check-in hall during peaks. If you’re standing in a rope line with no clear sightline to the actual lane mouths, you’re likely in an overflow snake; walk forward along the stanchions until you can visually identify the screening entry portals and the first tray-loading positions, then decide standard vs priority from that split.
What is the shortest walk route from the Terminal 1 departures entry to the security screening entrance (step-by-step via fixed landmarks) to avoid wrong-corridor backtracking?
The shortest route is a straight-through line from the Qantas Departures doors to the central security “fortress,” staying on the open concourse edge of the check-in hall until you reach the fenced lane mouths. This avoids drifting into check-in rows or getting trapped behind kiosk/bag-drop clusters that force sideways backtracking.
| Step | Landmark-to-landmark route | Typical walk |
|---|---|---|
| 1 | Enter via the Departures level doors signed for Qantas (Departure Drive curbside) | 0:00–0:30 |
| 2 | Keep to the main through-corridor at the front edge of the check-in hall (do not cut into kiosk or bag-drop rows) | 0:30–1:30 |
| 3 | Follow overhead “Security Screening” signage toward the hall’s compression point where stanchions begin | 1:30–2:30 |
| 4 | Walk to the fenced lane mouths where you can see tray-prep benches and the CT X-ray/body scanner entry portals | 2:00–4:00 |
| 5 | Only then choose a lane (standard vs priority) based on the visible split at the portals | +0:30 |
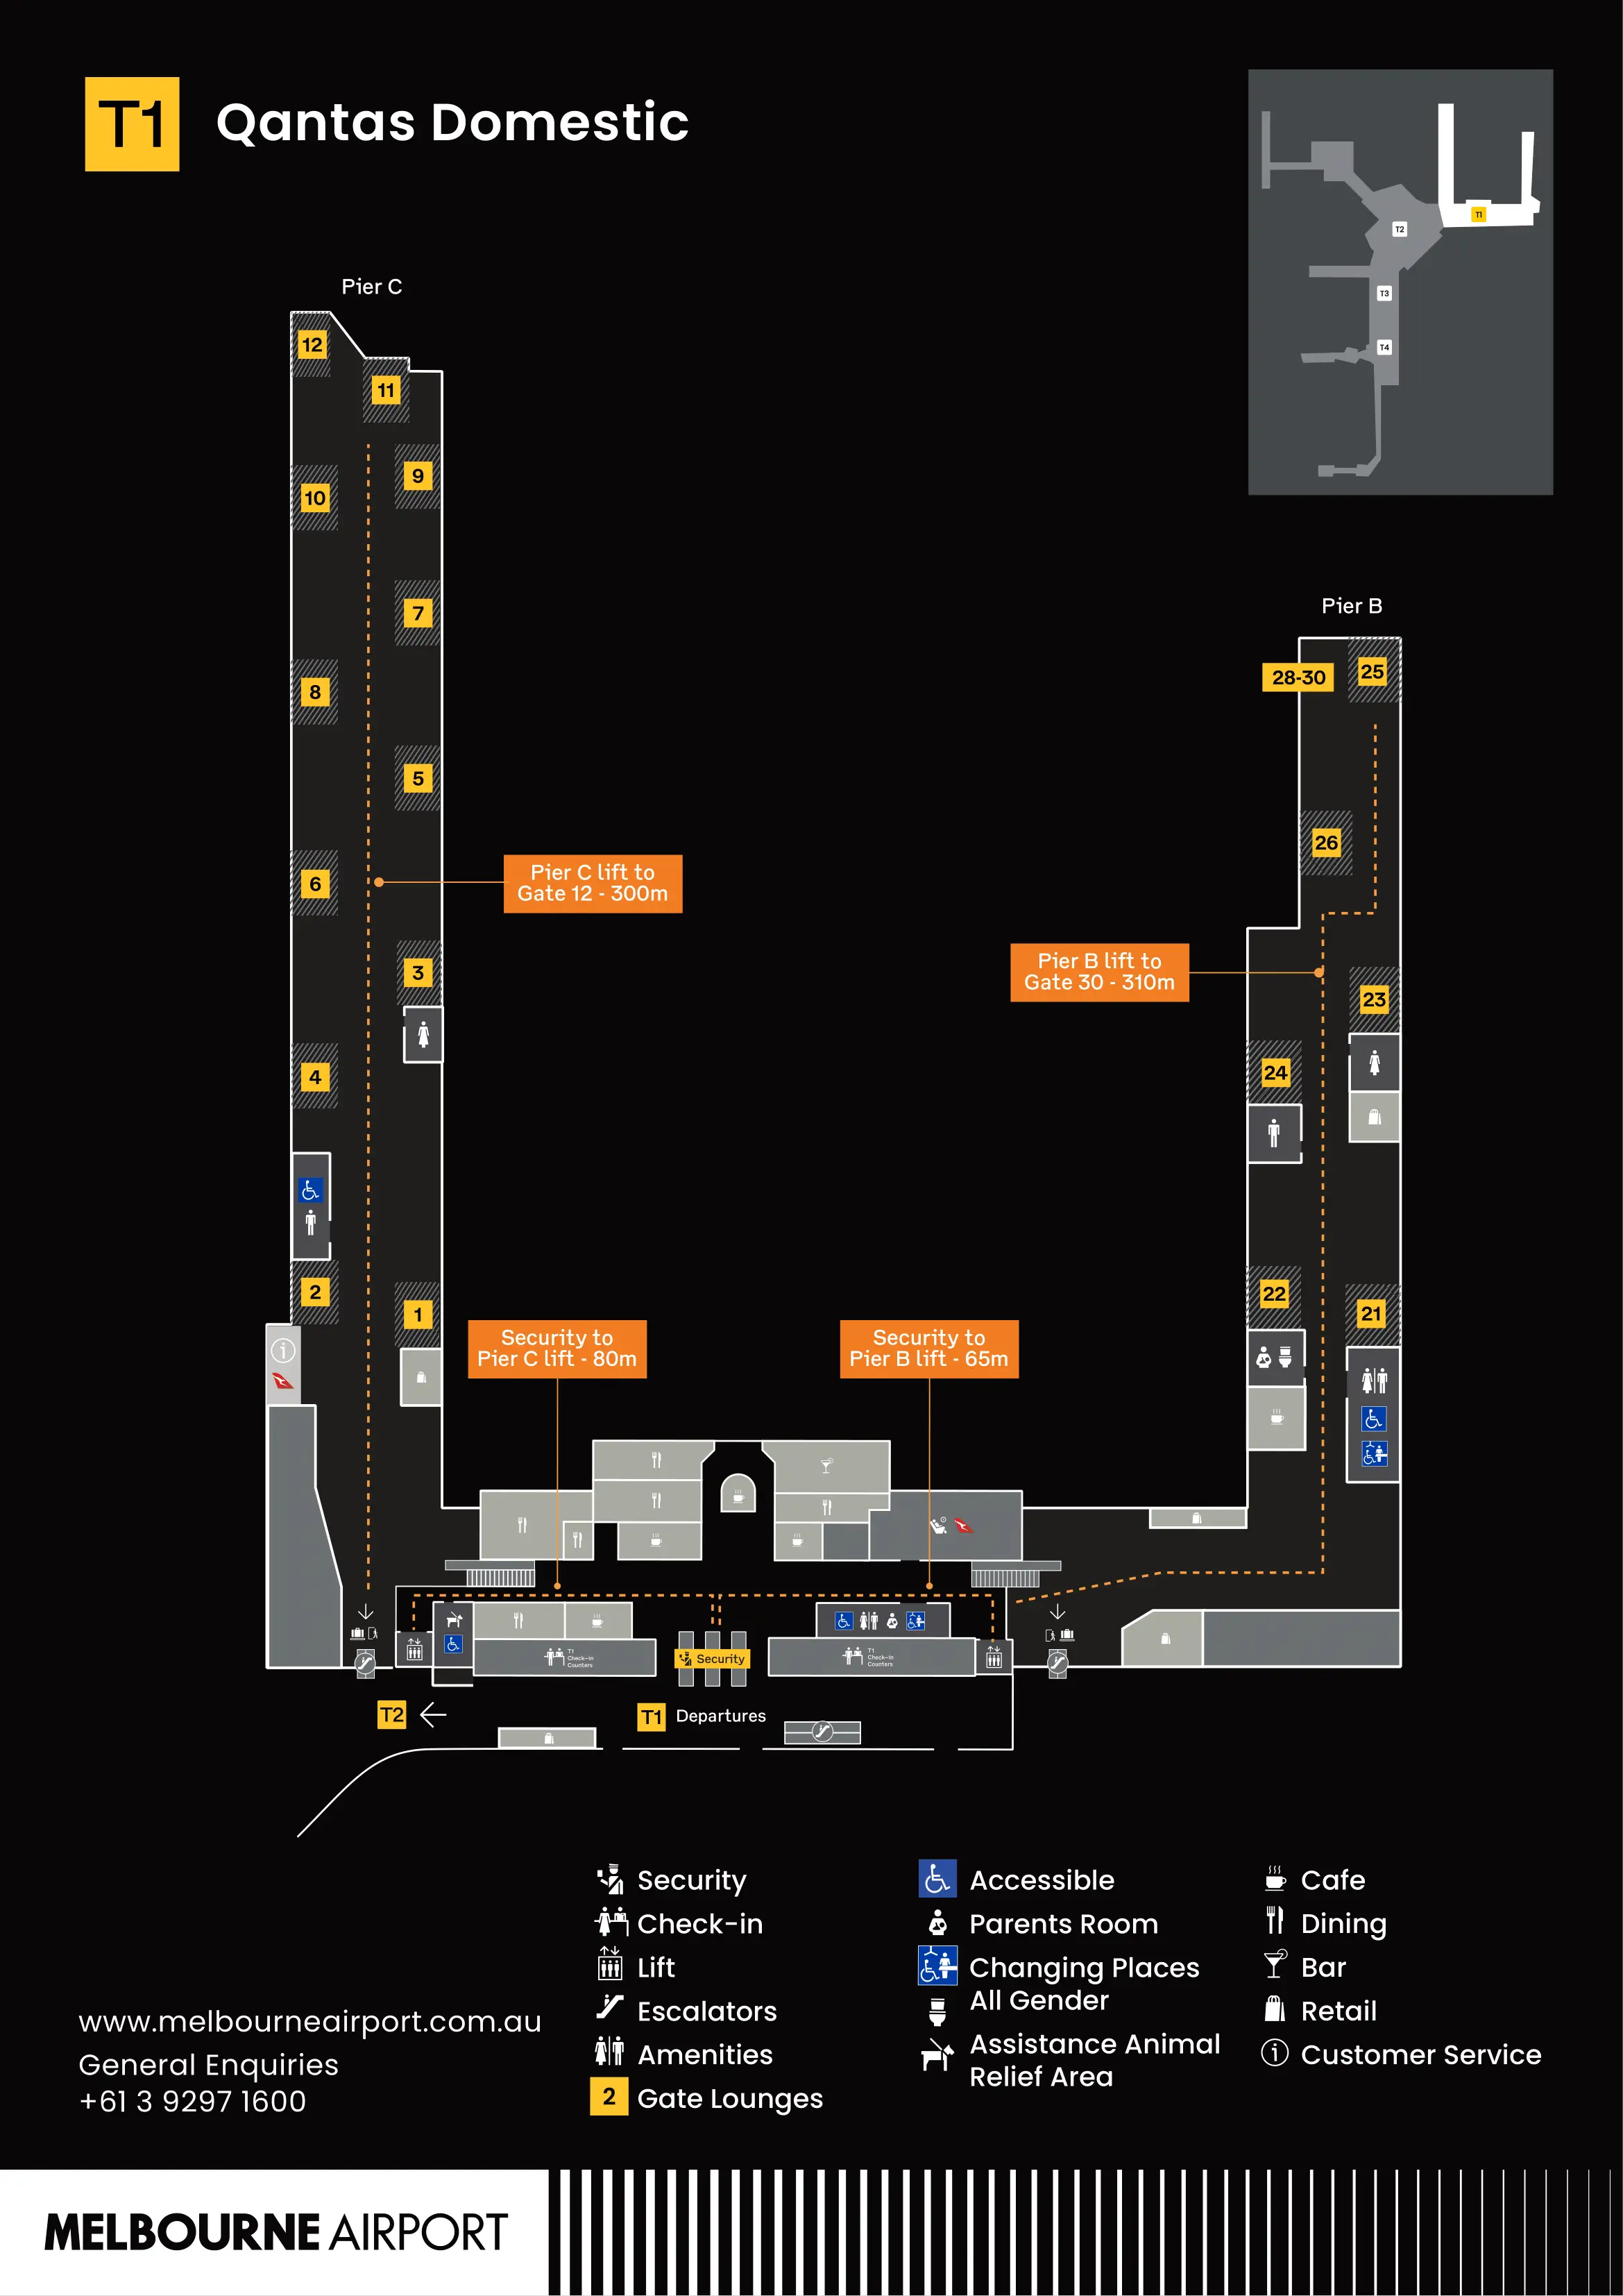
What is the walking distance (meters) from the Terminal 1 security exit to the furthest Qantas domestic gates, measured along the actual passenger route (not straight-line)?
Walking is 600+ meters from the Terminal 1 security exit to the furthest Qantas domestic gates on the northern pier (typically Gates 20–24). That distance is along the real concourse route from the security release point through the airside spine to the regional end, not a straight-line estimate.
From the security exit, you spill into the central airside retail atrium, then stay on the main concourse spine that feeds Gates 1–12 before it stretches north toward the QantasLink gate area. The “furthest gate” pattern is usually the regional pier (20–24), which adds sustained corridor walking after the central gate cluster.
A brisk solo walk typically takes about 8 minutes; with family pace or carry-on complexity, budget up to 15 minutes door-to-door from security exit to the last gates.
Where exactly is the Terminal 1 Qantas bag-drop area located relative to the main check-in rows, and what is the fastest path from curb drop-off to that bag-drop point?
The Qantas bag-drop area sits within the Terminal 1 Departures check-in hall as the auto-bag-drop banks aligned with the main Qantas check-in rows, accessed immediately after the kiosk/tag-print zone. The fastest curb-to-bag-drop path is the “front edge” line: enter Departures, cut to kiosks first only if you need tags, then move directly to the nearest open auto-drop bank without weaving through the deeper check-in queues.
From Departure Drive curbside, enter through the Qantas-signed Departures doors and hold the open corridor along the front of the hall (avoids getting boxed into queue mazes). If you need bag tags, step into the first available self-service kiosk bank, print/apply tags, then pivot back out to the aisle and walk straight to the auto-bag-drop mouths where the belts and scanners start. If the kiosk/bag-drop banks you see are fully congested, the quickest recovery is to stay in the main aisle and walk laterally to the next bank rather than pushing through the check-in-row interior.
If the primary bag-drop/check-in area is disrupted, what is the next nearest in-terminal service point passengers can physically reach (exact location by landmark) to re-tag/reprocess luggage?
The next nearest physically reachable fallback is the staffed Qantas service/check-in help point on the Departures level within the same Terminal 1 check-in hall, positioned at the periphery of the automated kiosk and bag-drop banks where staff can intervene when machines reject bags or tags. The practical landmark test is: it’s the closest staffed counter cluster you can see from the kiosk/bag-drop area without leaving the check-in hall or going toward security.
If auto-bag-drop rejects your bag (handle/strap, weight/size scan, tag error), do not walk toward security or change levels—stay landside in the check-in hall. Step out to the main aisle at the front edge of the hall, then move laterally to the staffed assistance point nearest the bag-drop mouths (where rejected-bag issues are handled) rather than rejoining the kiosk line. For oversize items (golf clubs, surfboards, large prams), the correct fallback is the dedicated oversize drop counter on the outer edge of the hall; waiting at standard auto-drops for oversize is a time sink that can burn the automated cutoff window.
What is the exact walking route from Terminal 1 arrivals to the designated Uber pickup zone for Terminals 1–3, including which level/exit doors a passenger must use?
Uber pickup uses the Terminal 1 ground-level forecourt “Split Rank,” reached by exiting the Arrivals hall doors and turning left. This is not an indoor pickup point, and walking the wrong direction can pull you into the Terminal 2 frontage flow and cost you a full re-walk.
| Step | Landmark-to-landmark route | Typical time |
|---|---|---|
| 1 | Go to Terminal 1 Arrivals (Ground Floor) and face the main sliding glass exit doors from the baggage reclaim hall | 0:00–1:00 |
| 2 | Exit through the sliding doors to the forecourt (outside) | +0:15 |
| 3 | Turn LEFT immediately on the forecourt sidewalk (do not follow crowds right toward Terminal 2) | +0:15 |
| 4 | Walk along the curbside frontage to the signed rideshare section within the “Split Rank” opposite Terminal 1 | +1:30–3:30 |
| 5 | Stand at the Terminal 1 rideshare bays and match the app pickup (plate/driver photo; PIN if prompted) before loading | +0:30–1:00 |
Where is the Terminal 1 “1 Minute Pickup” area located (by lane/bay structure), and what is the shortest indoor route from arrivals hall doors to the correct lane/bay markers?
The Terminal 1 “1 Minute Pickup” area is on the ground-level forecourt directly outside Terminal 1 Arrivals, in the outer pickup lanes where vehicles are enforced to stop briefly and then move on. It is not a waiting area: if the passenger is not curbside and ready at the bay markers, the driver gets pushed forward and often forced into a recirculation loop.
From inside Terminal 1, the shortest route is: baggage reclaim → Arrivals hall → exit through the main sliding glass doors to the forecourt → walk a few meters along the curb until you can see the pickup lane/bay markers and vehicle marshals/camera enforcement. The “correct spot” confirmation is that you are aligned with the signed pickup bays (not the rideshare/taxi split) and you can see the live curb flow in front of you; if you’re on a sidewalk segment with no bay markers, keep moving along the frontage until the marked pickup section begins.
What is the vehicle approach path that reaches Terminal 1 pickup without getting forced into a loop or wrong terminal frontage (turn-by-turn via named roads/ramps)?
The safest “no-loop” approach is to stage first in the Mercer Drive Wait Zone, then make a just-in-time run to the Terminal 1 forecourt so you enter the pickup lanes only when the passenger is already curbside. This prevents the most common failure mode: arriving early, missing the passenger, and getting ejected into the 10–15 minute recirculation loop.
From the freeway approach, take the airport terminal exits that feed Airport Drive, then follow terminal precinct signs for Terminals 1–3 and the Arrivals/Pickup forecourt rather than Terminal 4 (Jetstar/Rex) routes. Stay committed to the Terminals 1–3 frontage once you enter the precinct: late lane changes are what force drivers into the wrong frontage or an exit-only spur. On the final approach, use the lane that is signed for public pickup (not taxi/rideshare ranks) and treat the 1-minute zone as load-and-go—if the passenger is not visible at the bay markers, do not stop; continue through and reset via the Wait Zone instead of looping tight inside the terminal roads.
From Terminal 1 arrivals, what is the shortest walking route to the nearest legal “wait/stage” alternative (e.g., a nearby car park or clearly-defined staging area), and what is the exact distance?
The nearest legal “wait/stage” option you can reach on foot from Terminal 1 Arrivals is the Terminal Car Park serving Terminals 1–3, accessed via the signed pedestrian connection from the forecourt into the parking structure. This is the walkable alternative when the 1-minute curb zone is too chaotic or you need more than a brief load-and-go.
From the Arrivals hall, exit through the main sliding doors to the forecourt, then follow signs to the Terminal Car Park pedestrian entry/bridge connection (the controlled path into the garage). The walk is short—typically only a few minutes—because the car park is designed as the immediate adjacent buffer to the forecourt.
An exact meter distance is not specified in the provided audit material; the operational distance-to-plan from Arrivals doors to the car park entry is “minutes, not blocks,” with the time penalty dominated by finding the signed entry point rather than pure walking length.
What is the true walking path (and time/distance) from the common public transport drop point used for Terminal 1 to the Terminal 1 departures doors—using the correct pedestrian connections (to prevent the “wrong 30-minute walk” error)?
Walking uses the signed terminal pedestrian spine from the ground-transport set-down into the Terminals 1–3 forecourt, then up to the Departures level doors for Terminal 1. The wrong-choice penalty happens when people follow roads or car-park edges instead of the marked pedestrian connections, turning a short terminal transfer into an exposed, indirect walk.
From the public transport drop point, follow “Terminals 1–3” pedestrian signage to the terminal forecourt entrance (stay on the paved, ramped walkway built for luggage and trolleys). Once you reach Terminal 1’s ground-level frontage, go to the vertical connection (escalators/lifts) up to Departures (Level 1) and exit at the Qantas-signed doors on Departure Drive. If you find yourself walking alongside vehicle lanes with no terminal-facing doors in sight, you’ve drifted off the pedestrian spine—reset by rejoining the signed forecourt path.
Exact time/distance for this specific PT drop-point-to-Departures route is not provided in the audit material; the document’s quantified walking matrix covers terminal-to-terminal and arrivals-to-rank distances, not the bus set-down origin.
What is the exact indoor route from Terminal 1 arrivals hall to the correct pickup exit that aligns with rideshare/taxi/public pickup signage (so passengers don’t exit to the wrong frontage)?
The correct pickup exit is the main Terminal 1 Arrivals sliding-glass doors that open directly to the forecourt sidewalk where the “Split Rank” (rideshare/taxi) and “1 Minute Pickup” flows are signed. Exiting via side corridors or drifting toward the Terminal 2 frontage is what creates the wrong-frontage penalty and forces a re-walk.
From baggage reclaim, walk straight into the public Arrivals hall and stop where you can see daylight through the largest set of sliding glass doors in front of you (the main forecourt exit). Go out those doors, then use the first overhead/kerbside signs as your truth source: turn left on the forecourt sidewalk for the Terminal 1 rideshare/taxi “Split Rank,” or stay aligned with the marked outer pickup lanes and bay markers for “1 Minute Pickup.” If you exit and immediately see international-facing frontage flow or “Zone B” style directions, you’ve drifted toward Terminal 2—turn back and re-center on the Terminal 1 forecourt doors.
What is the walking distance from Terminal 1 to Terminal 4 along the official pedestrian route, including the correct entry/exit points a passenger must use to avoid ending up outside the terminal spine?
Walking is about 850 meters to 1 kilometer from Terminal 1 to Terminal 4 along the established pedestrian connection, and the route begins at Terminal 1’s ground-level frontage before continuing along the signed forecourt walkway toward Terminal 4. This is the distance that produces the classic wrong-choice penalty: assuming T4 is “next door,” then discovering it’s a long, commitment-heavy walk.
Use this anchor-to-anchor pattern: start from Terminal 1 Arrivals/forecourt doors (Ground Floor), join the paved pedestrian path that runs along the terminals’ frontage (trolley-friendly ramps), then continue south past Terminals 2 and 3 toward Terminal 4’s check-in entrance. The indoor connector exists via the T2/T3 “single roof” links, but it is more circuitous and slower because it adds level changes and crowd friction; the more direct line is typically the forecourt-level pedestrian path.
Planning times from the audit: about 12–15 minutes brisk, or 25–30 minutes with family pace and luggage.