John Glenn Columbus International Airport Map (Most Up-To-Date)
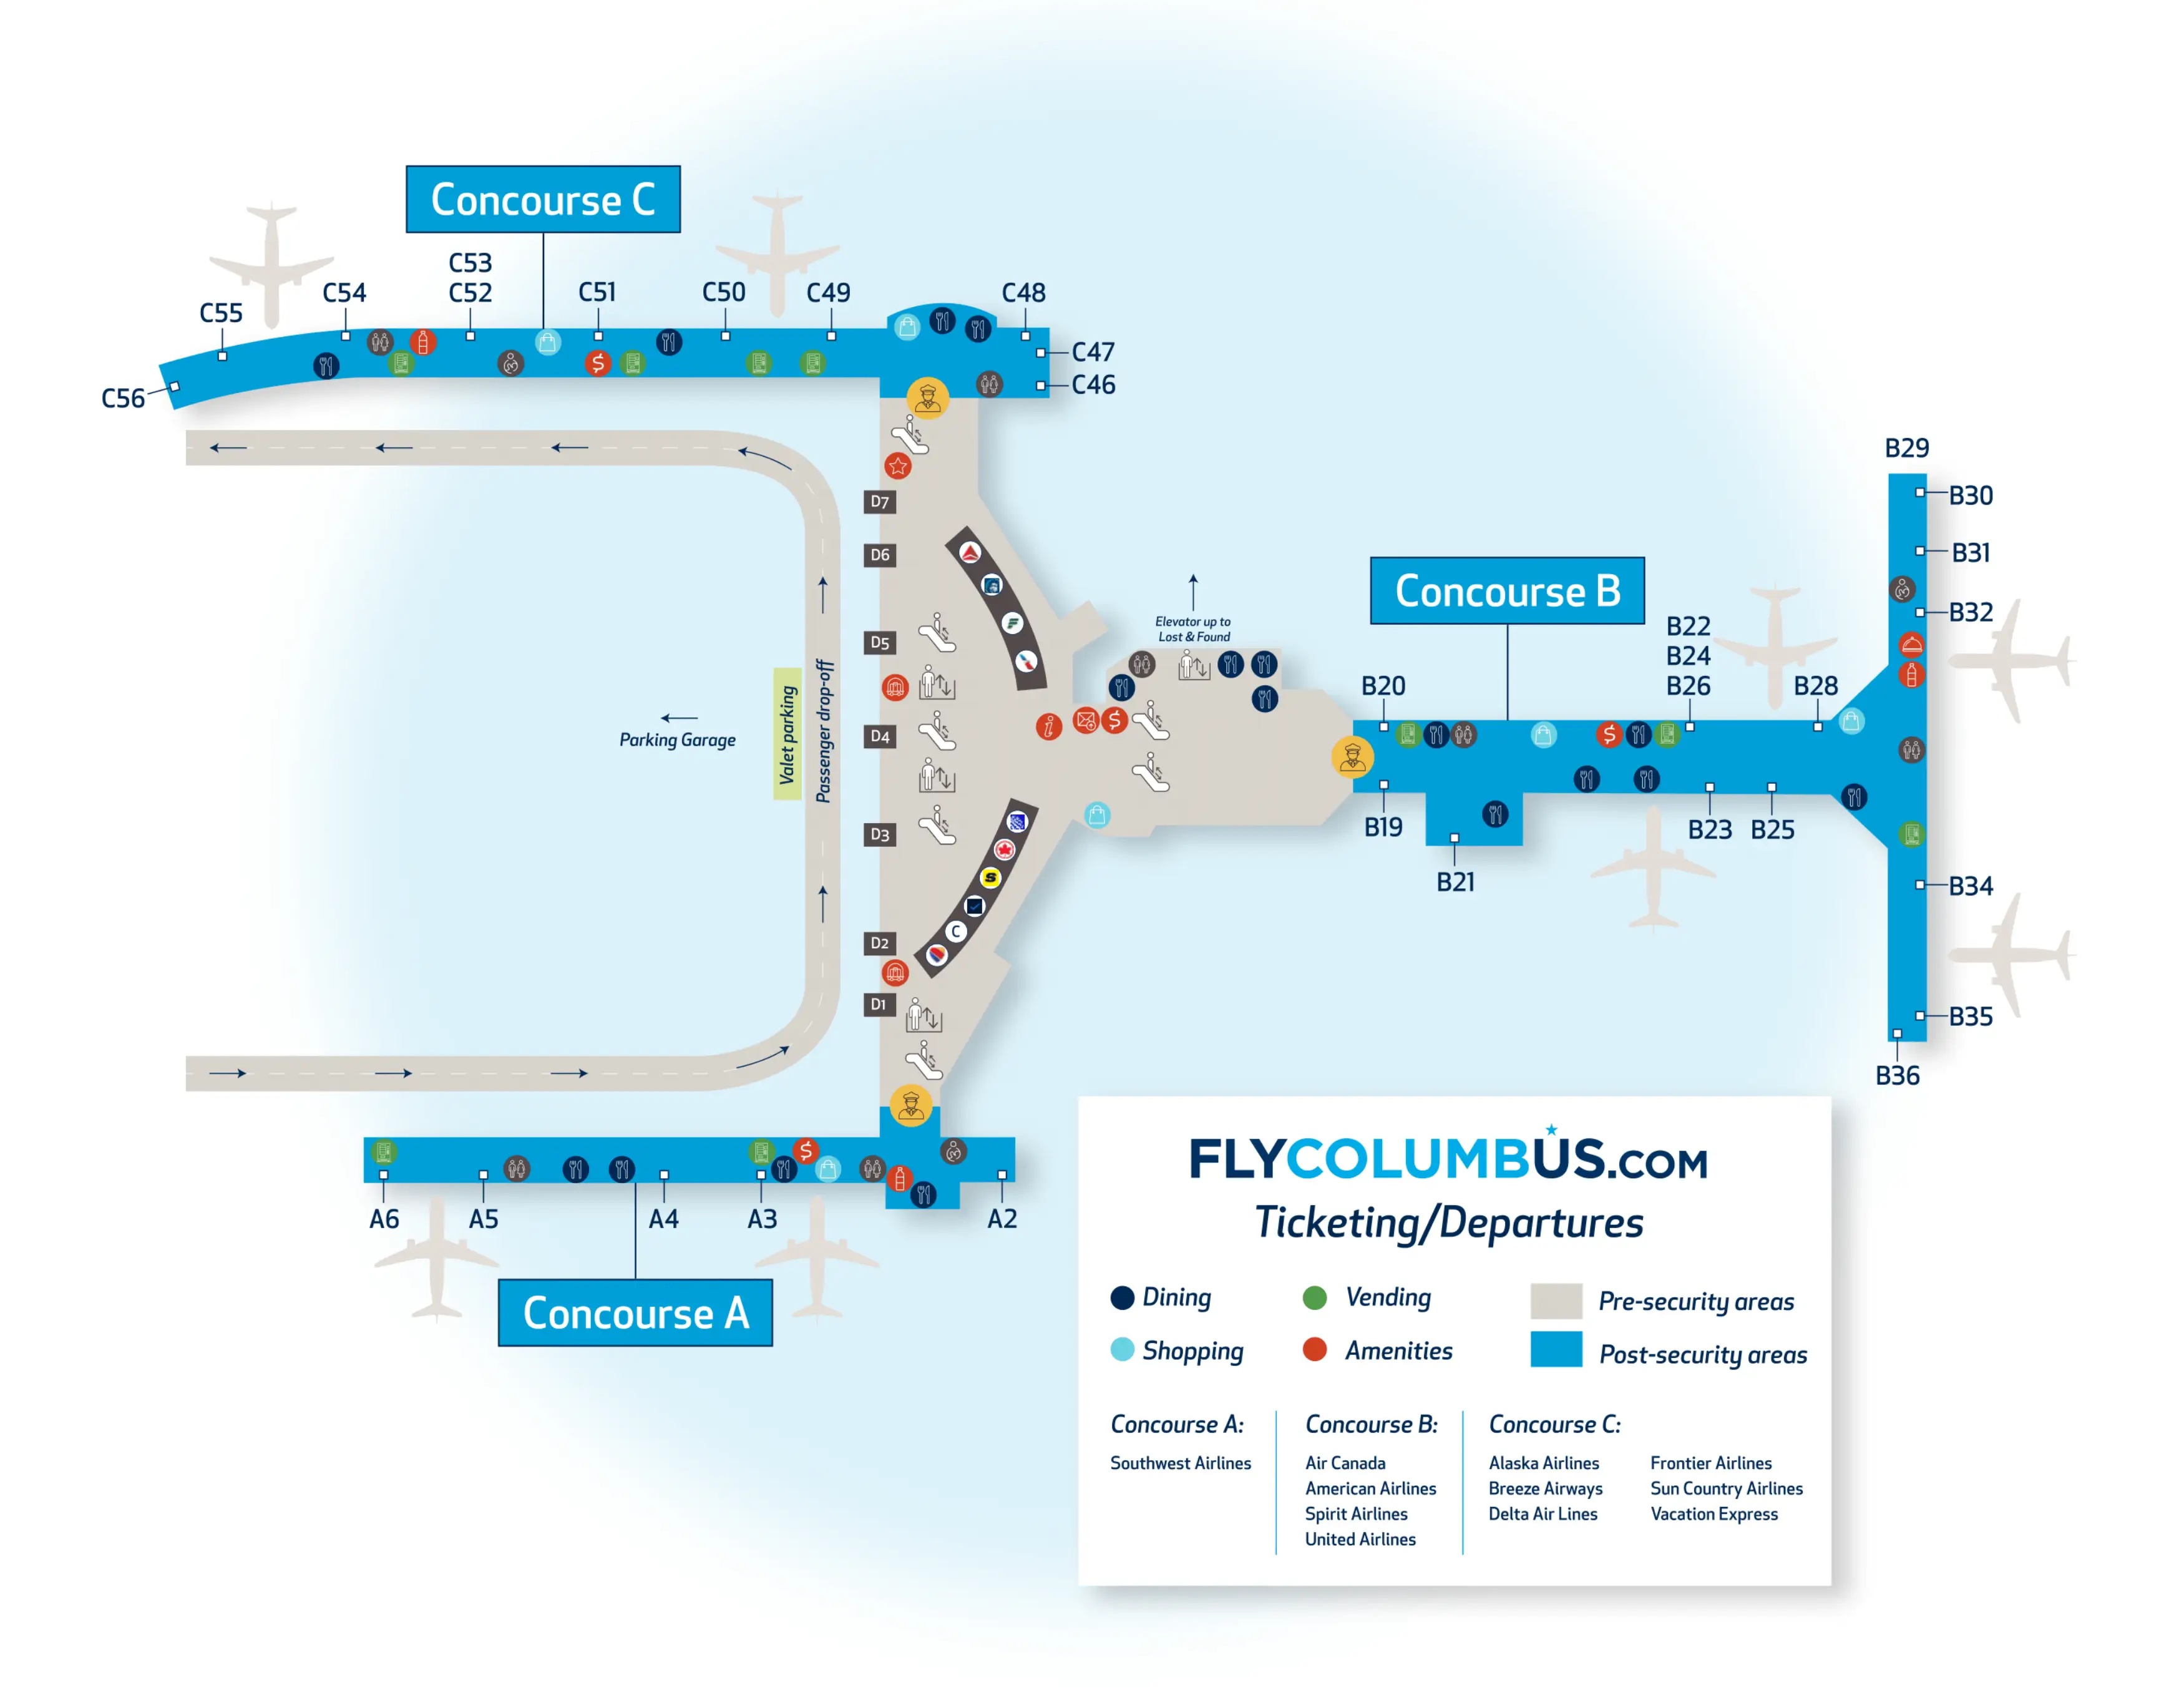
John Glenn Columbus International Airport (CMH) uses a compact, single-terminal layout that fans into three isolated concourses (A south, B center, C north) off one landside Ticketing Hall (Level 2), with Arrivals/Baggage Claim concentrated on Level 1 below. The biggest orientation factor inside Columbus’s main airport hub is that each concourse has its own checkpoint and there’s no airside connector—your first concourse/checkpoint choice largely locks in your path.
Map Table
| Terminal | Key Airlines | Primary Function | Transfer Mode |
|---|---|---|---|
| Concourse A (South) | Southwest | Gates, departures | Landside walk, re-clear security |
| Concourse B (Center) | American, United, Spirit | Gates, departures | Landside walk, re-clear security |
| Concourse C (North) | Delta, Alaska, Frontier | Gates, departures | Landside walk, re-clear security |
| Levels | Departures 2, Arrivals 1 | Ticketing, security, baggage | Ramps, escalators, elevator |
John Glenn Columbus International Airport Map Strategy
- Treat CMH as “one concourse, one checkpoint”: pick Concourse A/B/C before you commit to any TSA queue, because switching concourses typically means exiting security and re-clearing.
- Use the last irreversible Departures cues: Concourse A decision at the south end by Southwest counters; Concourse B decision at the central atrium/food court; Concourse C decision at the north end by Delta counters.
- Run a construction-proof pickup plan: approach the temporary Cell Phone Lot via International Gateway, remember the eastbound-only exit constraint, and aim for the first legal Arrivals curb entry to avoid forced loops.
- Reduce curb/stand mistakes on Arrivals Level: private pickup stays at the inner curb by the terminal doors; rideshare/taxi and rental shuttles use the center median zones (green for ground transport, purple for rental cars).
2026 John Glenn Columbus International Airport Map + Printable PDF
Active construction for the CMH Next program continues through 2026, so the most important “map” updates are outside the building: parking inventory shifts, a permanently closed Blue Lot, and a relocated Cell Phone Waiting Lot with routing constraints. Inside, the legacy layout remains the same—three concourses, separate checkpoints, and landside-only transfers—so printing a map is mainly about preventing wrong-checkpoint and wrong-curb errors.
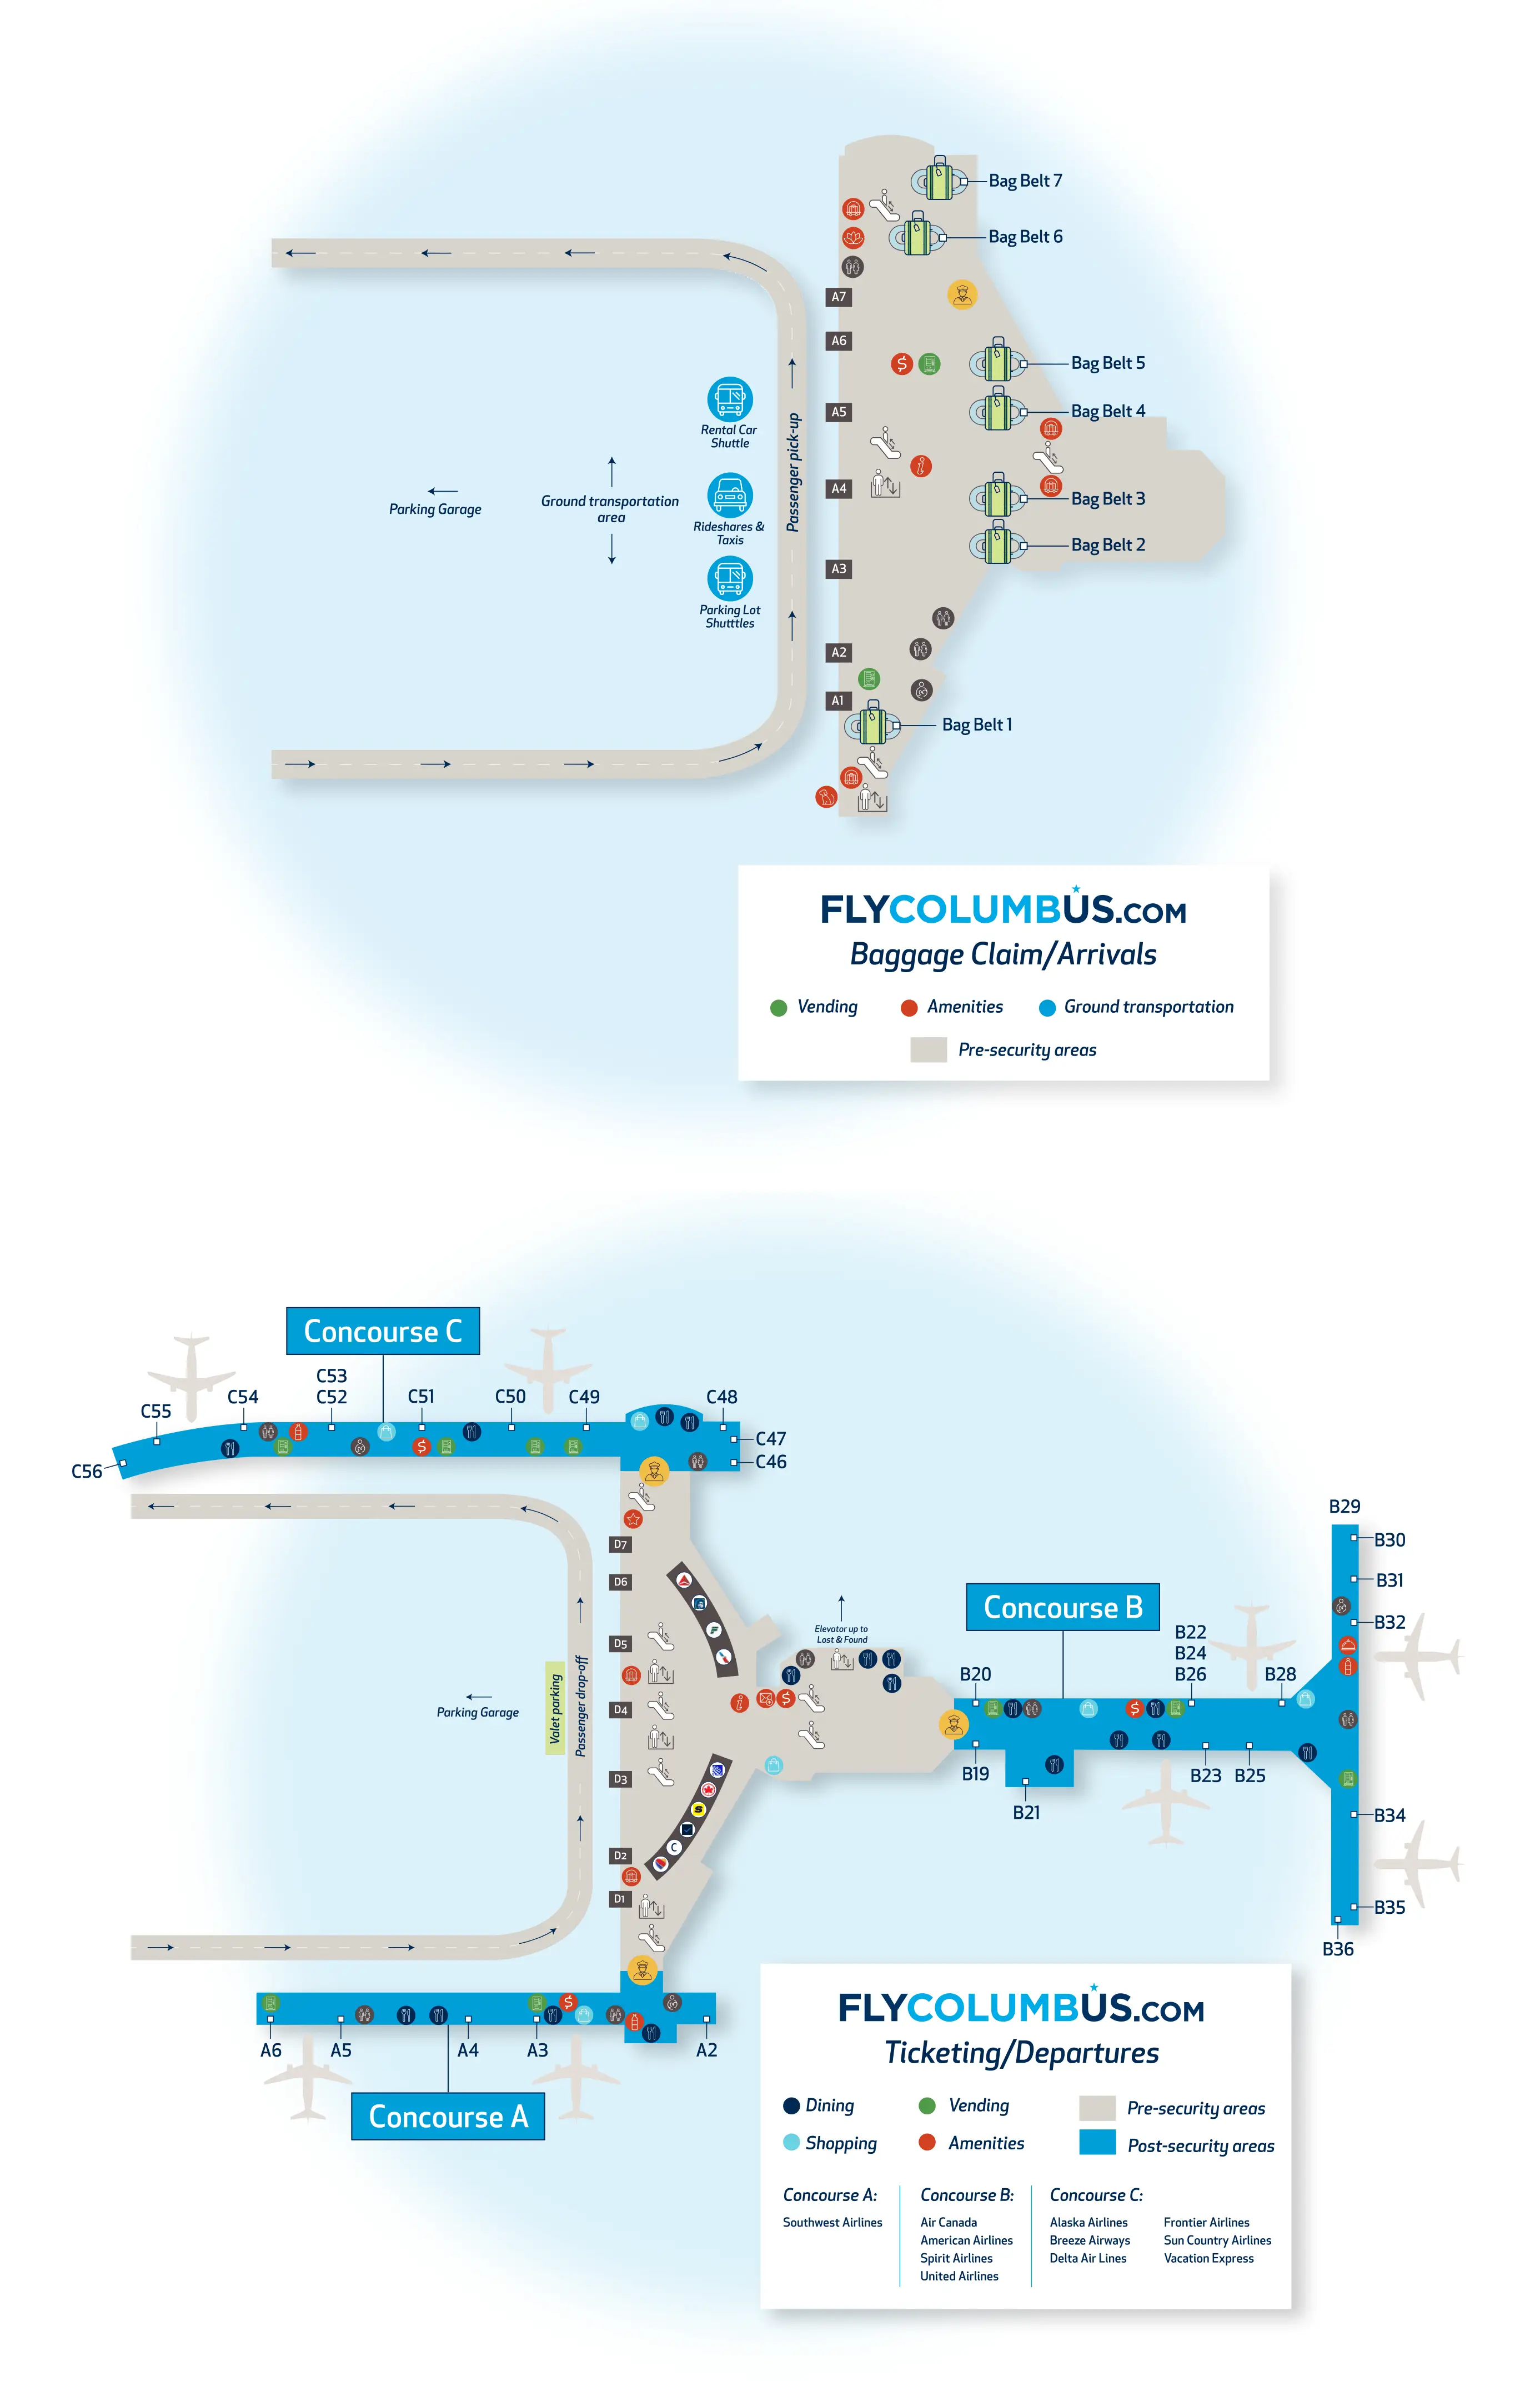
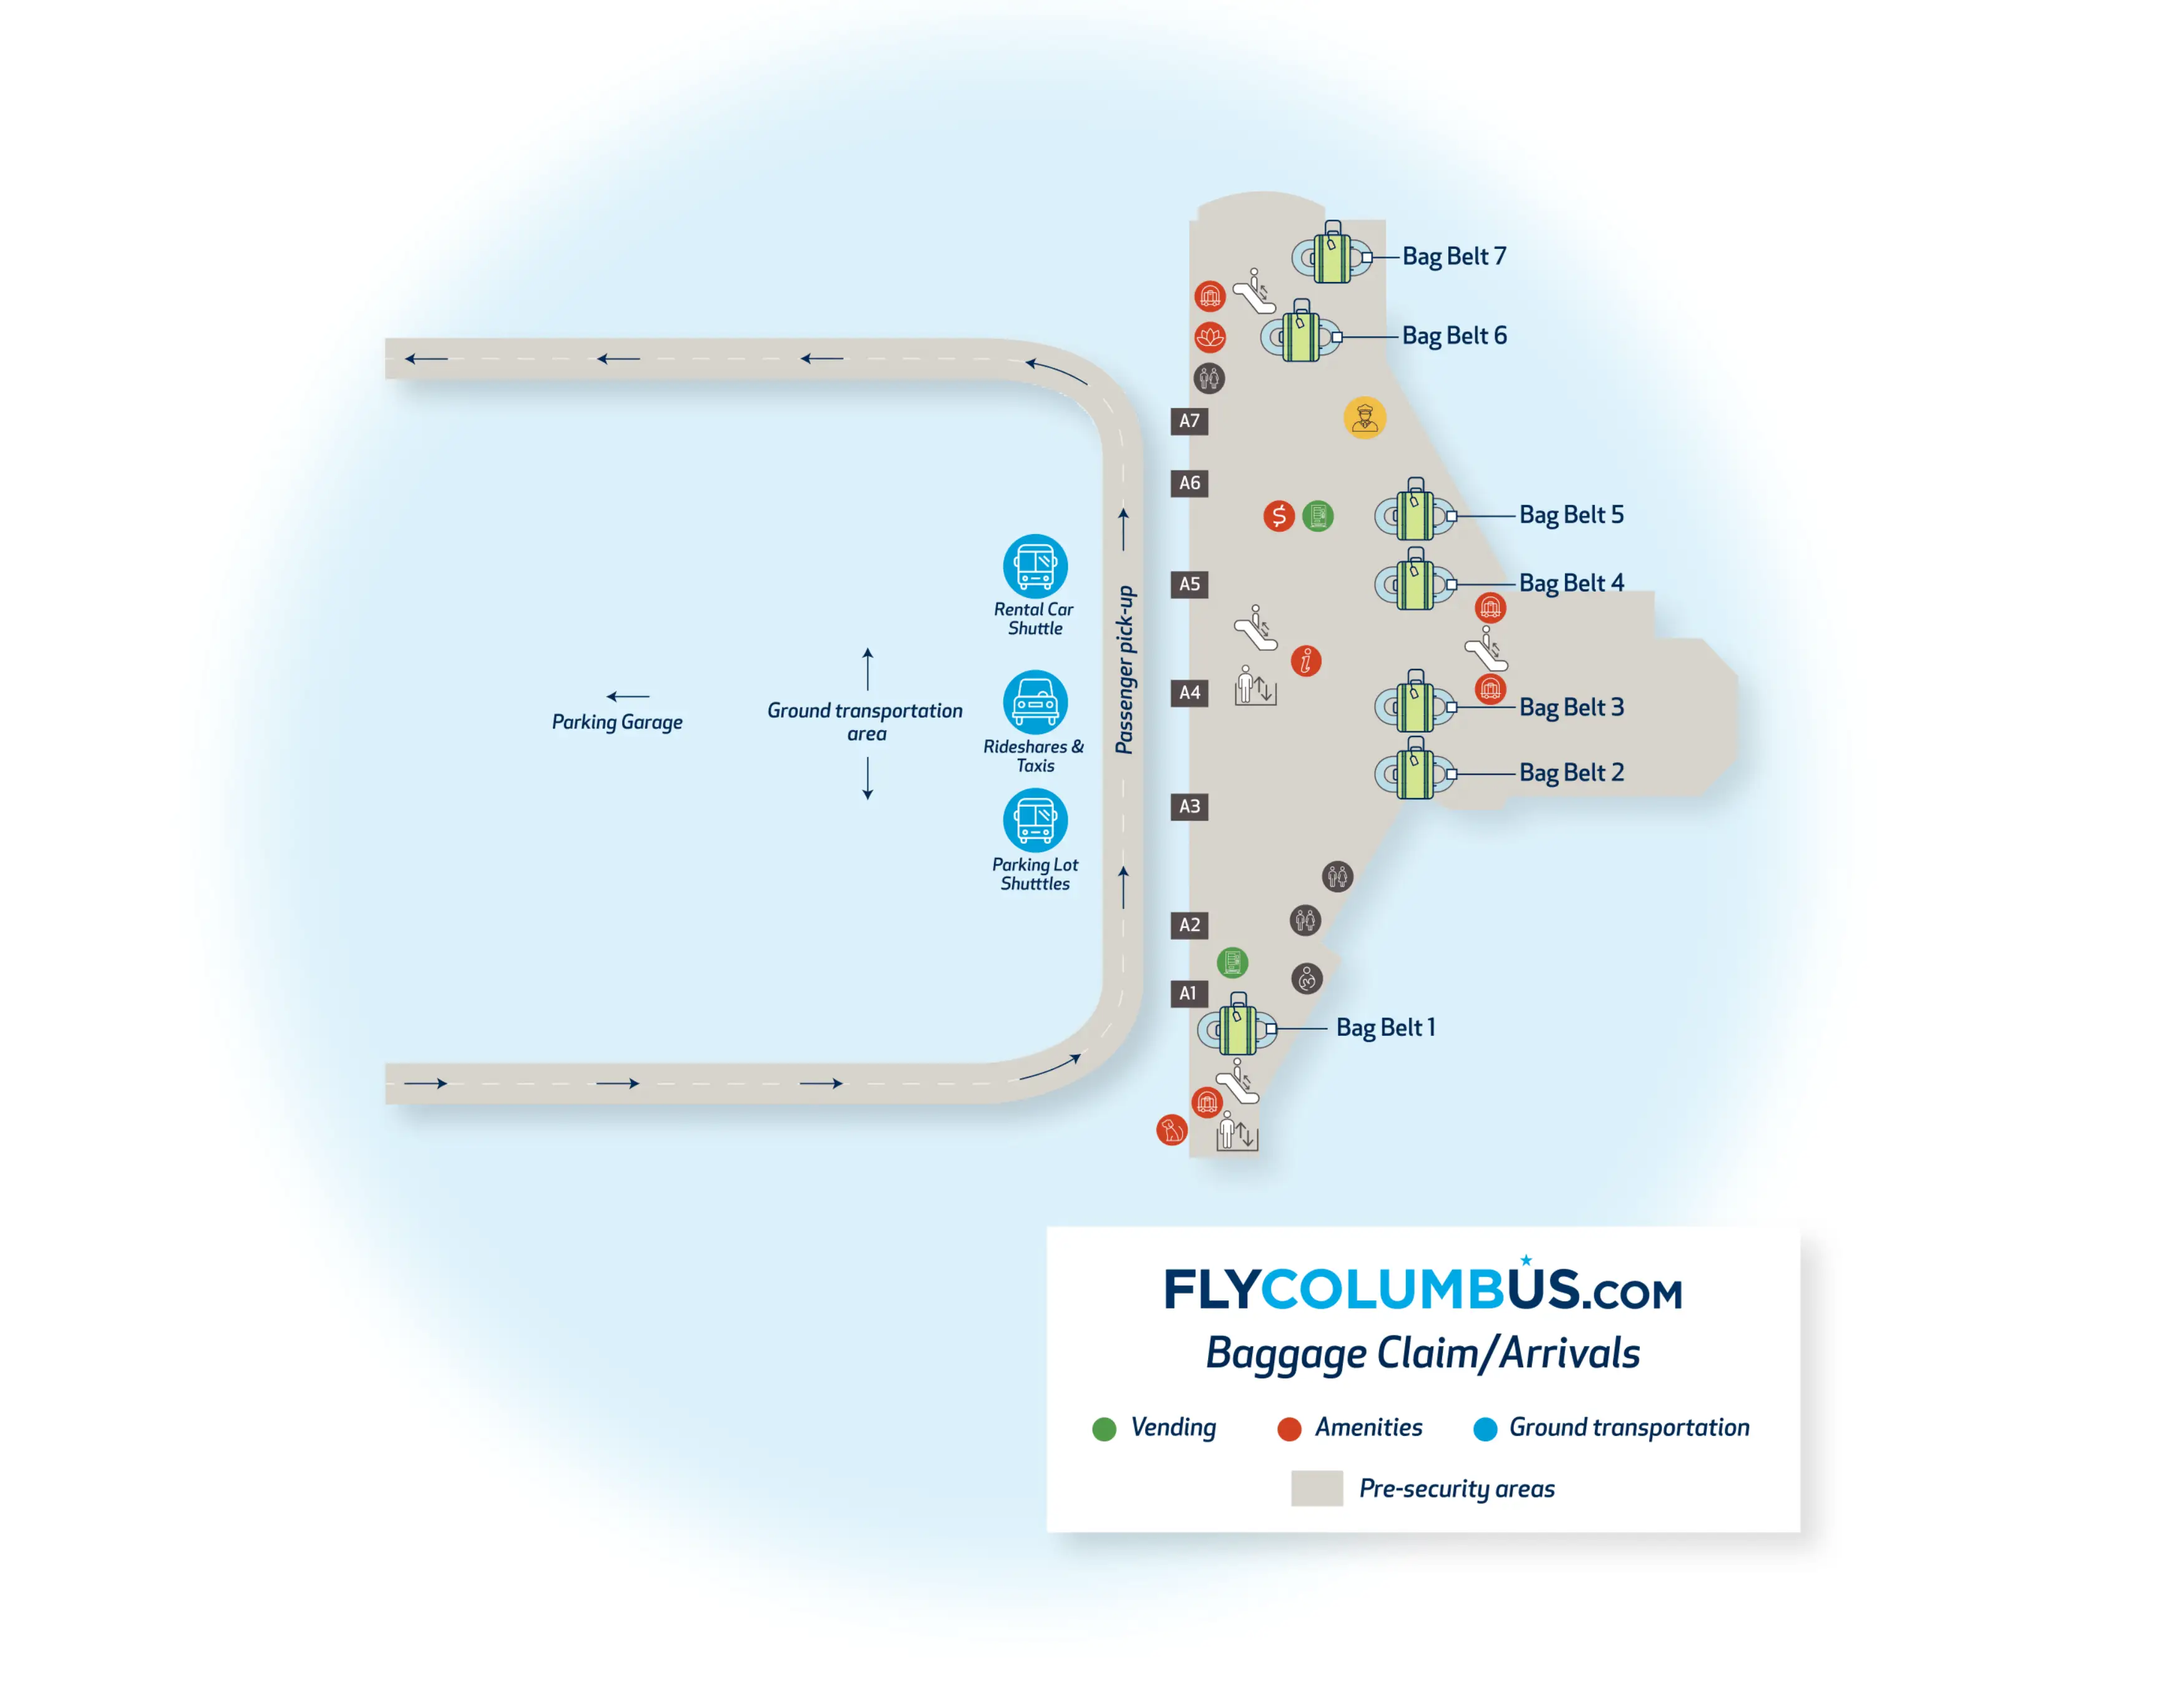
John Glenn Columbus International Airport Arrivals Map 2025
John Glenn Columbus International Airport Departures Map 2025
2026 John Glenn Columbus International Airport Map Guide
Where is the exact decision point in Departures where you must choose the TSA entrance for Concourse A (the last point before backtracking becomes costly)?
The last high-cost decision point is the south-end corridor transition immediately after the Southwest Airlines ticket counter bank in the Departures/Ticketing Hall (Level 2).
Walking south from the central atrium, the flow passes Starbucks and the Southwest counters, then the architecture narrows and “funnels” you into the dedicated Concourse A security queue area. If you drift back toward the central atrium/food court zone instead, you’re pulled into the Concourse B catchment and correcting it typically means a full turn-back and a long walk to return to the south end during peak crowds.
Where is the exact decision point in Departures where you must choose the TSA entrance for Concourse B (the last point before backtracking becomes costly)?
The commitment point is the Concourse B TSA queue entry at the central atrium/food court frontage in the Departures/Ticketing Hall (Level 2).
This checkpoint sits straight ahead from the main garage skybridge/central curb doors and is the “default” pull for most foot traffic. The costly moment is when you step into the queue matrix that often spills into the main circulation path; once you’re in it, the time penalty is usually the wait you’ve already sunk before realizing you needed Concourse A (south) or Concourse C (north). Use the central atrium landmarks—pre-security food court and the main center corridor—to confirm you’re choosing B intentionally, not by drift.
What is the exact walking distance (in feet/meters) from the main Ticketing hall midpoint to the entrance of the Concourse A TSA queue?
The walking distance is approximately 500 feet (150 meters) from the Ticketing Hall midpoint to the Concourse A TSA queue entrance.
The midpoint reference point is the central Ticketing Hall area by the main garage skybridge entry and the primary vertical circulation (elevators/escalators) up from baggage claim. From there, walk south past the central atrium toward Starbucks and the Southwest ticket counter bank; the Concourse A checkpoint entrance sits just beyond the end of those counters where the corridor narrows into the security queue. Crowd and bag friction can stretch the walk even though the distance is short.
What is the exact walking distance (in feet/meters) from the main Ticketing hall midpoint to the entrance of the Concourse B TSA queue?
The walking distance is approximately 150–200 feet (45–60 meters) from the Ticketing Hall midpoint to the Concourse B TSA queue entrance.
The midpoint reference point is the central Ticketing Hall area by the main garage skybridge entry and the main elevator/escalator bank up from baggage claim. From there, Concourse B is essentially straight ahead at the central atrium, adjacent to the pre-security food court frontage where the queue often extends into the main circulation lane. This short distance is why Concourse B acts like the “default” checkpoint—verify airline/concourse before stepping into the queue.
Where is the shortest mapped route to switch from Concourse A to Concourse B when already airside (showing the required exit-to-landside and re-entry path)?
There is no airside route between Concourse A and Concourse B; switching requires exiting to landside and re-clearing security at the other checkpoint.
| Segment | From | To | What to follow |
|---|---|---|---|
| 1 | Concourse A gate area (airside) | Concourse A security exit | “Exit” / “Baggage Claim” signs |
| 2 | One-way sterile exit doors | Ticketing Hall (Level 2), south end | Stay on Level 2, avoid down escalators |
| 3 | Ticketing Hall south end | Central atrium / food court frontage | Walk north past Southwest counters |
| 4 | Concourse B TSA entrance | Concourse B airside | ID + boarding pass, full re-screening |
Where is the exact landside corridor/door you must use to go from the Concourse A sterile exit back to the Concourse B TSA entrance (no detours through baggage claim)?
The correct path is the Level 2 Ticketing Hall main circulation corridor immediately outside the Concourse A one-way sterile exit, staying on Departures and walking north to the central atrium for Concourse B security.
When you exit Concourse A through the sterile doors, you’ll see escalators down to Level 1 (Baggage Claim) nearby—skip them. Continue straight ahead and angle slightly left into the Ticketing Hall spine, passing the Southwest ticket counter frontage and the curbside windows. Keep walking north until the central atrium/food court zone, then turn right into the Concourse B TSA queue entrance at the center checkpoint.
Where is the exact entrance/turn-in on the road network for the Cell Phone Waiting Lot (the correct lane/approach that avoids dead-ends during construction routing)?
The Cell Phone Waiting Lot turn-in is on International Gateway at the temporary lot positioned by the large “John Glenn International” sign, between the Air Traffic Control Tower and the terminal area.
Approach on International Gateway and watch for the lot entrance aligned with the sign frontage rather than older GPS prompts for the closed Blue Lot zone. The key construction-era constraint is directional: the lot can be entered from either direction on International Gateway, but the exit is eastbound-only toward the terminal loop, so once you pull in you’re effectively committed to proceeding to Arrivals pickup instead of doubling back to the highway.
What is the mapped driving path from the Cell Phone Waiting Lot exit to the correct Passenger Pick-Up curb segment (the first legal curb you can enter without looping)?
The mapped path is: exit the Cell Phone Waiting Lot eastbound on International Gateway, follow the split for Arrivals, loop under the terminal, and enter the covered Arrivals curb as your first legal pickup curb.
After you turn right out of the lot, immediately position for the lanes marked “Arrivals” as the roadway divides. The Departures/Ticketing lanes peel away to the left for Level 2; stay right for Arrivals/Baggage Claim on Level 1. Follow the curve as it loops beneath the terminal structure, then take the first curb entry into the covered Arrivals roadway. That inner curb beside the building is the private passenger pickup zone and is the earliest legal curb access without forcing an extra loop.
Where is the exact Passenger Pick-Up curb zone relative to baggage claim exits (which door numbers/side puts you on the correct curb)?
The Passenger Pick-Up zone is the inner curb directly outside the Level 1 Baggage Claim exit doors along the terminal frontage.
Baggage Claim is linear, so the simplest “mapped” rule is door-proximity: exit the doors closest to your carousel and you’ll land on the correct private pickup sidewalk immediately beside the building. For less congestion, the east/southwest end of the hall (near Carousels 1–2) tends to feed a curb segment away from the central pinch point, while the west end (near Carousels 5–7) feeds the opposite side of the pickup flow. Door numbering can vary by signage set, so use carousel position (east/center/west) as the reliable anchor.
What is the exact walking distance from the primary baggage claim exit doors to the rideshare/taxi pickup area (curb-to-curb distance)?
Walking is approximately 60–80 feet (18–24 meters) from the baggage claim exit doors to the rideshare/taxi pickup area.
Exit Level 1 baggage claim to the sidewalk at the inner curb (private pickup lane), then use the marked crosswalk to cross the first roadway to the center pedestrian island/median. The rideshare/TNC and taxi staging signage is posted on that island, so the distance is short but the “risk” is timing the crosswalk through active vehicle flow rather than the length of the walk.
Where is the exact pedestrian route from the Parking Garage to the Ticketing hall entrance (including which level/skybridge/crosswalk you must use)?
The standard route is: take the garage elevator to the Terminal Access/Walkway level, cross the enclosed skybridge from Garage Level 3, and enter the Ticketing Hall on Departures Level 2.
The parking garage connects to the terminal at an elevated walkway level, where garage grade and terminal grade align (commonly signed as “Terminal Access”). From your parking level, use the garage elevator to Level 3, follow “Terminal” signs to the enclosed bridge, and cross directly into the center of the Ticketing Hall (Level 2). This entry drops you into the main decision zone—south for Concourse A, center for Concourse B, north for Concourse C—without using the curb.
Where is the exact shuttle pickup point for the Red/Green/remote lots at the terminal (which curb segment/door minimizes wrong-stand risk)?
The shuttle pickup point is on Arrivals Level 1 at the Ground Transportation center median zone marked with green wayfinding signage.
From baggage claim, exit through the central doors nearest Carousels 3–4, then cross the inner private-vehicle lane at the marked crosswalk to the center pedestrian island. The Red/Green/remote lot buses stage along this median, separated from the inner curb private pickup flow. Using the central baggage claim doors reduces wrong-stand risk because it lines you up with the main ground-transport island instead of the less clearly segmented curb areas toward the ends of the building.
Where is the exact Rental Car Shuttle pickup point on the terminal side (which door/curb location) as shown on the terminal map?
The Rental Car Shuttle pickup point is on Arrivals Level 1 at the center median marked by purple signage and purple columns.
Exit baggage claim through the central doors closest to Carousels 3–4, step to the inner curb, then use the marked crosswalk to the pedestrian island/median. The rental shuttle zone is not at the ends of the terminal frontage; it’s centralized to keep buses out of the most congested curb segments. Look specifically for the purple-coded wayfinding and “Rental Car Shuttle” identifiers on the median.
What is the shortest mapped path from baggage claim to the Rental Car Shuttle pickup point (including which doors to exit)?
Walking is roughly 80 feet (24 meters) from baggage claim to the Rental Car Shuttle pickup on the center median.
From the baggage claim hall, aim for the central exit doors nearest Carousels 3–4. Go outside to the inner curb, then use the marked crosswalk to cross the private-vehicle lane to the pedestrian island/median. Once on the median, turn toward the purple-coded zone (purple columns/signage) and wait at the “Rental Car Shuttle” stop. Exiting at the building ends increases wrong-stop risk because the rental shuttle staging is designed to be centralized.
Where is the nearest legal wait alternative (cell phone lot / staging) to the pickup curb if the curb is congested—based on mapped proximity (not policy)?
The nearest reliable legal wait alternative is the Green Shuttle Lot, which functions as a practical overflow staging area close to the terminal loop.
The Green Lot sits off Stelzer Road at 3256 E 17th Ave and is positioned to re-enter the airport road network without the same curb enforcement pressure as the Arrivals frontage. If the temporary Cell Phone Lot on International Gateway is confusing or crowded, staging in the Green Lot keeps you stationary and legal, then you can drive in when your passenger is at the curb. The temporary Cell Phone Lot is still the closest “purpose-built” option, but its eastbound-only exit makes missed timing more likely to trigger a forced loop.