John F Kennedy International Airport Terminal 4 Map (Most Up-To-Date)
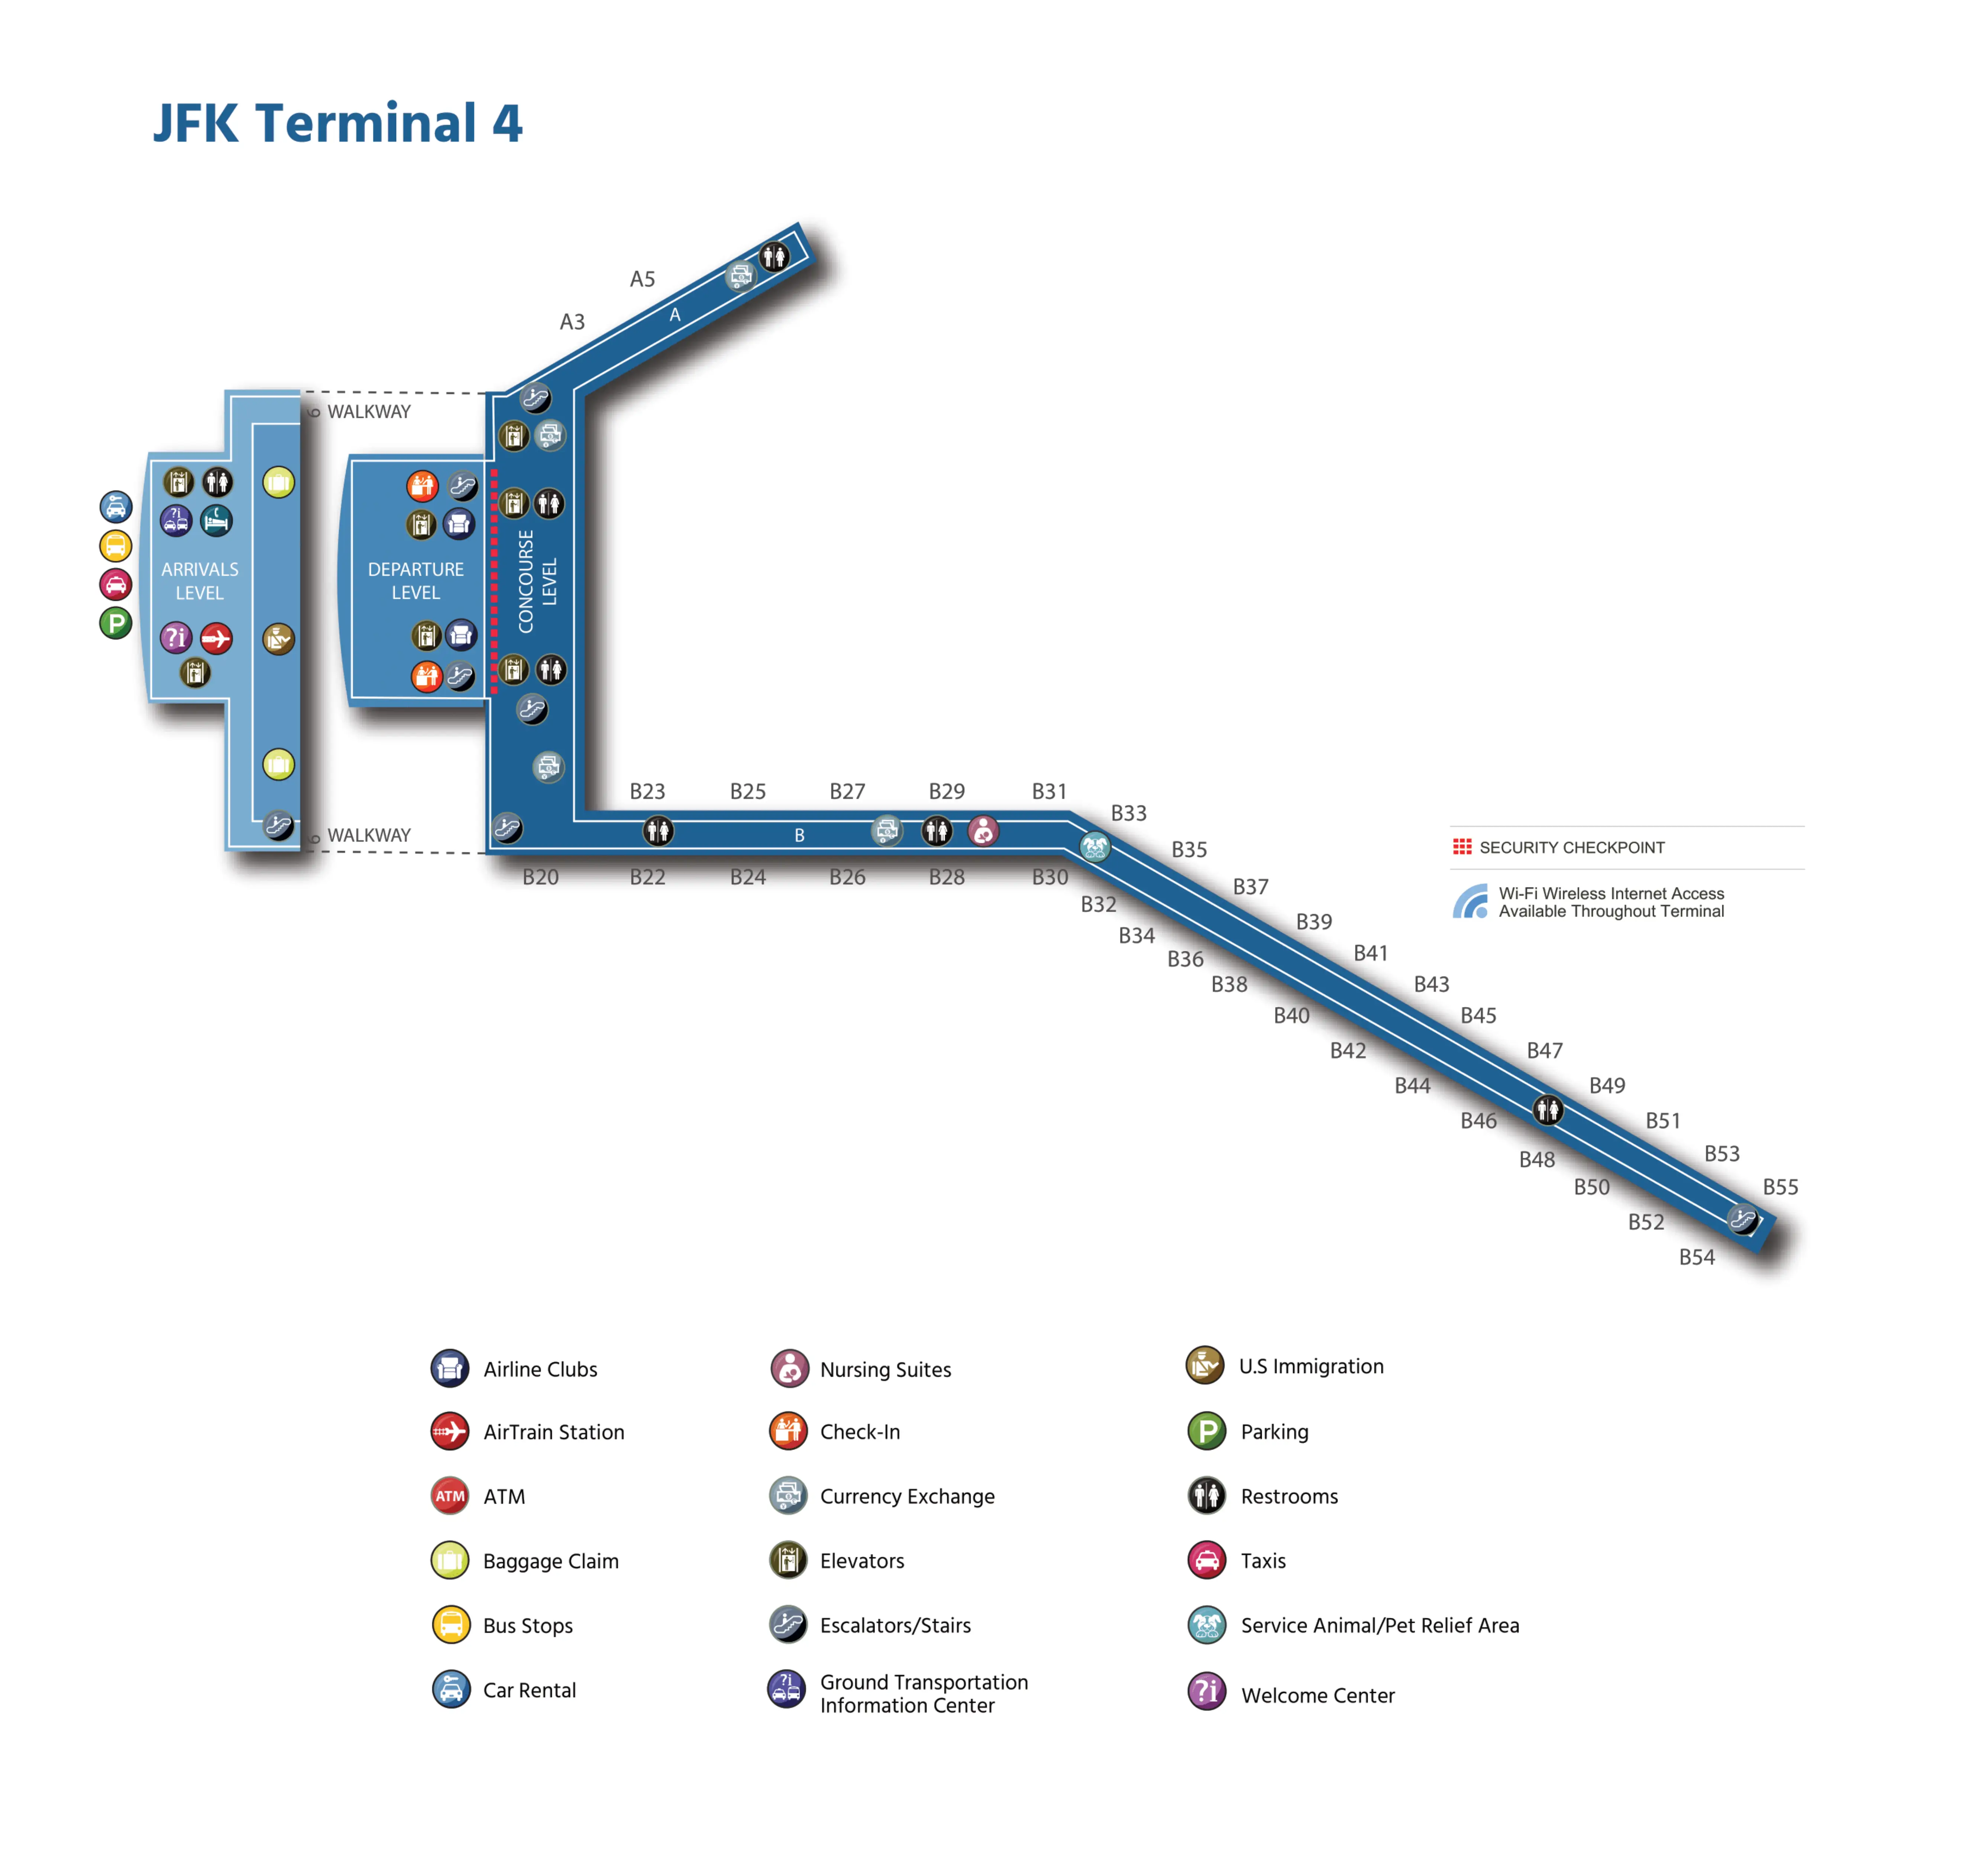
JFK Terminal 4, within New York’s main international airport complex, is a “hockey stick” layout: a huge central headhouse feeding two airside arms—shorter Concourse A to the east and the long, relentlessly linear Concourse B to the west. The terminal’s scale is deceptive, with far-end A-to-far-end B approaching about a mile end-to-end. Scale Warning: deep Concourse B walks (B40–B55) are physically and time-critical. Vertical levels matter: AirTrain access lives on the Departures bridge level, not Arrivals.
Map Table
| Zone | Anchor | Key Decision Node | Walk Time |
|---|---|---|---|
| Headhouse, Level 3 | main security exit, Retail Hall | Concourse direction choice, A vs B | Retail Hall 3–5 min |
| Concourse B throat | gates B20 / B22 / B23 | “commit” point into B pier | to B20 ~4–7 min |
| Mid Concourse B | B31 Sky Club area | last major services anchor | buffer before deep B |
| B33 / B35 hinge | architectural “bend” seam | verify gate, no-backtracking risk | decision point |
| Deep Concourse B | B40–B55 extension | walkway segmentation, amenity drop-off | to B55 15–25 min |
| Arrivals, Level 1 curb | Doors 3–4 area | rideshare window check, curb selection | curb-to-shuttle 2–6 min |
| AirTrain access | Level 3 bridge | level-change requirement | elevator + walk 6–12 min |
John F Kennedy International Airport Terminal 4 Map Strategy
- Budget the B-gates like a hike: B40–B55 is the time sink; plan 20–25 minutes from security to deep B, not “15 minutes,” and don’t treat the Retail Hall as “already at the gates.”
- Treat B20/B22/B23 as the commitment line: once you pass the B throat, A↔B recovery costs real time; confirm gate family before entering the pier, then re-confirm at the B33/B35 hinge before pushing deeper.
- Avoid the re-screening/level trap: AirTrain access is only on Level 3; from baggage claim you must go up first—do not exit Level 1 expecting a direct station entrance.
- “Check the time” before calling a car: 12:00 PM–2:00 AM rideshares shift to Lot 66 via shuttle from the outer curb near central Arrivals doors; taxis remain on Curb B when rideshares are blocked.
2026 John F Kennedy International Airport Terminal 4 Map + Printable PDF
In 2025, JFK Terminal 4 remains fully operational but in a high-impact construction phase that changes landside behavior more than the terminal map suggests. The biggest “map mismatch” is ground transport: rideshare pickup rules shift by time window (notably the Lot 66 shuttle period), and a single wrong curb choice can cost 20–30 minutes.
2026 John F Kennedy International Airport Terminal 4 Map Guide
What is the exact walking distance from the Concourse B security checkpoint to Gate B55?
The walk is not a single exact number because it depends on where you start measuring (security recomposure exit vs. deeper in the Retail Hall), but it consistently audits at about 0.65–0.80 miles (1.05–1.30 km) to Gate B55.
From the security recomposure exit you land in the Retail Hall, then you turn right (west) toward Concourse B. Passing the B20/B22/B23 throat is the “true start” of the pier walk, and the perceived “finish” near the B33/B35 hinge is a mirage—the newer extension continues beyond that. In real crowd conditions (food queues, walkway breaks, slow groups), the same distance typically behaves like 20–25 minutes of travel time to B55.
During the Lot 66 rideshare reroute window (12pm–2am), where is the shuttle boarding point on T4 Arrivals curb, and what is the shortest path from baggage claim to that curb door?
The Lot 66 rideshare shuttle boards on the Arrivals level outer curb “bus/shuttle island” in front of Terminal 4, typically aligned with the central Arrivals doors around Doors 3–4 under “Ride App / Car Services Pick-Up Shuttle” signage.
From baggage claim, walk straight toward the central Arrivals exits (aim for the doors closest to the middle of the hall, not the far ends). Go out through the central door set, then keep moving straight outward across the first curb lane(s) to the outer island where buses and shuttles load. If you find yourself walking left or right along the building façade after exiting, you’ve missed the shortest perpendicular path—turn back and re-center on the Doors 3–4 area.
Where is the Delta Shuttle Bus stop “adjacent to A9” located relative to the Concourse A entrance/fork?
The Delta Shuttle Bus stop by “A9” sits at the start of Concourse A’s lower-level extension, right at the bottom of the down-ramp/escalator that drops you from the main Concourse A level into the A9–A21 pier.
From the Retail Hall side, enter Concourse A and head toward the first run of A gates on the main level (A2–A7), then watch for the point where the corridor offers a clear level change down for “A9 and above.” Once you descend, A9 is the first gate you hit on the lower level, and the shuttle stop is immediately adjacent in that same lower-level entry area—before you’ve walked deeper toward A11/A21.
What is the shortest indoor route from T4 baggage claim to the AirTrain station access point (including the level change you must take)?
The shortest indoor route is to go up from Level 1 baggage claim to Level 3 Departures/Ticketing, then walk to the AirTrain bridge entrance from the check-in hall—there is no direct Level 1 access to the AirTrain platform.
From baggage claim, head toward the central elevator banks near the Welcome Center–style information area, then take the elevator up to Level 3. Exit into the Departures/check-in hall and follow “AirTrain” signs toward the glass bridge connection. If you exit outside on Arrivals Level 1 and try to “follow the tracks,” you’ll end up underneath the AirTrain structure without a platform entrance and will have to come back inside to find an elevator.
If walking Terminal 4 → Terminal 5, what is the exact sidewalk route starting from the correct T4 exit direction (right/left) and where do the road crossings occur?
Walking Terminal 4 → Terminal 5 starts on Arrivals Level 1: exit to the curb and turn right (east), then follow the sidewalk past the east end of T4 and along the connector road to T5. The road crossings happen at the marked crosswalks where the sidewalk cuts across the service/loop-road lanes between the terminals.
| Step | Landmark | What to do | Where crossings occur |
|---|---|---|---|
| 1 | T4 Arrivals curb exits | outside, face traffic | — |
| 2 | Immediately outside T4 | turn right, stay tight to building-side sidewalk | — |
| 3 | Far east end of Terminal 4 frontage | continue as sidewalk curves away from T4 | crosswalk across the first connector/service-road lanes |
| 4 | Connector sidewalk between terminals | stay on the continuous pedestrian path toward T5 | crosswalk across the loop-road lanes as you approach T5 frontage |
| 5 | Terminal 5 Arrivals frontage | arrive at T5 curbside/Arrivals doors | — |
On the Arrivals level, which exact doors/curbside section correspond to “all the way to the right” for the hand-baggage-only security line?
Carry-on-only access is at the far east end of Terminal 4 Arrivals, and it can be restricted by program/time—if you have checked bags to drop, this checkpoint won’t help. “All the way to the right” means the far-right curbside doors when you’re outside facing the terminal, on the Concourse A end (often signed near the far-east door set, commonly posted around the Door 1 area).
Inside the Arrivals hall, stand facing the street and walk all the way to the east end (toward Concourse A). Outside on the curb, do not linger near the central doors used for most flows; keep moving to the terminal’s eastmost curb section until you see the dedicated security signage for the carry-on/alternate entry.
If arriving to Concourse B and being directed to a “special bus” for checked baggage, where is the bus pickup point relative to the B arrivals exit and baggage claim signage?
The “special bus” pickup is typically immediately after you exit the Concourse B arrival corridor, before you commit to the normal “Baggage Claim” path down to Level 1, with staff and overhead “Baggage Claim/Customs” signs pulling you into a roped queue beside the ground-level bus doors.
In practice, you come off Concourse B into the landside exit area near the B pier root (often around the B20/B22 zone). Instead of taking the usual escalators/elevators down toward “Baggage Claim,” look for agents holding the flow and pointing to a nearby bus door/loading lane under the same overhead sign family. If you find yourself already descending toward Level 1 baggage claim, you’ve passed the pickup point and need to turn back to the Concourse B exit area where the bus queue is being staged.
In Concourse B, where is the first major bend/decision point (around the B33/B35 area), and what is the “no-backtracking” path to continue deeper toward B gates?
The first real decision point is at the B33/B35 seam, where the older Concourse B transitions into the newer extension and the corridor geometry subtly shifts, signaling the start of the deep-B “commitment” zone.
Past the B20/B22/B23 throat, keep moving west until you reach the mid-concourse area where gates B33/B35 appear and the space feels like it changes (slight bend/angle, different ceiling/column rhythm). At that node, stop and confirm your gate number; if you’re headed to B40–B55, continue straight into the extension and stay with the forward flow along the moving-walkway runs. Once you enter the extension segment, avoid trying to reverse direction through the walkway funnels—use the side static aisle only if you must, and treat B33/B35 as the last clean “turnaround” point.
What is the closest pre-security restroom to the main security checkpoint entrance on the departures level?
The closest reliable pre-security restrooms are on Level 3 along the far walls of the Departures/check-in hall, commonly found near the Interfaith Chapel area rather than inside or beside the security queue itself.
From the main security checkpoint entrance, look outward into the check-in hall and head to the nearest outer wall: one restroom cluster is typically near the west side check-in rows (often around the Row 7/8 zone), with another at the opposite end near the east wall/Row 1 area. Use the Chapel signage as your anchor—if you can spot “Interfaith Chapel,” the nearest pre-security restroom is usually close to that node. Avoid entering the security queue expecting facilities; there are no restrooms in the queue maze.
In Concourse A, where is the split that determines going toward A3 vs A5, relative to the concourse entrance?
The functional split in Concourse A is not a left-right fork near the entrance; it’s a level-change split that shows up a bit deeper, where A2–A7 stay on the main level and A9–A21 drop to a lower-level extension.
From the Retail Hall, enter Concourse A and you’ll pass into the main-level gates where A3 and A5 live on the same plane. The first “real” decision moment comes after you’re already in the A2–A7 zone: if your boarding pass says A9 or higher, you must take the down escalator/elevator/ramp to the lower level at the signed transition point (often noticed around the A5–A7 area). If you never descend, you’ll keep seeing A3/A5-style numbering and miss the A9–A21 pier entirely.
Where is the Taxi pickup (“B curb”) relative to Arrivals exits and the ground transportation area?
Taxi pickup is on the middle island labeled “B curb,” one roadway out from the terminal doors on Arrivals Level 1, before you reach the outer bus/shuttle islands.
Exit Arrivals to the curb and walk straight outward from the doors. The first curb lane tight to the building is the inner curb (often private/limited use). Cross that first active roadway and you’re on the next island: that is Curb B, where the taxi dispatch booth and the main taxi queue operate. If you keep crossing additional lanes toward the farthest islands with buses and shuttles (where the Lot 66 rideshare shuttle loads during the blackout window), you’ve gone past the taxi curb.