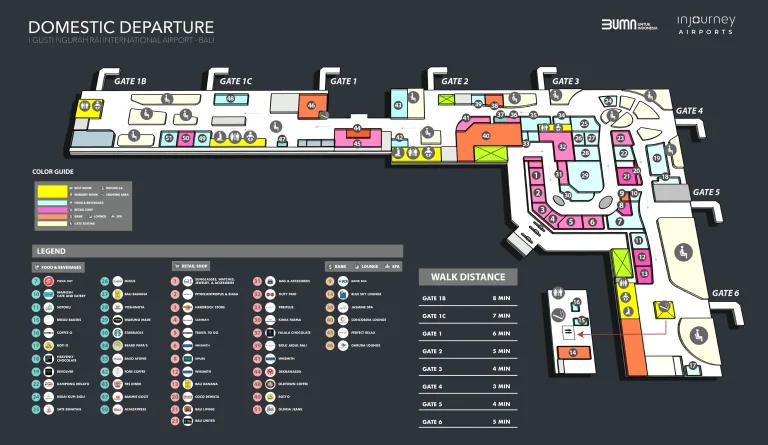
Istanbul Atatürk Airport Terminal 2 Map (Most Up-To-Date)
İstanbul “Atatürk Terminal 2” routing is best treated as the single mega-terminal at the city’s IST mega-hub: a central processing hub with long concourse “piers” radiating out like a star. The footprint is massive (multi-kilometer end-to-end), with international flows concentrated through a central transfer/security core. For wayfinding, assume most paths either funnel into the central hub or shoot straight down a pier.
Map Table
| Zone | Connection | Walk Time |
|---|---|---|
| Central Hub | Transfer Security, Transfer Desks, Duty-Free atrium | choke-point zone |
| Pier A/B/D/F | International gates | long corridor |
| Pier G | Domestic gates | diagonal traverse |
| Remote stands | Bus-gate entry | batch arrival |
İstanbul Atatürk Airport Terminal 2 Map Strategy
- Treat passport control and transfer security as the two time-killers: use the map to locate them first, then commit to the shortest pier-to-hub line without detours.
- Pre-commit your corridor: once you clear transfer security, move away from the escalator landing and pick the correct pier direction before checking boards.
- Assume bus gates add “invisible minutes”: map the bus arrival entry to the transfer-security approach so you don’t lose time hunting for the right funnel.
- Reduce panic by controlling info: identify the nearest flight-info board to the transfer exit, then re-check there instead of wandering the duty-free core.
2026 Istanbul Atatürk Airport Terminal 2 Map + Printable PDF
Printable 2026 maps should reflect the single-terminal IST reality: a central transfer/security valve feeding multiple international piers (A/B/D/F) plus the domestic pier (G). The operational “gotchas” to mark are the transfer-security funnel, passport-control hall (for landside/domestic moves), and bus-gate entry points that can drop you into the terminal with hidden minutes already spent.
2026 İstanbul Atatürk Airport Terminal 2 Map Guide
What is the exact location of the International Transfer / Transfer Security checkpoint inside Terminal 2 (landmark-to-landmark on the map)?
The International Transfer / Transfer Security checkpoint sits in the Central Hub on the arrivals level, directly beneath the main departures duty-free atrium. Arrivals from Piers A, B, D, and F all funnel toward this single screening hall via the “International Transfers” signage.
It’s positioned as the boundary between the inbound arrivals corridors and the secure departures zone: you follow the pier’s glass-walled arrivals corridor toward the center until it opens into the hub, then the checkpoint is the large screening bank immediately before the escalators that take you back up to departures. The most reliable fixed landmark pairing is “end of pier arrivals corridor → central hub screening hall → up-escalators into duty-free.”
Where are the Turkish Airlines transfer desks on the arrivals level, relative to the entrance to International Transfer (map position + nearest fixed landmark)?
Turkish Airlines transfer desks sit on the arrivals level directly opposite the main International Transfer / Transfer Security entrance in the Central Hub. The fixed reference is the large transfer-security screening bank: the desks face it across the same central hall.
They’re placed before you commit into the queue and screening lanes, in the open hub space where multiple pier-arrival corridors converge. If you’re standing at the mouth of the International Transfer funnel looking toward the x-ray/metal-detector lines, the transfer-desk bank is across the hall behind the main passenger flow zone. The closest “can’t-miss” adjacent landmark is the cluster of vertical circulation immediately beyond screening (the escalators that rise toward the departures duty-free atrium).
What is the walking distance (meters) from Transfer Security to the farthest end-of-corridor gates in Terminal 2?
Walking distance from Transfer Security to the farthest end-of-corridor gates is about 800–1,000 meters along the longest international pier. That run starts at the Central Hub transfer-security exit (where you come up toward the duty-free atrium) and continues straight down a pier to the last gate cluster at the tip.
| Route (landmark to landmark) | Estimated distance | Typical fast-walk time |
|---|---|---|
| Transfer Security exit in Central Hub → end of Pier A/B/D/F gate tips | ~800–1,000 m | ~10–15 min |
| Transfer Security exit in Central Hub → cross-terminal far tip (worst-case diagonal) | ~1,800–2,200 m | ~25–30 min |
Where is passport control located relative to the main arrivals flow, and where does the queue physically split (the exact split point on the map)?
Passport control is in the Central Hub on the arrivals level, on the landside-bound path signed in blue for “Passport Control / Baggage Claim / Exit,” positioned west of the International Transfer funnel. The queue split happens at the head of the immigration hall where the lane banks begin.
The main arrivals flow from each pier’s glass-walled corridor feeds into the central block, then separates by signage: “International Transfers” peels off toward transfer security, while “Passport Control” continues into the immigration hall. The physical split point is the stanchioned “decision mouth” at the entrance to the booth banks, where lanes diverge into Turkish Citizens vs Other Nationalities, with fast-track channels pushed to the outer flanks and e-gate banks typically centered behind the first line break.
Where do bus-gate passengers enter Terminal 2 (exact bus drop-off point), and what is the shortest mapped route from that entry point to Transfer Security?
Bus-gate passengers enter through a ground-level arrivals intake that feeds directly into the central processing block rather than a pier corridor. The bus drop-off is at the terminal’s lower/ground arrivals interface (often labeled by operators as Level -1/0), where large batches are released into the same funnels used for passport control and international transfer.
From that entry, the shortest route is a straight “follow-the-funnel” line: bus intake doors → join the central arrivals stream → follow “International Transfers” signage into the Central Hub → reach the main Transfer Security hall beneath the departures duty-free atrium. Practically, you’re aiming for the first major split where blue “Passport Control” continues forward and “International Transfers” branches toward the transfer-security screening bank; stay on the transfer branch and you’ll hit the queue without needing to traverse a pier.
Where are the secondary screening / extra-check areas located in Terminal 2 for specific long-haul flows (e.g., “end of corridor” checks), and what gates are closest?
Secondary screening for specific long-haul flows is positioned at the departure gates themselves in glass-walled holding-room setups, not at a single central checkpoint. The closest “gate set” is whichever pier hosts the flight—commonly in the main international piers (A, B, or D), where some gates are fitted with document-check and bag-search stations at the entrance.
These extra-check areas sit right at the gate threshold: you reach the gate podium, then funnel into the holding-room lane for swabs/bag searches and onward document control before boarding. Because the screening is gate-based, the “closest gates” are simply the long-haul gates equipped with holding rooms on that pier segment (often westbound/UK/US/Canada departures). The map behavior to use is: identify your pier and gate range first, then treat the last 50–100 meters before the gate door as a controlled-access zone that can close earlier than the posted departure time.
What is the nearest restroom cluster to the Transfer Security queue area, and what is the shortest walking route from the queue line to that restroom?
The nearest restroom cluster sits immediately adjacent to the Transfer Security queue area in the Central Hub on the arrivals level. The key landmark is the queue mouth: restrooms are placed right beside the entrance to the stanchioned line so passengers can check queue length and step out without committing deep into the lanes.
The shortest route is a lateral sidestep, not a backtrack: step out of the queue approach area before the x-ray/metal-detector lanes begin, follow the wall edge around the queue entrance, and the restroom doors are within the same hub node. If you’ve already entered the stanchions, the fastest path is to exit back to the queue mouth (not forward toward screening), then take the nearest side corridor opening beside the transfer-security hall.
Where are the largest seating pockets in Terminal 2 post-security, and what is the closest gate range to each seating pocket?
The largest seating pockets post-security cluster at the pier “roots” just beyond the central duty-free atrium and in designated nap/seating zones along the concourses. The highest-capacity public resting areas are the marked nap-zone seating groupings, which act as reliable anchors when gate areas are overcrowded.
| Seating pocket (airside landmark) | Closest gate range |
|---|---|
| Central duty-free atrium edges (immediately after coming up from transfer security) | hub-adjacent pier roots |
| Nap zone near Gate A7 | A7 area |
| Nap zone near Gate B18 | B18 area |
| Nap zone near Gate D1 (terrace zone) | D1 area |
| Nap zone near Gate F13 | F13 area |
| Transfer-zone nap area opposite the security checkpoint | hub-adjacent, before dispersal into piers |
Where are the flight information display boards located along the Terminal 2 main corridor, and which board is closest to the International Transfer exit?
Flight information display boards are positioned at the Central Hub decision points and then repeated at intervals along each pier corridor near major intersections and gate clusters. The most important set is the bank you encounter immediately after clearing Transfer Security and coming up into the departures-level duty-free atrium.
The closest board to the International Transfer exit is the first major FIDS cluster at the top-of-escalators area where transfer passengers emerge into departures. That hub board is the “source of truth” anchor before you commit down a pier: check it there, then walk a clean line toward your pier and use the next mid-pier board only as a confirmation scan rather than doubling back into the hub.
Where is the fastest “escape route” from a mid-corridor point to the end-of-corridor gates (the route with the fewest choke-points / intersections shown on the map)?
The fastest escape route is the straight-through pier spine that avoids re-entering the Central Hub and minimizes decision nodes. From a mid-corridor position, staying on the same pier and committing to the moving-walkway direction is almost always fewer choke-points than cutting back through duty-free.
Use the map like a “rail line”: identify your pier letter/zone, then follow the main corridor centerline past consecutive gate-number runs without crossing into retail pockets or junction cut-ins. The only intersections worth taking are the clearly marked cross-corridor connectors that bypass crowded seating/retail bulges; otherwise, the lowest-intersection path is “mid-pier → continue forward on pier spine → last gate cluster,” with no hub re-entry and no vertical circulation.
Where are the security re-screening points positioned (entrance screening vs gate-area screening), and what is the minimum-step route that avoids doubling back?
Re-screening is positioned in two distinct layers: a central International Transfer Security checkpoint in the Central Hub and gate-area secondary screening at specific long-haul departure gates. The minimum-step route is the one that clears the central checkpoint once, then commits directly to the correct pier without returning to the hub.
Central re-screening happens when inbound transfer passengers enter the hub funnel and pass through the main x-ray/metal-detector bank beneath the departures duty-free atrium. Gate-area screening happens at certain departure gates with holding-room setups, where document checks and bag searches occur before boarding. To avoid doubling back: go from arrivals corridor (or bus intake) straight to International Transfer Security, ascend into departures, check the first hub flight-info board at the escalator/duty-free edge, and then walk directly down your assigned pier to the gate—treating any gate-area screening as the final, unavoidable step rather than a reason to re-enter the hub.