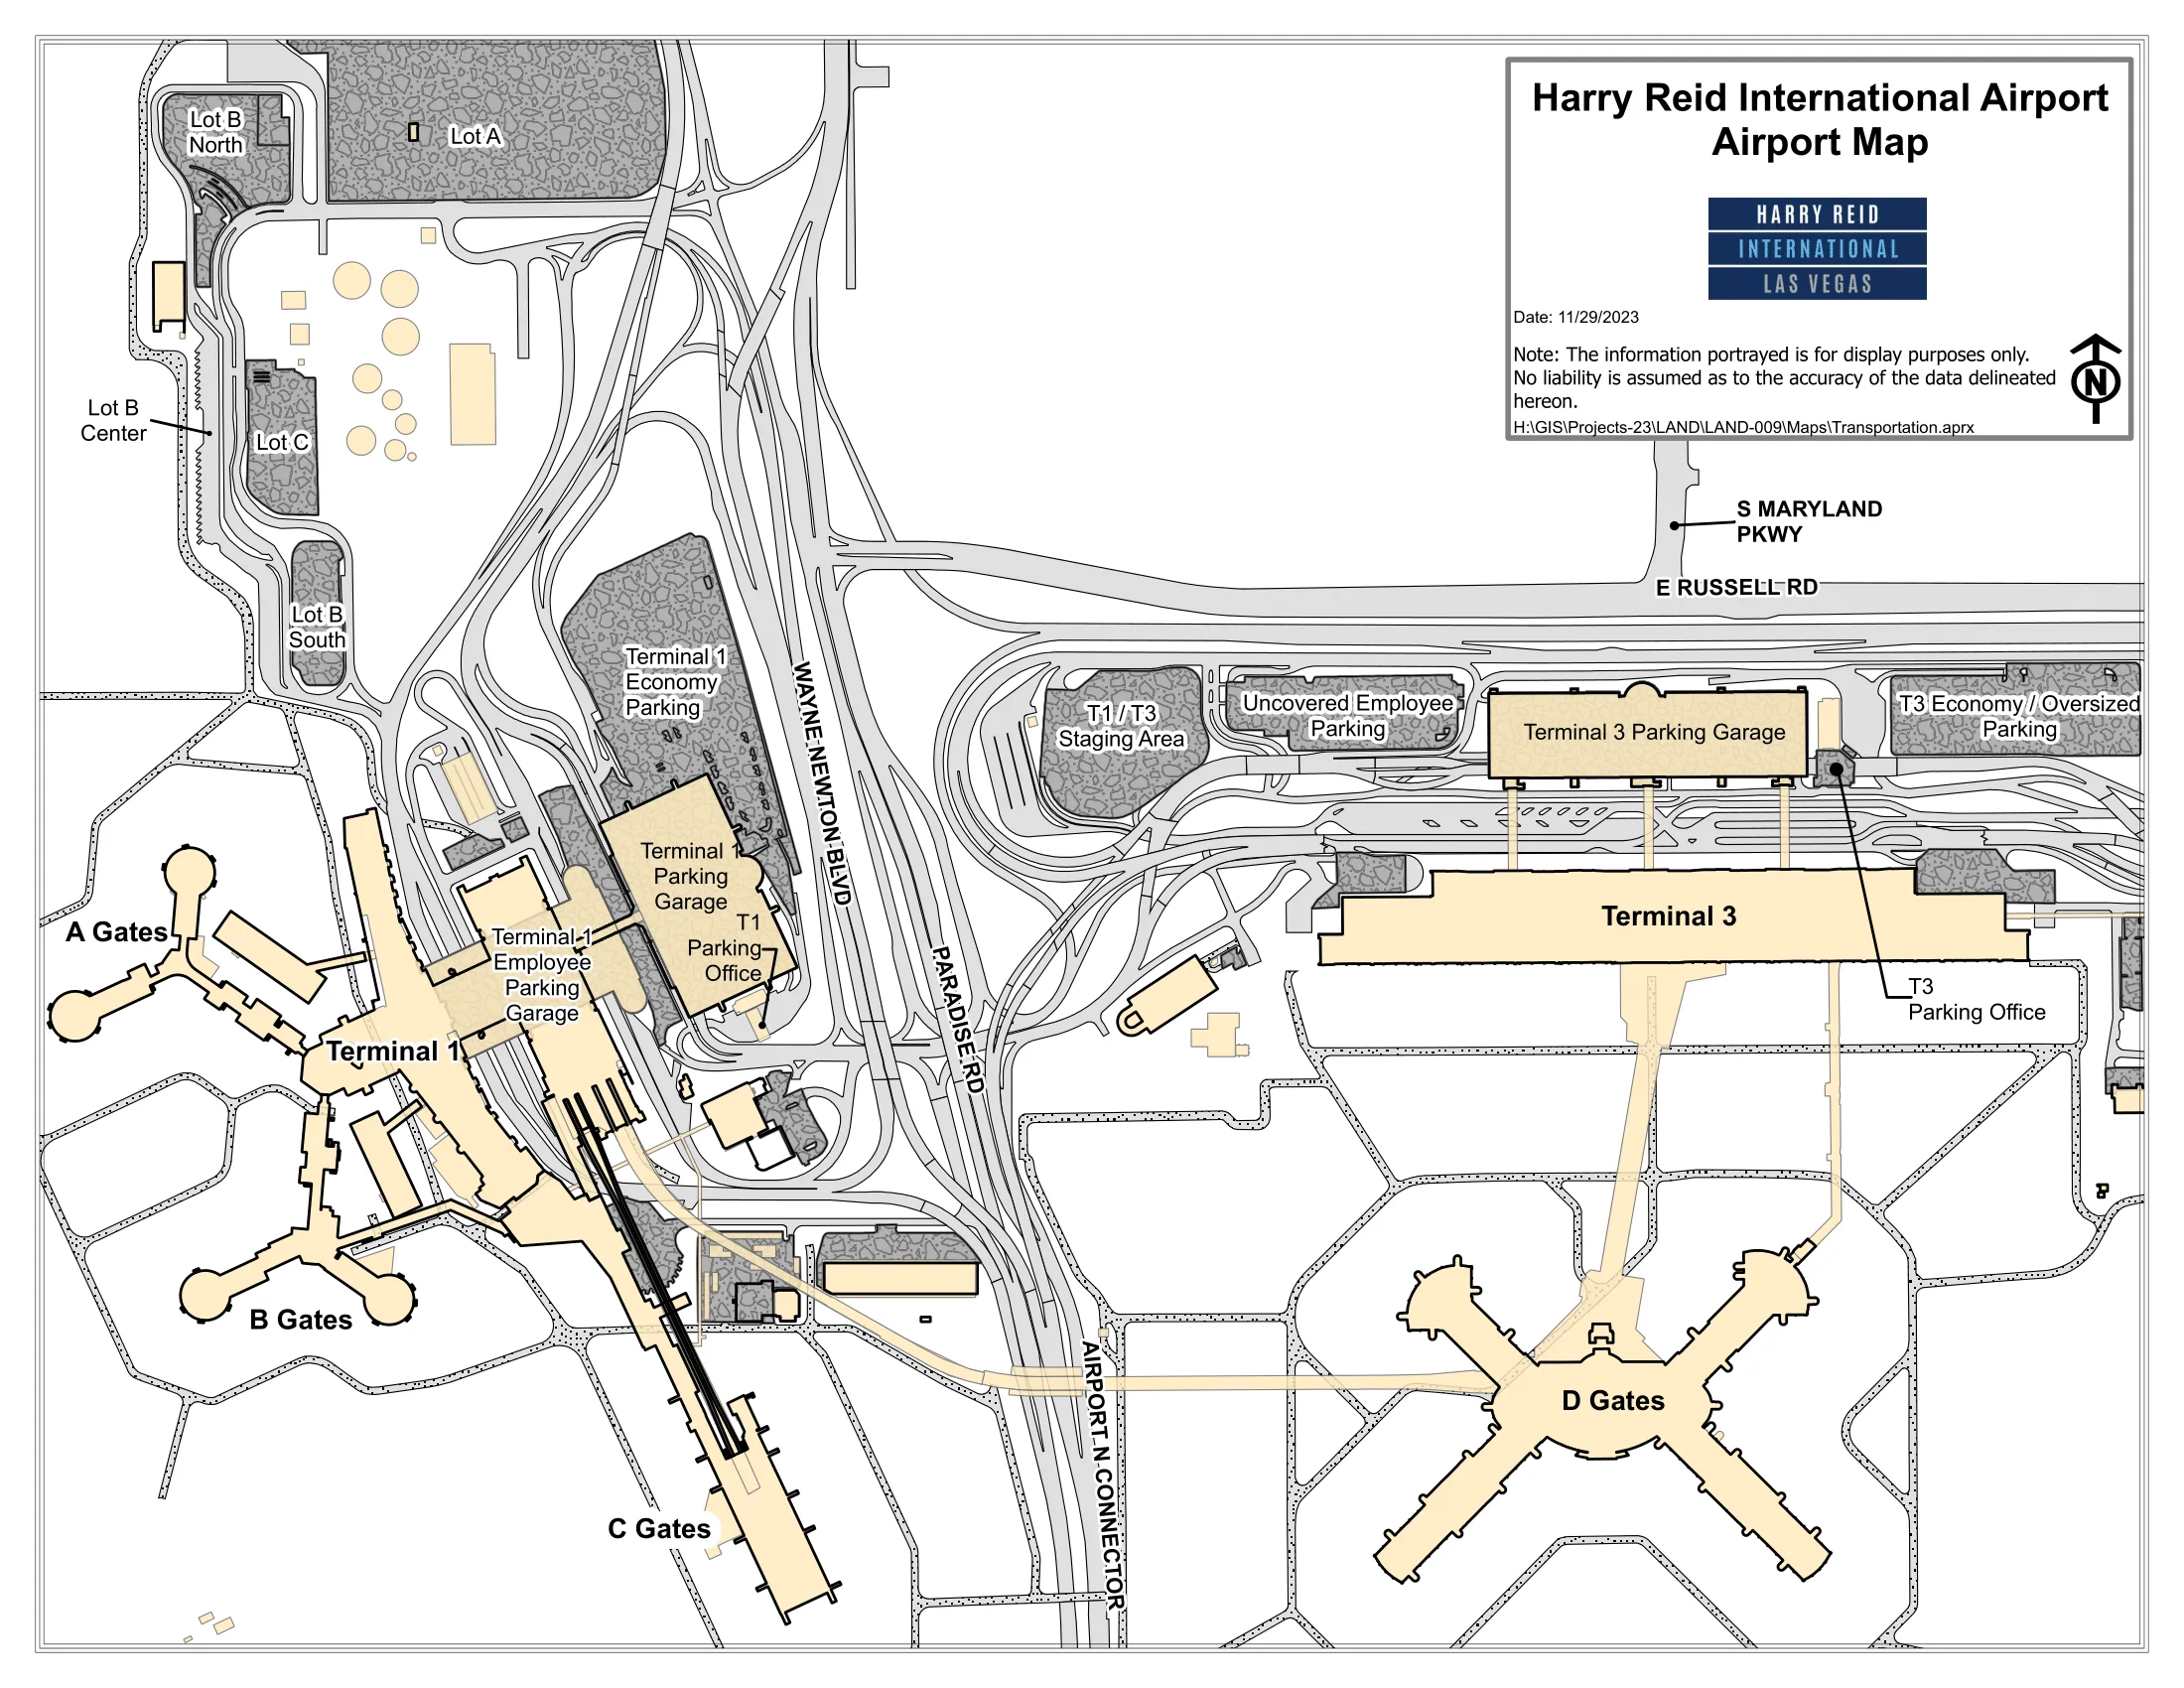
Harry Reid International Airport Map (Most Up-To-Date)
Harry Reid International Airport (LAS) maps as a three-part layout: Terminal 1’s triangular hub feeding A/B/C piers, Terminal 3’s long linear E-gates hall, and the remote D Concourse “satellite” centered between them and reached only by tram. The whole facility runs west-to-east within Las Vegas’s primary airport complex, with D acting as the airside mixing point—great for connections when you stay sterile, punishing when a wrong turn drops you landside.
Map Table
| Terminal | Key Airlines | Primary Function | Transfer Mode |
|---|---|---|---|
| Terminal 1 | Southwest, Spirit, American, Delta | A/B/C gates, main domestic processing | Airside connectors A/B↔C, Blue Line tram to D |
| Terminal 3 | United, Alaska, Frontier, Hawaiian, international | E gates, international facilities | Red Line tram to D, landside curb + garage nodes |
Harry Reid International Airport Map Strategy
- Treat D Gates as a neutral satellite: your trip outcome depends on choosing the correct tram line (Blue to Terminal 1, Red to Terminal 3) before the doors close.
- When moving A/B → C (or toward D from Terminal 1), prioritize “C Gates / C/D Checkpoint” wayfinding over “Baggage Claim / Ground Transportation” to avoid the exit-security trap near the central esplanade.
- At D’s tram platform, anchor on the destination words, not the crowd: “Terminal 1 / Baggage Claim 1” vs “Terminal 3 / Baggage Claim 3,” plus matching color banding.
- Landside switching with bags is shuttle-only: inter-terminal shuttles, rideshare garage levels, and rental bus medians all have different door/level logic—commit to the exact stop label before you leave baggage claim.
2025 Harry Reid International Airport Terminal Map + Printable PDF
In 2026, LAS continues operating as a split-terminal airport with D Gates functioning as the satellite bridge between Terminal 1 and Terminal 3. The most important map detail remains the sterile-only APM tram network (Red vs Blue) and the “don’t accidentally exit” zones near Terminal 1’s core. Ground pickup is still garage- and curb-segmented, so door/level precision matters for rideshare, rental shuttles, and inter-terminal transfers.
2026 Harry Reid International Airport Map Guide
What is the exact on-map location/label of the airside “exit security” point near Wells Fargo that people accidentally walk through when leaving A/B gates?
Exiting security happens at the glass-partition break where the A/B concourse feed meets the Terminal 1 central esplanade and the forward flow points to “Baggage Claim / Ground Transportation,” with Wells Fargo immediately visible landside. This is the A/B-to-central-hub junction where walking straight carries you through the exit doors/partition into the public Terminal 1 Esplanade (Level 2).
The failure point sits at the widened corridor just beyond the A/B gate walk, at the moment you reach the main terminal hub sightline. Wells Fargo is the landmark that appears directly ahead after you cross the secure boundary, alongside the carpet-to-tile transition and the landside retail/slots zone. The safe alternative is the lateral corridor entrance near Starbucks that is signed for “C Gates / C/D Checkpoint,” which keeps you airside.
What is the exact airside connector/corridor (by on-map label) that takes you from A/B gates to C gates without exiting security?
The airside route is the corridor signed “C Gates / C/D Checkpoint,” which bypasses the Terminal 1 landside esplanade and keeps you inside the sterile A/B–C connection. This is the connector you take instead of walking straight toward “Baggage Claim / Ground Transportation” at the Wells Fargo sightline.
The corridor entrance is adjacent to the Starbucks area near the A/B checkpoint exit flank, where the secure circulation turns laterally away from the exit doors. Once you commit to the “C Gates / C/D Checkpoint” corridor, you stay behind the security partitions and follow the enclosed walkway past interior anchors like the Pharmacy and the Pet Relief Area. The connector deposits you into the secure C Concourse side near the C/D checkpoint zone, where “D Gates / Tram” wayfinding becomes the next decision.
From the D Concourse tram platform, what is the precise boarding-side/signage label that distinguishes the Blue Line vs Red Line (so you pick the correct terminal)?
The platform signage that prevents the wrong-tram mistake is the destination text paired with the color banding: “Terminal 1 / Baggage Claim 1” for Blue and “Terminal 3 / Baggage Claim 3” for Red. This decision happens at the D Concourse central rotunda tram platform before the doors close.
| Tram line at D Concourse rotunda | What the signs say | Where it takes you |
|---|---|---|
| Blue Line | Terminal 1, Baggage Claim 1 | Terminal 1 side (A/B/C processing, T1 baggage claim) |
| Red Line | Terminal 3, Baggage Claim 3 | Terminal 3 side (E gates complex, T3 baggage claim) |
What is the shortest on-map walking route from the D-gates arrival point to the correct tram back to Terminal 3 (minimizing wrong turns)?
Taking the Red Line tram signed “Terminal 3 / Baggage Claim 3” is the shortest correct return route from D Gates to Terminal 3. The key is staying in the D Concourse central rotunda and choosing the red-coded platform side before you descend or drift toward the blue side.
From your D-gates walk, follow “Tram / Terminal” wayfinding into the D Concourse rotunda (the central atrium). Use the rotunda as your anchor: do not follow crowds to whichever platform is closest—scan for the red banding and the destination words “Terminal 3” and “Baggage Claim 3” on column wraps and platform signs. Once you step onto the Red Line side, stay on that side through boarding; the mirror-image layout is what creates the wrong-turn risk.
Where is the exact landside shuttle pickup point (door number / level / stop label) for Terminal 3 → Terminal 1 transfers when you have checked bags?
Terminal 3’s inter-terminal shuttle to Terminal 1 picks up on Level Zero at the center curb by Door 55, signed “Inter-Terminal Shuttle.” This is the landside transfer point you use when checked bags force you out of the sterile area.
Door 55 sits on the east/international end of Terminal 3’s ground-transport curb, so it can be a walk if you exit nearer the west/domestic doors. Stay on Level Zero (ground transportation level), then follow curbside wayfinding toward Door 55 and look for the center-curb shuttle position rather than the building-side curb. The key landmark is the Door 55 numbering itself—once you see Door 55, match the stop signage that explicitly reads “Inter-Terminal Shuttle” before lining up.
Where is the exact landside shuttle pickup point (door number / level / stop label) for Terminal 1 → Terminal 3 transfers when you have checked bags?
Terminal 1’s inter-terminal shuttle to Terminal 3 picks up on Level Zero in the Courtesy Shuttle Zone, roughly aligned with Doors 7–13, with signage reading “Inter-Terminal Shuttle.” This is not on the main arrivals curb by baggage claim—missing the level change is the common failure.
After baggage claim at Terminal 1 (Level 1), go down one level to Level Zero using the nearest elevators/escalators. Exit the glass doors and use the crosswalk to reach the outer courtesy-shuttle lane by the covered parking garage side; the bus does not stop tight to the terminal building curb. Once across, align yourself with the Door 7–13 area and confirm the stop placard says “Inter-Terminal Shuttle” before waiting.
What is the exact walking distance (or minutes) from Terminal 1 baggage claim to the rideshare pickup area in the parking garage (using the signed route)?
Walking time is about 5–10 minutes from Terminal 1 baggage claim to the rideshare pickup area in the parking garage when you follow the signed route to Level 2M. Elevator queues and bridge crowding are what usually push it toward the longer end.
Start at Terminal 1 Baggage Claim (Level 1) and head toward the elevators near Door 2 on the ticketing/check-in side. Ride up to Level 2, then cross the pedestrian bridge into the parking garage. Once inside the garage, follow rideshare wayfinding to Level 2M (the mezzanine pickup level), not the standard Level 2 parking deck. If you step out onto a normal parking floor with no pickup stalls, you’re one level off—go to 2M.
Which garage level + zone label is the designated rideshare pickup for Terminal 1 (as shown on official wayfinding/maps)?
The designated Terminal 1 rideshare pickup is on the parking garage’s Level 2M (Mezzanine), signed as the rideshare pickup level off the Level 2 pedestrian bridge. This is the map-critical label—Level 2 and Level 2M are different destinations.
From Terminal 1 baggage claim routing, you take elevators up to Level 2 and cross the pedestrian bridge into the garage. Inside the garage, confirm you are following signage that explicitly includes “2M” (not just “2”). The visual tell of a mistake is arriving on a standard parking deck with parked cars but no organized pickup stalls or rideshare staging—correcting it typically means using the garage elevators/stairs to reach Level 2M.
What is the exact rental car shuttle bus stop location at Terminal 1 (between which buildings/doors, per map labels)?
Terminal 1’s rental car shuttle stop is on Level 1 at the center median outside Doors 10 and 11, signed for Rental Car Shuttles to the Rental Car Center. This is distinct from the inter-terminal shuttle, which uses Level Zero.
Exit Terminal 1 on the baggage claim/ground transportation level (Level 1) and orient to the door-numbering along the curb. Go to Doors 10–11, then cross to the center median where shuttle buses load; waiting on the building-side curb can put you in the wrong queue. Use the door numbers as your anchor first, then match the stop placard to “Rental Car Shuttle” before boarding.
What is the exact rental car shuttle bus stop location at Terminal 3 (level + door/stop label, per map labels)?
Terminal 3’s rental car shuttle stops are on Level Zero at the curb outside Doors 51–54 (west/domestic side) and Doors 55–58 (east/international side), signed for the Rental Car Shuttle to the Rental Car Center. The “two-stop” layout is the map detail that prevents walking the full terminal curb unnecessarily.
Use door numbers to pick the nearest stop based on where you exit baggage claim at Terminal 3. If you emerge near the west end, anchor on Doors 51–54; if you’re on the east/international end, anchor on Doors 55–58. In both cases, stay on Level Zero and confirm the stop signage reads “Rental Car Shuttle” (not “Inter-Terminal Shuttle,” which concentrates at Door 55).
Which Terminal 3 TSA checkpoint entrance is geographically closest (on-map) to the tram path to D gates (minimizing post-security backtracking)?
The Terminal 3 D/E Gates Checkpoint (Level 2) is the closest TSA entrance to the Red Line tram path for D Gates. This checkpoint drops you into the same post-security zone that immediately feeds the escalators/elevators down to the tram level.
After screening at the Level 2 D/E checkpoint, follow the “D Gates / Tram” wayfinding toward the vertical core that goes down to the Red Line station. The key anchor is that elevator/escalator bank: if you can see the down-to-tram access points, you’re already at the correct feeder zone. Using the Innovation Checkpoint (Level 0) adds an extra up-to-concourse step before you can reach the tram path.
Which Terminal 1 TSA checkpoint (A/B vs C) is geographically closest (on-map) to the airside route toward D gates?
The Terminal 1 C/D Checkpoint is the closest TSA checkpoint to the airside route toward D Gates and the Blue Line tram. This checkpoint aligns with the terminal core where “D Gates / Tram” wayfinding begins, minimizing post-security backtracking.
Using the A/B checkpoint typically forces a longer walk across the Terminal 1 secure esplanade to reach the Blue Line station area. The C/D checkpoint instead places you near the C-side hub where the “D Gates / Tram” signs and the Blue Line station access are integrated into the same central zone. If your plan is D Gates from Terminal 1, enter through C/D unless you have a gate-specific reason to start at A/B.
What is the exact decision point at D gates where choosing the wrong door/escalator/elevator can lead you out of the secure area on the way to E gates?
No door/escalator/elevator at D Gates should take you out of the secure area on the way to E Gates if you follow “Tram” wayfinding into the D Concourse rotunda. The real dealbreaker at D is boarding the wrong tram line at the rotunda platform, which sends you to the wrong terminal’s baggage claim landside.
The critical decision point is the D Concourse central rotunda tram platform where the flow splits between Red Line and Blue Line boarding sides. Anchor on the platform text labels: “Terminal 3 / Baggage Claim 3” (Red) for E Gates access via Terminal 3, versus “Terminal 1 / Baggage Claim 1” (Blue). If you drift onto the wrong side because the layout is mirror-imaged, you don’t exit security at D—you exit at the wrong terminal after the ride.
What is the exact on-map vertical transition (elevator/escalator location label) required to go D → E while staying airside?
Staying airside from D to E requires going down to the tram level at D, riding the Red Line to Terminal 3, then going back up to the concourse level at Terminal 3. This transition is the D Concourse rotunda’s down-to-tram elevators/escalators followed by the Terminal 3 station’s up-to-gates elevators/escalators.
From the D Gates concourse level, follow “Tram” wayfinding into the central rotunda and take the elevator/escalator down to the APM platform level (often shown as the tram level). Board the Red Line signed “Terminal 3 / Baggage Claim 3,” then at the Terminal 3 station, take the elevator/escalator up to the secure concourse feeding the E Gates. This entire path remains sterile if you never follow “Baggage Claim / Exit” signage.
What is the shortest airside route distance from Terminal 3 security exit to the D-gates tram boarding point (measured on the map)?
Zero backtracking is required from the Terminal 3 D/E Gates Checkpoint exit to the Red Line tram down to D Gates because the checkpoint feeds directly into the tram-access zone. The “distance” on the map is essentially the short in-zone walk from the checkpoint exit to the down escalators/elevators.
After clearing the D/E Gates Checkpoint (Level 2), stay in the immediate post-security plaza and follow “D Gates / Tram” signs to the vertical core. The key adjacent anchor is the escalator/elevator bank that drops to the Red Line station level—this bank sits in the same security-exit area, not down a corridor. If you reach E-gates retail/dining spines, you’ve walked past the tram feeder; turn back toward the checkpoint-side vertical access.
What is the shortest airside route distance from Terminal 1 C gates area to the D-gates tram boarding point (measured on the map)?
A 2–5 minute walk is the shortest map-based distance from the Terminal 1 C gates core to the D Gates tram boarding point because the Blue Line station is integrated near the C/D checkpoint zone. This route does not require riding the Green Line C-concourse tram if you’re already near the C core.
From the central C gates hub (near Gate C1), follow signs toward the terminal core for “D Gates / Tram” rather than “C Gates” deeper into the pier. The anchor point is the C/D Security Checkpoint area, where the Blue Line tram access is physically integrated into Terminal 1’s post-security infrastructure. If you find yourself looking at Green Line tram signage for the far C pier, you’re oriented the wrong direction—turn back toward the C/D checkpoint and the “D Gates / Tram” wayfinding.
Where is the exact “wrong terminal baggage claim” failure point for D-gates arrivals—i.e., the fork where Terminal 1 vs Terminal 3 baggage claim paths diverge (by map label)?
The failure point is the D Concourse central rotunda tram platform where boarding splits between “Terminal 1 / Baggage Claim 1” (Blue Line) and “Terminal 3 / Baggage Claim 3” (Red Line). This is the fork where the baggage-claim outcome is decided before you ever reach a terminal.
At D, both tram berths sit in mirror-image positions in the rotunda, which makes it easy to drift onto the wrong side if you follow the crowd. The map-critical behavior is to treat the platform as the divergence node: confirm your baggage claim terminal, then match it to the platform signage text and color banding. Once the doors close, you’re committed to that terminal’s landside system, with no airside crossover to correct it.
Archive Harry Reid International Airport Terminal Map
Below are all historical map versions for Harry Reid International Airport. Each year includes the official map available for that period, presented as both WebP and PDF.
2023-2025 Harry Reid International Airport Terminal Map (Official 2023 Edition)