Haneda International Airport Map (Most Up-To-Date)
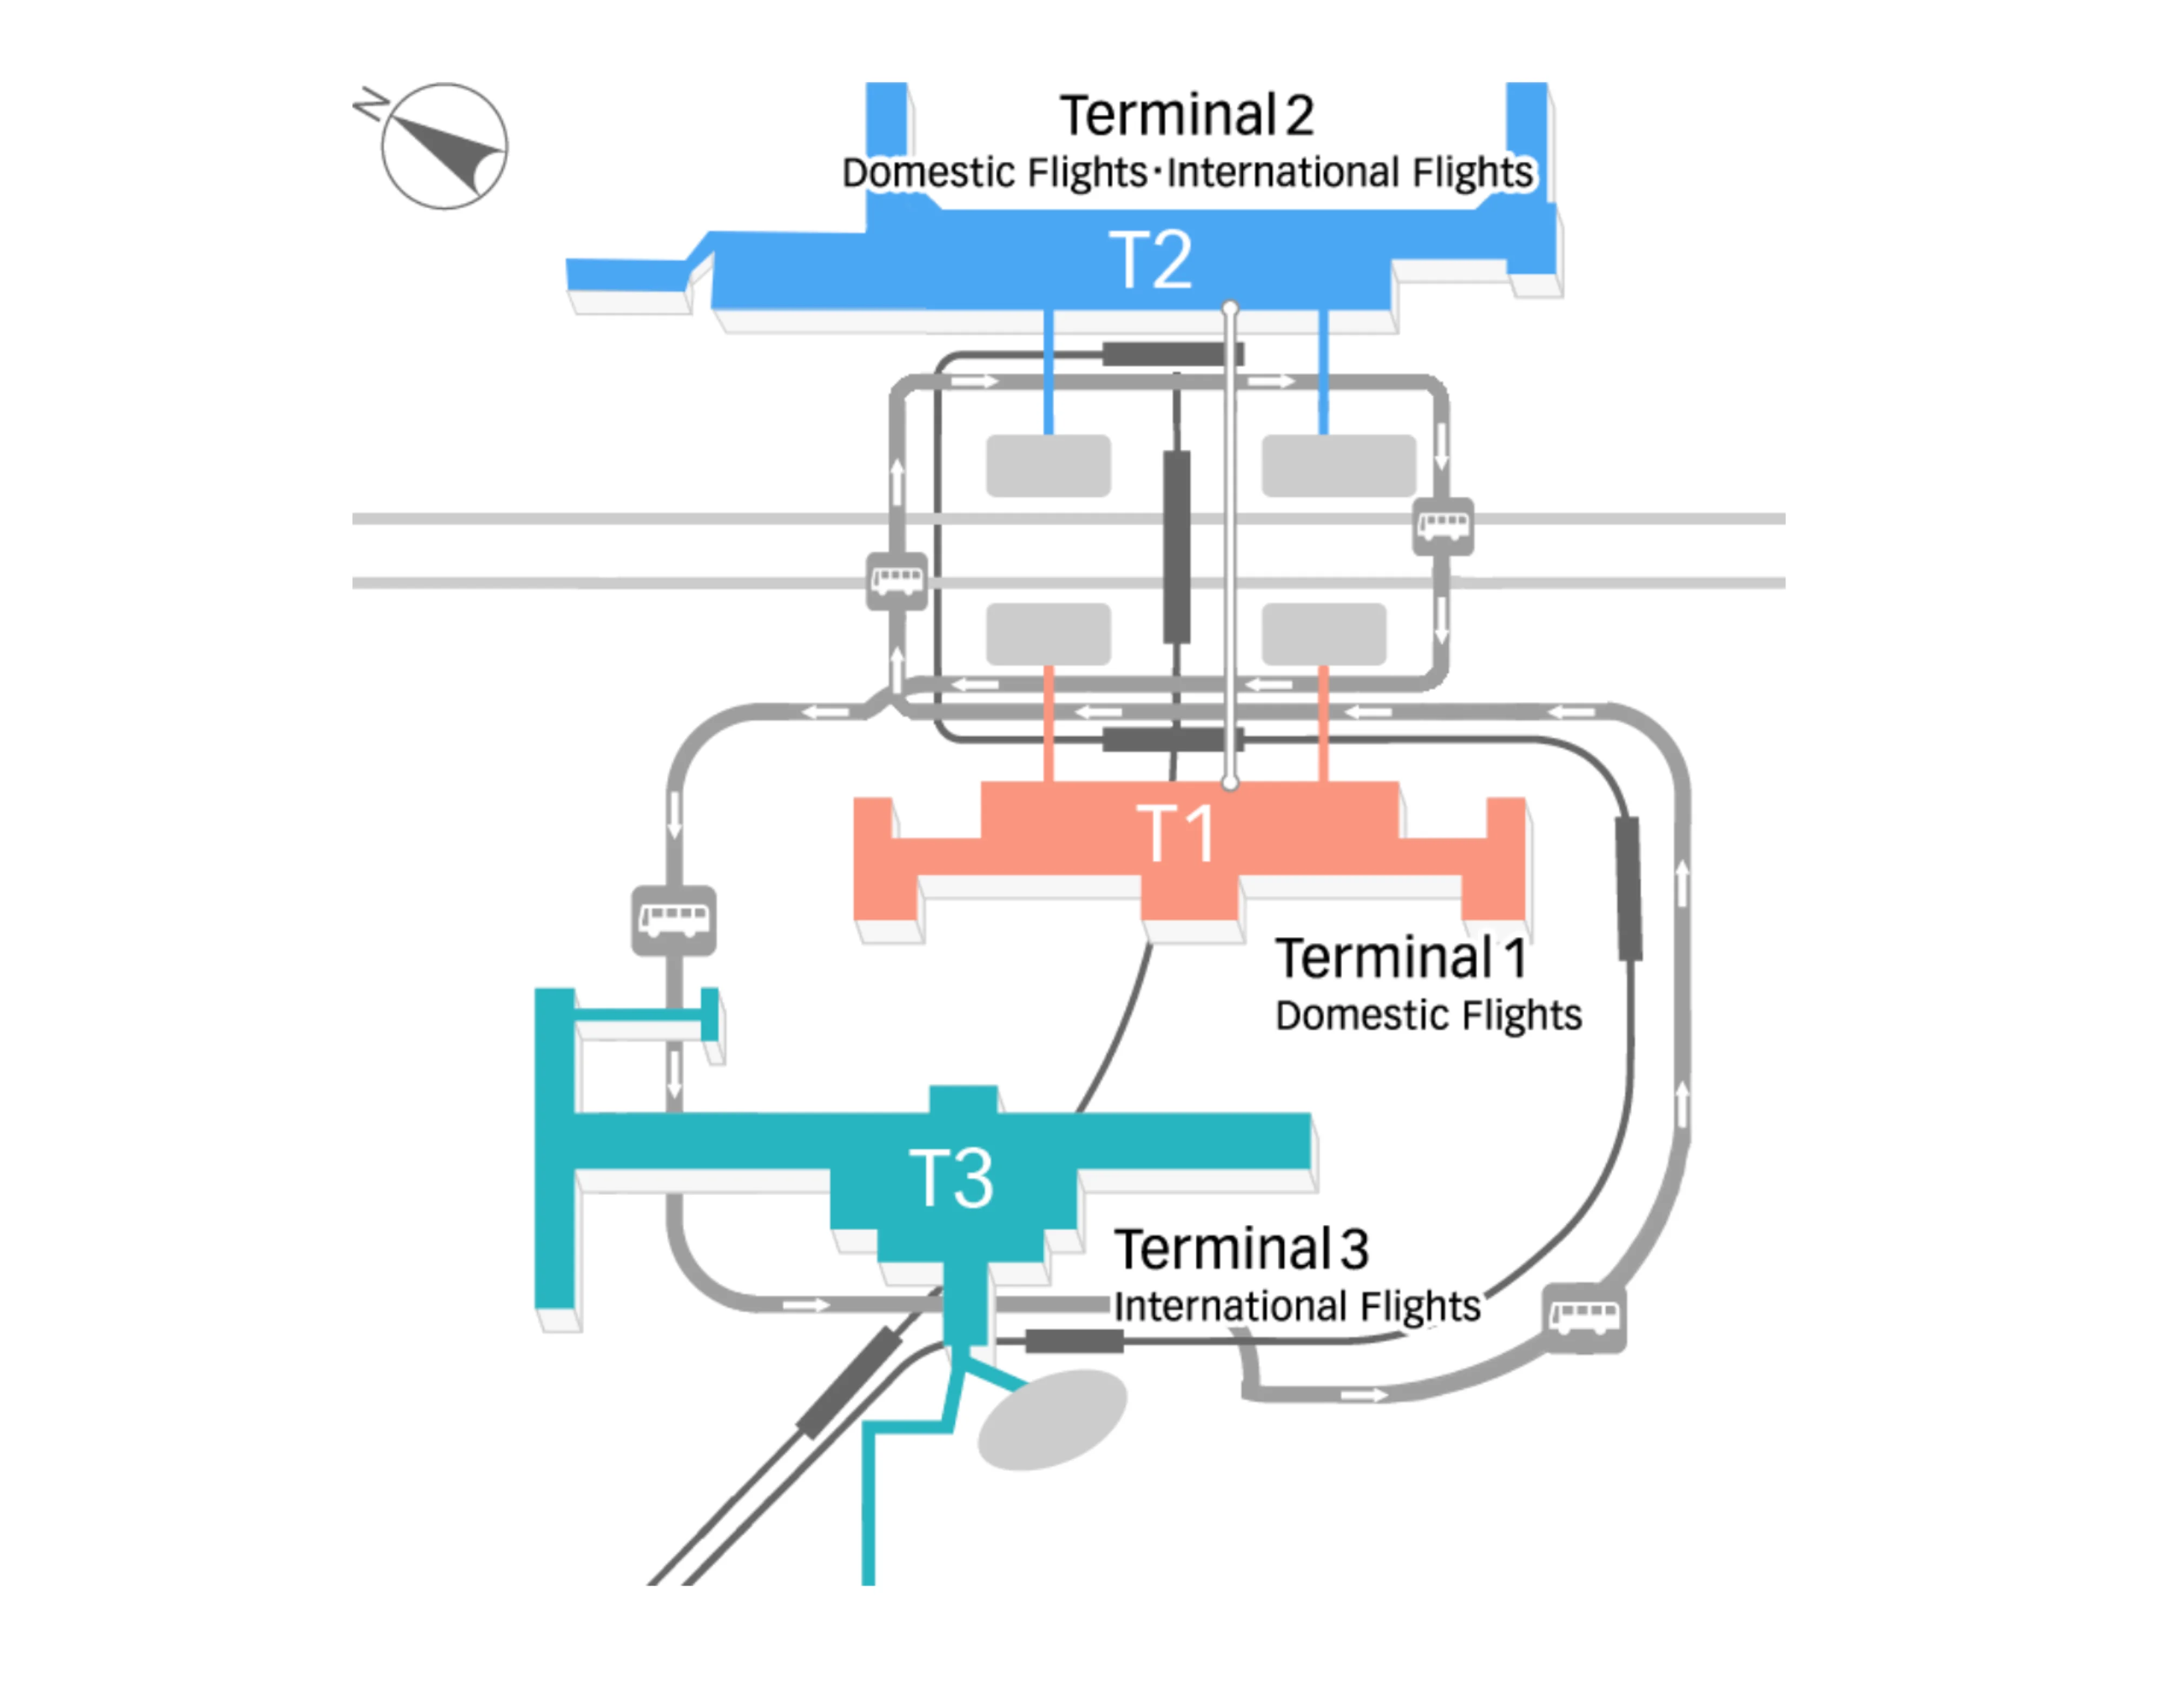
Haneda Airport’s terminal layout is a three-node system: International Terminal 3 (T3) sits apart from the domestic pair (T1 and T2), which are linked landside by an underground passageway. The overall footprint is large but linear at the domestic side, with transfers driven by three “modes” (free shuttle bus loop, rail, and limited airside transit). Most time loss happens right after customs inside Tokyo’s main Haneda gateway, where you must commit to bus vs rail before you’re fully oriented.
Map Table
| Terminal | Key Airlines | Primary Function | Transfer Mode |
|---|---|---|---|
| Terminal 3 | ANA, JAL, major international carriers | International arrivals/departures | shuttle bus (Stop 0), Keikyu, Monorail, limited airside bus |
| Terminal 2 | ANA (majority), some ANA int’l | Domestic core, departures on 2F | shuttle bus (Stop 9), Keikyu/Monorail (B1F), tunnel to T1 |
| Terminal 1 | JAL (majority), others | Domestic core, departures on upper level | shuttle bus, Keikyu/Monorail (B1F), tunnel to T2 |
Haneda Airport Map Strategy
- Treat the first 15 meters after T3 customs as the commitment zone: straight-ahead leads you into the 2F→1F “bus/taxi” descent, while immediate right/left keeps you on the rail vector (Keikyu right, Monorail left).
- Use door-to-stop math to calm headway anxiety: T3 customs exit → Stop 0 is ~140 m plus a level change; if elevators are jammed by carts, rail becomes the lower-variance play.
- Default to conservative security assumptions: if your arrival is inside the T3 transit-security closure window or you’re near the 60-minute bag cutoff, skip airside transfer and choose a landside option immediately.
- Anchor on injection distance at T2: the bus drops at Stop 9 (1F), then you must push inward and up to departures/security (2F); rail arrives at B1F and feeds centrally via high-capacity escalators, reducing wrong-turn risk.
2026 Haneda International Airport Map + Printable PDF
Transfer routing at HND in 2026 still hinges on one operational reality: the “fastest” option can disappear. The Terminal 3 Domestic Transit Security checkpoint has closure windows (effective Nov 1, 2025: 11:00–15:00 and 19:00–19:30), which can force a last-second switch to landside bus or rail. Plan around the T3 vertical drop (Arrivals 2F → curbside 1F) and the T2 bus injection gap (Stop 9 on 1F → security on 2F).
2026 Haneda International Airport Map Guide
What is the exact walking distance from Haneda Terminal 3 international arrivals exit to the free inter-terminal shuttle bus stop (meters, door-to-stop)?
Walking distance is approximately 140 meters from the Terminal 3 international arrivals customs exit (2F) to the Inter-terminal Free Shuttle Bus stop at Stop 0 (1F curbside).
That distance assumes a direct line from the customs sliding doors into the 2F arrival lobby, then to the vertical transition down to 1F, and onward through the 1F automatic doors to the curbside stop. The biggest variance isn’t the meters—it’s the vertical pinch point: elevators can bottleneck with luggage carts, while escalators can be unusable if you’re committed to a cart. For time-critical transfers, treat the 140 m as “clean walking,” then add a buffer for the 2F→1F descent and any curbside queue at Stop 0.
Where is the Terminal 3 shuttle bus stop exactly located (floor/exit number/landmark), so a traveler can find it without asking staff?
Terminal 3’s inter-terminal free shuttle bus stop is Bus Stop 0 on 1F (Entrance Plaza curbside), reached by descending from the 2F Arrivals Lobby to the Bus/Taxi exit area and walking out through the 1F automatic doors to the bus bays.
From the customs exit doors on 2F, continue forward toward the central concourse and follow overhead signs for Bus / Taxi and Entrance Plaza to the elevator/escalator bank. After you reach 1F, keep moving toward the curbside lanes and exit the building; Stop 0 sits under the terminal overhang near the bus bay signage, often amid group tour/meeting signs and ground-transport icon boards. The key landmark is the 2F-to-1F vertical transition: once you commit to it, you’re on the bus vector.
What is the door-to-door transit time range for the free shuttle bus from Terminal 3 to Terminal 2, including the typical walk from drop-off to Terminal 2 security entrance?
Door-to-door time is typically 20–35 minutes from Terminal 3 arrivals to Terminal 2 security when using the free inter-terminal shuttle bus.
This range includes the ~140 m walk and 2F→1F descent to T3 Stop 0, variable wait time (peak headways about every 4 minutes; later evening about every 8 minutes), the bus loop segment T3 → T1 → T2 with dwell at Terminal 1, and then the Terminal 2 ingress walk from Stop 9 (1F curbside) into the building and up to departures/security on 2F (~100–120 m plus escalator/elevator time). The biggest swing factor is boarding latency at Stop 0: if the queue exceeds a bus load, the “wait + load” penalty can add 10–15 minutes before the bus even rolls.
What is the exact walking distance from Terminal 3 customs exit to the domestic recheck/transfer counter area (the “drop bags right after customs” point), in meters?
Walking distance is approximately 40 meters from the Terminal 3 customs exit (2F) to the domestic recheck/transfer counter area used for airside transit.
After you pass through the customs sliding doors into the 2F Arrivals Lobby, turn right and follow the flow along the far-right edge of the lobby toward the ANA/JAL domestic transit check-in counters. This is the “drop bags right after customs” zone and sits adjacent to the domestic transit workflow, with the Domestic Transit Security checkpoint positioned immediately next to the counter area. Because this route stays on 2F with no curbside exit, it’s the lowest-distance option when the airside path is operational.
In Terminal 2, where is the shuttle bus drop-off point relative to the domestic departures security checkpoint (same level vs escalators, which direction)?
A level change is required because the Terminal 2 shuttle bus drop-off is at Bus Stop 9 on 1F, while domestic departures security checkpoints are on 2F.
After you get off at Stop 9 (curbside), enter through the adjacent automatic doors into the 1F arrivals-side interior, then immediately hunt for Departures signage and the nearest escalator/elevator up to 2F. The practical orientation is “inward, then up”: you’re injected at the arrivals layer and must climb to the departures layer before you can even see the checkpoint lettered entrances (A–D). Expect roughly 100–120 m of walking plus the escalator ride before you reach the 2F flight information boards and can choose the correct security entrance.
What is the shortest mapped route from Terminal 3 arrivals to the Tokyo Monorail platform, and what is the walking distance (meters) along that route?
The shortest route is the left turn rail vector: from the Terminal 3 customs exit (2F), turn left toward the Tokyo Monorail entrance/ticket gates on 2F, then proceed through the gate area and take the vertical access up to the 3F elevated platform.
From the customs sliding doors, the walking distance to the Monorail station entrance area is approximately 50–70 meters, using the overhead “Tokyo Monorail” signs as your ceiling-level guide. The key landmark is the immediate left split in the 2F arrivals lobby: staying left keeps you out of the 2F→1F bus descent. If you need a transfer boarding ticket, the central 2F information counter sits between the rail vectors and can add queue time before you enter the gates.
What is the shortest mapped route from Terminal 3 arrivals to the Keikyu Line platform, and what is the walking distance (meters) along that route?
The shortest route is the right turn rail vector: from the Terminal 3 customs exit (2F), turn right toward the Keikyu Railways entrance/ticket gates, then continue down to the underground platform level via the station access.
From the customs sliding doors, the walking distance to the Keikyu station entrance/ticket gate area is approximately 40–60 meters, guided by the large blue “Keikyu” overhead signs. The landmark that prevents wrong-turn loss is the immediate right split in the 2F arrivals lobby—taking it keeps you on the rail vector and avoids the bus/taxi descent to 1F. If you’re using the free transfer ticket, the central 2F information counter is the usual issuance point before you enter the gates.
Between Terminal 1 and Terminal 2, where are the two entrance points to the underground passageway, and what is the passageway walking distance (meters) end-to-end?
The underground passageway entrances are on B1F in both terminals, and the end-to-end walking distance is approximately 400 meters.
In Terminal 1, the entrance is on B1F near the Keikyu/Monorail ticket gate area, signed toward Terminal 2; look for the wide corridor branching off beside the rail concourse rather than going up to departures. In Terminal 2, the entrance is also on B1F, on the north side of the basement concourse heading toward Terminal 1—commonly referenced near the Marketplace zone (often near a McDonald’s depending on the map revision). If the moving walkways are offline due to construction, treat the full 400 m as manual walking for planning.
What is the exact distance from the Terminal 3 arrivals hall to the first major wayfinding decision point where travelers choose bus vs rail for terminal transfer (meters, with landmark)?
Distance is approximately 15 meters from the Terminal 3 customs exit into the 2F arrivals hall to the first major transfer decision point.
That decision point is the moment you clear the opaque customs sliding doors and enter the 2F Arrivals Lobby sightline where the overhead wayfinding splits: straight-ahead signage pulls you toward Bus/Taxi / Entrance Plaza (the path that eventually descends to 1F for Stop 0), while the immediate right lane is marked for Keikyu Railways and the immediate left lane is marked for Tokyo Monorail. If you walk past this fork without choosing, you usually drift toward the vertical transition and “default” into the bus vector.
What is the mapped walking distance from the Terminal 3 shuttle bus stop to the nearest staffed information desk (meters), for travelers who realize they’re at the wrong transfer point?
A level change is required because the nearest staffed help point is the Information Counter on 2F, not curbside, and the mapped distance is approximately 50 meters plus the 1F→2F ascent.
From Bus Stop 0 (1F curbside), re-enter Terminal 3 through the nearest automatic doors into the Entrance Plaza interior, then head directly to the elevator/escalator bank that returns to the 2F Arrivals Lobby. Once back on 2F, the Information Counter sits centrally in the arrivals hall and acts as the primary recovery node for rail transfer tickets and routing confirmation. The key landmark is that same vertical transition you used to reach the bus: if you reverse it, you’re back at the help desk core instead of wandering curbside.