Hamburg Helmut Schmidt Airport Terminal 1 Map (Most Up-To-Date)
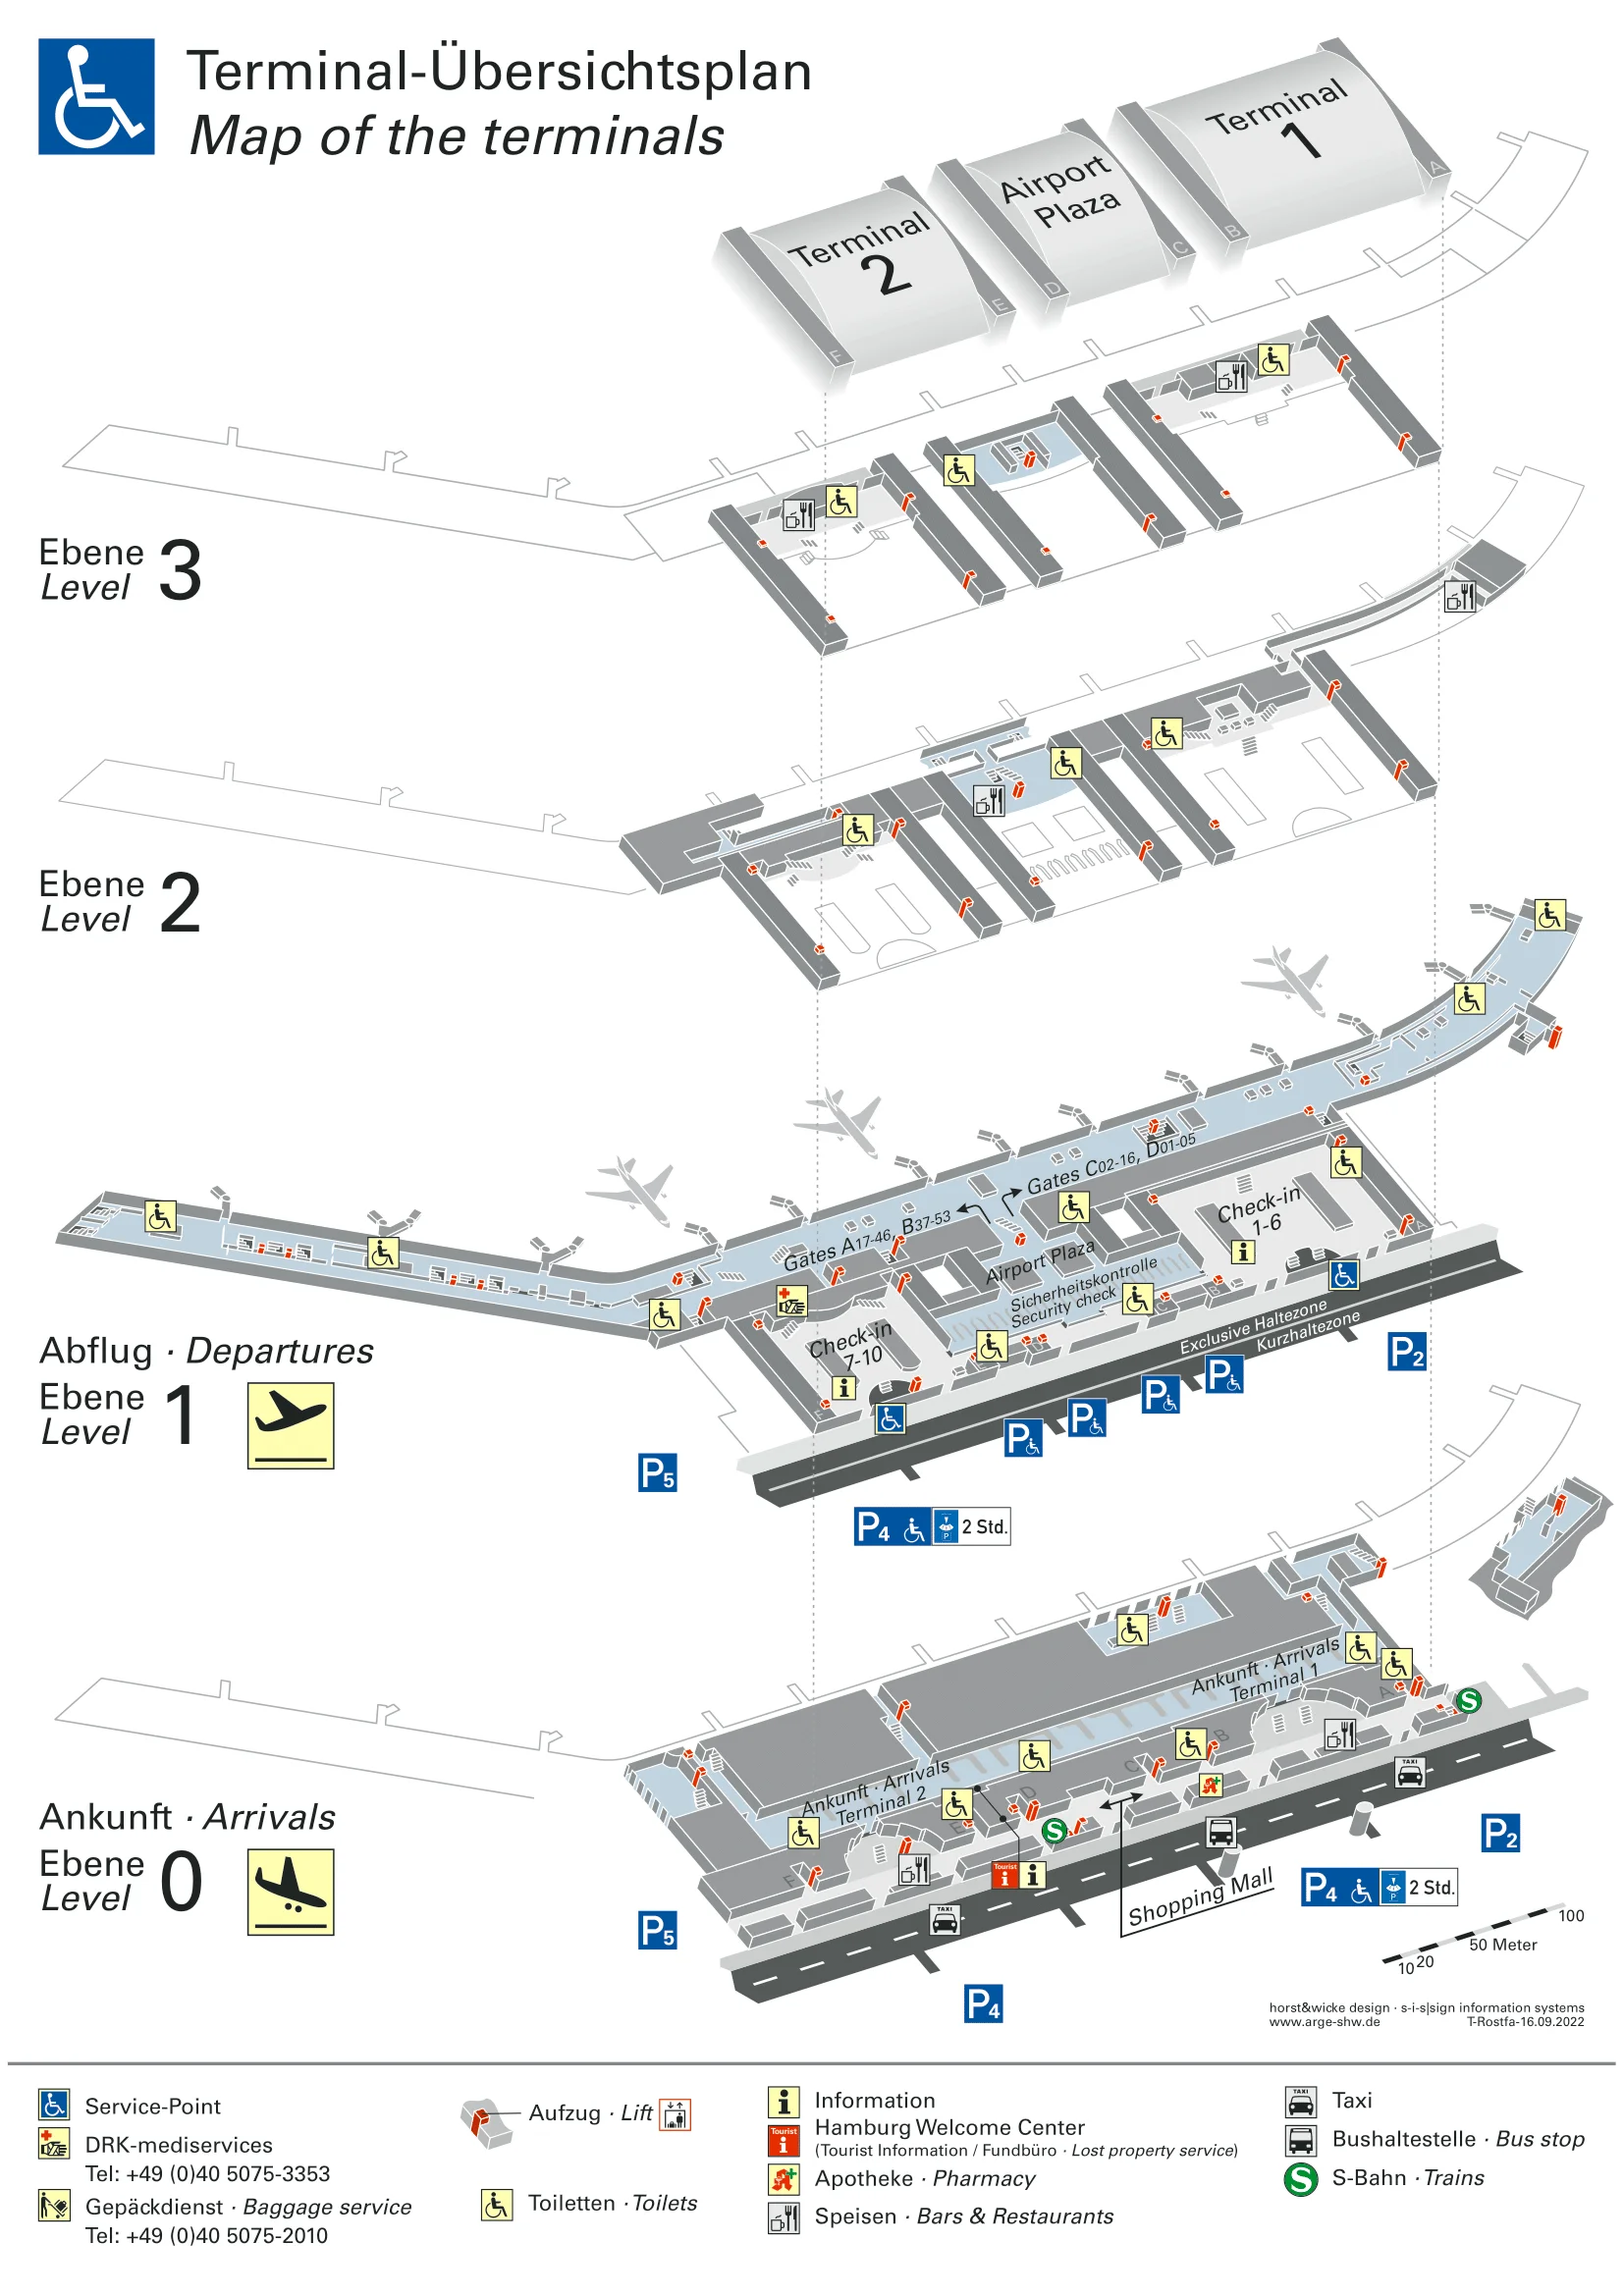
Hamburg Airport Terminal 1 is a long, curved departures hall (Level 1) that feeds south into the Airport Plaza, where the airport’s single Central Security checkpoint sits as the main funnel. Check-in rows run north-to-south inside T1, with the quickest security access clustering around the Plaza-facing end and the Slot&Fly entry near Row 4. Within Hamburg’s main airport campus, most “where do I go?” decisions come down to picking the correct security entrance before the queue merge swallows the walkway.
Map Table
| Zone | Connection | Walk Time |
|---|---|---|
| T1 Departures hall (Level 1) | Check-in Rows 1–6 | Long hall spine |
| Check-in Row 4 area | Slot&Fly entry | Short detour |
| Airport Plaza (Level 1) | Central Security + retail | Primary funnel |
| Plaza vertical core | Arrivals L0 / S-Bahn L-1 / Lounge L3 | One elevator bank |
Hamburg Helmut Schmidt Airport Terminal 1 Map Strategy
- Approach security with a single goal: reach the Airport Plaza Level 1 security front without getting absorbed into the T1/T2 merge, which typically forms in the Plaza-facing connector zone between the terminal wings.
- Use Terminal 1’s Row 4 as your orientation anchor for Slot&Fly, then stay to the right-hand side of the security frontage (relative to the checkpoint) to find the booked-slot entry before the general queue braids together.
- Treat “priority” as a routing tool, not a time guarantee: the real slowdown is scanner/tray throughput, so entering the wrong lane can cost more than any status benefit saves.
- Plan for landside spillback: if the security line pushes past the Plaza threshold into the departures circulation, stop walking into the crowd and reposition to the correct entrance (Slot&Fly vs general vs PRM/family) before committing.
2026 Hamburg Helmut Schmidt Airport Terminal 1 Map + Printable PDF
Terminal 1 continues to operate as a “one-roof” wing feeding into the Airport Plaza’s shared Central Security, with queue behavior shaped by lane availability and ongoing screening-tech upgrades. The practical reality in 2026 is that the best map use-case is avoiding the wrong entrance and the unstable merge area, especially during the early-morning surge when lines can spill back toward check-in.
2026 Hamburg Helmut Schmidt Airport Terminal 1 Map Guide
What is the exact walking distance (meters) from Terminal 1 check-in desks to the Central Security Checkpoint entrance?
Walking is typically 180–320 meters from Terminal 1 check-in to the Central Security entrance, depending on which check-in row you start from. The shortest paths start near Rows 5–6 (Plaza-facing end), while Rows 1–2 require the longest straight-line walk down the T1 hall toward Airport Plaza Level 1.
The practical route is a single, flat corridor move on Departures Level 1: leave your check-in island, aim for the Airport Plaza transition at the south end of Terminal 1, then continue straight to the Central Security frontage. Row 4 sits mid-hall and is a useful triangulation point; from Row 4 you’re usually in the ~220–260 meter range to the general security entrance, with the last stretch tightening as you hit the Plaza-facing bottleneck area where queues can spill outward.
Where is the physical merge point where Terminal 1 and Terminal 2 security lines combine (exact landmark/level)?
The merge happens at Airport Plaza Level 1, right in front of the Central Security frontage where the Terminal 1 and Terminal 2 approach corridors open into the same queuing forecourt. This is the point where separate terminal foot-traffic stops being “T1 vs T2” and becomes one braided mass feeding the same screening lanes.
From Terminal 1, the merge forms as you exit the T1 departures hall into the Plaza-facing connector and step into the open Plaza queue area; from Terminal 2, it forms at the equivalent corridor mouth on the opposite side. The easiest landmark to triangulate is the Plaza threshold itself: once you can see the central security lane signage and the wider retail/Plaza space, you’re at the convergence zone where economy, fast/priority, and PRM/family flows start competing for the same physical frontage.
Where is the Slot&Fly (booked time-slot) lane entrance located relative to Terminal 1 departures (exact door/landmark)?
The Slot&Fly entrance is on Departures Level 1 in Terminal 1, aligned with the Check-in Row 4 zone and positioned to the right-hand side of the main Central Security frontage as you face security. It is not centered in the Airport Plaza crowd; it sits on the Terminal 1 side before the general queue fully braids together.
Walk from Row 4 toward the Airport Plaza and keep right as the space opens toward the security forecourt. You’re looking for the dedicated Slot&Fly access point with an automated gate/reader rather than a free-flow queue mouth. If you find yourself already absorbed into the central, mixed queue mass in the Plaza, you’ve gone too far left/central and will need to peel back toward the Terminal 1 edge to locate the booked-slot entry.
What is the exact walking distance from the Slot&Fly lane entrance to the first security tray/scanner position?
Walking is typically 20–45 meters from the Slot&Fly entrance gate to the first tray/scanner position, depending on how far the internal Slot&Fly queue is stacked at that moment. Even with Slot&Fly, the scanner/tray area is the throughput limiter, so the distance stays short but the dwell time can still expand.
After the automated Slot&Fly gate on Departures Level 1 (Terminal 1 side, near Row 4), the lane runs straight into the same screening “head” area used by other passengers. In light traffic you reach trays in roughly a half-minute walk; in heavier periods, the effective distance becomes the length of the penned lane inside the security frontage as it backs up toward the gate. The key landmark is the transition from the Slot&Fly penned lane to the open tray tables directly in front of the scanners.
Where is the priority/fast-track security queue physically separated from the regular queue (exact barrier/landmark)?
The priority/fast-track queue splits at Airport Plaza Level 1, at the Central Security forecourt where stanchions and overhead “Fast Lane/Gold Track” signage create a dedicated lane mouth separate from the economy entry. The separation is visible before the tray tables, not at the scanners.
From the Terminal 1 side, walk into the Plaza-facing security frontage and look for the first point where metal barriers and belt posts divide passengers into distinct penned corridors. The fast/priority lane is typically offset toward the central/T2-facing side of the security frontage rather than the Terminal 1 Slot&Fly gate area near Row 4. If you are already in a single mixed crowd with no stanchioned split, you are still in the pre-merge approach zone and need to advance to the Plaza forecourt where the lane mouth is physically fenced.
What is the exact distance from the priority/fast-track queue entry to the scanner(s) (the point that becomes the bottleneck)?
Walking is typically 25–60 meters from the priority/fast-track lane mouth to the scanner/tray tables, with the distance expanding only when the penned lane backs up. The scanner position is close, but it’s also where “priority” loses its advantage if trays and CT lanes are saturated.
From the Airport Plaza Level 1 security forecourt, step into the fast/priority stanchioned corridor and follow it straight to the tray tables immediately in front of the screening machines. When the line is light, the lane is a short, direct walk; when it’s heavy, the effective distance becomes the full length of the fenced queue channel before you reach the trays. The landmark to watch for is the transition from stanchions to the open tray-table area where passengers start loading bins.
Where are the Terminal 1 self-bag-drop machines located (exact zone/row on Departures level)?
The Terminal 1 self-bag-drop machines are on Departures Level 1 in the central check-in sector, clustered around the Check-in Rows 3–4 area. This is the same mid-hall zone used as a practical landmark for the Slot&Fly routing.
From the curbside doors into Terminal 1, orient yourself to the numbered check-in islands running north-to-south. The SBD bank sits in the main landside processing area where passengers tag bags at kiosks, then step forward to the automated belts, creating a dense pause-and-repack zone in the circulation aisle. If you are standing at Row 4 and face toward the Airport Plaza/security direction, the self-bag-drop cluster is within the same immediate check-in neighborhood rather than down by the Plaza-facing Row 6 end.
What is the exact walking distance from the self-bag-drop area (Terminal 1) to the Central Security Checkpoint entrance?
Walking is typically 170–260 meters from Terminal 1 self-bag-drop to the Central Security entrance, because the SBD bank sits mid-hall around Rows 3–4 and security is at the Airport Plaza Level 1 frontage. The shortest lines happen when you exit the SBD zone already aimed toward the Plaza-facing end.
From the SBD cluster near Rows 3–4, take the main Departures Level 1 aisle toward Airport Plaza and stay on a clean line past the Row 5–6 sector until the hall opens into the Plaza forecourt. The distance compresses if you start on the Plaza-facing edge of the SBD area and expands if you have to weave around tagging kiosks and stalled trolleys. Your “arrival landmark” is the first Central Security lane signage at the Plaza threshold, before you’re absorbed into the merged queue mass.
What is the exact walking distance from the Terminal 1 arrivals exit to the first baggage reclaim carousel zone?
Walking is typically 40–90 meters from the Terminal 1 arrivals exit into the first baggage reclaim carousel zone on Level 0. The distance is short because arrivals egress feeds directly into the shared reclaim hall layout.
After you enter Arrivals Level 0, follow the flow toward the reclaim hall opening where the belt bank begins. The “first carousel zone” is effectively the front edge of the reclaim belt area where you can first stand at a belt and read flight belt assignments on the overhead monitors. If you’re exiting from a bus-gate arrival stream, the approach can feel longer due to corridor bends and crowd compression, but the physical walk remains within a single hall-level transition from the arrivals exit into the reclaim bank.
Where is the oversized baggage pickup point located relative to Terminal 1 baggage belts (exact room/landmark)?
The oversized baggage pickup point is inside the Baggage Reclaim Hall on Level 0, at a dedicated Sperrgepäckausgabe counter separate from the main carousel belts. It is close enough to the belt bank that passengers often miss it and wait at the carousel while the item sits at the counter.
From the Terminal 1 reclaim belts, scan the perimeter of the reclaim hall for the staffed/service counter marked for bulky/oversized items rather than a numbered carousel. The practical landmark is that it sits within the same reclaim room and not out in the public Arrivals hall beyond Customs—so you should look for it before you exit through the Customs doors. If you reach the Customs egress, you’ve walked past the reclaim-only service area and need to turn back into the reclaim hall.
What is the exact walking distance from the furthest common Terminal 1 gate area to baggage reclaim (longest plausible “hike”)?
Bus-gate arrivals can add a 15–20 minute apron-to-terminal bus ride before you even start the walk. Walking from the far end of Terminal 1’s A-pier (around Gates A44–A46) to baggage reclaim on Level 0 is typically about 900–1,200 meters total, which is roughly 12–15 minutes at a normal pace.
| Segment (anchor-to-anchor) | Distance | Typical walk |
|---|---|---|
| Gate A44–A46 seating area → Plaza duty-free exit point | 550–750 m | 7–10 min |
| Plaza hub (post-security retail zone) → nearest down escalator/elevator to Arrivals Level 0 | 120–200 m | 2–3 min |
| Arrivals Level 0 corridor → first baggage belt row in the reclaim hall | 230–300 m | 3–4 min |
Where is the lost property / lost-and-found desk located relative to Terminal 1 arrivals (exact level + nearest landmark)?
The lost-and-found desk is on Airport Plaza Level 0 (Arrivals level), in the storefront space that used to be the Hamburg Welcome Center. It is landside, so you reach it after exiting the baggage reclaim/customs area into the public Arrivals hall.
From Terminal 1 arrivals, follow signs toward the Airport Plaza public Arrivals zone rather than staying inside the reclaim room. The desk is positioned as a service-counter storefront along the Plaza’s Level 0 frontage, making it easier to locate by landmark than by belt number. If you are still inside the baggage reclaim hall among the carousels, you have not reached it yet; it sits out in the public Arrivals circulation after customs egress.
Where is the Airport Lounge entrance located relative to Terminal 1 security exit (exact direction/landmark)?
The Airport Lounge entrance is airside on Level 3 above the Airport Plaza, reached by taking the Plaza elevator/stair core shortly after you clear Central Security. The correct direction is “up” before you commit to the long walk down Terminal 1’s A-pier.
After security, you’re funneled through the Plaza’s duty-free/retail path; stay in the central Plaza hub area and look for the vertical-transport core that serves Level 3 rather than following the pier flow toward gates like A30 or beyond. The landmark is that you access the lounge via the Plaza elevators in the hub zone, not from mid-pier. If you’re already well down the A-gates corridor, you’ve overshot and will need to backtrack to the Plaza center.
What is the exact walking distance from Terminal 1 security exit to the nearest restroom (first reachable toilets airside)?
Walking is typically 25–60 meters from the Central Security exit into the first airside restroom cluster in the Airport Plaza Level 1 zone. The closest toilets are in the immediate post-security retail hub before you head down the Terminal 1 pier.
After you clear security and enter the Plaza airside circulation, pause before committing into the duty-free flow and scan the hub edges for restroom pictograms. The nearest facilities are positioned for high throughput right at the Plaza node, which makes them the fastest to reach but also the most crowded. If you instead follow the main stream toward the A-pier, you’ll pass additional restrooms farther down the corridor (often less congested), but those are no longer the “first reachable” option from security.
Where is the closest elevator/escalator route from Terminal 1 arrivals to Terminal 1 departures (most direct vertical path)?
The most direct vertical route is the Airport Plaza Level 0 to Level 1 core by the Edeka supermarket, which lifts you from Arrivals into the Departures level near the Terminal 1/Plaza interface. This avoids the most congested atrium escalators and keeps you on the shortest luggage-friendly line.
From Terminal 1 Arrivals (Level 0), walk toward the Airport Plaza public hall and aim for the Edeka storefront as your landmark. Take the adjacent elevator bank (or the nearest escalators if traveling light) up one level to Departures (Level 1), then follow the landside hall north into Terminal 1 toward your check-in row. If you surface into the open Plaza atrium and see dense trolley congestion at the main escalators, you’re slightly off the optimal core; correct back toward the Edeka-side lifts.
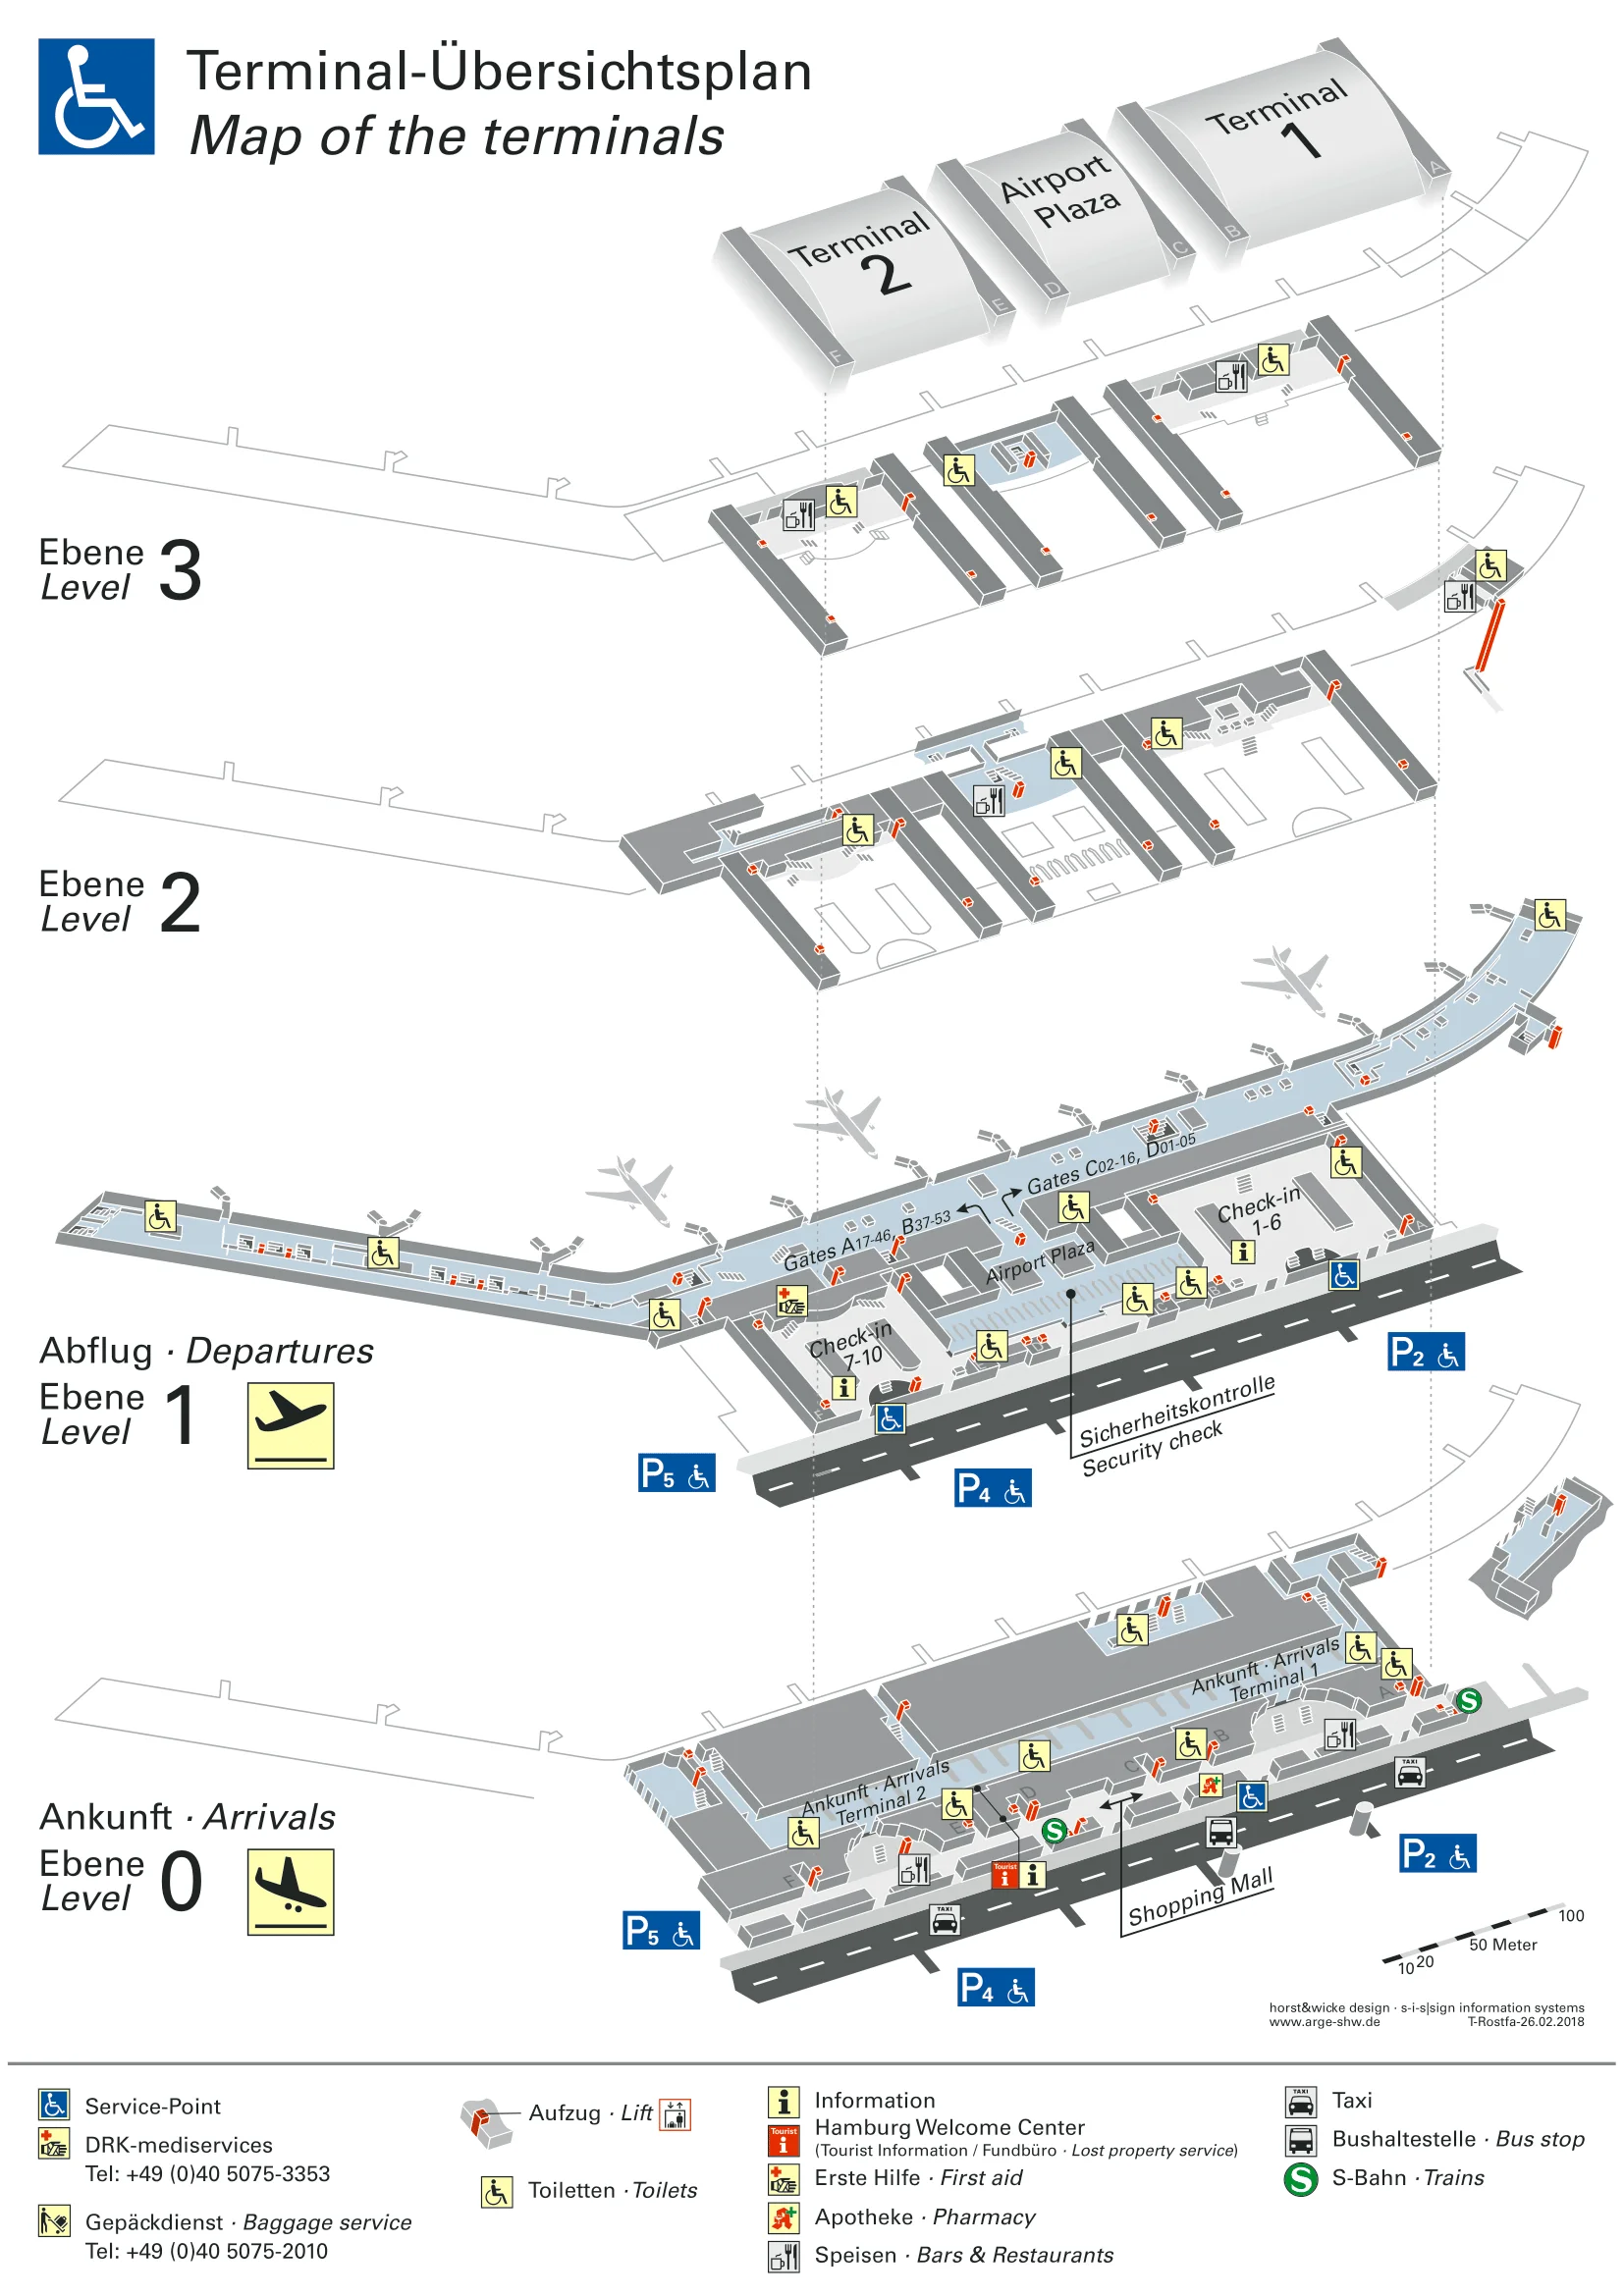
Archive Hamburg Helmut Schmidt Airport Terminal 1 Map
Below are all historical map versions for Hamburg Helmut Schmidt Airport. Each year includes the official map available for that period, presented as both WebP and PDF.
2016 Hamburg Helmut Schmidt Airport Terminal 1 Map