Hamad International Airport Map (Most Up-To-Date)
Hamad International Airport (DOH) is a two-node layout: the South Node centered on the Urs Fischer “Lamp Bear,” and the North Node centered on the Orchard garden, linked by the long Concourse C spine (about 1.0–1.2 km end to end). Most flows radiate from the South Node, while far gates and the D/E wings sit toward the North end. Within Doha’s primary aviation hub, the main orientation task is choosing walk vs train and spotting the correct vertical “drop” for bus gates.
Map Table
| Terminal | Key Airlines | Primary Function | Transfer Mode |
|---|---|---|---|
| Main terminal, dual-node (South + North) | Qatar Airways, oneworld partners | Global transfer hub, long-haul banks | Walkways, moving walks, internal train, escalators/lifts, bus gates |
Hamad International Airport Map Strategy
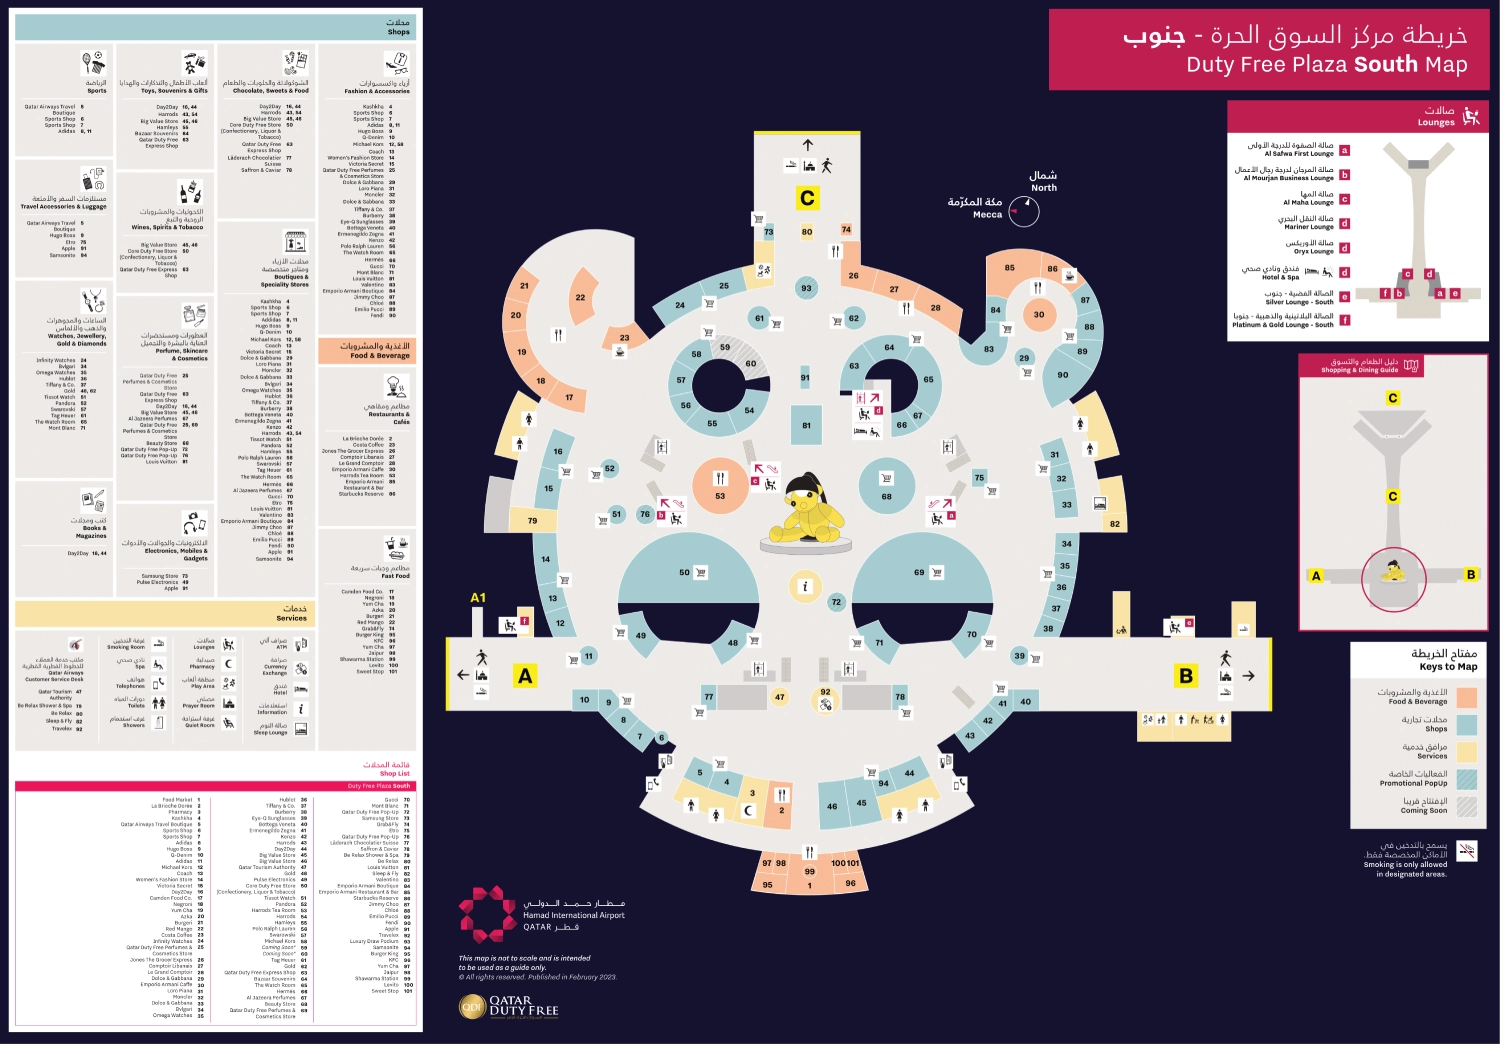
- Treat the Lamp Bear as your datum point: clear Transit Security, drop into the South Node plaza, then decide your vector (Concourse C walk spine vs train) from that exact center.
- Use the train only when you’re truly going North Node or D/E; mid-Concourse C and the C80–C93 bus gates are faster by walking Concourse C to the signed descent near the C30–C43 zone.
- For bus gates C80–C93, anchor on the level-change node (escalators/lifts down) and arrive early: the Level 0 pen crowding plus 10–15 minutes of bussing is the real time trap.
- For “glass box” gate screening (common near early C gates like C1–C13), build queue time into your plan: getting to the gate can be quick from the Bear, but gate-entry screening can turn a “short walk” into a risky connection.
2026 Hamad International Airport Map + Printable PDF
Current DOH operations still hinge on the South Node (Lamp Bear) vs North Node (Orchard) split, with Concourse C as the predictable backbone when timing is tight. The internal train remains point-to-point (no mid-stops), so it’s a win for D/E and far-north gates but can create overshoot/backtrack for mid-Concourse C and the C80–C93 bus-gate cluster. Expect late gate certainty on some connections.

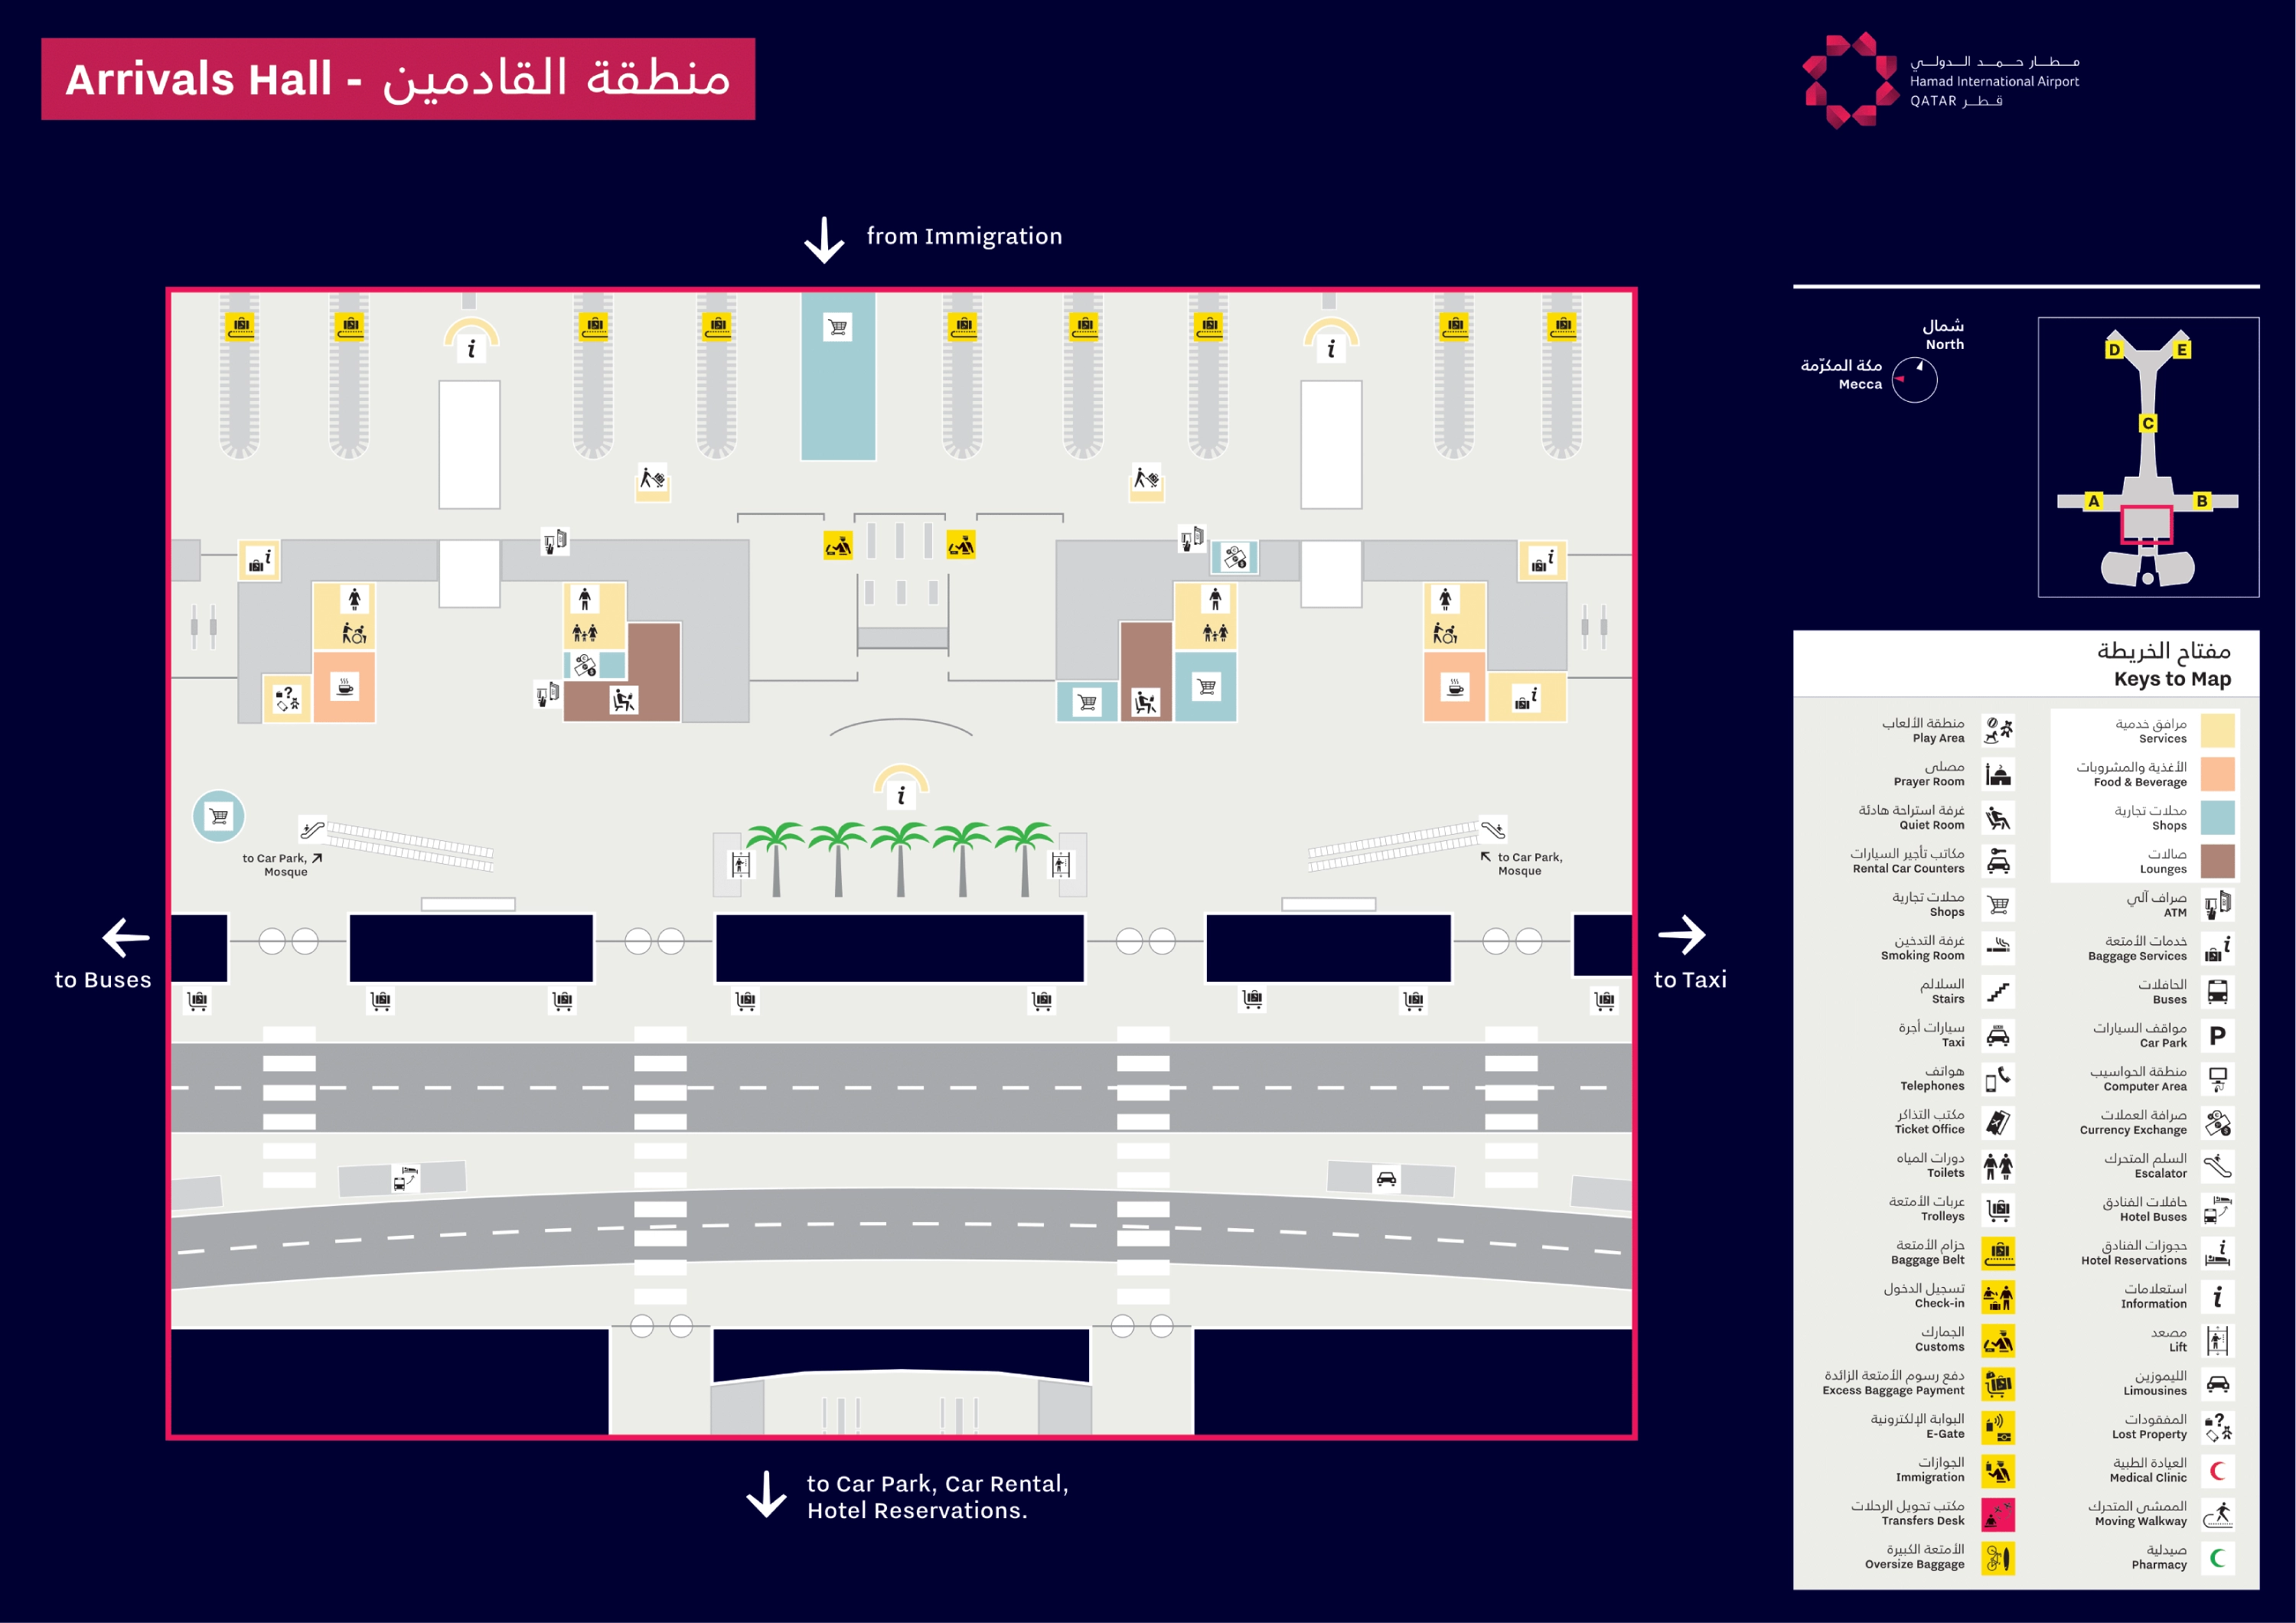
Hamad International Airport Arrival Hall Map 2026
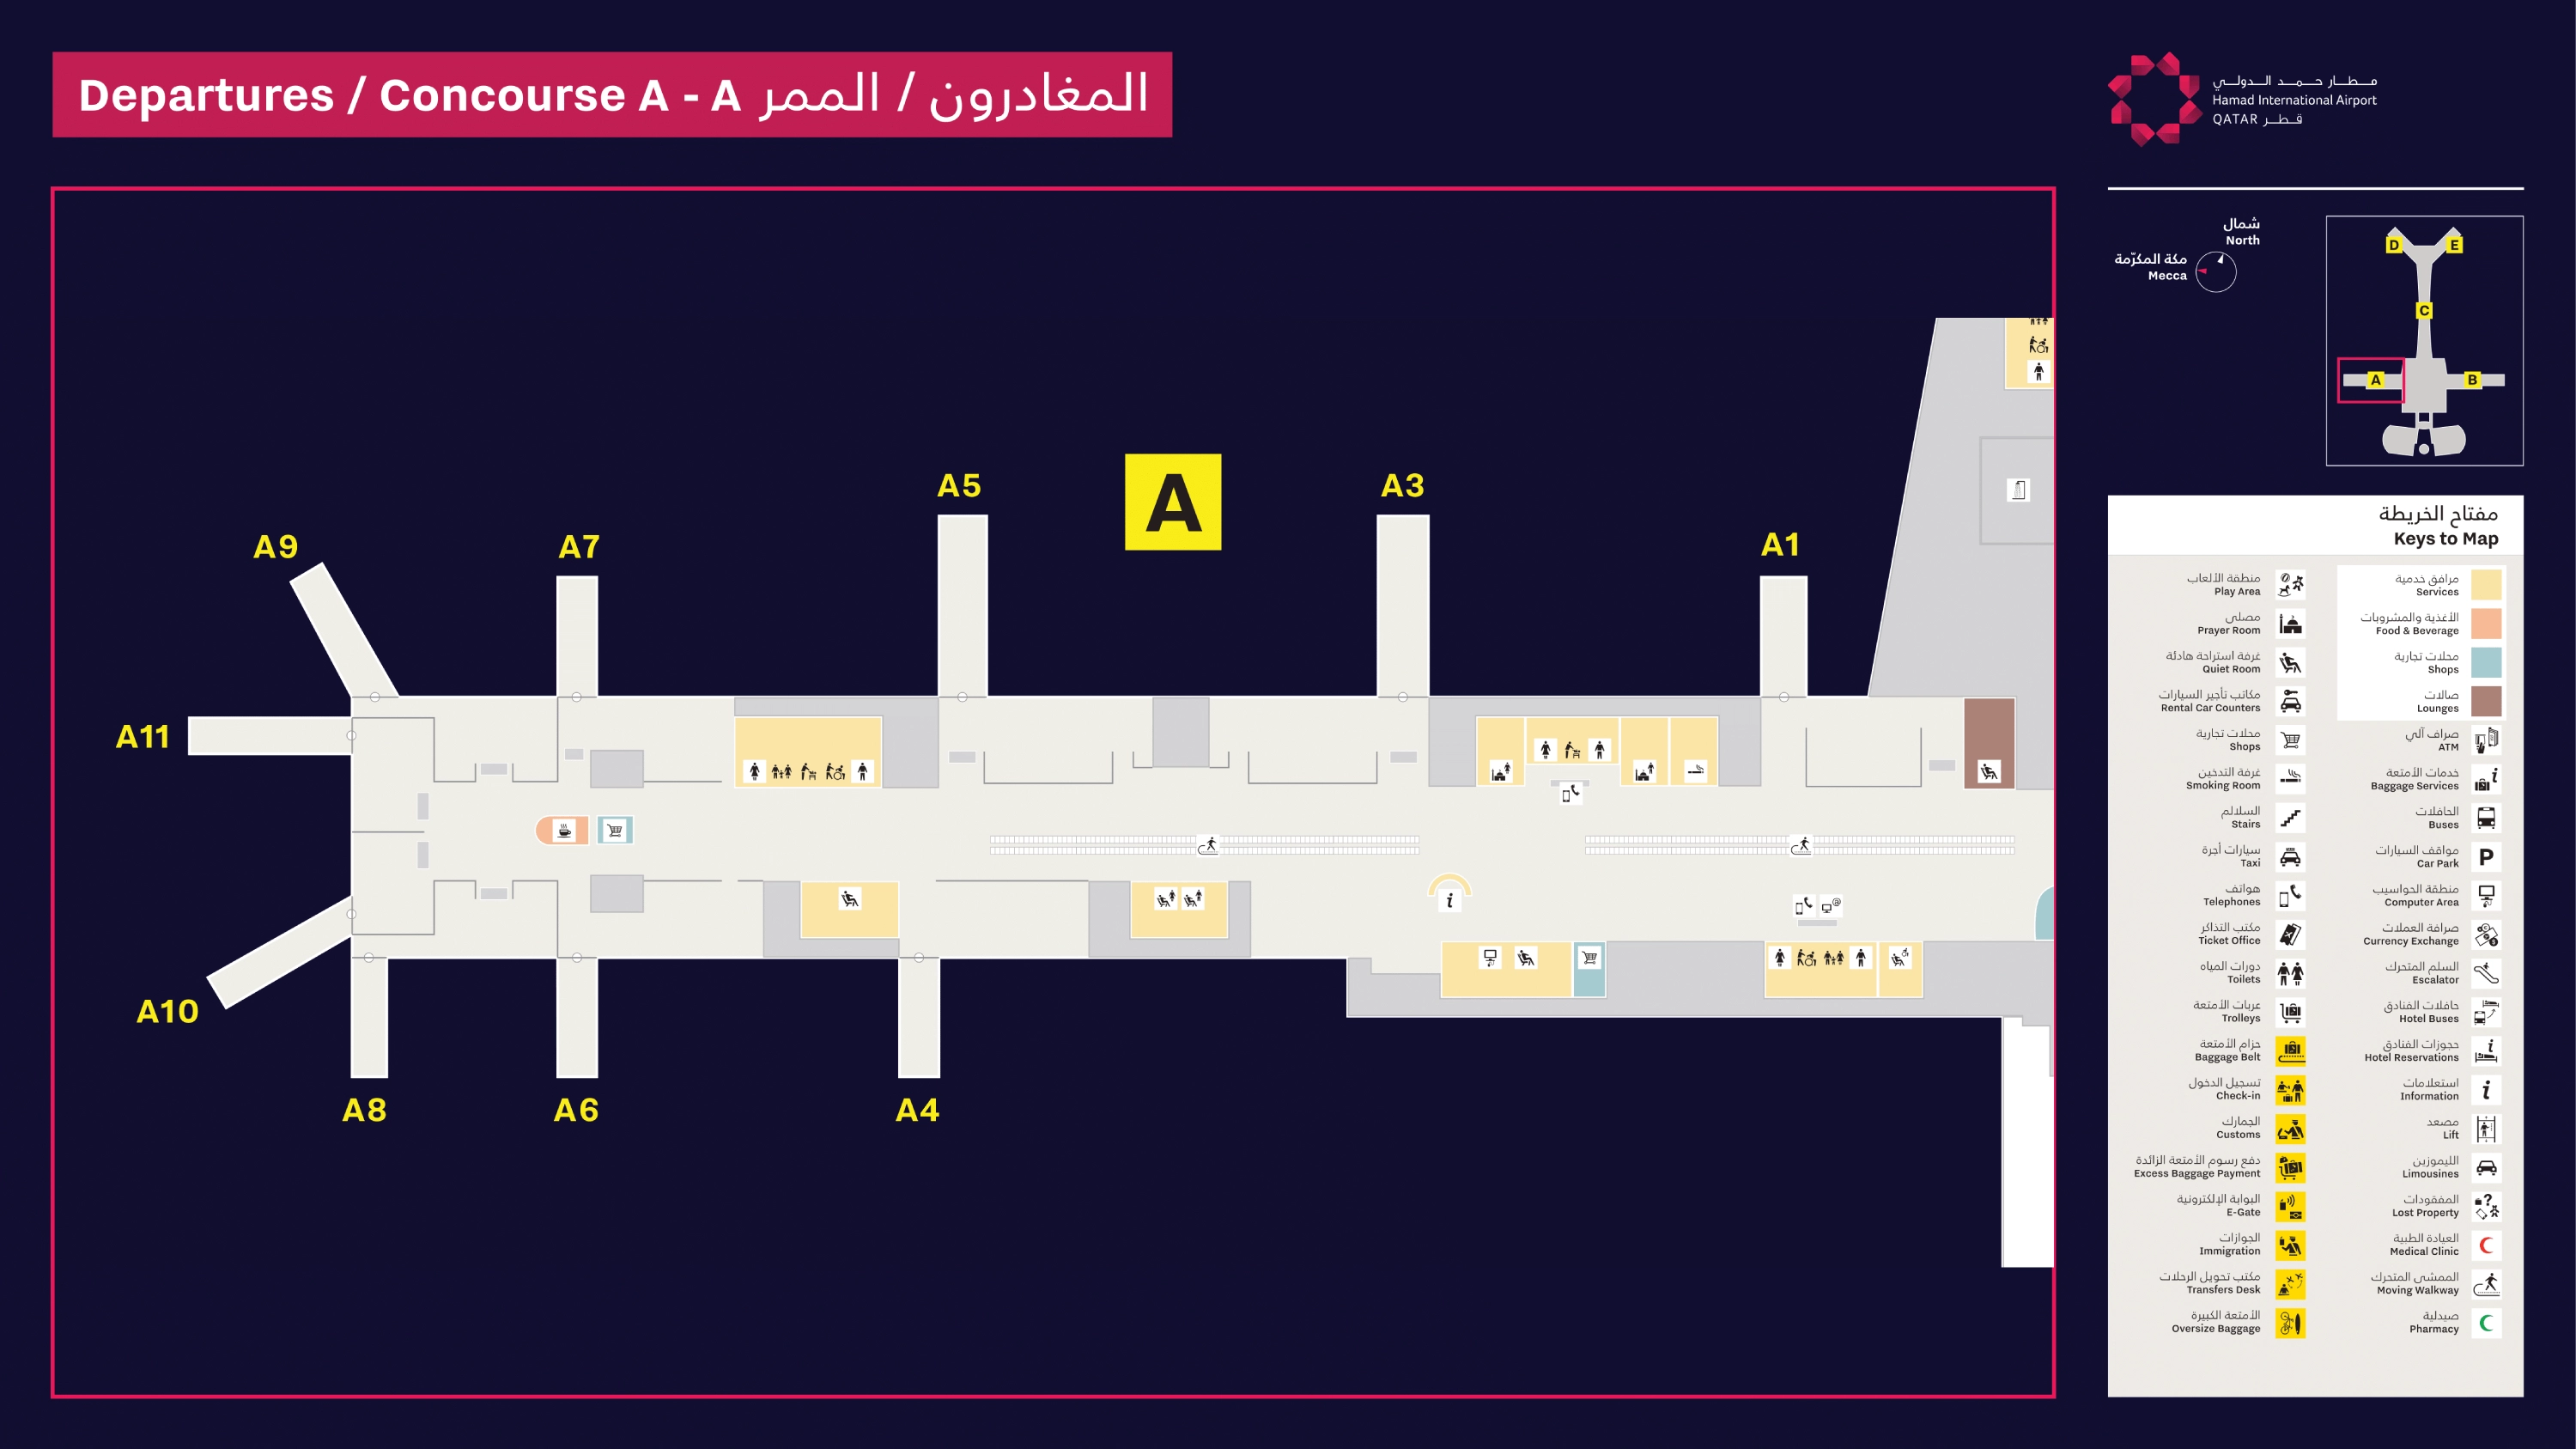
Hamad International Airport Concourse A Map 2026
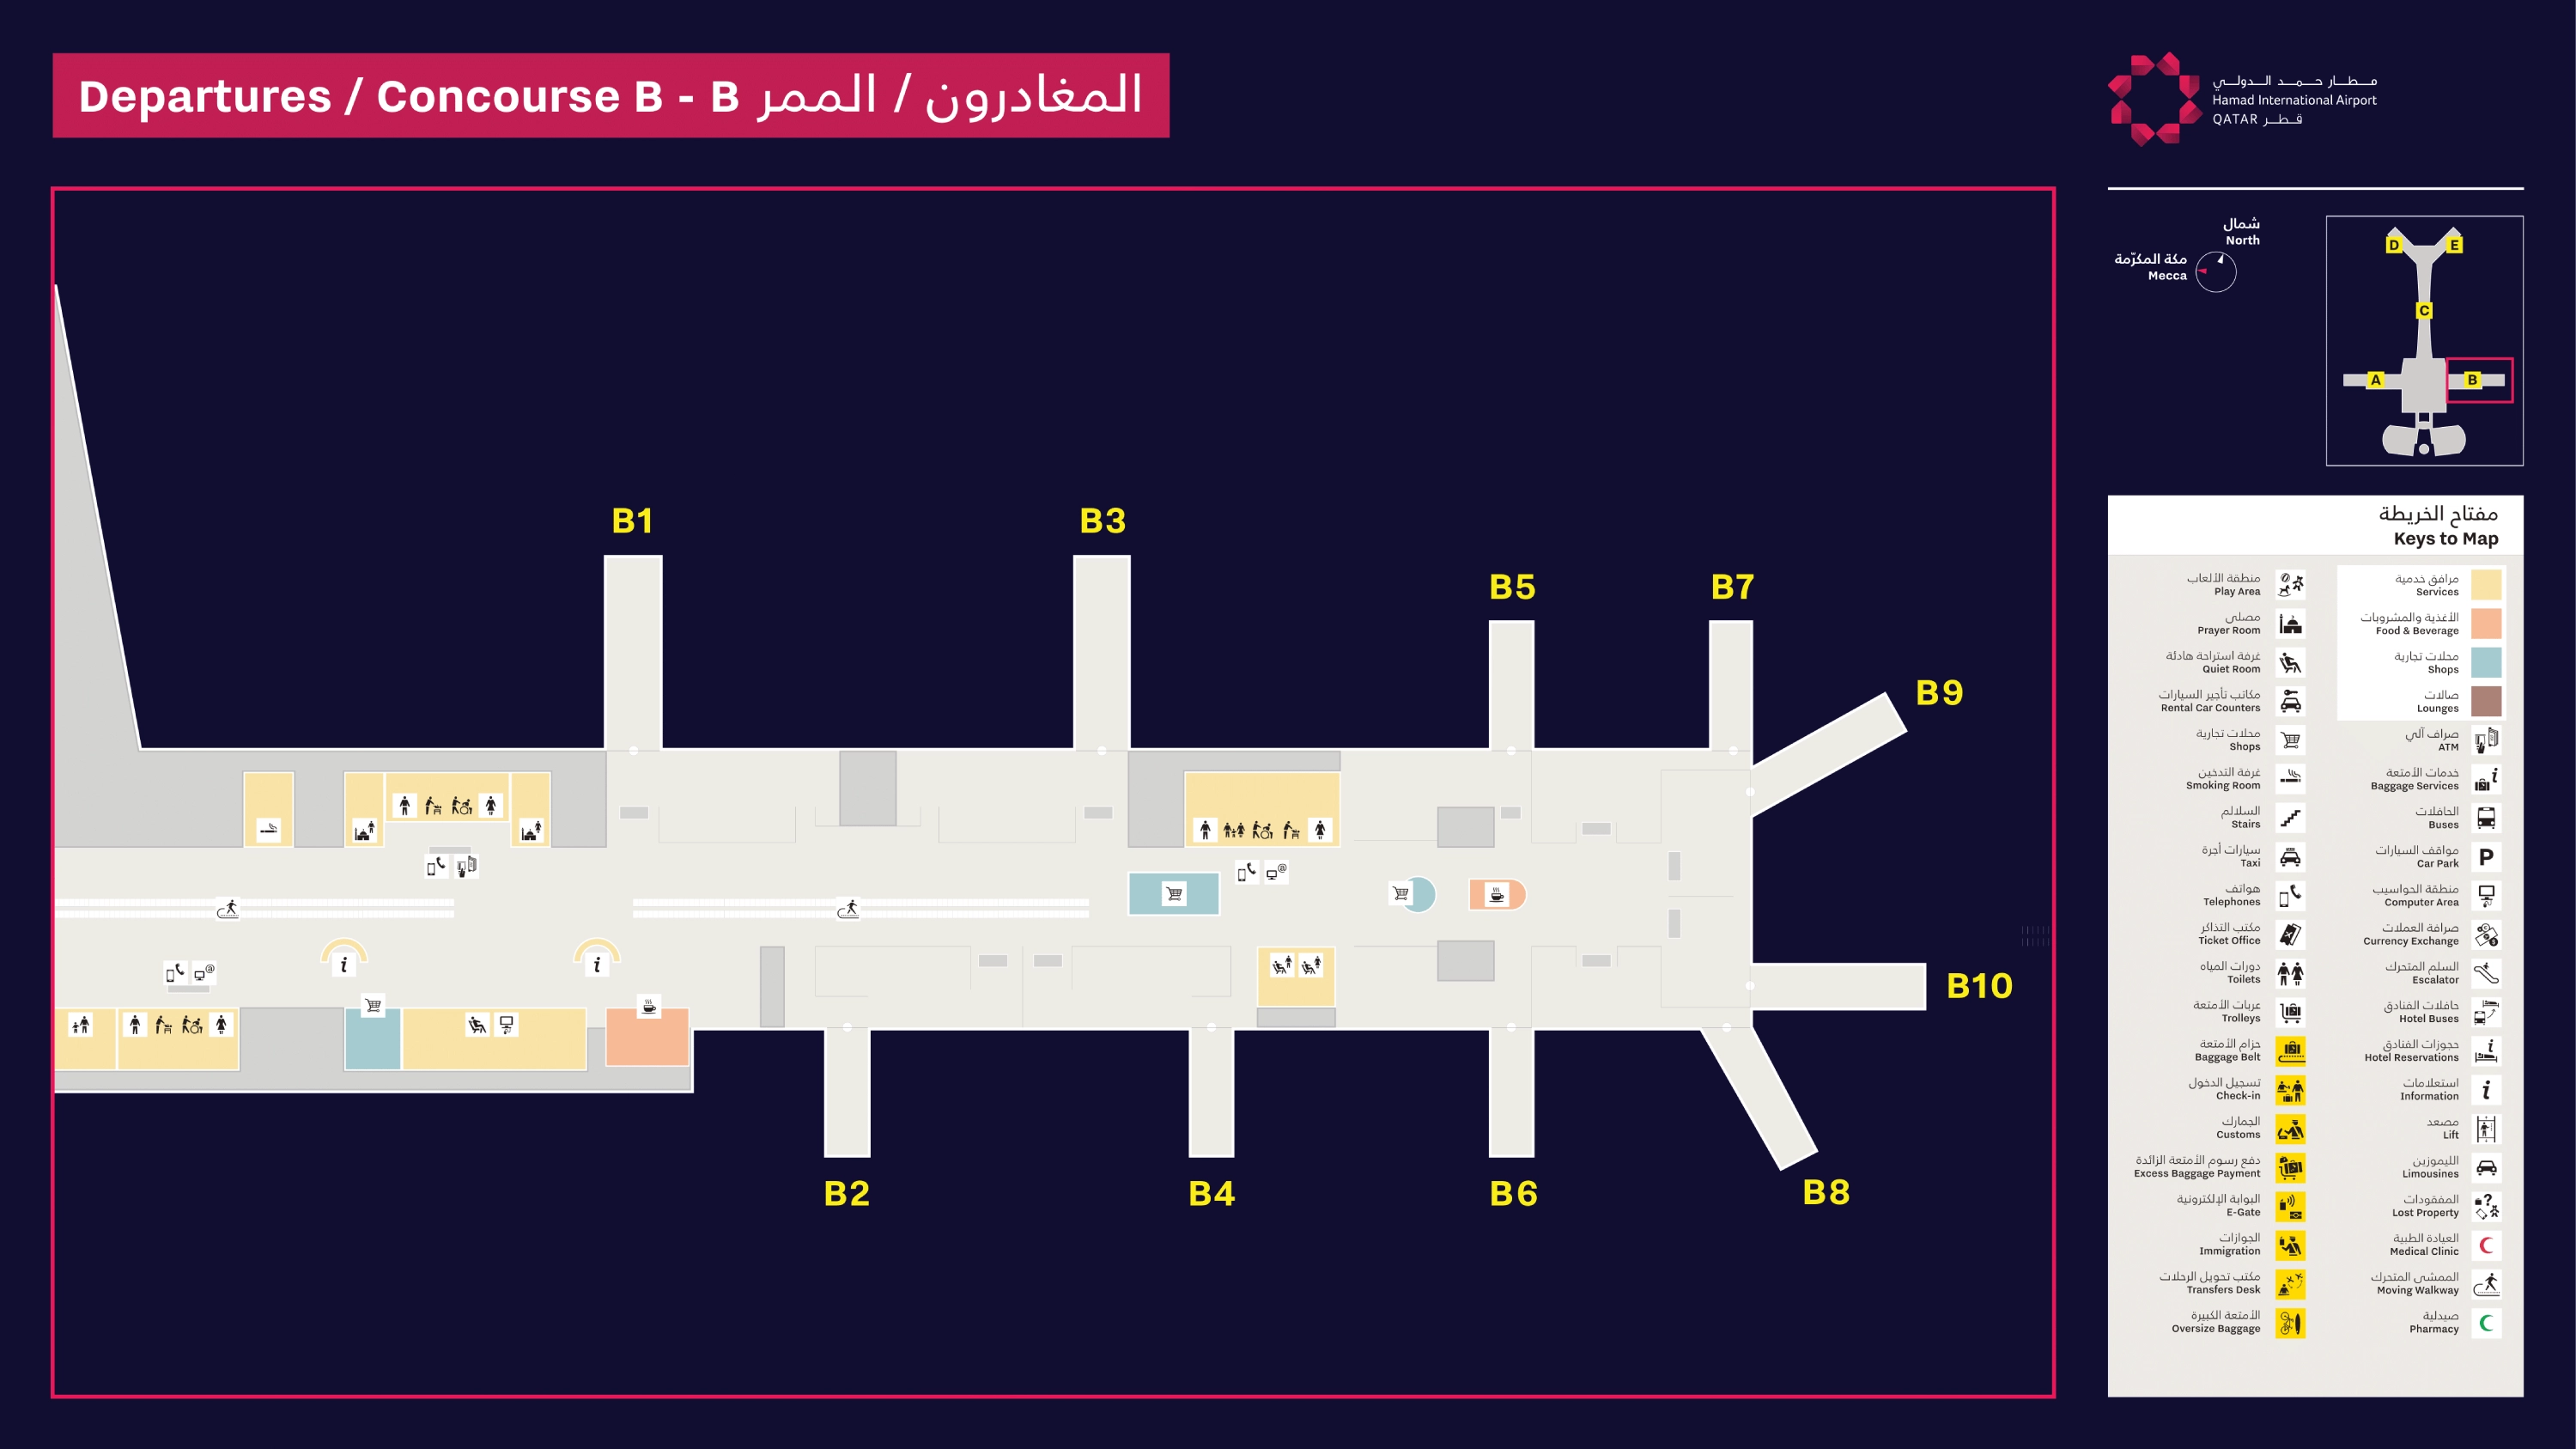
Hamad International Airport Concourse B Map 2026
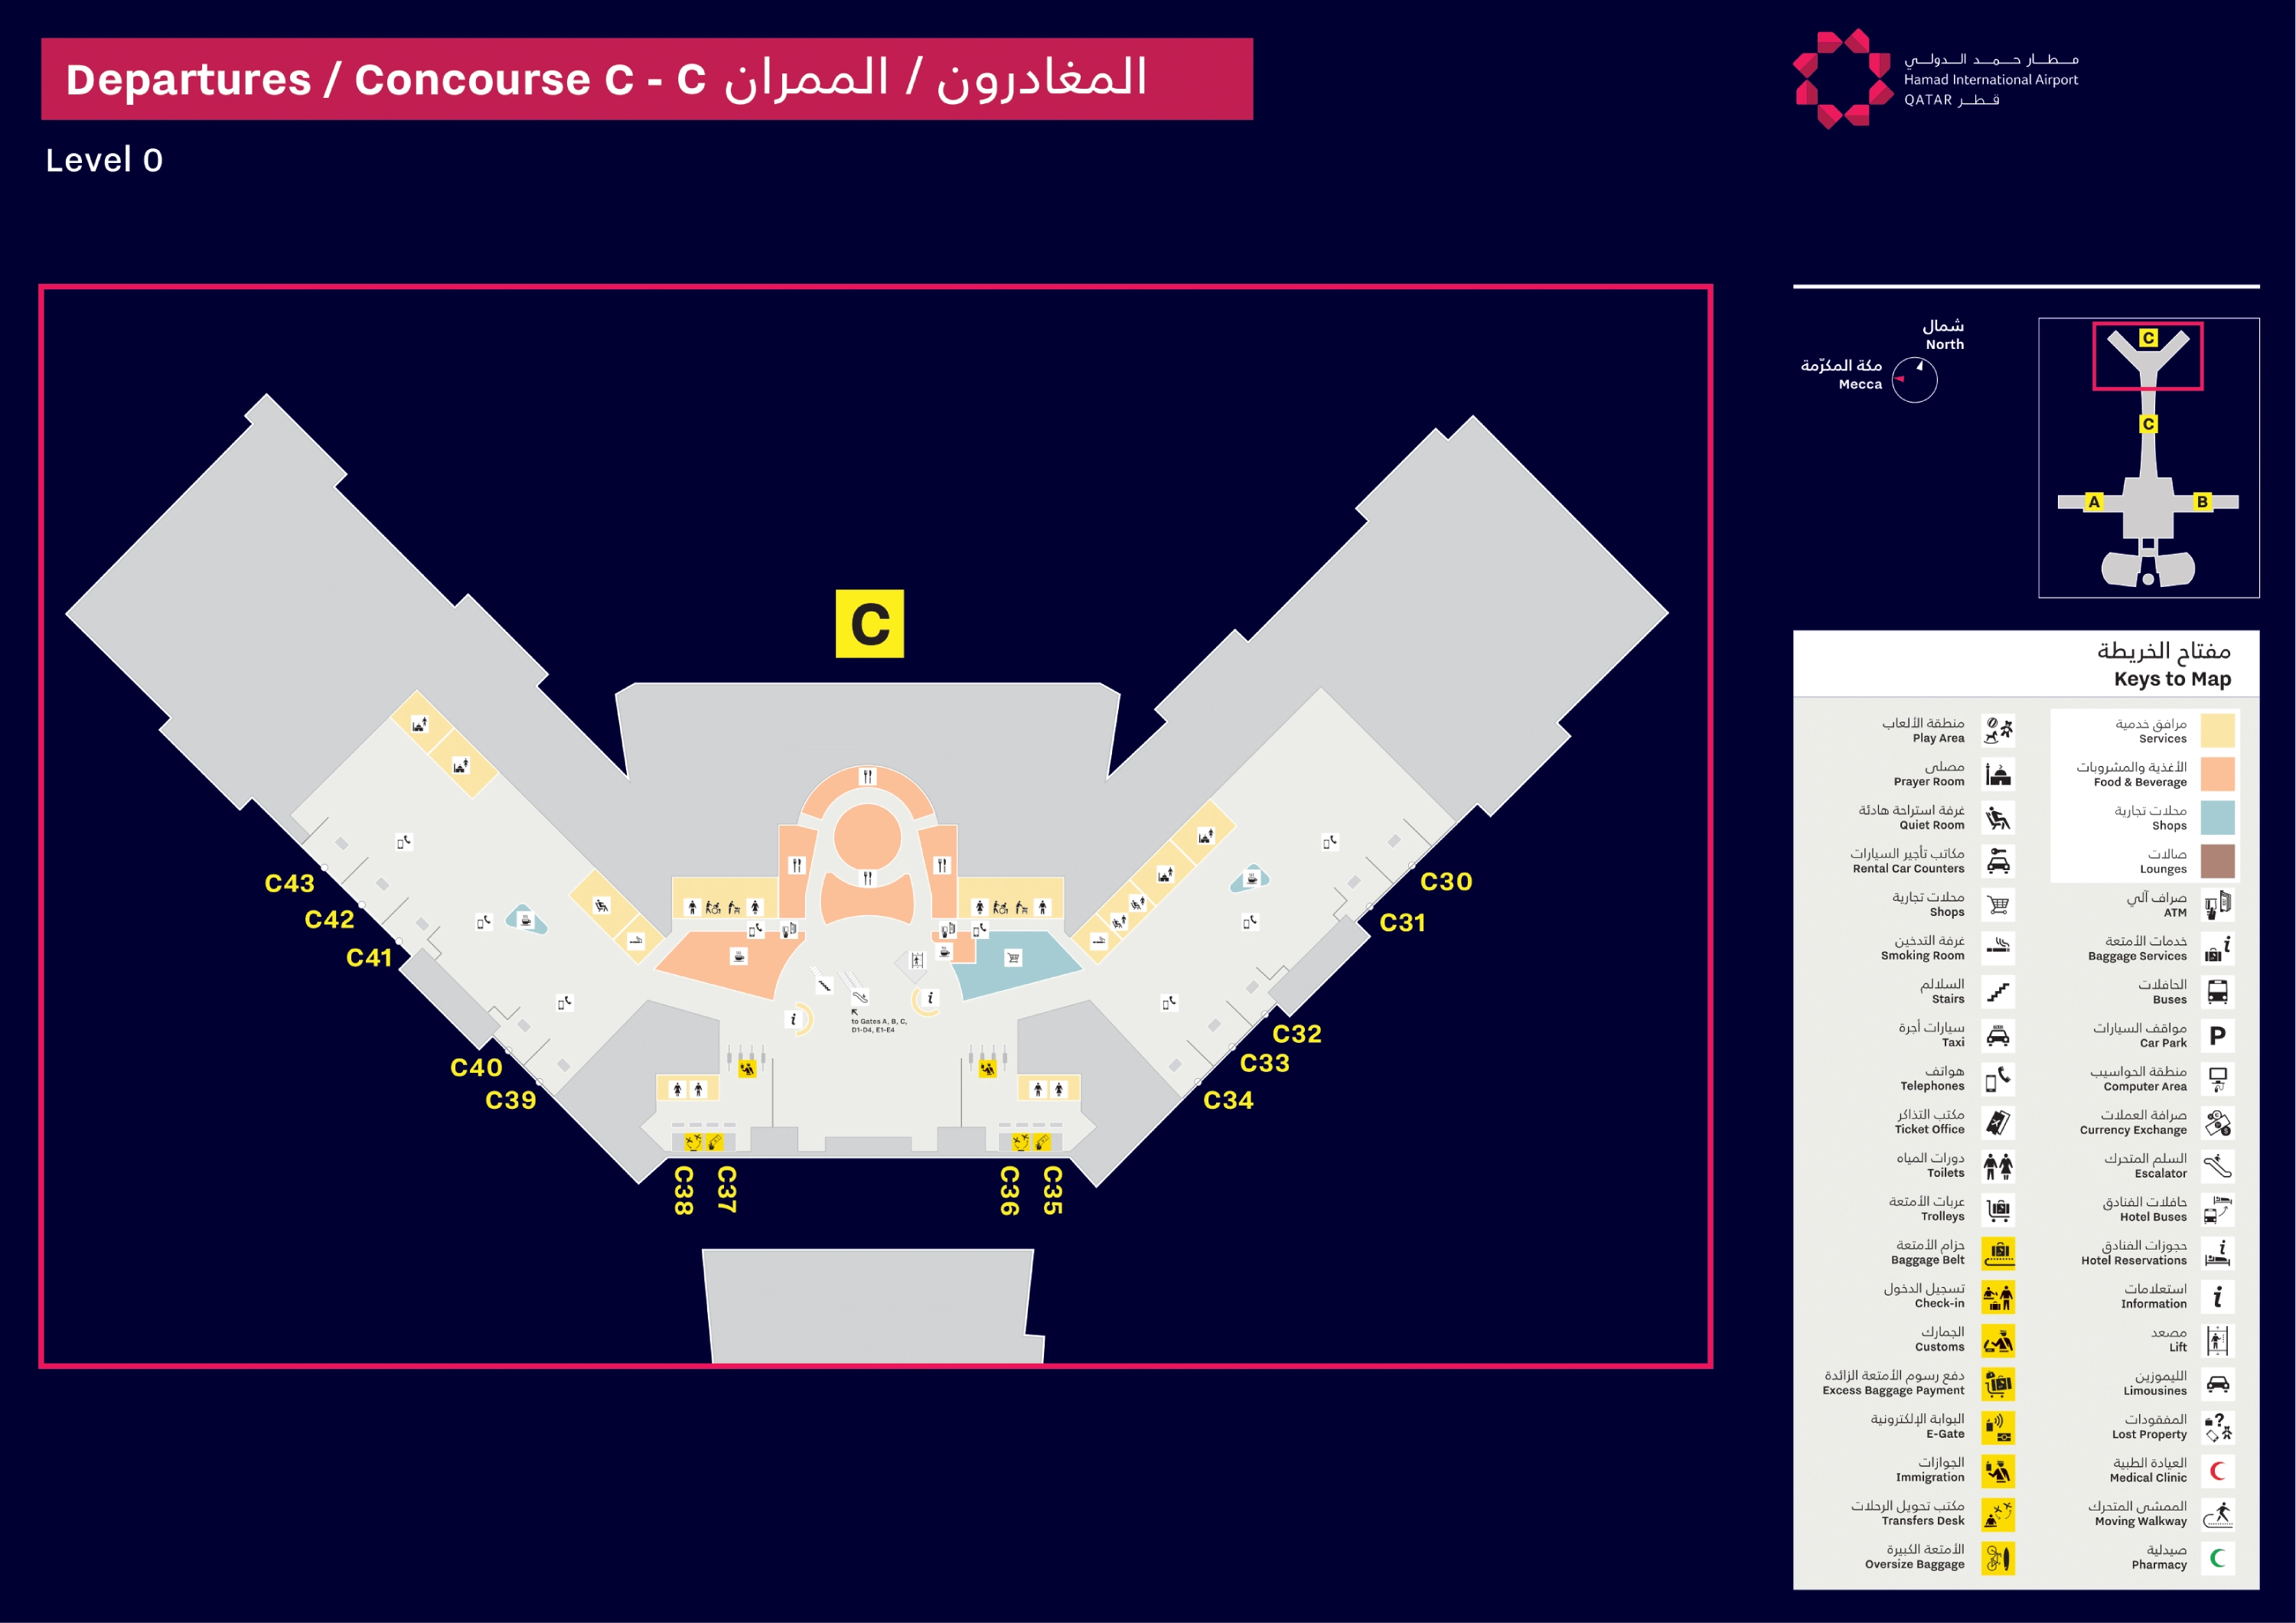
Hamad International Airport Concourse C Map 2026
Hamad International Airport Concourse D E Map 2026

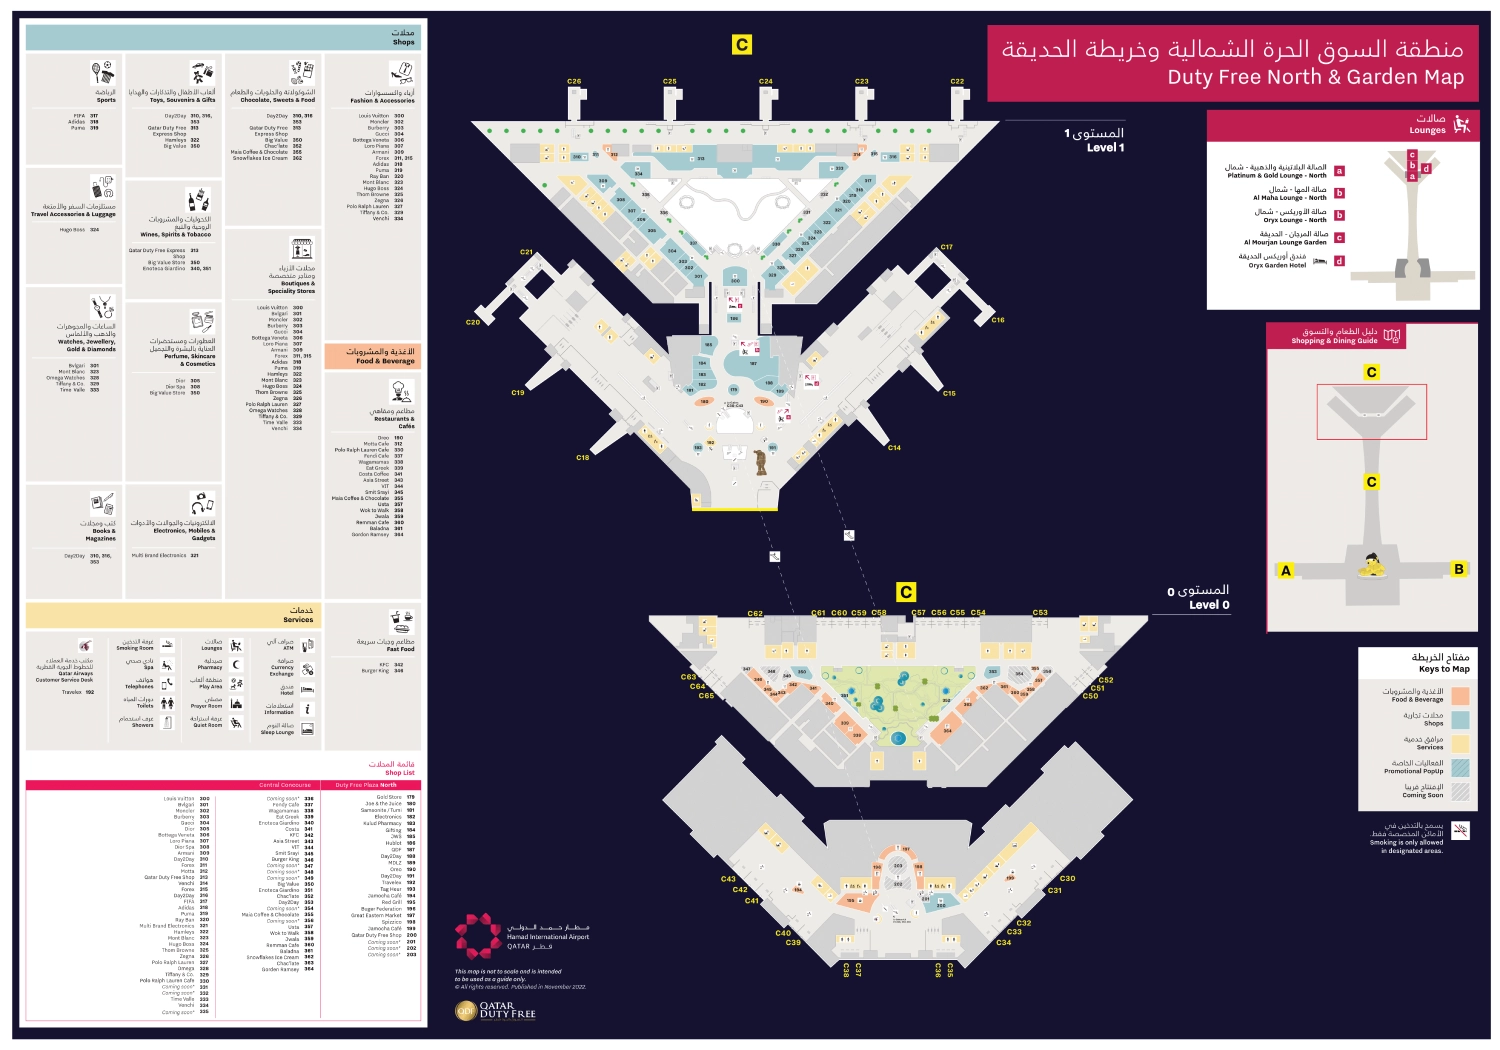
Hamad International Airport Duty Free North and Garden Map 2026
Hamad International Airport Duty Free Plaza South Map 2026
2026 Hamad International Airport Map Guide
What is the exact walking distance (meters) from Transit Security exit to the closest entrance of the airport train/people-mover?
Walking is about 120 meters from the Transit Security exit to the nearest signed train/people-mover entrance at the South Node. The distance is short, but the time cost is driven by the up-down access pattern rather than the horizontal walk.
The route runs from the Transit Security exit on the mezzanine (Level 2) down the escalators into the Lamp Bear plaza (Level 1), then across the retail-plaza edge to the escalator bank back up to the train station level (Level 2). Congestion around the Lamp Bear columns and duty-free islands can slow this segment even when the meter count stays roughly the same.
Where is the primary Transit Security checkpoint located relative to the central “Lamp Bear” area (which side/node and what level)?
The primary Transit Security checkpoint sits in the South Node on the mezzanine level (Level 2) directly above and adjacent to the Lamp Bear plaza. The exit flow forces you down into the South Plaza with the sculpture visible below.
After screening, passengers funnel to the escalator bank that drops into the Lamp Bear void on Level 1, with the main FIDS columns and central retail ring immediately in front of the descent. This placement means almost every transfer path begins by “landing” at the Bear, then branching north into Concourse C or sideways into the A/B throats.
What is the exact walking distance (meters) from the train/people-mover platform to the C80–C93 bus-gate access point (C8–C10 escalator/lift area)?
Walking is about 250 meters from the North Node train platform to the C80–C93 bus-gate descent access point (the escalator/lift bank that drops to Level 0). This assumes you rode the train to the North Node and then backtracked south into Concourse C toward the C30–C43 sector where the bus-gates signage appears.
The train station egress drops you into the Orchard retail/garden zone; from there, follow Concourse C back toward the mid-concourse C-gate blocks until you reach the “Bus Gates C80–C93” overhead sign with a downward arrow and bus icon. That signed node is the critical anchor—once you pass it, you’ve overshot and will need to reverse direction again.
What is the shortest signed route from Concourse C main level to the ground-floor bus gates (C80–C93), including the exact escalator/lift location?
The shortest signed route is the “Bus Gates C80–C93” descent located off Concourse C main level near the mid-concourse C30–C43 area, using the dedicated escalator/lift bank down to Level 0. The key is to follow Concourse C until you see the overhead “Bus Gates C80–C93” sign with the down arrow and bus icon.
| Step | On-map anchor | What to follow |
|---|---|---|
| 1 | Concourse C main spine | Overhead C-gates numbering toward C30–C43 |
| 2 | C30–C43 zone | “Bus Gates C80–C93” sign + down arrow/bus icon |
| 3 | Descent node | Escalators (fast) or adjacent lifts (slower) to Level 0 |
| 4 | Level 0 entry | Boarding pass scan point into the holding pen for C80–C93 |
What is the exact walking distance (meters) from the central “Lamp Bear” landmark to the nearest gate holding “glass box” gate-queue area (identify the closest gate zone)?
Walking is about 160 meters from the Lamp Bear to the nearest “glass box” gate area, typically in the early Concourse C gate zone around C1–C3. The closest practical target is the Concourse C throat where the first low-numbered C gates begin.
These glass-box holds are most commonly used on destination profiles that require extra gate-entry screening, so the real risk is not the walk but the doorway queue. From the Bear, move into Concourse C toward the first gates; the screening-to-enter point is at the glass room entrance, and the line can spill into the main corridor beside the moving-walkway edge, slowing both gate access and through-traffic.
Where are the largest public seating clusters located airside, and what is the shortest walking distance from those seating zones to the nearest departures information boards?
The largest public seating clusters are in the concourse wings rather than in the Lamp Bear plaza, with the densest runs beginning in the A/B throats and along the Concourse C spine seating lines. The shortest walk from these seating zones to a departures information board is about 20 meters if you use the first seating rows closest to the South Node columns.
Public seating is scarce in the 0–50 meter radius around the Lamp Bear, but rows start roughly 80–100 meters into Concourses A and B and around 150 meters into Concourse C near the moving-walkway runs. The nearest departures boards are the large monolithic FIDS screens mounted on the structural columns encircling the Lamp Bear void, so the quickest seating-to-FIDS move is to sit in the closest concourse-throat rows and cut back to the Bear-side columns.
What is the point-to-point distance (meters) between the North Node and South Node, and what is the fastest on-map route between them (walk route vs train route)?
The point-to-point distance between the South Node (Lamp Bear) and North Node (Orchard) is about 1,200 meters via Concourse C. The fastest route is usually the train when the platform is immediately accessible and a shuttle is imminent, but the most time-predictable route is walking the Concourse C moving-walkway spine.
| Route option | Distance basis | Typical time | Best use case |
|---|---|---|---|
| Walk via Concourse C | ~1,200 m | ~10–12 min (moving walks), ~15–18 min (no assist) | Tight timing, avoiding wait variance |
| Train (point-to-point) | Node-to-node shuttle | ~2 min ride + ~6 min access/egress | D/E gates, far-north connections, low platform queues |
For a flight assigned to a bus gate, what is the exact route from the main concourse to the bus boarding pen, including the final turn/entrance where people typically hesitate?
The route is Concourse C main level to the signed “Bus Gates C80–C93” descent near the C30–C43 area, down the escalator/lift bank to Level 0, then through the boarding pass scan into the holding pen for bussing. The most common hesitation point is the moment you leave the main corridor and commit to the down-arrow bus-gates entrance beside the escalators.
From the Lamp Bear side, stay on the Concourse C spine until you see the overhead “Bus Gates C80–C93” sign with the bus icon and downward arrow, then turn off the main flow into that recessed vertical core. At the bottom, the transition is controlled: the scan point is the “you’re in the right place” confirmation, and the pen beyond is a dense holding area where “Gate Open” typically signals the start of bus processing, not aircraft door boarding.
From a remote-stand arrival that drops passengers at C gates, what is the exact backtrack path to reach Arrivals/Immigration (identify the correct corridor/vertical transition)?
The backtrack path is the remote-stand bus drop-off into the terminal, then onto the sterile Arrivals corridor system that runs on an upper level (commonly Level 2) with dedicated Arrivals moving walkways, continuing southbound until all flows converge at the South Node processing hub, where you follow “Arrivals/Immigration” signage into the landside immigration hall.
Remote-stand arrivals keep you separated from departing passengers, so the correct move is to stay in the glass-walled/sterile arrivals corridors rather than trying to cut into the retail departure deck. If you’re dropped nearer the north end (C/D/E side), expect a long southbound traverse on the Arrivals pathway before the final vertical transition down into the immigration area; the key anchor is the South Node convergence point where Arrivals and Transfer decision signage splits.
What is the exact walking distance (meters) from the transit train stop to the farthest common gate zone passengers report as a “long walk” (identify that gate zone by letter/number range)?
Walking is about 550 meters from the North Node train stop to the farthest common “long walk” gate zone, typically the outer ends of the D/E wings around Gates D24 and E24. This is the “last mile” after the train, because the station drops you at the hub where Concourse D and Concourse E branch.
From the platform, you descend into the Orchard junction area, then follow the overhead gate range signs down the relevant wing to the high-number gates. Moving walkways help, but the main variable is congestion at the Orchard retail edges and the fact that the train solves only the node-to-node gap, not the spoke length to the farthest gates
Where are the gate-entry security choke points located (screening-to-enter-gate points), and what is the nearest alternate route to reach the same gate zone without dead ends?
The gate-entry security choke points are the doorways into the “glass box” gate holding rooms, most commonly in the low-number Concourse C zone around Gates C1–C13 and in select D/E gate zones used for destinations that require secondary screening. The nearest alternate route to reach the same gate zone does not exist because the screening doorway is a mandatory single entry.
Queues often form outside the glass enclosure, spilling into the main corridor and partially blocking the moving-walkway edge near the Concourse C throat by the South Node. The practical mitigation is positional rather than navigational: approach from the main Concourse C spine, identify the correct glass-box entrance early (before the crowd bottleneck), and add buffer time because the choke is time-based, not distance-based.
What is the shortest on-map route from the Al Safwa lounge area (South Node) to the C80–C93 bus-gate descent point, including level changes?
Walking is the shortest route: Al Safwa (Level 3) down to the Lamp Bear concourse (Level 1), then north along Concourse C to the “Bus Gates C80–C93” descent near the C30–C43 area, then down to Level 0. This avoids the train overshoot and the backtrack to mid-Concourse C.
| Segment | Level change | On-map anchor |
|---|---|---|
| Exit Al Safwa | L3 → L1 | Al Safwa escalator down to Lamp Bear plaza |
| Traverse to bus-gate access | none (stay L1) | Concourse C spine northbound to C30–C43 sector |
| Descend to bus gates | L1 → L0 | “Bus Gates C80–C93” sign + escalator/lift bank |
| Enter pen | none (stay L0) | Boarding pass scan into C80–C93 holding area |


