Faro Airport Map (Most Up-To-Date)
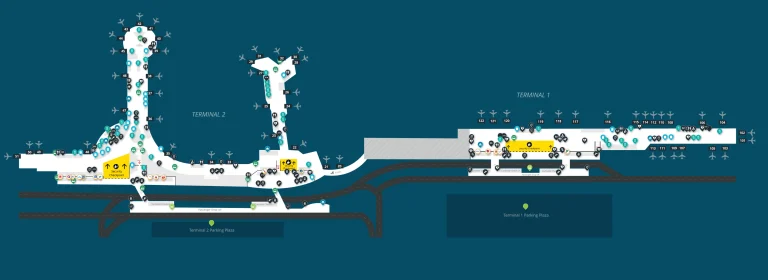
Faro Gago Coutinho Airport is a compact, single-terminal layout with a mostly linear flow: Ground Floor (Level 0) check-in hall feeds a central escalator up to Level 1 security, then forces all passengers through a duty-free “black box” before the departures concourse splits for Schengen vs non-Schengen processing. Within the Algarve’s main airport hub, the most time-critical geometry is the post-security corridor-to-stairs funnel that feeds Non-Schengen passport control, plus the landside walkout to Car Park 4 (P4) for off-airport rentals.
Map Table
| Level | Terminal Layout | Primary Bottleneck | Key Landside Node |
|---|---|---|---|
| 0 | Check-in desks 01–60 | Desk-queue overflow | Arrivals curbside exits |
| 1 | Security + Duty Free exit | Passport-control feeder corridor | Departures façade walkway |
| Split | Gates A vs Passport Control | Stairs pinch point | P4 covered walkway |
| P4 | Rental meeting/prefab zone | Outdoor queuing | Shuttle pickup zone |
Faro Airport Map Strategy
- Treat the Duty Free exit as the last clear decision point: commit immediately to the passport-control corridor if you’re non-schengen, because the queue “start node” forms right after that doorway and backfills fast.
- Assume the stairs are the system’s limiter: the constriction happens at the head of the staircase, so once the line reaches that narrowing, movement becomes stop-start and missed-flight anxiety spikes.
- If you need the family/priority (“baby”) routing, aim for the lift beside the staircase entrance before you’re boxed in; expect a chaotic merge at the bottom where the lift opens into the side of the booth area.
- For arrivals car rentals, separate “in-terminal desks” from P4: commit to the left-turn exterior walk past Departures to the covered P4 walkway and use the P4 Meeting Point prefab/glass building as your confirmation landmark.
2026 Faro Airport Map + Printable PDF
Current operations still hinge on a single post-security passport-control interface for non-Schengen flows, where corridor width and a staircase feed rate can overwhelm staffing and e-gate availability. The most reliable way to use a 2026 printable map is to mark the Duty Free exit as your “decision doorway,” then trace the corridor-to-stairs funnel and the lift bypass so you can choose the right lane early and avoid getting trapped in a static queue.
2026 Faro Airport Map Guide
What is the exact physical point where the EU vs non-EU passport-control split becomes visible in the departures flow?
The EU vs non-EU split becomes visible immediately after you exit the main Duty Free shop on Level 1. That Duty Free exit is the first point where overhead signs and the corridor geometry reveal the Schengen (Gates A) versus Non-Schengen/Passport Control direction.
The decision happens in the open departures concourse right outside the Duty Free doorway, before you enter the narrower corridor that feeds the passport-control stairs. Use the Duty Free exit itself as your anchor: once you step out, look up for the first overhead gate-group signs and follow the Non-Schengen/Passport Control routing away from the main food court/plaza area toward the processing corridor.
Where do passengers first join the passport-control queue after clearing security (the queue “start node”)?
Passengers first join the passport-control queue in the corridor immediately after the main Duty Free exit on Level 1. That corridor is the first “holding” space for the line, and it can backfill toward the Duty Free doorway when demand spikes.
The queue does not reliably begin at the passport booths downstairs; it forms upstream in the transit corridor that leads from the Duty Free exit toward the staircase down to passport control. Use the Duty Free exit as the landmark: if you step out of Duty Free and see a stationary line already occupying the corridor mouth toward the stairs, you’re at the start node and the system is already in compression mode.
What is the exact staircase/corridor segment where the passport queue backs up and constricts (the “pinch point”)?
The pinch point is the narrowing at the head of the staircase that drops from the Level 1 departures concourse down to the passport-control booth level. That transition forces the wide post–Duty Free corridor into the fixed width of the stairs, creating stop-start movement and rapid backfill.
The backup typically stacks first in the corridor leading to the stairs, then compresses right where the stair entrance constricts the flow. Use the staircase entrance itself as the anchor: if the line is moving on flat Level 1 but stops in waves as it approaches the stair mouth, you’ve reached the geometric limiter that caps how fast passengers can be fed to the booths below.
Where is the e-gate / automatic passport-scanner bank located relative to the main passport booths (which side/aisle)?
The e-gate bank is located alongside the manual passport booths, running parallel to the main booth line on one side. It sits in the same passport-control zone, flanking the staffed counters rather than being in a separate room or upstream corridor.
Relative to your approach from the stairs/lift, the e-gates appear as a distinct bank of automatic lanes immediately adjacent to the staffed desks, typically grouped together as a single block. The key landmark is the booth array itself: once you can see the staffed counters, the e-gates are already in that same field of view, positioned to one side as an alternative processing aisle (when switched on).
What is the exact elevator/lift location used to reach the priority/family (“baby”) routing described by travelers?
The priority/family lift is located post-security on Level 1, adjacent to the staircase entrance that leads down to passport control. It sits near the head of the passport-control queue, close enough that reaching the call button often requires pushing through the dense crowd staged for the stairs.
Use two anchors to find it: the Duty Free exit (where the queue starts) and the staircase mouth (the pinch point). The lift is positioned at that staircase area, not back by security or inside Duty Free, and it is not protected by a separate cordoned corridor—so families typically have to aim for it immediately before the queue fully compresses around the stair entrance.
After taking that lift, where is the downstairs merge point where priority routing rejoins the main passport-control process?
The lift rejoins the process at the bottom of the stairs, opening directly into the side (flank) of the passport-control booth area. That doorway deposits priority/family passengers into the same discharge zone where the staircase flow arrives, rather than into a protected, separate lane.
The merge point is immediately outside the lift doors on the lower level, adjacent to the booth array and beside the stream of passengers coming down the stairs. The key landmark is the stair landing: if you can see the base of the stairs and the booth line in the same glance, you’re standing in the merge zone where priority routing has to blend back into the main immigration flow.
Where does the security queue physically begin on the map (first barrier/turnback), when it’s in “overflow” mode?
The overflow security queue begins at the top of the central escalators on Level 1. That escalator landing becomes the first “turnback” point when the screening hall is saturated and the line spills outward into the mezzanine circulation space.
The first physical barriers are the portable belt stanchions that form a serpentine just before the boarding-pass scanners that gate entry to the screening lanes. When demand is high, the queue extends laterally along the mezzanine balcony that overlooks the Level 0 check-in hall; the escalator landing is the anchor where you’ll first encounter the line before you even reach the controlled entrance to the screening area.
What is the shortest walk path from check-in/bag drop to security entrance, by distance (meters) or minutes?
The shortest walk path is about 50–100 meters and typically takes 2–4 minutes from the central check-in desks to the security entrance. It runs straight from the check-in bank toward the central escalators opposite the main departures doors, then up to Level 1.
From a mid-hall position (around Desk 30), the route is: move to the central escalator cluster in the middle of the check-in hall, ride up one level, and step directly into the Level 1 security preparation area. The best landmark chain is Desk 30 → central escalators (in sight from much of the hall) → Level 1 escalator landing at the security entry zone.
Where is the best “early warning” vantage point to visually assess passport-control queue length before you’re trapped in it?
No effective early-warning vantage point exists before you exit Duty Free. The duty-free “forced-flow” layout blocks line-of-sight to the passport-control corridor, so you can’t reliably see queue length from security, the mezzanine, or inside the shop.
The first practical check happens only at the Duty Free exit on Level 1, where you can finally see whether the passport-control corridor is already occupied by a stationary line. Use that doorway as your last assessment point: pause as you step out, look down the corridor toward the stairs, and decide immediately whether to proceed straight into the queue or move quickly past the corridor mouth if your route is Schengen (Gates A).
Where is the designated pickup point (curb/zone) for off-airport car-rental shuttles, and what landmark confirms you’re standing in the right place?
The designated pickup point for off-airport car-rental shuttles is Car Park 4 (P4). The confirming landmark is the P4 “Meeting Point” structure, described as a glass building or prefab office unit positioned centrally in the lot.
Look for P4-level signs such as “Pre-Booking Rent-a-Car” and operator flags/banners clustered around the Meeting Point and canopy area. If you’re standing at curbside taxi/bus bays directly outside Arrivals, you’re too early in the landside flow—the shuttle ecosystem you want is the P4 hub, not the immediate terminal frontage.
What is the exact pedestrian route from Arrivals exit to the car-rental shuttle pickup zone (including crossings/ramps)?
The route is: exit Arrivals through the main sliding doors, turn left, walk along the outside façade past the Departures entrance, then cross the service road at the marked pedestrian crossing and follow the covered walkway into Car Park 4 (P4). The walk is about 250–300 meters and takes roughly 5–7 minutes with luggage.
Stay on the terminal-side sidewalk with the building on your left as you move. Do not cross immediately after exiting Arrivals, because that pulls you into the taxi/public bus frontage. The key landmarks in sequence are Arrivals sliding doors → left-turn exterior promenade → Departures entrance doors → marked crossing → covered “P4 / Rent-a-Car” walkway → P4 Meeting Point/prefab zone.
Where is the CP4 car-rental desk area located inside the terminal relative to arrivals exits (which side/row), given reported queueing there?
CP4 is not inside the terminal; it refers to the Car Park 4 (P4) rental facility outdoors. Reported “CP4 queueing” describes lines forming at the P4 prefab/Meeting Point canopy area where staff process paperwork or stage shuttle boarding.
Inside the terminal, the main in-terminal rental desks for major brands are in the Arrivals Hall, typically on the right side as you exit the restricted baggage reclaim area into the public hall. If you’re still in the Arrivals Hall by the desk row and air-conditioned queues, you’re at the in-terminal operators—not the CP4/P4 processing zone.