Austin Bergstrom International Airport Map (2025-2024)
Barbara Jordan Terminal is a single, semi-oval main building with split-level roadways (Departures up, Arrivals down) feeding one central processing hall and a long, linear concourse that stretches east–west to the gate ends. Most “navigation failures” happen within Austin’s main airport complex at chokepoints—security, baggage claim, and the off-terminal rideshare walk—because short distances funnel into shallow spaces with limited queue room.
Map Table
| Zone | Connection | Walk Time |
|---|---|---|
| Upper curb Doors 2–3 | Checkpoint 2 (central hall) | 150–250 ft / 45–75 m |
| Checkpoint 2 West | TSA PreCheck lanes | same hall, west side |
| Baggage Claim (Carousels 1–3) | Rideshare (CONRAC Level G) | 10–15 min walk |
| Baggage Claim (center) | South Terminal shuttle (Upper curb Doors 1–2) | 600–800 ft / 180–245 m |
Austin Bergstrom International Airport Map Strategy
- Enter near Doors 2–3 when possible to minimize resets; security is close, but queues can backfill into the curb sidewalk during morning peaks.
- Treat TSA PreCheck as a location problem, not a line problem; aim directly for Checkpoint 2 West, not the first checkpoint signage you see.
- Rideshare is not curbside; commit to the Red Garage bridge route and use Columns J/K as the “you’re on track” anchor before crossing into the Rental Car building.
- South Terminal transfers are landside only; go upstairs to the Departures curb between Doors 1–2 for the shuttle, and assume re-screening at the South Terminal (no airside connection).
2026 Austin Bergstrom International Airport Map + Printable PDF
Active construction and checkpoint availability can change the “default” route at Barbara Jordan Terminal in 2026, especially around the central security hall during peak mornings. Expect crowd spillback to reach the entry doors when queues surge, and plan your entry door choice around Checkpoint 2 West if you need PreCheck. Last-mile paths (rideshare via the Red Garage bridge, South Terminal shuttle upstairs) remain the highest-friction moves.
Austin Bergstrom International Airport Baggage Claim Map 2025
Austin Bergstrom International Airport Departures Map 2025
Austin Bergstrom International Airport Mezzanine Map 2025
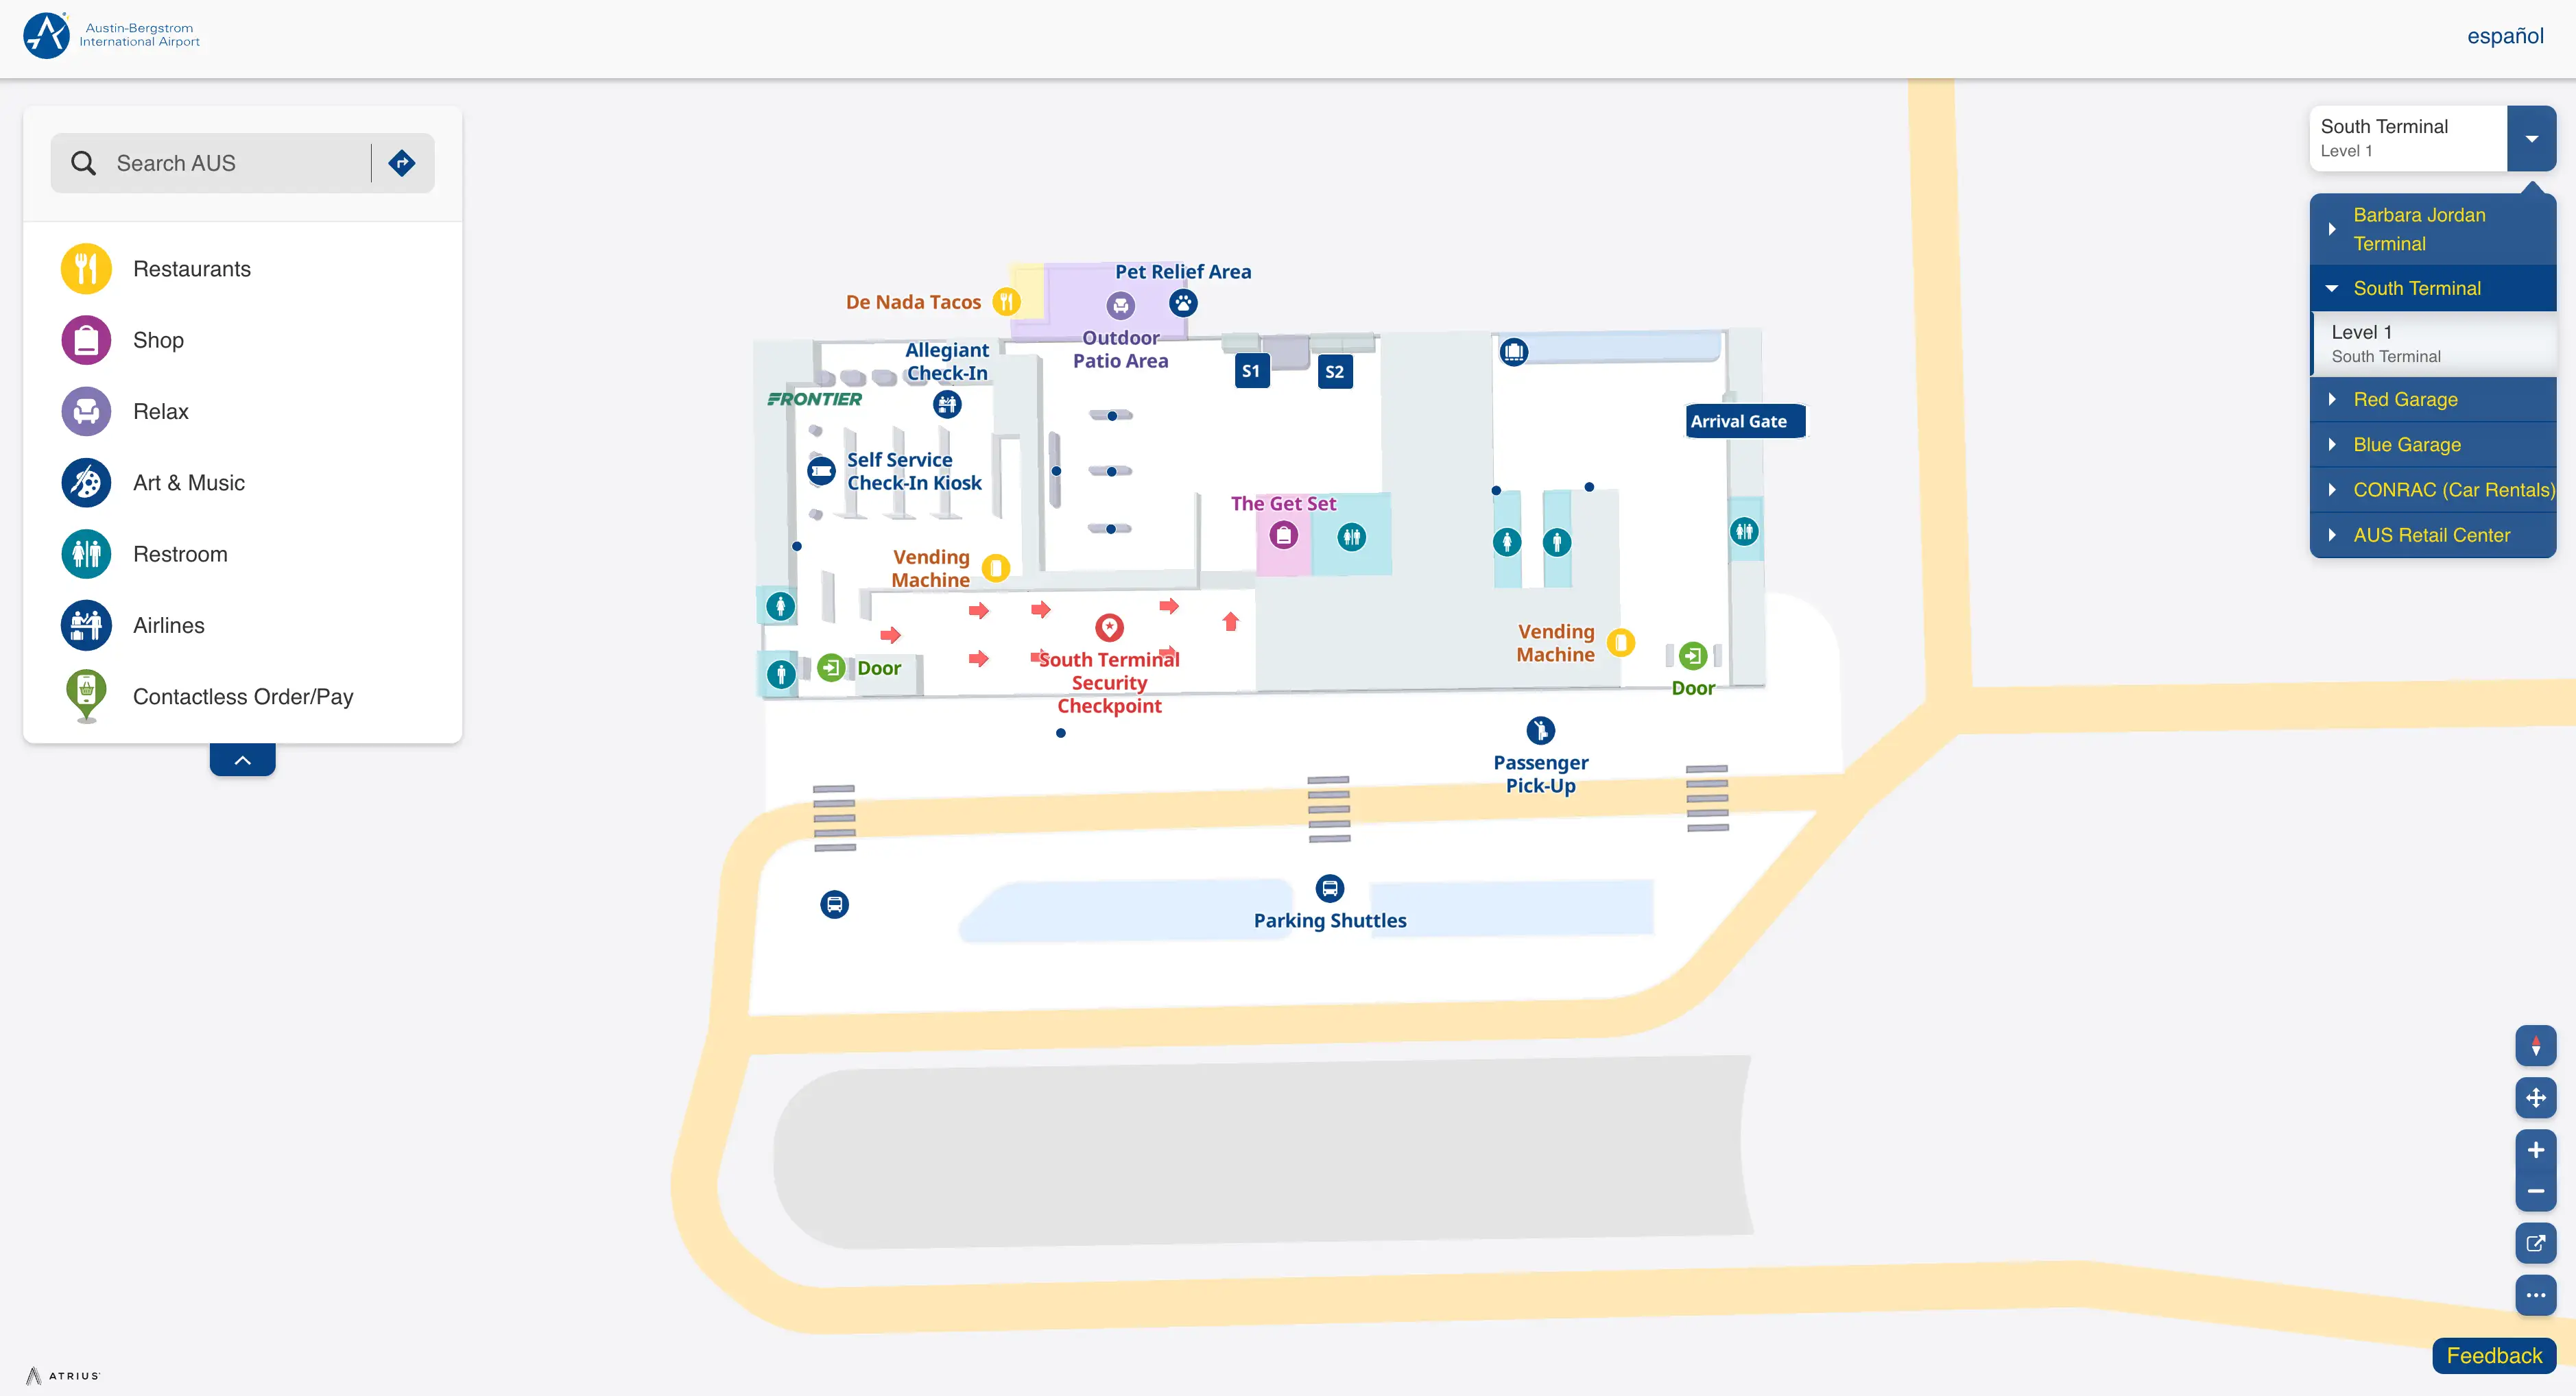
Austin Bergstrom International Airport South Terminal Level 1 Map 2025
2026 Austin Bergstrom International Airport Map Guide
What is the exact walking distance (in feet/meters) from the main terminal curbside drop-off doors to the primary TSA checkpoint entrance?
The walking distance is approximately 150–250 feet (45–75 meters) from the central Departures curb doors (typically Doors 2 or 3) to the main security entry at Checkpoint 2. This short span can still feel slow because the ticketing hall is shallow, so queues often spill back toward the doors during morning peaks.
| Start (anchor) | Path (indoor) | End (anchor) | Distance |
|---|---|---|---|
| Upper-level Departures curb, Doors 2–3 | straight into ticketing hall, central concourse line | TSA Checkpoint 2 entry | ~150–250 ft / 45–75 m |
Where is the TSA PreCheck lane physically located relative to the standard lanes at Austin-Bergstrom International Airport (same hall vs separate entry)?
The TSA PreCheck lane is in the same main ticketing hall, consolidated at Checkpoint 2 West rather than a separate security entry. Standard screening lanes are positioned at Checkpoint 2 East and at Checkpoint 1, so joining the first visible queue can put PreCheck passengers into the wrong line.
| Lane type | Physical location | Landmark anchor |
|---|---|---|
| TSA PreCheck | Checkpoint 2 West | west side of the central security area |
| Standard screening | Checkpoint 2 East | east side of the central security area |
| Standard screening | Checkpoint 1 | separate checkpoint node along the frontage |
What is the exact pedestrian route from baggage claim to the designated rideshare pickup lot, including every required crosswalk/bridge/underpass?
The route requires leaving the baggage claim doors, crossing the arrivals roadway, cutting through the Red Garage, then using the pedestrian bridge into the Consolidated Rental Car Facility where rideshare pickup is on the ground level. There is no curbside rideshare pickup at the terminal, so waiting outside baggage claim will put you in the wrong place.
Exit baggage claim through doors near Carousels 3–4, then use the marked crosswalk over the lower-level roadway into the Red Garage entrance. Go up to Level 2 in the Red Garage and follow signs toward the pedestrian bridge, using Columns J and K as the “on-route” landmark. Cross the bridge into the Consolidated Rental Car Facility, then take the elevator or stairs down to Level G for “Ride App Pickup” loading zones.
What is the nearest signed landmark (door number / column / zone name) that anchors the rideshare pickup geofence so passengers stand in the “correct” GPS zone?
The best geofence anchor is the “Ride App Pickup” area on the Ground Level (Level G) of the Consolidated Rental Car Facility, where the numbered loading zones align with driver GPS. The most reliable intermediate landmark on the walk is the Red Garage grid near Columns J and K, which confirms you’re on the correct bridge path before you enter the rental car building.
Use baggage claim doors near Carousels 3–4 to start, cross into the Red Garage, and head to Level 2 for the pedestrian bridge. As you walk through the garage, look specifically for Columns J and K, then continue across into the rental car facility. Once you descend to Level G, stand at the exact numbered stall or zone shown in your Uber/Lyft instructions so the app places you inside the pickup geofence.
What is the shortest marked walking route from the Red/Blue garage area to the terminal ticketing level, and what is its measured distance?
The shortest marked route uses the pedestrian bridges from the garage structures directly into the ticketing (Departures) level. Red Garage is the quickest because its Level 3 bridge drops you straight onto the upper terminal frontage, while Blue Garage typically requires a longer traverse via Red Garage or the connecting pedestrian path.
| Parking origin | Marked route to ticketing | Measured distance |
|---|---|---|
| Red Garage | Level 3 pedestrian bridge into upper terminal (ticketing) | ~300–500 ft (2–3 min) |
| Blue Garage | walk toward/through Red Garage, then use Level 3 bridge | longer; ~5–10 min walk |
Where is the economy parking shuttle stop located on the terminal curb, and what is the walk distance from baggage claim exits to that stop?
The economy parking shuttle stop is on the Lower Level (Arrivals) curb outside the baggage claim doors. Walking distance is roughly 100–200 feet depending on which baggage claim exit you use and where the shuttle is staged along the curb.
Most travelers do best by exiting baggage claim near the center doors, then turning along the curb until you see the posted “Economy Parking Shuttle” stop signage. If you exit far to one end of the hall, the walk is longer, but still typically under a minute. The main risk isn’t the walk—it’s shuttle frequency variability, which can stretch waits into the 15–20 minute range at peak times.
Where is the South Terminal shuttle boarding point at the main terminal, and what is the walking distance from baggage claim to that boarding point?
The South Terminal shuttle boards on the Upper Level (Departures) curb between Door 1 and Door 2 near the west end of the main terminal. This is a dealbreaker for arrivals because waiting on the Lower Level curb will put you in the wrong place.
From the center of the baggage claim hall, go to the nearest escalator/elevator bank and ride up one level to ticketing. Turn and walk west along the upper curb frontage toward Doors 1–2 until you reach the large “South Terminal” stop sign. The total walk is about 600–800 feet (roughly 180–245 meters), with the vertical ride accounting for part of the time cost.
What is the exact roadway route the South Terminal shuttle takes between terminals, and where are the in-route delay pinch points (intersections/merge points) visible on a map?
The South Terminal shuttle uses public roads, not an airside connection, so traffic delays apply like any normal city drive. The core risk is the TX-71 and US-183 interchange, where commuter flow can stall the shuttle during rush windows.
| Segment | Roadway move | Delay pinch point (map-visible) |
|---|---|---|
| Main Terminal (Departures curb) | exit via Presidential Boulevard | terminal loop congestion at curb exits |
| Airport exit | merge to Texas 71 East | merge friction leaving airport property |
| Major interchange | connect to U.S. 183 South | TX-71 ↔ US-183 interchange backups |
| Surface-road approach | left onto Burleson Road | two-lane congestion (freight/incident sensitivity) |
| Final approach | left onto Emma Browning Avenue | terminal access queueing near entrance |
Which baggage claim carousels serve the highest-volume carriers (e.g., Southwest) and where are those carousels positioned relative to the main exit doors?
Southwest typically uses Carousels 1, 2, and 3, clustered toward the east end of the baggage claim hall. Relative to the main curbside exit doors, that means Southwest arrivals generally bias left/east once they come down into baggage claim, instead of walking across the full hall.
If your flight is Southwest and you exit baggage claim from a central door, staying near the east-side carousel cluster reduces cross-traffic with other carriers that load farther west (often Carousels 5–7). When carousels get reassigned during heavy arrival banks, the quickest way to avoid “wrong-way” walking is to hold position near the Southwest service-office area adjacent to the east cluster until the display confirms the final carousel number.
Where is the information display / announcement focal point nearest the Southwest carousel cluster (the spot passengers should stand to see reassignment notices)?
The focal point is the Flight Information Display System bank positioned directly above/between Carousels 2 and 3 in the east baggage claim cluster. Standing there keeps you in the best sightline for reassignment notices while staying close to the Southwest baggage service area along the back wall.
If you’re meeting someone or waiting on delayed bags, anchor yourself between Carousels 2 and 3 rather than at the curbside doors. That spot reduces “missed update” risk because the screens are overhead and visible without weaving through crowds around Carousel 1’s edge. When a carousel flips, you can move a short distance east or west without committing to a full-hall walk.
What is the measured end-to-end walking distance from the Delta end of the terminal to the central food/seating core (the crowding zone), following the actual concourse path?
The walking distance is approximately 800–1,000 feet (about 245–305 meters) from the Delta end of the concourse (typically Gates 1–12 area) to the central food/seating core near Gate 19. This is the main “mixing bowl” where dining lines, seating, and boarding queues compress the usable corridor width.
Follow the concourse spine from the east-side Delta gate area toward the center until you reach the Gate 19 zone (often identified by the stage/music area and the densest cluster of eateries). During peak departures, the same distance can take twice as long because the effective walking lane narrows around restaurant queues and gate lineups. If you’re trying to move through fast, stay to the outer edge of the concourse and pass the food core before stopping to regroup.
From the furthest common gates (end of concourse), what is the walking distance to baggage claim using the shortest indoor route?
The walking distance is approximately 1,500–1,800 feet (450–550 meters) from the furthest common gates to baggage claim using the shortest indoor route. This typically translates to a 7–10 minute walk, depending on crowding and how quickly you can access the main escalators down to the arrivals level.
From the far gate area, stay on the main concourse spine toward the central core, then continue to the main exit from the secure area. After you pass the last checkpoint/exit control, take the first major escalator or elevator bank down to the baggage claim level and walk straight to your assigned carousel. Moving walkways can reduce effort on the long spine, but they don’t meaningfully reduce total distance because you still have to enter/exit them and merge through the central food-crowd zone.