Albany International Airport Map (Most Up-To-Date)
Albany International Airport is a compact, two-level main terminal with a central atrium feeding three concourses in a T/Pi shape, but 2026 construction reshapes the “normal” flow across the Capital Region air hub. With the pedestrian bridge inside the garage complex closed, most garage, shuttle, and curb movements now funnel through Level 1 (Baggage Claim) and then back up to Level 2 (Ticketing/TSA). Expect crosswalk staging, blocked vestibules, and lane shifts to drive the real map.
Map Table
| Terminal Layout | Curbside Lanes | Security Flow | Concourse Reach |
|---|---|---|---|
| 2 levels, central atrium | Lanes 1–2 passenger, 3–4 through, 5–6 commercial island | Level 2 platform, overflow to Level 1 escalators | Farthest gate A6 |
Albany International Airport Map Strategy
- Treat Level 1 as the default entry/exit node: garage, shuttle, and even TSA overflow can all funnel into Baggage Claim before you go upstairs.
- Stage pickups like a synchronization: aim for the crosswalk/commercial island area first, then call the car in from the Cell Phone Lot.
- Use the fixed landmark anchor: the Information Desk opposite Carousel #2, then navigate by the nearest open vestibule and the central escalator/elevator bank.
- Run a worst-case mental model: assume one baggage-claim exit is blocked, the TSA line starts downstairs, and the active curb is separated by a “moat” of through-traffic lanes.
2026 Albany International Airport Map + Printable PDF
Active terminal operations continue through 2026 while the Main Terminal Expansion and facade/“bowtie” work compresses curb length, shifts exits, and relocates the practical choke points. The most important live change is the closed parking-garage pedestrian bridge, which forces garage-to-terminal access onto Level 1 crosswalks and pushes many departures into the Baggage Claim level before going back upstairs.
Albany International Airport Level 1 Map 2026
Albany International Airport Level 2 Map 2026
Albany International Airport Level 3 Map 2026
Archive Albany International Airport Map
Below are all historical map versions for Albany International Airport. Each year includes the official map available for that period, presented as both WebP and PDF.
2019 Albany International Airport Map
2026 Albany International Airport MAP Guide
What is the exact pedestrian route (doors + turns) from baggage claim to the active passenger pickup curb during construction?
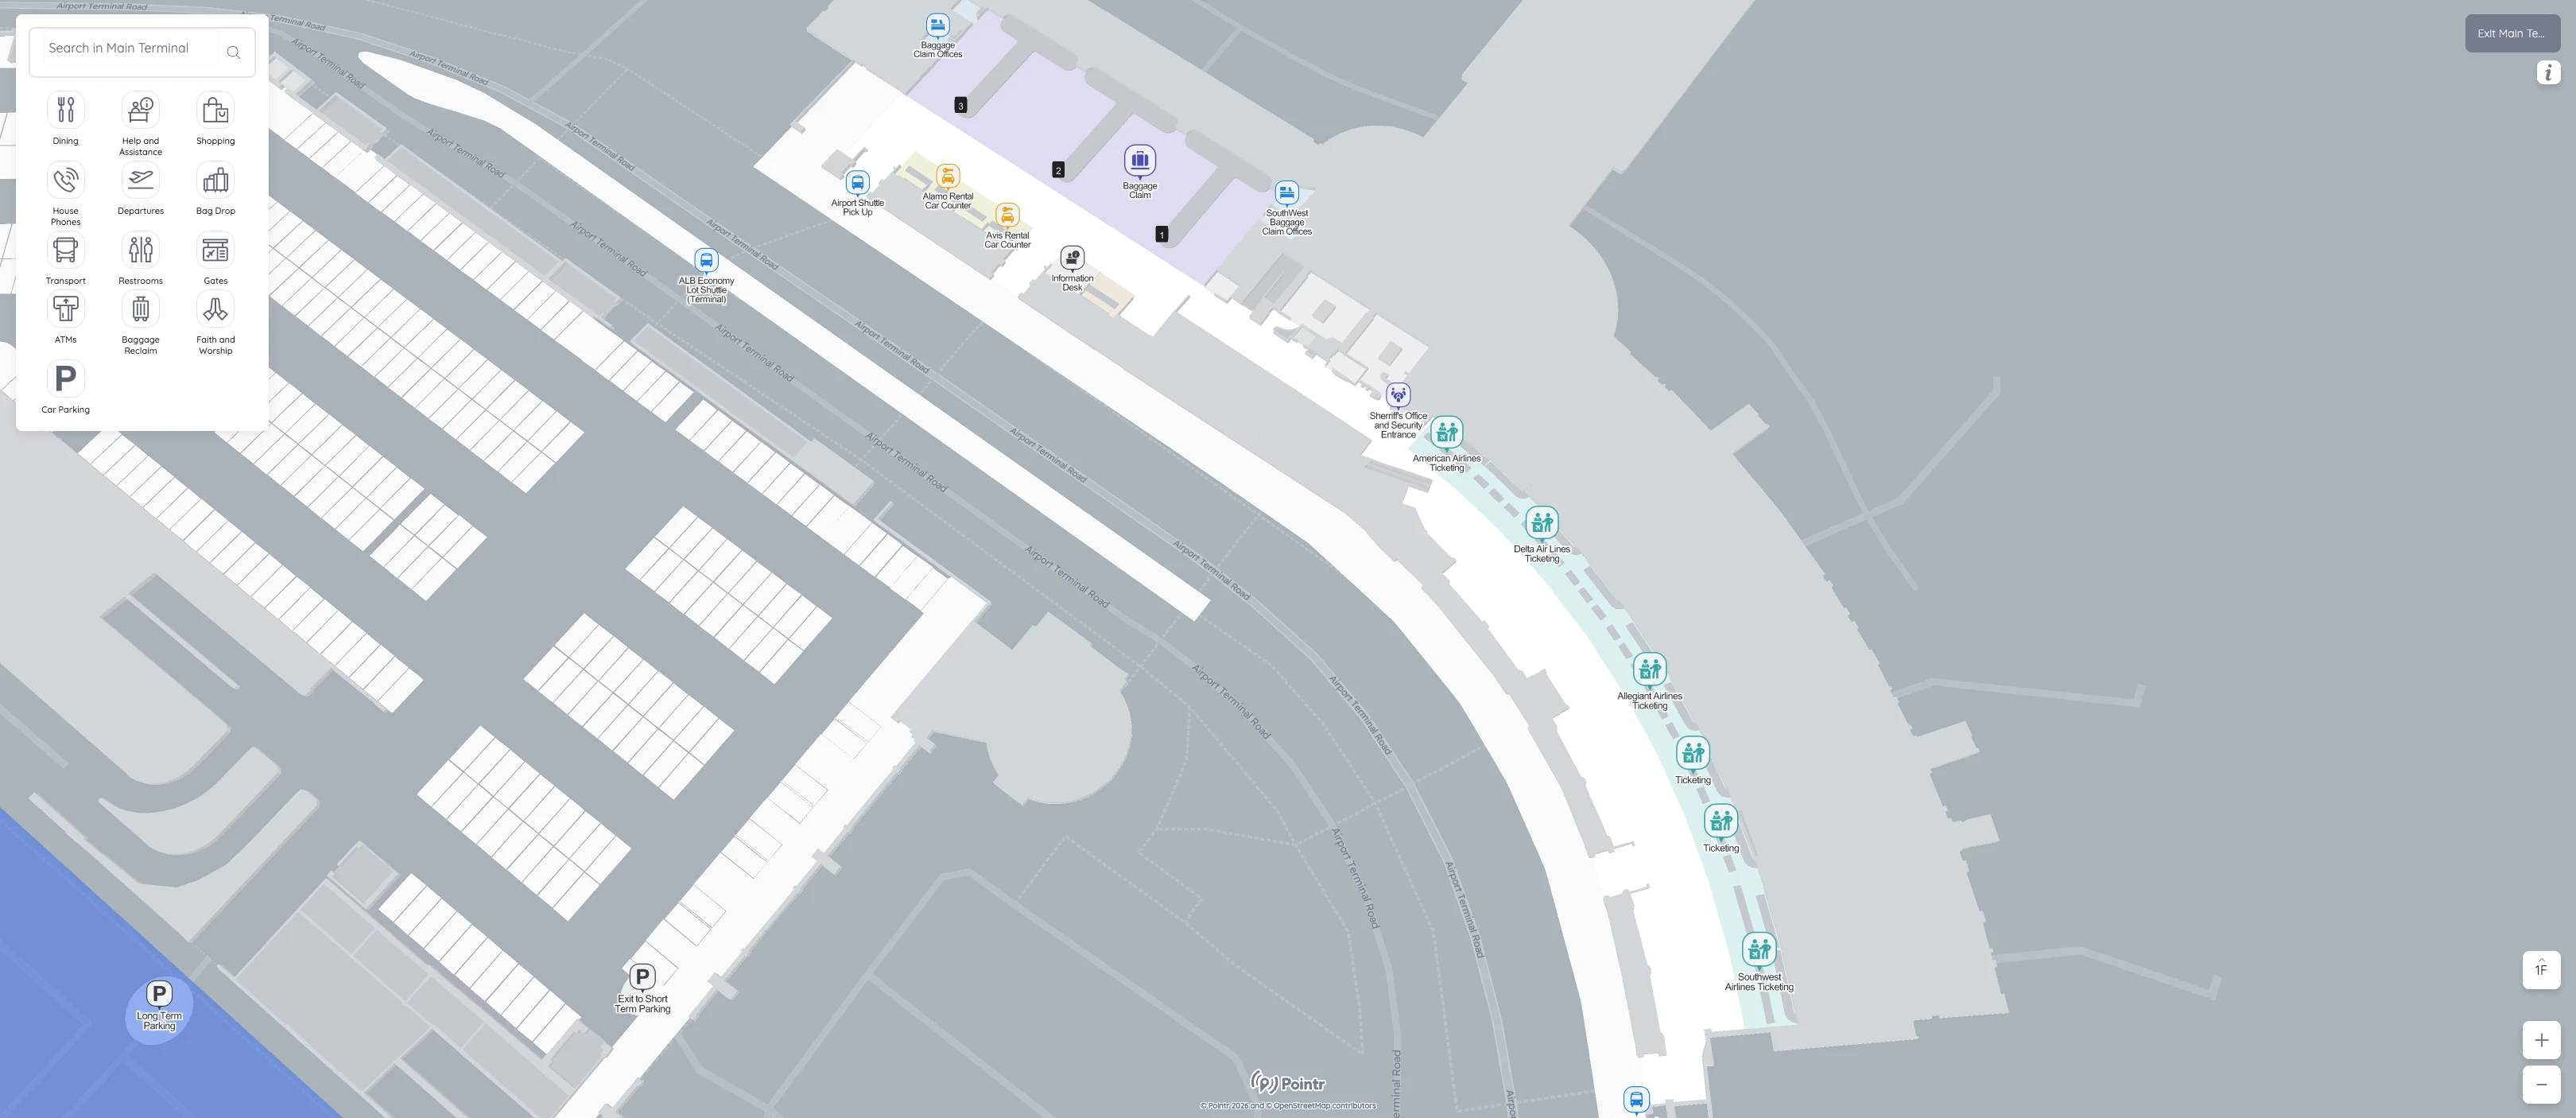
Private-vehicle pickup works best as a staged walk to the central baggage-claim vestibules by the Information Desk across from Carousel #2, then a short move to the active crosswalk that reaches the commercial island lanes. Construction regularly breaks the “nearest door = correct curb” assumption, so using the Carousel #2/Info Desk landmark reduces wrong-exit errors.
Exit Baggage Claim through the central doors nearest the Information Desk opposite Carousel #2, then turn toward the marked crosswalk serving the active pickup flow. Cross the through-traffic lanes to the commercial island (the outer lanes used by shuttles/limos) and stage on that island so the driver can roll up without idling at the inner curb. If the central vestibule is closed, walk to the next open east- or west-end baggage-claim exit, then backtrack outside to the same signed crosswalk rather than trying to load at a barricaded inner curb.
Which specific curb lane is the correct passenger pickup lane, and where does it physically dead-end/merge near the construction wall?
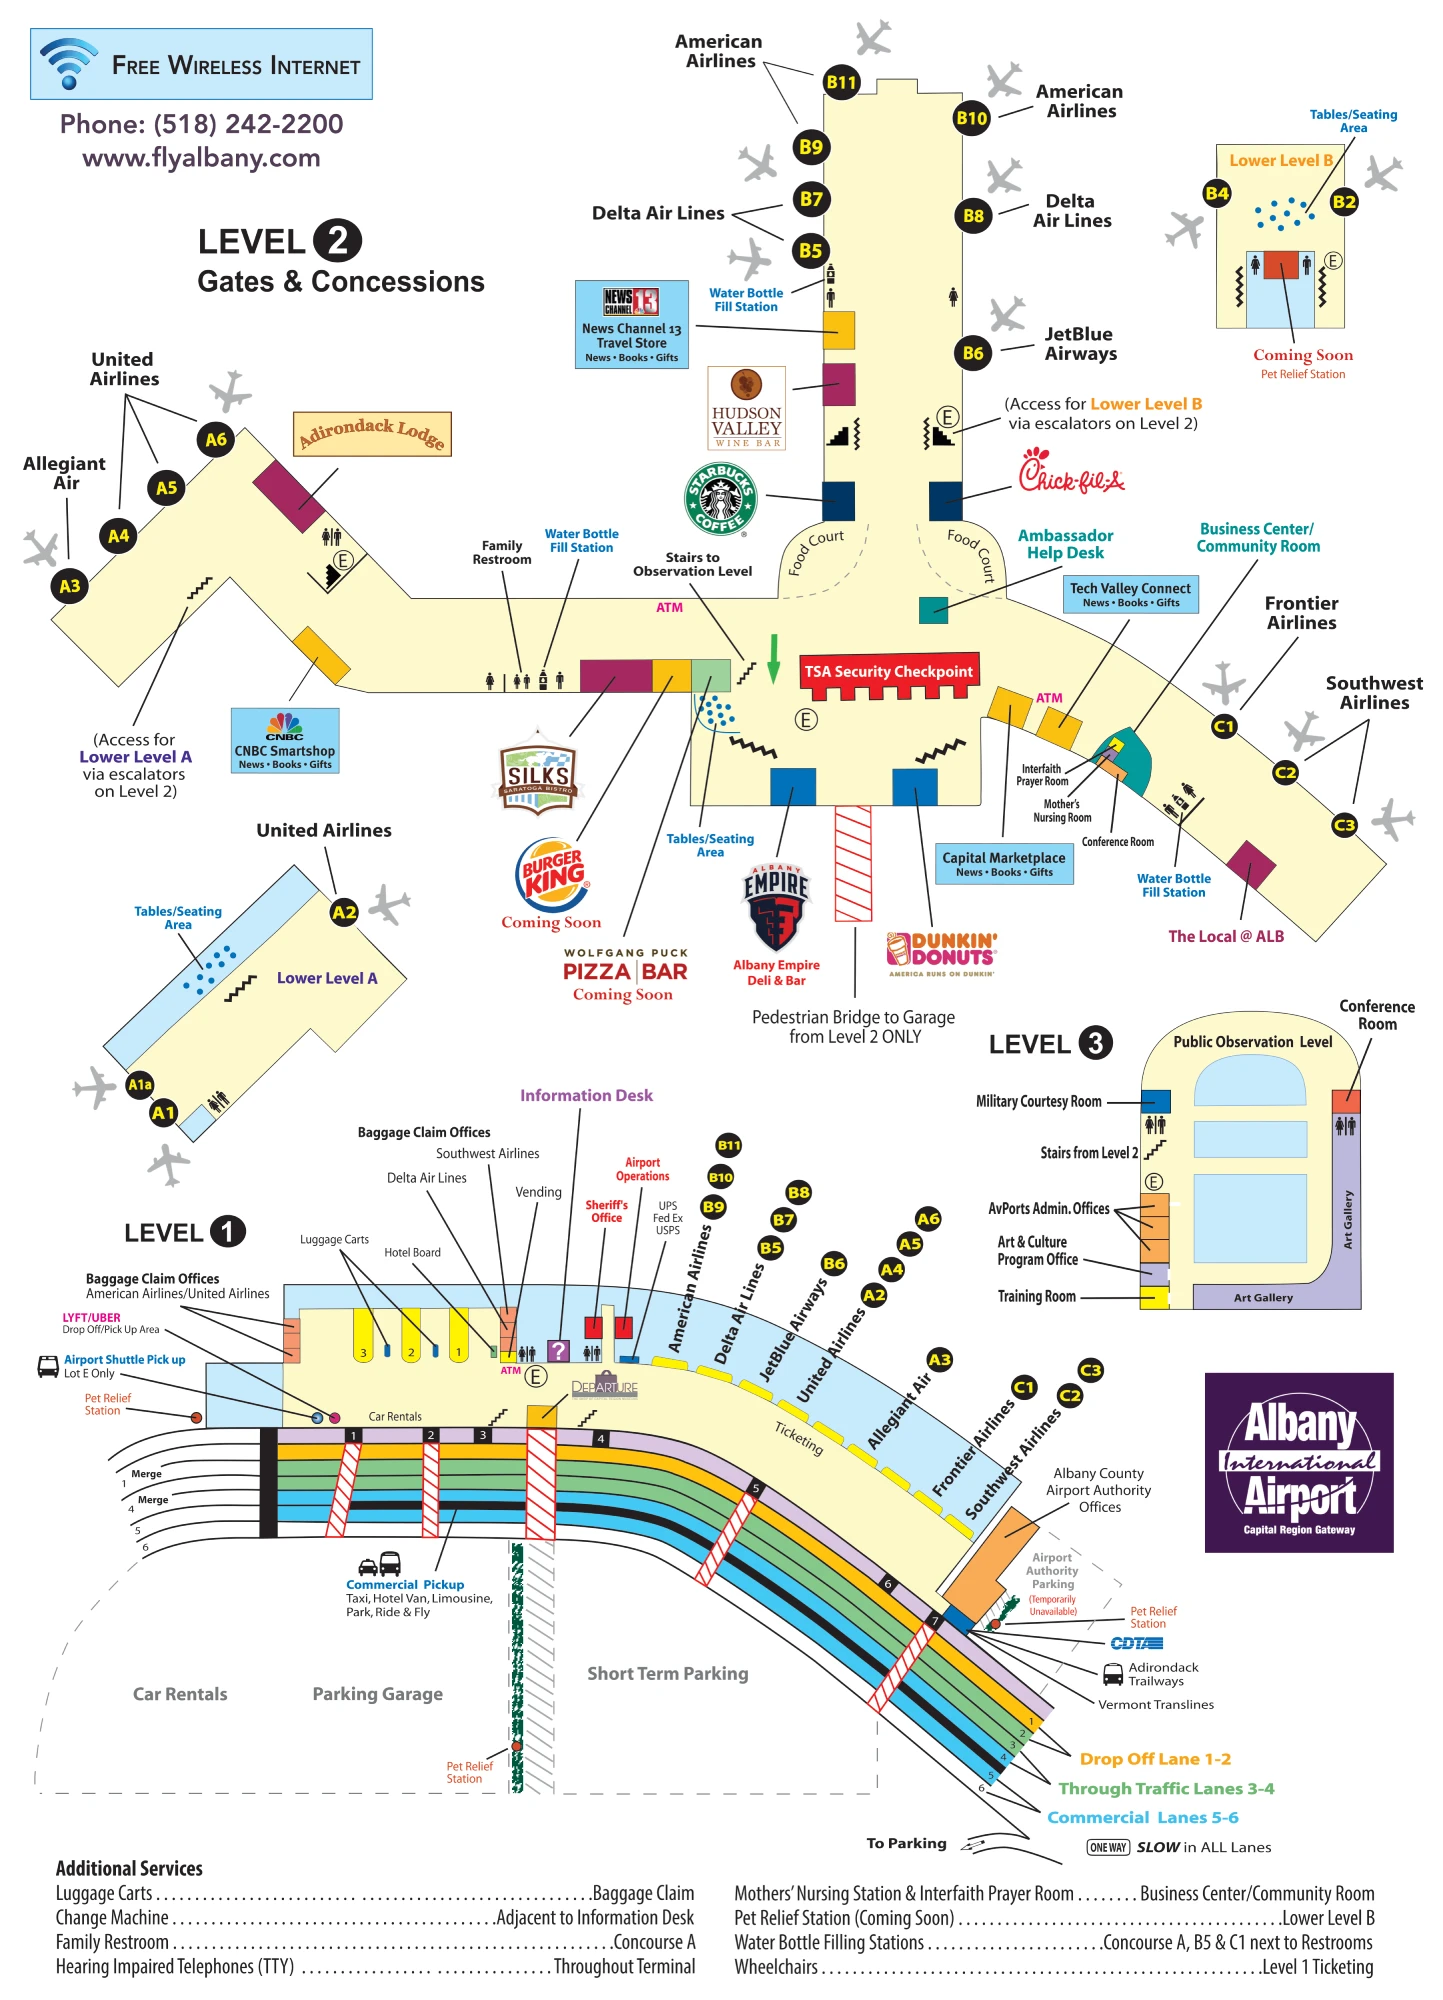
Passenger pickup is intended for the inner curb lanes closest to the terminal (Lanes 1–2), while Lanes 3–4 function as through-traffic and the outer island (Lanes 5–6) serves commercial vehicles. Construction can convert “pickup” into a no-idling zone, forcing a practical pickup shift to the commercial island or short-term/garage periphery.
| Segment | What it is | What goes wrong near construction |
|---|---|---|
| Lanes 1–2 (inner curb) | Passenger loading zone | Barricades and active-work closures shorten usable curb, creating last-second merges and “keep moving” enforcement |
| Lanes 3–4 (middle) | Through-traffic only | Stopping behaves like a dead-end because it blocks the only escape flow around stalled curb activity |
| Lanes 5–6 (outer island) | Commercial/shuttle lane | Easy to confuse with the adjacent garage intake; drifting the wrong way can funnel a driver into the garage diversion loop |
| Garage intake near canopy | Diversion trap/merge | Under diversion, barriers channel terminal-front traffic into the North Garage entrance with no curbside escape until exiting the west-side toll/exit lanes |
Where is the true start point of the non-PreCheck TSA line (exact location/landmark), especially when it backs up toward baggage claim?
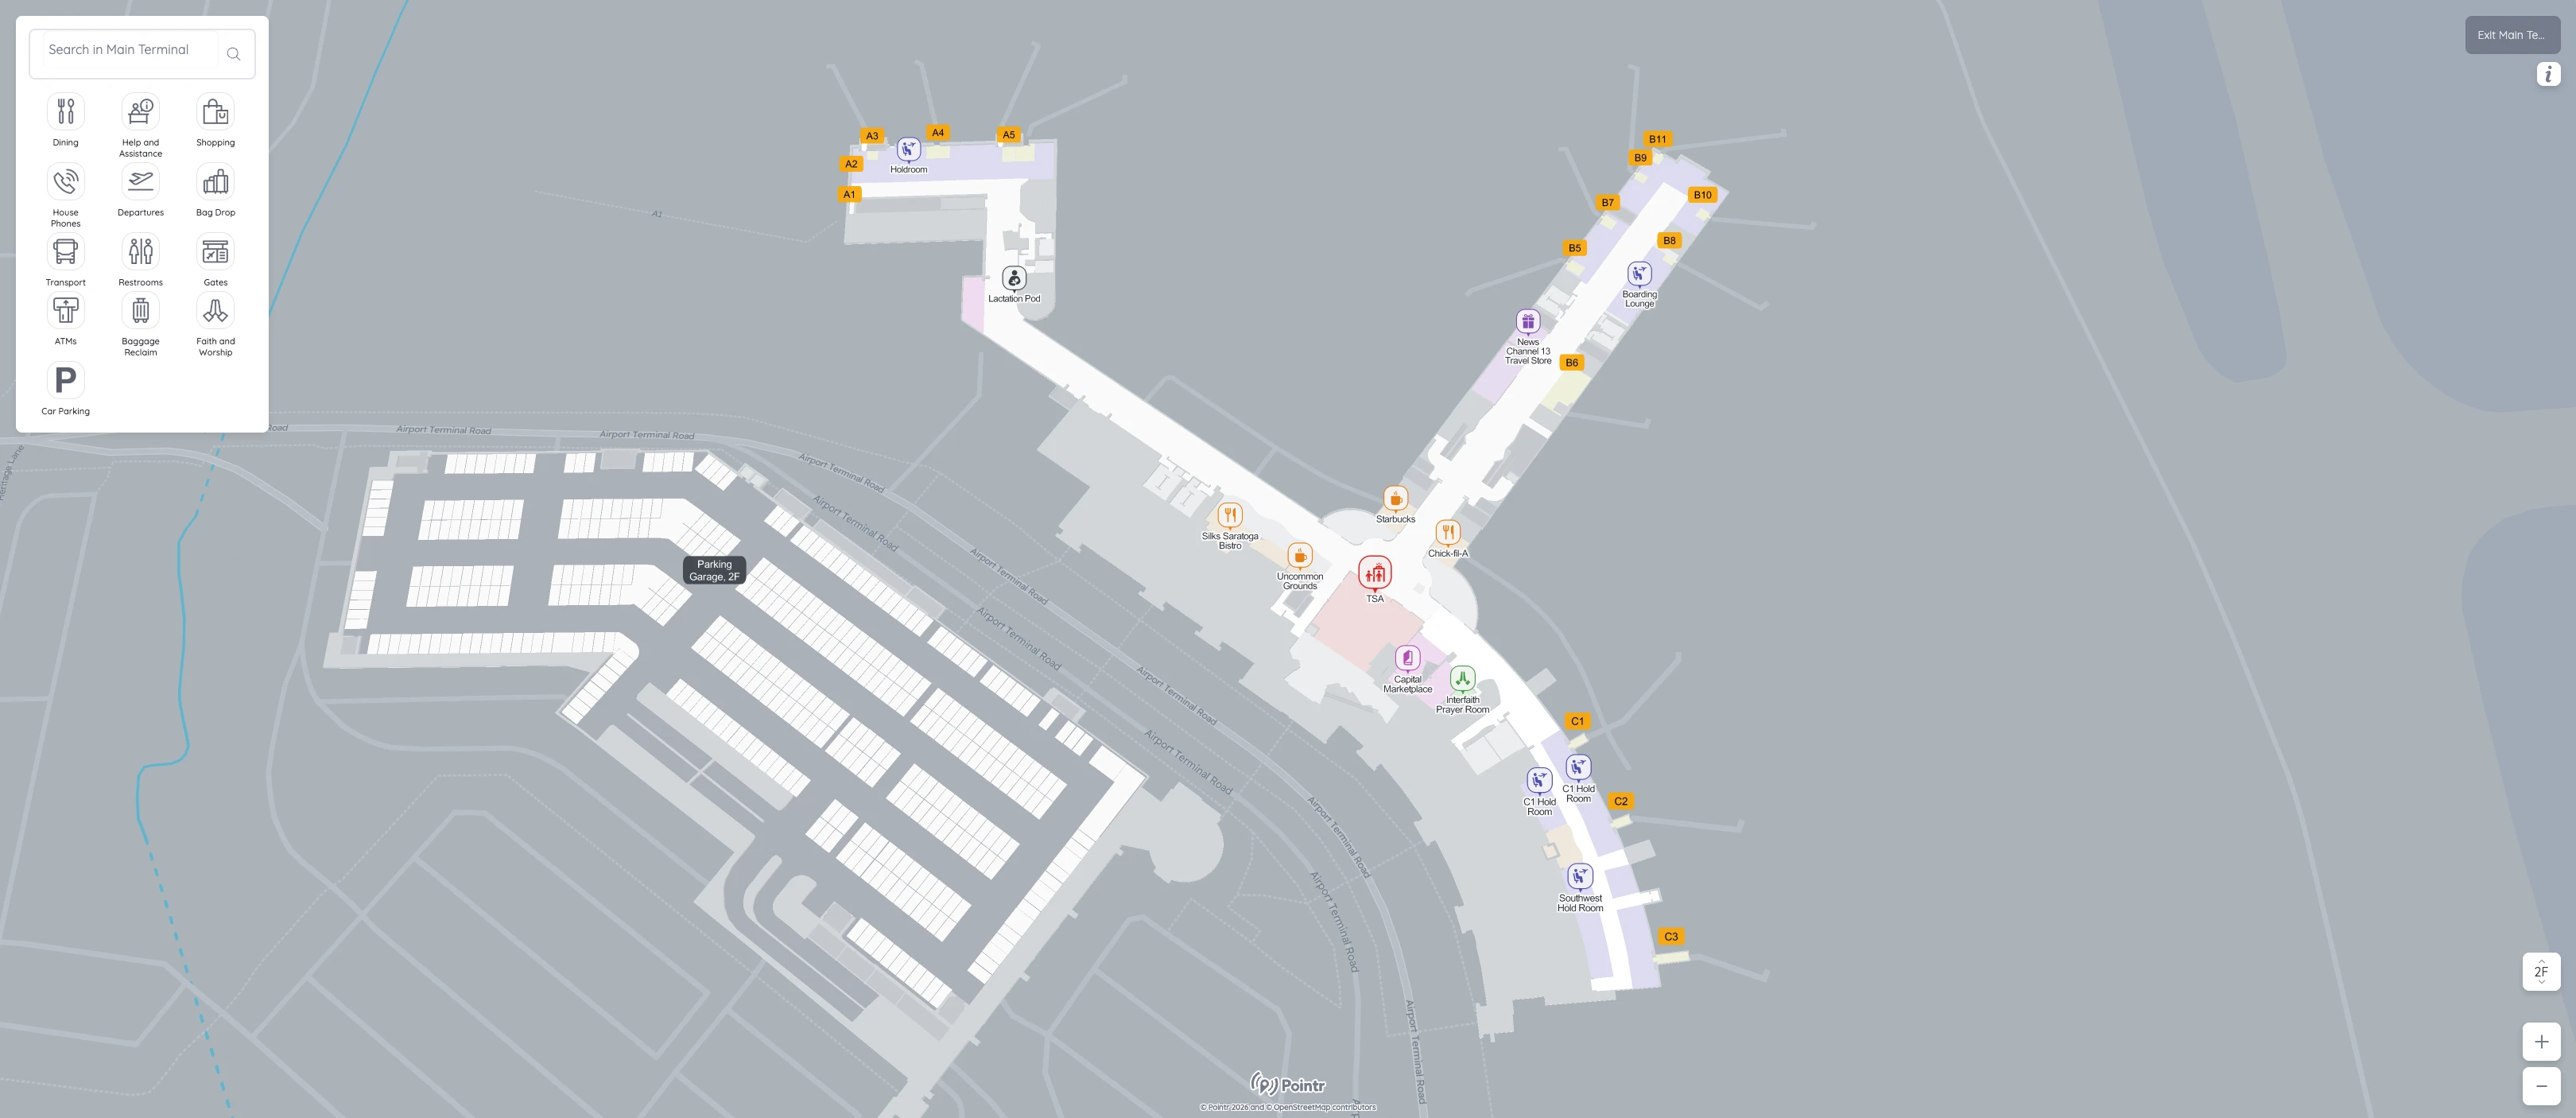
The true start of the non-PreCheck TSA line is the entrance to the Level 2 queuing platform, but when that platform fills, the line’s start shifts downstairs to Level 1 at the base of the central escalators. That Level 1 escalator base becomes the effective “end of the line” when the queue backs toward Baggage Claim.
Under normal flow, go to Level 2 and look for the purpose-built queuing platform in the central atrium near ticketing, close to the (currently closed) bridge-side area. Under peak flow, ignore the temptation to go upstairs first: stand on Level 1 in Baggage Claim and sightline the central escalator/stair bank—if you see stationary people queued at the escalator base, that is the real line start. The closest consistent landmark for orienting before you join the queue is the Information Desk opposite Carousel #2, then move toward the central escalators.
What is the walking distance (in feet/meters) from the end of the TSA queue area to the main security screening position (to gauge queue compression)?
Walking distance ranges from about 50–100 feet (15–30 m) when the line starts on the Level 2 queuing platform to 500+ feet (150+ m) when the queue spills down to Level 1 at the base of the central escalators. The Level 1 spillover is the distance threshold that signals heavy compression and long standing time.
| Queue end scenario | End-of-line landmark | Distance to screening |
|---|---|---|
| Platform start (Level 2) | Entrance to the Level 2 queuing platform | ~50–100 ft (15–30 m) |
| Atrium overflow (Level 2) | Wrapped line in Level 2 atrium near ticketing | ~200–300 ft (60–90 m) |
| Spillover (Level 1) | Base of the central escalators in/near Baggage Claim | ~500+ ft (150+ m), plus vertical ascent |
From the South Garage, what is the shortest indoor path to the ticketing level/security, including which elevator/escalator bank to use?
There is no true indoor path from the South Garage to ticketing/security during the bridge closure, so the shortest route is an outdoor crosswalk entry on Level 1 followed by the central terminal vertical-transport bank up to Level 2. The indoor-only expectation is the dealbreaker in the current construction phase.
Walk from the South Garage down to Ground/Level 1, then head toward the North Garage side and exit to the signed pedestrian crosswalk leading to the terminal frontage. Enter the terminal through the Level 1 baggage-claim vestibules, orient using the Information Desk across from Carousel #2, then walk to the central escalator/elevator bank in the middle of the building and go up to Level 2 for ticketing and the TSA queuing platform. If you have multiple bags or a cart, favor the elevators in that same central bank rather than hunting for a side escalator that may route you into closed frontage zones.
From the Economy Lot shuttle drop-off, what is the exact entry door and the fastest indoor route to ticketing/security?
The most reliable construction-era path starts from a Level 1 commercial-island shuttle drop, crosses at the signed crosswalk, and enters through the central baggage-claim vestibules, then uses the central escalator/elevator bank to reach Level 2 ticketing/security. Shuttle drop levels can vary, but Level 1 is the safe assumption when congestion restricts departures curb access.
After you exit the Economy Lot shuttle on the commercial island (outer lanes), walk to the nearest marked crosswalk and cross the through-traffic lanes toward the terminal. Enter via the central Level 1 baggage-claim doors closest to the Information Desk opposite Carousel #2, then continue straight toward the building’s central escalator/elevator bank and ride up to Level 2. From the top of the bank, the TSA queuing platform entrance is in the Level 2 atrium area near ticketing; if you see the general line starting downstairs, join at the Level 1 escalator base instead of going up and back down.
Where are the rental car counters relative to the baggage carousels, and what is the shortest walking route from Carousel #2 to the counters?
The rental car counters are inside the Level 1 Baggage Claim hall within immediate sight of Carousel #2, clustered along the wall near the Information Desk area. Walking from Carousel #2 to the counters is typically under 50 feet (about 15 m), so it’s a straight, no-detour move rather than a “rental center” transfer.
Stand at Carousel #2, then turn away from the belt toward the open hall; the Information Desk is directly across from Carousel #2 and acts as your visual anchor. Walk toward that Information Desk side of the hall and continue along the same wall line to the counter cluster (Avis/Budget/Enterprise/Hertz/National depending on the day’s staffing). If crowds bunch at a closed vestibule, stay inside the hall—do not exit—because the counters remain on the baggage-claim interior wall, not outside on the curb.
From the rental car counters, what is the exact path into the parking garage to reach the rental car fleet (which doorway/connector)?
The rental car fleet is reached by exiting through the doors immediately adjacent to the rental car counters in the Level 1 Baggage Claim hall, then using the same main pedestrian crosswalk into the North Parking Garage ground level. The walk is short—about 60 feet (roughly 20 yards / 18 m)—but it is an outdoor, traffic-exposed crossing.
From the counter line, face the terminal frontage and walk to the nearest exterior doors beside the counter area rather than the far-end baggage exits. Step outside to the curb edge, then follow the marked pedestrian crossing that leads directly across the traffic lanes to the North Garage entrance area on the opposite side. Once you reach the garage side, continue straight into the ground-level rental staging area (lower levels/ground floor) where the agency rows are parked; if a crosswalk is temporarily blocked, use the next signed crosswalk rather than cutting between lanes.
What is the walking time and distance from the main checkpoint exit to the farthest gate in use (worst-case sprint scenario)?
The farthest walk from the main TSA checkpoint exit is to the end of Concourse A near Gate A6 at roughly 800–1,000 feet (about 240–305 m), which is about 3–5 minutes at a brisk pace. Construction walls can narrow the corridor and push that to the high end of the range, but it remains a short “sprint” compared to security delays.
After clearing TSA into the central atrium, turn toward Concourse A signage and stay on the main concourse spine as it extends away from the atrium. Continue past the mid-concourse pinch points created by construction partitions, then follow the corridor to the last active A-gates area. If your boarding pass shows A5/A6 during active work, keep your stride steady through any temporary “tunnel” sections rather than stopping to re-check signs—ALB’s concourses do not branch repeatedly, so the farthest-gate risk is distance, not complex turns.
Which exit door(s) at baggage claim are blocked/closed, and where is the nearest alternative exit that still connects cleanly to pickup?
Specific baggage-claim vestibules can be intermittently closed during facade and “bowtie” work, with the central vestibules most often affected near the former bridge-side frontage. When you hit a locked or walled-off vestibule, the nearest clean alternative is typically the next open exit to the east or west end of the same Level 1 baggage-claim hall, then an outside walk back to the signed crosswalk that serves the active pickup flow.
Use the Information Desk opposite Carousel #2 as the decision point: if the central doors nearby show orange/black construction closure signage or are physically blocked, stay inside and walk along the baggage-claim hall to the first clearly open vestibule at either flank. Exit there, then immediately orient toward the same marked crosswalk used for the commercial island/garage crossing rather than trying to load at the first curb edge you see. Avoid any door marked “Emergency Exit Only” even if it looks convenient, because it is alarmed and does not function as a normal pickup connector.
Where is the Information Center in relation to baggage claim Carousel #2, and what’s the shortest path from arrivals to it?
The Information Center is directly across from Carousel #2 in the Level 1 Baggage Claim hall, positioned as a front-and-center arrivals landmark. The shortest path from arrivals is a straight walk into Baggage Claim and a 180-degree turn off the Carousel #2 belt line.
From the corridor into Baggage Claim, walk toward the middle of the hall where Carousel #2 sits. If you are standing at Carousel #2 facing the belt, turn around to face the open hall; the Information Desk should be in your direct line of sight on the opposite side of the hall, near the temporary Dunkin’ kiosk area. If crowds are bunching near a closed exit vestibule, step closer to Carousel #2 first, then use the open space across from the belt to cut directly to the desk without threading through the curbside-door bottleneck.
What is the exact curbside location (zone/side/door reference) for rideshare pickup, and what is the shortest indoor route from baggage claim to that point?
Rideshare pickup is not at the main terminal curb lanes; it is in the designated app-based pickup area in the surface lot adjacent to the terminal near Lot 2, referenced by services as “by the museum.” The shortest indoor route begins in Level 1 Baggage Claim, then exits through an open vestibule and follows “App-Based Rideshare/TNC” signs across the traffic lanes toward that surface-lot pickup zone.
Start at the Information Desk opposite Carousel #2, then walk to the nearest open Level 1 baggage-claim exit that has wayfinding for rideshare/TNC pickup rather than “Passenger Pickup” at the inner curb. After exiting, do not stop at the first curb edge; continue toward the signed crosswalk and cross to the outer side past the commercial island lanes, then walk along the frontage toward the surface lot pickup area near Lot 2. If your app pin looks wrong, anchor your meeting spot by referencing “Lot 2 / museum” in messages and stand at the posted rideshare signage rather than under the main canopy.