Oslo Gardermoen Airport Map (Most Up-To-Date)
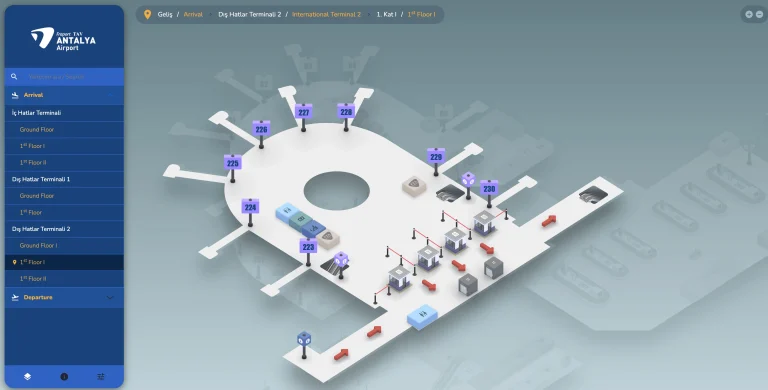
Oslo Gardermoen is a single-building airport laid out as a central hub with four long piers radiating outward (West A, South B/G, North C/D, East E/F). The footprint is large—about 265,000 m²—so “close on the map” can still mean a long walk. The biggest navigational truth is that Oslo operates like multiple sealed zones within Norway’s main Oslo airport hub: Domestic, Schengen, and Non-Schengen.
Map Table
| Terminal | Key Airlines | Primary Function | Transfer Mode |
|---|---|---|---|
| Single terminal, 4 piers | SAS, Norwegian, Widerøe | Domestic + Schengen + Non-Schengen | D2 Domestic Transfer filter |
| East Pier E/F | Emirates, SAS, Norwegian | Schengen E / Non-Schengen F | Passport Control barrier |
| South Pier B/G | SAS, Norwegian | Remote stands, swing use | Shuttle bus via International Bus Lounge |
| North Pier C/D | SAS, Norwegian, Widerøe | Split-level hybrid | Level-segregated corridors |
Oslo Gardermoen Airport Terminal Map Strategy
- Treat Passport Control (E↔F boundary) as the primary failure point; plan your route so you reach it early, not after shopping, because the queue is the schedule killer.
- Use the D2 “Domestic Transfer / Transfer Innland” scan gates as your binary decision node; if you can’t pass, commit immediately to Arrivals → baggage reclaim → re-check → main security.
- Navigate by pier letters, not vibes: East Pier for E/F, North Pier for C/D split-level, West Pier for A; visual proximity between C and D does not equal a usable shortcut.
- For remote G/B anxiety, anchor on “Fiskeriet” and the International Bus Lounge; if your boarding pass says G1–G8, assume bus-first access and avoid walking toward the South Pier from the international zone.
2026 Oslo Gardermoen Airport Map + Printable PDF
Current terminal operations in 2026 still behave like a “single terminal with hard walls”: Domestic, Schengen, and Non-Schengen are separated by passport control and one-way transfer filters. The D2 “Domestic Transfer” node remains the make-or-break checkpoint for tight connections, and the South Pier’s G-gate usage continues to rely on the international bus lounge by Fiskeriet for airside access.
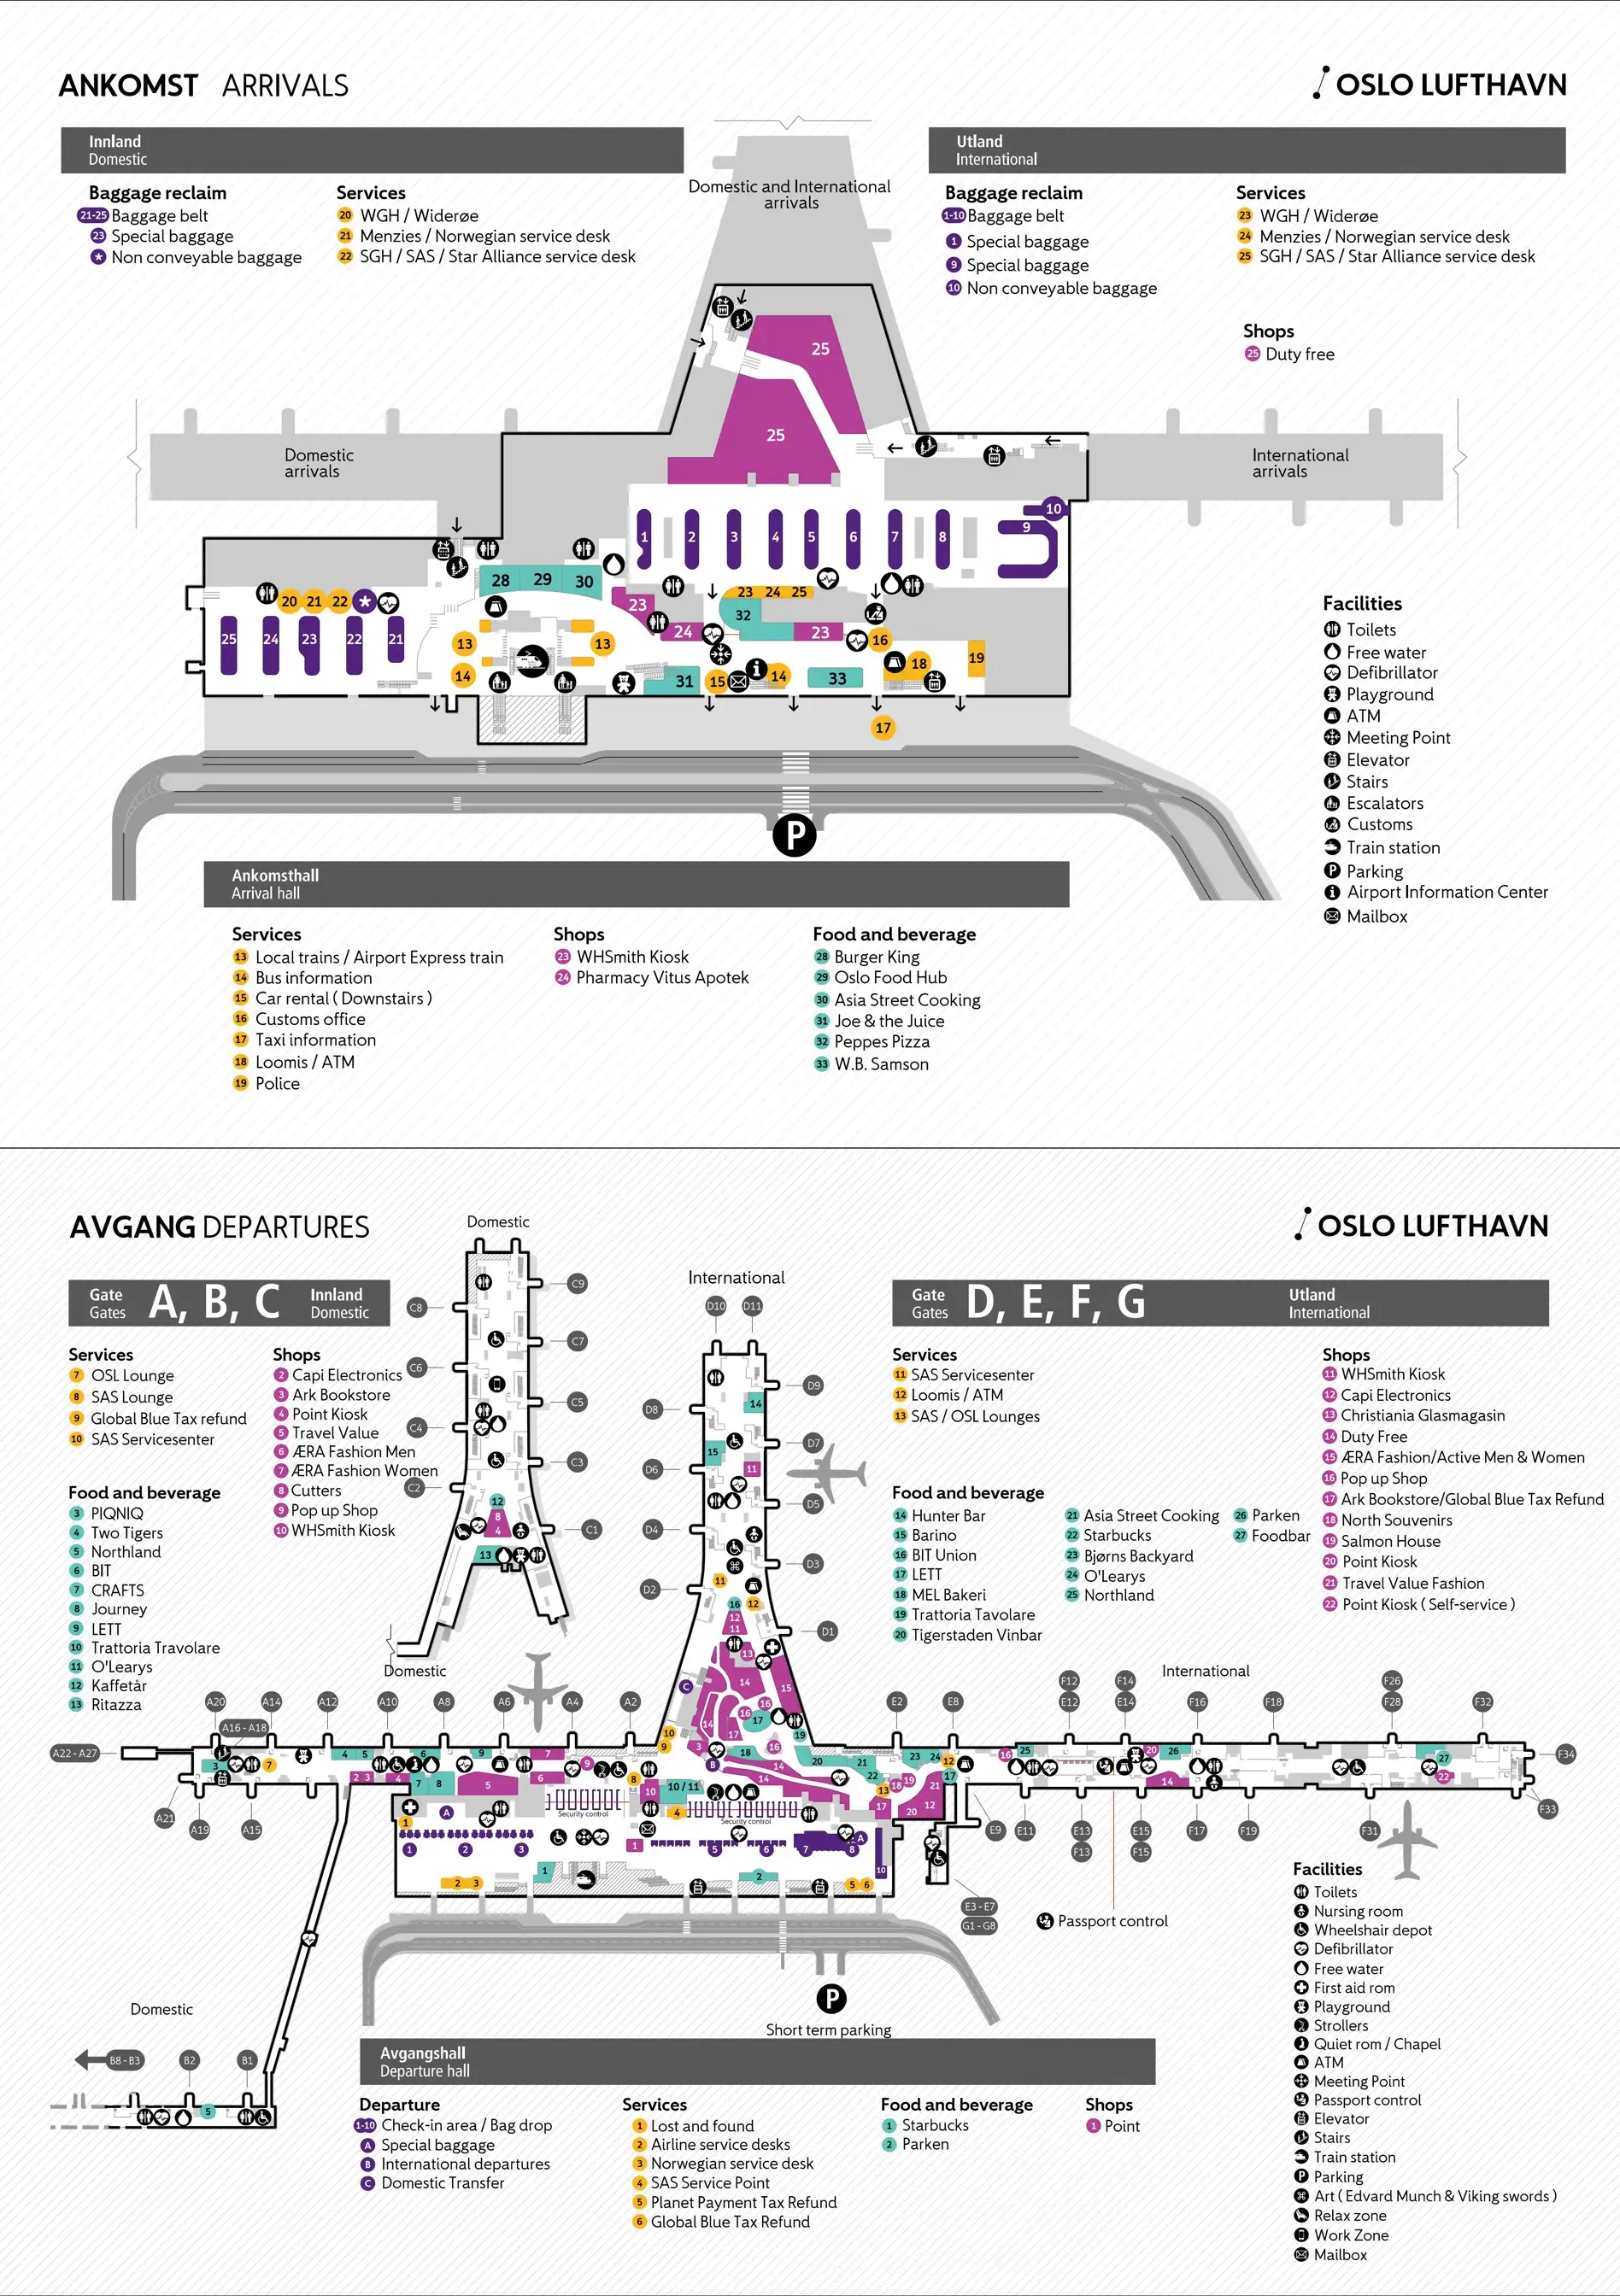
Oslo Gardermoen Airport Arrivals Map 2025

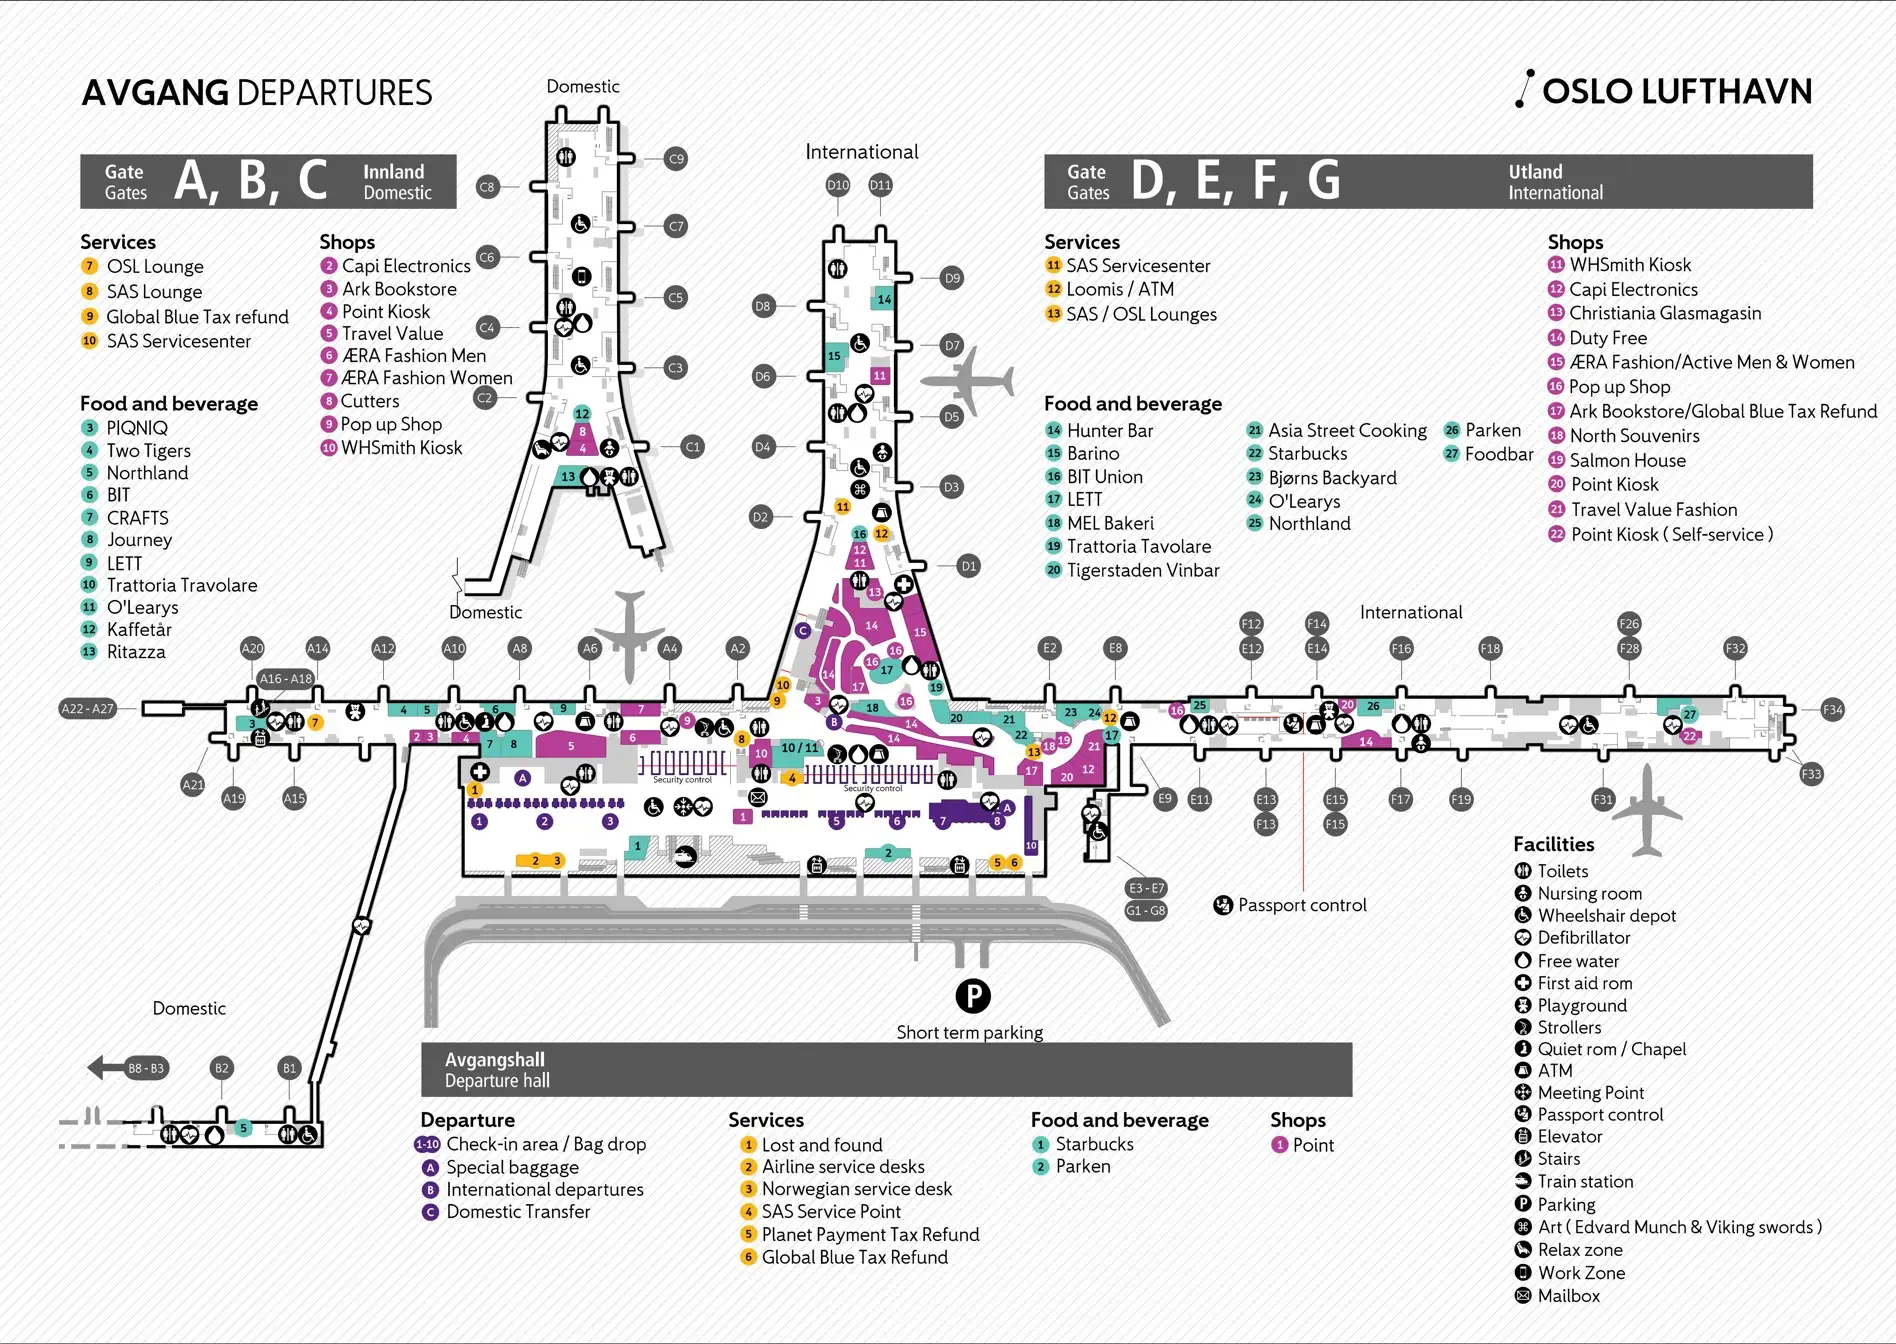
Oslo Gardermoen Airport Departures Map 2025
2026 Oslo Gardermoen Airport Map Guide
Where on the terminal map is the passport-control chokepoint you must pass to enter the F (non-Schengen) gates area?
The passport-control chokepoint is the Passport Control checkpoint in the East Pier corridor after the E-gates, positioned just beyond Gate E8 before the corridor opens into the F-gates holding area. It is the hard border between the Schengen E-zone and the Non-Schengen F-zone, so every departure walking eastbound to F-gates must funnel through it.
| Segment | Map anchor | What happens |
|---|---|---|
| Schengen side | Gate E8 area | Last E-zone reference point before the funnel |
| Chokepoint | Passport Control hall | Queue + passport check to exit Schengen |
| Non-Schengen side | First F-gate zone | F13–F19 waiting area access only after control |
What is the shortest mapped route from a typical F-gates arrival corridor to the “Domestic Transfer” entrance near Gate D2?
Clearing Passport Control is mandatory before you can reach the Domestic Transfer entrance near Gate D2 from the F-gates arrival corridor. The fastest path stays airside: walk west from F, pass the E/F Passport Control barrier, continue through the E-pier toward the central hub, then cut to the D2 elbow at the North Pier junction.
| Step | From → To | Map anchors | Typical walk |
|---|---|---|---|
| 1 | F-gates corridor → E/F boundary | F-pier westbound corridor | 3–6 min |
| 2 | Passport Control → E-zone | Passport Control hall after Gate E8 | queue-dependent |
| 3 | E-zone → central hub | past Gate E8 toward main international retail hub | 5–8 min |
| 4 | hub junction → D2 | elbow where East Pier meets North Pier | 1–3 min |
Where exactly is the baggage reclaim hall located on the map relative to the check-in / bag-drop counters used for re-checking bags after an arrival?
The baggage reclaim hall is on the Ground Floor Arrivals level, directly below the check-in and bag-drop counters on the First Floor Departures level. The map relationship is a vertical penalty loop: baggage belts and customs exit feed into the public arrivals hall, then you must go up one level (escalator/elevator) and cross the departures hall to reach bag drop.
- Ground Floor: Arrivals corridor → Duty-Free Arrivals → Baggage Reclaim Hall (baggage belts) → Customs green/red exit → public arrivals hall
- Vertical connection: escalators/elevators near the ends of the arrivals hall and by the Flytoget/train-side entrance
- First Floor: Departures hall check-in rows → bag-drop counters → main security checkpoint entrance
Where is the boarding-pass scan point that controls entry into the domestic transfer corridor, and what map-labeled corridor does it feed into?
The boarding-pass scan point is the “Domestic Transfer / Transfer Innland” gate bank immediately beside Gate D2 in the International Schengen D-gates area. Passing the scanners sends you into a one-way transfer corridor commonly shown as the customs/transfer filter that bypasses the public arrivals hall and delivers you into the Domestic Departure Hall on Level 2 near the central retail hub.
- Scan location: Gate D2 elbow area where the East Pier and North Pier meet
- Visual anchors: yellow “Domestic Transfer / Transfer Innland” signage, automated scanner lanes, info screens
- Corridor it feeds: one-way customs/transfer filter corridor into the Domestic Departure Hall (Level 2)
What is the exact walking distance (map-measured) from the Domestic Transfer entrance (near D2) to the farthest A/B/C domestic gates?
The farthest domestic-gate walk from the Domestic Transfer entrance near Gate D2 is about 550–600 meters to the West Pier A-gates tip (around A28). Reaching the far end of the domestic C-gates is shorter, and the domestic South Pier (B in domestic mode) typically lands in between, once the D2 transfer filter drops you into the Domestic Departure Hall.
| Destination | Route anchor points | Map-measured distance |
|---|---|---|
| Farthest A-gates (West Pier tip, e.g., A28) | D2 scanners → transfer filter → Domestic Departure Hall hub → West Pier spine | ~550–600 m |
| Farthest C-gates (North Pier tip, e.g., C9) | D2 scanners → transfer filter → Domestic Departure Hall hub → North Pier spine | ~400 m |
| South Pier in domestic mode (B-pier tip) | D2 scanners → transfer filter → Domestic Departure Hall hub → South Pier walkway | ~450 m |
Where on the map are the G-gates (formerly discussed as B-gates) located, and where is the airside shuttle/bus boarding point to reach them?
The G-gates are in the South Pier (the same physical pier often labeled B in domestic configuration), extending south from the main hub off the West-side structure. The airside shuttle/bus boarding point for international passengers is the International Bus Lounge in the international departures zone, reached via the corridor by the seafood restaurant Fiskeriet.
- G-gates location: South Pier gate zone G1–G8 (remote stands, no jet bridges)
- Why it matters: the South Pier is not walk-accessible from the international zone because the connecting walkway sits inside the domestic security area
- Bus boarding anchor: International Bus Lounge corridor beside Fiskeriet, near the central international hub at the E/D junction
Where is the transit security checkpoint (arrivals-to-gates screening) located on the map, distinct from the main landside security entry?
The transit security checkpoint sits on the international transfer path after arrivals processing, separate from the main landside security in the departures hall. For non-Schengen arrivals, it appears after you clear Passport Control at the E/F boundary and before you merge into the clean Schengen departures population; for domestic connections using the special flow, screening functions are effectively concentrated at the D2 “Domestic Transfer” node.
- Non-Schengen → Schengen transfer: after Passport Control near the E/F boundary, on the transfer route toward the international departures lounge
- Domestic Transfer (D2) flow: D2 scan-gate area acts as the controlled screening/filter node for eligible connections
- Main landside security (not this): departures hall security entrance on the public side of Level 1
From the C/D pier area, what is the shortest mapped route to the E-gates (Schengen) pier entrance, without backtracking landside?
Walking airside through the central international hub is the shortest route from the C/D pier area to the E-gates entrance. From the D-gates level, it’s a direct same-level connection to the duty-free hub; from the C-gates level, you must take the one-way domestic-to-international threshold at the hub and drop down to the international level before entering the East Pier.
| Start point | Fastest airside path | Map anchors |
|---|---|---|
| D-gates (North Pier, international level) | walk toward central hub → turn into East Pier | North Pier spine → main international retail hub → E-pier entrance |
| C-gates (North Pier, domestic level) | walk toward central hub → pass domestic-to-international exit valve → descend to international level → enter East Pier | C-pier spine → Domestic Departure Hall hub → international transition point → E-pier entrance |
How many separate access corridors (map-labeled entry points) lead into the F-gates non-Schengen zone, and where are they positioned?
One primary passport-control corridor is the main mapped entry into the F-gates non-Schengen zone, positioned in the East Pier after the E-gates around the Gate E8 reference area. In addition, a set of flex-gate corridors at the E/F interface can be switched to feed the non-Schengen holding area when designated as F-gates.
- Main entry: East Pier E-zone → Passport Control bank after the Gate E8 area → F-zone holding area
- Flex-gate interface: E13–E15 / F13–F15 swing-gate corridor set at the E/F boundary (doors lock to route passengers to the active zone)
- Transfer-only routing: signed non-Schengen transfer corridor immediately off the F-pier arrivals split for non-Schengen-to-non-schengen connections
Where on the map is the decision point where a connecting passenger is forced to divert toward baggage reclaim/exit instead of continuing airside transfer?
The decision point is the Gate D2 “Domestic Transfer / Transfer Innland” scan-gate area, where your boarding pass and bag/customs status are validated before you’re allowed into the one-way transfer filter. Failing that scan (ineligible airline, bags not cleared, instruction to go to arrivals) forces you onto the adjacent down escalator/stairs signed for Arrivals and Baggage Reclaim.
- Decision node: D2 transfer scanners at the East/North pier elbow
- Forced-divert path: the immediately adjacent escalator/stairwell down to Duty-Free Arrivals
- Irreversible endpoint: Duty-Free Arrivals → Baggage Reclaim Hall (ground floor), with no airside return without re-check + main security