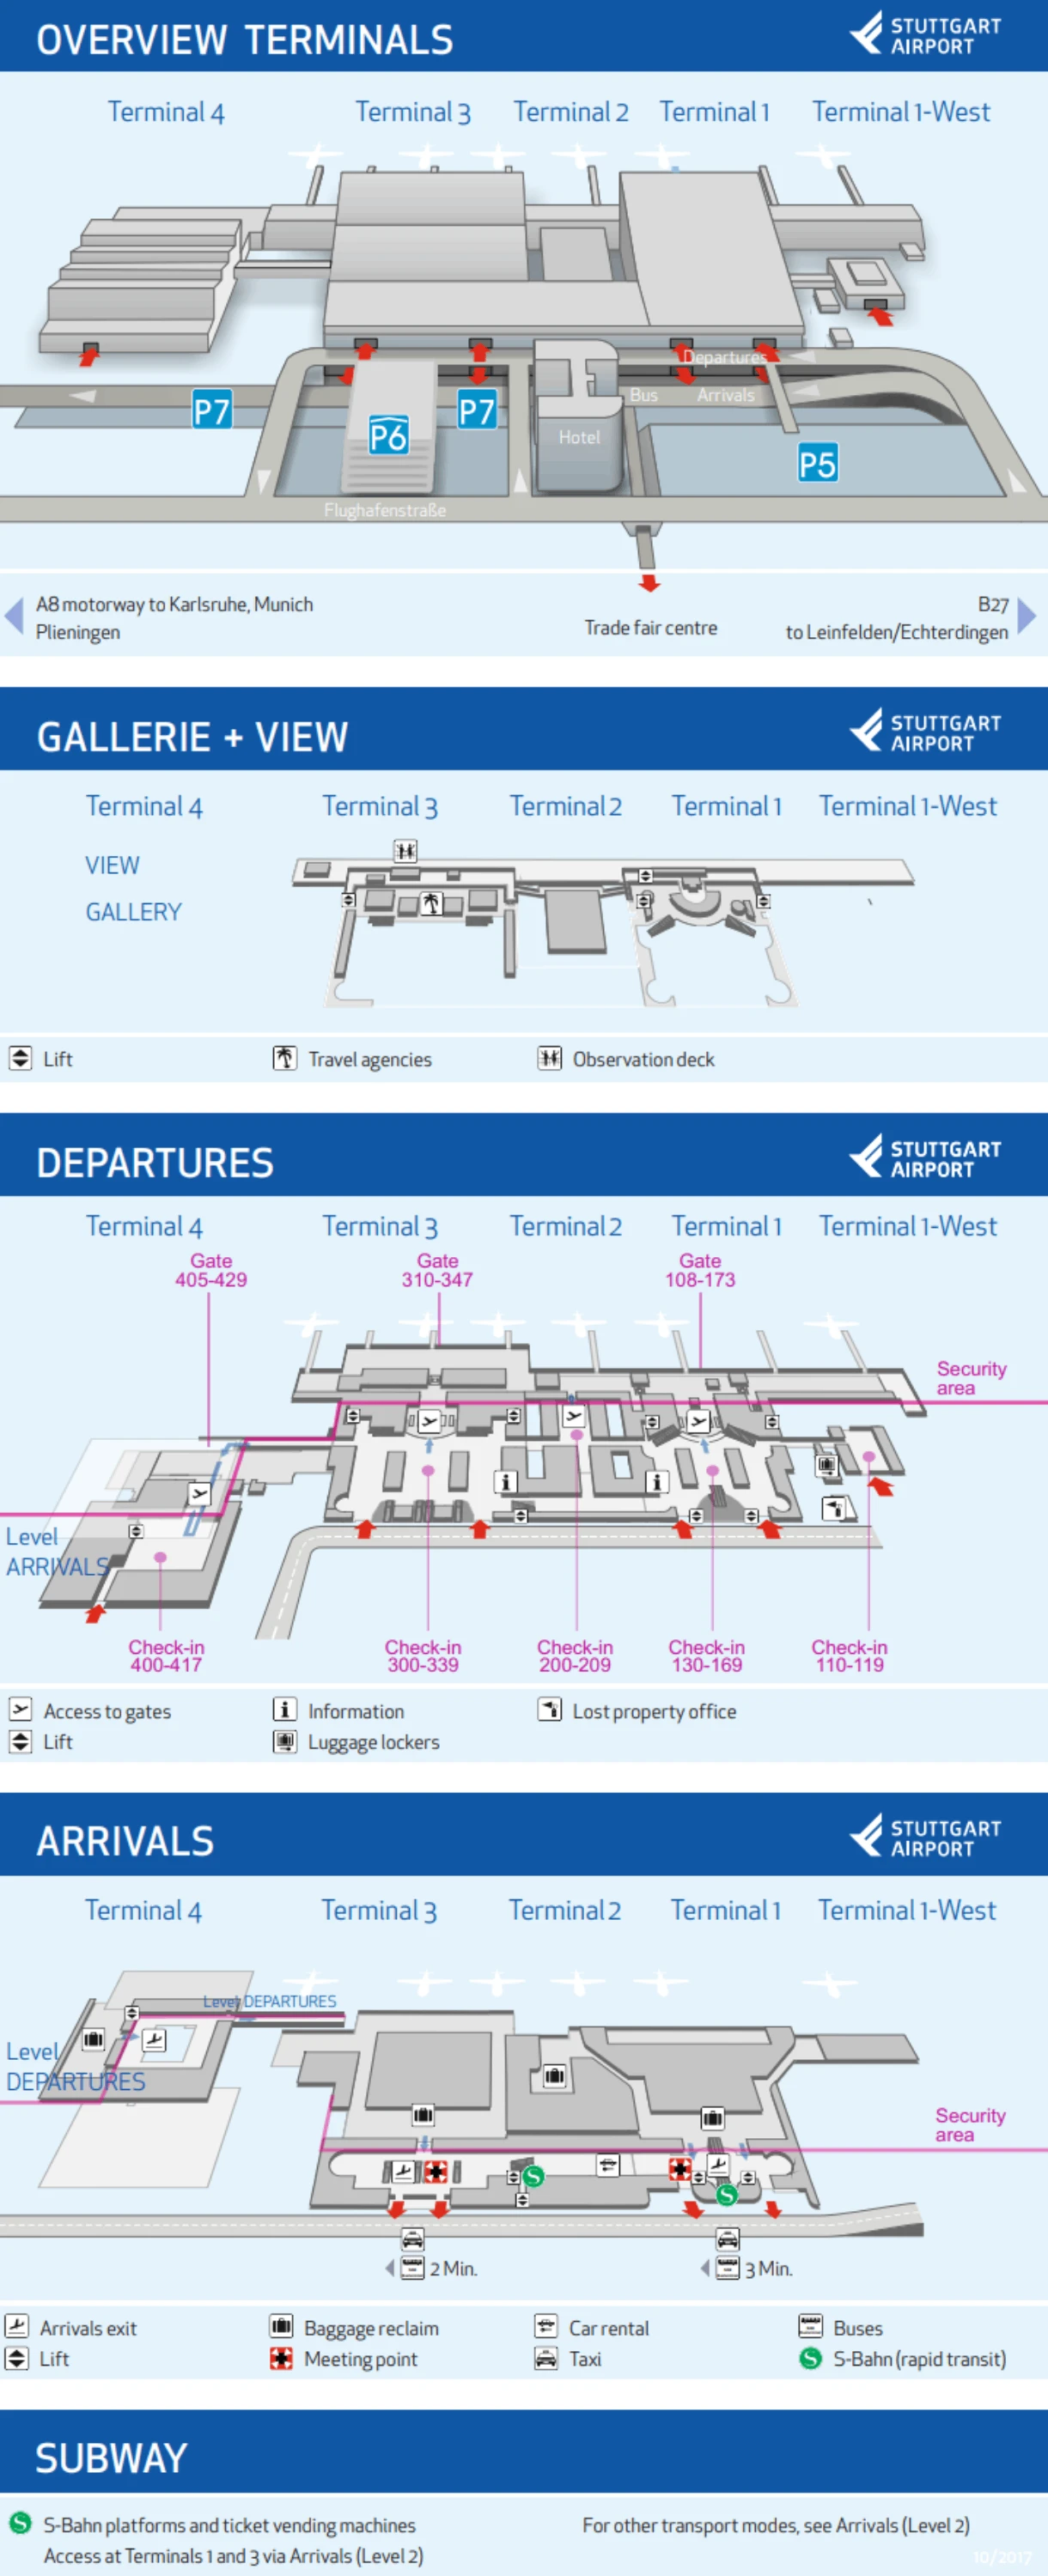
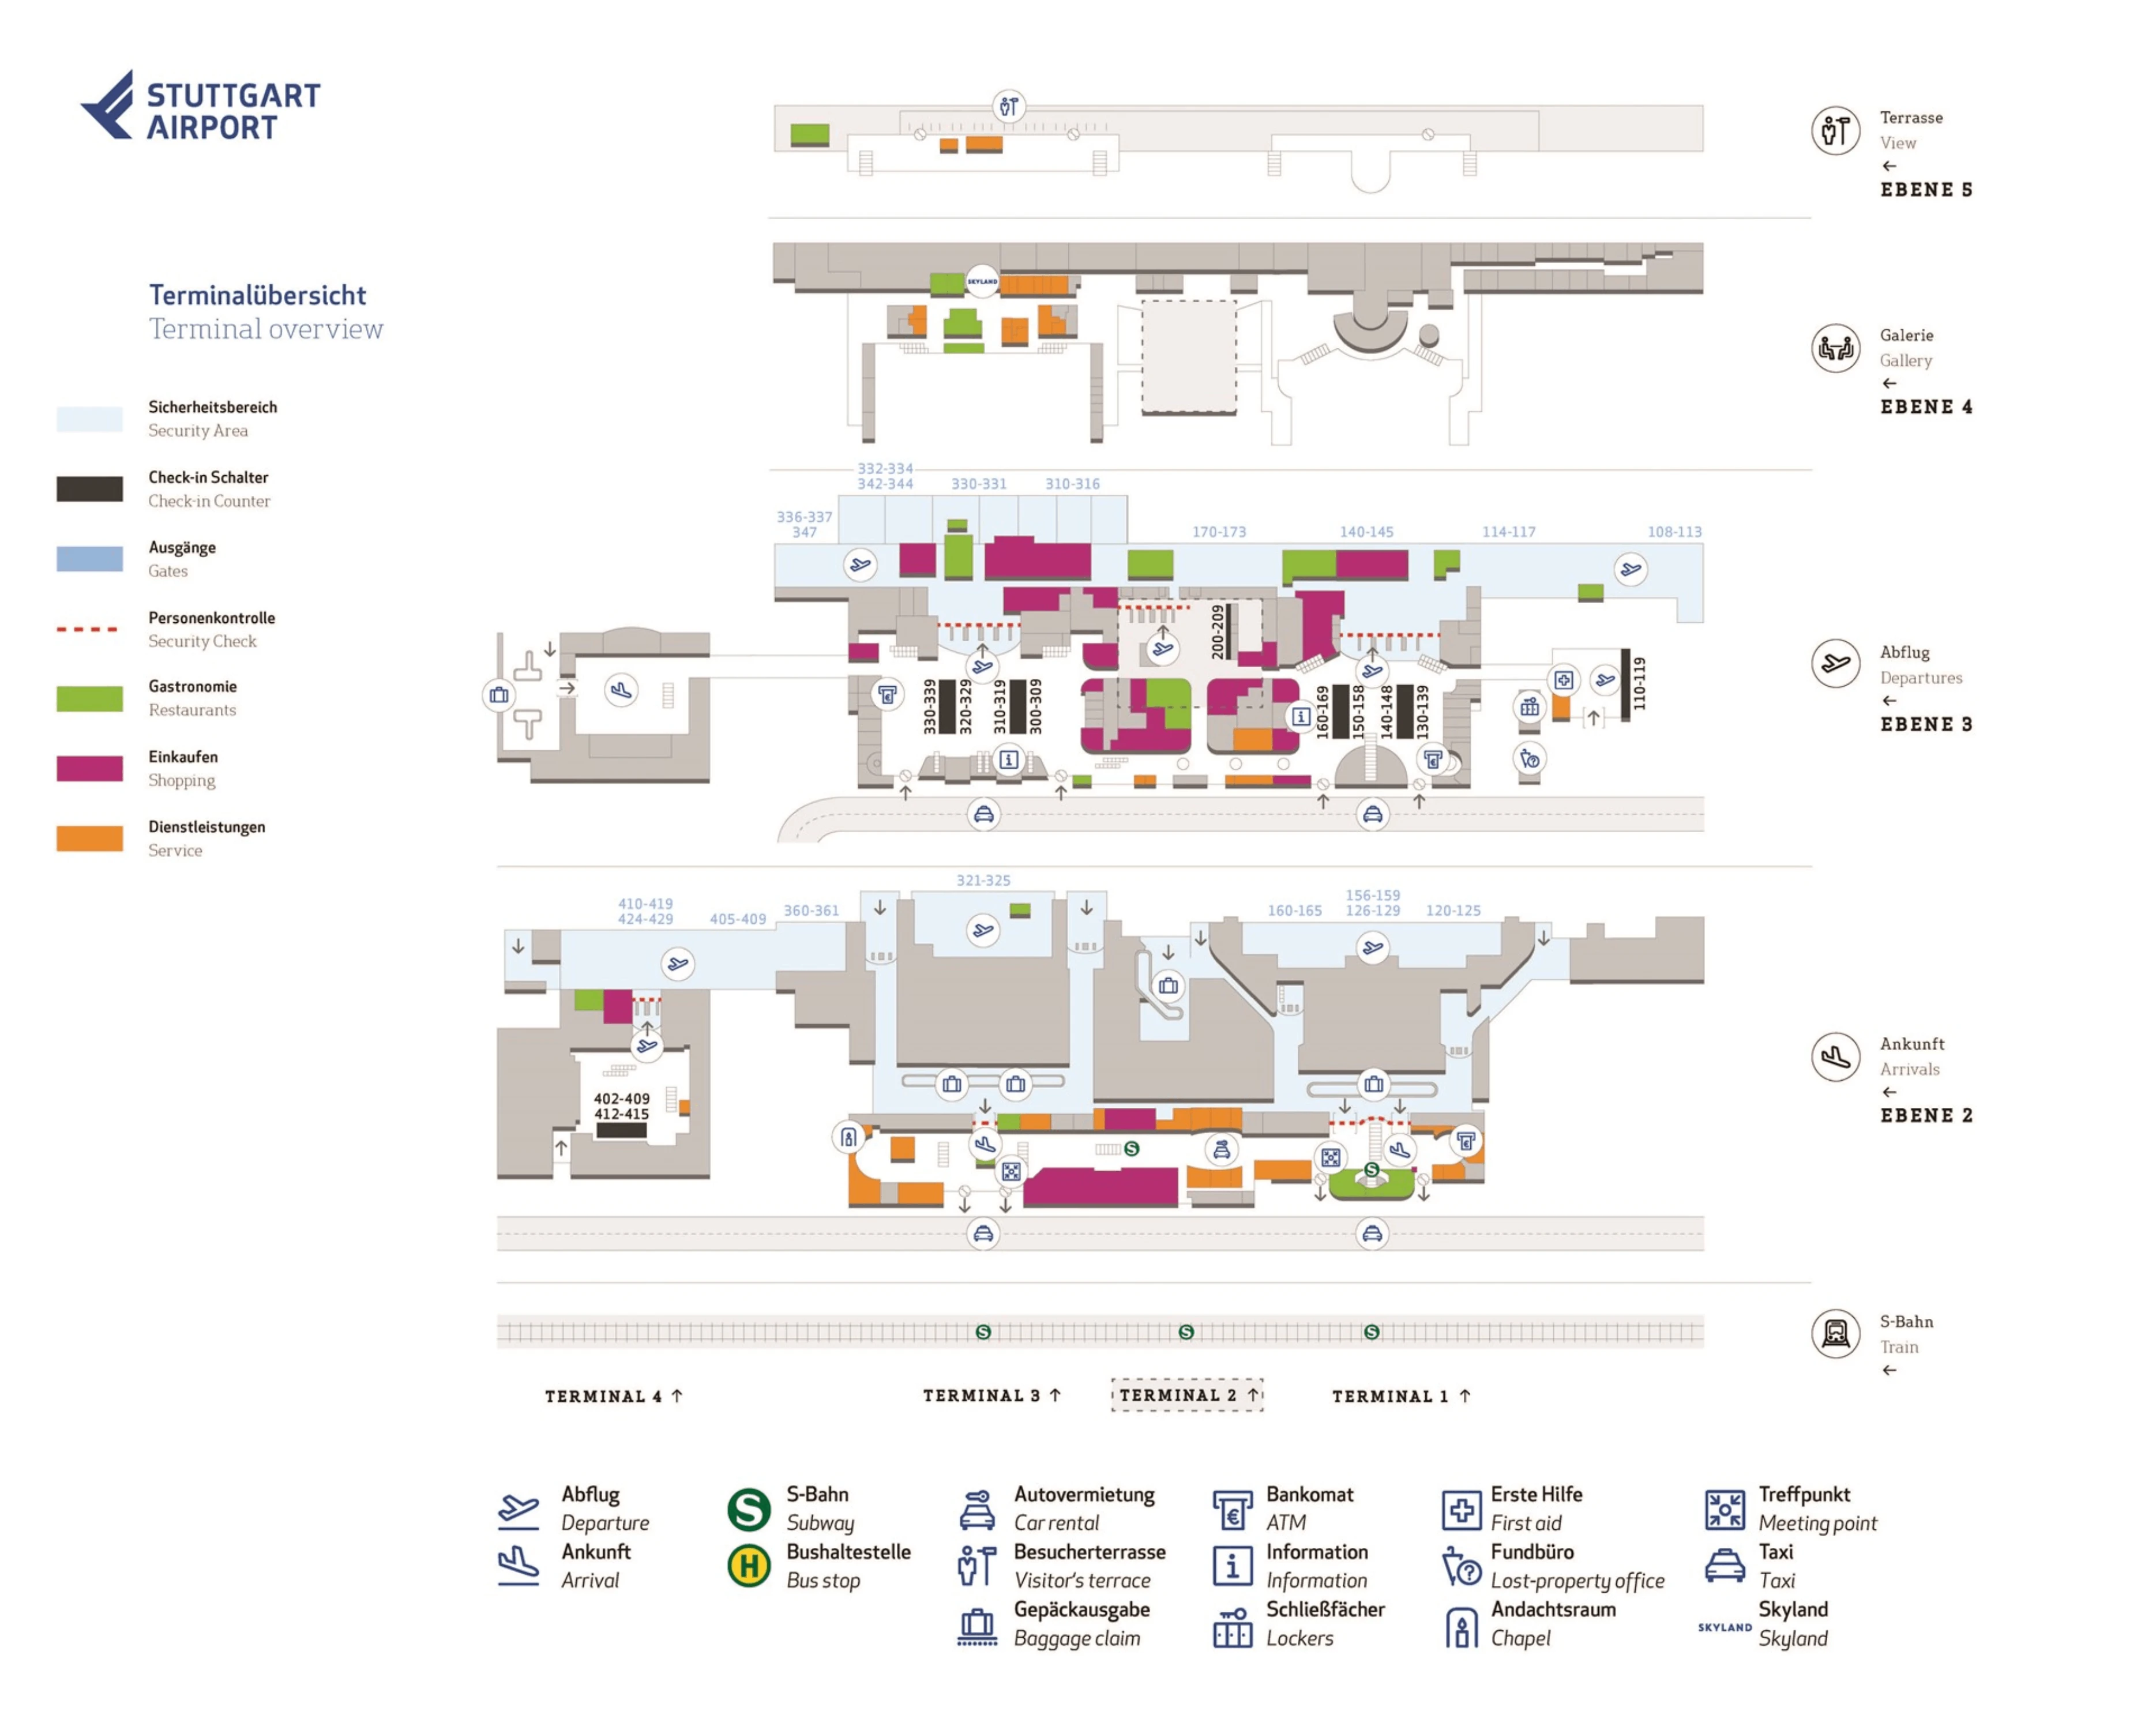
Stuttgart Airport Terminal 1 Map (Most Up-To-Date)
Terminal 1 at Stuttgart Airport is a long, rectangular departures hall (Level 3) with “tree” support columns that break sightlines and pinch walking lanes when queues spill out. Most passenger flow stacks vertically from the S-Bahn below (Level 1) up through Arrivals (Level 2) into Departures (Level 3), then funnels into a single main security area before a linear, sometimes disorienting airside spine toward Gates 108–173 within Stuttgart’s main airport hub.
Map Table
| Zone | Connection | Walk Time |
|---|---|---|
| S-Bahn platform (L1) | escalators/lifts → Arrivals (L2) | 2–4 min |
| Arrivals (L2) | corridor → Departures banks | 2–3 min |
| Departures (L3) check-in 110–169 | main hall → T1 security lanes | 2–6 min |
Stuttgart Airport Terminal 1 Map Strategy
- Treat security as a routing choice, not a single destination: default to Terminal 2 Smart Lane for predictability, then walk airside back toward T1 gates.
- Avoid the “ghost hunt” toward Terminal 3 screening: T3 check-in can be fine for bag drop, but security movement must shift west/central (T1/T2).
- Don’t scan into a gate holding pen early: eat, fill water, and use restrooms in the main airside spine (best options toward the Terminal 2 plaza) before committing.
- Budget a separate buffer for late-stage controls: passport control for non-Schengen departures can sit deeper in the airside route, and remote-stand bus gates add extra descent + staging ambiguity.
2026 Stuttgart Airport Terminal 1 Map + Printable PDF
Terminal 1 remains the primary security valve while Terminal 3 security stays closed for renovation, so “queue shock” is still the main risk on the departures level. The Terminal 1 checkpoint uses newer CT scanners, but consolidated demand can push lines back toward check-in islands. For predictable entry, the Terminal 2 Smart Lane (pre-booked slot) functions like a controllable bypass, even if you checked bags in T1.
2026 Stuttgart Airport Terminal 1 Map Guide
What is the exact walking route (and distance) from Terminal 1 check-in hall to the Terminal 1 security checkpoint with the new scanners?
The Terminal 1 CT-scanner security checkpoint is directly behind the Terminal 1 check-in islands on Departures Level 3, reached by walking straight through the main hall toward the back wall. From the center of the check-in hall (counters roughly 110–169), the walk is typically about 120–200 meters, depending on which check-in row you start from.
Walk from your check-in island toward the rear of the hall (away from the curbside doors) using the longitudinal aisle between the “tree” columns, then aim for the central “Security” signage set along the back wall. The fastest line is the one that stays inside the hall (no exit to curb) and avoids weaving through queue spillback by cutting along the edge of the check-in islands closest to the airside-facing wall.
Where is the physical decision point where a passenger can choose Terminal 1 vs Terminal 3 security access, given T1–T3 are connected in one building?
Terminal 3 security is closed, so there is no real Terminal 1 vs Terminal 3 security choice point. The only live decision is whether you enter security at Terminal 1 (standard lanes) or walk into the central Terminal 2 area for Smart Lane/Fast Track access.
From the Terminal 1 check-in islands on Departures Level 3, the practical decision point is the moment you either continue straight toward the Terminal 1 “Security” entry behind the check-in area, or turn east along the landside departures concourse toward the Terminal 2 shopping-arcade zone. If you find yourself following signage toward Terminal 3 screening or a checkpoint entrance and you hit construction hoarding, that’s the dead-end confirmation you’ve gone too far east—reverse course back toward T1/T2.
Where is the boarding-pass scan gate that can lead into the “no man’s land” area if screening is closed, and what is the exact exit path back out to landside?
No man’s land happens when you pass a secondary boarding-pass scan into a gate holding pen and then discover you can’t freely reverse out without staff release. At Stuttgart, that scan point is at the entrance to specific gate waiting areas (Warteraum) on the airside distribution spine, most commonly associated with mid-number gate clusters that feed bus gates (often around Gates 120–140).
If you’ve already scanned in and need to get back out, the exit path runs backward to the same pen entrance: return to the glass/turnstile or manned scan desk you entered through and request staff to “offboard” you so the barrier can be opened. After you’re released, follow the main concourse signage back toward the Duty-Free exit and the security checkpoint, then continue through the security exit to re-enter the Departures Level 3 check-in hall landside.
What is the exact indoor route from the S-Bahn station exit to Terminal 1 departures/check-in, including which entrance/escalator/elevator bank is the fastest?
The fastest indoor route uses escalators (not elevators) from the S-Bahn to Arrivals, then the next escalator bank up to Departures Level 3 for Terminal 1 check-in counters 110–169. Walking is short, but elevator queues can add the most delay.
| Step | Landmark waypoint | Direction | Typical time |
|---|---|---|---|
| 1 | Flughafen/Messe S-Bahn platform (Level 1) | take escalator up to Arrivals (Level 2) | 2–4 min |
| 2 | Arrivals escalator landing (Level 2) | walk straight ahead ~50 m to the next vertical bank | 1–2 min |
| 3 | Departures escalators/lifts (Level 2→3) | take escalator up to Departures (Level 3) | 1–2 min |
| 4 | Departures hall (Level 3) | follow “Terminal 1 / Check-in 110–169” into the main hall | 1–3 min |
Where are the queue-length display boards located (showing current security wait times), relative to the main approach to security?
The queue-length display boards are positioned at the landside entrance vestibules by the main revolving-door entries, not at the rail/S-Bahn ascent into the hall. In practice, they sit left/right of the curbside-facing entry points into the Terminal 1/Terminal 3 building frontage.
Relative to the main approach to Terminal 1 security (behind the check-in islands on Departures Level 3), the monitors are “behind you” if you arrived from the S-Bahn core and walked inward to check-in. You’ll naturally miss them unless you walk toward the curbside doors and look back into the vestibules before committing to the security funnel. For rail arrivals, the reliable equivalent is checking the airport app before you hit the queue spill zone at the check-in islands.
Where exactly is border control located near the gates for Terminal 1 departures, and what is the last “safe” waypoint before you’re forced into that queue?
Border control for non-Schengen departures is centralized in the Terminal 3 sector on an upper connecting level (often described as Level 4/connecting level), reached airside by walking east from Terminal 1 along the main shopping/plaza spine toward signage for non-Schengen gates (e.g., Gates 300+ / “Passport Control”). The critical “gotcha” is that you can be departing from a Terminal 1 gate but still be routed into the Terminal 3 footprint for emigration checks.
The last safe waypoint is the main airside shopping/plaza corridor before the passport-control entry throat, where you still have free movement to detour for food, restrooms, and seating. Once you pass the passport-control entry into the queuing channel (the Federal Police-controlled zone), reversing out is no longer frictionless, so treat the plaza spine as your final staging point before committing to that line.
Which specific gates in Terminal 1 are used for bus boarding to remote stands, and where is the bus-staging corridor from the main concourse?
Bus boarding in the Terminal 1 flow most commonly uses higher-number gate positions that feed stairs/elevators down to the apron-level holding areas, typically starting around the Gates 120+ range rather than the low-number contact stands. The most consistent pattern is that Gates 108–119 skew toward contact stands with jet bridges, while Gates 120 and above are more likely to be configured as bus/ground-boarding gates depending on operations.
The bus-staging corridor sits one level below the main concourse and runs parallel to the apron, reached from the gate level by descending at the signed bus-gate access points (stairs/escalators/elevators near the relevant gate). From the main concourse, follow the gate-number signage to your bus gate, then take the first clearly marked descent into the low-ceiling, industrial “holding tank” area where boarding-pass scans and queuing for buses occur.
Where is Fast Track located relative to the standard Terminal 1 security lanes (which lane bank and entry side)?
Fast Track at Stuttgart is effectively the Terminal 2 “Smart Lane,” not a dedicated lane embedded inside the Terminal 1 security bank. The functional location is Terminal 2 on Departures Level, accessed by walking east/central from Terminal 1 check-in into the shopping-arcade zone and entering security through the separate Smart Lane entry.
Instead of looking for a special lane at the Terminal 1 queue mouth, treat the decision as spatial: Terminal 1 standard security sits behind the Terminal 1 check-in islands, while Smart Lane is a distinct checkpoint entrance in Terminal 2 with its own intake area. The key landmark is the central Terminal 2 retail/plaza connector—once you’re in that zone, follow Smart Lane/Fast Track signage to the dedicated entry rather than joining the Terminal 1 stanchions.
If an airline/app shows the wrong terminal (e.g., T3 vs T1), what is the shortest indoor walking path between the two check-in zones?
The shortest indoor path is the flat Departures Level 3 landside corridor that runs straight through the continuous T1–T3 building. The walk is typically about 200–300 meters end-to-end between the Terminal 1 check-in islands and the Terminal 3 check-in area, depending on which row numbers you’re starting from.
From Terminal 1 check-in (counters roughly 110–169), face along the concourse and walk east past the central shopping/arcade zone toward Terminal 3 check-in, staying inside the building and following overhead “Terminal 3 / Check-in” wayfinding. The cleanest line avoids cutting through queue spill by using the main longitudinal aisle between the “tree” columns rather than zig-zagging between check-in islands.
Where are the largest seating clusters in/near Terminal 1 departures (post-security), especially with clear line-of-sight to gate screens?
The largest post-security seating cluster for Terminal 1 is near the pier root around the low-number gates (roughly Gates 108–115), where the concourse is widest and seating density is highest. A second high-capacity option with better tables and dwell space is the Terminal 2 airside plaza area, which remains connected to Terminal 1 airside.
The most reliable sightline strategy is to sit near the main concourse spine where the large overhead gate screens are concentrated, then walk down the pier only when your gate number is stable. Seating deeper toward higher-number gates tends to become thinner and more linear, and the “tree”/column geometry can block partial views, so the pier-root zone gives the best balance of capacity and screen visibility.
Where is the nearest warm-food option to the Terminal 1 post-security area (vs grab-and-go/cold options)?
The nearest reliable warm-food cluster is in the Terminal 2 airside plaza, reached by turning toward the central shopping/food-court zone after clearing security rather than walking deep into the Terminal 1 gate pier. Terminal 1 itself skews toward cafes and grab-and-go (pretzels, sandwiches) once you’re out on the pier.
From the Terminal 1 security exit and Duty-Free flow, take the route that keeps you on the main airside distribution spine toward Terminal 2’s larger restaurant concepts (often branded like a brewery/restaurant format). Eat there first, then budget the linear walk back to your Terminal 1 gate—especially if you’re headed toward the far end of Gates 108–173, where warm-food availability drops off sharply.
Where are the most reliable power-outlet work surfaces/tables in Terminal 1 (landside or airside), given limited “work-ready” space?
The most reliable work-with-power spots are in the Terminal 2 connector/plaza zones, not deep in the Terminal 1 gate pier. Terminal 1’s gate seating is mostly beam rows with scarce outlets, so “work-ready” tables with dependable charging are more likely along walls, booths, or high-top work surfaces around the Terminal 2 airside food-court area.
If you’re still landside, the best odds are near the central shopping arcade area where commercial tenants tend to have more power infrastructure, then you move to security. Airside, stage yourself in Terminal 2 plaza to charge and work, then walk to the Terminal 1 pier only when you’re ready to commit to your gate—especially important if your flight uses a bus gate or a holding-pen scan that can trap you away from amenities.
Archive Stuttgart Airport Terminal 1 Map
Below are all historical map versions for Stuttgart Airport. Each year includes the official map available for that period, presented as both WebP and PDF.
2025-2026 Stuttgart Airport Terminal 1 Map (Official 2025 Edition)
2017 Stuttgart Airport Terminal 1 Map (Official 2017 Edition)