Sacramento International Airport Terminal B Map (Most Up-To-Date)
SMF Terminal B is an “island terminal” made of two big pieces: a multi-level Landside building (Levels 1–3) and a separate Airside concourse (Gates B4–B23) about 1,200 ft away, connected by a single Automated People Mover. The concourse runs roughly north–south, with a central “Piazza” hub splitting the gate wings. Within Sacramento’s primary airport hub, most navigation stress concentrates at Level 3 (security + tram).
Map Table
| Zone | Connection | Walk Time |
|---|---|---|
| Landside Level 2 (Ticketing) | central escalators/elevators → Level 3 | 3–5 min |
| Landside Level 3 (TSA) | TSA exit → APM boarding lobby | < 1 min |
| APM ride | Landside station ↔ Concourse station | ride time variable |
| Concourse “Piazza” hub | hub → Gate B23 (farthest) | 4–6 min |
| Parking Garage Level 5 (Lobby E) | bridge → Terminal B Level 3 | 2–4 min |
Sacramento International Airport Terminal B Map Strategy
- Treat the APM as a single point of failure: plan your route so you arrive at Level 3 with buffer for staged boarding, platform crowding, and occasional reduced-capacity operations.
- Use Level 3 landmarks to de-risk TSA uncertainty: orient on the central atrium core (escalator bank + “Leap” sculpture zone) so you can identify where the line starts and where it spills back.
- Don’t “wing it” from parking: Economy/Daily access is shuttle-dependent, so park for the nearest shelter grid and track the terminal drop-off level so you don’t accidentally add a Level 1 → Level 2 → Level 3 climb.
- Eliminate decision-fork mistakes early: confirm whether you’re going to Terminal A or Terminal B before committing to garage bridges/elevators, and memorize the Garage Level 3 → Level 5 change required for the Terminal B bridge.
2026 Sacramento International Airport Terminal B Map + Printable PDF
2026 navigation still hinges on forced dependencies: Level 3 security funnels directly into the APM boarding lobby, and there’s no general walkable alternative to reach the B gates if the people-mover is disrupted. The garage bridge mismatch (Garage Level 5 to Terminal Level 3) remains a common wayfinding trap, so a printable map is most useful when it’s door-, level-, and bridge-specific.
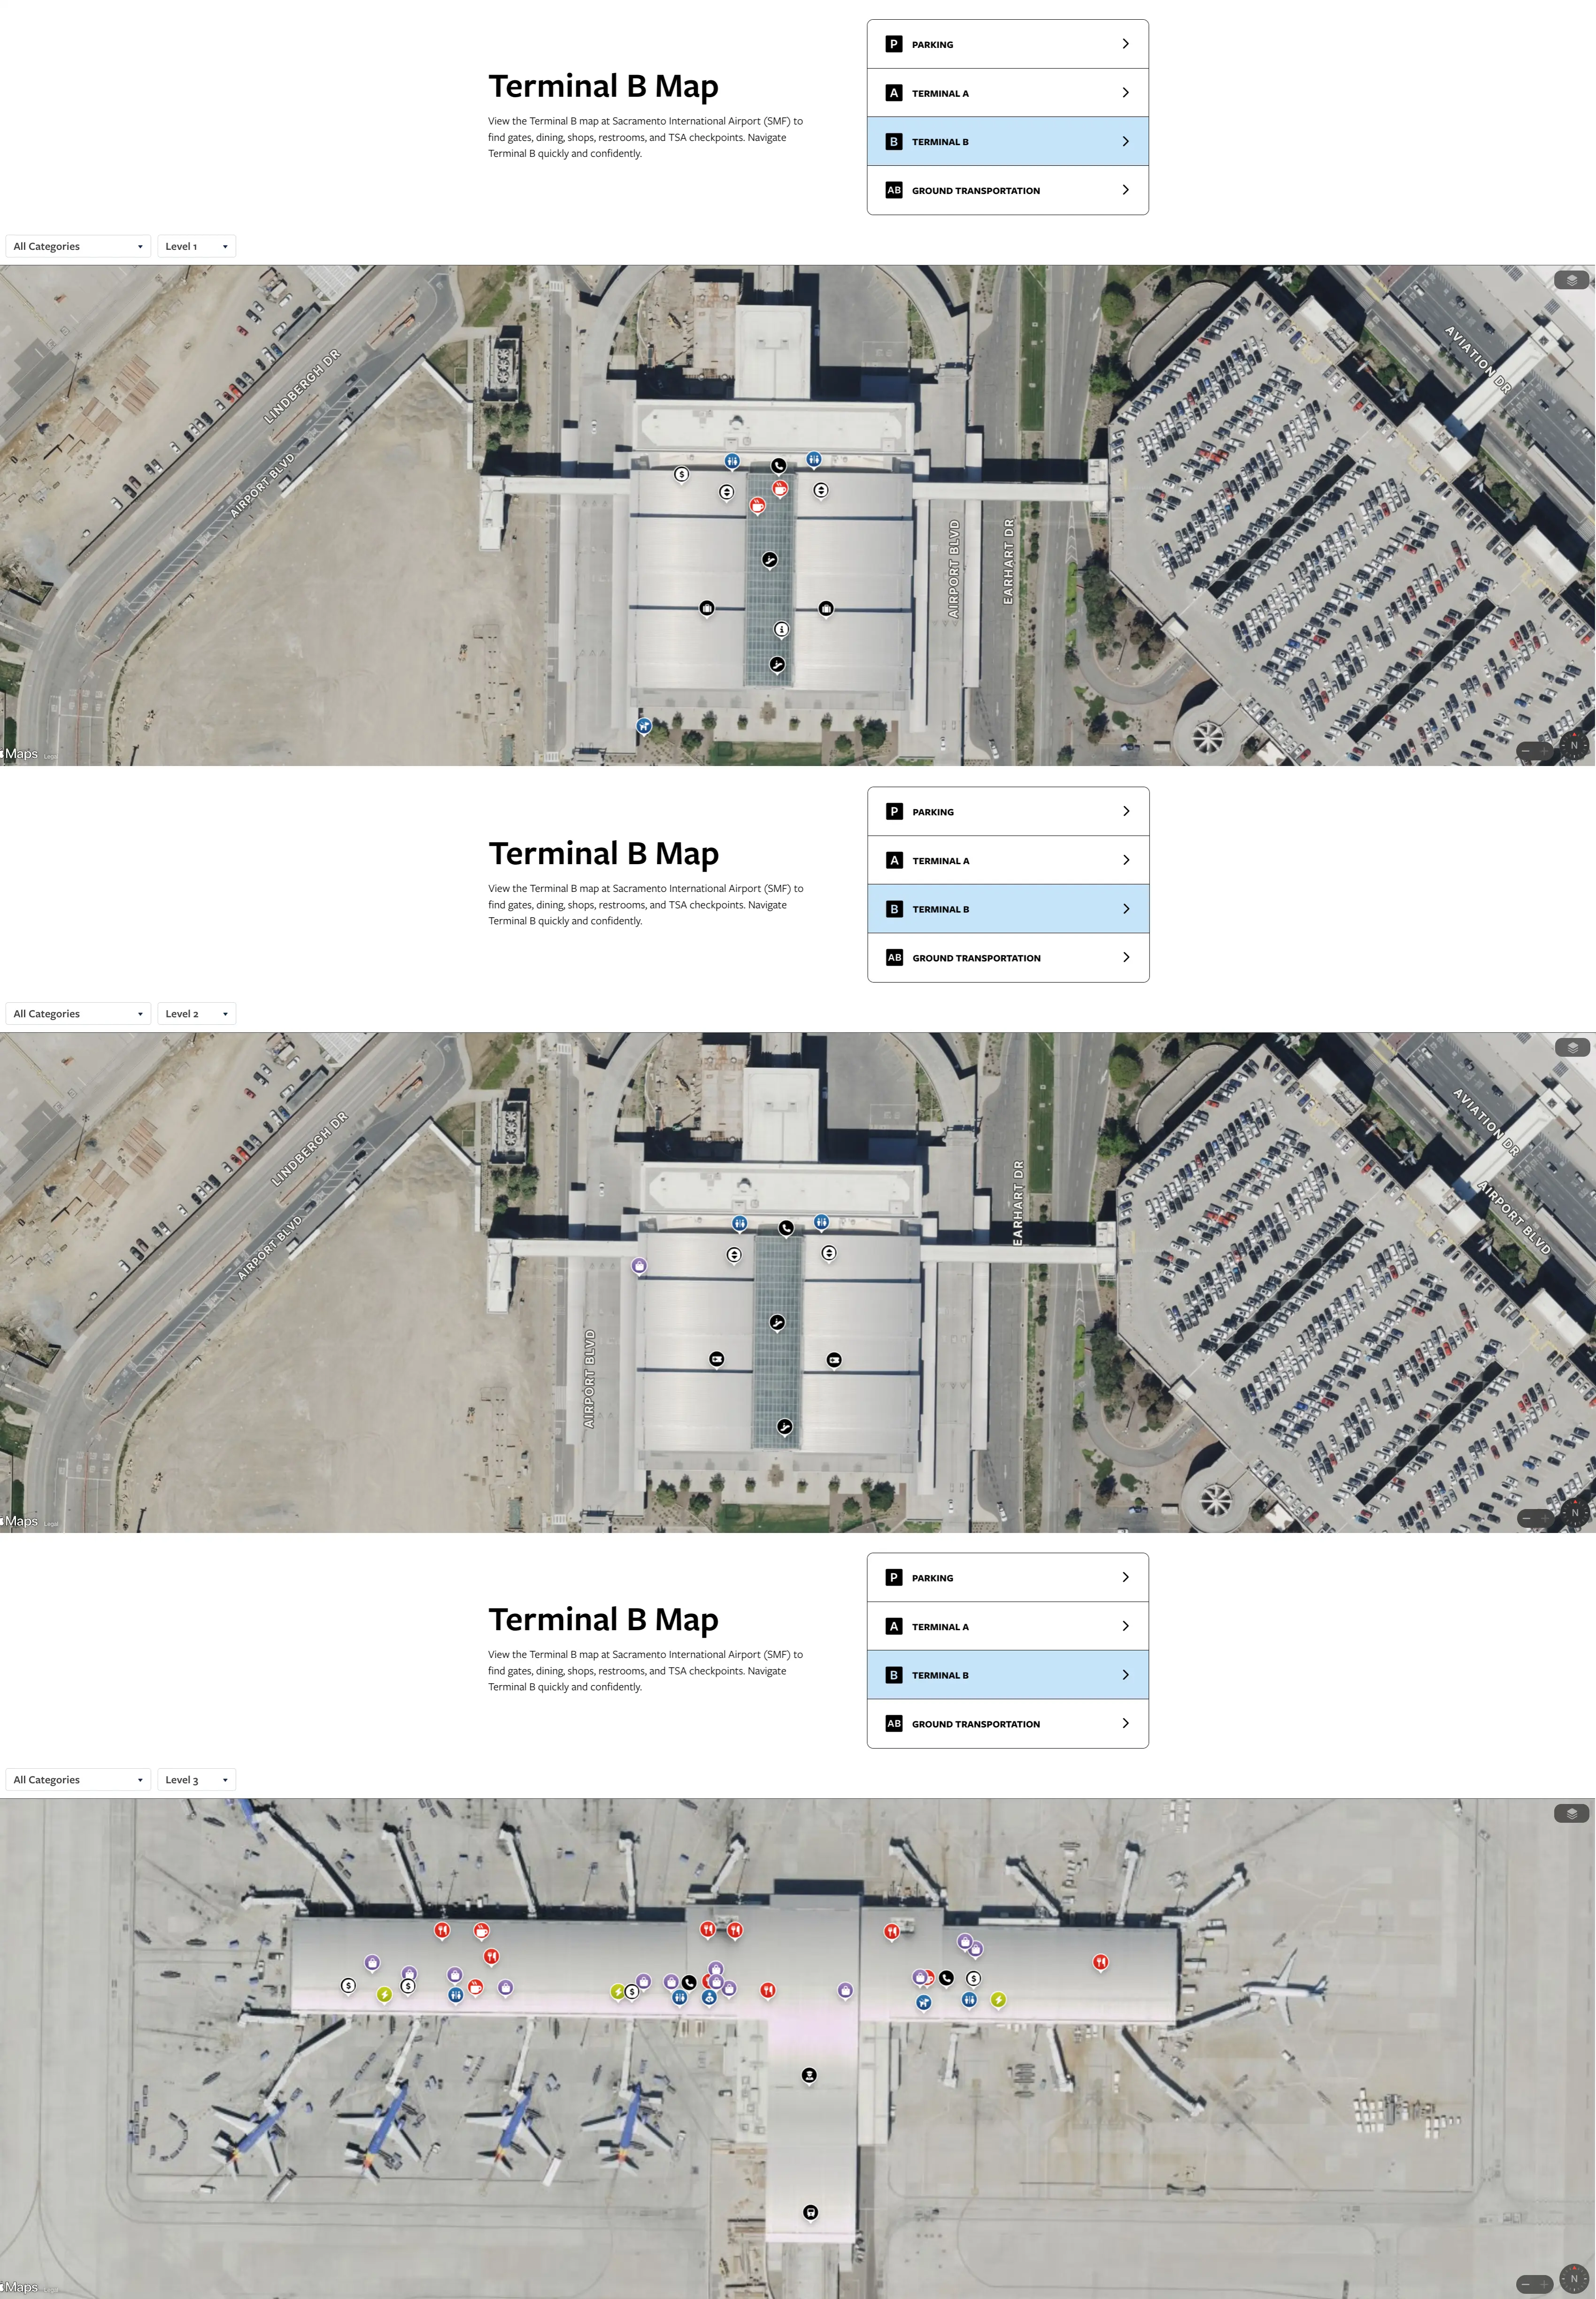
Sacramento International Airport Terminal B Level 1 Map 2026

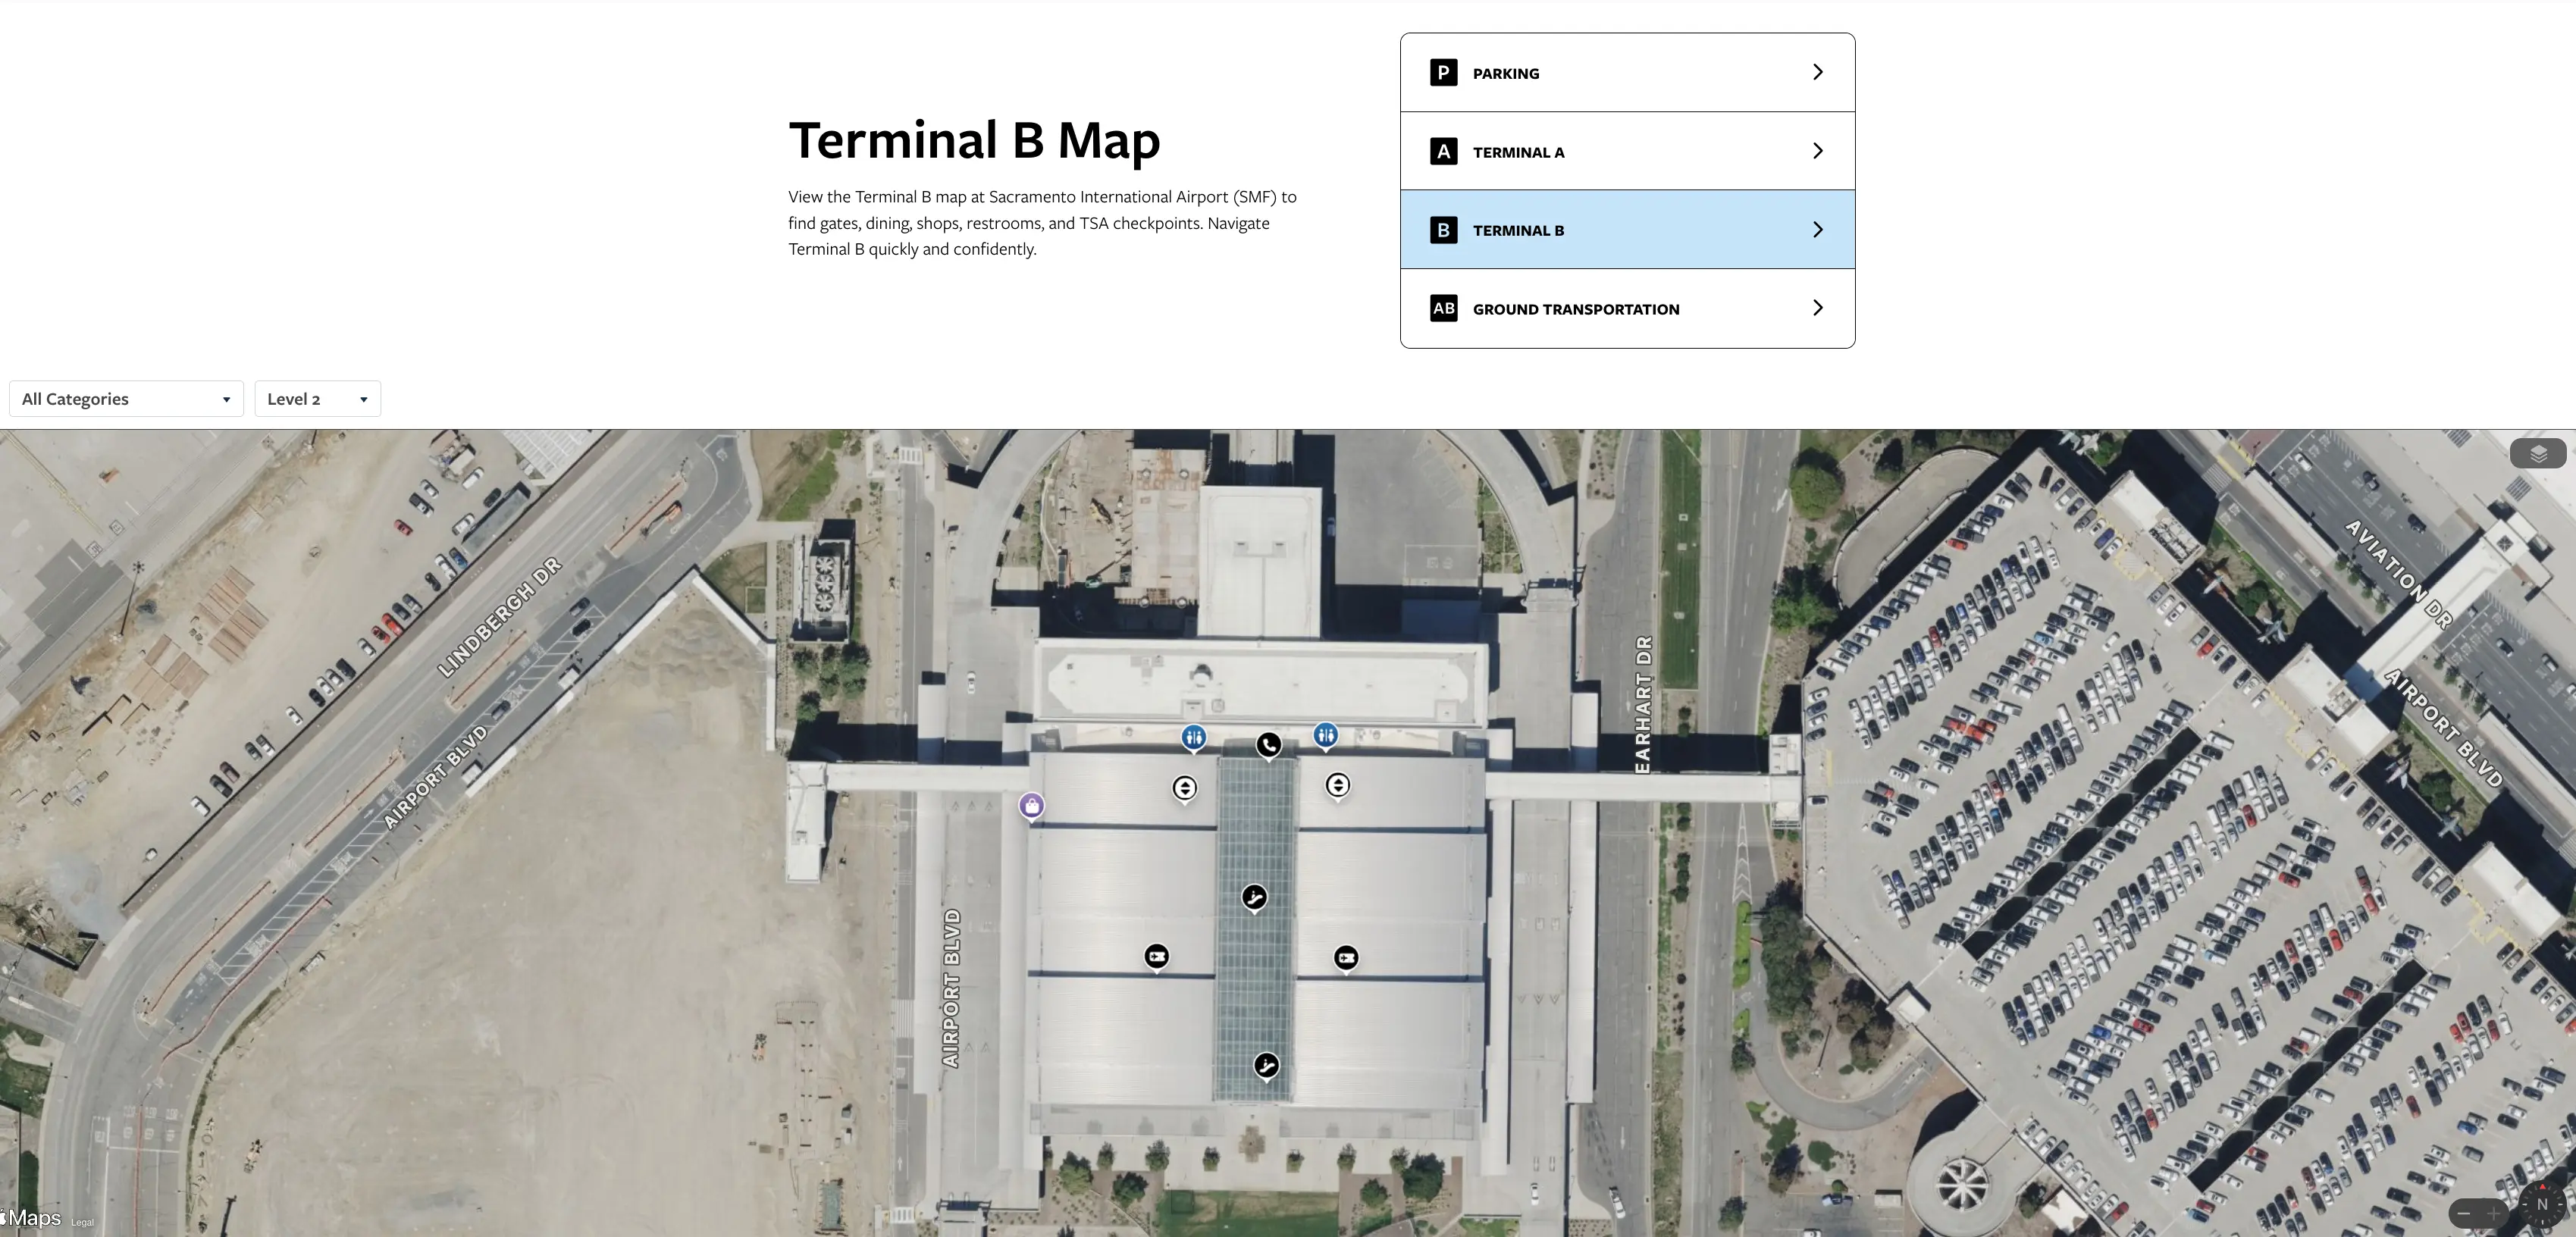
Sacramento International Airport Terminal B Level 2 Map 2026
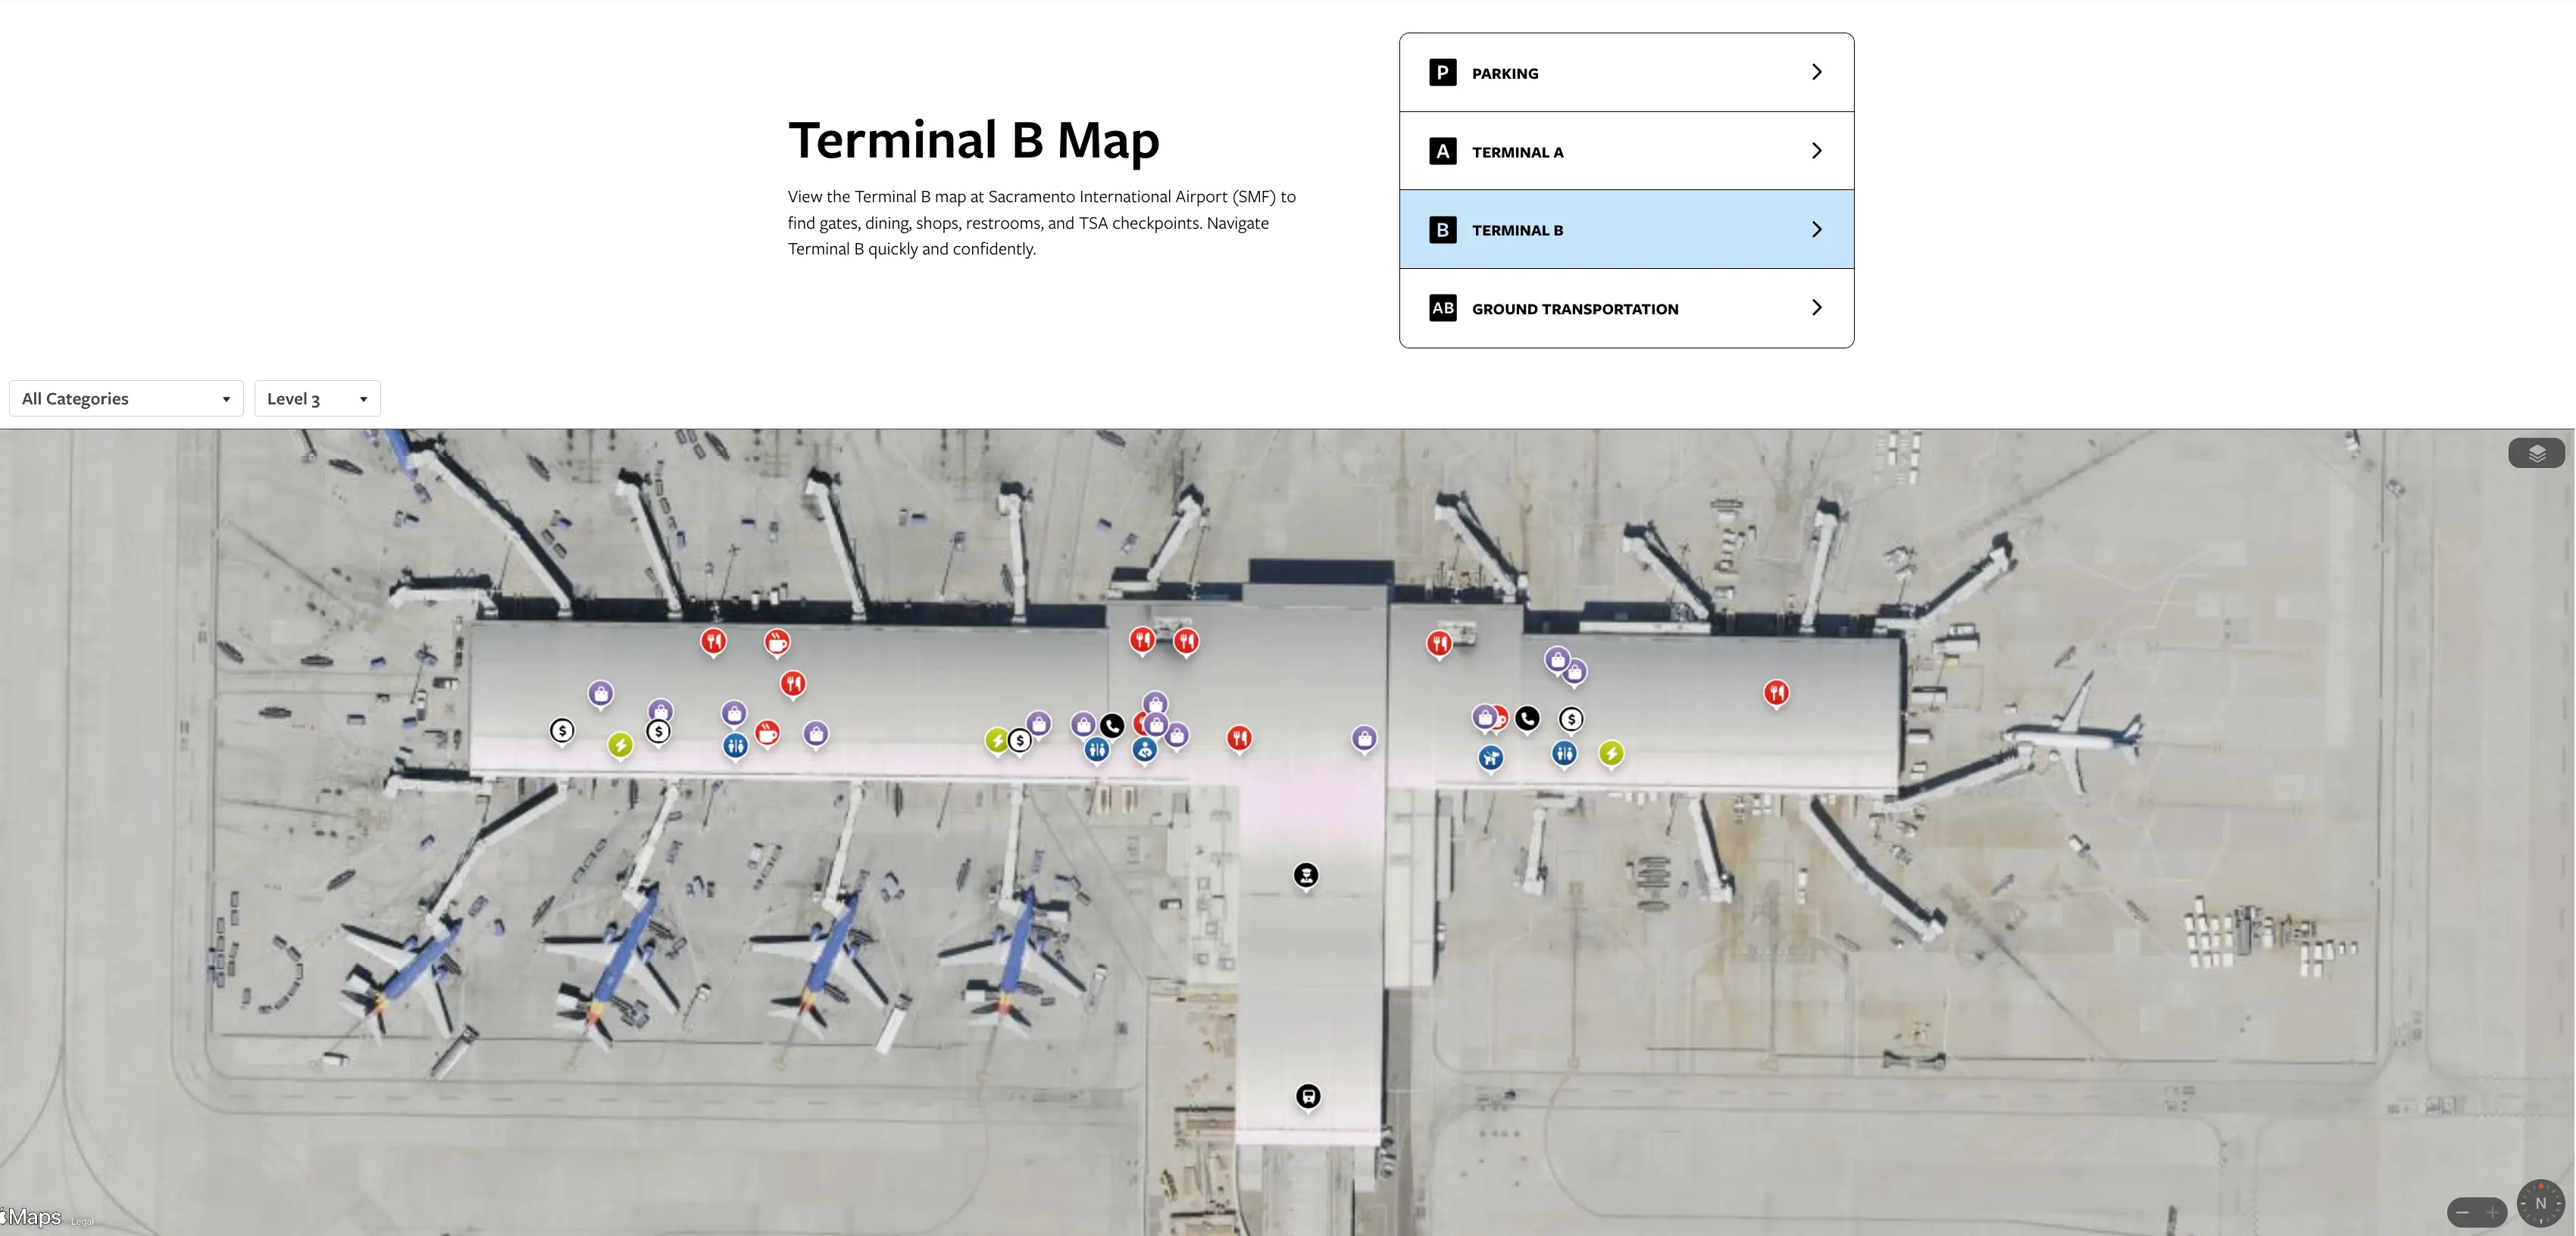
Sacramento International Airport Terminal B Level 3 Map 2026
2026 Sacramento International Airport Terminal B Map Guide
What is the exact walking route and distance from the Terminal B tram/people-mover drop-off to the TSA checkpoint entrance?
No public route exists from the Terminal B people-mover drop-off to the TSA checkpoint entrance because TSA is before the people-mover for departing passengers. The APM “drop-off” is on the airside concourse, while the TSA checkpoint entrance is on Landside Level 3.
The only consistent, map-verifiable relationship is the opposite direction on departures: TSA exit to APM boarding lobby is roughly 50–100 feet inside Landside Level 3. After screening, walk straight into the small APM holding/boarding lobby immediately adjacent to the screening exit where passengers cluster when a tram has just departed.
Where exactly does the Terminal B TSA line physically begin when it backs up—does it reach the tram exit, and along which corridor?
The Terminal B TSA line begins at the Level 3 checkpoint stanchions under the central atrium and backs up toward the central escalator core, not toward an APM “tram exit.” When it overflows, the queue extends away from the screening entrance into the open Level 3 floorplate.
The backup path typically runs from the stanchion area beneath the “Leap” sculpture zone toward the escalators/elevators that rise from Level 2 ticketing. In extreme surges, it can wrap toward the Level 3 sky-bridge connection from the parking garage, creating a collision point where garage-entering passengers meet the back of the queue.
Where is the economy parking shuttle pickup point for Terminal B, and what is the shortest mapped path from the nearest parking rows to that stop?
The economy parking shuttle pickup is at numbered/lettered shuttle shelters inside the East Economy Lot grid, not at a single terminal-facing stop. The shortest path is from parking rows that flank the central shuttle thoroughfare, where shelters are easiest to reach on foot.
| Segment | Start | End | Distance / Time |
|---|---|---|---|
| Lot walk-in | rows near the central spine (typically C or D rows) | nearest labeled shelter (example pattern: C4/D11) | shortest; peripheral rows add 300+ yards |
| Shuttle dependency | East Economy shelter | terminal loop | wait can be 25–30 min interval |
| Negative constraint | any economy row | terminal on foot | not walkable; > 1 mile; shuttle required |
On the shuttle loop, what is the exact stop order and where is the Terminal B drop-off relative to the Terminal B entrance doors?
The typical shuttle loop runs Economy Lot stops first, then Terminal A, then Terminal B, before returning to the lots. Terminal B drop-off is on the Ground Level (Level 1) commercial curb at the east end of the Terminal B frontage.
After you step off at Terminal B, the closest entrance is the set of automatic doors directly beside that Level 1 curb stop, leading into the baggage claim hall. From there, reaching ticketing requires a central-building traverse to the main escalator/elevator bank and an ascent to Level 2; reaching security continues up to Level 3. This Level 1 drop-off is the key “vertical penalty” versus Level 2 rideshare drop-offs.
What is the shortest indoor route from rideshare/TNC drop-off to Terminal B ticketing (including which doors/level you enter)?
Rideshare/TNC drop-off for departures is at Terminal B Departures Level 2, with the shortest indoor route through Doors 2 or 3 into the Ticketing Hall. Ticketing counters are directly ahead once you enter, so the walk is effectively a straight shot.
From the Level 2 curb, step through Door 2 or Door 3 (the central sliding glass doors). You arrive immediately in the high-ceiling ticketing lobby; airline counters are perpendicular to the entry doors and visible within the first few steps. If you are mistakenly dropped at Arrivals Level 1 instead, enter baggage claim and use the central escalator/elevator bank between the carousel zones to go up to Level 2, adding a 3–5 minute vertical correction.
What is the shortest route from Terminal B ticketing to the tram/people-mover platform (door-to-platform), and where are the choke points?
The shortest route is Ticketing Level 2 → central escalator core → Level 3 TSA → TSA exit → APM boarding lobby/platform doors. The choke points are the central escalator bank (crowd compression), the Level 3 atrium queue spill zone, and the post-TSA APM holding area where staged boarding forms.
From the ticketing hall, walk inward to the center of the space where the main escalators/elevators cluster between the counters. Take the up escalator to Level 3; the “Leap” red rabbit sculpture is the dominant landmark as you crest Level 3. Join the TSA queue in the atrium stanchions, then after screening walk straight into the compact APM boarding lobby. If a train has just departed or single-tram operations are in effect, passengers stack tightly here and can press back toward the screening exit.
What is the exact walking distance from Terminal B security exit to the farthest B gates (end-of-concourse), using the primary corridor?
Walking from the Terminal B security exit to the farthest B gates is not a single continuous walk because the APM ride breaks the route. The longest walk segment after the APM is from the concourse tram station “Piazza” hub to the farthest gate (typically Gate B23) at about 800–1,000 feet.
After you clear TSA on Landside Level 3, you walk roughly 50–100 feet into the APM boarding lobby and ride the people-mover to the airside concourse. The tram drops you into the central retail/dining rotunda that splits the concourse into two wings. For the farthest walk, turn toward the east/right wing (Gates B13–B23) and stay in the main corridor to the end holdroom area at the tip of the pier.
Where are the closest restrooms to the Terminal B security exit, and what is the shortest mapped path to them?
The closest restrooms to the Terminal B security exit are on the airside concourse in the central hub immediately after you arrive by APM. The shortest path is straight off the people-mover into the “Piazza” rotunda, then to the perimeter restroom blocks that ring that central space.
After screening, walk into the APM boarding lobby (about 50–100 feet), ride to the concourse, and exit into the central rotunda where retail/dining clusters. The large restroom banks are positioned right off that hub, so you don’t need to commit down either gate wing to find them. If the hub restrooms are crowded right after a tram unloads, the next-closest option is 2–3 minutes down your gate wing to the mid-pier restrooms (around the B8/B10 area on the west wing or B16/B18 on the east wing).
Where is the Terminal B priority / PreCheck entry point located relative to the main security queue entrance, and which lane feeds which scanners?
The Terminal B TSA PreCheck entry is on the far right side of the checkpoint array when you are facing the scanners/people-mover direction. Those priority lanes feed dedicated scanners on the right side of the screening hall.
From the Level 2 ticketing escalators, you arrive near the center of Level 3 by the atrium core. Instead of merging into the central general-queue mass under the “Leap” sculpture zone, veer laterally to the right edge of the checkpoint frontage to find PreCheck, with CLEAR typically adjacent on the same right flank. Passengers entering Level 3 from the parking garage sky-bridge tend to arrive closer to this right-side frontage, which reduces cross-traffic through the center.
Where exactly are the Terminal B parking payment kiosks on Level 5, Lobby E, and what is the shortest mapped path from the Terminal B walkway/bridge entry to those kiosks?
The Terminal B parking payment kiosks are inside the Parking Garage’s Level 5 Lobby E enclosure immediately adjacent to the Terminal B sky-bridge entry. The shortest path is straight off the Terminal B Level 3 bridge into the garage, then into Lobby E where the kiosks sit within the elevator-lobby area.
From Terminal B, go to Level 3 and take the pedestrian sky bridge to the parking garage. You arrive in the garage on Level 5 (this 3-to-5 mismatch is the common wayfinding trap). At the bridge landing, follow the lobby/core signage to Lobby E; once you enter that enclosed lobby space, the pay-on-foot kiosks are positioned inside that elevator-lobby zone. Cash is not accepted at exit lanes, so this is the required stop for cash payment.
What is the exact A ↔ B terminal transfer walking route from the Terminal A exit point to the Terminal B entrance, and where are the decision forks?
Walking from Terminal A to Terminal B is a landside transfer through the parking garage, and you must change garage levels to reach the Terminal B bridge. The critical decision fork is going up from Garage Level 3 to Garage Level 5; staying on Level 3 strands you away from the Terminal B connection.
Exit Terminal A into the public area and get to Level 2. Take the pedestrian bridge from Terminal A to the parking garage, which lands you on Garage Level 3. Walk across the garage following “Terminal B” signage until you reach a vertical core, then take an elevator or stairs up to Garage Level 5. From Level 5, cross the second pedestrian bridge to Terminal B, which deposits you into Terminal B on Level 3 (pre-security atrium). Plan about 0.4 miles and 10–15 minutes.
Where is the Escape Lounge in Terminal B located relative to the nearest gates, and what is the shortest mapped path from security exit to its entrance?
The Escape Lounge is immediately left after you arrive on the airside concourse from the people-mover, near the West Wing entrance toward Gates B4–B12. The shortest path is TSA → APM → concourse hub → left turn to the lounge entrance within about 50 feet.
After clearing TSA on Landside Level 3, walk into the APM boarding lobby (about 50–100 feet) and ride to the concourse. Exit into the central “Piazza” hub, then make a sharp left before committing down the long west-wing corridor. The lounge is positioned right off the hub near the start of the B4–B12 side; if you find yourself already walking deep toward B12, you likely passed the entrance.