Brisbane International Airport International Terminal Map (Most Up-To-Date)
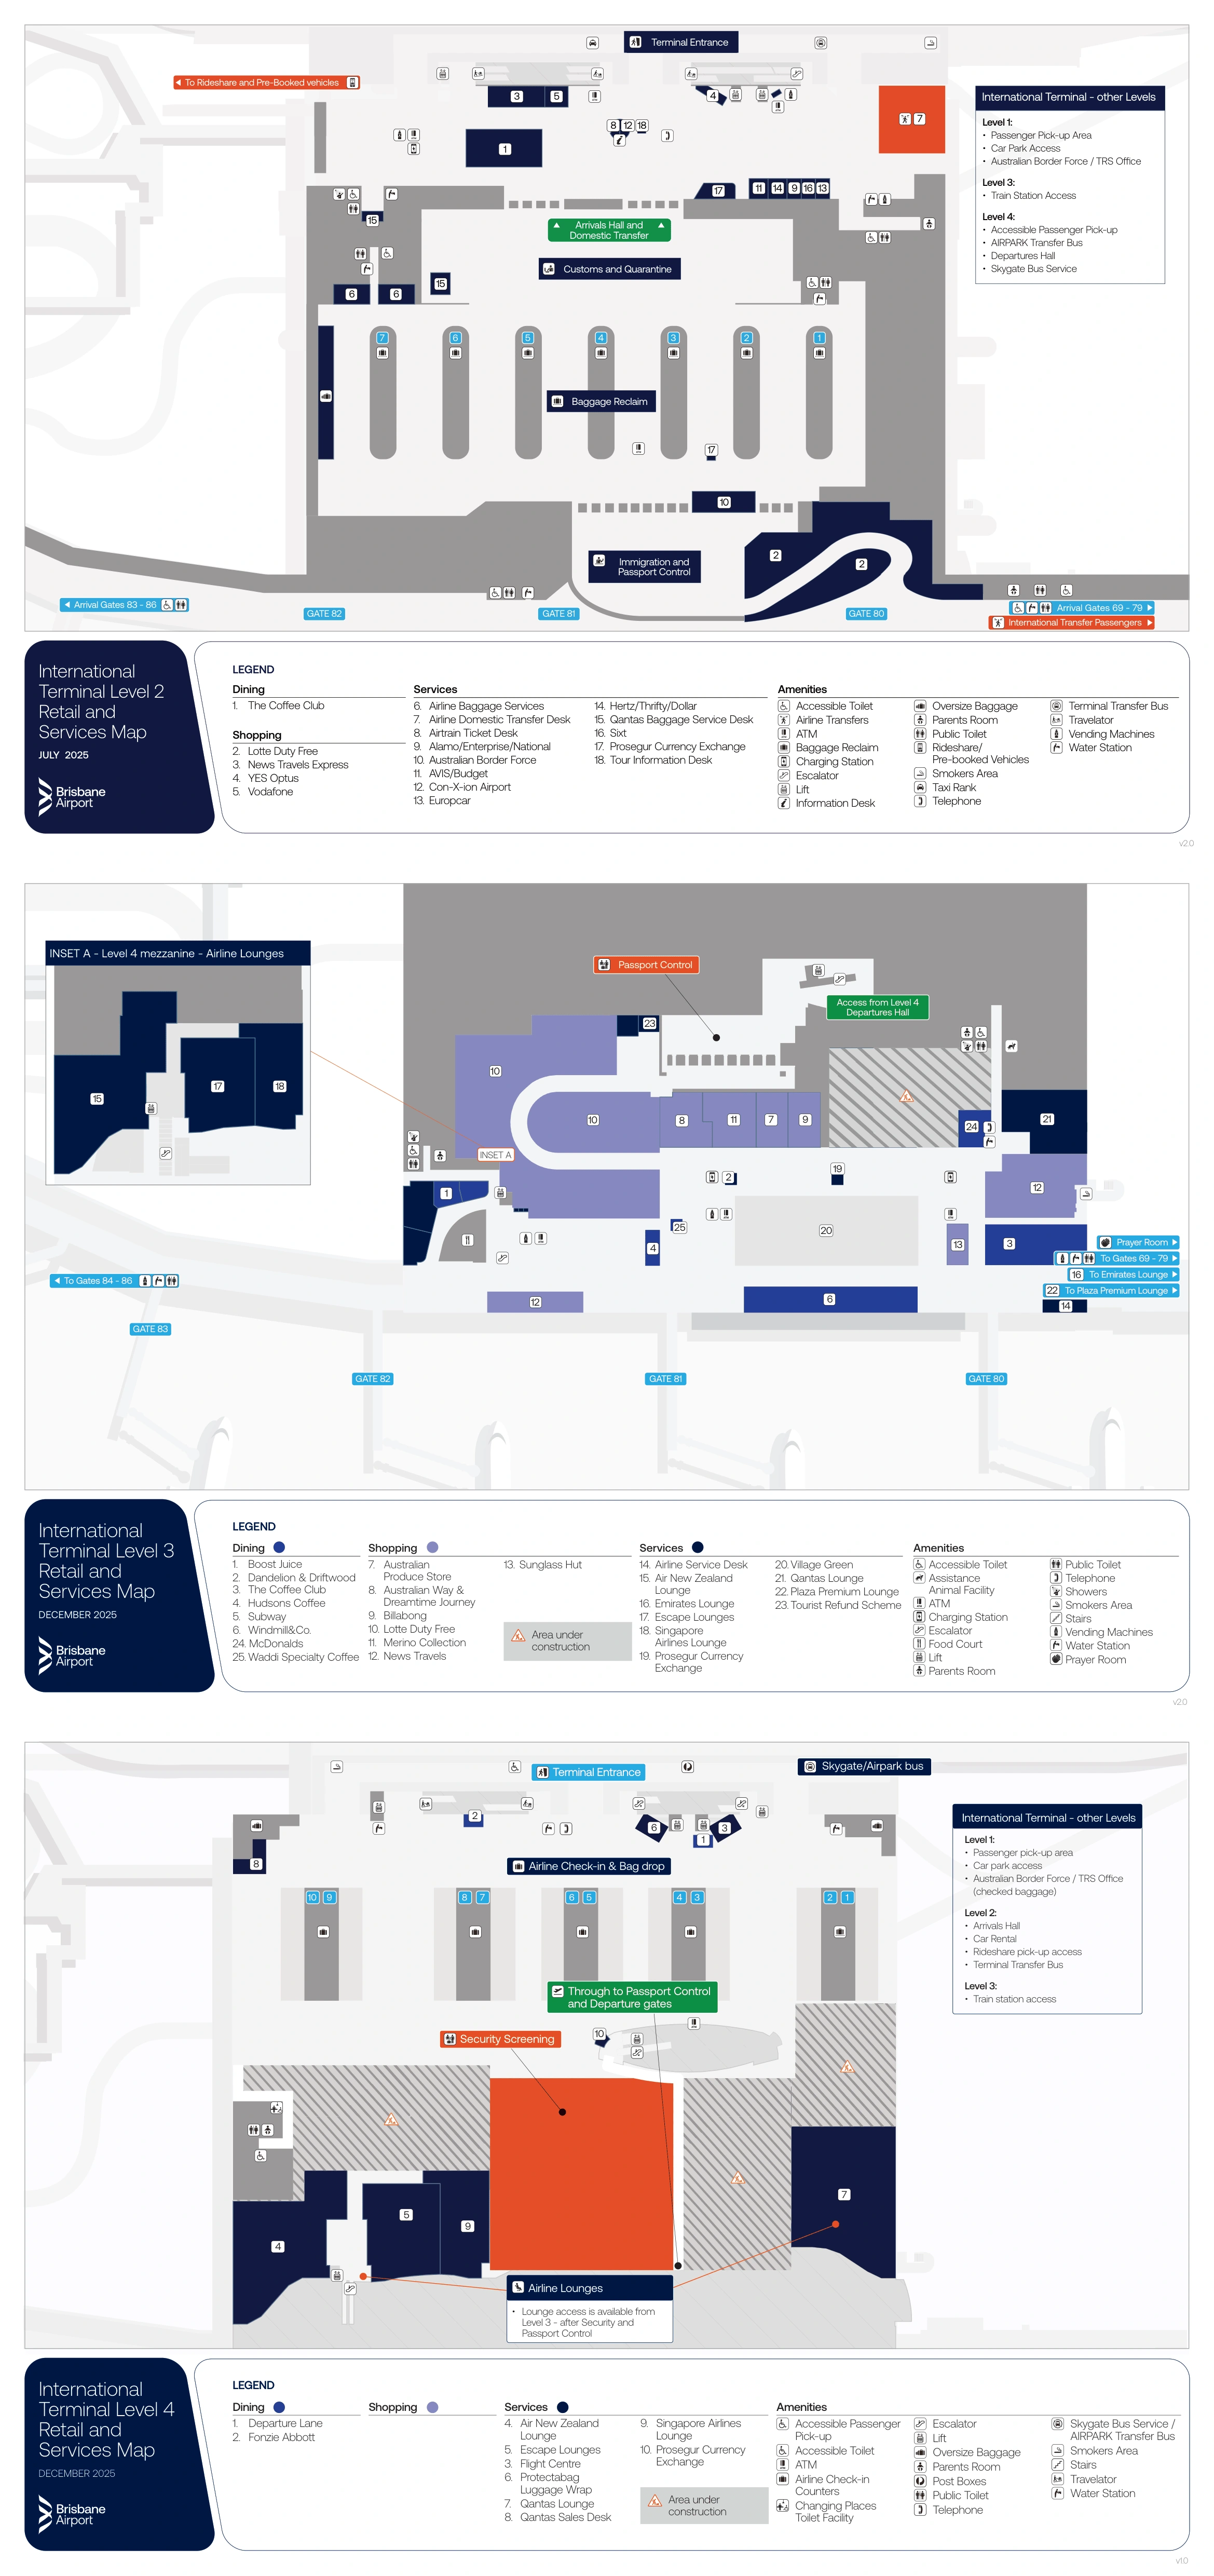
Brisbane Airport’s International Terminal is a tall, four-level “stacked” building with passenger flows separated by level: Arrivals processing on Level 2, the Airtrain bridge on Level 3, Departures check-in and security on Level 4, and service/pick-up functions anchored on Level 1. Within the broader Brisbane airport hub, the terminal runs as a mostly linear funnel end-to-end, with north/south extremes creating wrong-turn risk for ground transport and long queue spillovers at peak banks.
Map Table
| Level | Primary Use | Key Waypoints | Ground Access |
|---|---|---|---|
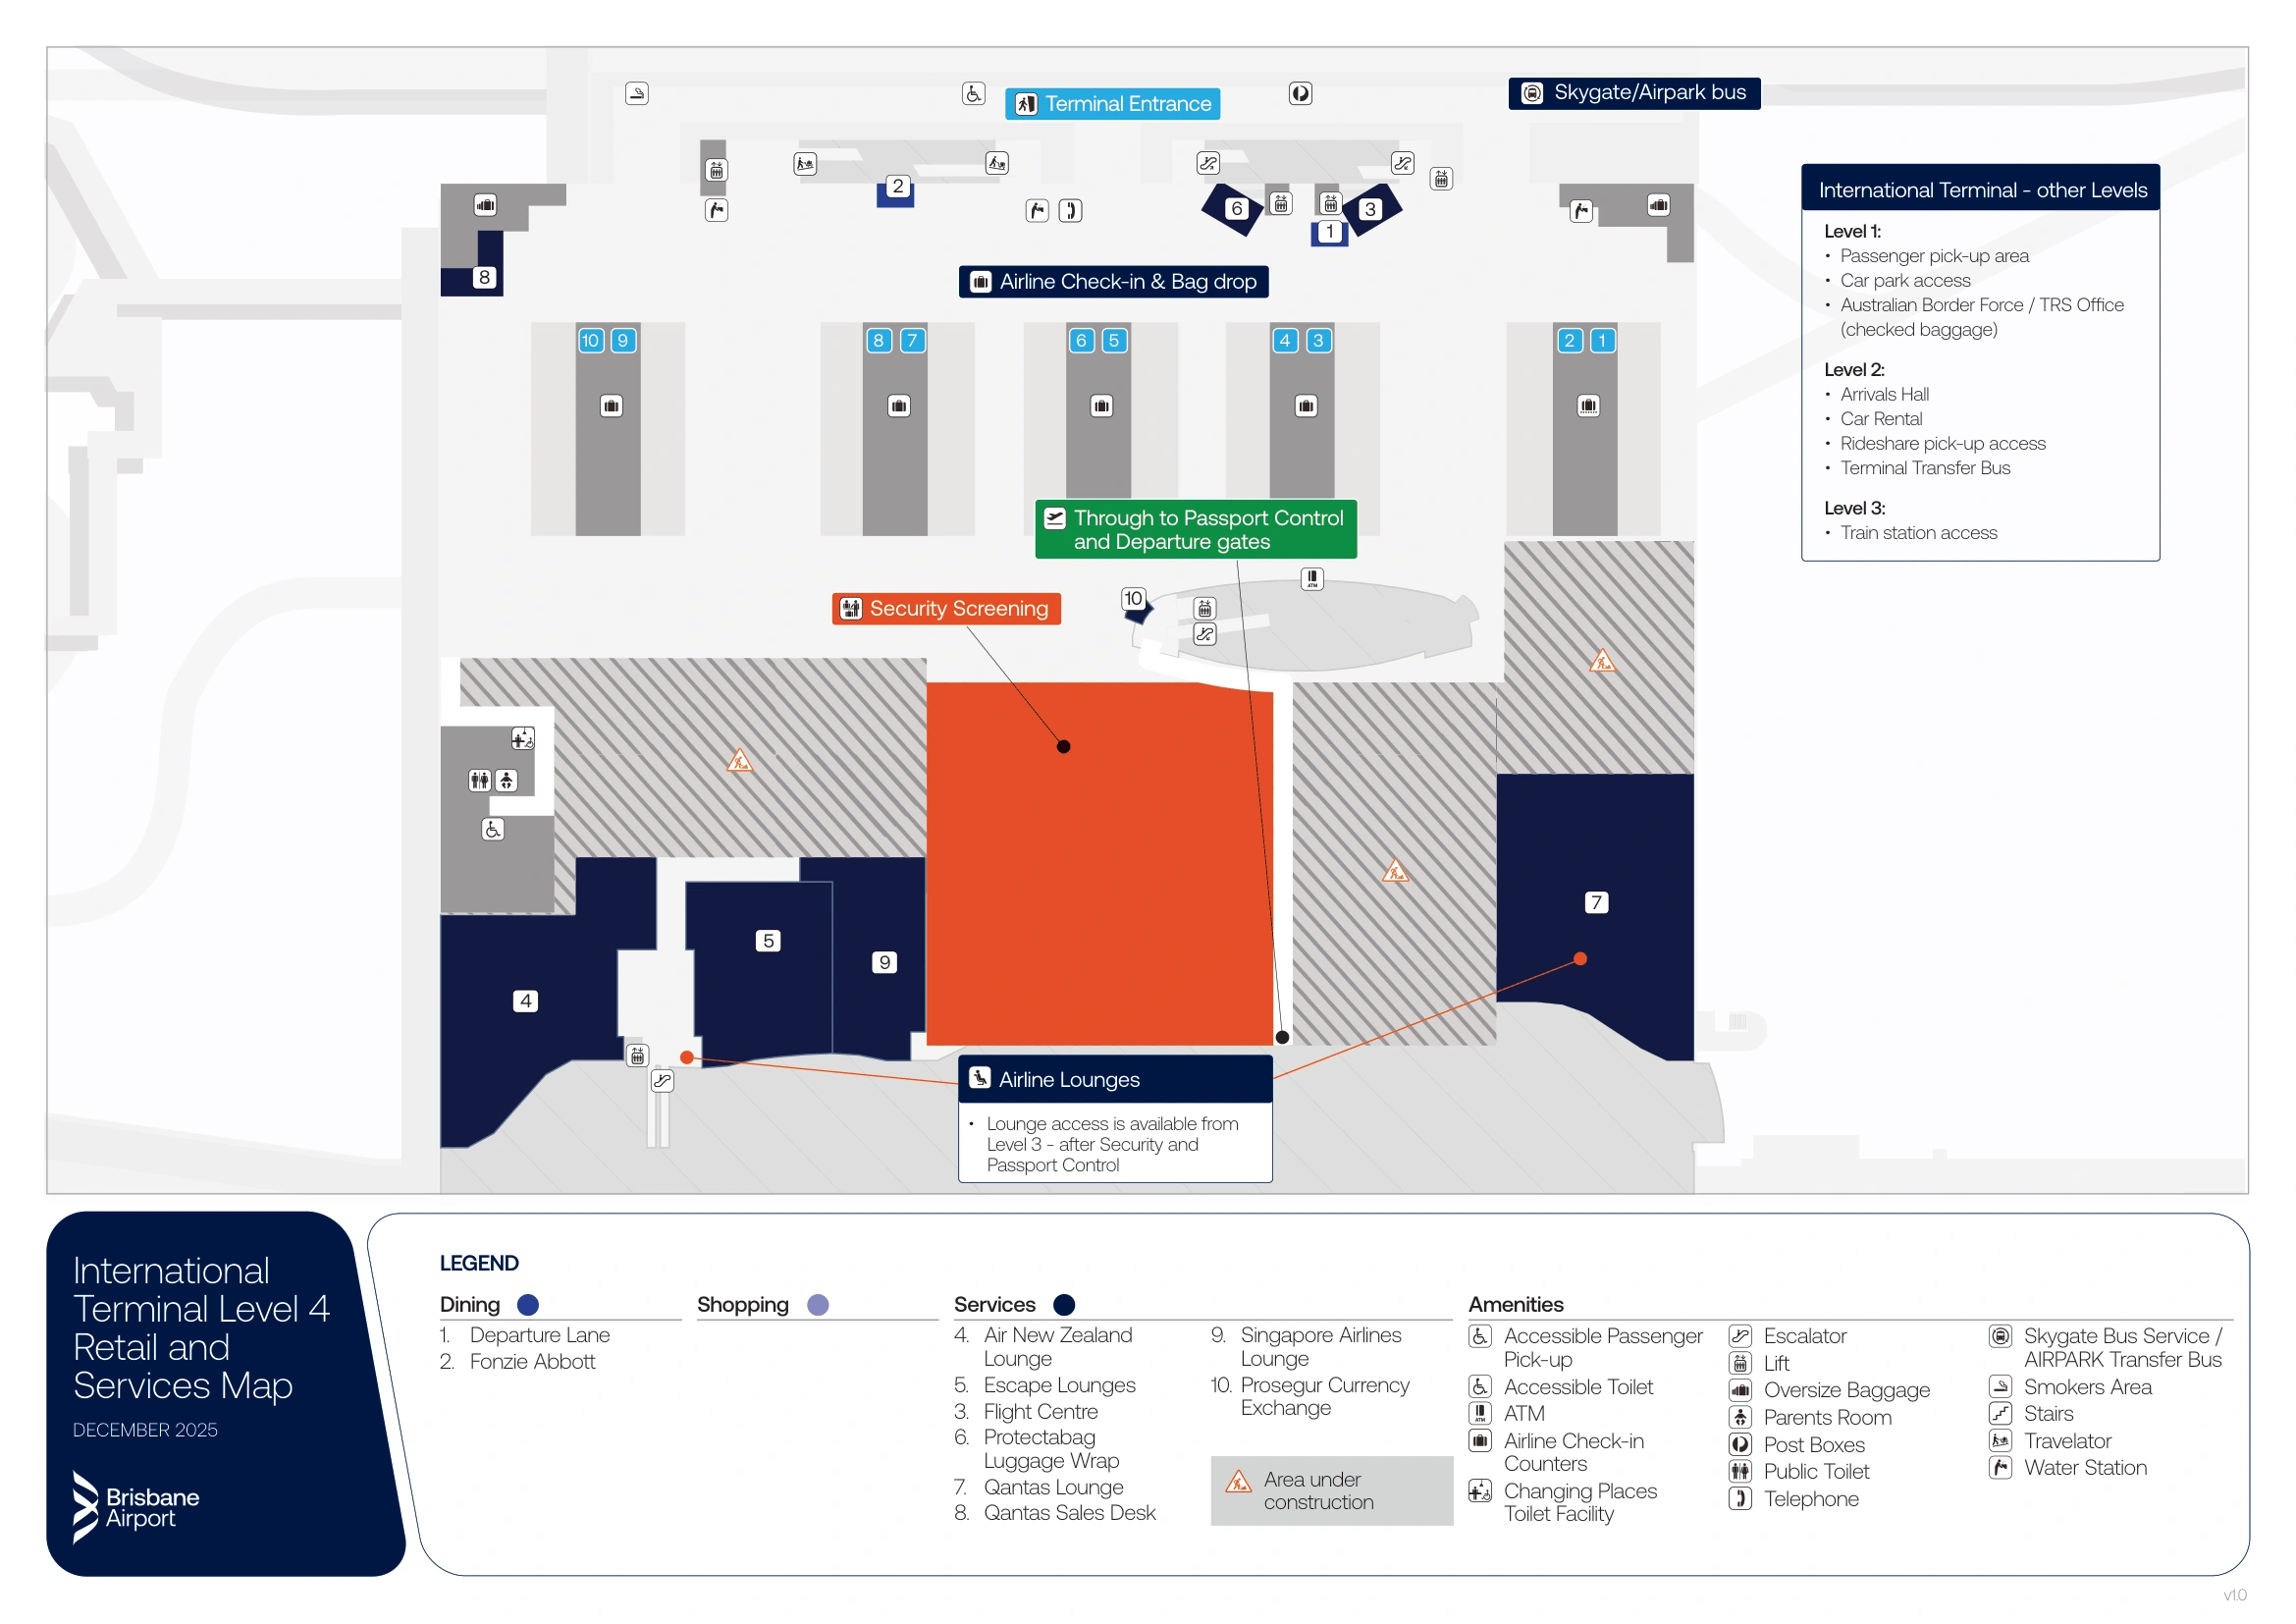
| Level 4 | Departures landside | Check-in Rows A–C; oversized drop; primary security | Departures drop-off; Skygate/AIRPARK stops |
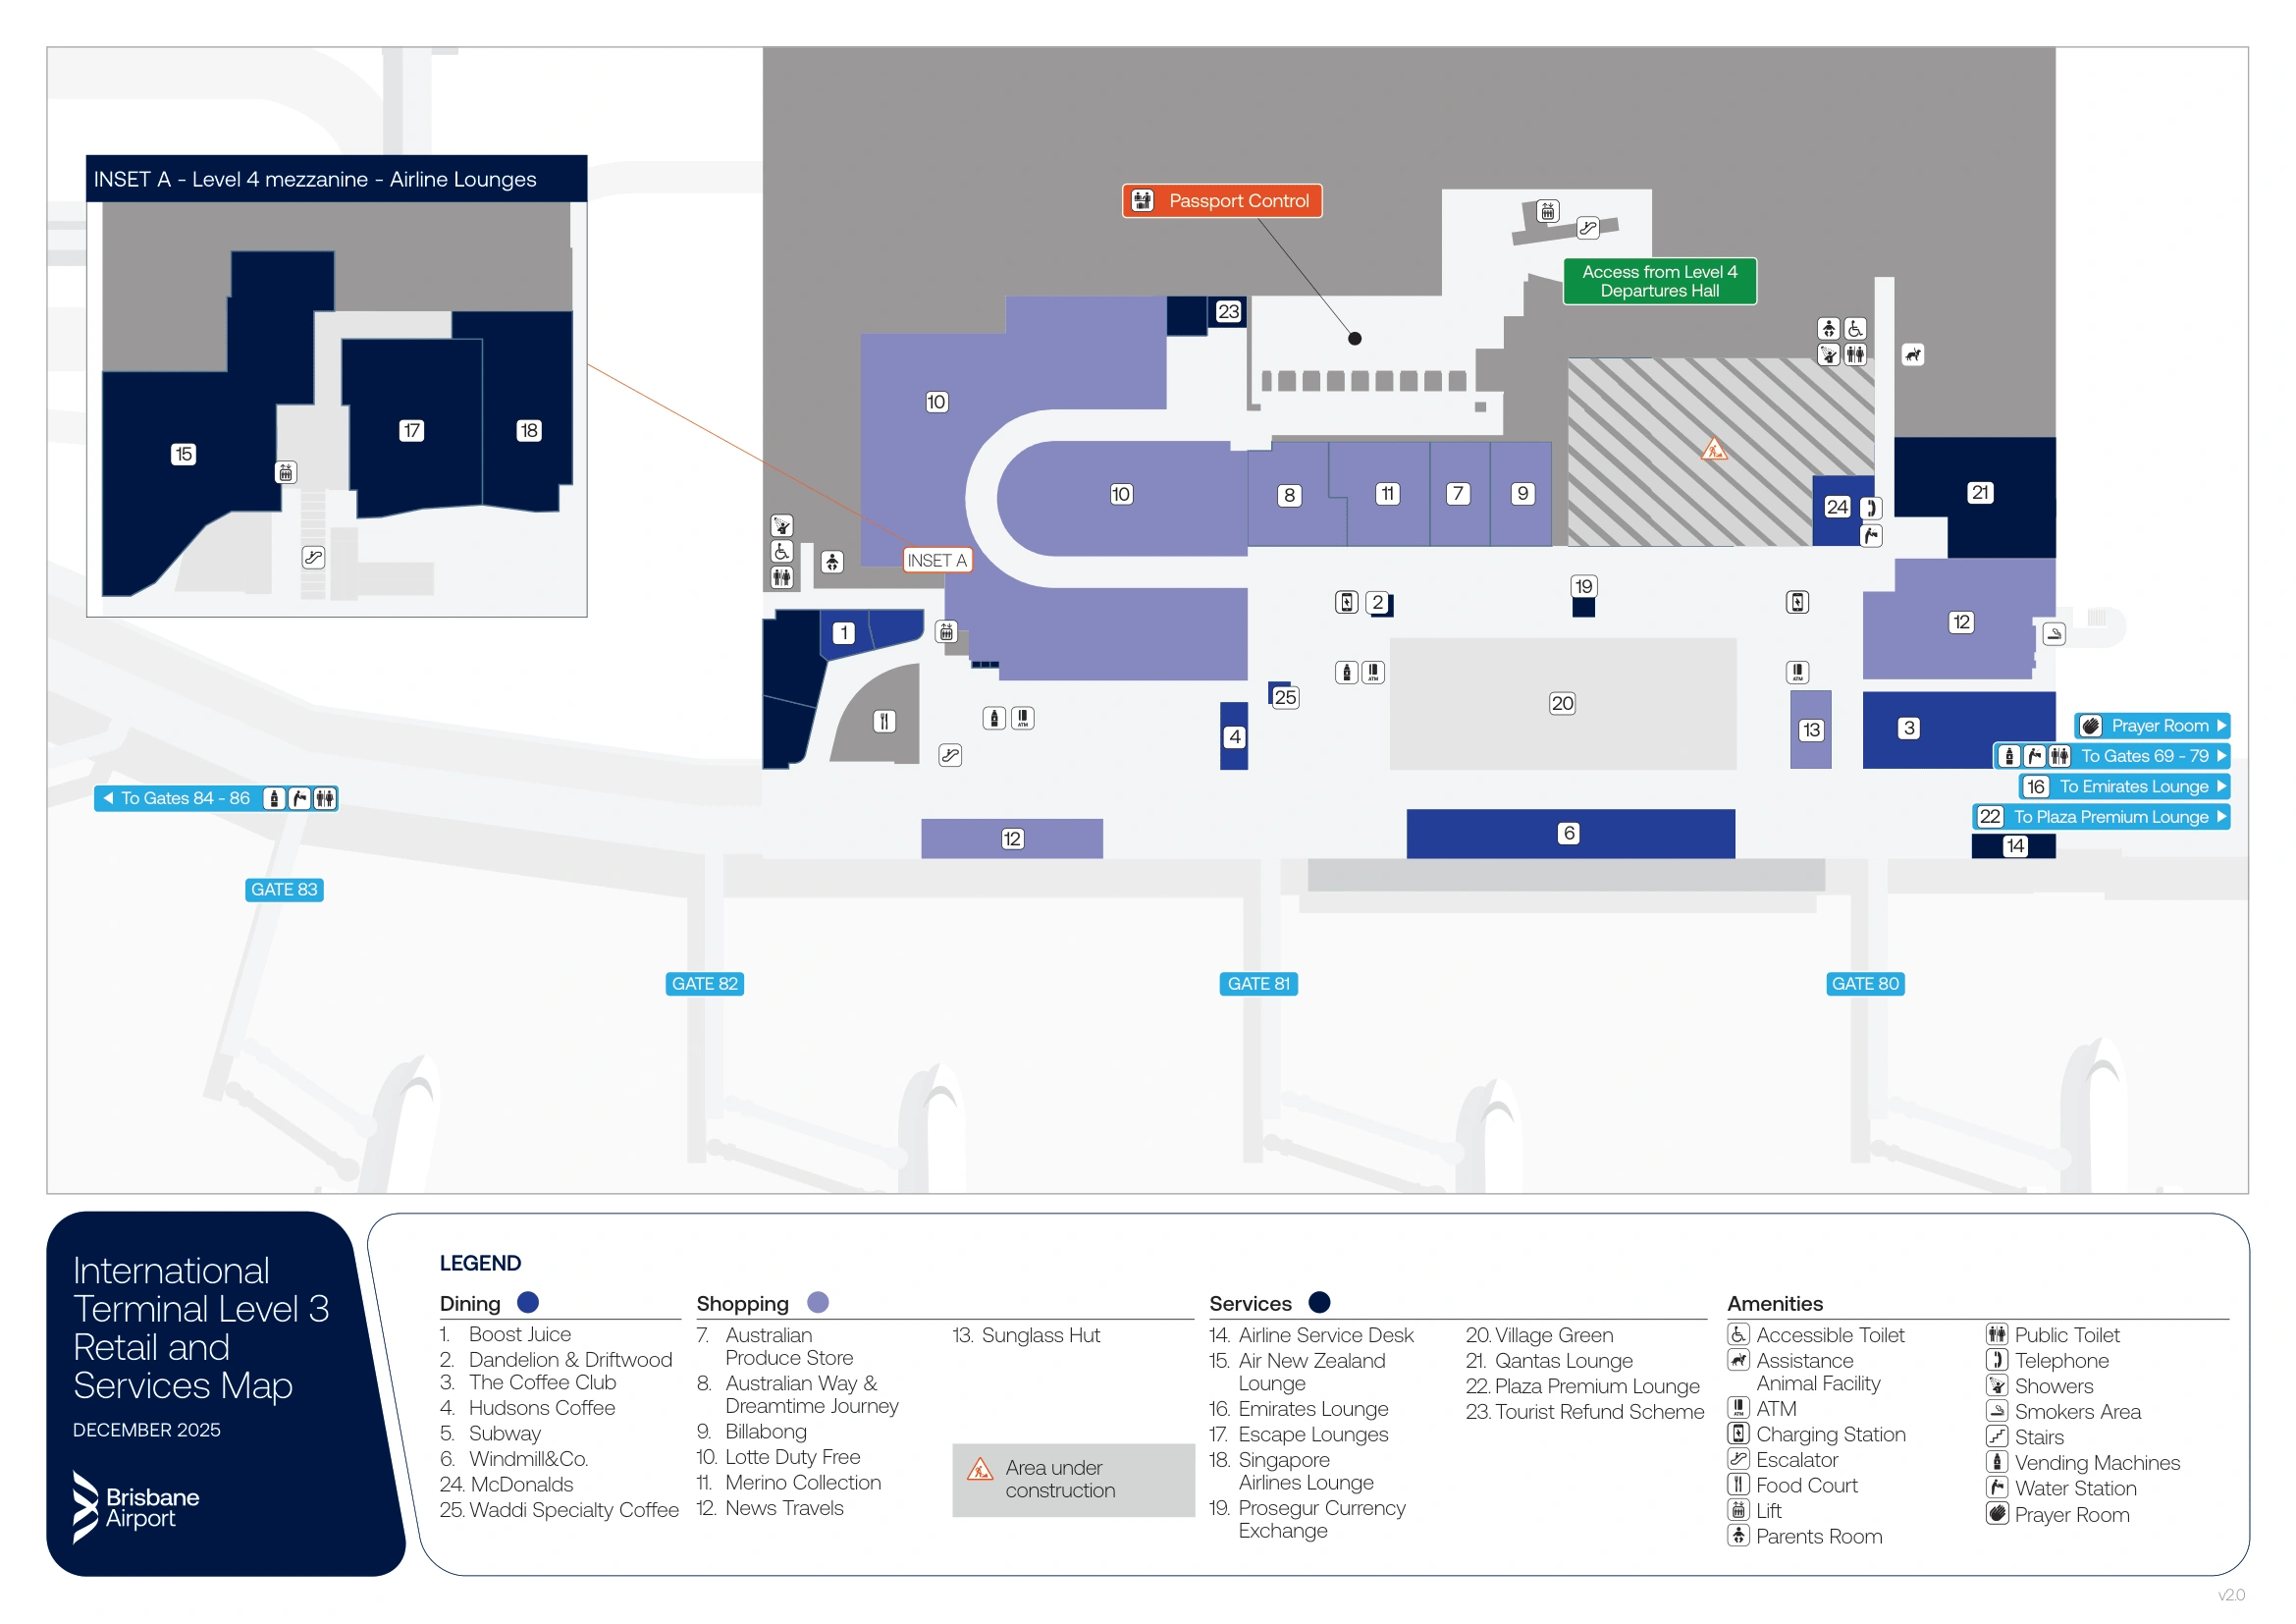
| Level 3 | Departures airside + rail access | Passport control; duty free; lounge spine; Airtrain bridge | Airtrain via elevated pedestrian bridge |
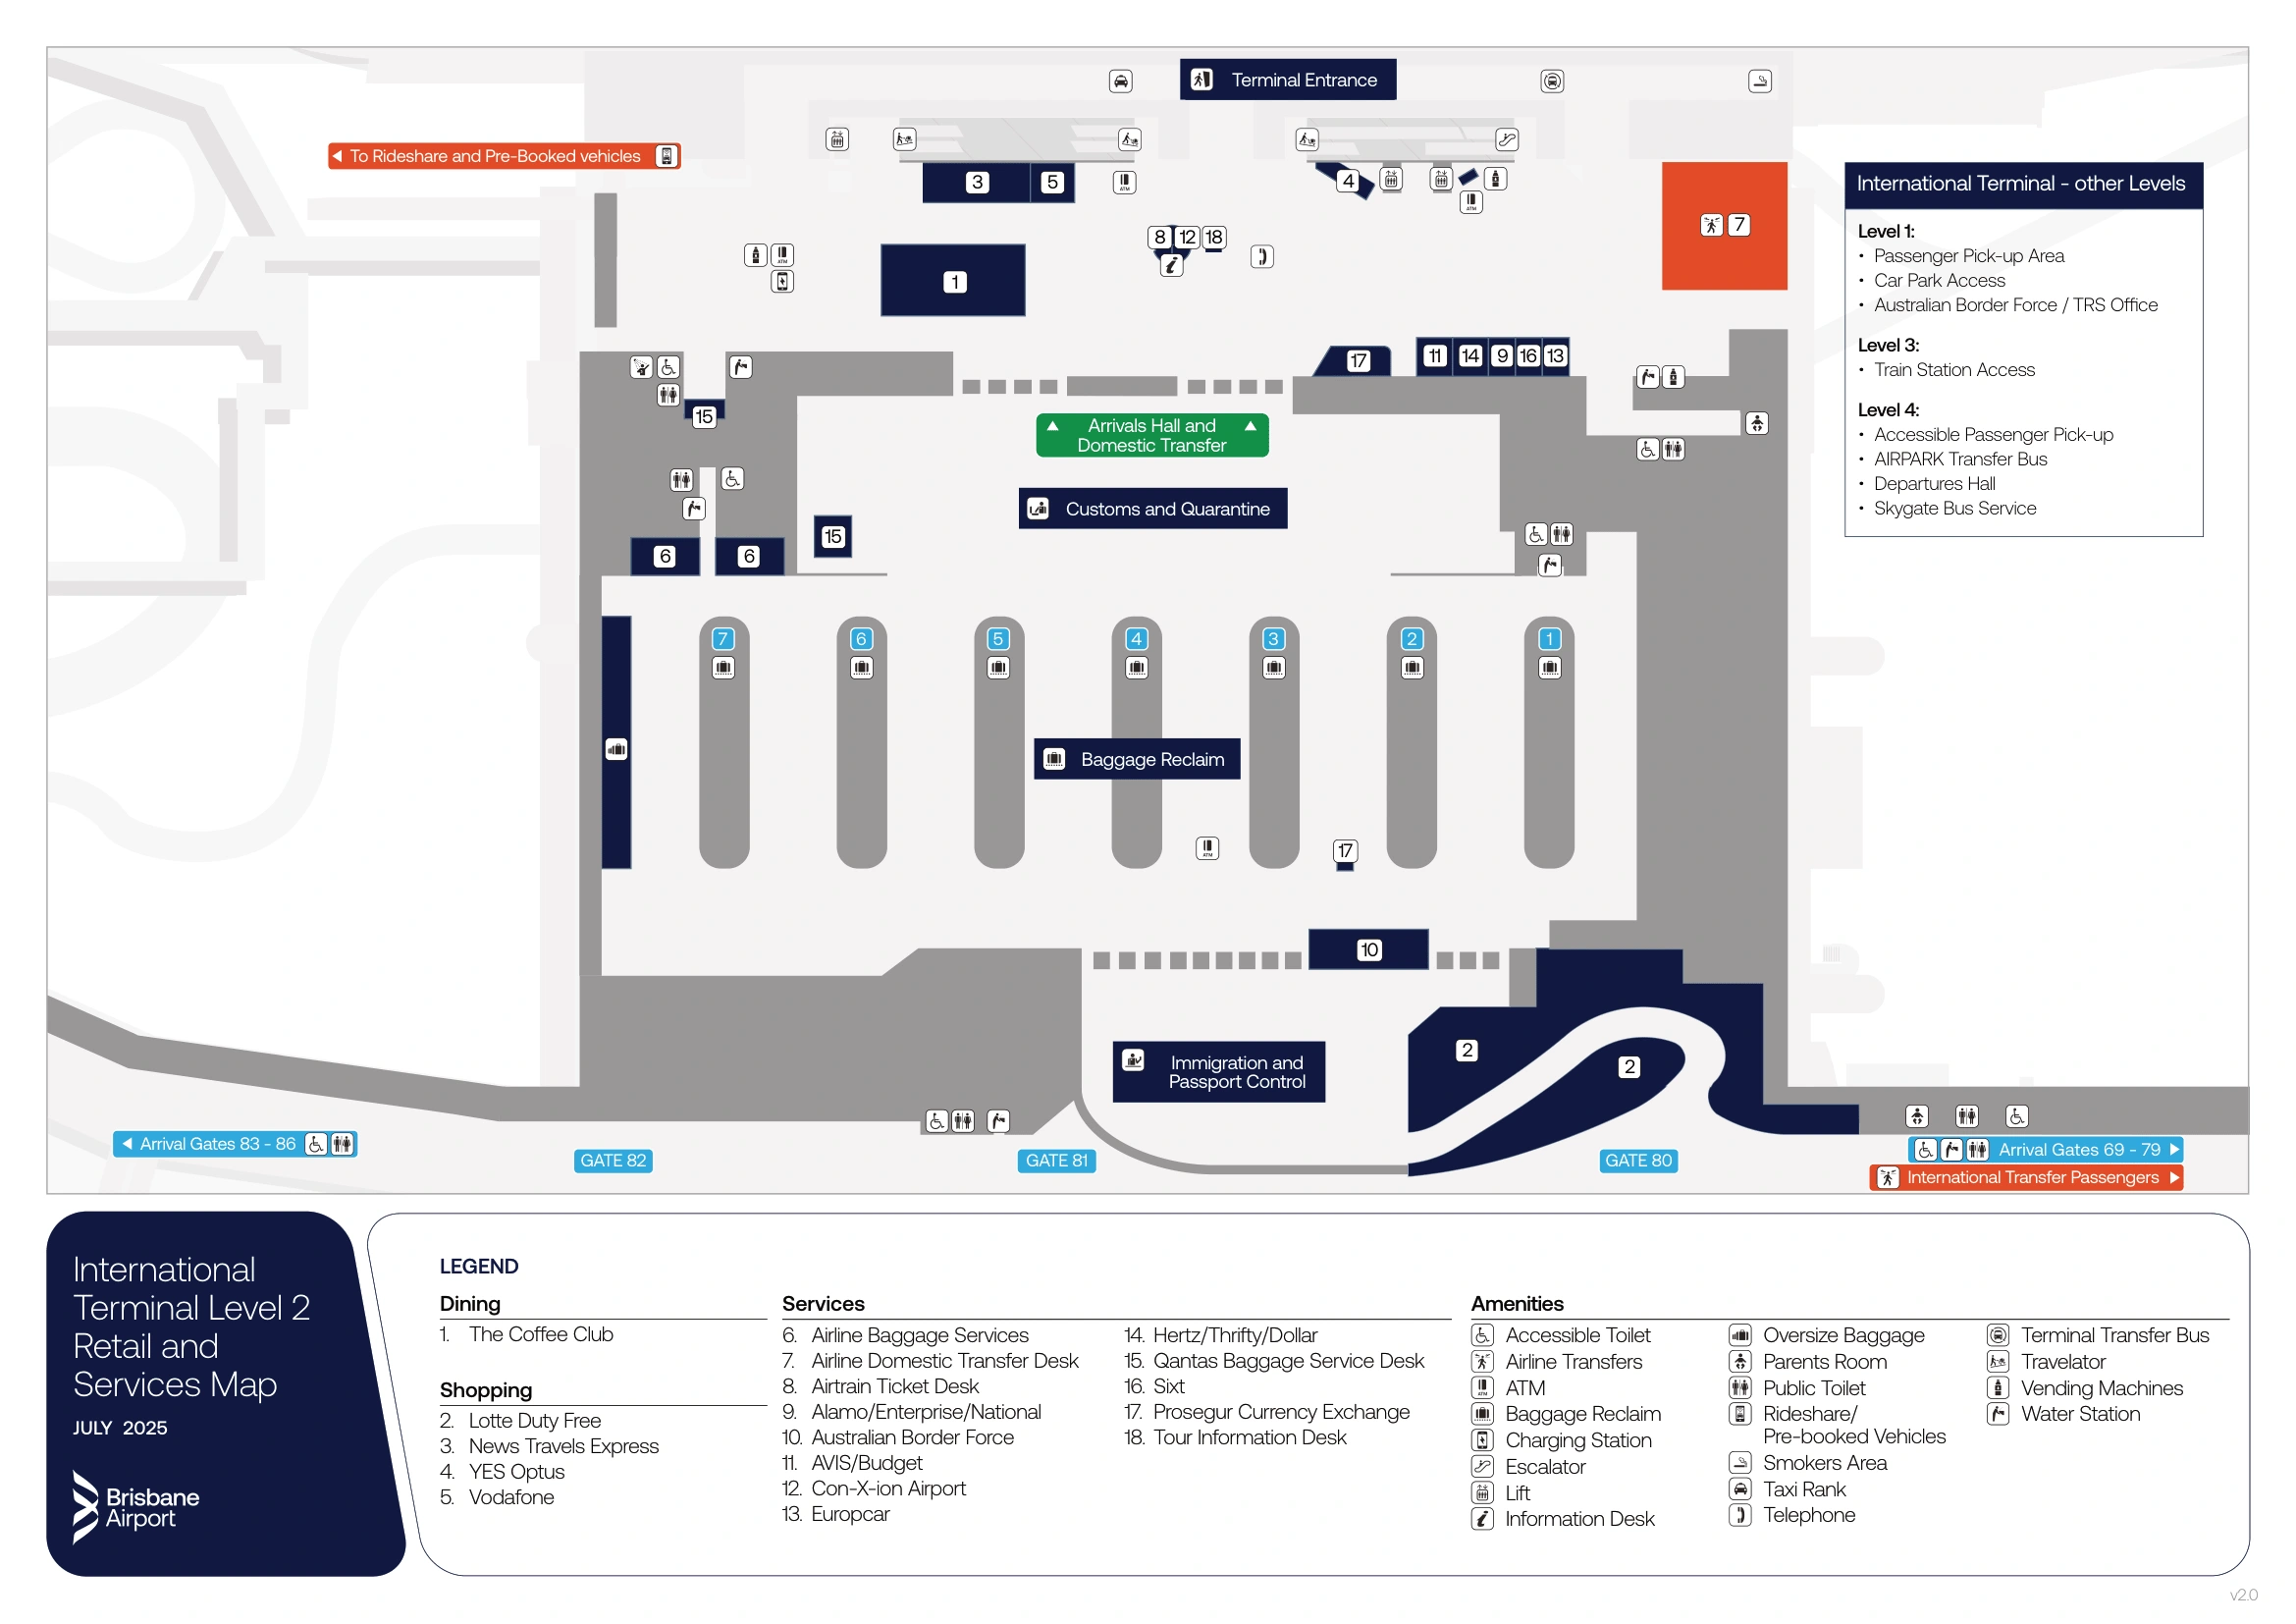
| Level 2 | International arrivals | Immigration; baggage reclaim; customs/biosecurity; transfer desk | Taxi rank; T-Bus stop; rideshare walkout |
| Level 1 | Services + pick-up | ABF Client Services; airline offices | Public passenger pick-up zone |
Brisbane Airport International Terminal Map Strategy
- Treat Level 2 as a funnel with moving line starts: pick your lane early (SmartGate vs manual), then commit to the first obvious “join here” point to avoid backtracking into a longer merge.
- Assume the biggest failure happens after baggage: locate the single customs/biosecurity merge mouth before you hit carousel crowds, then follow the forced collapse point instead of joining side lines between belts.
- Lock in the transfer decision at Arrivals: find the Domestic Transfer Desk on Level 2 before you exit, because leaving without using it can convert your connection into a full luggage haul and re-check.
- For Domestic ⇄ International transfers, navigate by door/level waypoints, not “follow the signs”: the bus stop and rail access live on different levels, and peak-bank stress makes the wrong level the fastest way to miss a connection.
2026 Brisbane International Airport International Terminal Map + Printable PDF
Current routing at Brisbane International is shaped by the ongoing terminal upgrade program and shifting queue footprints, especially around Departures security (now on Level 4) and constrained corridor space that can turn into “miles of lines” during peak waves. Temporary closures can also force lift detours between Levels 2–4, so a 2026 map should prioritize exact level changes, the correct exit doors, and the non-walkable realities between terminals.
Brisbane International Airport International Terminal Level 2 Map 2025-2026
Brisbane International Airport International Terminal Level 3 Map 2025-2026
Brisbane International Airport International Terminal Level 4 Map 2025-2026
2026 Brisbane International Airport International Terminal Map Guide
What is the exact physical start point of the Arrivals immigration queue (the first “join here” decision node) after international disembarkation?
The Arrivals immigration queue starts at the entrance mouth to the Level 2 Immigration Hall where the corridor from the airbridge arrivals walkway opens into the SmartGate/manual-processing split. This is the first true “join here” decision node, because the flow stops being a moving corridor and becomes two banked queues.
After leaving the aerobridge, stay on Level 2 and follow the primary “Arrivals / Passport Control” stream until the space widens into the immigration hall. The start point is the first barriered queue line immediately before the SmartGate banks, with the manual-processing queue beginning alongside it. The closest landmark is the SmartGate kiosks and their stanchioned lanes at the head of the hall; once you see the SmartGate face-on, you’re at the queue origin.
Where is the first forced merge point between baggage carousels and the customs/biosecurity exit queue, where multiple lines collapse into one?
The first forced merge point is the single Biosecurity/Customs screening entrance mouth on Level 2 immediately after the baggage reclaim zone, where all carousel-side lines are funneled into one controlled lane. This is where the free-flow space between carousels ends and stanchions/lanes begin for inspection.
From any carousel, move toward the “Customs / Biosecurity” exit direction until you hit the only narrow opening that feeds into the screening area. The merge is physically defined by the first hard barrier line (stanchions or partitions) that captures passengers coming from multiple belts and feeds them forward as one queue. Use the end-of-reclaim landmark: it’s the point where passengers stop circulating around belts and instead face a single forward channel toward officers and screening benches.
What is the exact door/exit number (and level) where you catch the Domestic ⇄ International transfer bus from the International Terminal?
The Domestic ⇄ International transfer bus is caught on Level 2 directly outside the International Arrivals hall at the terminal transfer (T-Bus) stop beside the Domestic Transfer Desk area. A numbered “door/exit” is not the way this stop is designated on-site; the reliable waypoint is the central Arrivals exit onto the Level 2 arrivals roadway.
From customs/biosecurity, follow the stream into the public Arrivals hall on Level 2 and keep moving toward the main external doors to the arrivals roadway. The stop is immediately outside those doors, clustered next to the Domestic Transfer Desk zone used by Qantas/Virgin domestic connections. If you can see the taxi rank area on the Level 2 roadway, you are in the correct frontage; the T-Bus stop is on this same arrivals-level curbside, not up on Level 4 and not over at the Level 3 Airtrain bridge.
What is the exact walking distance (meters) from the International Arrivals exit to the Airport Train station entrance used by passengers (not carparks/back-of-house paths)?
Walking is about 320 meters from the International Arrivals exit doors on Level 2 to the passenger-used Airtrain station entrance on Level 3 (via the elevated bridge). This route is fully public-access and avoids carpark/back-of-house shortcuts.
| Segment | Waypoint-to-waypoint | Distance |
|---|---|---|
| 1 | Level 2 Arrivals exit doors → main lift/travelator bank up to Level 3 | 60 m |
| 2 | Lift/travelator landing (Level 3) → landside “Airtrain” bridge doors | 90 m |
| 3 | Elevated pedestrian bridge → Airtrain station entrance doors | 170 m |
| Total | 320 m |
Where is the primary entry mouth of International Departures security screening (the exact point people begin lining up from check-in)?
The primary entry mouth of International Departures security screening is on Level 4 at the new main security checkpoint immediately off the check-in hall, where stanchions begin feeding into the X-ray and body-scanner lanes. This is the first fixed “line starts here” point for departing passengers once you leave the open check-in rows.
From the central Level 4 check-in zone (Rows A–C), follow the “Departures / Gates” stream until you reach the obvious barriered queue corral leading into screening equipment. The closest landmark is the security hardware itself: X-ray belt openings and millimeter-wave body scanners visible beyond the stanchions. Treat this as one-way: once you clear Level 4 security and descend to Level 3 for outbound passport control and duty free, returning landside to Level 4 is not straightforward.
What is the shortest navigable route from the main international check-in counter zone to Departures security, measured as walking distance (meters)?
Walking is about 140 meters from the main Level 4 international check-in counter zone (Rows B/C central area) to the Level 4 Departures security queue mouth. This is the shortest navigable path in normal operations because it stays on Level 4 and does not use any down-and-up detours.
From the densest check-in area, aim straight for the “Departures / Gates” flow that leads into the stanchioned security corral, not toward lifts/escalators. The key junction is the point where open check-in floor becomes constrained by construction hoarding and queue barriers; once you see the first stanchions for security, you’re at the entry mouth. If the southern-end escalators are closed, avoid heading that way—use the direct Level 4 line toward the visible X-ray/body-scanner hardware instead.
Where is the official rideshare pickup zone (Uber/DiDi etc.) relative to the International Arrivals exit doors—which door gets you there with the fewest wrong turns?
The official rideshare pickup zone is on Level 2 at the northern end of the terminal, reached by turning left from the Arrivals hall and walking to The Coffee Club, then exiting behind it down the signed ramp to the dedicated rideshare area. The fewest-wrong-turns path starts from the central Level 2 Arrivals exit doors and immediately commits left toward the building’s northern extremity.
After you clear customs/biosecurity and enter the public Arrivals hall, leave through the main Level 2 doors to the arrivals roadway and turn left without crossing to the taxi rank queue. Keep walking along the frontage until you reach The Coffee Club (your anchor landmark). Behind The Coffee Club is the key decision node: follow the rideshare signage to the ramped path leading down and out to the designated pickup zone, rather than waiting at the curbside taxi frontage where app drivers cannot stop.
Where is the official taxi rank queue relative to the Arrivals exit, and what is the exact queue entry point passengers should join (to avoid informal solicitation zones)?
The official taxi rank queue is on the Level 2 arrivals roadway immediately outside the International Arrivals exit frontage, with the queue entry at the stanchioned taxi line start beside the terminal doors. This is the controlled, metered rank; joining anywhere else increases solicitation and wrong-vehicle risk.
Exit customs/biosecurity into the public Arrivals hall on Level 2, then go out through the central external doors to the arrivals roadway. The taxi queue begins right outside this frontage—look for the formal barriered line and rank marshal position rather than approaching individuals inside the hall or at random curb points. If you can see the main Level 2 curb lane and the structured stanchions forming a single file, you’re at the correct entry mouth; do not follow anyone offering “taxi” services away from the marked queue.
Where are the nearest luggage trolley bays positioned for arriving passengers before leaving the controlled arrivals area (the last trolley-access decision node)?
The nearest “last-chance” luggage trolley bays are positioned on Level 2 at the edges of baggage reclaim just before the customs/biosecurity funnel, where trolley access transitions from reclaim circulation into the single exit channel. This is the final point you can reliably grab a trolley before you’re committed into the inspection lanes.
After passport control, enter the baggage reclaim hall and look along the main walkway that runs between the carousels and the direction-of-travel toward “Customs / Biosecurity.” The last trolley-access decision node is at the reclaim-to-screening boundary: near the end of the carousel zone where passengers stop looping around belts and begin lining up toward screening. If you reach the stanchioned merge mouth for biosecurity/customs and you still don’t have a trolley, backtracking into the carousel area is the highest-friction move during peak banks—grab one before you enter that constrained queue corridor.
Where is the TRS (Tourist Refund Scheme) counter located in relation to Departures security and duty free, and what is the exact path junction where you must turn off?
The TRS claims counter is on Level 3 immediately after outbound passport control, positioned to the right of the Lotte Duty Free entrance. This means the critical turn-off is the first junction after passport control where the main flow pulls into the duty-free walkthrough and you instead peel right to the TRS desk.
From Level 4 security, continue to Level 3 for outbound processing and clear passport control. As you emerge, you’ll see the duty-free entry ahead as the dominant “walkthrough” route; the TRS desk is not inside the duty-free maze. At the junction where the concourse funnels toward Lotte Duty Free, turn right before committing into the duty-free entrance. If you’re already being pulled forward into the duty-free walkthrough aisles, you’ve missed the cleanest TRS turn and will need to locate the exit back toward that passport-control threshold.
After outbound processing, what is the exact exit point from the duty-free walkthrough back into the main departures concourse (the “you’re done with duty free” waypoint)?
The duty-free walkthrough exits back into the Level 3 main departures concourse at the single open mouth where the retail corridor releases you into the wider gate lounge spine. This waypoint is the first point after the Lotte Duty Free walkthrough where stanchions and retail walls stop and you regain full sightlines to gates, lounges, and concourse signage.
After passport control you’re funneled into duty free; stay with the one-way retail path until the corridor widens and the controlled retail boundary ends. The “done with duty free” point is identifiable because it’s the first place you can turn freely left/right toward gates rather than being shepherded straight through product aisles. Use the landmark logic: once you can see the broader departures lounge seating area and overhead gate-direction signs again (instead of shelf canyons), you are at the duty-free exit mouth back into the concourse.
Where are the Arrivals flight/carousel information screens positioned, and what is the closest screen cluster to the main immigration-to-baggage flow path?
Arrivals flight and carousel information screens are positioned at the baggage reclaim threshold and along the central spine between the carousels on Level 2. The closest cluster to the immigration-to-baggage flow is the first bank of screens you face as the passport-control exit corridor opens into baggage reclaim, before you fully enter the carousel floor.
- Baggage reclaim entrance mouth on Level 2, immediately after you leave the immigration hall and the space widens toward the belts
- Central walkway between the carousel islands, overhead-mounted where passengers circulate and look up for “Flight / Carousel” assignments
- Near the ends of the reclaim zone closest to the customs/biosecurity direction-of-travel, where late-arriving passengers re-check belt numbers before joining the exit funnel
In the Arrivals Hall, what is the exact location of the staff-controlled control point (where staff should be directing/triaging lines) relative to the carousels and exit lanes?
The staff-controlled control point is positioned on Level 2 at the central choke between the baggage carousel zone and the customs/biosecurity exit lanes, where officers can intercept passengers before the single-file screening queue forms. This is the only spot that can practically manage line starts, prevent queue jumping, and redirect travelers before they commit to the forced merge.
It sits just past the carousels in the direction of travel toward “Customs / Biosecurity,” at the head of the stanchioned lanes that pull people out of reclaim circulation. The defining geometry is a narrowing: open carousel space behind you, then a controlled corridor ahead. If you are still fully “among the belts,” you’re too early; if you’re already deep inside the inspection queue, you’re too late. The control point is the threshold where reclaim ends and the exit lanes begin.
If construction/closures reroute passengers, what is the exact detour path from International drop-off to the main check-in hall entrance (the first point where normal routing breaks)?
The construction detour begins at the Level 4 departures drop-off frontage where hoarding can block the direct straight-in line to the check-in doors, forcing you to divert toward the nearest open entry and then rejoin the check-in hall inside. The first point where normal routing breaks is the moment you meet closed corridor space on Level 4 and must choose lifts/alternate doors instead of the most obvious entrance.
Use this detour logic on Level 4: follow the pedestrian path from drop-off until you either see a clearly open terminal door into the check-in hall or you hit construction barriers that prevent the direct approach. If the southern end vertical connectors are affected (escalators closed), do not commit to that end; pivot to the lift bank opposite the closure and enter via the nearest open Level 4 doors that feed directly into Rows A–C. The operational rule is to stay on Level 4 for check-in—any route that drifts you down toward Level 2 is a detour failure unless signage explicitly forces it that day.
Archive Brisbane International Airport International Terminal Map
Below are all historical map versions for Brisbane International Airport. Each year includes the official map available for that period, presented as both WebP and PDF.
2025-2026 Brisbane International Airport International Terminal Map (Official 2025 Edition)