Haneda International Airport Terminal 1 Map (Most Up-To-Date)
Haneda Terminal 1 (“Big Bird”) is a long, linear terminal laid out on a north–south axis inside Tokyo’s primary aviation hub, with a central “Marketplace” core that stacks the key vertical connections. The building is easy to understand once you lock in the floor logic: B1F is rail, 1F is arrivals and curbside buses, and 2F is departures and security. Most time loss comes from lateral wing walks plus wrong-floor detours.
Map Table
| Floor/Axis | Primary Nodes | Transfers | Common Failure |
|---|---|---|---|
| B1F | Keikyu gates, Monorail gates, Information Counter, Sun/Moon Towers | Rail to Terminal 3, rail to Terminal 2 | skipping Info Counter, backtrack loop |
| 1F | Arrivals lobby, baggage claim exits, curbside bus stops | free shuttle at Bus Stop 8 | wrong stop (Stop 9 city buses), wrong floor |
| 2F | check-in hall, security checkpoints A–G, departures curb | airside to gates 1–24 | wrong wing, long corrective walk |
| North–South | North Wing, Marketplace center, South Wing | wing-to-wing walks | underestimating concourse distance |
Haneda Airport Terminal 1 Map Strategy
- Treat terminal-name confusion as a routing problem: Terminal 1 is domestic-first, and most international departures are Terminal 3, so plan a landside transfer before you move floors.
- Lock the “floor rule” into muscle memory: Bus on 1F, Plane on 2F, Train on B1F; if you’re looking for the free shuttle on B1F, you’re already in the wrong place.
- Use the map to prove feasibility: locate Bus Stop 8, the Marketplace elevator/escalator spine, and the nearest correct-wing checkpoint so your route has minimal level changes and no backtracking.
- Watch for negative constraints: you can’t switch terminals airside, and a terminal switch often means exiting to landside (and potentially re-clearing security), so budget time for that reset before committing to a “tight” transfer.
2026 Haneda International Airport Terminal 1 Map + Printable PDF
Terminal 1’s core navigation rules remain the same in 2026: the free inter-terminal shuttle to Terminal 3 is landside at 1F Bus Stop 8, trains sit on B1F, and domestic departures/security are on 2F. Printing a Terminal 1 map is most useful for two things—pinpointing the exact Bus Stop 8 curb position and planning the fastest vertical move through the Marketplace without drifting into the wrong wing.
Haneda International Airport Terminal 1 1F Arrival Lobby Map 2026

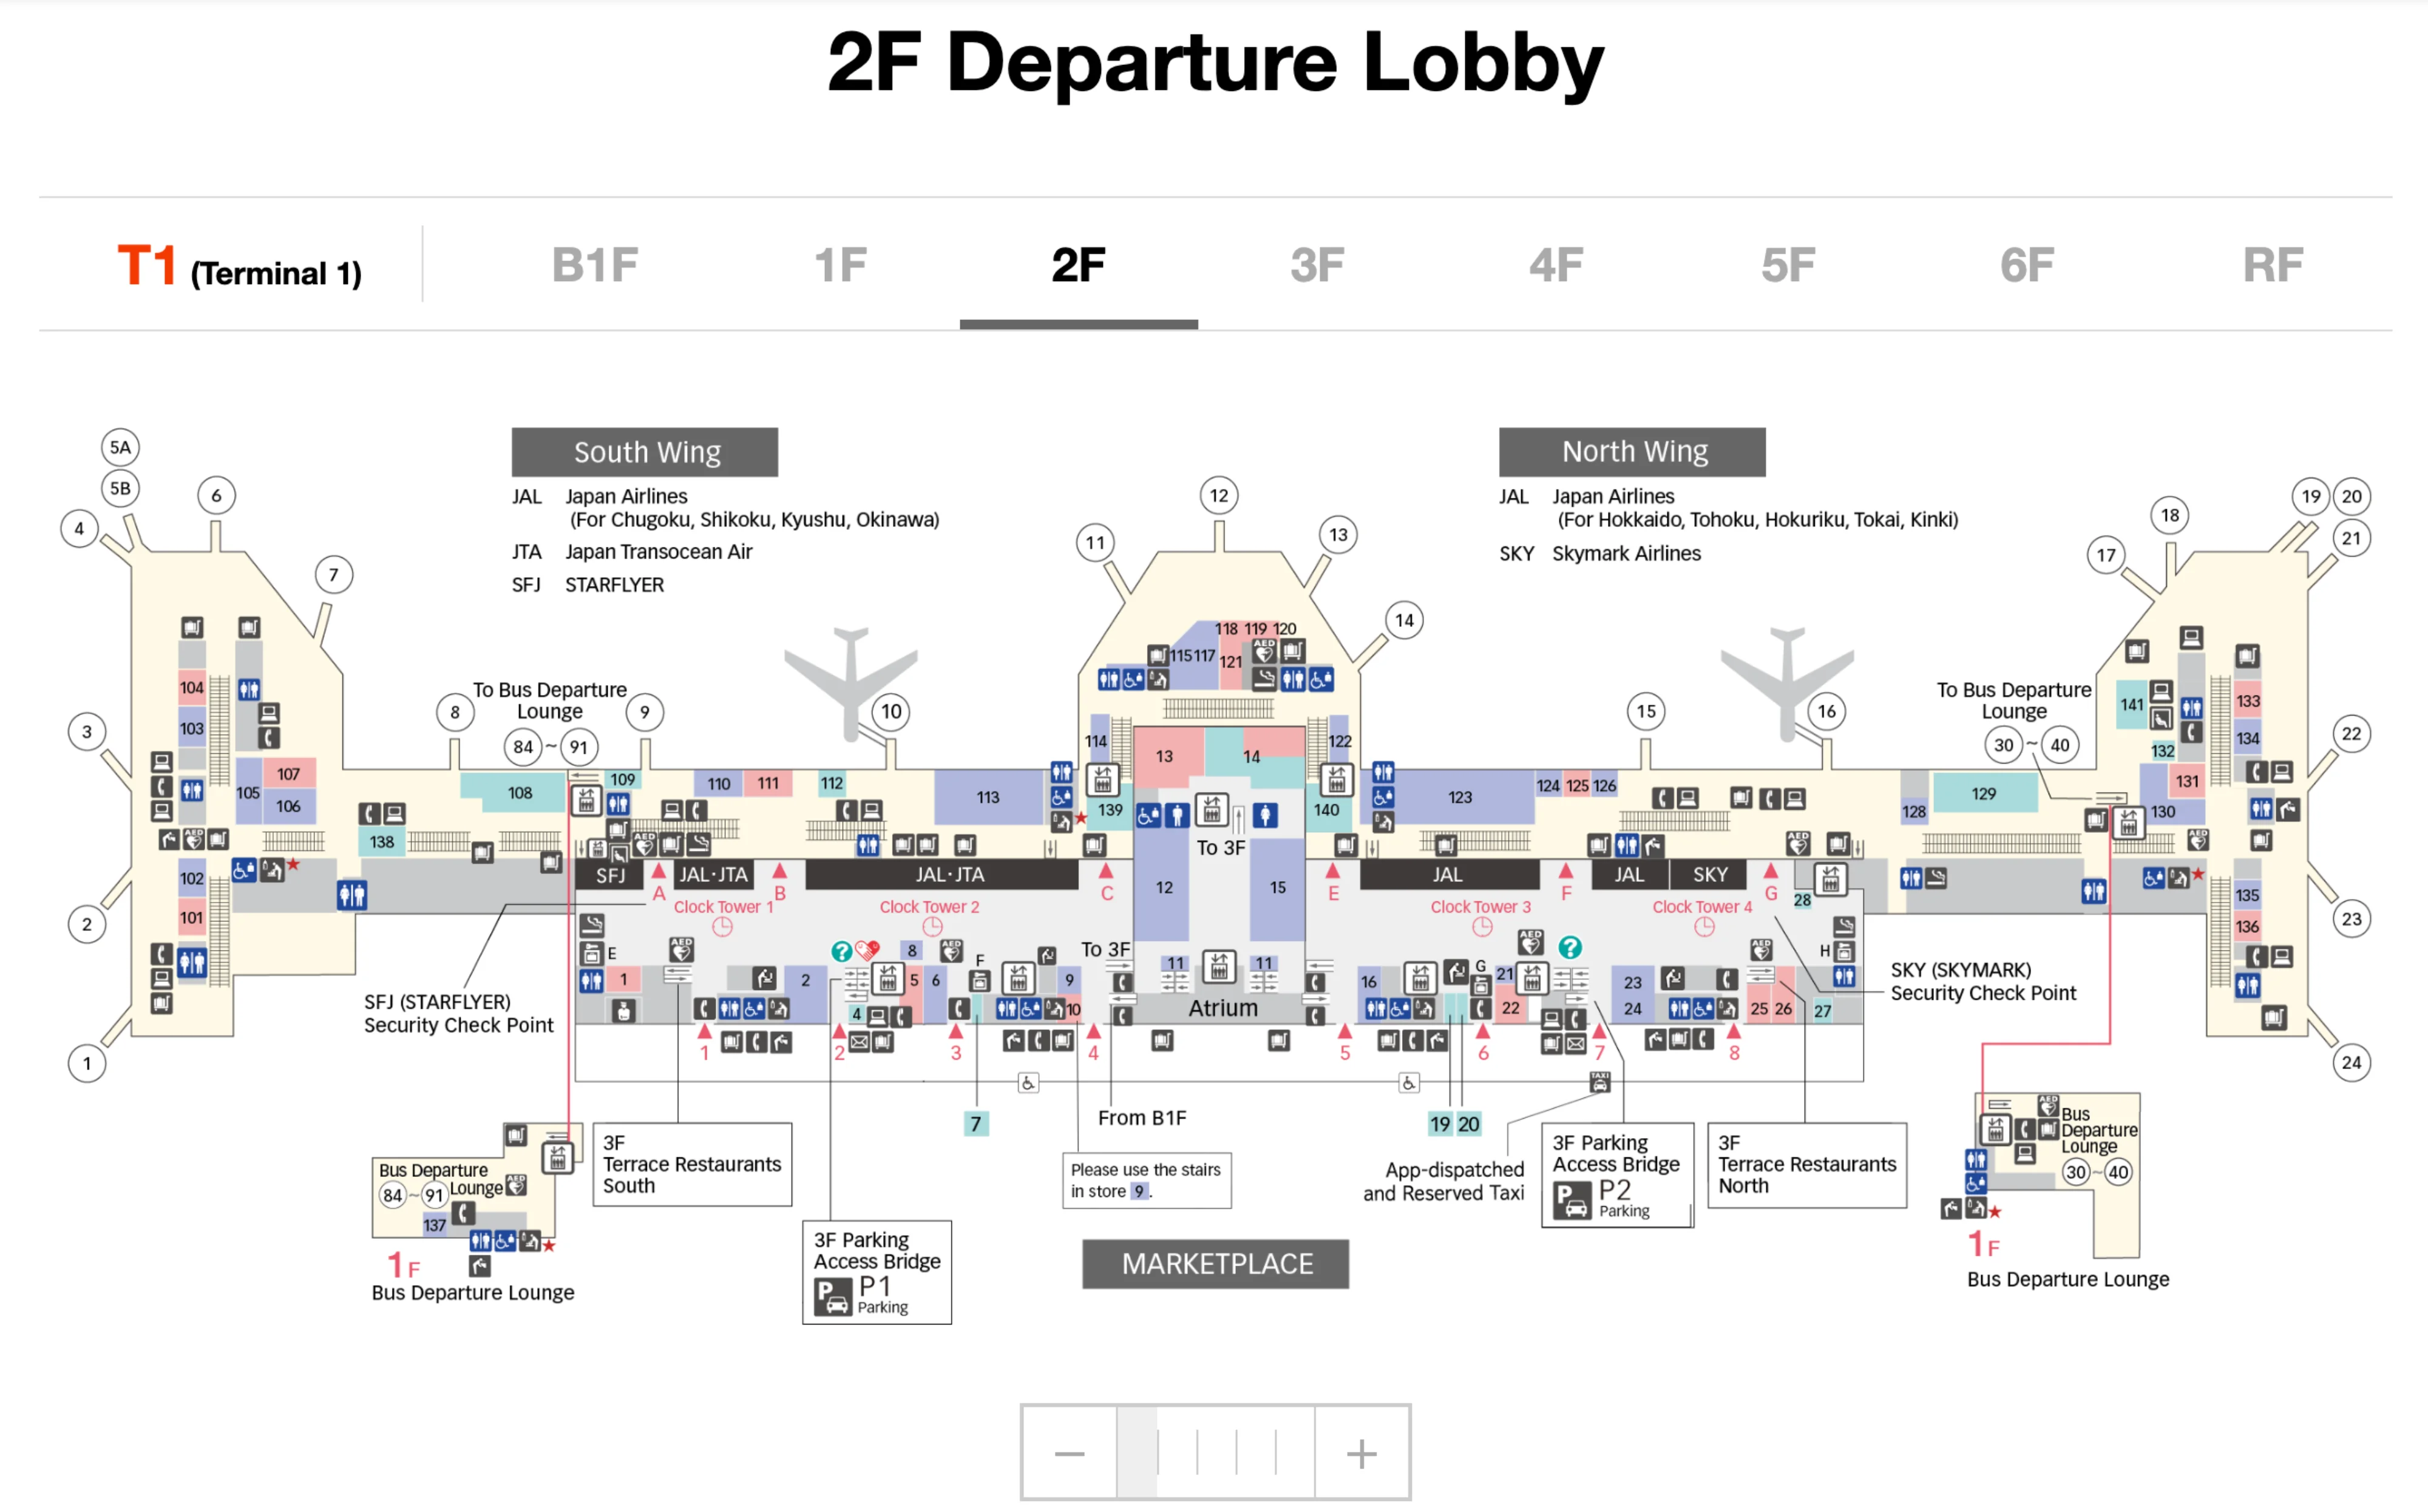
Haneda International Airport Terminal 1 2F Departure Lobby Map 2026
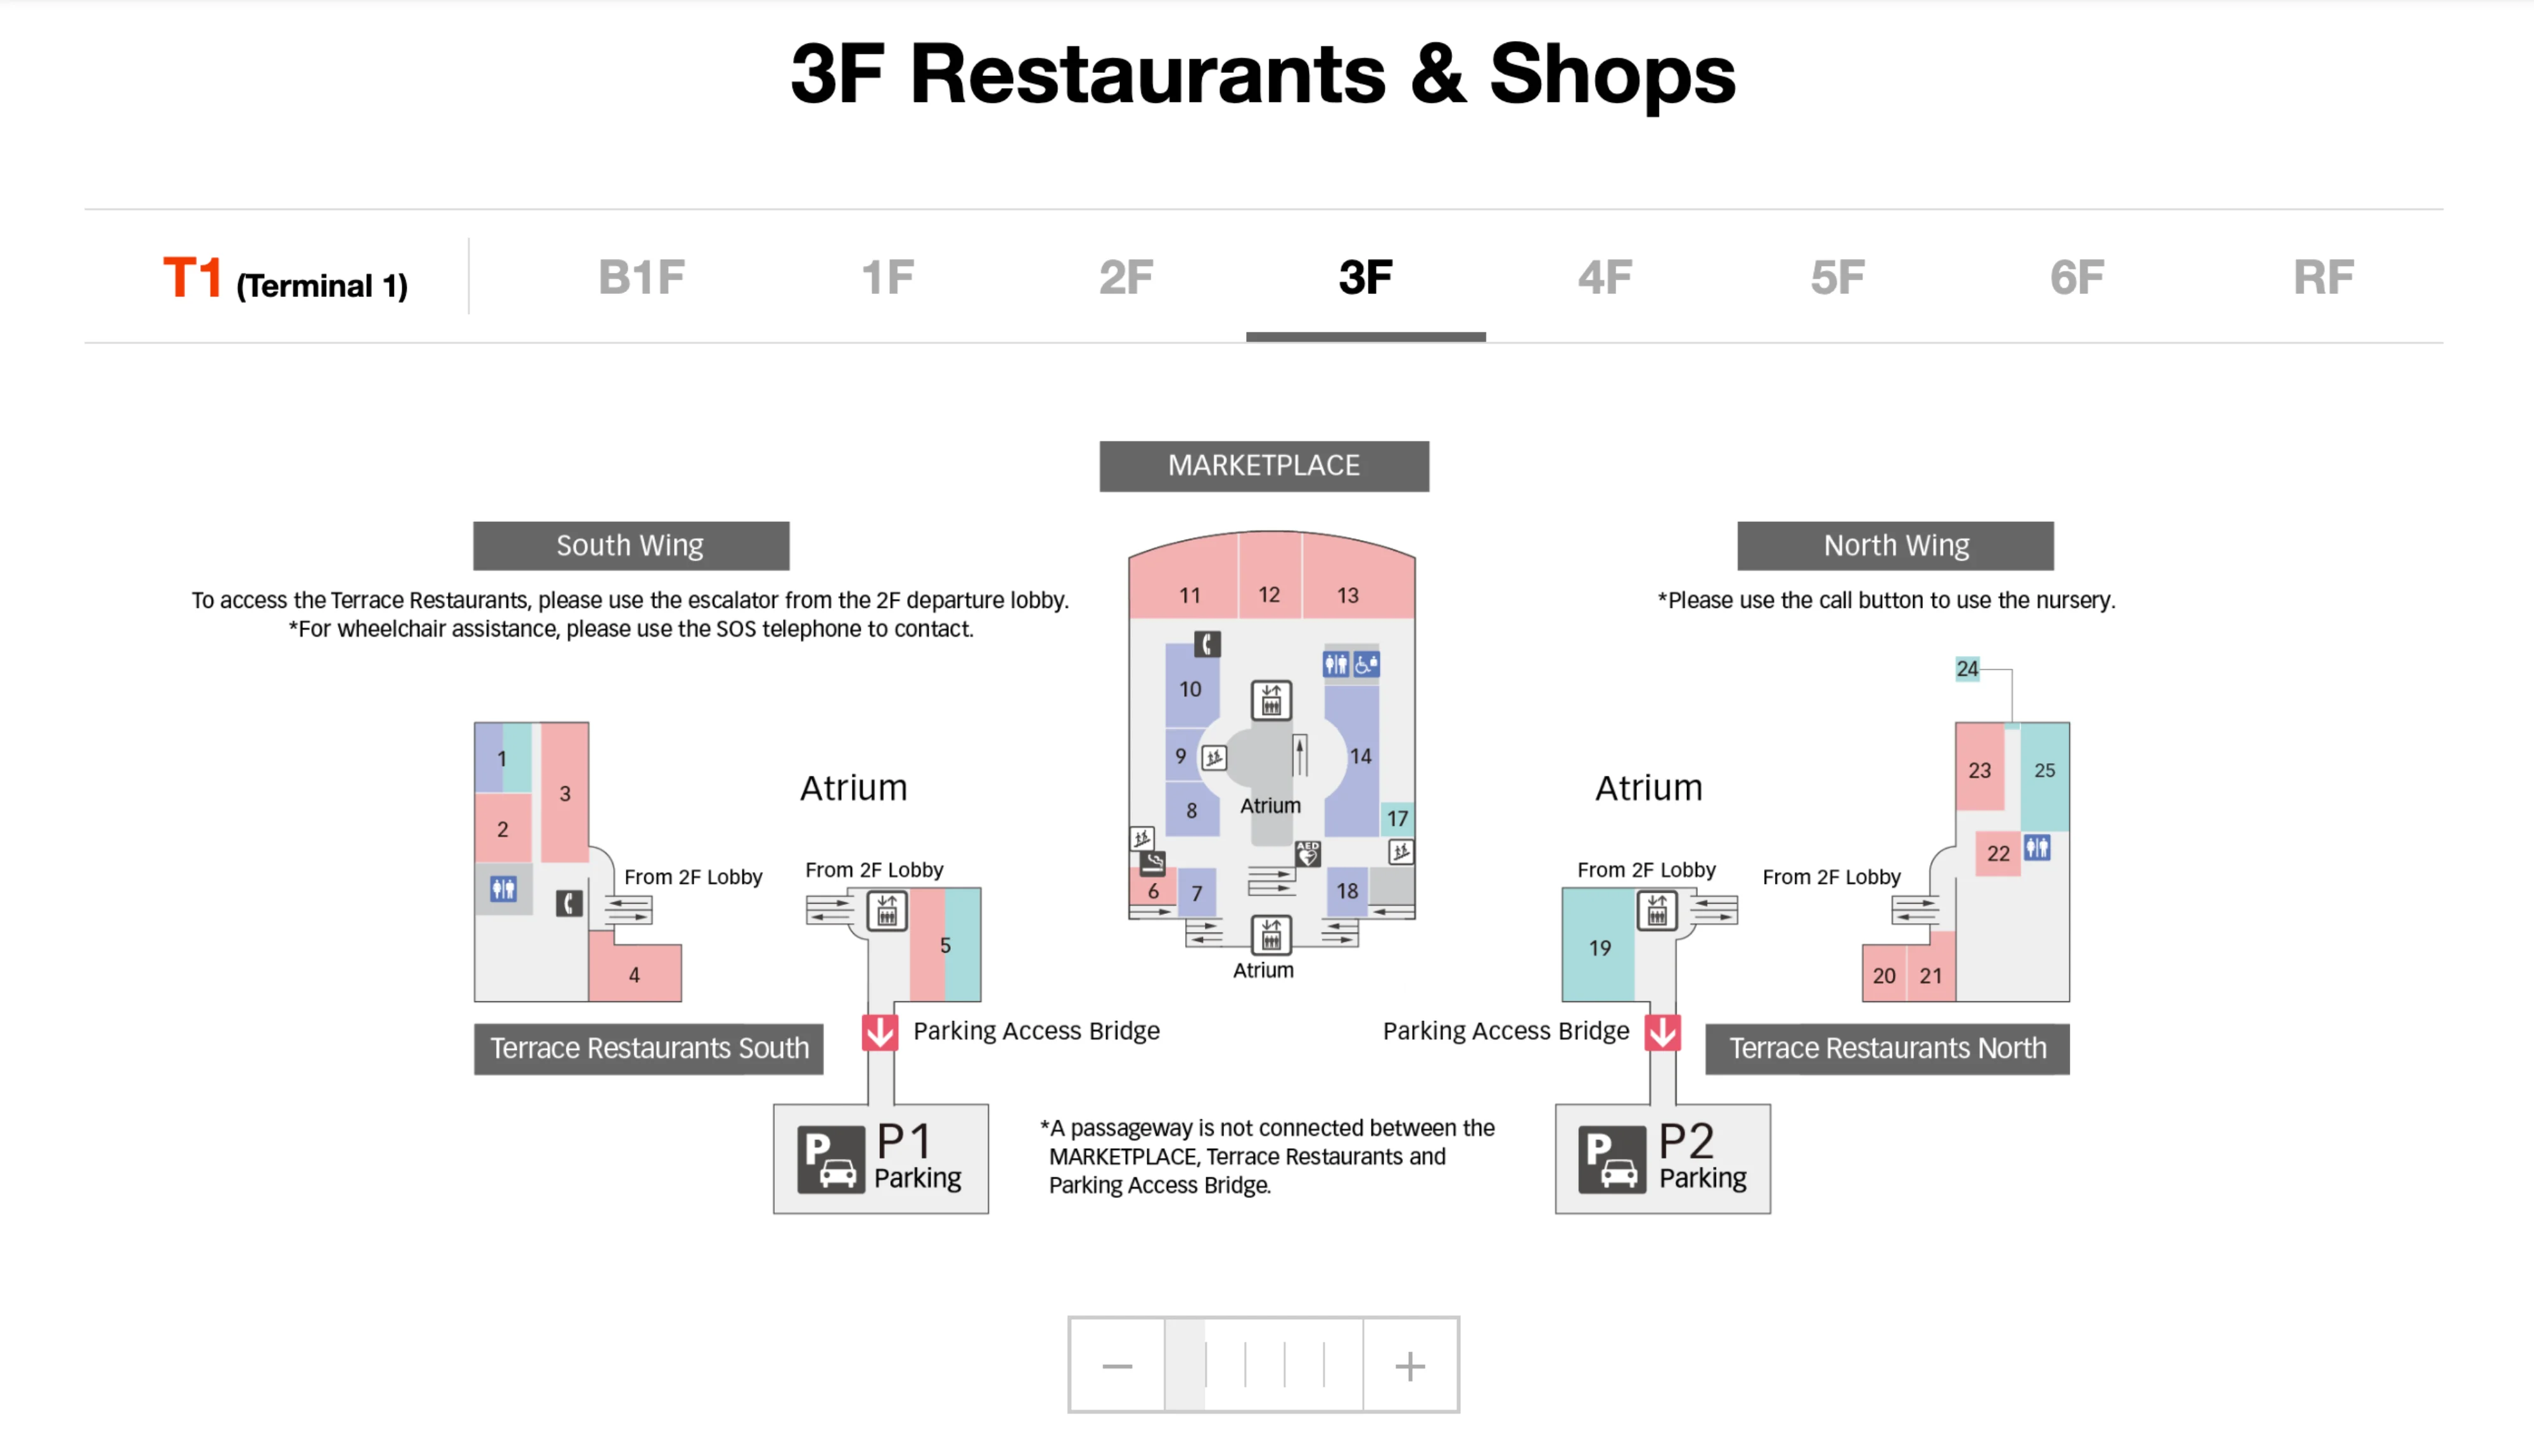
Haneda International Airport Terminal 1 3F Restaurants and Shops Map 2026
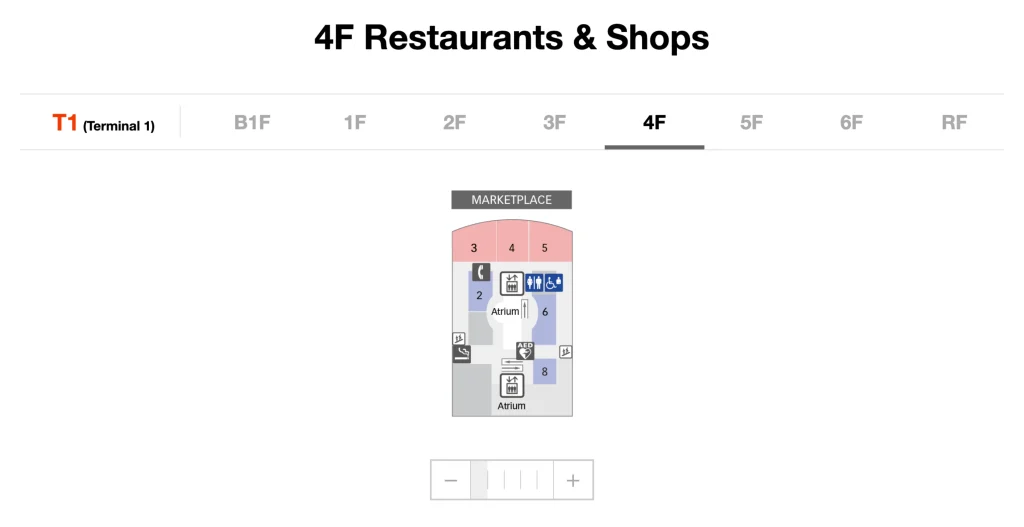
Haneda International Airport Terminal 1 4F Restaurants and Shops Map 2026
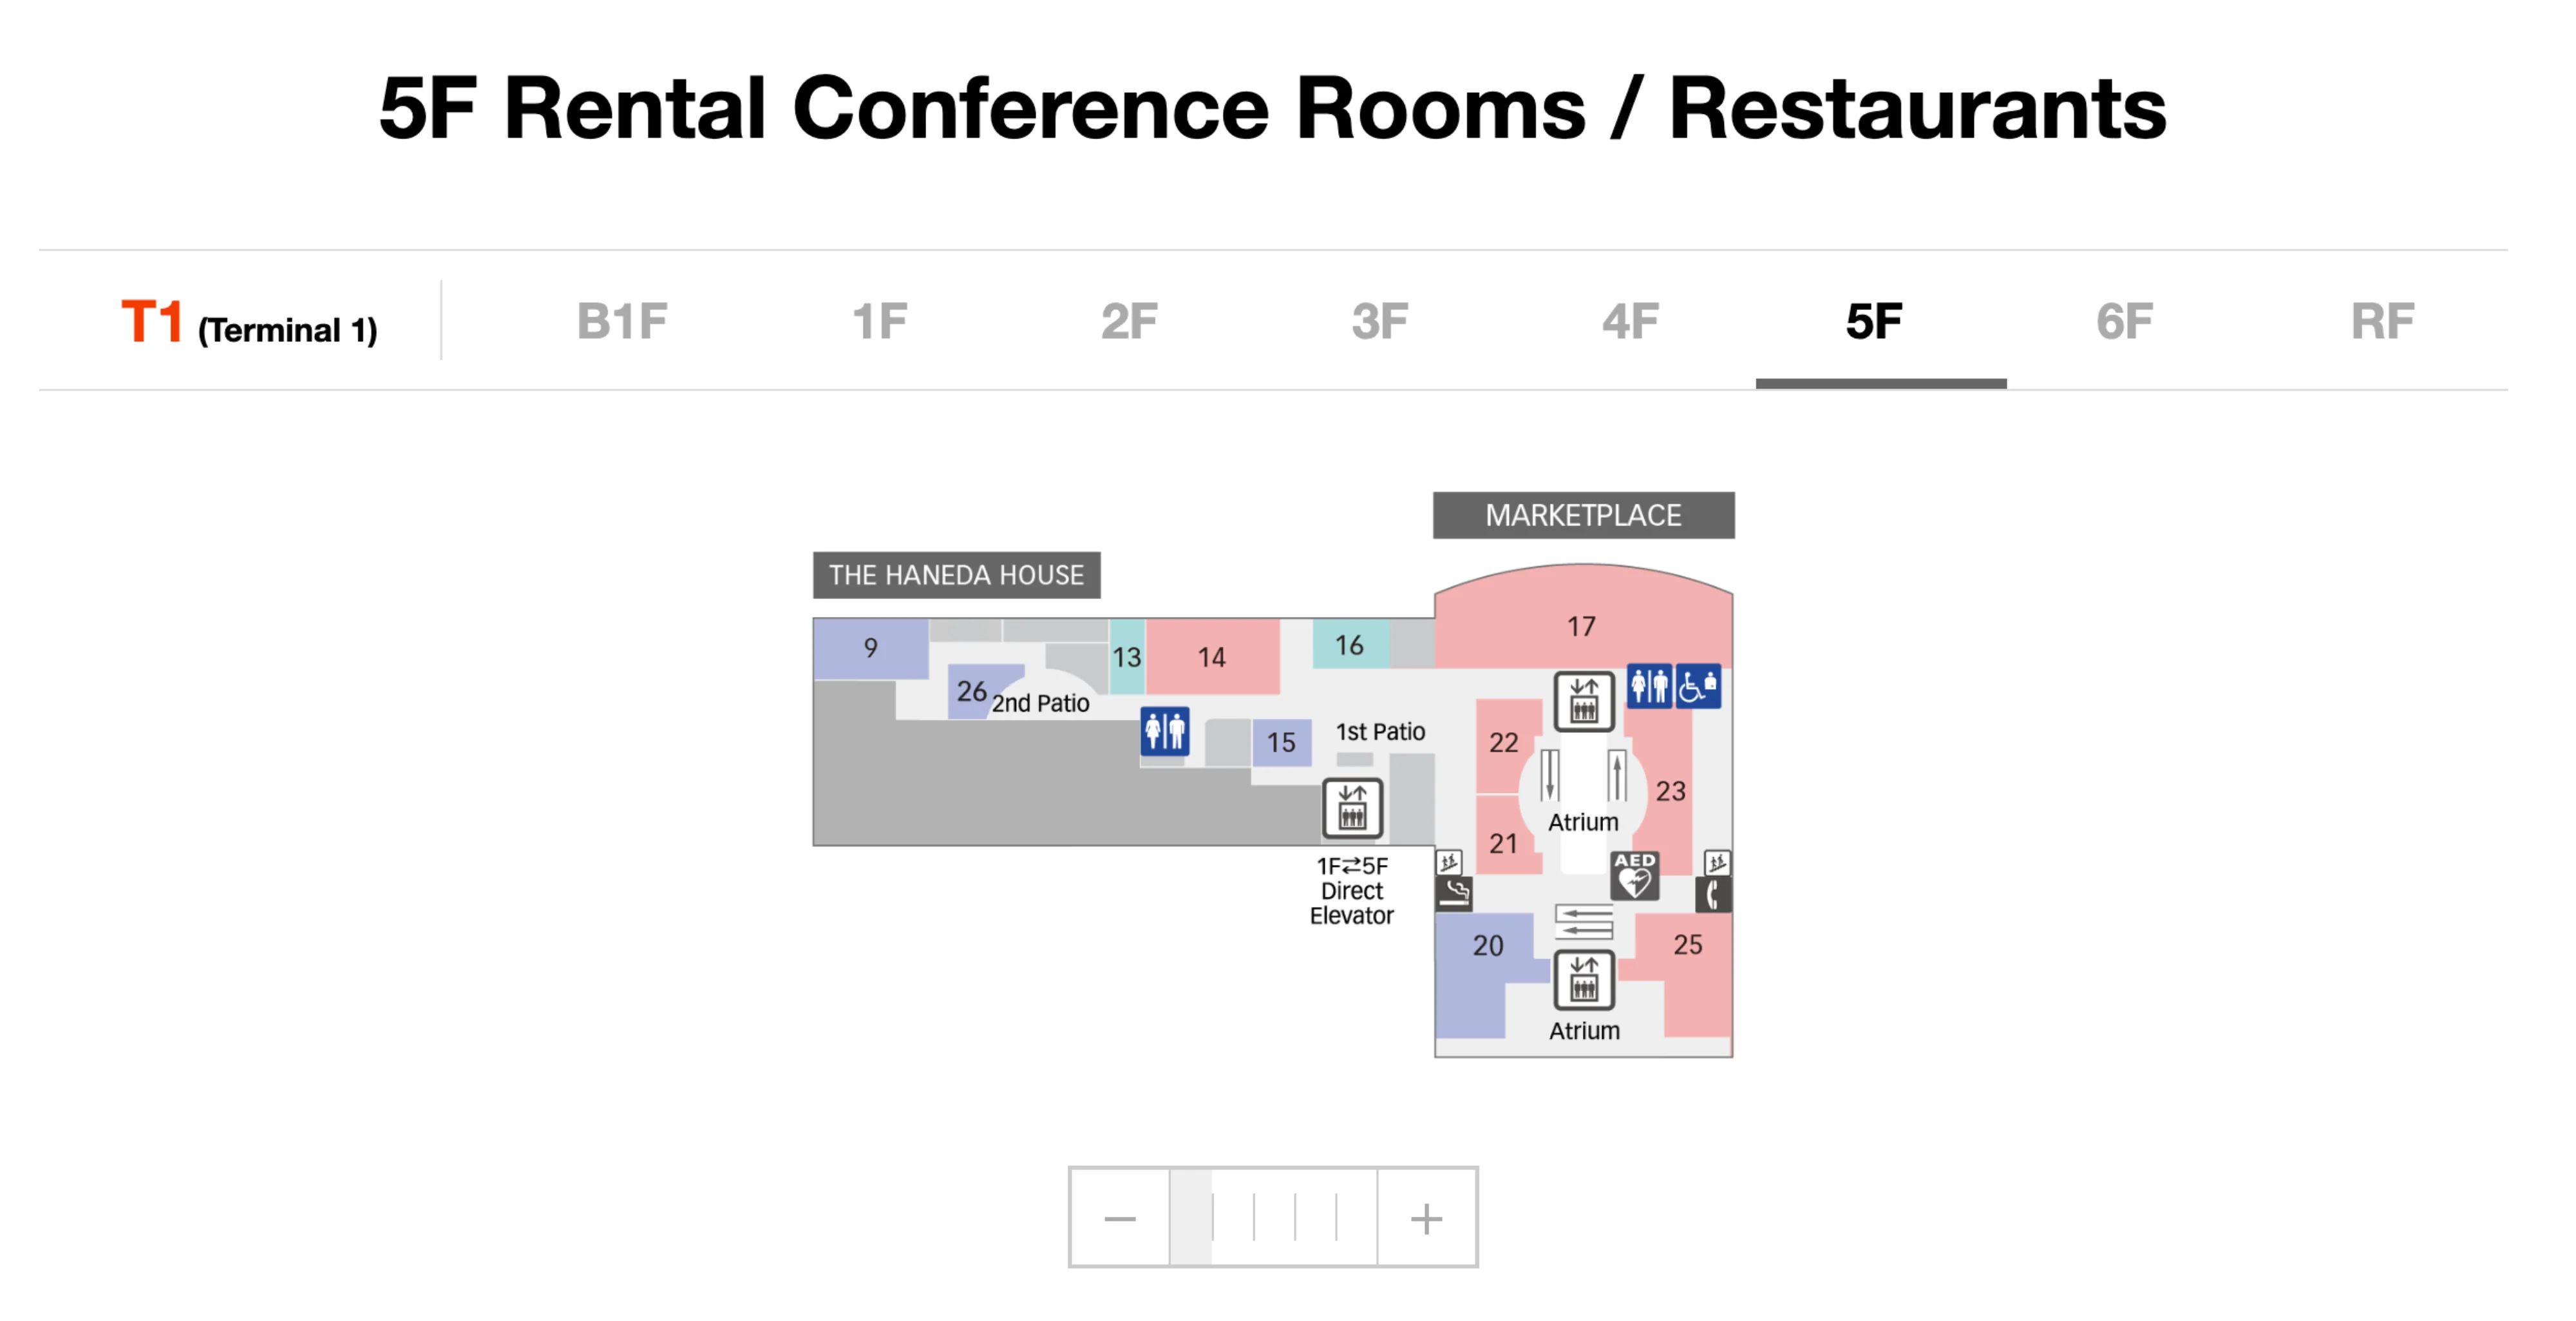
Haneda International Airport Terminal 1 5F Rental Conference Rooms and Restaurants Map 2026
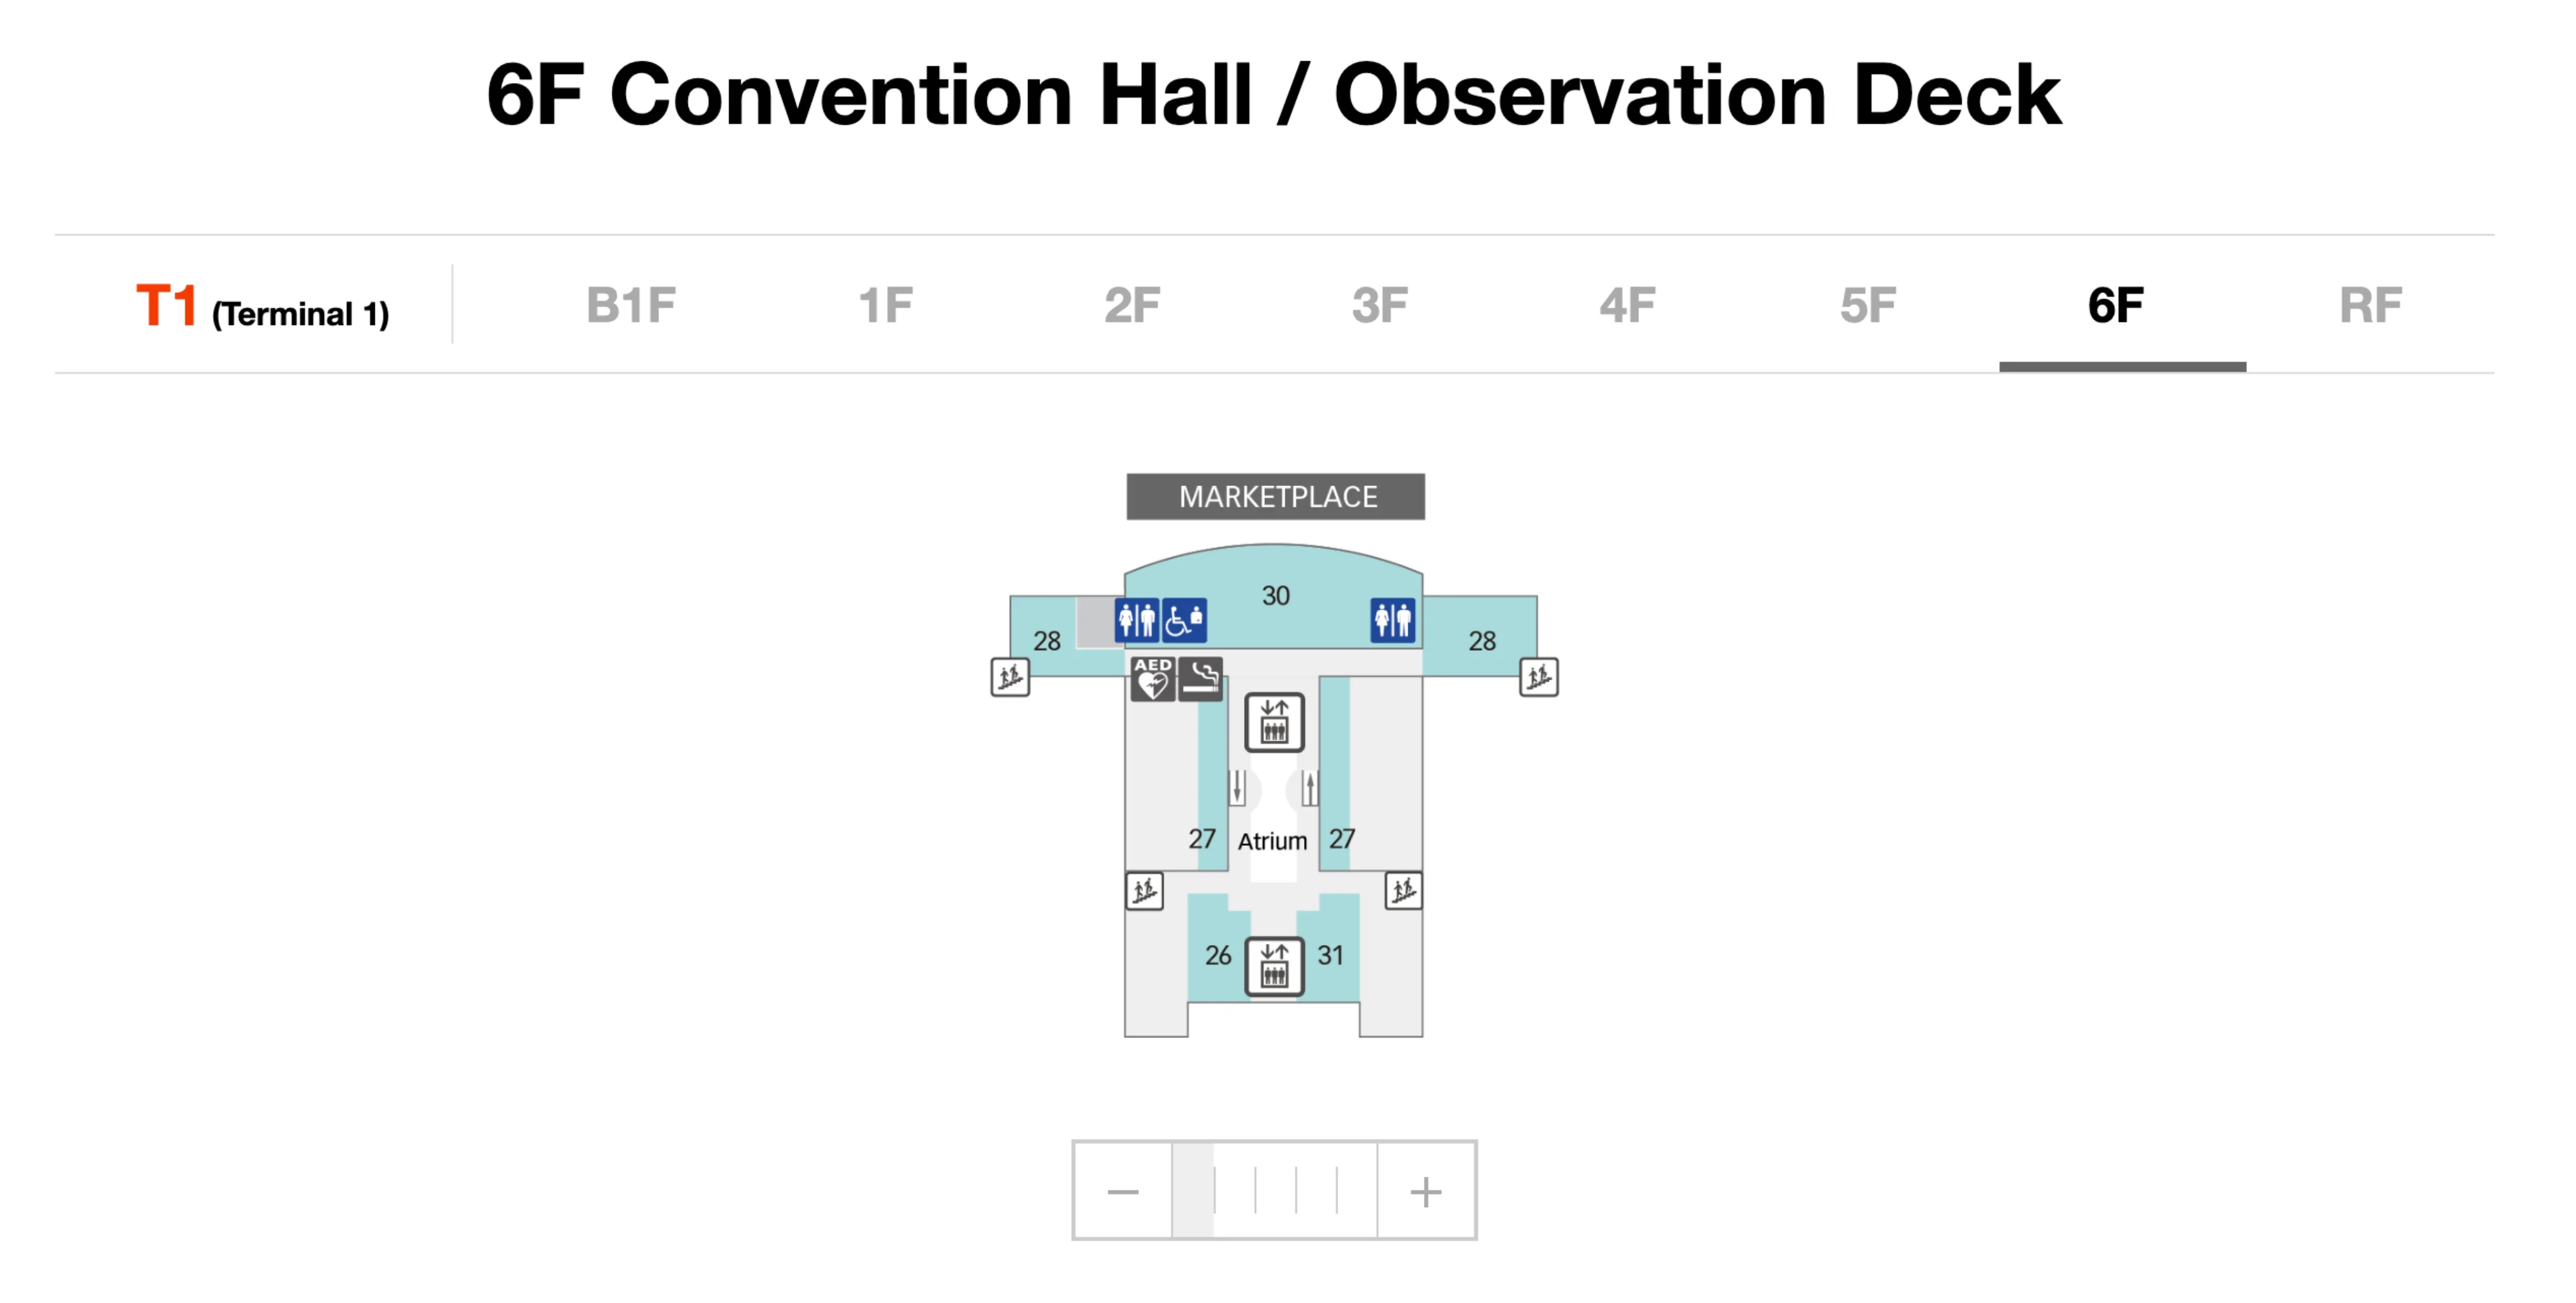
Haneda International Airport Terminal 1 6F Convention Hall and Observation Deck Map 2026
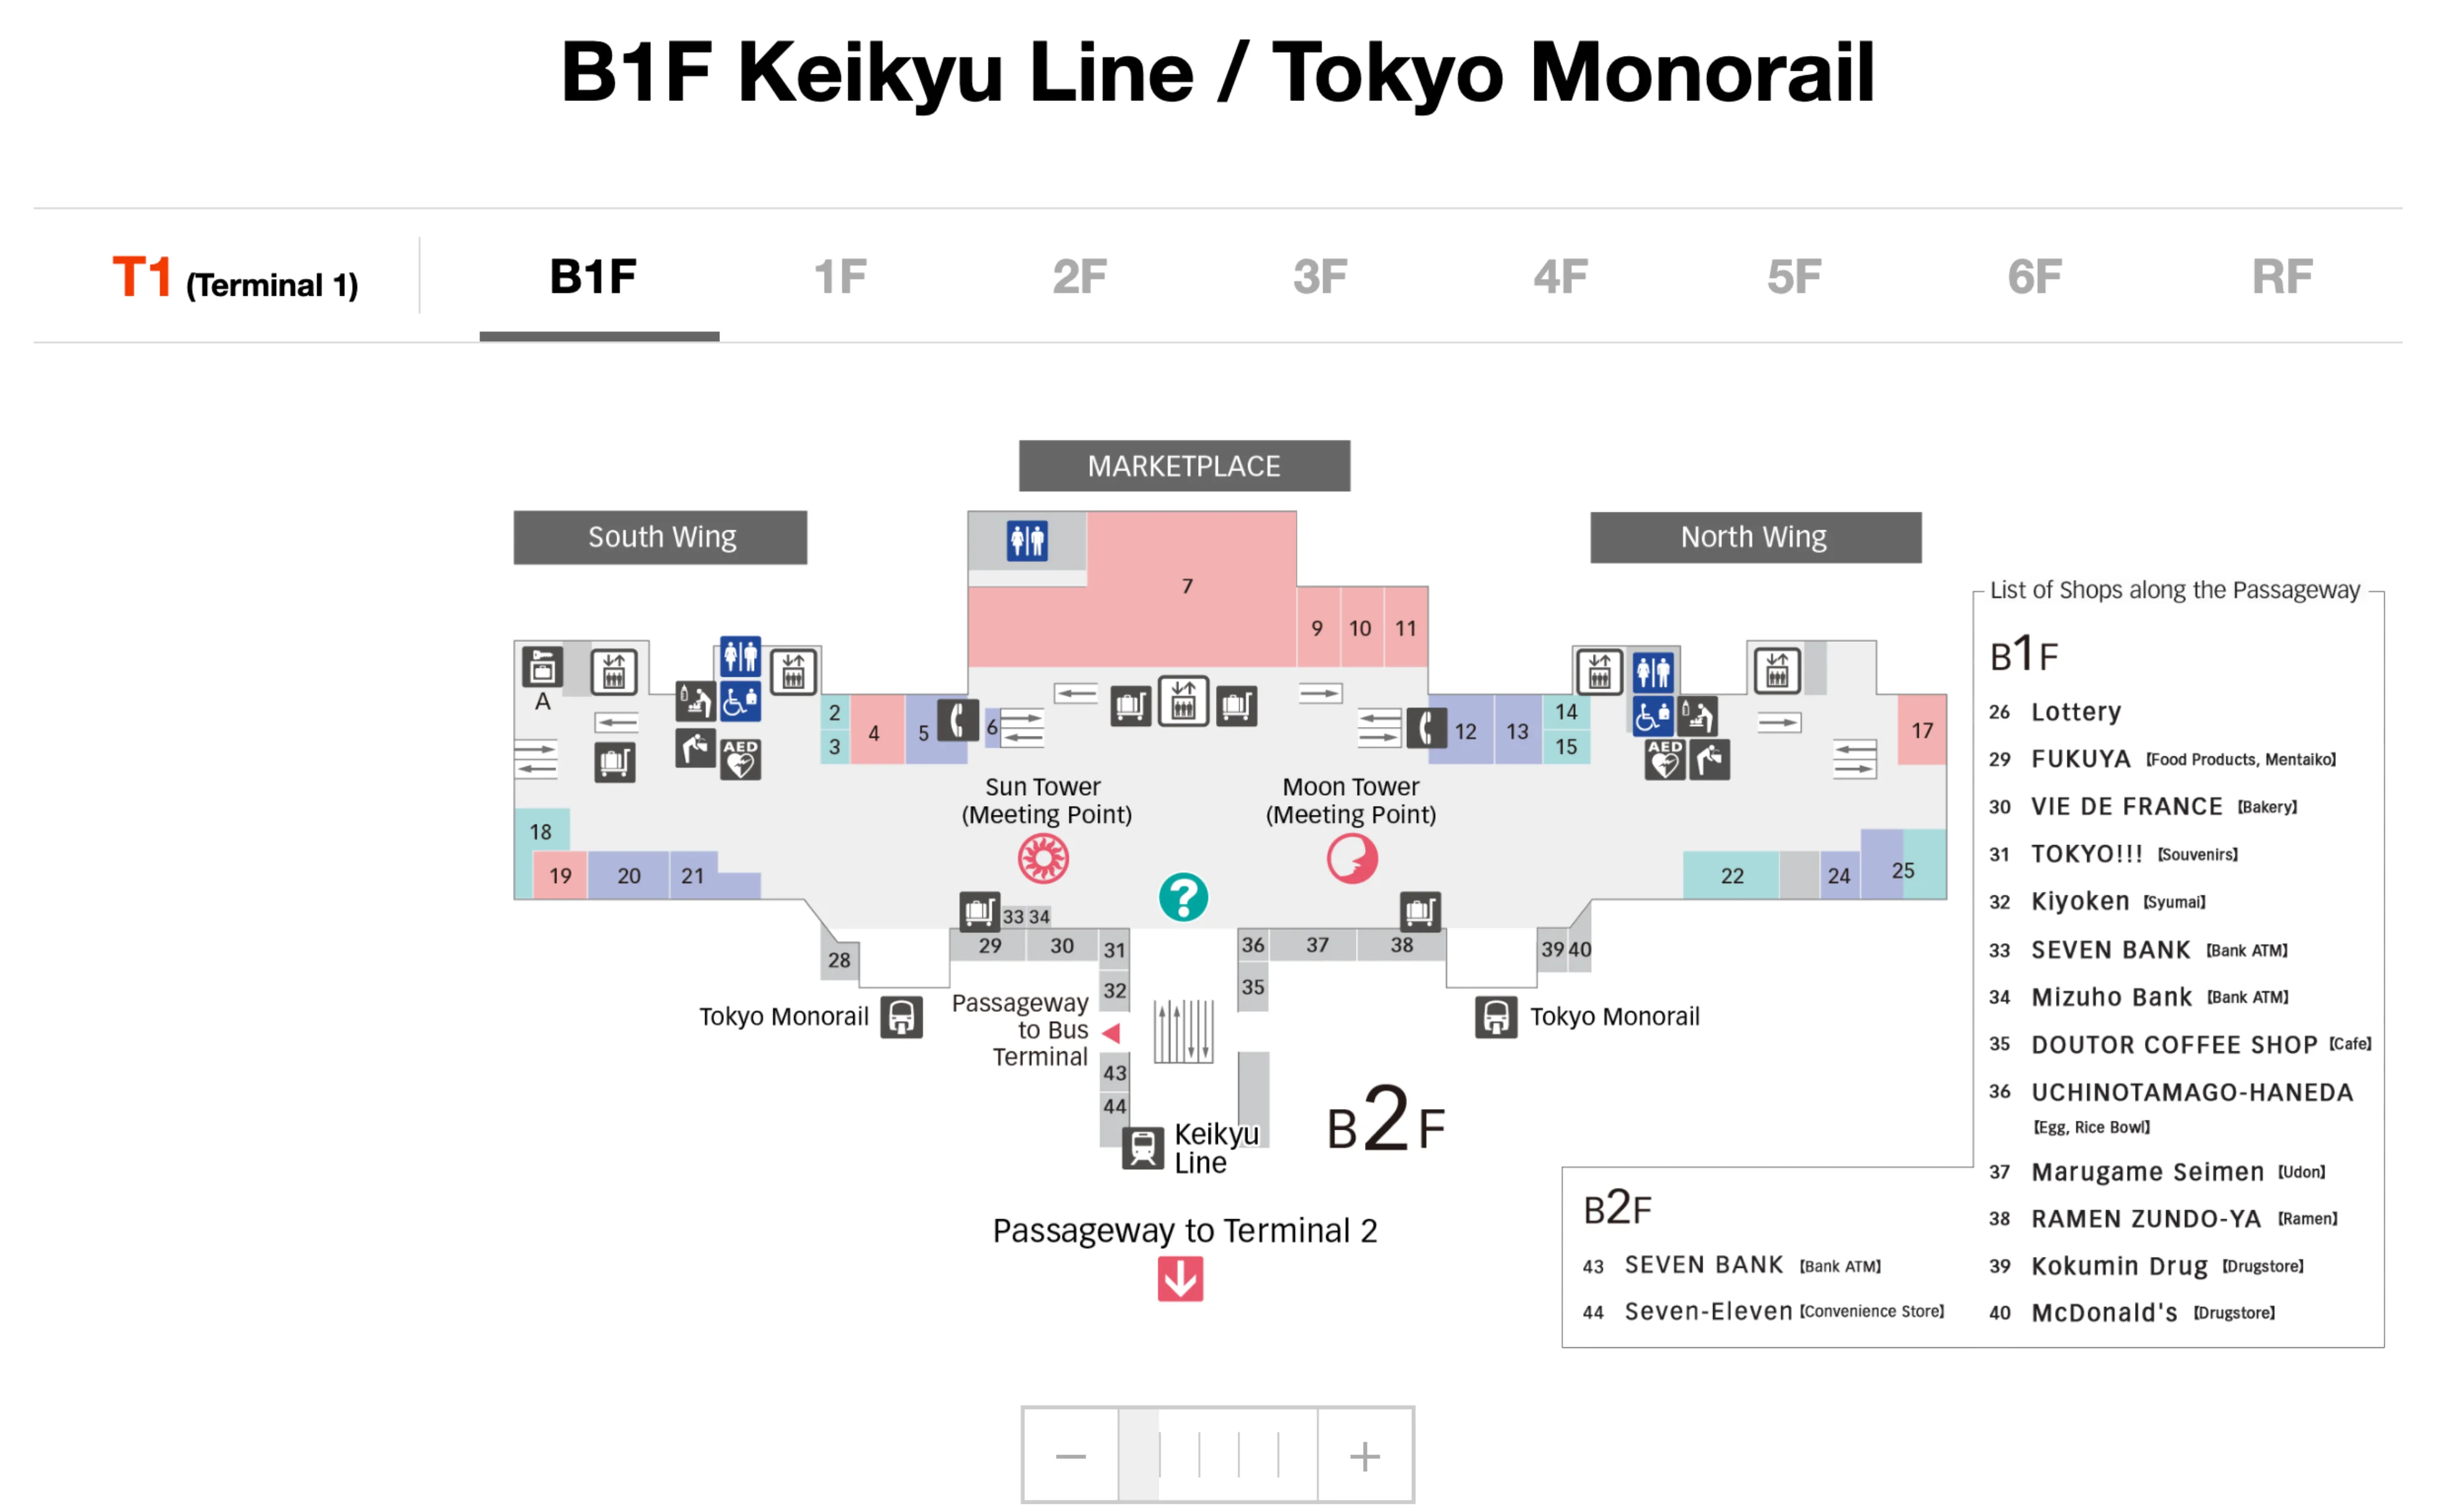
Haneda International Airport Terminal 1 B1F Keikyu Line and Tokyo Monorail Map 2026
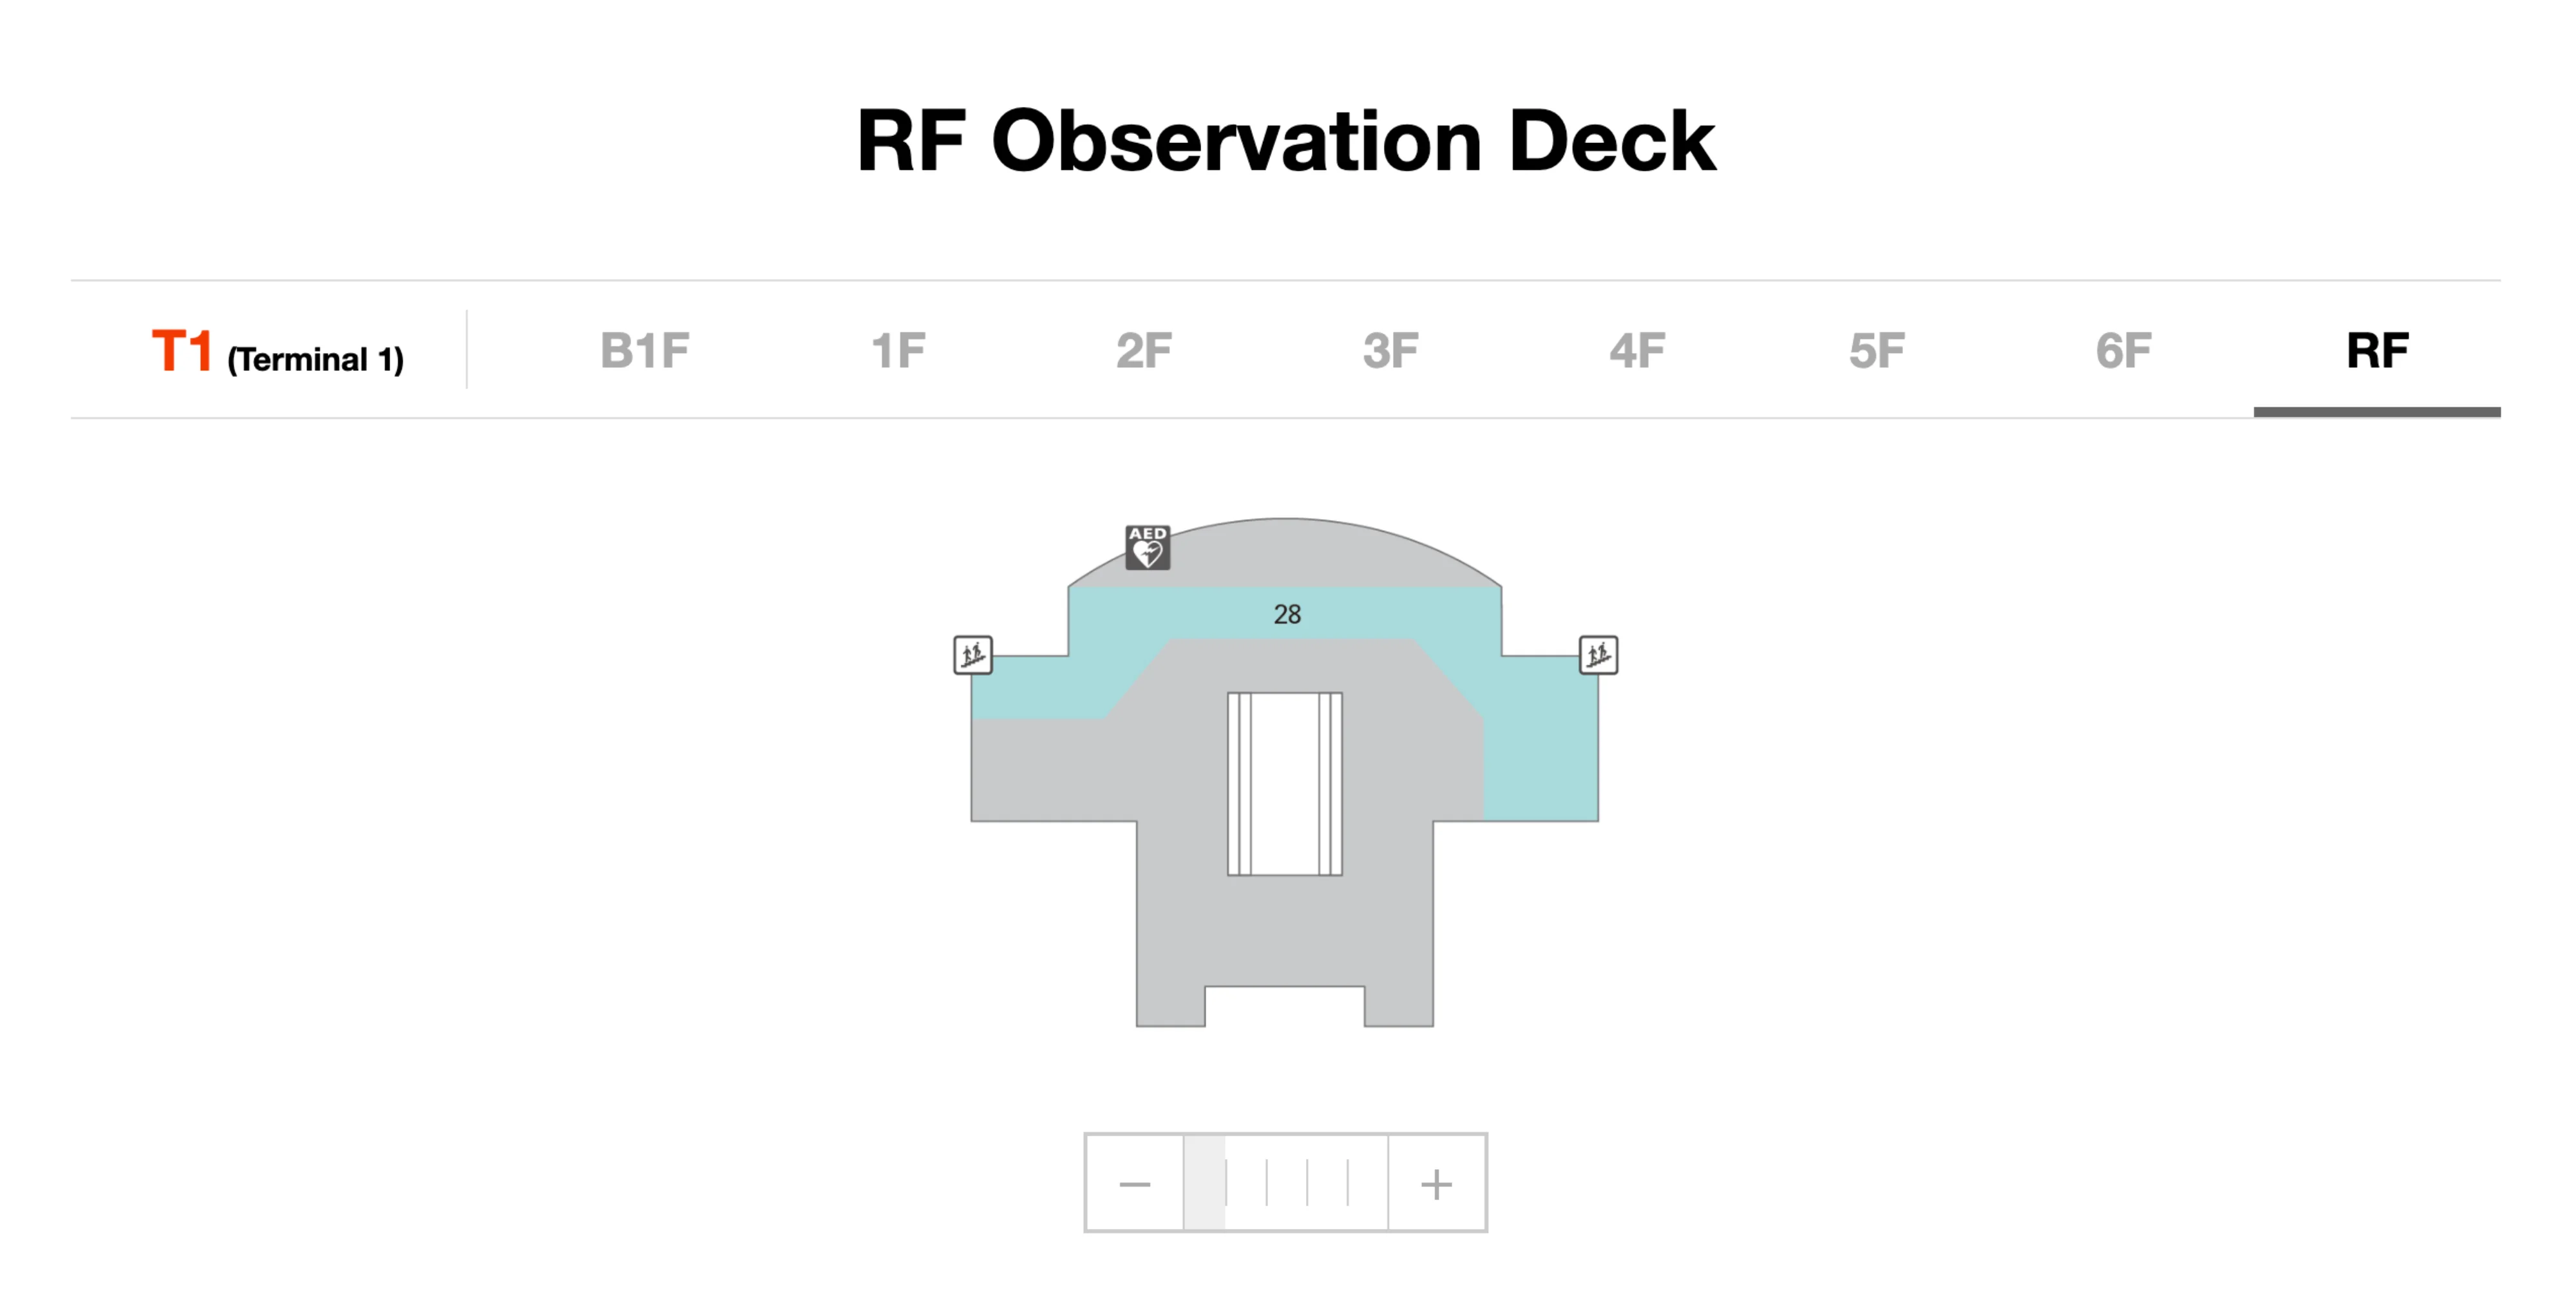
Haneda International Airport Terminal 1 RF Observation Deck Map 2026
2026 Haneda International Airport Terminal 1 Map Guide
What is the exact walking route (step-by-step) from Haneda Terminal 1 domestic arrivals to the free inter-terminal shuttle bus boarding point in Terminal 1?
Bus Stop 8 on the 1F Arrival Lobby curbside is the only correct boarding point for the free inter-terminal shuttle to Terminal 3. After you exit baggage claim into the public arrivals hall, stay on 1F and route straight to the curbside pillars with numbered stops—do not go down to the train level or up to departures.
Exit baggage claim through the sliding glass doors into the 1F Arrival Lobby, then follow the overhead green “Inter-Terminal Shuttle” signage toward the curbside doors. Step outside to the arrival curb and use the numbered pillar markers to align yourself with Stop 8. If you emerge from the South Wing side, walk slightly north toward the central Marketplace frontage; if you emerge from the North Wing side, walk slightly south toward the same central area. Stop at the pillar labeled “8” and verify the sign reads “Free Shuttle Bus” for Terminal 3/Terminal 2 before joining the queue.
What is the exact walking distance (meters) from Terminal 1 baggage claim to the Terminal 1 shuttle-bus stop for Terminal 3?
Walking distance runs about 50–180 meters from Terminal 1 baggage claim exits to Bus Stop 8 (the free shuttle for Terminal 3). The spread depends on which arrivals exit you use—central exits are closest, while north/south wing exits add a longer curbside walk.
| Starting point (Terminal 1) | Route anchor | Distance to Bus Stop 8 |
|---|---|---|
| Central arrivals exit | 1F Arrival Lobby doors nearest Marketplace frontage | ~50 m |
| South Wing arrivals exit | curbside sidewalk toward terminal center | ~100–150 m |
| North Wing arrivals exit | curbside sidewalk toward terminal center | ~80–120 m |
Where is the Terminal 1 → Terminal 3 shuttle bus stop located by floor level + door/exit number inside Terminal 1?
Bus Stop 8 on the 1F Arrival Lobby curbside is the only correct location for the free shuttle from Terminal 1 to Terminal 3. The boarding point is outside the 1F arrivals hall doors along the curb, aligned with the numbered pillar marked “8,” and it is not on the B1F train level or the 2F departures level.
The simplest way to pin it on a floor map is: 1F Arrivals → exit to curbside → find the line of numbered bus-stop pillars → stop at pillar “8” with green “Inter-Terminal Free Shuttle” signage. If you’re standing by Stop 9, you’re in the city-bus area and need to shift one stop back to Stop 8. If you’re on B1F looking for a bus platform, you’re on the wrong floor and must go up to 1F to reach Stop 8.
What is the shortest on-foot route from the Tokyo Monorail station (Terminal 1) to the Terminal 1 airline check-in counters?
The Marketplace vertical core route from B1F to 2F is the shortest walk from the Tokyo Monorail station to Terminal 1 check-in. Exiting to 1F first adds an unnecessary level change and usually lengthens the walk.
Exit the Tokyo Monorail ticket gates on B1F and walk straight into the central concourse toward the open atrium area marked by the Sun Tower (red) and Moon Tower (blue). At the center of this “Marketplace” node, take the main escalators or the large elevator bank directly up to 2F. You’ll arrive in the departures/check-in hall: turn right for the North Wing counters and turn left for the South Wing counters, using the wing split signage as your final alignment point.
What is the exact walk time band (fast / average / slow) from Terminal 1 security checkpoint to the farthest boarding gates in Terminal 1?
Walking takes 8–10 minutes fast, 12–15 minutes average, and 18–22 minutes slow from the central Terminal 1 security exit to the farthest gates. The longest walks are to the wing-end gates at the north and south tips, so your checkpoint choice can change the time band by several minutes.
| Start point | End point anchor | Fast | Average | Slow |
|---|---|---|---|---|
| Central security exit near the Marketplace spine | Gate 24 area at the North Wing tip | 8–10 min | 12–15 min | 18–22 min |
| Central security exit near the Marketplace spine | Gate 1 area at the South Wing tip | 8–10 min | 12–15 min | 18–22 min |
Which security checkpoint entrance in Terminal 1 is closest to the JAL (Terminal 1) domestic departure gates with the longest walks?
Security Checkpoint G is closest to the far-north JAL gate area (Gates 20–24), while Security Checkpoint A is closest to the far-south gate area (Gates 1–5). Using the wrong checkpoint can add a long, linear concourse walk in Terminal 1, especially when you enter from the central Marketplace area.
| Checkpoint (Terminal 1) | Closest “long-walk” gate cluster | Where you pop out airside | Landmark triangulation |
|---|---|---|---|
| G (North Side) | Gates 20–24 | around Gate 15/16 area | North Wing end of the 2F security line, away from the Marketplace center |
| A (South Side) | Gates 1–5 | around Gate 7/8 area | South Wing end of the 2F security line, toward the opposite tip from the north piers |
What is the shortest route from Terminal 1 check-in to the inter-terminal transit boarding ticket distribution point (for Keikyu/Monorail terminal transfer)?
The B1F central Information Counter near the Sun Tower (red) and Moon Tower (blue) is the ticket distribution point for the free inter-terminal rail transfer. Going straight to the Keikyu or Monorail ticket gates first triggers a backtrack loop that can cost 10–15 minutes.
Walk from your 2F check-in area toward the central Marketplace atrium, then take the main escalators or the large central elevators down to B1F. Step off into the open B1F concourse and orient on the Sun/Moon Towers in the middle of the space. The Information Counter is positioned in that central zone; collect the transit boarding ticket there, then walk to the adjacent Keikyu or Monorail gates on either side of the same B1F concourse.
What is the most direct path from Terminal 1 shuttle drop-off area to the Tokyo Monorail/Keikyu transfer corridor (no backtracking)?
The 1F-to-B1F descent to the train level is the most direct path from the Terminal 1 shuttle drop-off to the Monorail/Keikyu corridor. Going up to 2F first adds an extra level change and usually forces you back through the Marketplace core.
From the shuttle drop-off curb on 1F, enter Terminal 1 through the nearest automatic doors into the 1F Arrival Lobby. Immediately follow the overhead signs marked “Trains,” “Tokyo Monorail,” and “Keikyu Line,” and take the nearest down escalator or elevator to B1F. On B1F, you’ll arrive in the central concourse where the rail corridors split to the Keikyu gates on one side and the Monorail gates on the other, both accessible from the same main spine without returning to 1F or detouring to 2F.
What is the exact location (wing + floor) of the Terminal 1 observation deck entrance, and what is the shortest route to reach it from Terminal 1 landside center?
The observation deck entrance is accessed from the central core on 6F/Roof Floor, not from a wing tip. The shortest route starts at the Marketplace atrium in the middle of Terminal 1 and uses the main vertical lift stack rather than walking deep into the North or South Wings.
From the landside center, position yourself at the 2F Marketplace (the main atrium spine that connects all levels). Take the central glass elevator bank or the main escalator run up through the atrium levels to 6F. After you exit at 6F, follow the posted “Observation Deck” signs to the entrance, which sits off the core circulation area rather than requiring a long lateral walk down either wing.
Where is the Terminal 1 North Wing lounge complex entrance, relative to the nearest security checkpoint (directional placement on the floor map)?
The North Wing lounge complex entrance sits immediately above the North Wing security exits on 3F airside, reached by the first escalators up from the checkpoint area. Clearing North Wing security puts you one short level change away from the lounge reception, without a long concourse walk first.
Clear the North Wing security checkpoint (the North-side checkpoint cluster, typically F/G on the 2F security line), then stop at the security exit threshold and look for the escalators labeled up to 3F. Take the nearest up escalator directly from the checkpoint exit zone and you’ll reach the lounge reception at the top. On a floor map, the lounge is placed one level above the north security block, not in the central Marketplace area and not down the gates corridor.
What is the shortest indoor walking route from Terminal 1 bus stops (city buses) to the Terminal 1 departures hall?
The shortest indoor route is to enter Terminal 1 from the 1F curbside bus stop area and go straight up to 2F via the nearest escalator or elevator, then align yourself to the correct wing on the departures/check-in hall. The physically shortest climb is always the closest vertical core to your stop, but the time-shortest route avoids reaching 2F far from your intended check-in wing.
Enter through the nearest automatic doors from the 1F bus curb into the Arrival Lobby, then follow signs for “Departures” and take the nearest escalator/elevator up one level to 2F. Use the Marketplace core as the safest “no-regrets” anchor if you’re unsure of wing alignment: walking inside to the central Marketplace on 1F before going up typically prevents long corrective walks on 2F. Once on 2F, turn toward the North Wing or South Wing check-in rows based on your airline/flight region split.
What is the most direct route from Terminal 1 taxi stand/curb to the Terminal 1 domestic check-in row (fewest level changes)?
A 2F Departure Lobby taxi drop-off is the fewest-level-change route to Terminal 1 domestic check-in because it requires zero floor transitions. If you arrive at the 1F taxi/arrival curb instead, you must add a level change to reach the 2F check-in hall.
From the 2F taxi curb, walk straight through the nearest automatic doors and you’re immediately in the departures/check-in hall facing the check-in rows. Use the Marketplace center as your orientation anchor, then turn toward the North Wing or South Wing counters based on the signage for your flight. If you’re dropped at 1F (arrivals side), enter the terminal and take the nearest elevator/escalator up to 2F before trying to navigate laterally, because walking the length of 1F and then climbing usually costs more time than climbing first.
What is the exact route (including floor changes) from Terminal 1 arrivals to the Keikyu Airport Line ticket gates?
The route is 1F arrivals down to B1F, then straight to the Keikyu ticket gates in the B1F rail concourse. Staying on 1F or going up to 2F first adds unnecessary distance because Keikyu is entirely on the basement transit level.
Exit baggage claim into the 1F Arrival Lobby and follow overhead signs marked for “Keikyu Line” and “Trains” (red Keikyu branding is a common cue). Take the nearest down escalator or elevator to B1F, emerging into the central rail concourse near the Marketplace spine. From there, follow the Keikyu Line directional signage to the ticket gates for the “Haneda Airport Terminal 1 & 2” station area, then enter through the gates for your direction of travel.
Where is the closest elevator bank between Terminal 1 shuttle bus pickup and the main departures level (for travelers with large luggage)?
The Marketplace central elevator bank is the closest, easiest-to-find elevator route between the 1F shuttle pickup zone and the 2F departures hall for large luggage. It connects 1F to 2F directly with high-capacity lifts and avoids hunting for smaller wing-end elevators along the curb.
From Bus Stop 8 on the 1F curb, enter the terminal through the doors closest to the central Marketplace frontage and follow the open atrium sightlines inward. The main glass elevator bank sits in the Marketplace core and serves B1F, 1F, and 2F in one vertical stack. Ride up one level to 2F and exit into the departures/check-in hall, then turn toward the correct wing rather than rolling luggage laterally on 1F.
What is the shortest route from Terminal 1 security exit to the nearest restrooms, and how far is it (meters)?
Restrooms are typically 30–50 meters from the security exit inside Terminal 1 because amenity blocks repeat every few gates along the inner (landside-facing) wall of the airside concourse. The quickest move is to clear security and immediately scan left and right before you start walking down the gates corridor.
After you exit the security lanes, walk forward into the airside concourse and look along the wall behind the main passenger flow (the side closer to shops and services rather than the windows). The nearest restroom block is usually within the first one to two gate bays, so you should reach it in under a minute at normal pace. If you’ve already passed multiple gate numbers without seeing a restroom sign, you likely walked away from the inner wall; pivot back toward the amenities side and you’ll typically find signage within the next short segment.