O.R. Tambo International Airport Terminal B Map (Most Up-To-Date)
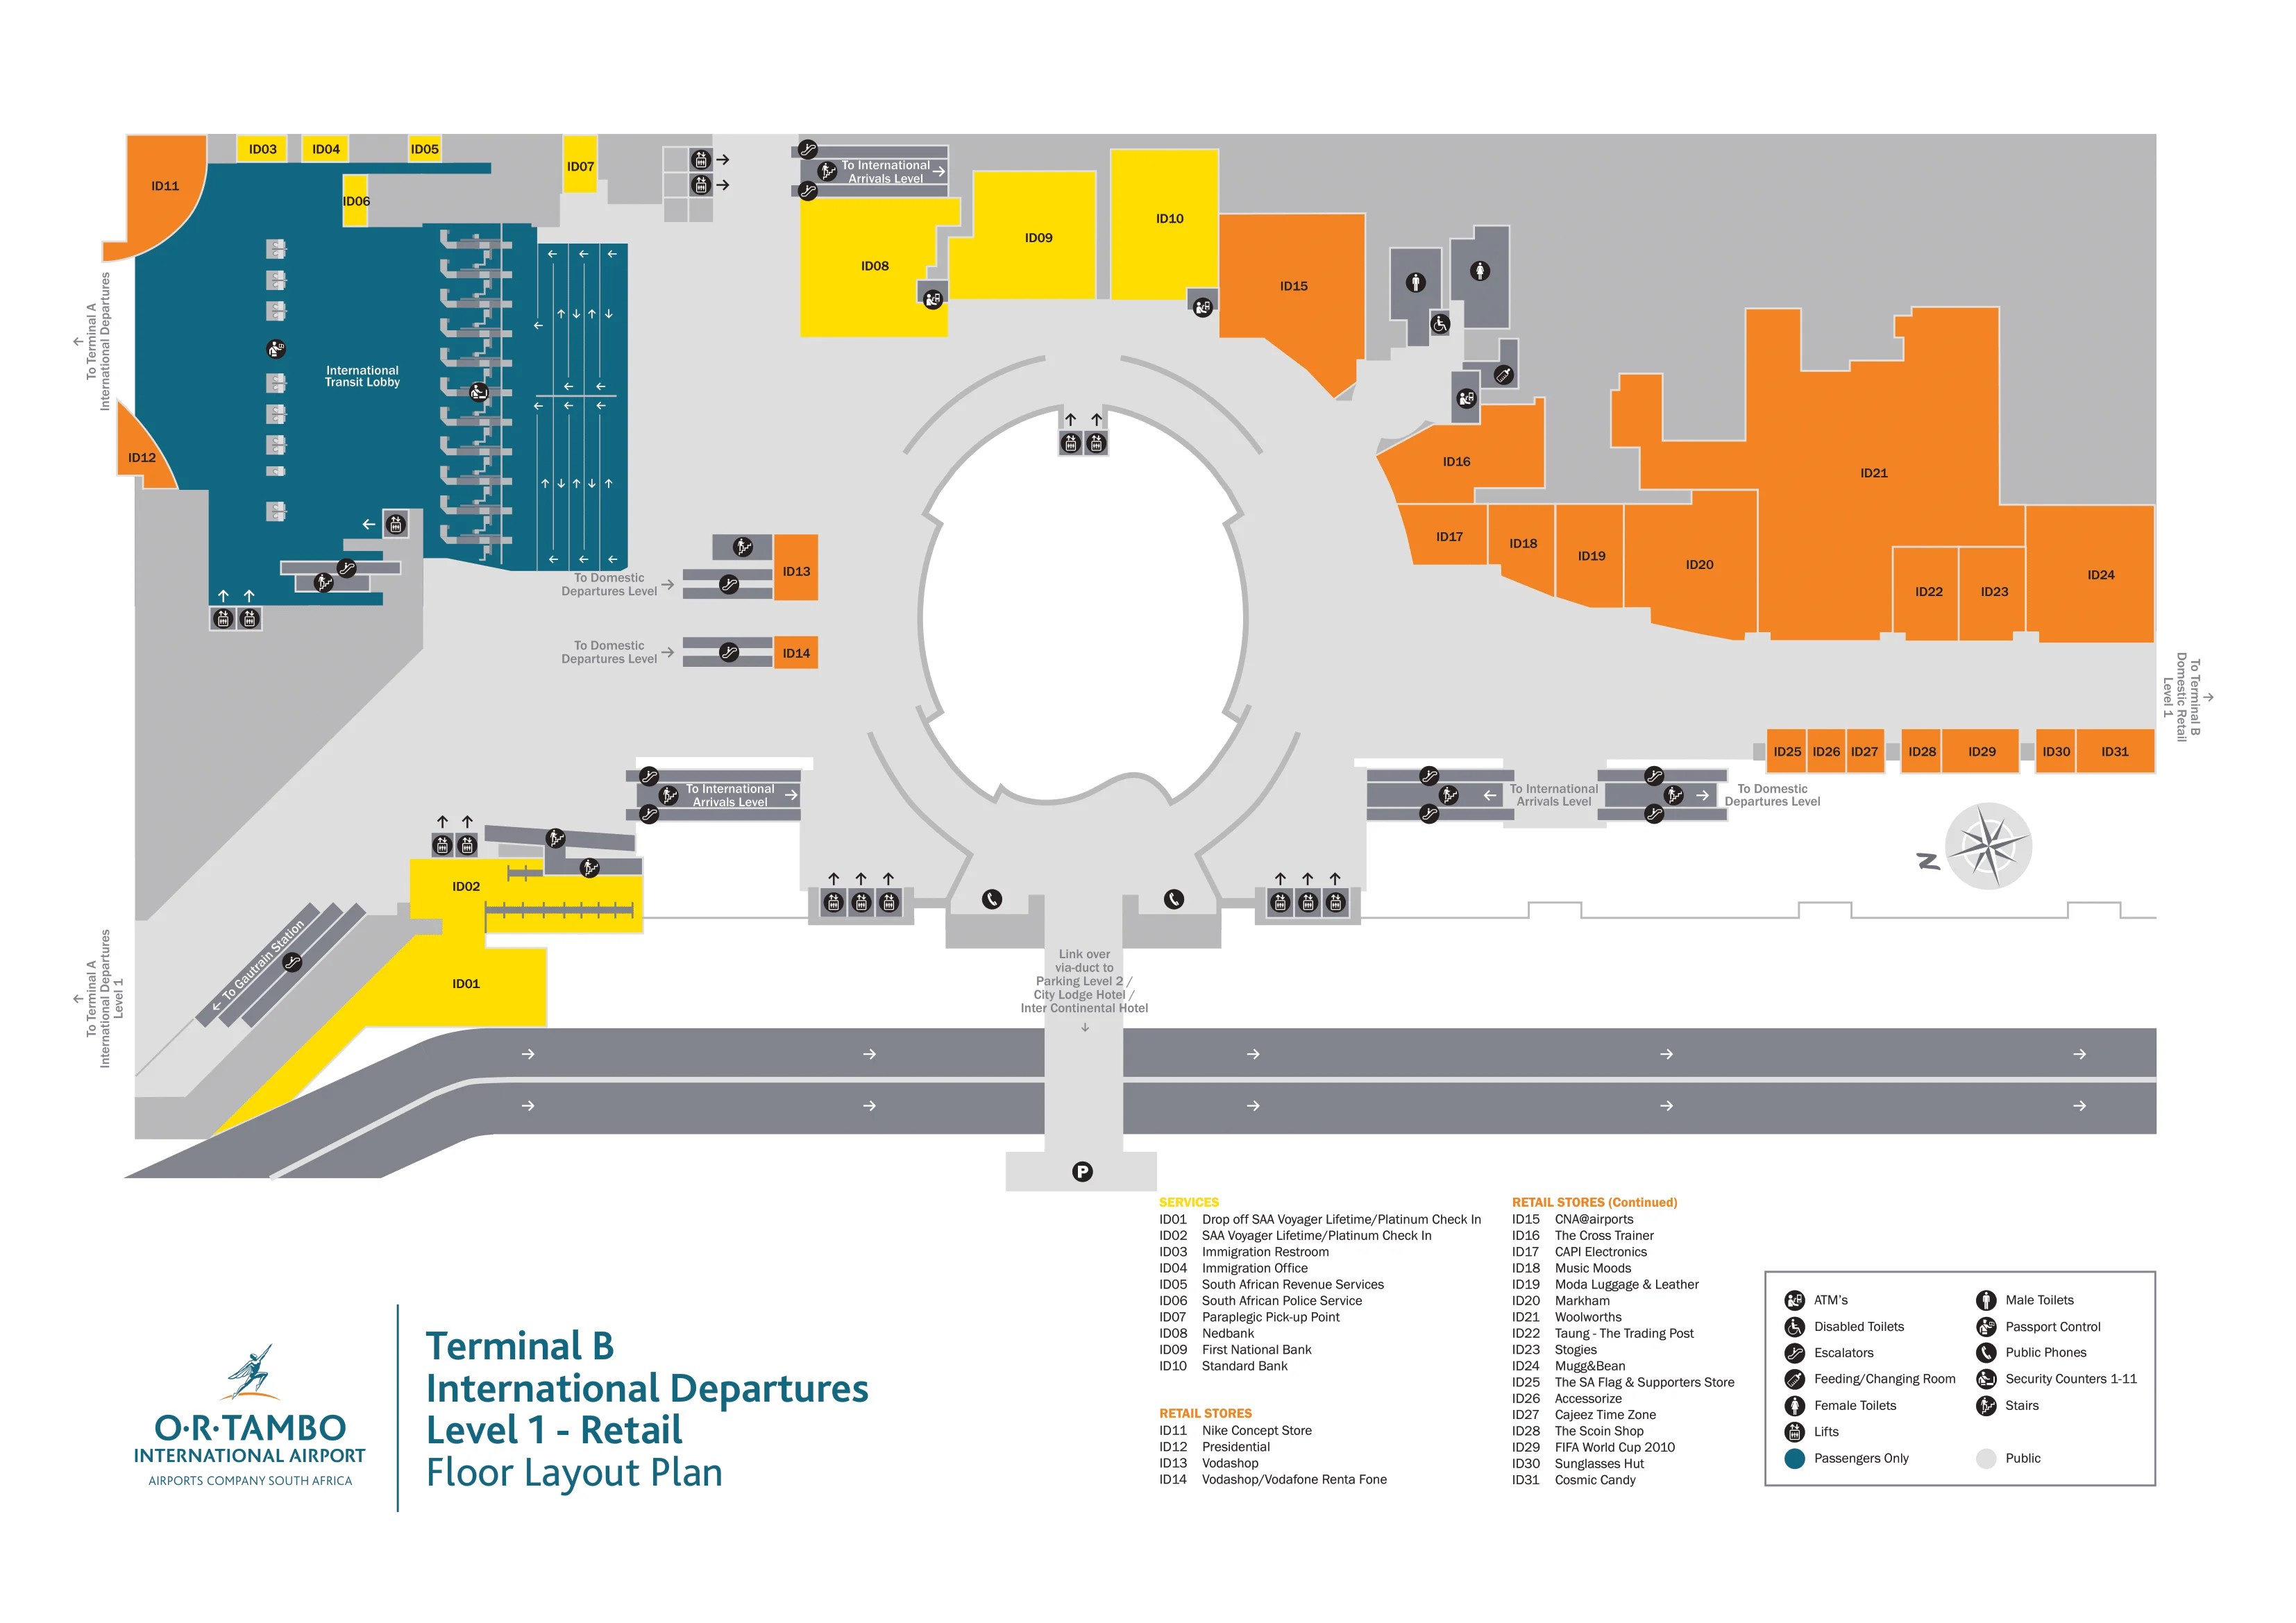
Terminal B at the Johannesburg main airport complex is a long, rectangular domestic-processing hall anchored on Level 2 (Departures) with a single central security injection point and long lateral walks to far-end counters and gate piers. Landside flow concentrates around check-in islands and the back-wall retail edge, while airside flow fans out from the security exit into a retail hub and onward to the D/E gate piers (worst-case walks).
Map Table
| Terminal | Primary Function | Key Nodes | Vertical Access |
|---|---|---|---|
| Terminal B (Level 2) | Domestic departures processing | Check-in islands, ACSA info desk zone, central security entrance | Escalators/elevators from Level 0 |
| Terminal B (Airside) | Domestic gates + lounges | Security exit decision point, lounge elevator block, D/E gate piers | Elevators/escalators to Levels 3–4 |
| Terminal B (Level 0) | Domestic arrivals release | Public arrivals exit, vertical cores up to Level 2 | Escalators/elevators nearby |
O.R. Tambo International Airport Terminal B Map Strategy
- Aim for the Level 2 security “maw” early: from your check-in island, move toward the inner wall where the single screening entrance forms, because the queue can spill into the retail corridor near the atrium edge.
- Treat counter location as distance: central-island check-in puts security closer, while far-north counters can add a long cross-hall walk before you even hit the queue start.
- Lock the restroom and re-pack step before joining the line: the nearest pre-security restrooms sit along the back wall near the perimeter food/retail outlets, a short walk from the queue start but easy to miss in crowd crush.
- After security, execute the immediate right: the lounge elevator/stair bank is within ~20 meters on the right-hand wall; if you drift straight into the retail/gate flow, you’ve passed the decision point and must backtrack.
2026 O.R. Tambo International Airport Terminal B Map + Printable PDF
Terminal B continues to operate as a queue-driven funnel on Level 2: check-in islands feed one main security entrance, and peak periods can push the line back into the adjacent retail corridor toward the atrium edge. After screening, the layout flips into a fast decision environment—miss the immediate right-turn for the lounge elevator block and you’ll add backtracking before committing to longer gate-pier walks.
2026 O.R. Tambo International Airport Terminal B Map Guide
What is the exact walking distance (in meters) from Terminal A International Arrivals exit (post-customs) to the Terminal B domestic check-in hall via the central atrium?
Walking distance is not a Terminal B–only metric, because it starts at Terminal A and crosses the Central Terminal Building atrium before reaching Level 2 in Terminal B. The verified range is 550–650 meters door-to-counter, with variance driven by which check-in island your airline uses inside Terminal B.
A practical breakdown keeps it spatially grounded: customs exit doors to the atrium edge runs about 50–80 m, the atrium crossing adds roughly 100 m, and the in-Terminal B hall segment to your counter can be up to ~300 m depending on counter placement. The pure walk is ~8–10 minutes, but 15–20 minutes is a safer door-to-counter baseline once crowd friction and vertical lift time are added.
Which exact doors/escalators/elevators are the fastest vertical route to go “2 levels up” when moving from Arrivals (A) toward Departures/Check-in (B)?
The atrium glass-elevator bank is the fastest two-level climb because it skips the Level 1 retail mezzanine entirely. Using it gets you from Level 0 arrivals flow straight to Level 2 departures without the “travelator to Level 1, then hunt for the next lift” delay.
From the international arrivals side, walk into the high-ceiling central atrium and ignore the sloped travelators that funnel people onto Level 1. Stay oriented to the “Departures / Level 2” and “Gautrain” direction cues and aim for the main glass lift shafts in the atrium block (or the elevator bank near the arrivals hall meeting-point zone). Ride to Level 2, then exit into the departures hall that feeds directly into Terminal B’s check-in environment.
Where is the “connection desk” area located between baggage reclaim and the public taxi/meeting area—and what is its exact distance from the nearest baggage carousel?
The connection desk sits immediately after customs, about 20–30 meters past the customs inspection benches, just before the sliding glass doors into the public arrivals hall. It functions as a pre-exit “buffer zone” counter, not a landside help desk.
From baggage reclaim, the flow is carousel area → customs red/green processing → customs benches → walk forward another 20–30 meters to the desk zone → sliding doors into the arrivals hall and meeting area. For separate-ticket domestic connections, the desk is not the operational shortcut—expect to be directed upstairs to Terminal B check-in on Level 2.
What is the exact walking distance from Terminal B check-in counters to the Terminal B security screening entrance (the point where queues begin)?
Walking distance ranges from 30 to 150 meters, depending on which check-in island your airline uses in Terminal B. The security queue begins at the single central screening entrance on the inner wall of the Level 2 departures hall.
| Start point in Terminal B (Level 2) | Distance to security queue start | Landmark triangulation |
|---|---|---|
| Central check-in counters (typical SAA-area islands) | 30–50 m | Straight toward the inner wall’s central security entrance |
| Far-north / peripheral counters (often LCC end of hall) | 120–150 m | Long cross-hall walk, then converge on the same central security “maw” |
Where is the primary Terminal B security queue spillover line physically located (which corridor/landmark), and what is the nearest alternate path around it (if any)?
No alternate public path exists because Terminal B uses a single main security entrance on Level 2. When the line blows out past stanchions, the spillover backs into the Level 2 retail corridor toward the atrium edge, so the “end of the line” often sits closer to the atrium than to the checkpoint itself.
The physical tell is the queue snaking past the darkened ticket-desk/airline-desk stretch just before the screening entrance, then continuing outward toward the atrium-side circulation space near the viewing deck entrance area. The only “bypass” is eligibility-based: the Fast Track lane runs adjacent to the main queue and is policed; otherwise, any attempt to walk to the far end of the terminal just creates extra distance before you return to the same queue end.
What is the exact walking distance from Terminal B security exit to the farthest domestic gate zone (worst-case gate walk inside Terminal B)?
Walking distance is about 400–500 meters from the Terminal B security exit to the farthest domestic gate zones on the D/E piers. That’s the worst-case interior walk when your gate is allocated at the far end of the airside branches.
From the screening exit, the route pushes forward through the airside retail hub, then continues down the relevant pier to the far-numbered gates (examples cited include D8 or E13). For many E-gates that operate as bus gates, the walking task doesn’t end at the holding pen: you often add a vertical descent via stairs/escalators to ground-level bus loading, plus boarding dwell time. Budget roughly 8–10 minutes for the walk alone at a tired pace, before any bus-gate boarding friction.
Where are the nearest restrooms to the Terminal B security queue (pre-security), and what is the exact distance from the queue start point?
The nearest pre-security restrooms are about 40–60 meters from the start of the Terminal B security queue. They sit along the back wall/perimeter edge of the Level 2 check-in hall, near the food and retail outlets.
Use the queue start as your anchor: face the security entrance, then peel back toward the hall’s perimeter where the retail strip runs (commonly referenced near outlets like Wimpy and nearby sweet shops). If the hall is congested with passengers repacking bags, the larger atrium-side restroom set near the food court is the more reliable option before you commit to the security line that can lock you in for 20–40 minutes during peaks.
What is the exact route (with landmarks) from Terminal B security exit to the elevators/stairs used for ORT/Bidvest Sky Lounge access?
The route is an immediate right turn to the lounge elevator block located within the first 20 meters of exiting security. This is a “decision-node” path: if you follow the crowd straight into the retail concourse, you’ve overshot and must backtrack.
Clear the screening area, collect your items, and walk forward toward the airside concourse opening. Before the main retail thoroughfare fully opens up, turn right to the right-hand wall where the elevators and stairs sit as a dedicated vertical circulation point. Use the overhead “Lounges” signage at this junction as confirmation, then take the elevator up to Level 4 for the Bidvest Sky Lounge.
After clearing Terminal B security, where exactly is the “turn right → elevator” decision point for the ORT Sky Lounge, and how many meters past the screening exit is it?
The decision point is less than 20 meters past the security screening exit. It happens before the main airside retail flow fully opens, so walking “straight ahead with the crowd” usually means you’ve already missed it.
Exit the scanners, gather your bags, and walk forward into the concourse throat. Within the first short stretch, look to the right-hand wall for the dedicated elevator/stair bank signed for lounges. Use the concourse expansion as your landmark: if you reach the first major retail/seating block, you’ve gone too far and need to backtrack to the screening exit area and take the right turn you skipped.
Where is the South African Airways lounge area relative to the ORT Sky Lounge elevators (same bank / opposite side), and what is the exact distance between them?
The South African Airways lounge area is in the same right-hand elevator circulation block used for the ORT/Bidvest Sky Lounge, typically on the opposite side or in an adjacent foyer on Level 4. The exact meter distance is not fixed as a single published value, because it depends on which Level 4 doorway is in use.
Both lounges share the same “turn right after security → take elevators up” vector. From the elevator doors on Level 4, follow the closest lounge signage in the immediate mezzanine zone rather than walking into any long gate corridor. If you find yourself moving away from the elevator lobby into the main retail/gate flow, you’ve left the lounge block—turn back to the Level 4 elevator landing and re-orient off the signage cluster there.
Where is the closest baggage-wrapping/locking service to Terminal B check-in, and what is the exact walking distance from the main check-in row?
The closest baggage-wrapping service is inside Terminal B’s Level 2 check-in hall at the ends of the check-in islands, about 0–10 meters from the main check-in queue entry points. These kiosks are positioned to catch you before you commit to the airline’s snake-queue.
From the center of the main check-in row, walk toward either end-cap of your check-in island rather than toward the back wall retail strip. Look for a semi-permanent wrapping kiosk (commonly branded Secure Wrap) set slightly off the island corner where trolleys can park without blocking the queue. If you’re standing at the point where stanchions begin to form the airline line, the wrapping counter is typically within a few steps at the island’s head or tail.
What is the exact walking distance from the Terminal B landside exit doors to the official taxi/rideshare pickup meeting point used after exiting the terminal?
No curbside rideshare pickup is allowed; the official Uber/Bolt meeting point is in Parkade 2 (P2) Level 2. Walking distance from Terminal B exit doors to the e-hailing zone is about 200–300 meters, typically 5–8 minutes with luggage.
| Step | Route segment | Distance | Landmark triangulation |
|---|---|---|---|
| 1 | Exit Terminal B to landside | 0–30 m | Terminal B doors → follow “Public Transport / Parkade 2” signs |
| 2 | Reach the pedestrian bridge/skywalk | 60–120 m | Walk toward the roadway crossing point linked to the parking garage |
| 3 | Cross into Parkade 2 (P2), Level 2 | 60–120 m | Bridge → enter garage structure |
| 4 | Walk to the marked e-hailing bay | 40–80 m | Follow “e-hailing” signs to the designated pickup area/pillars |
If a traveler must exit to landside then re-enter for A→B transfers, what is the exact re-entry checkpoint location in Terminal B relative to the main atrium (meters + level)?
The re-entry checkpoint is the main Domestic Departures security checkpoint on Level 2, about 100–150 meters north of the central atrium edge. There is no special transfer re-entry lane, so re-entry means joining the same public security funnel as every other departing domestic passenger.
From the atrium on Level 2, walk straight into Terminal B (northbound) and stay oriented to the inner wall where the screening entrance sits. The checkpoint presents as the single central security “maw” with queue stanchions and adjacent Fast Track. If you are still in the open atrium retail corridor, you are short of it; once you see the consolidated queue structure and screening portals, you are at the re-entry point.
Where are the nearest information/help counters to the Terminal B check-in area, and what is the exact distance from the center of the check-in hall?
The nearest help points are 20–40 meters away for airline sales/help desks along Terminal B’s back wall, while the main airport information desk sits farther out at roughly 100–150 meters toward the atrium on Level 2. Both are landside on the departures level.
From the center of the check-in hall, face the check-in islands and look toward the perimeter/back wall opposite the islands for the airline sales/ticket counters; these are the quickest “fix-it-now” desks for FlySafair/Airlink/SAA-type issues. For general wayfinding and airport-wide questions, walk southward toward the atrium pivot zone where the ACSA information desk is positioned as a central hinge between the domestic hall and the main atrium circulation.
What is the exact walking distance from Terminal A arrivals baggage reclaim to the central atrium connector that leads directly into Terminal B?
The distance is about 50–80 meters from the post-customs exit doors into the edge of the central atrium connector zone. This is the first short, controlled segment that gets you from the arrivals hall environment into the high-ceiling CTB atrium that links onward to Terminal B.
From the baggage reclaim area, you clear customs (red/green) and pass through the sliding exit doors into the public international arrivals hall. Immediately turn right and walk past the forex and car rental kiosks (commonly Bidvest Bank/Travelex and Avis/Europcar) until the ceiling height opens up and the space becomes the central atrium. That transition—low ceiling arrivals hall to open atrium—is your “you’ve reached the connector” confirmation point.
Where exactly do the domestic arrivals flow enter the public area in Terminal B, and what is the exact distance to the nearest domestic departures check-in point (to reduce “wrong level” errors)?
Domestic arrivals enter the public landside area on Level 0 at the northernmost end of Terminal B, not in the Level 2 check-in hall. The nearest path to departures check-in starts within about 20–50 meters of the arrivals exit, but requires a two-level climb to Level 2.
| Segment | Distance | Landmark triangulation |
|---|---|---|
| Domestic arrivals exit → nearest escalator/elevator core (Level 0) | 20–50 m | Arrivals public release area → immediate vertical circulation node nearby |
| Vertical move to departures check-in (Level 2) | 2 levels | Take escalator/elevator up; ignore any ground-floor “search for counters” instincts |
| Level 2 landing → nearest check-in point | Short in-hall walk | You should see the check-in islands and queue stanchions on the departures level |