Narita International Airport Terminal 1 Map (Most Up-To-Date)
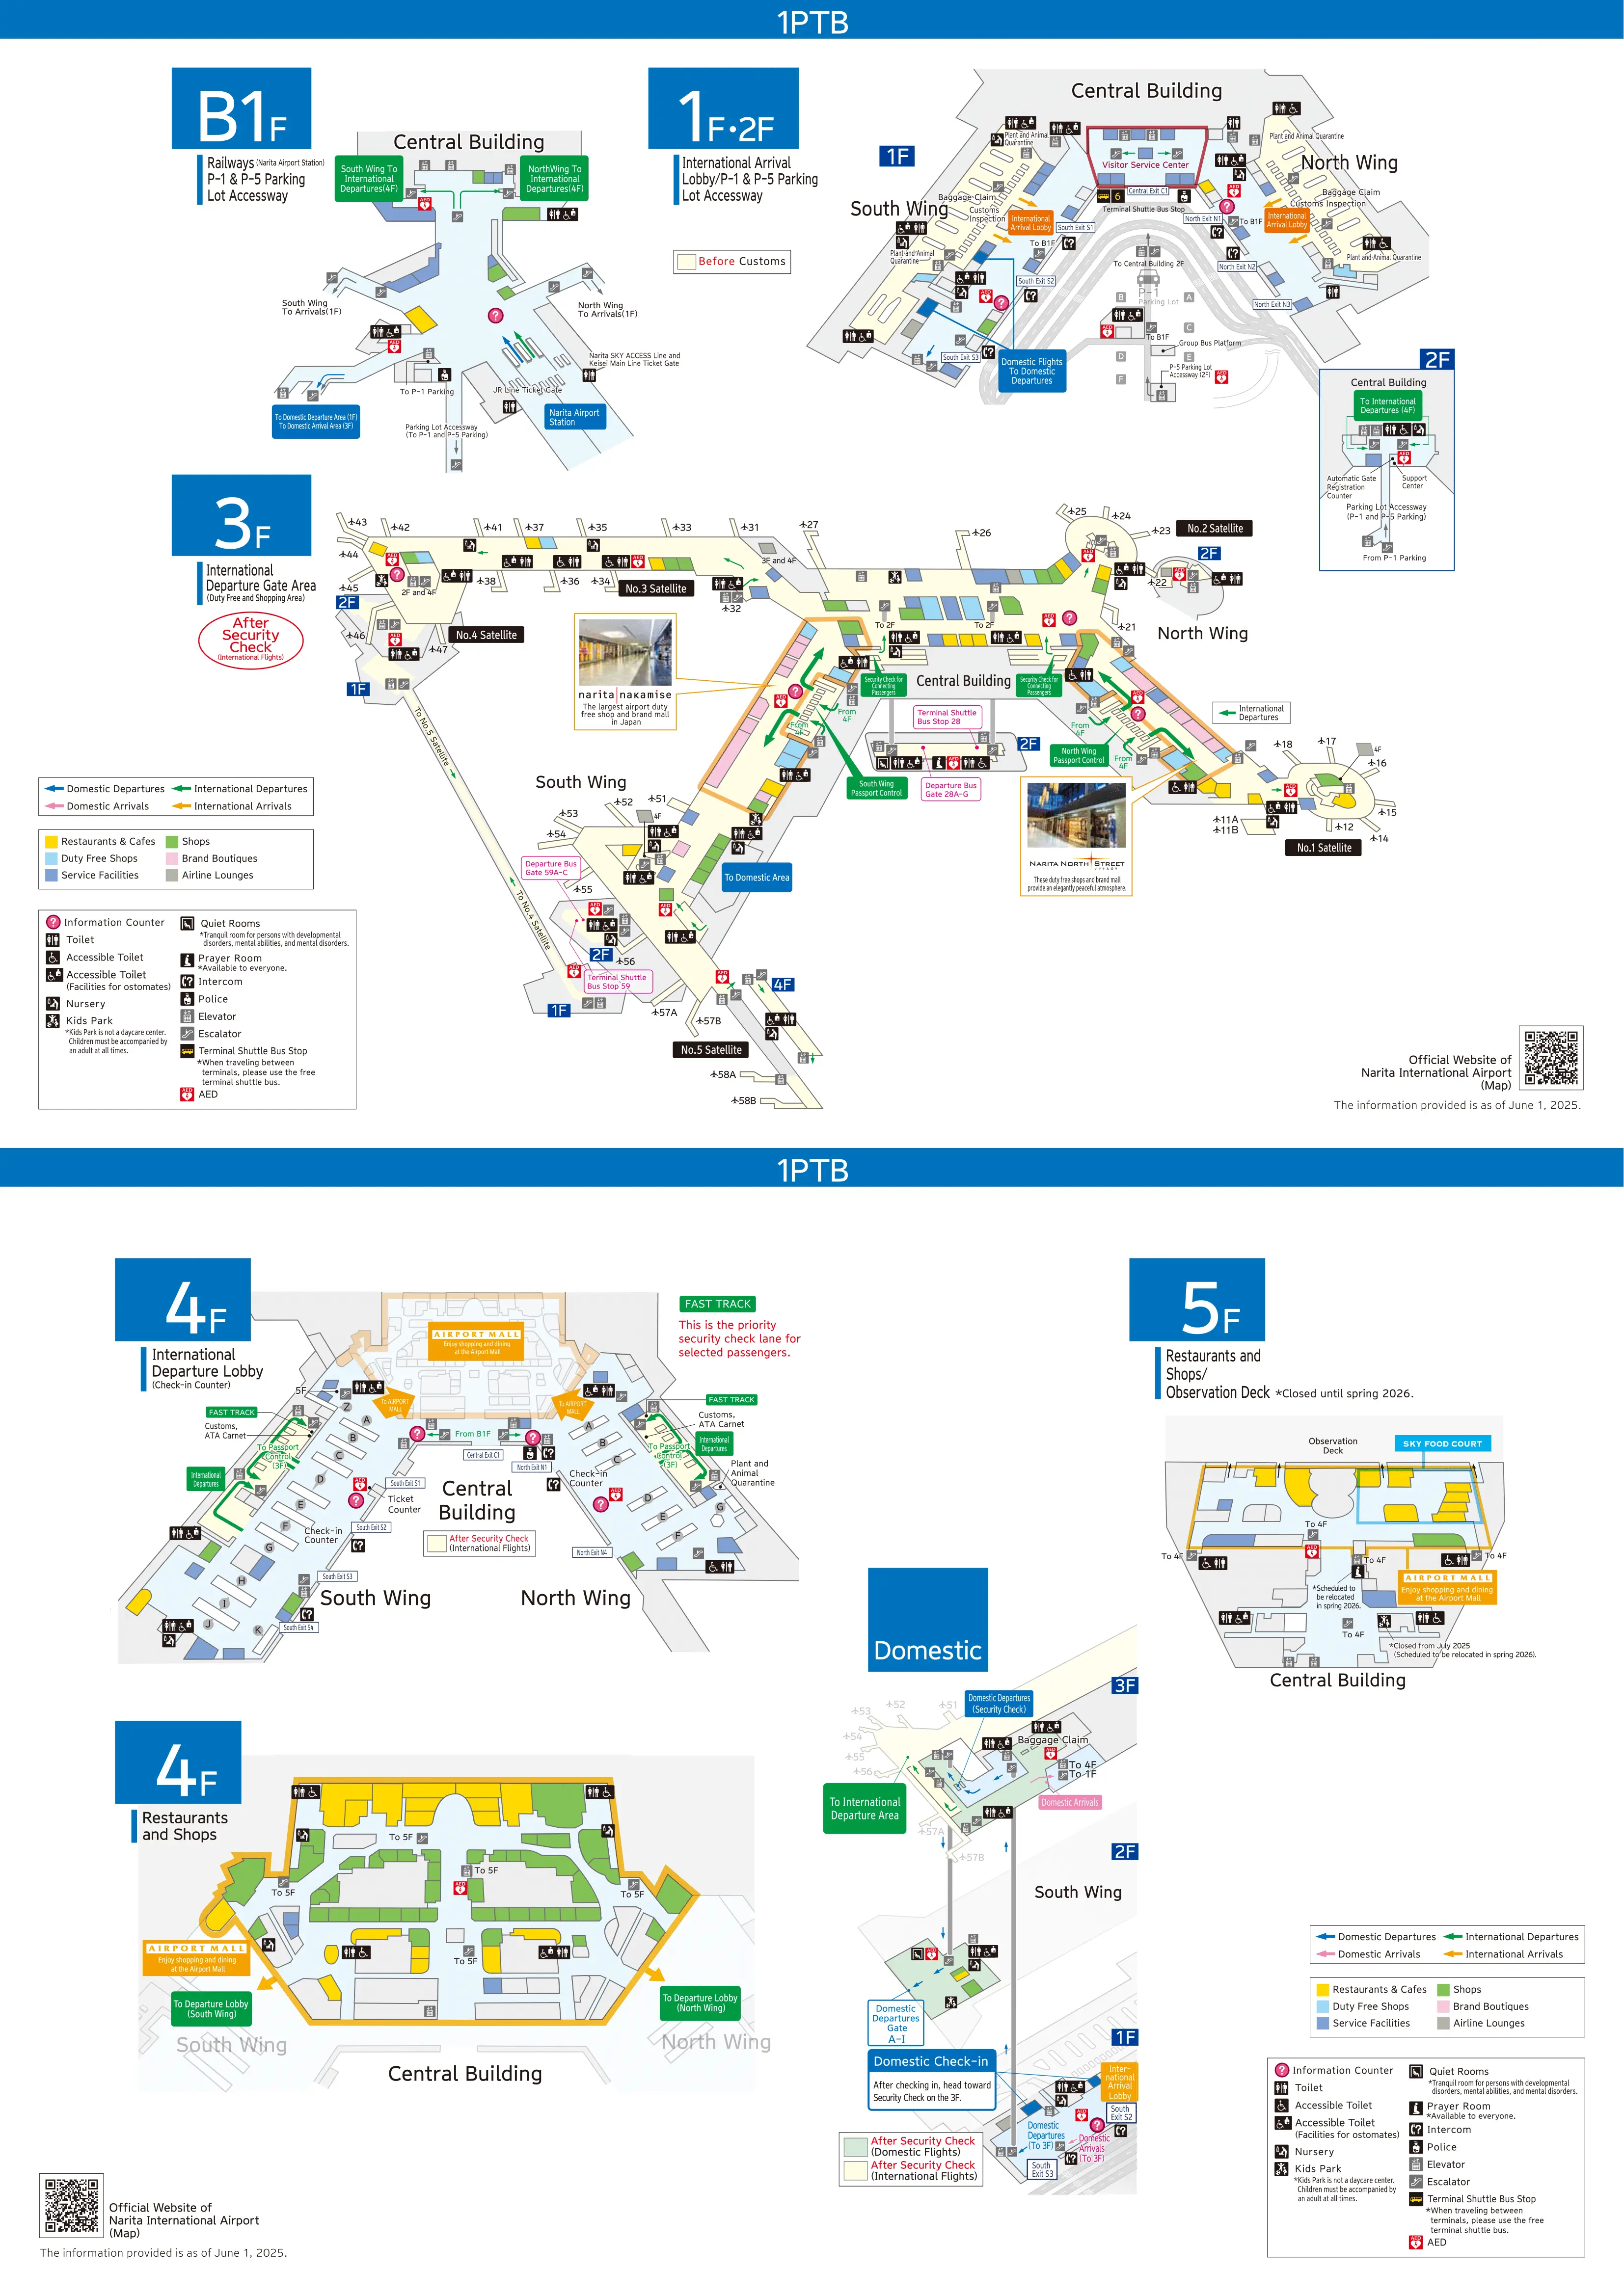
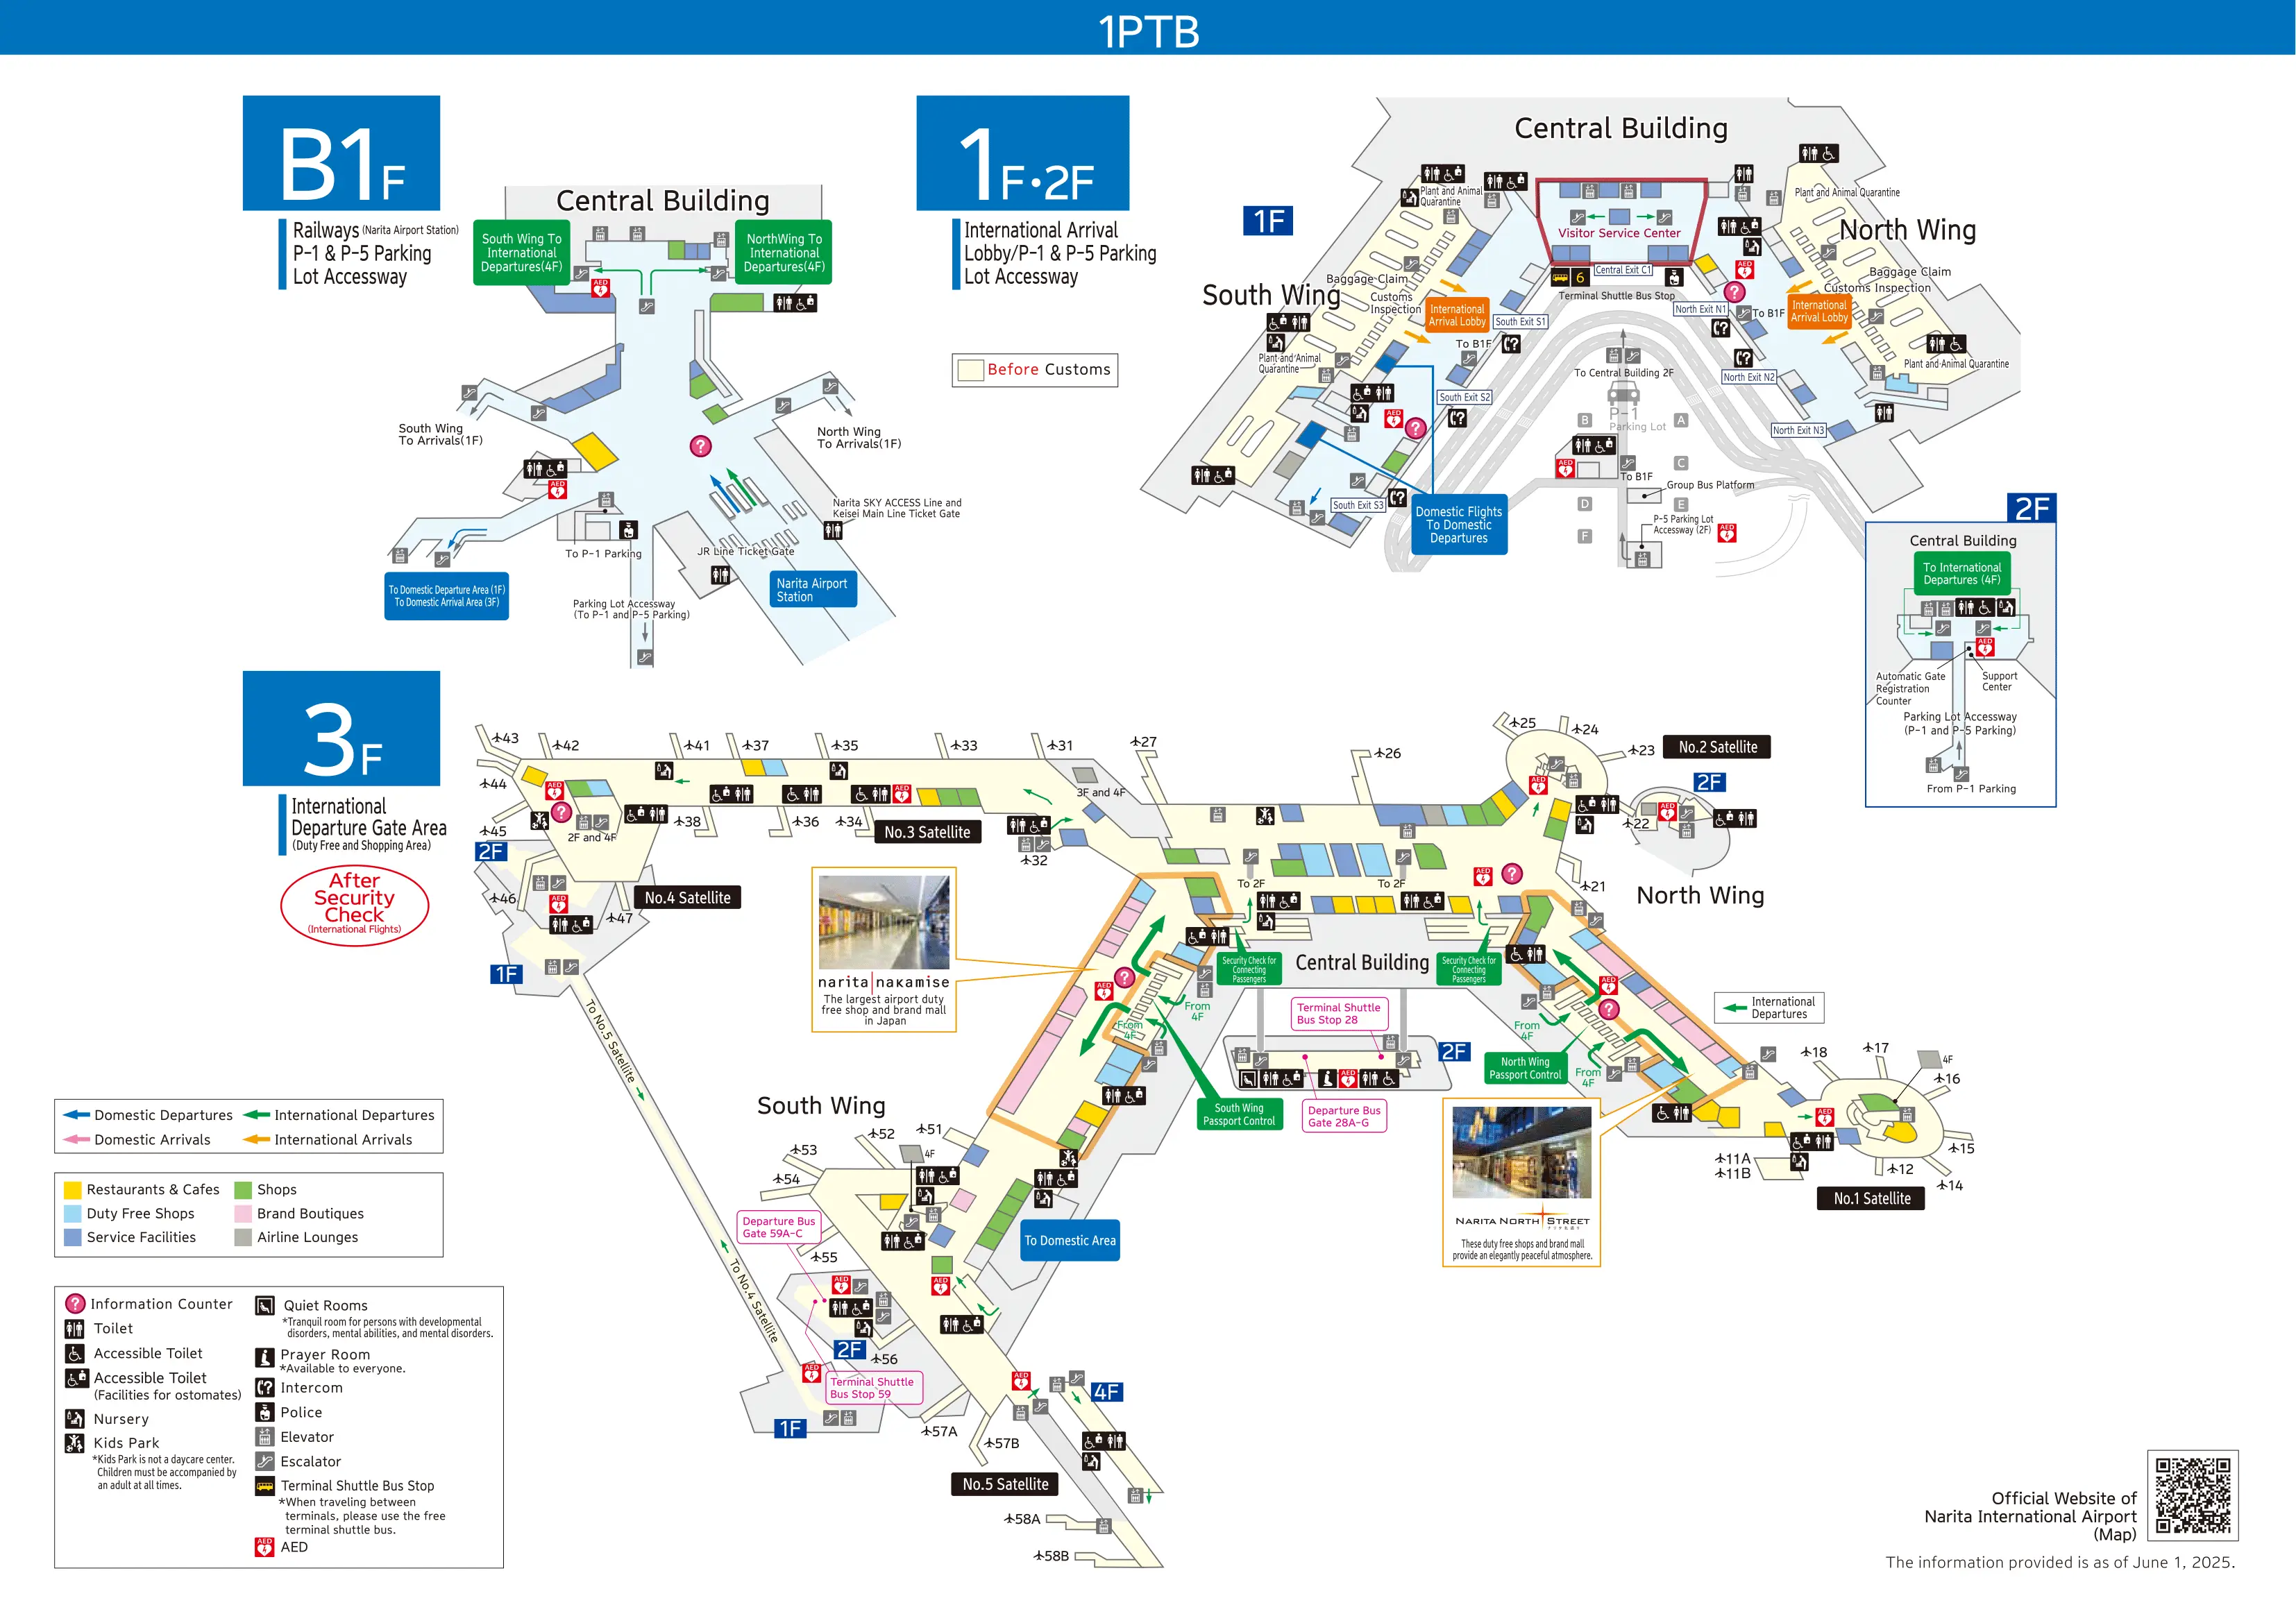
Narita Terminal 1 uses an inverted-Y footprint within Tokyo’s main Narita hub: North Wing and South Wing branch off a Central Building “spine,” with gates split across radial Satellites (1, 2, 5) and long linear piers (Satellites 3–4, including Gate 47). Arrivals cascade downward (2F → 1F → B1F), so the map matters most at wing decision points and at the Customs-to-trains descent.
Map Table
| Wing / Zone | Gate Clusters | Arrivals Processing | Rail Interface |
|---|---|---|---|
| North Wing | Sat 1 (11–18), Sat 2 (21–25) | North Immigration, North Baggage Hall | B1F concourse access |
| Central Building | Sat 3 (26–38), Sat 4 (41–47) | sterile corridors, wing-feed junction | central escalator bank |
| South Wing | Sat 5 (51–58) | South Immigration, South Baggage Hall, Customs exit | shortest path to JR/Keisei on B1F |
Narita Airport Terminal 1 Map Strategy
- Commit to the correct wing before the Central Building junction; Gate 47 flow belongs to South Wing processing, and wrong-wing drift creates unrecoverable baggage-hall penalties.
- Treat distance as a fixed “buffer tax”: Gate 47 sits at the end of a linear pier, so plan your walk as a long, uninterrupted exit vector, not a quick terminal hop.
- Use a single confirmation landmark immediately after Customs to prevent lobby drift; the Meeting Point area anchors the South Wing public hall and stabilizes orientation.
- Pre-trace the Customs-to-rail descent: identify the central escalator bank down to B1F, then lock onto JR’s red signage to avoid Keisei/JR counter confusion.
2026 Narita International Airport Terminal 1 Map + Printable PDF
Current 2026 operations still reward “map-first” decisions in Terminal 1: Gate 47 arrivals are functionally tethered to South Wing processing, and international-to-domestic connections often behave like a full landside loop (Immigration → Baggage → Customs → public lobby → bag drop → re-screen). Printing a Terminal 1 map is most useful for locking the correct wing early and tracing the vertical drop to B1F rail.
Narita International Airport Terminal 1 Level B1 1 2 3 Map 2025
Narita International Airport Terminal 1 Level 4 5 Map 2025
2026 Narita International Airport Terminal 1 Map Guide
What is the exact walking distance (meters) from Gate 47 (Terminal 1) to Arrivals Immigration?
The walking distance is approximately 700 meters from Gate 47 to the South Wing Arrivals Immigration hall. That total reflects a full-length exit along the Satellite 4 linear pier, then across the Central Building spine, then the final approach corridor into the South Wing processing zone.
| Segment | Landmark anchor | Approx. distance |
|---|---|---|
| Gate 47 → Satellite 4 junction | end-of-pier sterile corridor | 250–300 m |
| Junction → South Wing connector | Central Building merge point | 200–250 m |
| South connector → Immigration entry | South Wing approach corridor | 150–200 m |
On the Terminal 1 map, which side (North Wing vs South Wing) does the Arrivals exit path from Gate 47 feed into first?
The Arrivals exit path feeds into the South Wing first. Gate 47 sits on the Central Building’s Satellite 4 pier, but its arrivals sterile corridor is operationally funneled toward the South Wing Immigration hall rather than the North Wing processing side.
| Map decision point | What you’ll see nearby | Correct feed |
|---|---|---|
| Satellite 4 meets the Central Building spine | passenger streams merging from Gates 26–38 and 41–47 | South Wing |
| Approach into the processing hall | “South Wing” zone branding and yellow Arrivals directionals | South Wing |
From Arrivals Customs exit (Terminal 1), what is the first unambiguous named landmark shown on the map that confirms you are on the correct path to the public exits?
The first unambiguous named landmark is the Meeting Point in the South Wing Arrivals Lobby (1F). It sits in the central field of view after you pass through the Customs sliding doors, and it’s the fastest “yes, I’m in the right place” confirmation before you commit to buses, domestic bag drop, or the rail escalators.
The Meeting Point works as a hard anchor because it’s fixed, named, and centrally placed in the public lobby, unlike smaller counters that can be visually blocked by greeters. If you can orient off the Meeting Point, you can then triangulate to the curbside exits and the central “Train / Railways” descent without wandering deeper into the lobby.
Where exactly (terminal area + nearest labeled point) is the domestic-connection baggage drop-off located immediately after Customs in Terminal 1?
The domestic-connection baggage drop-off is landside in the South Wing Arrivals Lobby (1F), at the far South end, tied into the Domestic Check-in / Domestic Connecting Flights counter zone. It is not inside the Customs exit line; it requires a short landside walk after you enter the public hall.
From the South Wing Customs sliding doors, the mapped placement is reached by turning left (toward the South end of the lobby) and walking along the public frontage until the counters labeled for domestic connections/check-in appear. Use the Meeting Point area as the initial anchor, then continue toward the quieter South extremity where the domestic counter bank begins.
What is the exact walking distance (meters) from the United-arrival gate cluster (Gate 47 reference point) to the ANA Lounge entrance in Terminal 1?
The walking distance is approximately 800 meters from the Gate 47 reference point to the ANA Arrival Lounge entrance. This is a cumulative airside-to-landside walk: Gate 47 to South Wing Immigration, down to Baggage/Customs, then a short landside move in the South Wing Arrivals Lobby.
| Segment | Landmark anchor | Approx. distance |
|---|---|---|
| Gate 47 → South Wing Immigration | Satellite 4 pier + Central spine → South approach | ~700 m |
| Immigration → Customs exit | escalator descent into baggage hall, then Customs line | ~50 m |
| Customs exit → ANA Arrival Lounge | South Wing lobby, toward the South/domestic counter end | ~50 m |
What is the shortest mapped route from Terminal 1 Arrivals exit to the JR (Narita Express) ticket office entrance (visual path, not ‘follow signs’)?
The shortest route is Customs exit → central escalator bank down to B1F → turn toward the red JR frontage → JR ticket office entrance. This works because the rail descent is centralized between the North and South lobby ends, and JR’s ticket office is visually dominated by red branding once you hit the B1F concourse.
From the South Wing Customs sliding doors, walk straight into the public lobby until you reach the central “Train / Railways” escalators/elevators (use the Meeting Point zone as your immediate orientation anchor). Descend to B1F, then face the open concourse and lock onto the RED JR façade; the JR East Travel Service Center / JR Ticket Office frontage sits directly beside the JR gate line, distinct from the BLUE Keisei counters.
What is the exact walking distance (meters) from the JR ticket office to the Narita Airport Station platform access point for Terminal 1?
The walking distance is approximately 30–40 meters from the JR ticket office entrance to the Narita Airport Station platform access point for Terminal 1. The route is short because the JR ticket office frontage sits directly beside the JR ticket gates, and the platform access escalators are immediately beyond the gates.
After you enter the JR ticket gates next to the red JR signage, continue forward to the first clearly labeled escalator/stair head down to the platform level (B2). The distance is mostly “gate line → escalator head,” with the main time cost coming from handling tickets and luggage through the automated gates rather than the walk itself.
Where is the airside terminal-transfer bus stop located on the Terminal 1 map (exact area label + nearest gate/landmark)?
The airside terminal-transfer bus stop is located at Gate 59 (South Wing, Satellite 5) and Gate 28 (North Wing, Satellite 2). These are the two mapped bus-depot nodes used for airside terminal transfers, positioned inside their respective radial satellite gate clusters.
| Bus stop node | Exact area label on map | Nearest gate/landmark anchor |
|---|---|---|
| South transfer bus | South Wing, Satellite 5 | Gate 59 |
| North transfer bus | North Wing, Satellite 2 | Gate 28 |
Where are the two Arrivals duty-free stores shown on the Terminal 1 map (North Wing vs South Wing placement relative to customs)?
The two Arrivals duty-free stores are split as one in the North Wing baggage hall and one in the South Wing baggage hall, both positioned pre-Customs. Each is inside its wing’s sterile Arrivals/Baggage Claim zone, so you only see the one that matches the wing your arrivals flow feeds into.
Because Gate 47 arrivals feed South, the accessible store is the South Wing Arrivals duty-free in the South Baggage Claim Hall, before the Customs inspection exit doors. The North Wing Arrivals duty-free mirrors this placement in the North Baggage Claim Hall, also before Customs, but it is not reachable from the South sterile hall without staff intervention due to inter-hall separation.
Where are the north vs south luggage service counters (e.g., storage/forwarding) positioned on the Terminal 1 map relative to the check-in rows?
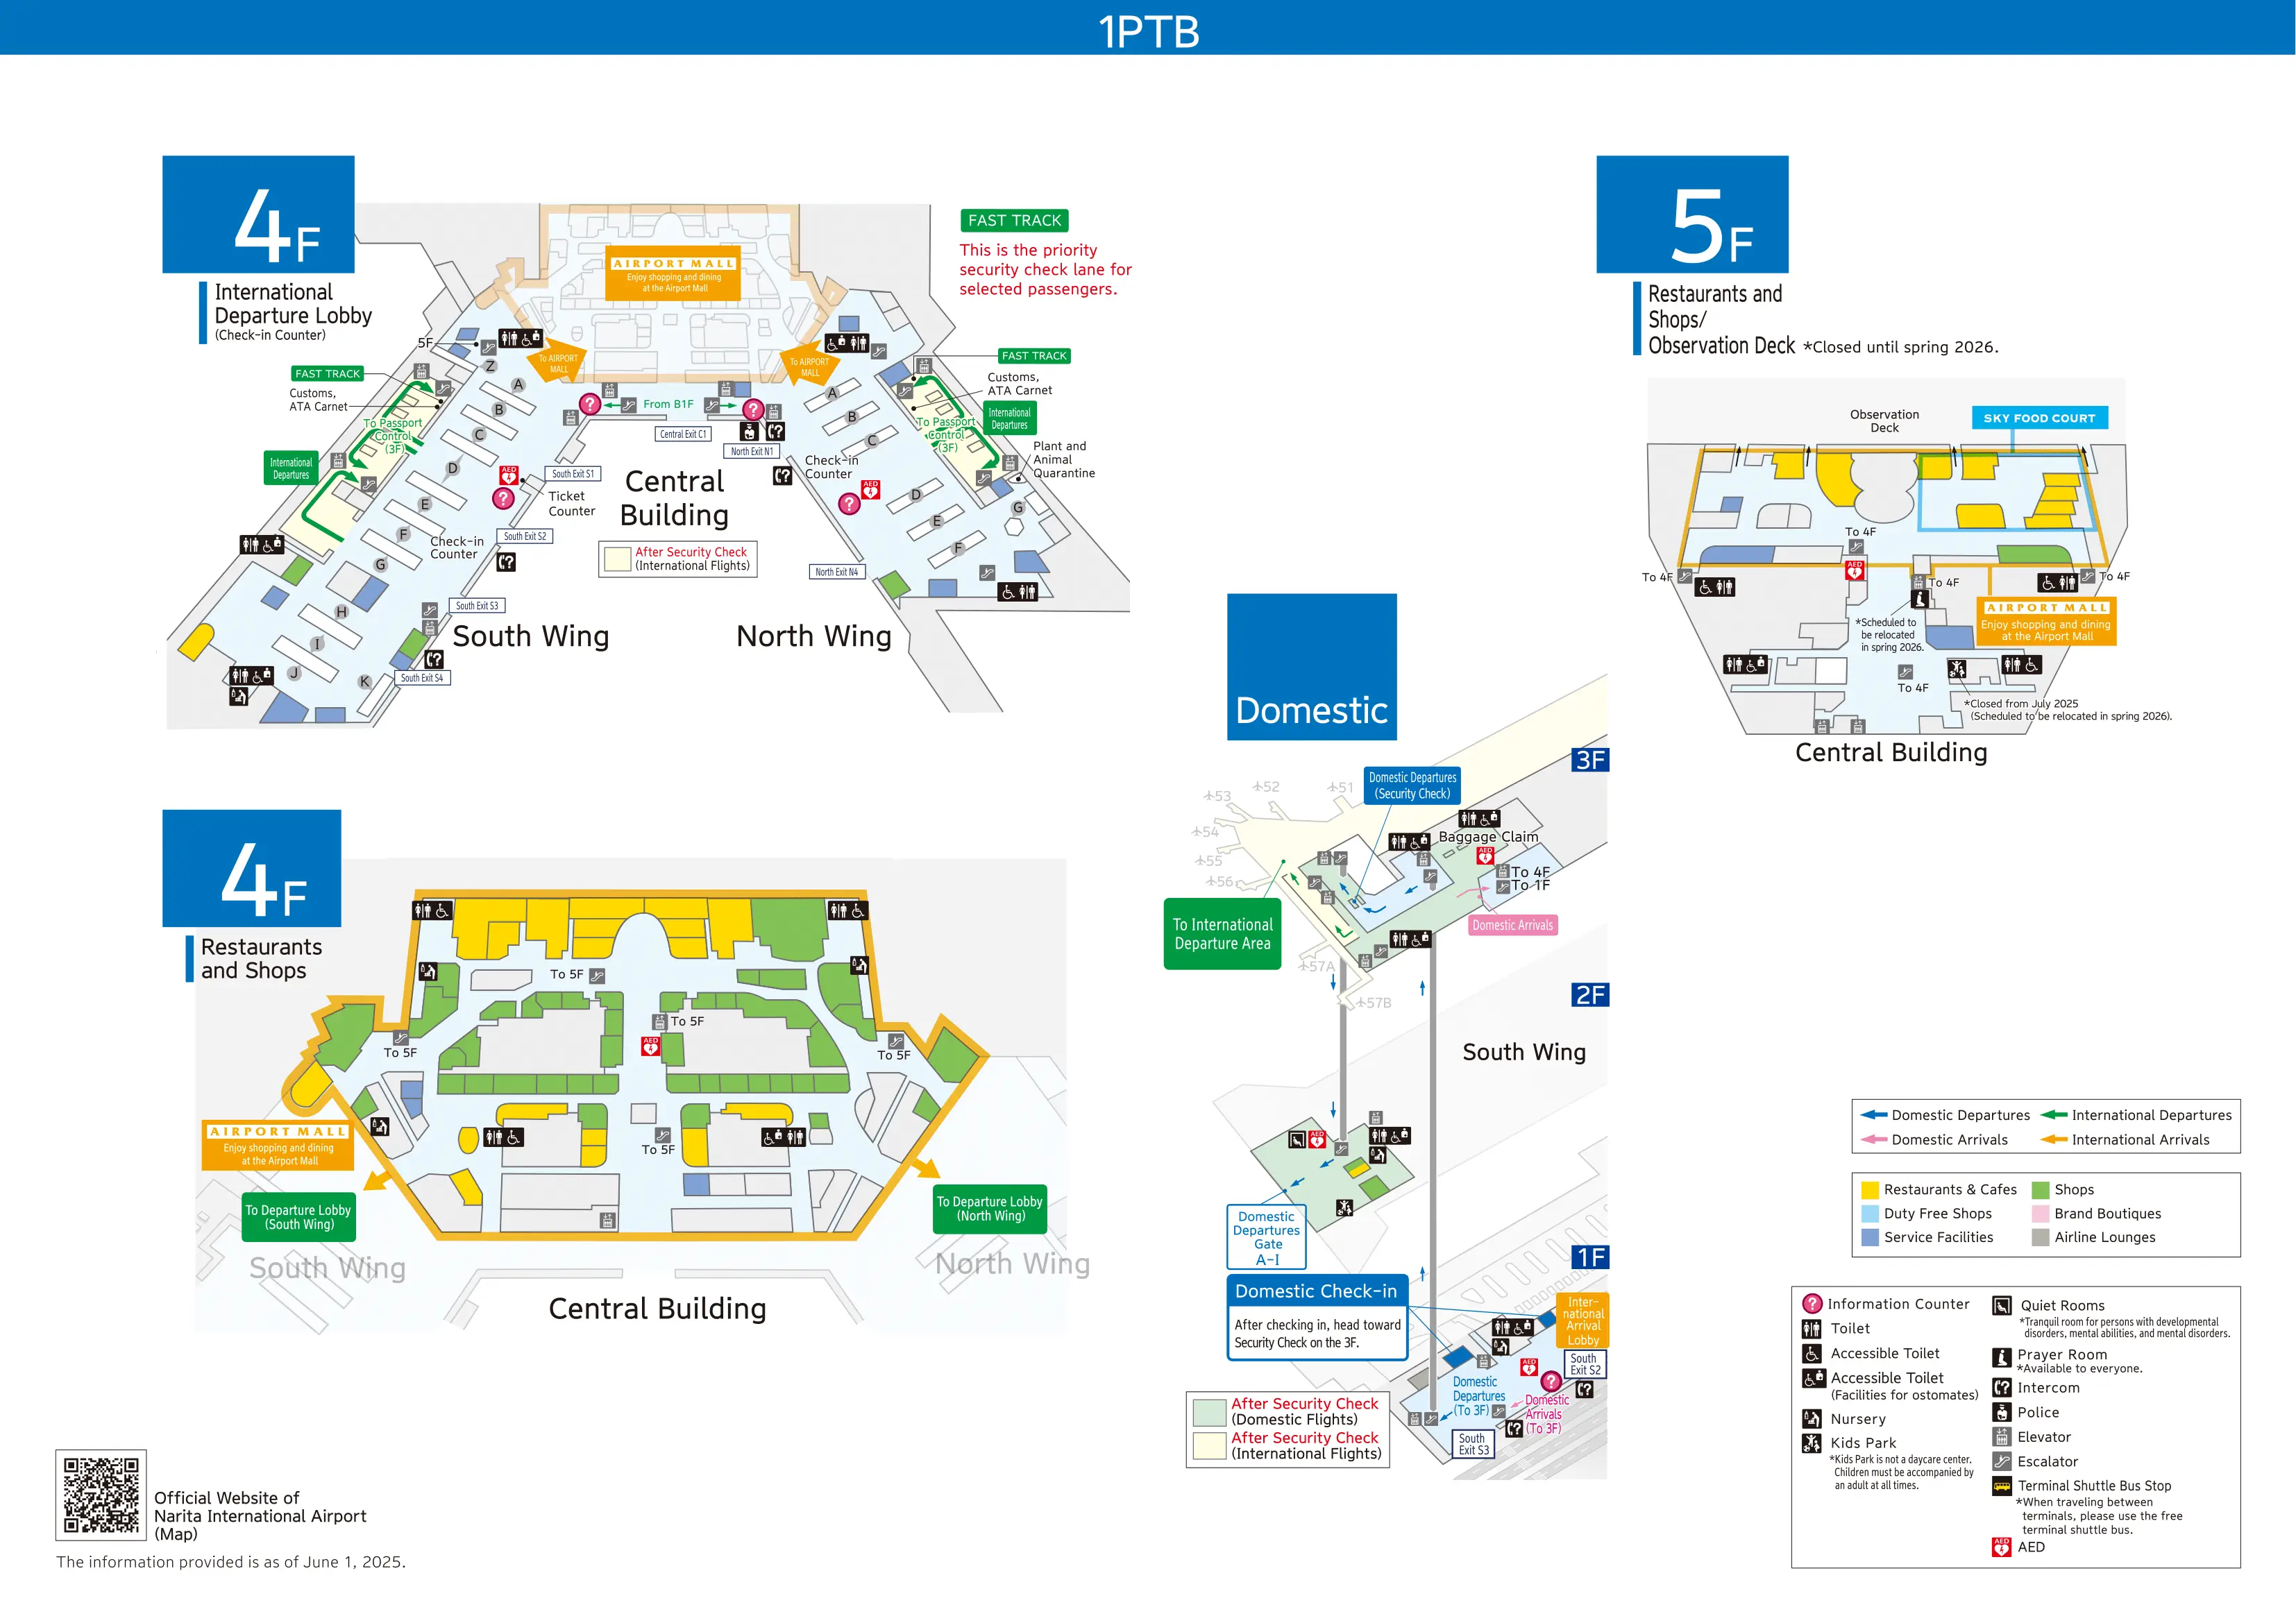
The luggage service counters are positioned as bookends at the far ends of the 4F departures check-in hall, aligned to their wing’s check-in row blocks. The South-side counter sits at the South extremity near the South Wing check-in aisles, and the North-side counter sits at the North extremity near the North Wing check-in aisles.
| Wing | Position relative to check-in rows | Nearest labeled hall reference |
|---|---|---|
| South Wing | far South end of 4F hall | South Wing check-in row block (Rows A–J zone) |
| North Wing | far North end of 4F hall | North Wing check-in row block (Rows K–Z zone) |