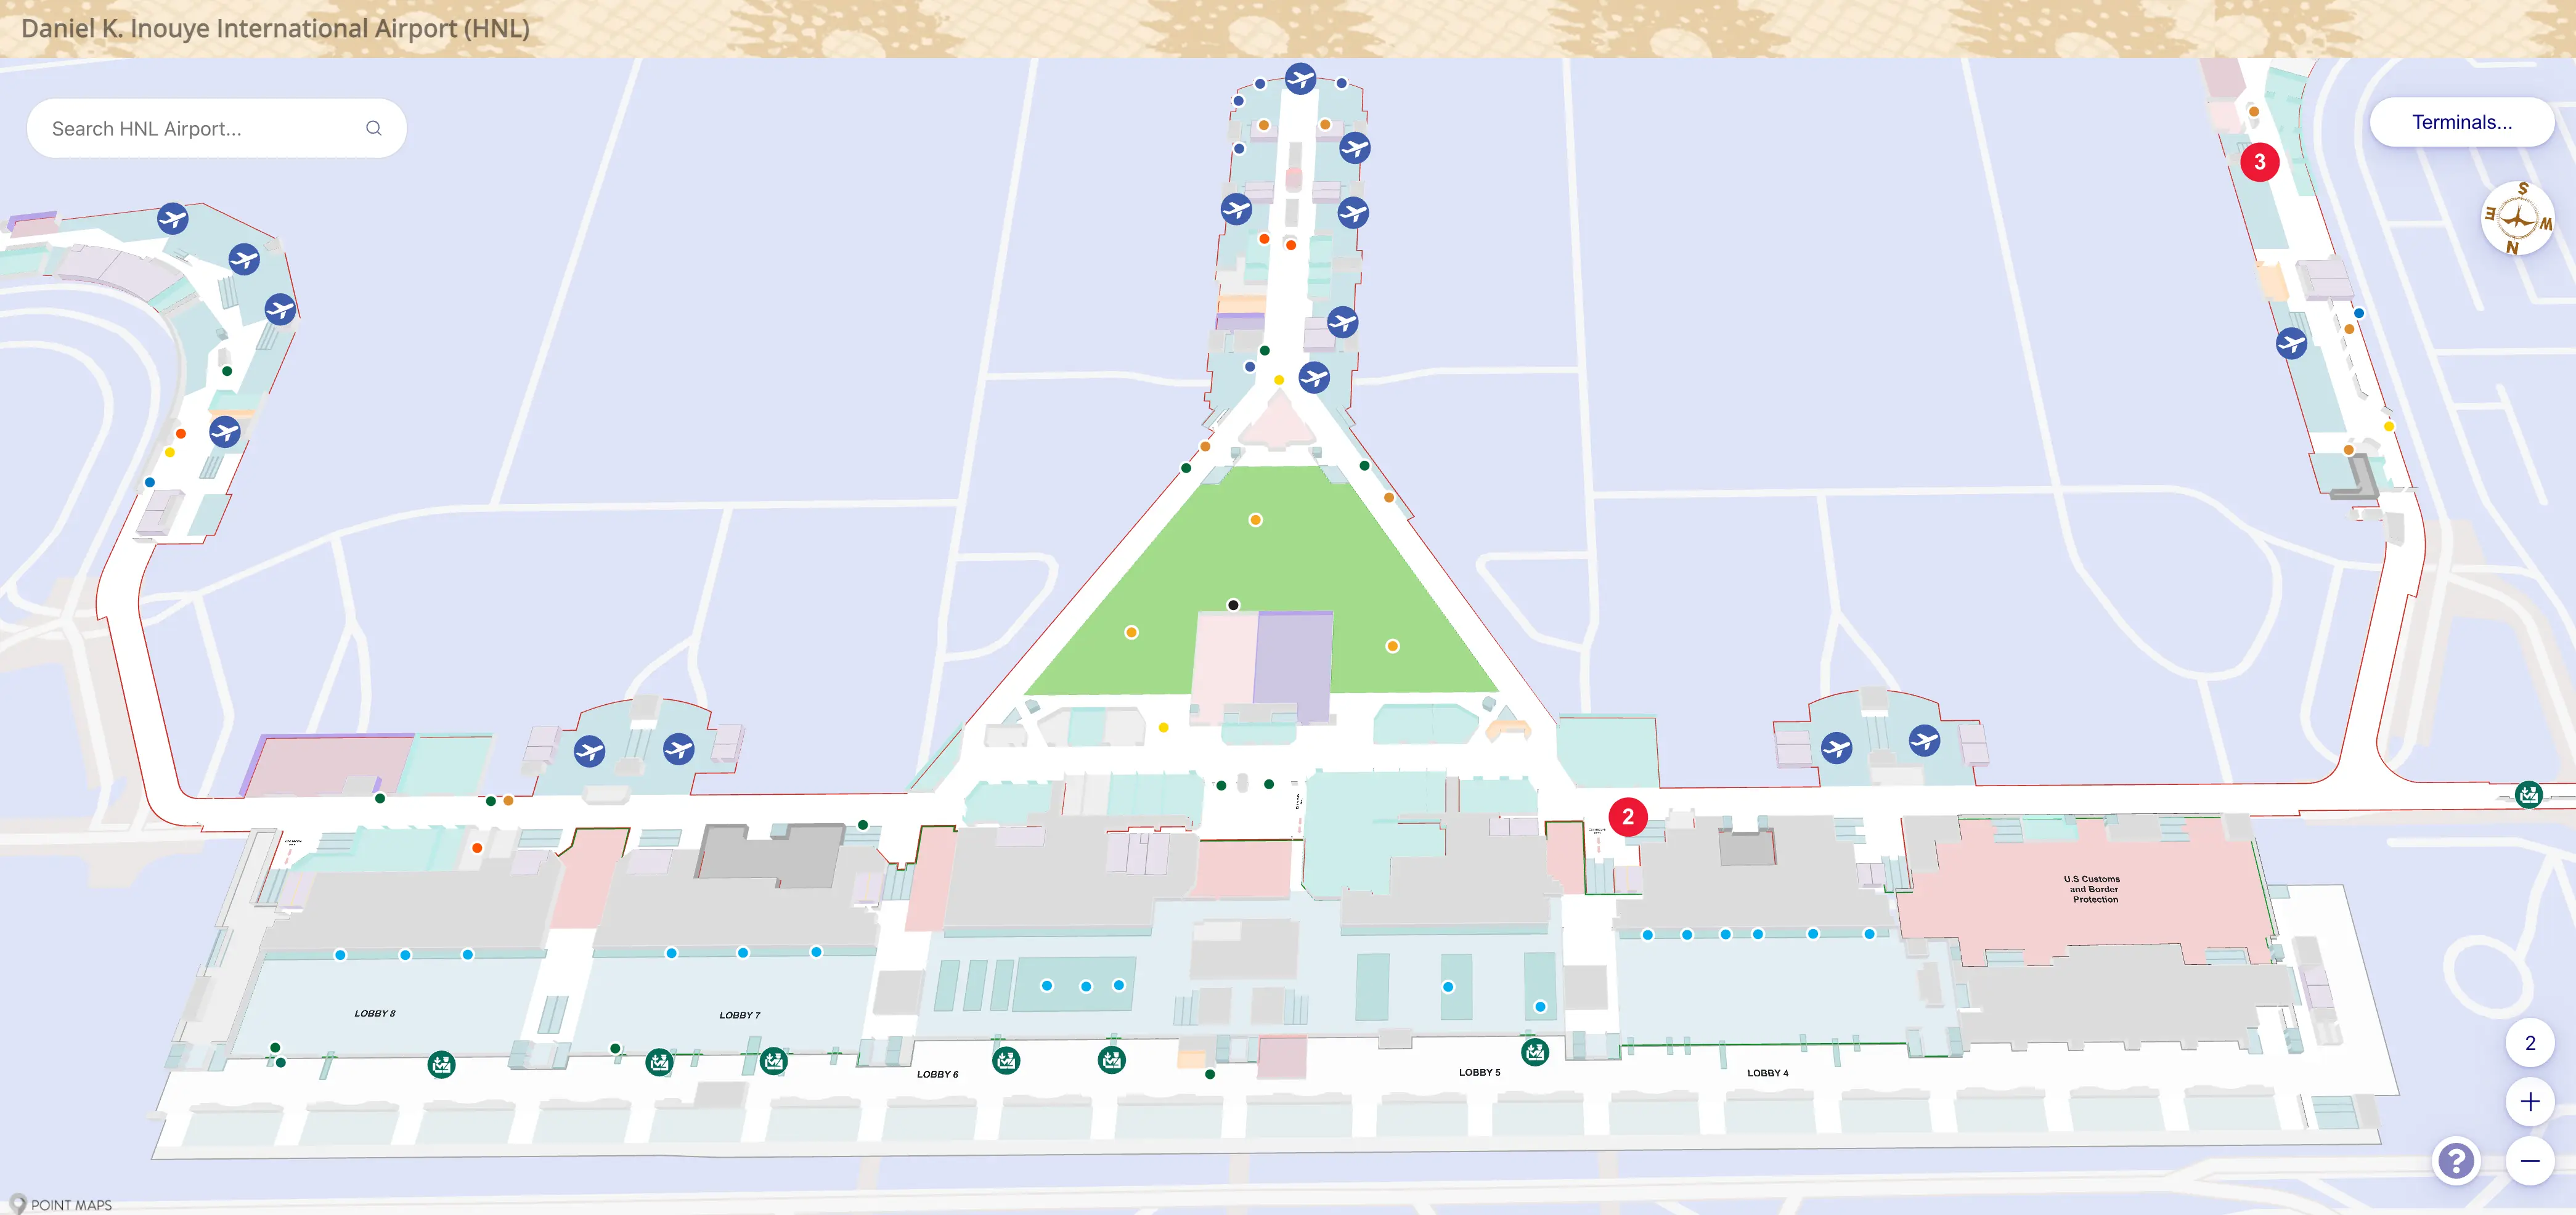
Daniel K Inouye International Airport Terminal 2 Map (Most Up-To-Date)
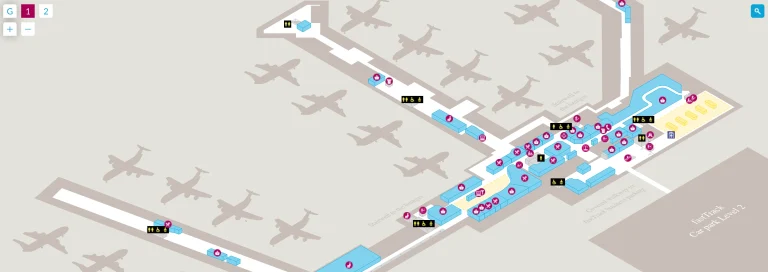
Daniel K. Inouye International Airport Terminal 2 is a long, linear terminal with multiple ticket lobbies spread along the curb and a single airside “spine” that stretches west (C/Terminal 1 side) to east (G/Diamond Head side). Wrong turns are costly because there are few cross-overs once you commit to a wing. Within Honolulu’s primary airport hub, the key is orienting yourself around the Central Great Hall (DFS hub), then choosing the correct checkpoint, concourse, and connector before you start the long walk.
Map Table
| Zone | Connection | Walk Time |
|---|---|---|
| Ticket Lobbies 4–8 | TSA Checkpoints 2–5 | 45–65 m lobby-to-nearest checkpoint |
| Central Great Hall / DFS hub | C vs E vs G split | immediate post-security decision point |
| C Concourse (west) | Terminal 1 connector + USDA | “C1 neck” choke area |
| E Concourse (center pier) | Central spine | 550 m (CP3 → E10) |
| G Concourse (east extension) | Central spine | 780 m (CP5 → G10) |
Daniel K. Inouye International Airport Terminal 2 Map Strategy
- Treat Terminal 2 as a one-way linear commitment: confirm your gate letter (C / E / G) before picking a checkpoint, because backtracking can add hundreds of meters.
- Use the Central Great Hall / DFS hub as your “last obvious split”: left for C/Terminal 1, center for E, right for F/G—don’t drift past it hoping for a shortcut.
- Expect the USDA carry-on agriculture x-ray on the Terminal 1→Terminal 2 post-security connector near the C1/B5 neck; keep it moving like a quick bag scan, not TSA.
- For pickups and rideshare, anchor your plan to the level (Ground/Arrivals vs Departures/Level 2) shown in-app at booking time to avoid the “wrong curb” penalty.
2026 Daniel K Inouye International Airport Terminal 2 Map + Printable PDF
Current operations still reward map-first choices: Terminal 2’s checkpoints feed the same sterile area, but the concourse commitment after the DFS hub is hard to undo without major backtracking. The Terminal 1↔Terminal 2 connector remains defined by the USDA carry-on x-ray pinch point, and rideshare/pickup routing continues to hinge on level-specific instructions that can change by policy and signage.
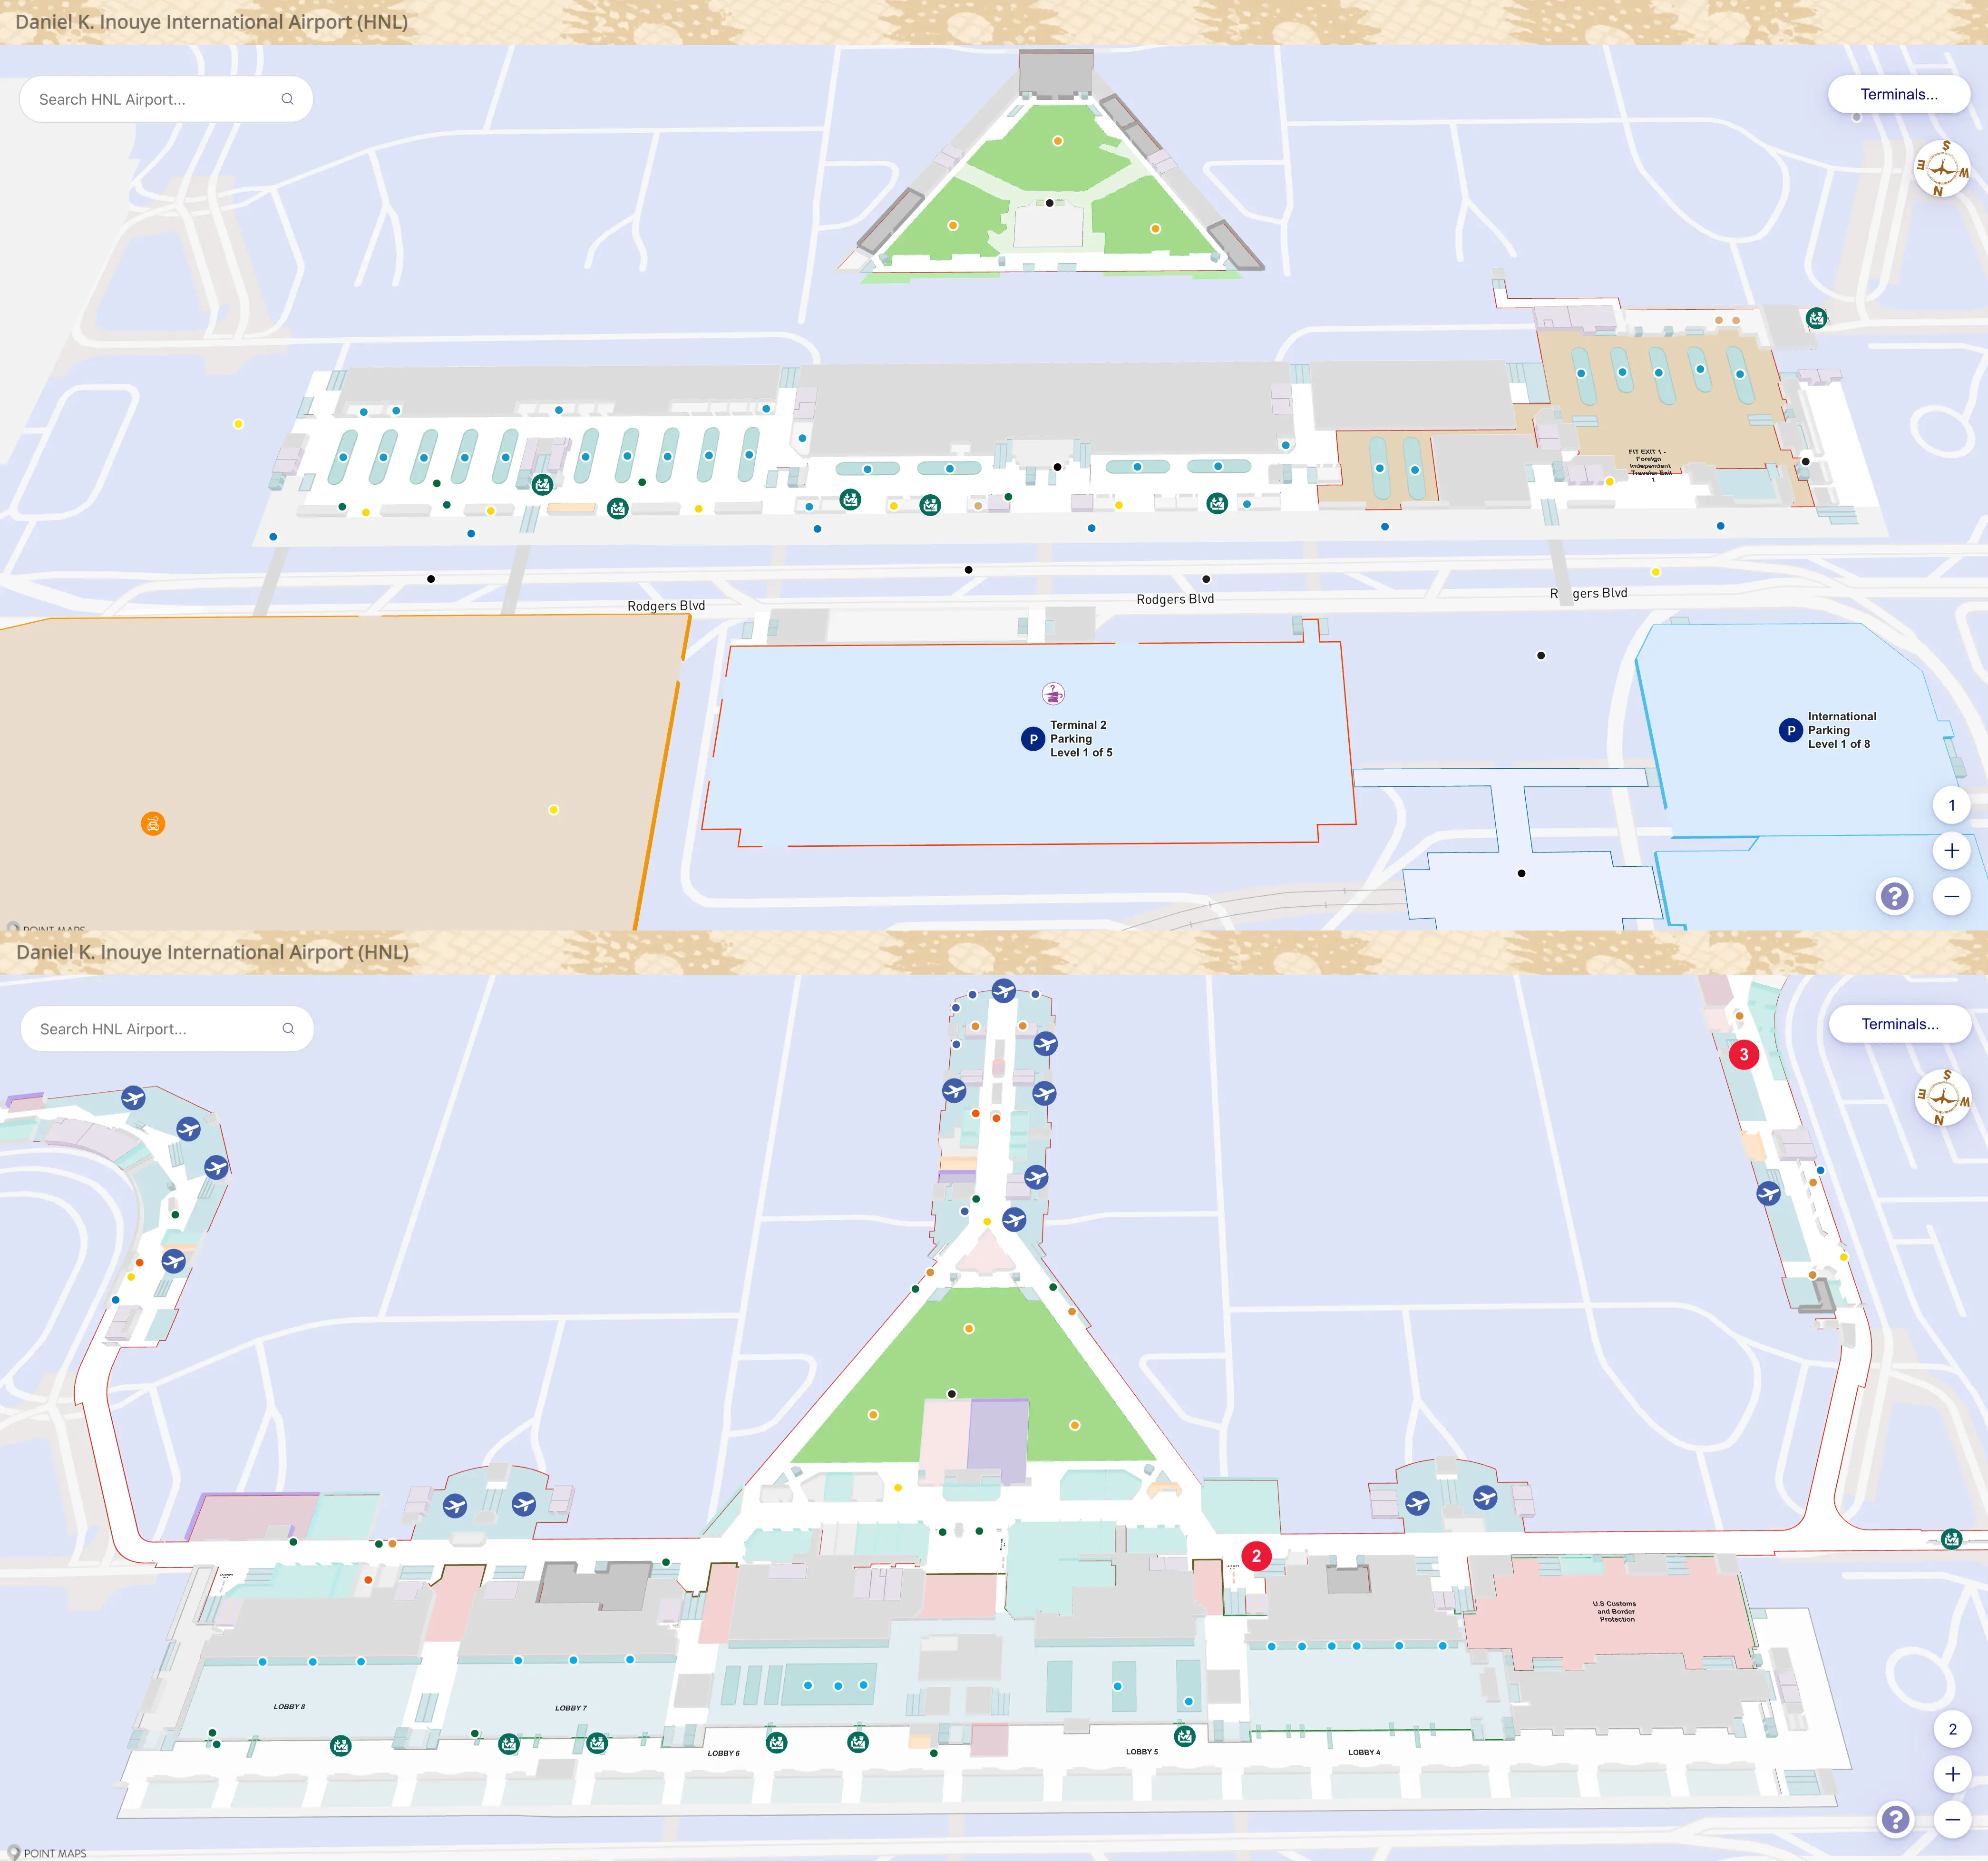
Daniel K Inouye International Airport Terminal 2 Level 1 Arrivals Map 2025
Daniel K Inouye International Airport Terminal 2 Level 2 Departures Map 2025
2026 Daniel K Inouye International Airport Terminal 2 Map Guide
What is the exact walking distance (meters) from Ticket Lobby 8 (Terminal 2) to the entrance of TSA Checkpoint 5?
Walking takes 65 meters from the center of Ticket Lobby 8 to the queue-entry stanchions at TSA Checkpoint 5.
The path runs west along the curbside-side ticketing hall to the checkpoint bay positioned between Ticket Lobby 7 and Ticket Lobby 8. Use the structural “gap” between the lobby number signs as your confirmation landmark: when you’re no longer centered under the Lobby 8 overhead markers and you reach the next bay toward Lobby 7, you’re at Checkpoint 5. If the visible line seems to “start” back inside Lobby 8, you’re seeing queue spillover—keep following the stanchions to the actual checkpoint mouth.
What is the exact walking distance (meters) from TSA Checkpoint 5 to Gate G10 (Terminal 2)?
Walking takes 780 meters from the exit of TSA Checkpoint 5 to Gate G10.
The route goes east through the main post-security retail spine, passing the central Duty Free (DFS) hub and continuing into the Diamond Head (G) Concourse. Use the Gate G1/G2 rotunda area as your “false finish” landmark: reaching that circular node means you’re only at the base of the G concourse, not the end. From the rotunda, continue straight past the G-gate sequence toward the far G7–G10 cluster, where Gate G10 sits at the terminal end near the ground-level boarding area access.
Where is the USDA carry-on agriculture x-ray located on the post-security Terminal 1 → Terminal 2 connector (closest gate landmark)?
The USDA carry-on agriculture x-ray is in the post-security connector corridor at the narrow “neck” closest to Gate C1 on the Terminal 2 side (and closest to Gate B5 on the Terminal 1 side).
From Terminal 2, it sits where the C Concourse constricts into the enclosed walkway leading toward Terminal 1—look for the corridor just off the C-gates base area and follow signs for Gates A & B / Terminal 1 until the passage tightens. From Terminal 1, it appears just past the end of the B gates near B5 before you fully enter Terminal 2. It looks like a checkpoint, but it functions as an agriculture bag x-ray rather than TSA.
What is the exact walking route (turn-by-turn landmarks) from the Terminal 2 baggage claim exit to the rideshare pickup zone across Lobby 6 on Level 2?
Rideshare pickup on Level 2 can be a “wrong level” trap, so the correct first move is following the level shown in your app before you commit upstairs.
Start at the Terminal 2 baggage claim exit doors near the central claim area (around Claims 19–20). Turn toward the inner wall (mauka side) and go to the main elevator/escalator bank by the International Arrivals / group tour staging area. Go up to Level 2 (Departures/Ticketing). Exit to the curbside doors near Ticket Lobby 5–6, then cross to the center median under the pedestrian bridge span aligned with Lobby 6. The legacy Level 2 pickup area sits in that median zone; if your app shows “Ground Level/Arrivals Median,” stay downstairs and cross at the baggage-claim roadway instead.
What is the exact walking distance (meters) from TSA Checkpoint 2 to Gate C9 (Terminal 2)?
Walking takes 480 meters from the exit of TSA Checkpoint 2 to Gate C9.
After clearing Checkpoint 2 (between Ticket Lobbies 4 and 5), turn west toward the C/D side rather than drifting toward the central DFS hub. Pass the D-gates junction and continue into the C Concourse entrance portal. Use the “Terminal 1 / Gates A & B” overhead signage near the C-gates base as a reassurance landmark—you are still in Terminal 2. From the base of the C pier, continue straight down the concourse to the distal end where Gate C9 is located.
Where is the closest elevator/escalator bank that takes you from Terminal 2 baggage claim level up to the Level 2 departures roadway (nearest fixed landmark)?
The closest reliable vertical core is the elevator/escalator bank between Baggage Claim 19 and Baggage Claim 20, by the International Arrivals exit / group tour staging area on the inner (mauka) wall.
From the baggage claim doors, stay inside the arrivals breezeway and walk along the interior wall rather than the curb edge where passenger clusters form. The elevators are recessed slightly behind the tour-meet-up traffic, so use the Claim 19/20 number markers as your anchor, then look for the upward “Departures / Ticketing” movement signs. A secondary option sits farther east near Baggage Claim 29/31.
What is the exact walking route (landmark-based) from TSA Checkpoint 4 to the Terminal 1 post-security walkway entrance?
Walking stays fully post-security and reaches the Terminal 1 connector by steering west from the Terminal 2 central hall toward the C-gates “neck” near Gate C1.
Exit TSA Checkpoint 4 (between Ticket Lobbies 6 and 7) into the Central Great Hall, then turn left (west) and keep the main food court on your right as you bypass the DFS hub area without entering the E Concourse throat. Continue past the open-air cultural garden depression on your right, then pass the D-gates entry (D1/D2) area. At the base of the C Concourse, follow overhead signs for “Terminal 1” or “Gates A & B,” veer toward Gate C1 (not down the C pier toward C9), and enter the narrowing enclosed connector walkway.
What is the exact walking distance (meters) from TSA Checkpoint 3 to Gate E10 (Terminal 2)?
Walking takes 550 meters from the exit of TSA Checkpoint 3 to Gate E10.
After clearing Checkpoint 3 (between Ticket Lobbies 5 and 6), you emerge into the Central Great Hall area. Aim straight toward the E Concourse throat (the center option between the west-flow to C/Terminal 1 and the east-flow to F/G). Once you enter the E pier, continue down the double-loaded corridor with gates on both sides. Use the pier’s “makai” end as your confirmation: Gate E10 sits at the far tip of the E Concourse at the terminal end.
Where is the in-terminal decision point (the “last obvious split”) where a traveler must choose between heading toward C Gates vs E/G Gates after clearing security in Terminal 2?
The last obvious split is the Central Great Hall / Duty Free (DFS) hub immediately after TSA Checkpoints 3 and 4.
This is the first large, open retail atrium where sightlines widen and overhead signs present three distinct flows. Left/west leads toward C Gates, D Gates, and the Terminal 1 connector; straight ahead enters the E Concourse throat; right/east commits you toward F and G gates. Once you pass beyond the DFS complex toward the G corridor, there are no convenient cross-overs back to the C/D side without backtracking through the retail spine.
What is the exact walking route (landmark-based) from Gate G1 to the Wiki Wiki Shuttle / intra-airport shuttle boarding point used to move between Terminal 2 concourses?
The Wiki Wiki Shuttle boarding point for moving between Terminal 2 concourses is reached by going up to Level 3 from the G-concourse base area near the Duty Free hub.
From Gate G1, walk back toward the circular rotunda where the G concourse meets the main terminal spine (the same node aligned with the Duty Free / F-gates retail area). At that rotunda, follow “Wiki Wiki Shuttle / Shuttle” wayfinding to the nearest escalator/elevator core and go up one level to the open-air Level 3 deck. The shuttle stop is on that Level 3 roadway platform, used to ride toward the C-gates side or the Terminal 1 side without doing the full central-terminal walk.
What is the exact walking distance (meters) from Ticket Lobby 4 (Terminal 2) to the entrance of TSA Checkpoint 2?
Walking takes 45 meters from the center of Ticket Lobby 4 check-in counters to the queue-entry stanchions at TSA Checkpoint 2.
The checkpoint bay sits immediately adjacent to Lobby 4, positioned between Ticket Lobby 4 and Ticket Lobby 5. Use the Lobby 4 overhead number markers as your anchor, then move toward the next structural bay toward Lobby 5 until you see the stanchioned queue mouth. If crowds are dense, double-check you’re not standing in a perpendicular bag-drop line that overlaps the security queue in the same zone.
Where is the closest “wrong terminal” recovery corridor from Terminal 2 (post-security) that leads back toward Terminal 1 gates without exiting security (closest gate landmark)?
The closest post-security recovery corridor is the Terminal 1 connector entrance at the C-gates “neck” closest to Gate C1.
From the Terminal 2 sterile-area core, head west toward the C/D side and follow overhead signs for “Terminal 1” or “Gates A & B” until the passage narrows into the enclosed connector walkway. The Gate C1 area is the key landmark that you’re at the correct interface point; if you find yourself walking deep down the C pier toward C9, you’ve overshot the connector turn. This corridor keeps you inside security, with the USDA x-ray infrastructure visible in the connector zone.