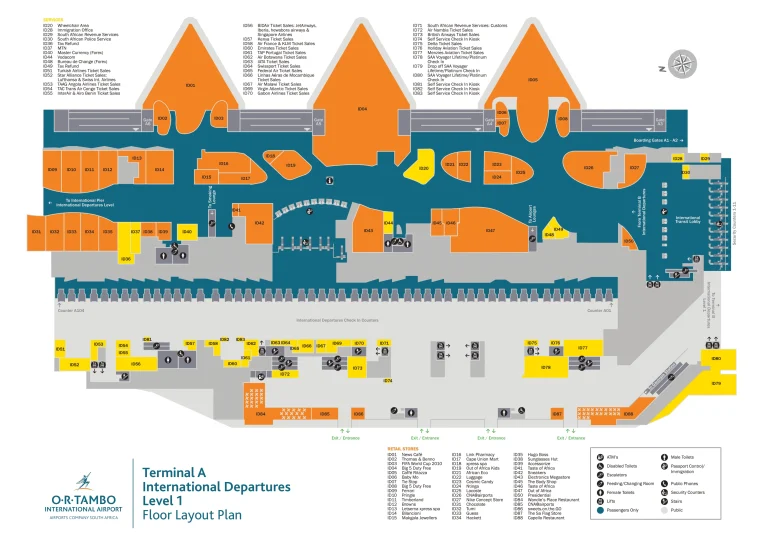
Vienna International Airport Terminal 3 Map (Most Up-To-Date)
Vienna International Airport Terminal 3 (“Skylink”) is a vertical, three-deck terminal inside Vienna’s main airport hub, with F Gates on Level 1 (Schengen) stacked directly under G Gates on Level 3 (non-Schengen). Level 2 is the transfer “valve” for security feed, lounges, and passport control. The critical navigation risk is the hidden airside Transfer Shuttle access down to Level 0 near the central F-plaza retail node.
Map Table
| Zone | Connection | Walk Time |
|---|---|---|
| Level 0 | arrivals hall; bus-gate interface; airside Transfer Shuttle dock | core-to-core via escalators |
| Level 1 (F Gates) | Schengen departures; central retail plaza | F plaza → passport control escalators 3–5 min |
| Level 2 | passport control; transfer corridors; lounge cluster | security exit → F plaza short |
| Level 3 (G Gates) | non-Schengen departures above F Gates | passport control → G concourse variable |
Vienna International Airport Terminal 3 Map Strategy
- Find the Transfer Shuttle by landmark, not gate numbers: use the central F-plaza at Jamie Oliver’s Bar, then turn left and go down from Level 1 to Level 0 under “Gates C D” shuttle/bus signage.
- Kill Terminal 3 ↔ Terminal 1 confusion by separating landside vs airside: landside hall-to-hall is an indoor walk; airside F/G ↔ C/D relies on the shuttle path and its hidden vertical drop.
- Treat Level 2 as a border and queue throttle: plan the F → G move as “F plaza → up to Level 2 → passport control,” and pad time for volatility even though the walk is only minutes.
- Lock in safe waiting zones before you commit: wait in the Level 1 F-plaza until you’re ready for passport control, and use the Level 2 landside corridor by “Police (Polizei)” for low-foot-traffic early/overnight downtime.
2026 Vienna International Airport Terminal 3 Map + Printable PDF
Terminal 3’s map stays “level-first”: F is Level 1, the border step to G is routed via Level 2 passport control, and the C/D connection is not an airside walk. The printable PDF matters most when it clearly marks the Jamie Oliver’s plaza node, the down-to-Level-0 shuttle access, and the up-only re-entry flow that forces a fast choice back to F (stay on Level 1) or toward G (climb for passport control).
2026 Vienna International Airport Terminal 3 Map Guide
Where is the airside Transfer Shuttle pickup point in Terminal 3 (F-gates area), specified by level + nearest fixed landmark?
The airside Transfer Shuttle pickup point is on Terminal 3 Level 0, reached by going down from the F-gates concourse (Level 1) at the central plaza by Jamie Oliver’s Bar.
From the F-gates retail plaza, use Jamie Oliver’s Bar as the fixed anchor, then turn left and follow overhead signage for “Gates C D” with the bus/shuttle symbol into the side alcove that hides the vertical transition. Take the escalator or elevator down one level to Level 0; the shuttle boarding area is immediately at the bottom, in the secure apron-level bus/shuttle zone rather than along the F pier.
What is the exact drop-off location (level + corridor entry) for the Transfer Shuttle when arriving at the C/D piers?
The Transfer Shuttle drops you on the lower level directly beneath the Relay Shop at the C/D transfer junction. The correct corridor entry back into the C/D pier system is the left-turn corridor at the bottom of the escalator bank behind/adjacent to Relay.
Exit the shuttle into the secure lower-level area and orient to the escalators immediately by the Relay Shop core (you’re one level below the main C/D concourse). Take the escalator up if you need the main C/D departures flow; if you’re following the signed transfer routing, use the lower-level left turn into the marked corridor/waiting area at the base of the escalators, then follow overhead signs for the C/D pier directions to rejoin the gate concourse.
What is the shortest indoor walking route from Terminal 3 Arrivals (baggage claim exit) to Terminal 1 check-in desks, without going outdoors?
The shortest indoor route is the landside connector spine: turn right from the Terminal 3 Arrivals hall after the baggage claim exit and follow overhead signs for “Terminal 1” into the continuous indoor corridor that deposits you in Terminal 1’s check-in hall.
Start at Level 0 in Terminal 3 after you pass the customs green-channel doors into the public Arrivals hall. Keep to the right and stay inside—do not head toward the curb/taxi doors. Follow the overhead “Terminal 1 / Check-in 1” signage through the wide indoor connection hall past airport services/CAT counter areas, continuing straight as the architecture shifts from Terminal 3 finishes to Terminal 1’s older terrazzo look. The walk is about 300–400 meters (roughly 5–8 minutes with luggage) and remains step-free with ramps/elevators available.
What is the walking distance (meters) from the C/D security exit to the C21 bus-gates seating area?
Walking distance is about 100–120 meters from the C/D security exit to the C21 decision point, plus the short down-transition into the downstairs holding pen where the C21 seating area actually is.
From the C security exit, go straight into the main concourse past the first duty-free frontage to the yellow overhead signage for “C21–C24” pointing down. That sign-and-stairs/elevator node is the key landmark; the seating for C21 is not on the main level. After you reach the down sign, take the stairs or elevator to the ground-floor holding room, then continue a brief interior walk to the C21 door-side seating bay inside the downstairs bus-gate pen.
Where is the fast track / priority security entrance for the C/D gates security zone, identified by the exact corridor/entrance position relative to the main queue?
The fast track entrance is on Terminal 1 Departures Level 1 at the same security hall as the main C/D checkpoint, positioned to the side of the standard queue maze rather than in a separate room.
Stand facing the bank of security scanners and the main zig-zag barrier queue. The priority lane is the dedicated side entrance with “Priority/Gold Track” style signage and an automated boarding-pass scan gate at its mouth; it runs parallel to the main line instead of joining it. Use the scan gate (boarding pass or FastTrack QR) and stay within that side-lane channel until it feeds into the same screening lanes ahead of the general queue.
What is the walking time (minutes) from F Gates to the passport control entry that leads into the G (non-Schengen) gates zone?
Walking time is about 3–5 minutes from the central F-gates plaza to the passport control entry that feeds the G-gates zone.
Use the F-gates central retail plaza as your anchor (Jamie Oliver’s Bar and the main duty-free cluster). From that node, follow overhead signage for “G Gates” or “Passport Control” to the nearest vertical core and go up from Level 1 to Level 2. The passport control queue entry is immediately off the Level 2 landing in the transfer/border area; the time swing comes from the line, not the walk, so arriving at the Level 2 queue mouth is fast even when processing isn’t.
Where is the closest re-entry point back toward F/G gate concourses immediately after exiting the Transfer Shuttle (i.e., the first passenger-accessible corridor that returns you to gates)?
The closest re-entry point is the unidirectional upward circulation core immediately outside the shuttle’s secure intake door on Terminal 3 Level 0, which funnels you straight to the Level 1 central transfer node feeding the F concourse (or onward up toward G).
After shuttle deboarding, follow the only passenger flow to the adjacent escalator/elevator bank; there is no lateral corridor option at that level. Ascend to Level 1 and you emerge at the first gate-accessible junction in the central airside node near the F-plaza retail area. From that junction, staying on Level 1 returns you directly into the F-gates concourse, while following overhead “G Gates” signs sends you toward the Level 2 passport control path for non-Schengen.
Where is the Bulky Luggage counter located relative to Terminal 3 check-in, specified by check-in row/side + walking distance from the main hall entrance?
The Bulky Luggage (Großgepäck) counter is at the far right end of Terminal 3’s landside check-in hall, near check-in rows 371–372, about 150–200 meters from the main central hall entrance.
Stand in the Terminal 3 check-in hall facing the check-in islands and orient to the right-hand side of the hall (the end away from the central doors). Walk the full length of the check-in bank to the extreme right end where the islands terminate; the bulky luggage intake sits in that end-zone with an extra-wide conveyor setup. Use rows 371–372 as the fixed locator, since the counter is clustered by that row range rather than mid-hall.
What is the exact location of the Terminal 3 massage chairs (which end of the hall + nearest fixed landmark) used by overnight travelers?
The Terminal 3 public landside massage chairs are at the far right end of the Terminal 3 check-in hall, set into a quieter alcove near the outer wall by the end of the check-in rows.
Face the check-in counters from the public hall and walk all the way to the right-hand end of the check-in hall, past the last check-in islands toward the wall-side end zone. The chair bank sits in that right-end alcove rather than the central check-in crush, using the “end of the check-in row block” as the fixed landmark so you can spot it without staff directions.
What is the most direct indoor route from Terminal 3 public (landside) check-in hall to the F-gates security checkpoint, specified by corridor choices (left/right) at major junctions?
The most direct route is a straight, central funnel with no left/right corridor choices until after security.
From the Terminal 3 landside check-in hall, walk straight toward the middle of the hall, aiming for the central bank of automated boarding-pass scanners positioned perpendicular to the check-in islands. Pass through the scanners and continue straight into the security plaza where all lanes feed the same post-security airside commercial zone. Only after you clear security do you make a directional decision: stay on the same level for F Gates (Level 1) or follow “G Gates / Passport Control” signage to go up.
Where is the best low-foot-traffic waiting spot on Terminal 3 level 2 near Police, specified as a precise corridor segment a traveler can find without staff help?
The best low-foot-traffic waiting spot is the landside Level 2 administrative corridor segment immediately along the signed “Police (Polizei)” direction, away from the open escalator landings and check-in sightlines.
Go up to Terminal 3 Level 2 from the main check-in hall using the public escalators/elevators, then follow the wall-mounted/overhead signs for “Police / Polizei” into the office corridor. Keep walking until the corridor straightens into the long, quiet stretch where passenger flow drops off and you are fully out of the check-in atrium’s noise footprint. Use the Police signage as your fixed locator and choose a bench section along that straight run rather than pausing at the Level 2 landing area.
What is the exact boundary point at the F/G gates where passengers are typically allowed to wait before boarding control opens (i.e., the nearest alternative seating zone to the gate door)?
The boundary waiting point is the Level 1 central F-gates plaza seating and dining zone by Jamie Oliver’s Bar, before you take the escalators marked “Passport Control” up to Level 2.
Use the F-plaza retail node (Jamie Oliver’s Bar and the main duty-free frontage) as the last practical place to sit with full amenities before committing to the non-Schengen flow. Once you step onto the escalator bank signed for “G Gates / Passport Control,” you’ve effectively crossed the functional boundary and should expect fewer options and a one-way-feeling progression. For the closest “not-at-the-gate” seating that still keeps you flexible, stay in the public seating pockets around the F-plaza until your timing buffer for passport control is met.