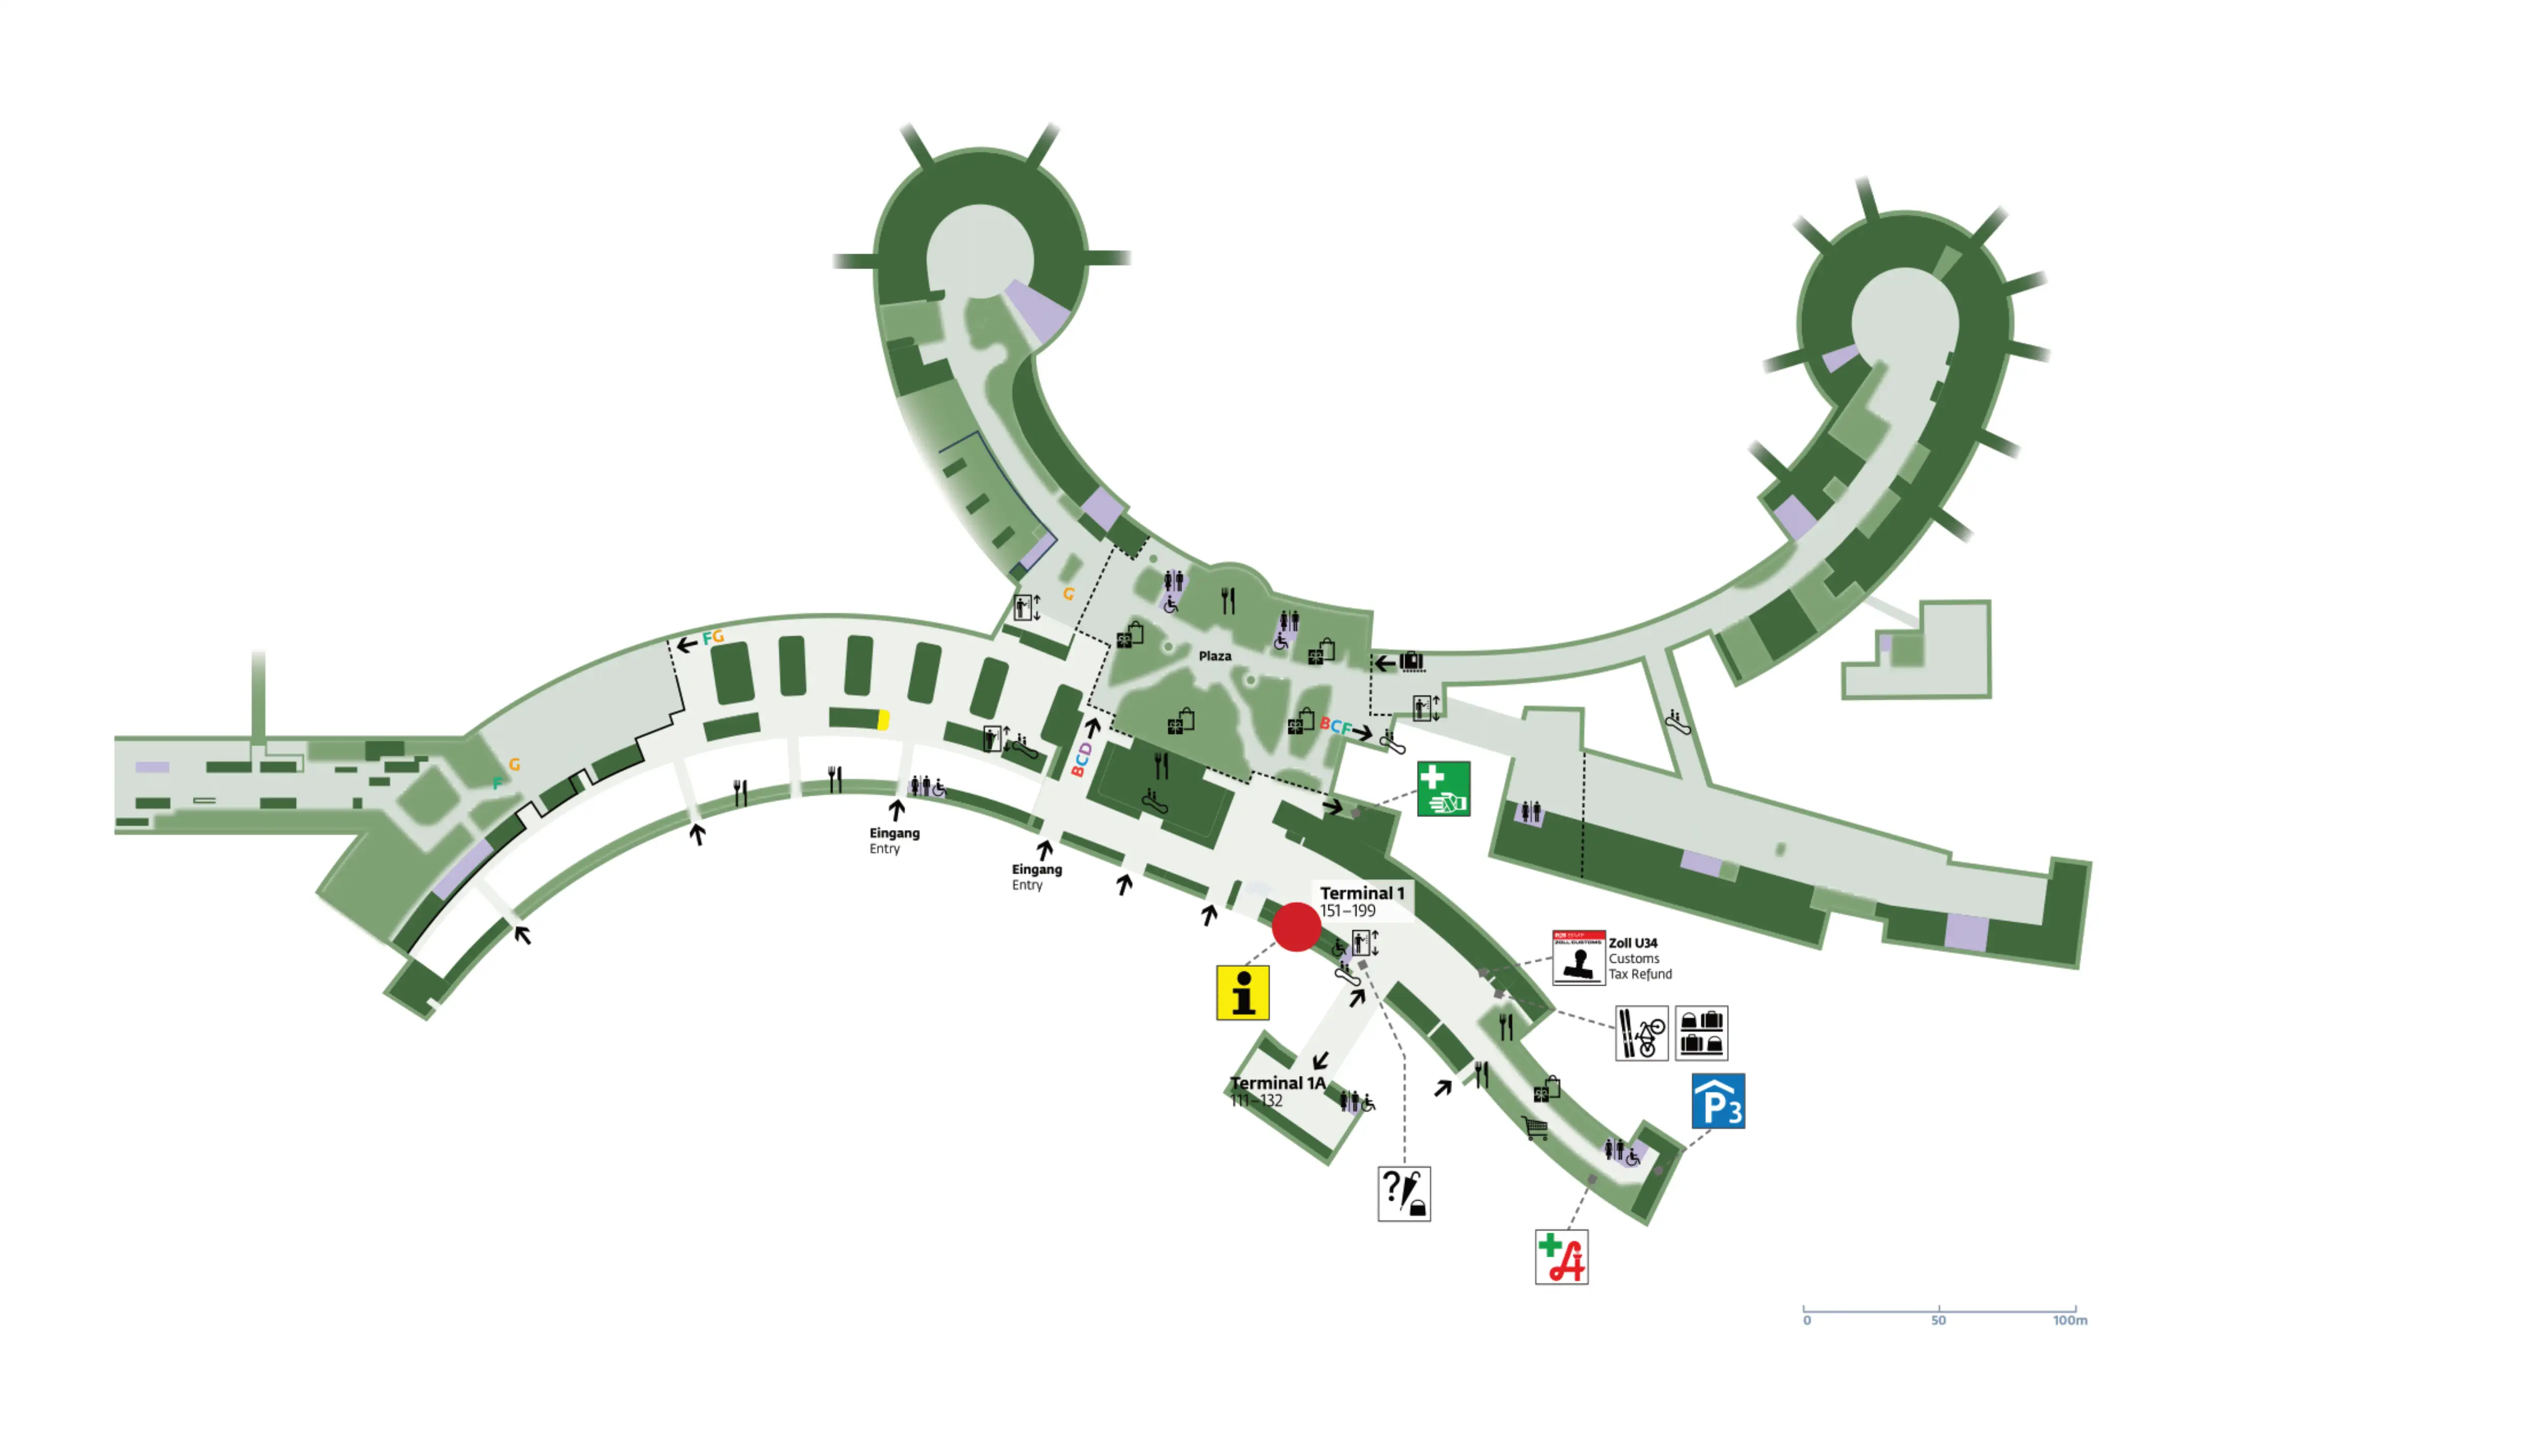
Vienna International Airport Terminal 1 Map (Most Up-To-Date)
Vienna International Airport Terminal 1 is a legacy, hub-and-spoke layout built around a central vertical core (check-in below, security above), then a wide retail “Plaza” distribution node feeding two long piers: Pier West (C, Schengen) and Pier East (D, non-Schengen). Terminal 1A is a detached landside check-in shell across the departures roadway, forcing an outdoor crossing before you ever reach security inside Vienna’s main airport hub.
Map Table
| Zone | Connection | Walk Time |
|---|---|---|
| Terminal 1 check-in hall | central escalators/elevators | 20–120 m to escalator base |
| Security level (Level 1) | C/D/B security funnel | ~30 m escalator top → queue entry |
| Fast Track entry | left-side bay, separate turnstiles | 0–1 min left-veer decision |
| Terminal 1A check-in hall | surface crosswalk to Terminal 1 doors | ~100 m building-to-building; ~250 m to security entry |
| The Plaza (post-security) | Pier C vs Pier D split | crowd-dense first 100 m |
| Pier West (C, Schengen) | open corridor from Plaza | up to ~550 m Plaza exit → C42 |
| Pier East (D, non-Schengen) | passport control barrier at pier entrance | up to ~650 m Plaza exit → D29 |
Vienna International Airport Terminal 1 Map Strategy
- Treat security as the single biggest variable: arrive at the Level 1 checkpoint with buffer, and don’t assume Fast Track will “merge later” because it’s a separate left-side entry that requires an immediate left-veer decision.
- Decide Terminal 1 vs Terminal 1A before you move: Terminal 1A is check-in only, so budget the outdoor crosswalk plus the re-entry and vertical ascent to Level 1.
- Plan around “not possible” airside constraints: C (Schengen) to D (non-Schengen) requires the passport-control barrier at the Pier East entrance; backtracking from D to C can trigger immigration friction.
- Avoid time-fatal wrong turns in the Plaza: after security, navigate straight to the correct pier mouth first, then stop for shops or food—Pier C is the open flow, Pier D is the guarded corridor behind passport control.
2026 Vienna International Airport Terminal 1 Map + Printable PDF
Terminal 1 remains an adapted, high-friction footprint: check-in and arrivals flows converge on a single central vertical node, then all C/D/B traffic compresses into one security funnel before you’re released into the Plaza retail maze. The long-pier walks still dominate timing risk, and the Schengen/non-Schengen split at the D entrance stays a hard boundary for route planning in 2026.
2026 Vienna International Airport Terminal 1 Map Guide
What is the exact walking distance (meters) from Terminal 1 check-in area to the C/D security checkpoint entrance?
The maximum walking distance is approximately 150 meters from the furthest Terminal 1 check-in counters to the C/D security checkpoint entrance.
Counters around rows 151–160 sit about 20 meters from the base of the central escalator bank, while the far end of the hall (around rows 190–196) is about 120 meters from that same escalator base. From the top of the escalators to the start of the security queue maze is another ~30 meters, with the escalator/elevator core acting as the main funnel point between check-in level and Level 1 security.
Where is the Fast Track entry located relative to the main security queue for C/D gates (same corridor vs separate branch)?
The Fast Track entry is a separate left-side branch, not the same corridor as the main security queue.
When you reach Level 1 and face the security checkpoint from the landside approach, Fast Track sits to the left of the main economy entrance and is typically partitioned into its own bay with automated turnstiles for boarding-pass scanning. It does not “merge later” with the main queue maze, so the key decision point is immediate: veer left at the checkpoint frontage rather than joining the central folding lines.
Where is the pedestrian route/connector from Terminal 1A (separate building) to the main Terminal 1 departures flow (the first decision point on the path)?
The connector is an outdoor surface walk that starts at Terminal 1A’s east-facing exit doors and immediately forces a crosswalk crossing to Terminal 1’s departures entrances.
Exit Terminal 1A through the glass sliding doors on the facade facing the main terminal complex, then follow the marked pedestrian crosswalk across the departures roadway (Abflugstraße). Your first real decision point is choosing the correct Terminal 1 ground-level departures entrance—typically Doors 1 or 2—because once inside you still must find the central escalator/elevator core to reach Level 1 security (Terminal 1A has no security, immigration, or gates).
What is the exact location of the first passport-control point you must pass when going from C gates (Schengen) toward a non-Schengen departure flow?
The first passport-control point is the booth line at the entrance to Pier East (Concourse D), immediately after you traverse back into the central Plaza zone from the C-gates side.
From Pier West (C), walk back toward the central terminal block until you re-enter the Plaza retail node, then aim for the D-gates corridor on the east/right side of the split. The passport-control booths are positioned across that D corridor as a hard barrier—once you pass them, you’ve exited the Schengen flow and are committed into Pier D’s non-Schengen departures path.
Which gate areas are separated by different security zones such that you cannot walk airside between them (e.g., F area ↔ C area)?
The F/G gate areas and the B/C/D gate areas are in different security zones, so you cannot walk airside between them via a normal pedestrian corridor.
B/C/D gates sit in the Terminal 1 security theater (the “old terminal” side), while F/G gates sit in the Terminal 3 security theater (the “new terminal” side). Even though the buildings are adjacent landside, the secure airside footprints are not linked by an open-to-all walking connection; moving between these zones requires the airside transfer shuttle bus or a landside exit and re-clearing security.
What is the shortest airside route from a C gate to a D gate that does not exit the secure area?
The shortest airside route is the backtrack from Pier West (C) to the Plaza, then through the Plaza to the Pier East (D) entrance and its passport-control barrier.
Walk down Pier C toward the central terminal block until you hit the Plaza retail node, then cross the Plaza to the D-gates corridor on the east/right side. Clear passport control at the Pier D entrance, then continue down Pier D to your gate. The root-to-root distance from the C pier mouth to the D pier mouth is about 300 meters, with passport control (not security re-screening) as the main time variable.
Where is the nearest re-screening/security choke point on the path from Terminal 1 arrivals-side flow to Terminal 1 departures gates (the spot that creates surprise delays)?
The nearest re-screening choke point is the main Terminal 1 security checkpoint on Level 1, because it’s the only way back into the secure departures area once you’ve ended up landside in arrivals.
If you follow arrivals flow into the public Arrivals Hall (Level 0) or slip through the one-way doors toward baggage reclaim/exit, there is no airside shortcut back to gates. The recovery route is to move through the arrivals public area to the central escalator/elevator core, go up to Level 1, and re-enter through the same C/D/B security funnel—often with full queue volatility and no dedicated “transfer re-entry” lane.
What is the exact distance from the C/D security exit to the furthest typical Terminal 1-served gate cluster (the longest walk risk)?
The longest walk risk is approximately 650 meters from the Plaza/security exit zone to Gate D29 at the tip of Pier East.
From the end of the security screening, you spill into the duty-free/Plaza retail node, where the first stretch is crowd-dense and slows pace before the long linear pier walk begins. For Schengen-side extremes, the furthest comparable walk is about 550 meters to Gate C42 at the tip of Pier West, but the non-Schengen side is longer and can also stack time at the passport-control barrier before you even start the deep-pier segment.
Where are the Ryanair document/visa check or control points positioned within the Terminal 1 departures flow (before security vs after security)?
Ryanair document/visa checks are positioned before security at the landside check-in counters.
For passengers who require a document/visa verification, the control is done by a Ryanair agent who stamps the boarding pass in the check-in area—primarily at Ryanair’s counter rows in Terminal 1A, with occasional overflow counters assigned in Terminal 1 during peak/closure scenarios. If you reach Level 1 security without that landside stamp when it’s required, you’ll be turned back into a time-costly loop to return to the counters and then re-queue for the main C/D/B security funnel.
Where are the carry-on bag sizer / enforcement pinch points positioned along the Terminal 1 Ryanair path (check-in hall vs gate area)?
Carry-on bag sizer pinch points exist in both places, but the hard-stop enforcement is at the gate podiums in the C and D piers.
On the landside side, sizer frames are typically placed near the Ryanair bag-drop/check-in queues in Terminal 1A (and sometimes near designated counters in Terminal 1), acting as an early “soft” filter. The operational choke point is airside: sizers at the boarding gate podium area, where bags are checked during the boarding scan and failures trigger step-aside testing and payment, momentarily blocking the narrow pre-boarding throat for everyone behind.
What is the precise location of the main stair/elevator/escalator node most people use to change levels between security and the Terminal 1 gate corridors?
The main vertical circulation node is centrally located in the Terminal 1 main hall, splitting the check-in banks and serving as the pivot point up to Level 1 security.
This is the primary escalator bank with adjacent elevators used by PRM travelers and heavy-luggage passengers, and it’s the convergence point for flows coming from Terminal 1A’s street crossing, the rail/bus side, arrivals hall movement, and the check-in rows. From this same core, passengers emerge at the top onto the Level 1 frontage that feeds directly into the C/D/B security queue maze (with Fast Track offset to the left at the checkpoint face).
Which single corridor/turn is the most common wrong-way branch that accidentally sends Terminal 1 passengers out of the intended departures flow (forcing backtracking)?
The most common wrong-way branch is the one-way “Exit / Baggage” door set that drops passengers from the airside concourse into the baggage reclaim/arrivals hall, cutting off airside return.
This trap appears at the arrivals boundary where “Exit / Baggage” wayfinding is visually dominant and passengers—especially tired transfer travelers—follow the crowd through anti-return doors into Level 0 baggage reclaim. Once through, you are effectively landside and must backtrack via the public arrivals hall to the central escalator core, go up to Level 1, and re-clear the main Terminal 1 security funnel to reach departures gates again.